This Aion 2 Sorcerer Hellfire PvE build focuses on powerful Hellfire casts, regular fire damage and area attacks that help you handle both bosses and groups of enemies. Your main goal is to prepare your damage bonuses before charging Hellfire, then keep your other skills working together while it recovers.
In this guide, we will cover your skill priorities, Specialties, passives and Stigmas, followed by your rotation, skill stacking and a simpler in-game macro setup. We will also explain how Wish of Concentration changes as you unlock its upgrades and where to focus your Daevanion investment.
If you are still learning the game’s systems, our Aion 2 beginner guide covers the early steps that help you get started.
A huge thank you to EUTOPIA for sharing his Sorcerer build!
Core Sorcerer Skills and Passives
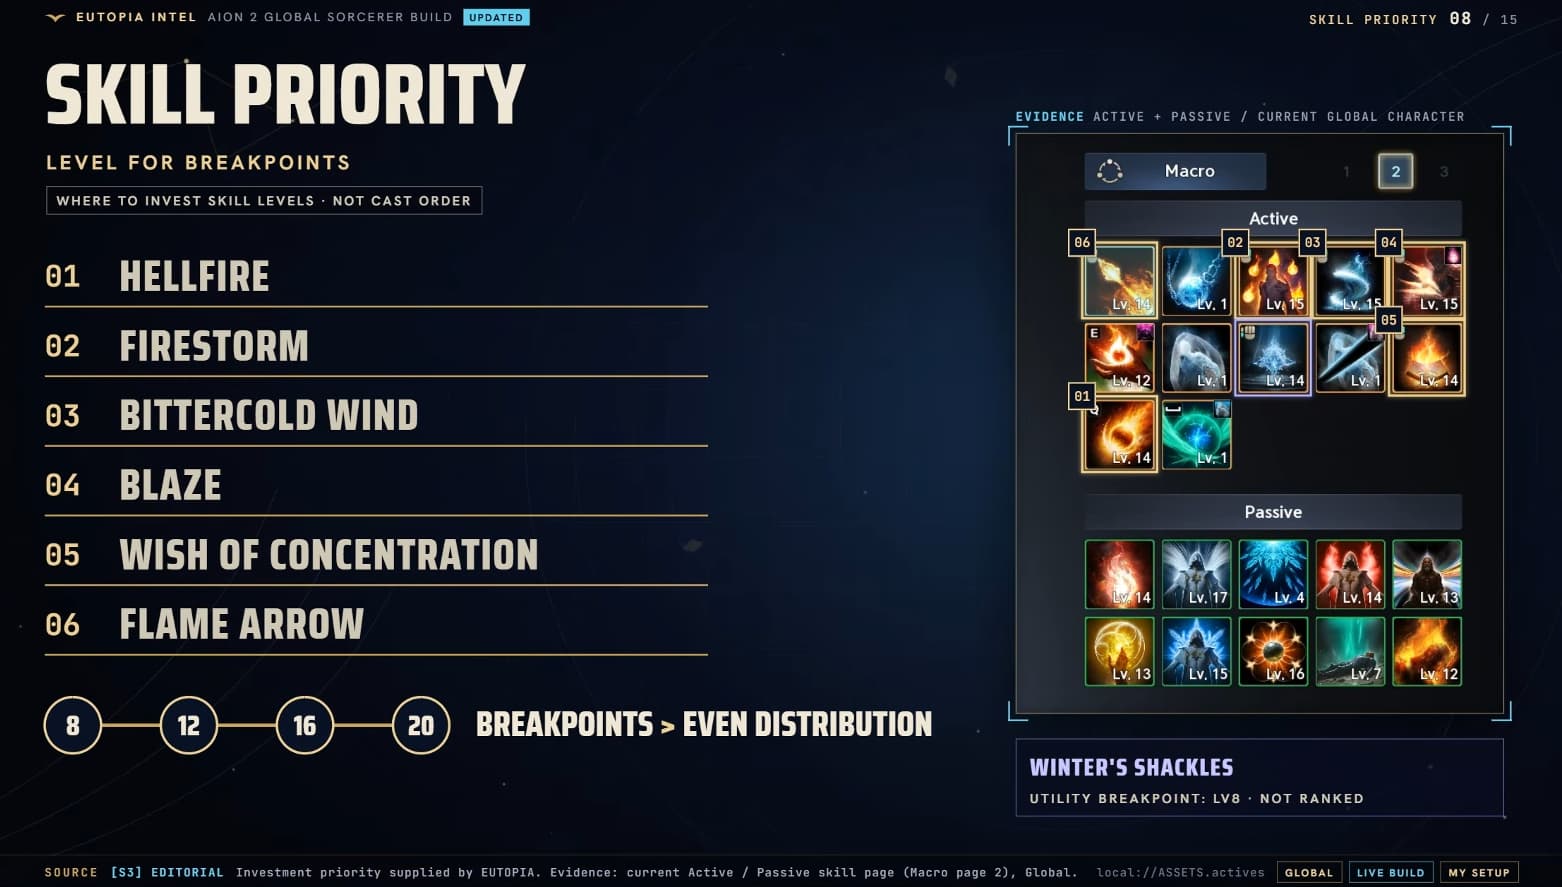
Hellfire is your main damage priority. Improve it first, then develop the skills that support your regular rotation.
Use this order to guide your investment:
Hellfire: Your main burst attack. Hold its input long enough to complete the charge.
Firestorm: A frequently used damage skill with a Specialty that helps bring Hellfire back sooner.
Bittercold Wind: A strong area attack that contributes damage alongside your fire skills.
Blaze: A regular damage skill to use throughout the fight.
Wish of Concentration: An offensive buff that gains an important cooldown-reduction option as its skill level increases.
Flame Arrow: Your basic attack and a way to keep attacking between other skills.
Winter’s Shackles also has an important place in the build. Its PvE damage-boost Specialty helps prepare your Hellfire burst, even though it is outside the six main investment priorities above.
Passive Priorities
Prioritize Fire Mark, then develop Robe of Cold, Robe of Flame, Robe of Earth and Grace of Enhancement alongside your main active skills. These are the passive upgrades to look for as you level skills and plan your Daevanion routes.
Grace of Resistance is another option to consider when you need more defensive support. Keep your main damage skills progressing while improving the passives that support them.
Ice Chain and Flame Scattershot
Ice Chain is not part of this core setup. With Bittercold Wind, Winter’s Shackles and Cold Storm in the full damage loadout, you already have several cold skills in your rotation. You do not need to add Ice Chain purely to trigger your cold-related passive effects.
It is also not the preferred answer to a failed stagger check here. If your group needs more stagger damage, use the Divine Burst Stigma swap covered below. Cold Snap is a lower investment priority than your main damage skills in this setup.
Flame Scattershot is an optional attack for staggered enemies. Keep it available if you want that extra option, but avoid spending heavily on it ahead of your core rotation. When your main skills are ready, do not automatically delay them just to fit it in.
Recommended Skill Specialties
Specialties must be selected and equipped. Unlocking an option does not automatically apply its effect, and you cannot use every available choice at once. Check your skill level and open slots before copying the full setup.
Work towards these selections:
Hellfire: Take +30% Skill Speed and the option that ignores Block and Evasion and lands as a Multi-Hit. Faster charging and the Multi-Hit effect support your main burst attack.
Firestorm: Take +20% Skill Speed and the Hellfire cooldown-reduction option.
Bittercold Wind: Choose the extra summon duration and the option that ignores Block and Evasion and lands as a Critical Hit.
Blaze: Take delayed damage after 3 seconds and Multi-Hit.
Wish of Concentration: Start with the additional Attack and Combat Speed options. Revisit these selections when you can equip its cooldown-reduction Specialty.
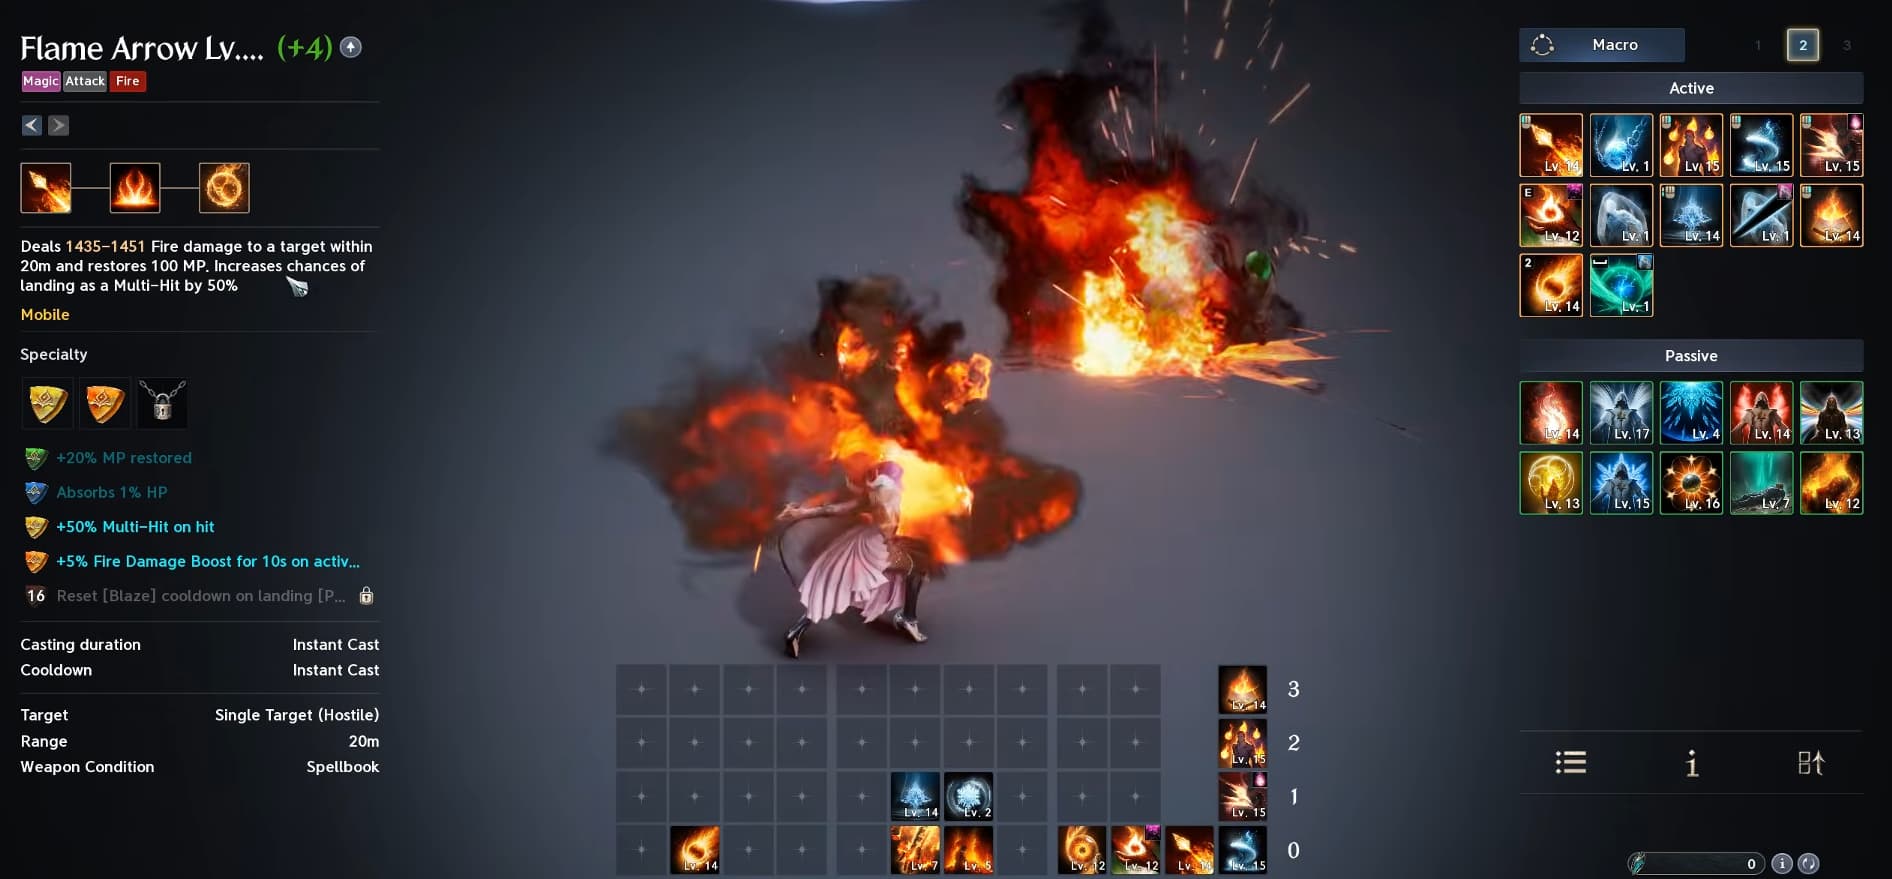
Flame Arrow: Take the +50% Multi-Hit option and the Fire Damage Boost after activating Pyroclasm.
Winter’s Shackles: Choose +20% PvE Damage Boost and the option that adds Winter’s Illusion.
Flame Scattershot: If you use it, choose Changes to mobile skill and Multi-Hit.
Read the full tooltip before dismissing a Specialty as a PvP option. Hellfire’s Multi-Hit and Bittercold Wind’s guaranteed Critical Hit remain relevant to PvE even though their descriptions also mention Block and Evasion.
For encounters that demand frequent movement, Hellfire’s mobile skill option is an alternative worth considering. It uses one of your available selections, so compare the movement benefit with the damage or speed option you would replace.
Recommended Stigmas
Use these four Stigmas for the full damage setup:
Element Enhancement: Your opening buff before the main burst sequence.
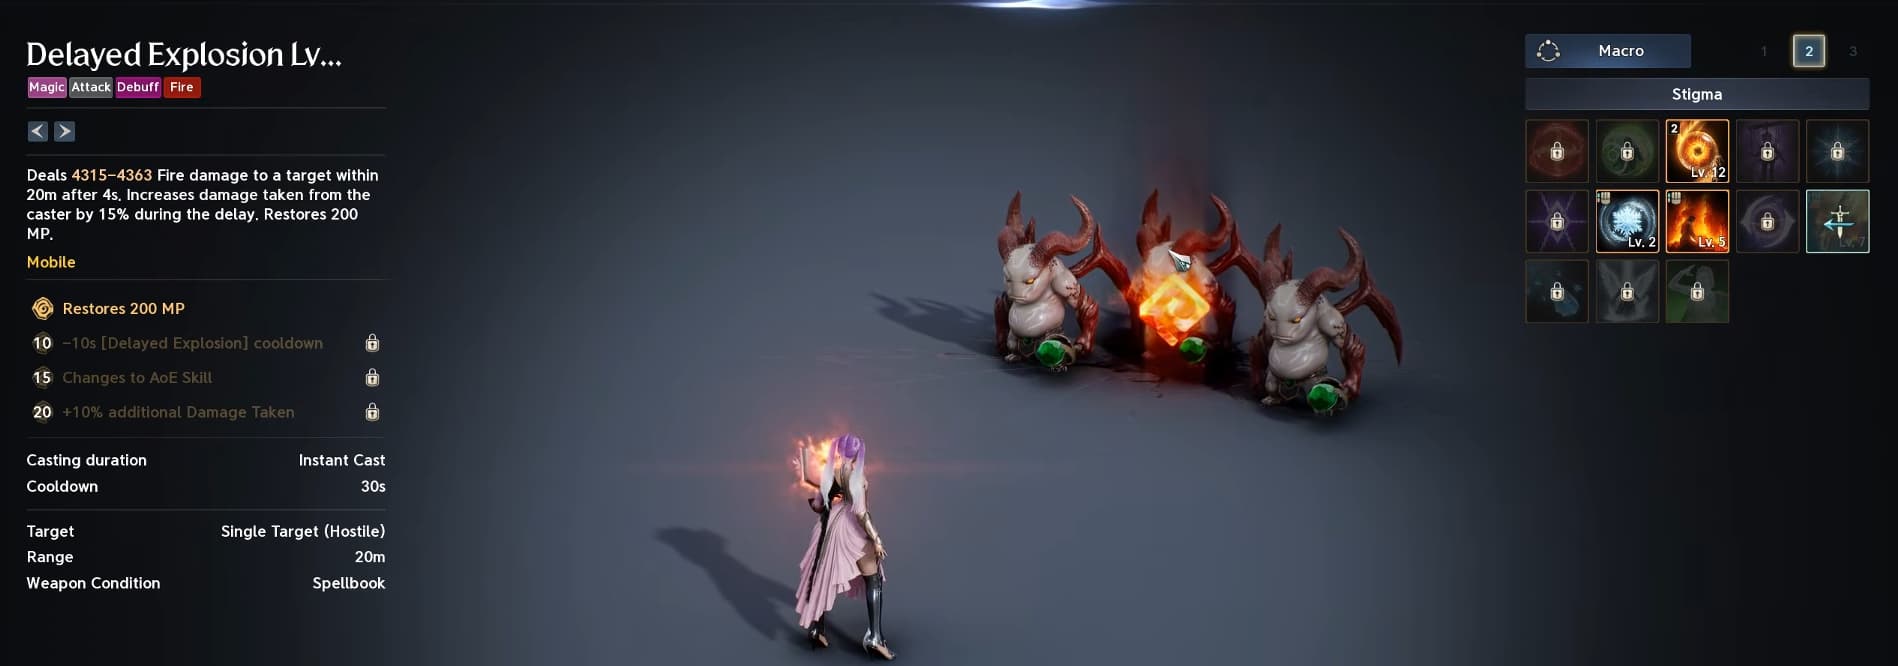
Delayed Explosion: An important part of preparing your burst before Hellfire.
Fire Wall: Adds area damage alongside your main skills.
Cold Storm: Another area-damage option that rounds out the offensive loadout.
Defensive and Stagger Swaps
Replace Cold Storm with Steel Barrier when staying alive is the bigger problem. This is particularly useful while learning Transcendence, Nightmare and harder Expedition or Conquest encounters.
Fire Wall can also be the slot you replace, but Cold Storm is the first swap to try for this setup. As encounters become more comfortable, reassess whether you still need the defensive slot.
If your group is struggling to break a boss’s stagger gauge, replace Cold Storm with Divine Burst instead. Choose the swap around what is stopping the group from completing the fight: Steel Barrier for protection, or Divine Burst for additional stagger damage.
Sorcerer Rotation
Your burst begins with Element Enhancement, Delayed Explosion and Winter’s Shackles, followed immediately by a fully charged Hellfire. This places your main attack inside the damage window you have just prepared.
Use the following opening sequence with the later Wish of Concentration cooldown-reduction setup:
Activate Element Enhancement.
Cast Delayed Explosion.
Use Winter’s Shackles.
Fully charge and cast Hellfire.
Cast Fire Wall, then Cold Storm if it is equipped.
Use Bittercold Wind, followed by Blaze and Firestorm.
Activate Wish of Concentration after your important skills are on cooldown.
Continue using your main damage skills as they become available, with Flame Arrow filling the gaps. Watch Hellfire’s cooldown so you can prepare another full cast when there is a safe opening.
Setting Up Your Skill Stacks
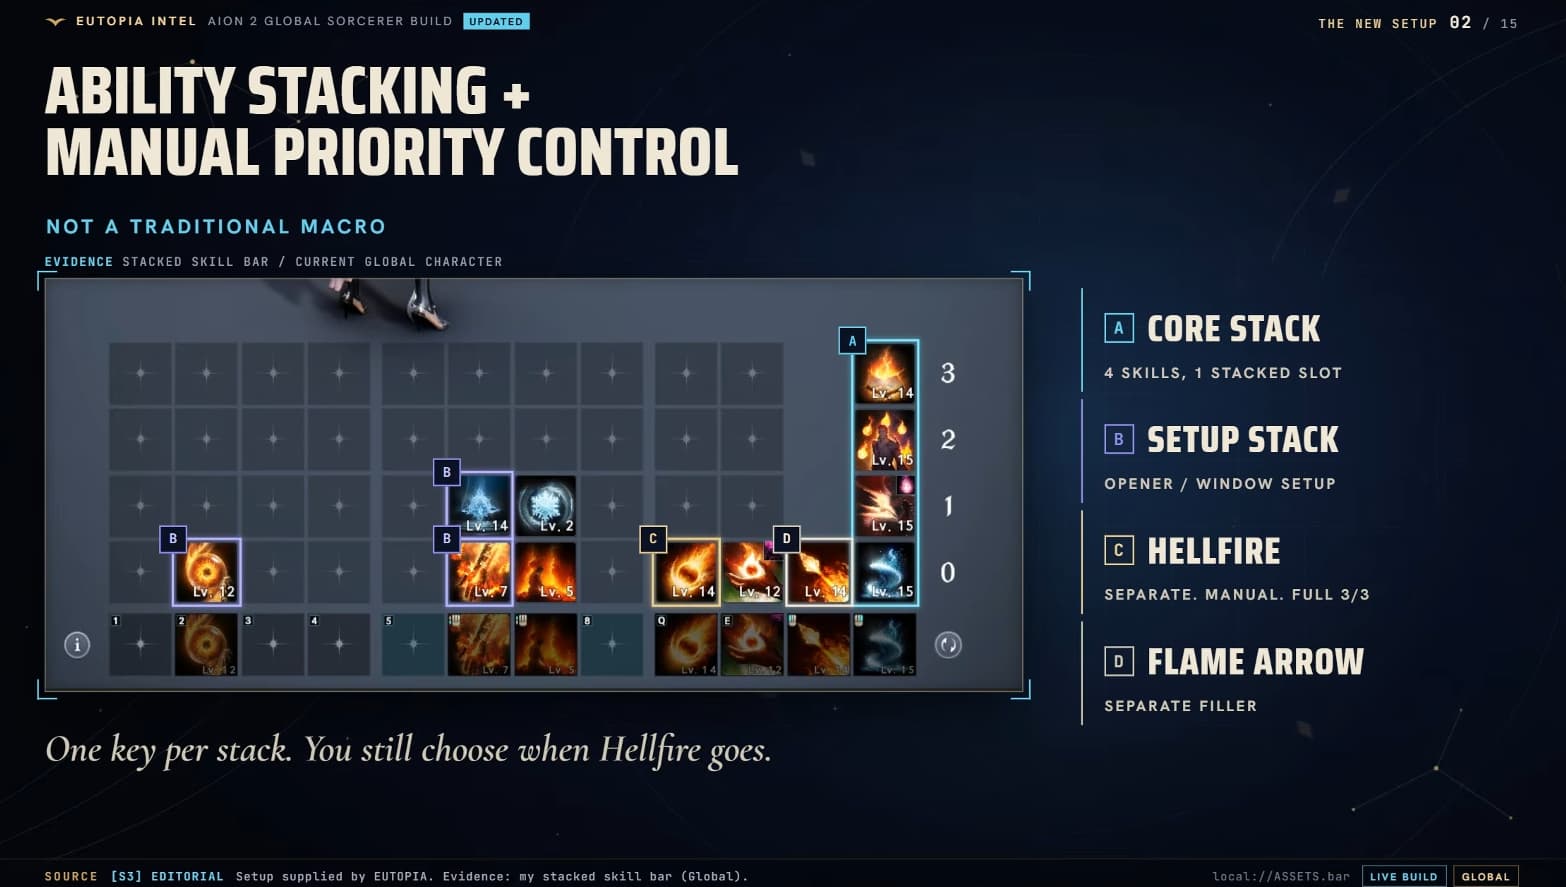
Skill stacking lets several skills share a quick-slot input, with the available skill of highest priority taking precedence. Organize the setup around these activation priorities:
Burst preparation: Element Enhancement > Delayed Explosion > Winter’s Shackles.
Additional area damage: Fire Wall > Cold Storm.
Main damage stack: Bittercold Wind > Blaze > Firestorm > Wish of Concentration.
Separate charged input: Hellfire.
These lists show the intended cast priority, rather than the physical top-to-bottom placement of icons. Check that your quick slots actually activate the skills in this order.
The key manual action is inserting Hellfire after the three burst-preparation skills. Stacking gives you control over when to move between groups, letting you react to mechanics instead of continuing through a long sequence at the wrong moment.
Keep Wish of Concentration visible on your bar, even if you include it in a stack, so you can track its cooldown. Keep defensive and situational skills easy to reach as well.
When to Use Wish of Concentration
Wish of Concentration has a 60-second base cooldown and provides offensive buffs. At skill level 16, its cooldown-reduction Specialty becomes available, but you must equip that option to benefit from it.
Before you equip cooldown reduction, using Wish before your damage sequence lets your opening attacks benefit from its buffs. Leaving it until the end at this stage can help you practise the later sequence, but it does not yet reduce your cooldowns.
Once cooldown reduction is equipped, use Hellfire, Firestorm, Bittercold Wind and your other important skills first, then activate Wish. This gives it active cooldowns to shorten and helps you return to your main attacks sooner.
Do not treat this as an automatic full reset. Watch which skills become available and continue your rotation from there.
In-Game Sorcerer Macro Setup
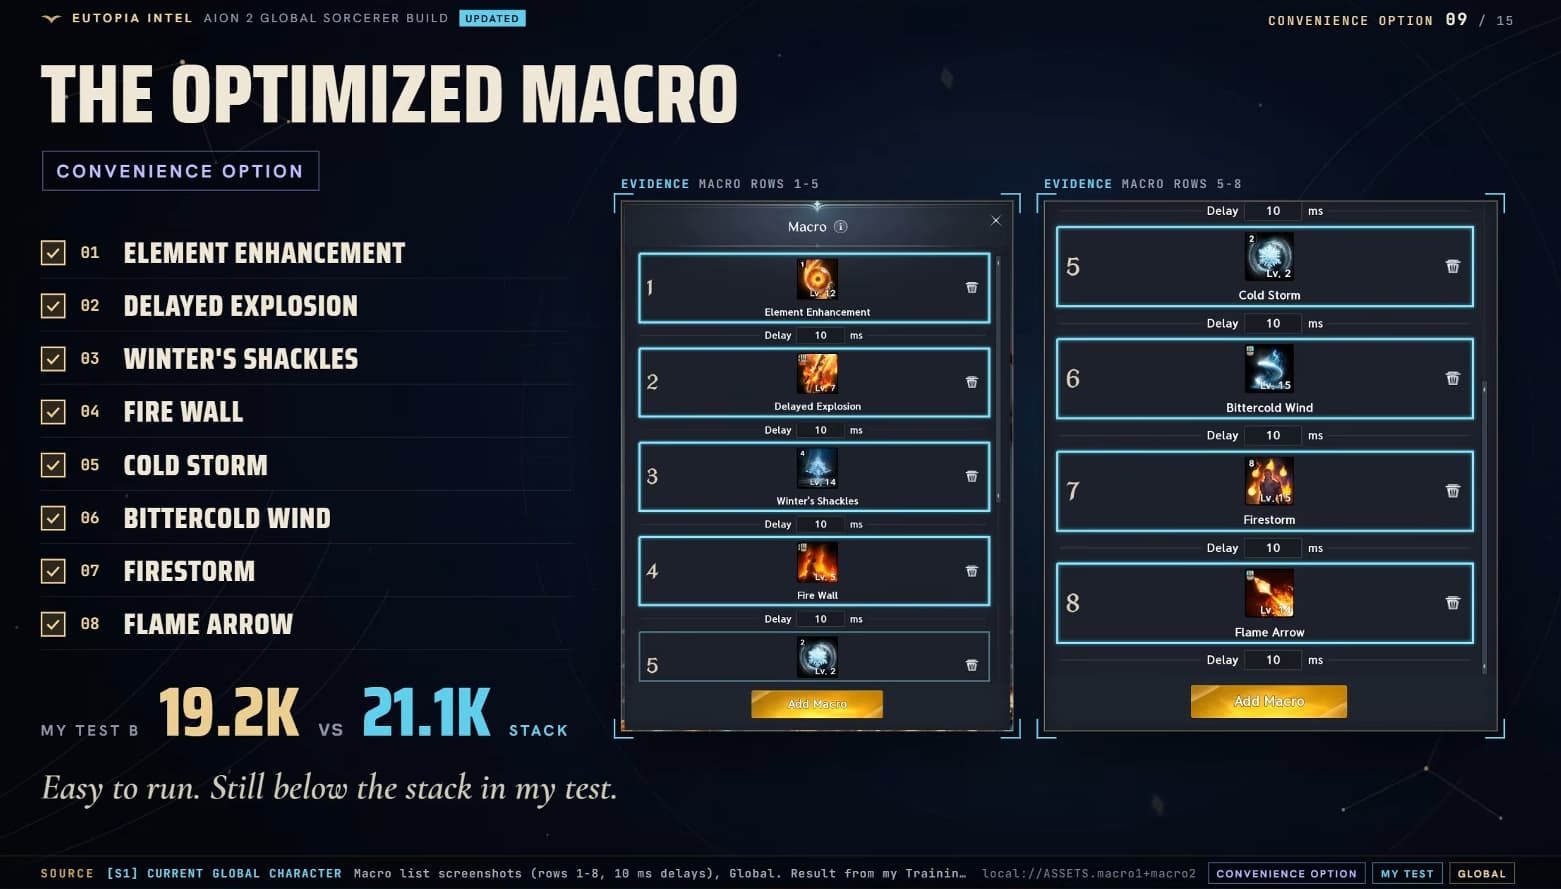
The in-game macro is a simpler way to handle much of the rotation, while skill stacking gives you more control over your burst timing. You still need to manage charged Hellfire casts yourself.
Use this input order for the simpler macro:
Element Enhancement
Delayed Explosion
Winter’s Shackles
Fire Wall
Cold Storm
Bittercold Wind
Firestorm
Flame Arrow
If you have swapped Cold Storm out, remove it from the damage sequence and keep your replacement Stigma available when needed.
Blaze still belongs in your rotation. If the quick slots assigned to your macro do not already include it in a skill stack, cast Blaze separately when it is available. Do not let the shorter macro list remove one of your core damage skills from the fight.
Keep Hellfire on a separate key, and preferably keep Wish of Concentration manual too. If you want Wish included, place it immediately before Flame Arrow, moving Flame Arrow to the ninth entry. Its cooldown-reduction upgrade still needs to be equipped for the later timing to have that benefit.
Weaving Hellfire Into the Macro
Start the macro to apply Element Enhancement, Delayed Explosion and Winter’s Shackles. Then release the macro input, hold Hellfire until it is fully charged, and resume the macro afterwards.
Repeat this manual charge whenever you are ready to use Hellfire again. Putting Hellfire into this sequential macro does not provide the held input needed for its full charge, which can leave you casting the weaker version.
The other limitation is timing. If you let the macro continue too far before switching to Hellfire, you can spend part of your buff window on other attacks and miss the best opportunity for your main burst.
Bind the macro to left-click, right-click or another comfortable input, then test it on a training dummy. Check the actual casts, your Hellfire charge and Wish timing before taking the setup into a dungeon.
For targeting, keybinds and clearer combat displays, our Aion 2 settings guide covers useful changes.
Daevanion Board Priorities
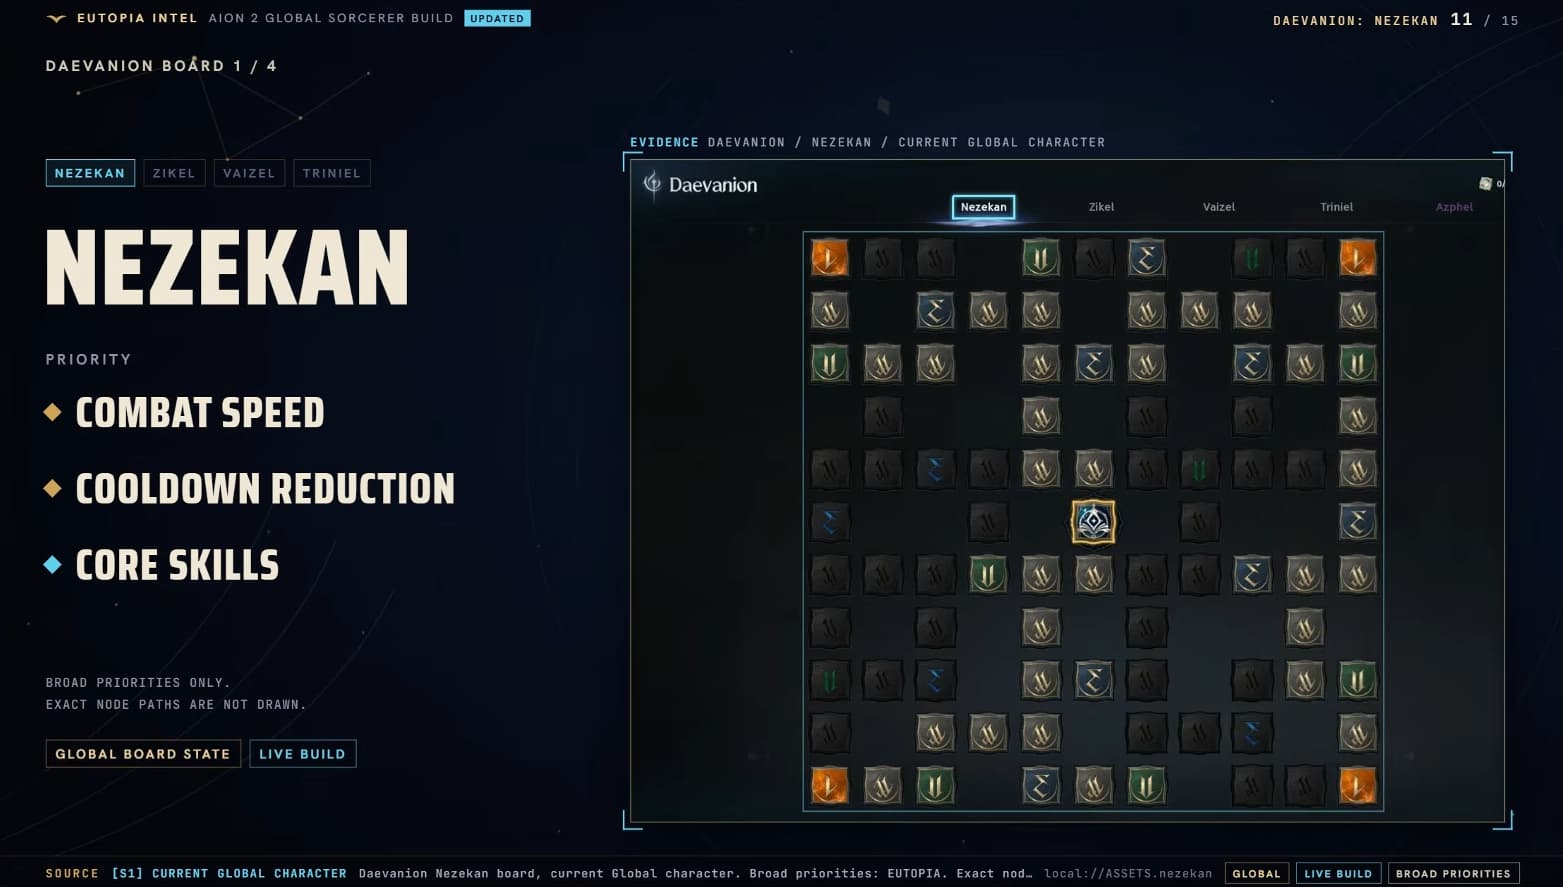
Plan your Daevanion routes around core skill upgrades and useful offensive stats. Crystals are limited, so avoid completing every node on one board before checking what the others offer.
Focus on nodes for Hellfire, Firestorm, Bittercold Wind, Blaze and Wish of Concentration, with Flame Arrow and Winter’s Shackles also contributing to the setup. Choose routes that help you reach useful skill and Specialty breakpoints.
For the early boards:
Nezekan: Look for Combat Speed, cooldown reduction and core skill upgrades.
Zikel: Prioritize Damage Boost alongside upgrades to your main skills.
Later boards: Continue checking for the same useful active skills, supporting passives and offensive stats.
Use the node tooltips to distinguish active-skill upgrades from passive upgrades before committing to a route. Keep Flame Scattershot behind your core damage skills when choosing where to spend limited crystals.
A larger displayed score does not tell you whether your points support the rotation you are playing. Review your routes whenever an extra skill level could unlock a useful Specialty or improve your main attacks.
For equipment upgrades and working towards new content requirements, our Aion 2 item level guide explains the wider progression steps.
Sorcerer Boss Fight Tips
Good positioning helps you get the damage out of the setup you have built. Look for safe opportunities to finish Hellfire’s charge and place your area attacks where enemies will remain in them.
Prepare before bursting. Apply your opening effects before committing to Hellfire.
Use full charges when it is safe. A quick tap is not equivalent to the charged attack.
React to the encounter. Move out of danger and use Steel Barrier when needed, even if that interrupts your planned sequence.
Adapt your fourth Stigma. Add defense or stagger damage when either is preventing a clear.
Review upgrades as you progress. Skill levels, equipped Specialties and Daevanion routes can change how the rotation works.
Get the opening burst and full Hellfire charge comfortable first, then practise keeping your regular damage skills active between casts. Once that feels reliable, refine your stacks and Wish timing to make better use of each safe damage window.