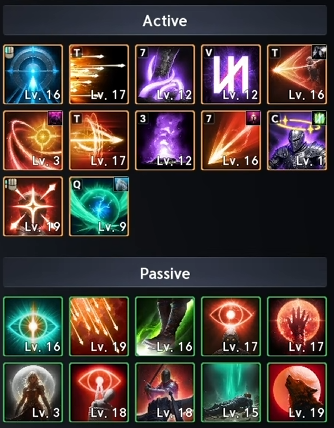
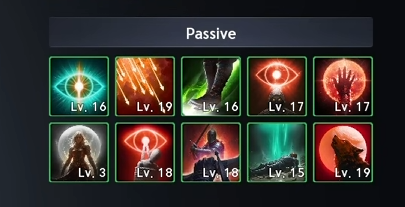
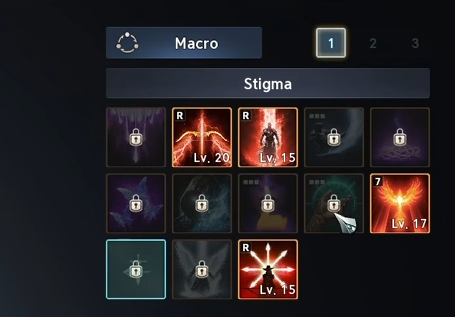
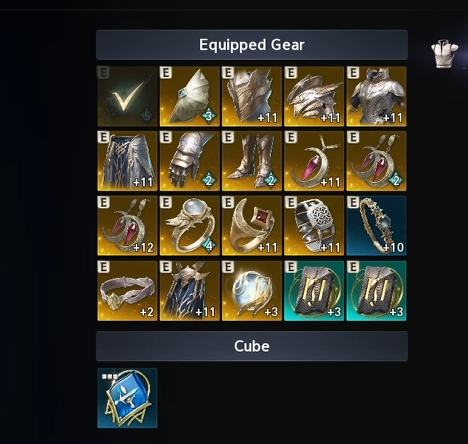
This Aion 2 Ranger PvE build focuses on powerful Deadshot casts, sustained ranged damage and carefully timed buffs. Your main priorities are reaching important skill Specialties, maintaining Gale and Precision, and keeping your offensive buffs available for useful boss damage windows.
The setup covers skills, passives, Stigmas, macros and rotation, alongside equipment, Arcana, Genus Insight, Daevanion boards, titles, Pantheon upgrades and wings. You can develop the build through dungeon equipment and gradual upgrades without needing a full crafted set.
If you are still getting familiar with the game’s systems, our Aion 2 beginner guide covers the early steps that help you get started.
A huge thank you to FRESHY for sharing his Ranger build! Be sure to check out his channel for more Aion 2 content.
Prioritise upgrades that change how your main skills work. Several important level 16 Specialties should be developed alongside Deadshot, which is your first active skill to push to level 20.
The levels below refer to your total skill level, including bonuses from equipment, Arcana and Daevanion.
Deadshot
Deadshot is your main charged damage skill. Keep it on a separate manual input and use it while Marking Shot's Precision buff is active.
For the setup before level 20, equip:
+30% Skill Speed
@Deadshot grants extra damage on hit
Precision increases Deadshot’s damage by 35%, making buff management an important part of every damage window.
Hold the input to complete the charge when it is safe to do so. Avoid beginning a charged cast immediately before a mechanic forces you to move.
Push Deadshot to level 20 first. The mobile Specialty is the planned third selection for this setup, allowing movement during the cast.
Snipe
At level 16, equip:
Reduces Deadshot’s cooldown by one second on hit
Adds the Tempest Arrow chain skill
Tempest Arrow replaces the earlier Multi-Hit selection and adds a fourth attack to Snipe’s chain.
Keep using Snipe between your other attacks. It restores MP and helps bring Deadshot back sooner, supporting both your resources and your damage rotation.
Tempest Shot
Reach level 16 and select 20% increased Skill Speed, replacing the 10% Critical Hit option.
The faster execution helps Tempest Shot fit into your repeated attacks and reduces the time spent using it between other skills.
Drill Dart
Reach level 16 and select the Specialty that activates Drill Dart one additional time.
You still press the skill once. The additional activation registers as a separate hit, and each hit can independently benefit from modifiers such as Multi-Hit, Perfect Chance and Double Chance.
This is one of the most valuable skill upgrades for the build.
Gale Arrow
Gale Arrow provides damage while maintaining an important offensive buff. With the relevant setup, Gale grants 15% Combat Speed and 15% PvE Damage Boost.
At level 16, select the 10-second cooldown reduction Specialty. This lets you maintain the buff continuously while you can keep attacking and reapply Gale Arrow.
Prioritise this upgrade because the buff supports your entire rotation.
Marking Shot
Keep Marking Shot at level 12 while developing your main damage skills.
Select the Specialty that adds five seconds to Precision’s duration. Maintain Precision for your Deadshot casts and refresh it before the effect expires.
Keep Marking Shot on a manual input so you control both its timing and movement.
Snare Shot
Keep Snare Shot at level 12 for this setup.
Its main role is applying Slow to enable Burst Arrow. Include it in your second attack stack so it supports the rest of the rotation.
Burst Arrow
Keep Burst Arrow in your regular attack setup, but do not prioritise its level 16 upgrade ahead of Drill Dart, Gale Arrow, Snipe and Tempest Shot.
Its cooldown-reduction chance is a lower priority than those core upgrades.
Situational Skills
Explosion Trap: Keep at level 12. Use its movement alongside Marking Shot to avoid attacks and preserve stamina when appropriate. It is primarily a utility option in this boss-focused setup.
Suppressing Arrow: Keep available for stagger mechanics, without investing ahead of your main damage skills.
Arrow Scattershot: Leave out of this rotation and prioritise the skills above. This setup does not invest in its cooldown-reduction Specialty.
Passive Skill Priorities
Prioritise Hunter's Resolve and Focused Eye when investing in passives and choosing skill bonuses on equipment.
After those two, develop your other offensive passives in this order:
Hunter's Soul
Concentrated Fire
Rooting Eye
Melee Fire
These passives support the damage effects used throughout your rotation. Spend remaining points on other options once your main offensive priorities are covered.
Look for the same passive bonuses across armour, accessories, Arcana and Daevanion. Combining these sources helps you improve the skills that matter most without relying on a single perfect item.
Recommended Stigmas
Use these four Stigmas:
Vaizel's Authority
Bow of Blessing
Supporting Fire
Griffon Arrow
A practical progression target is Vaizel’s Authority at level 20, followed by Griffon Arrow, Supporting Fire and Bow of Blessing at level 15.
Vaizel's Authority
Make level 20 your first major Stigma investment.
Its cooldown-reduction effect is central to the build’s faster rotation, helping your important skills become available more frequently while you attack.
Griffon Arrow
After Vaizel’s Authority reaches level 20, prioritise Griffon Arrow at level 15.
Griffon Arrow applies Crimson Flames, dealing damage over time and enabling additional damage interactions. Its level 15 upgrade is an important milestone for this setup.
If your Stigma points are limited, you can temporarily keep Bow of Blessing and Supporting Fire at level 5 to reach Griffon Arrow’s level 15 upgrade.
Once the rest of your allocation is established, continue developing Griffon Arrow towards level 20.
Supporting Fire
Work towards level 15 after securing your main Stigma milestones.
At that level, its cooldown lines up with Vaizel’s Authority in this setup, making the two buffs easier to manage together.
Bow of Blessing
Develop Bow of Blessing alongside your other offensive buffs, working towards level 15 as your available Stigma points increase.
Keep it in the manual buff stack with Vaizel’s Authority and Supporting Fire.
Combat Settings and Macro Setup
For this setup, turn off Skill Queue under Settings → Combat Controls. This supports the manual timing used for buffs, Marking Shot and Deadshot.
Arrange your attacks into two stacks, with your offensive buffs grouped separately.
First Attack Stack
Place these skills together in this order:
Gale Arrow
Drill Dart
Tempest Shot
Second Attack Stack
Place these skills together in this order:
Griffon Arrow
Snare Shot
Burst Arrow
Manual Buff Stack
Group these skills together:
Vaizel's Authority
Supporting Fire
Bow of Blessing
Keep Marking Shot and Deadshot on separate manual inputs. Leave Snipe available on your regular attack input.
Macro Entries
Add these entries to the combat macro:
Gale Arrow — 10 ms delay
Griffon Arrow— 10 ms delay
Each entry uses its associated attack stack. The available skills within those stacks still depend on their cooldowns and activation conditions.
Keep the buff stack outside the macro. Activate it manually so you can save your buffs when a boss is about to become untargetable or begin a mechanic.
For additional targeting and keybind adjustments, our Aion 2 settings guide covers useful options.
Ranger Rotation and Boss Timing
Start from a comfortable position where you can maintain your attacks and respond to mechanics. Around 10–12 metres from the boss is a useful starting point for this setup.
Opening Rotation
Activate Vaizel's Authority, Supporting Fireand Bow of Blessingg.
Press your macro input twice to activate Gale Arrow and Griffon Arrow.
Use Marking Shot to apply Precision.
Charge and release Deadshot.
Hold your macro input alongside Snipe to continue attacking.
Use Deadshot again when it becomes available, keeping Precision active.
Snipe and your supporting cooldown effects can bring Deadshot back very quickly. Watch its actual cooldown rather than assuming every cycle takes the same amount of time.
Maintain Precision
During the opening sequence, you may fit around three Deadshot casts into the first Precision window. Later cycles commonly refresh Marking Shot after around two Deadshot casts.
Use those counts as a rhythm to practise. Movement, interrupted attacks and cooldown effects can change the timing, so always check the buff itself.
Time Buffs Around Mechanics
Avoid activating your offensive buffs immediately before the boss becomes untargetable or forces you to stop attacking.
For example, using a buff five seconds before a ten-second untargetable phase wastes much of its duration. Waiting until the boss returns gives you a longer uninterrupted damage window.
The same principle applies when you need to hide behind pillars, dodge extended attack patterns or move away from the boss.
Manual buff control lets you adapt to the encounter instead of spending your cooldowns whenever the macro reaches them.
Equipment and Soul Binding
Dungeon equipment is a practical foundation for this build. Crafted gear is optional, and a full crafted set is not required to make the rotation work.
Consider crafting a weapon when you can gather most of its materials yourself and afford the remaining investment. Farming roughly 70% of the materials is a useful budgeting reference for this approach, rather than a requirement.
Compare the complete item, including its Soul Binding lines and skill bonuses, before committing to an expensive replacement.
Weapon and Guard
Prioritise:
Combat Speed
Weapon Damage Boost
Might
Other useful rolls include:
Attack
Multi-Hit Chance
Precision
Damage Boost
Armour
Use Nuakum armour with these Soul Binding priorities:
Helmet: Double Chance and Incoming Heal.
Shoulders: Critical Damage Boost and Double Chance.
Chest: Damage Boost and Perfect Chance.
Greaves: Perfect Chance.
Gloves: Combat Speed and Perfect Chance.
Boots: Move Speed and Perfect Chance.
Cloak: Double Chance.
Fill remaining lines with Attack, Accuracy, Focused Eye and Hunter’s Resolve where available.
Necklace
Look for:
Combat Speed
Might
Precision
Hunter’s Resolve
Focused Eye
Rings
On both rings, prioritise Might and levels for:
Deadshot
Gale Arrow
Drill Dart
Tempest Shot
Review your total skill levels before replacing a ring. Losing a useful skill bonus can drop an important ability below its Specialty milestone.
Earrings
On both earrings, look for:
Move Speed
Precision
Might
Hunter’s Resolve
Focused Eye
Use Lower Level Gear for Transfers
Check the rolls on lower-item-level yellow equipment before discarding it.
For example, gloves that drop with Combat Speed may be useful as a transfer source. Upgrading the source piece and transferring it can be cheaper than enhancing your endgame gloves directly.
Compare the total cost and inspect the transfer preview before spending materials. Confirm which stats and enhancement levels will carry over to the receiving item.
Our Aion 2 endgame gear guide explains Soul Binding, transfers and upgrade investment in more detail.
Soulstones and Manastones
Perfect stone rolls are a later refinement.
Useful blue Attack or Accuracy rolls are acceptable while you develop your skills, equipment and Arcana. If you have suitable Superior stones available, aim for a strong offensive yellow result, with Weapon Damage Boost as a priority.
Avoid spending heavily on repeated rolls while more important upgrades remain unfinished.
Arcana Cards
Prioritise Arcana bonuses to the active and passive skills that contribute most to your PvE damage. Your main active skill targets remain Deadshot, Drill Dart, Burst Arrow and Gale Arrow.
Combine Arcana bonuses with your rings and other skill upgrades to work towards the levels you need. Check your total skill levels when changing equipment so you can use your rings to fill any remaining gaps.
A strong overall setup matters more than one perfect card. Keep useful results while developing the rest of your build instead of spending all your resources chasing a single roll.
Pets and Genus Insight
Focus on offensive bonuses that support your current setup, including Attack, Accuracy, Critical Hit, Damage Boost, Critical Damage and Smite.
Prioritise these over less useful defensive or utility rolls when your goal is improving PvE damage. Keep your existing stats in mind when choosing upgrades, particularly whether you have enough Accuracy to land attacks reliably.
Useful rolls are enough to keep progressing. You do not need perfect results across both systems before moving on to other upgrades.
Daevanion Board Priorities
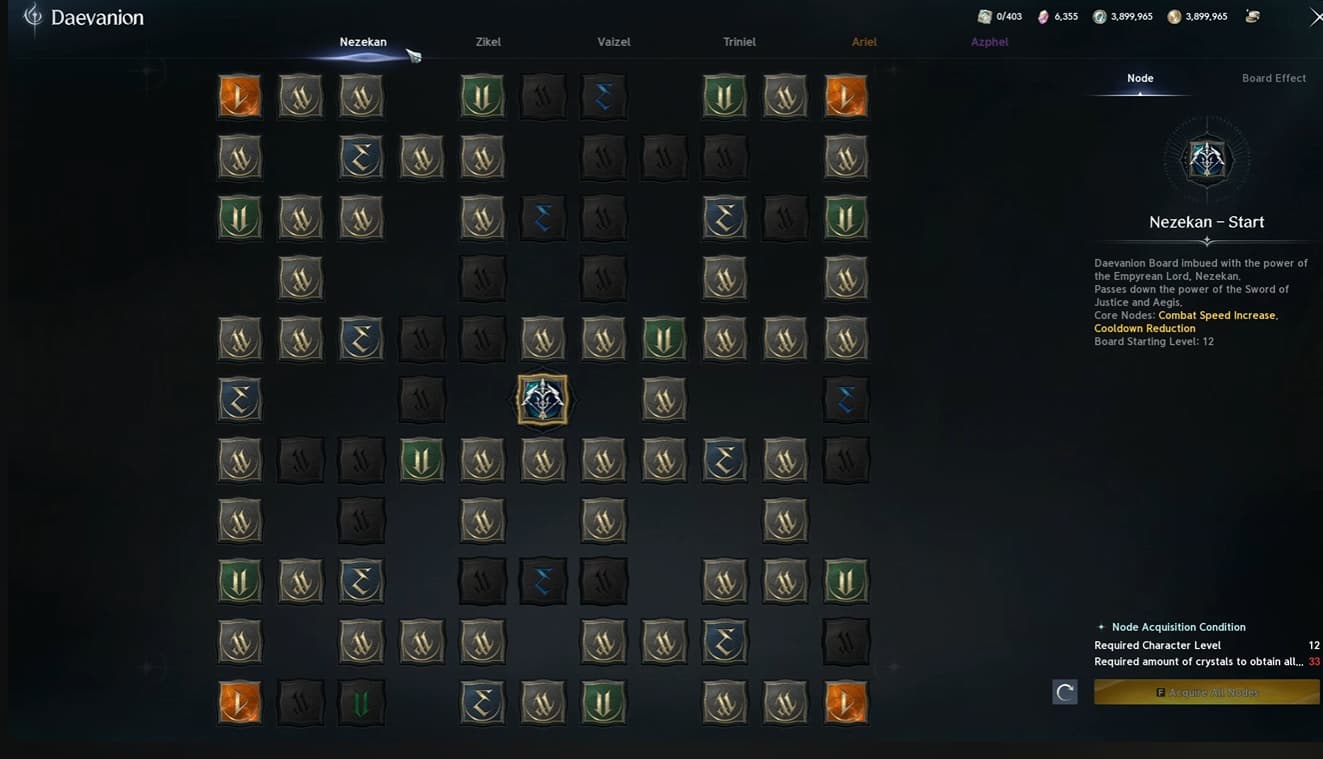
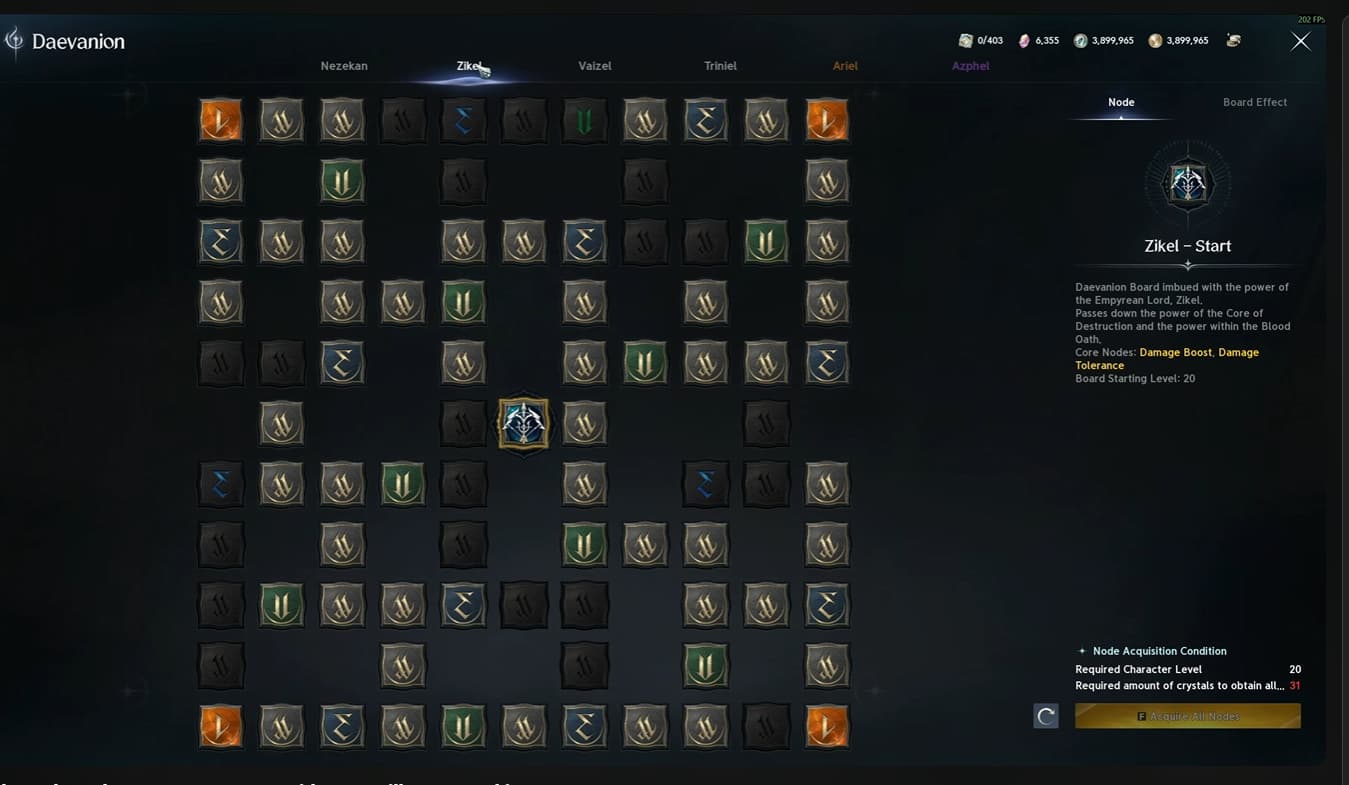
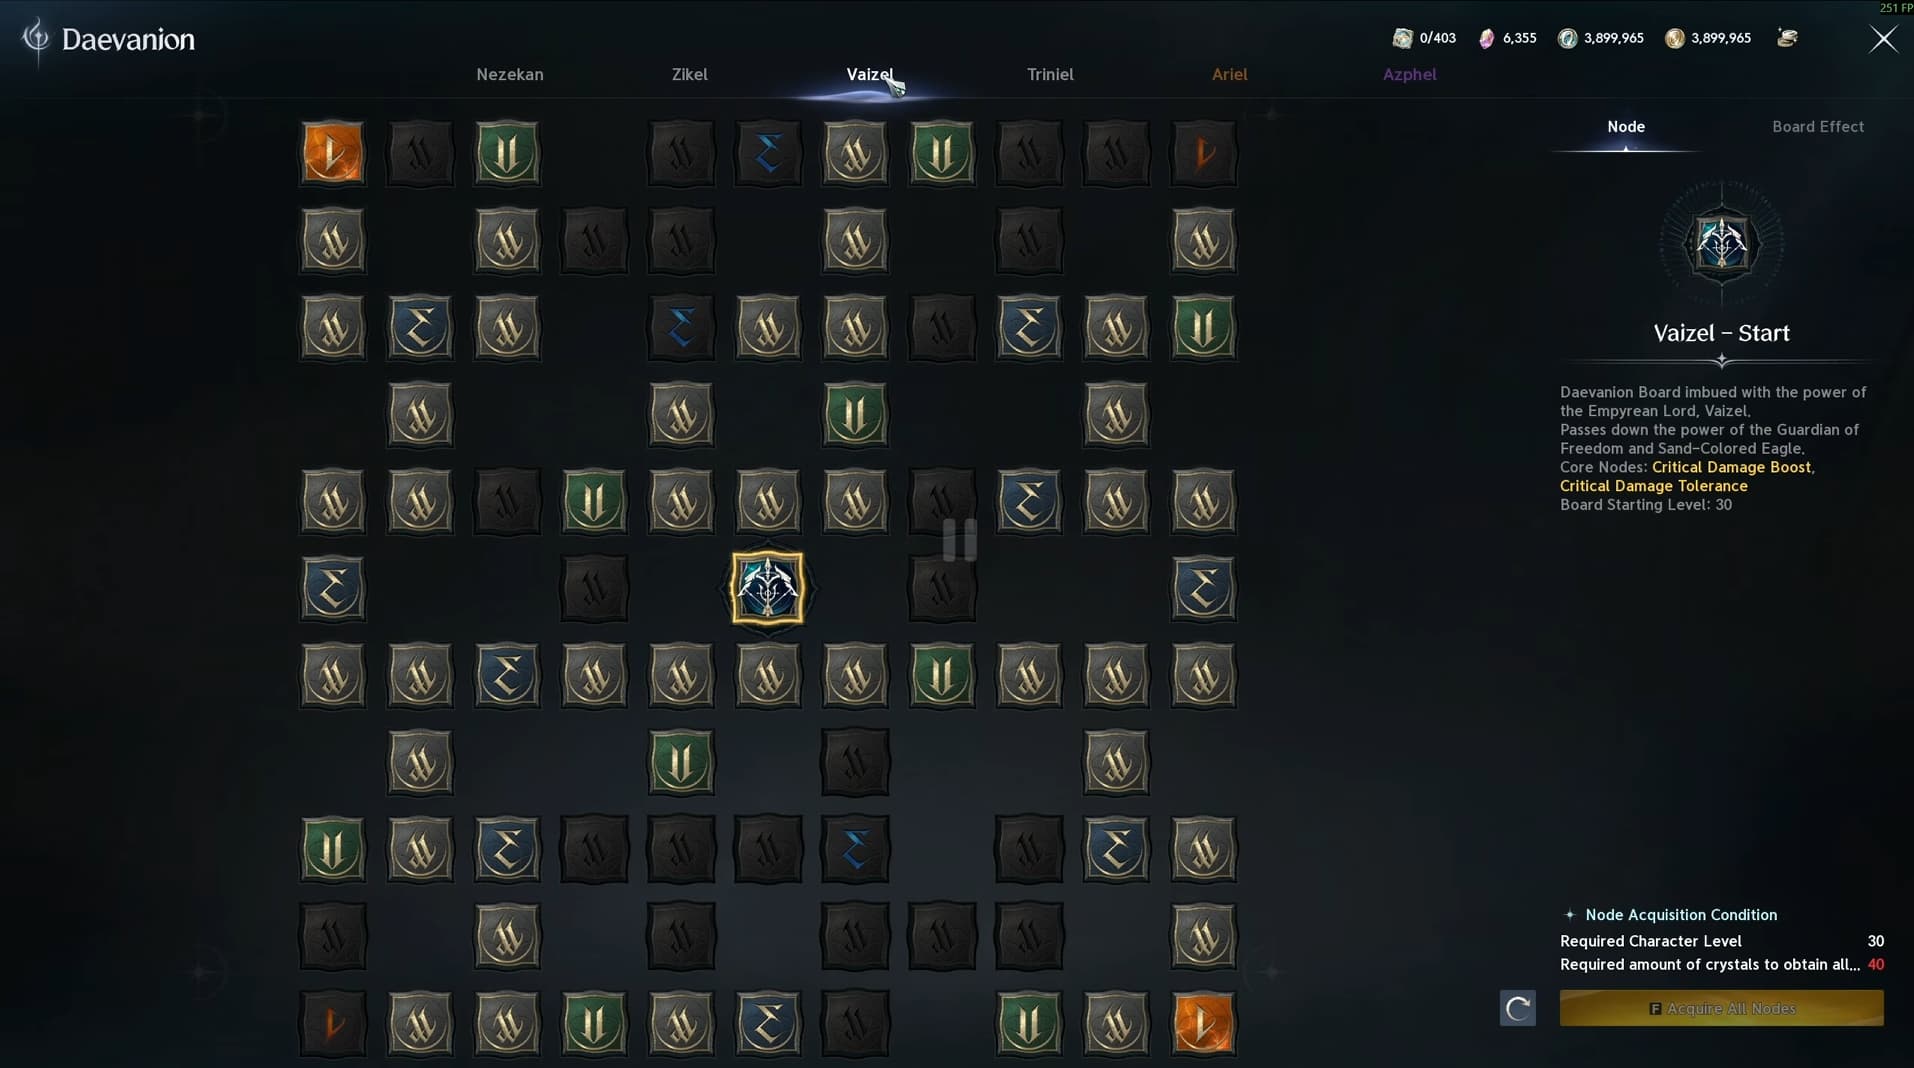
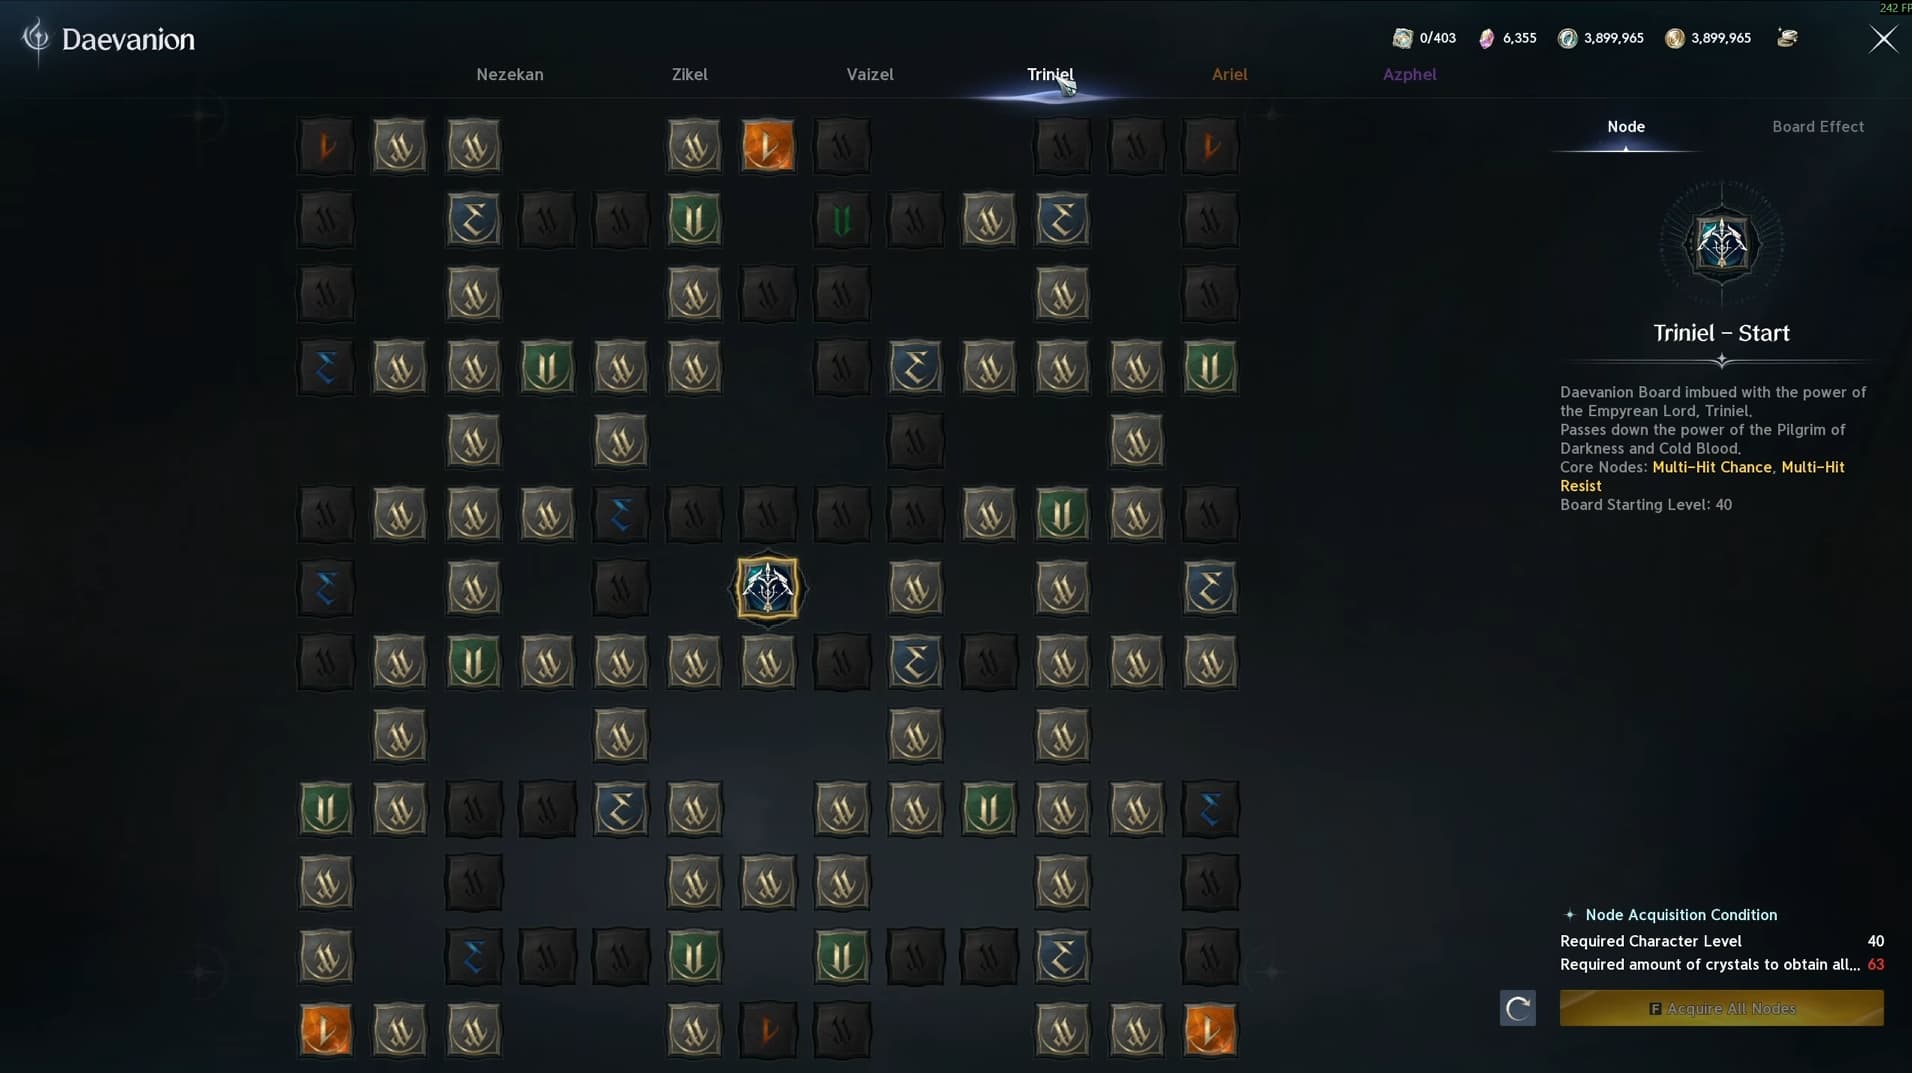
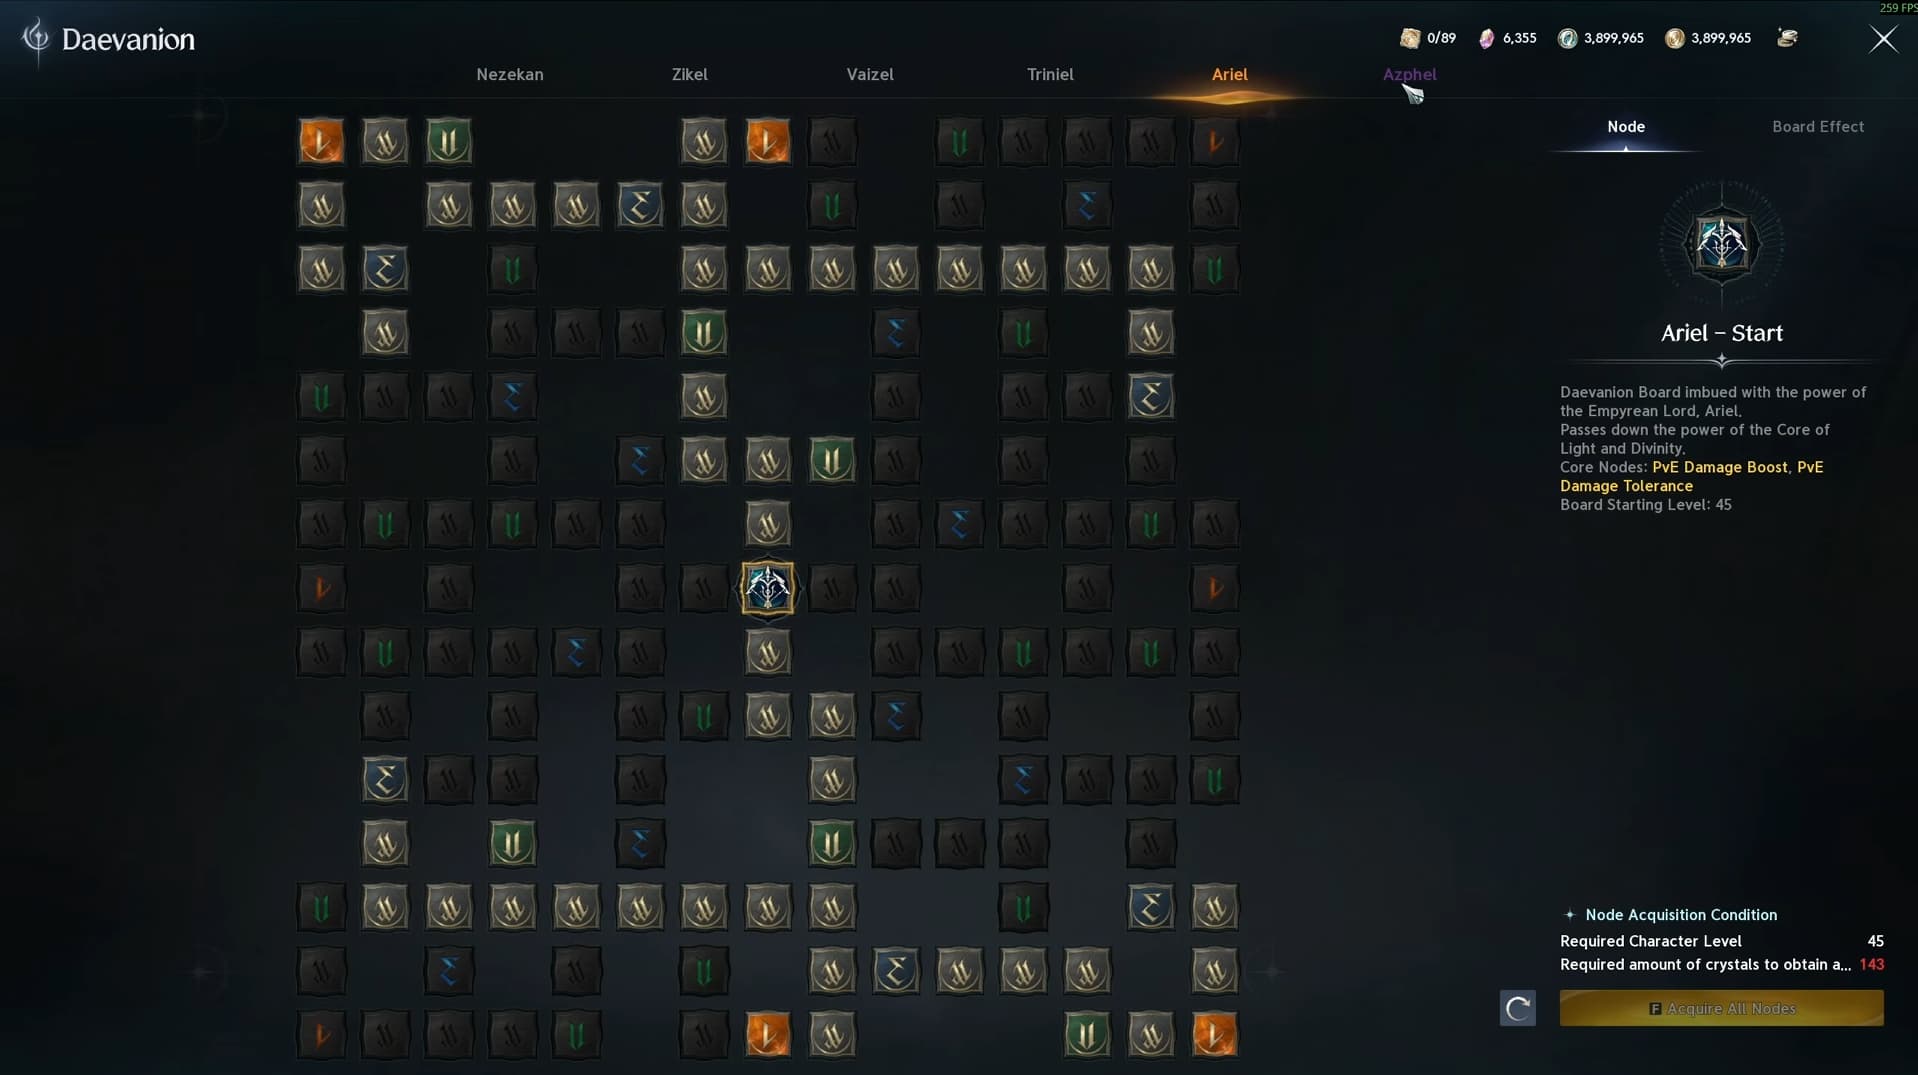
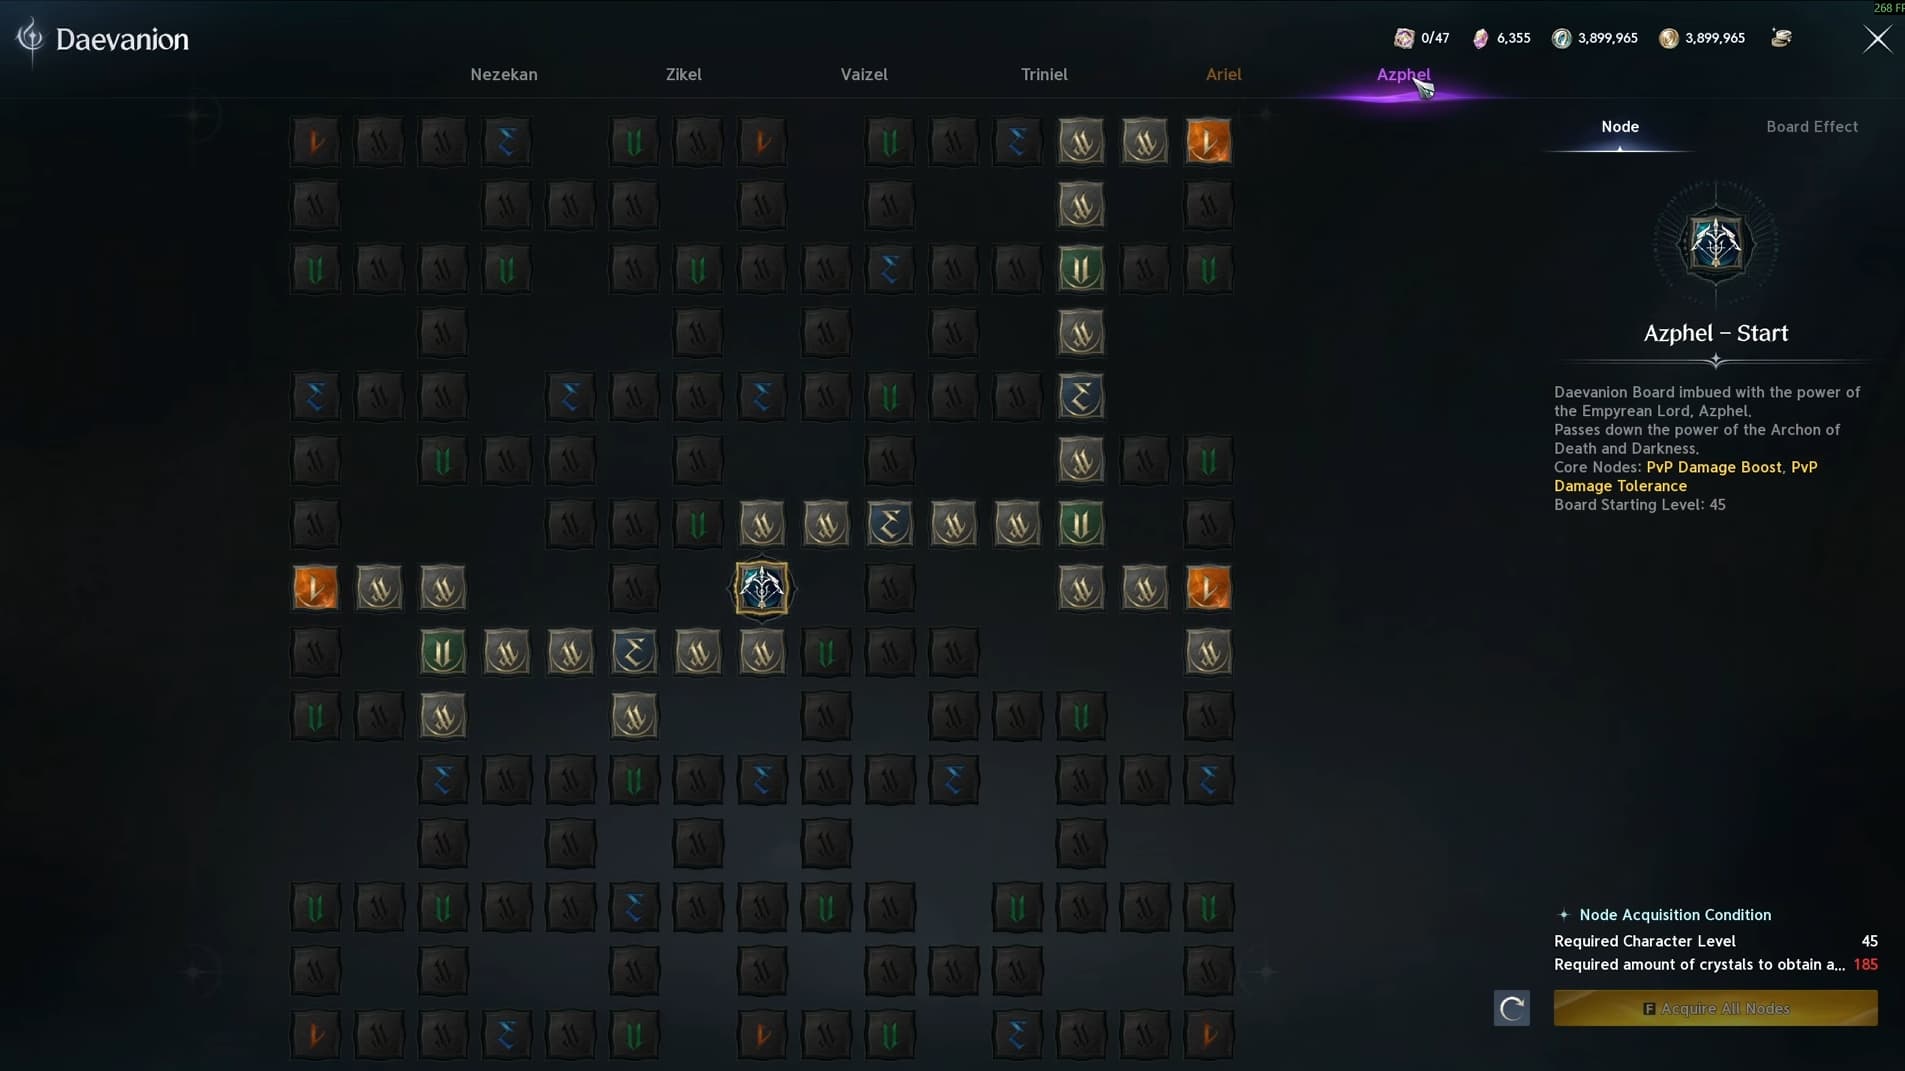
Plan your Daevanion routes around the Ranger skills you use regularly and the offensive stats that improve them.
Nezekan
Zikel
Vaizel
Triniel
Ariel
Azphel
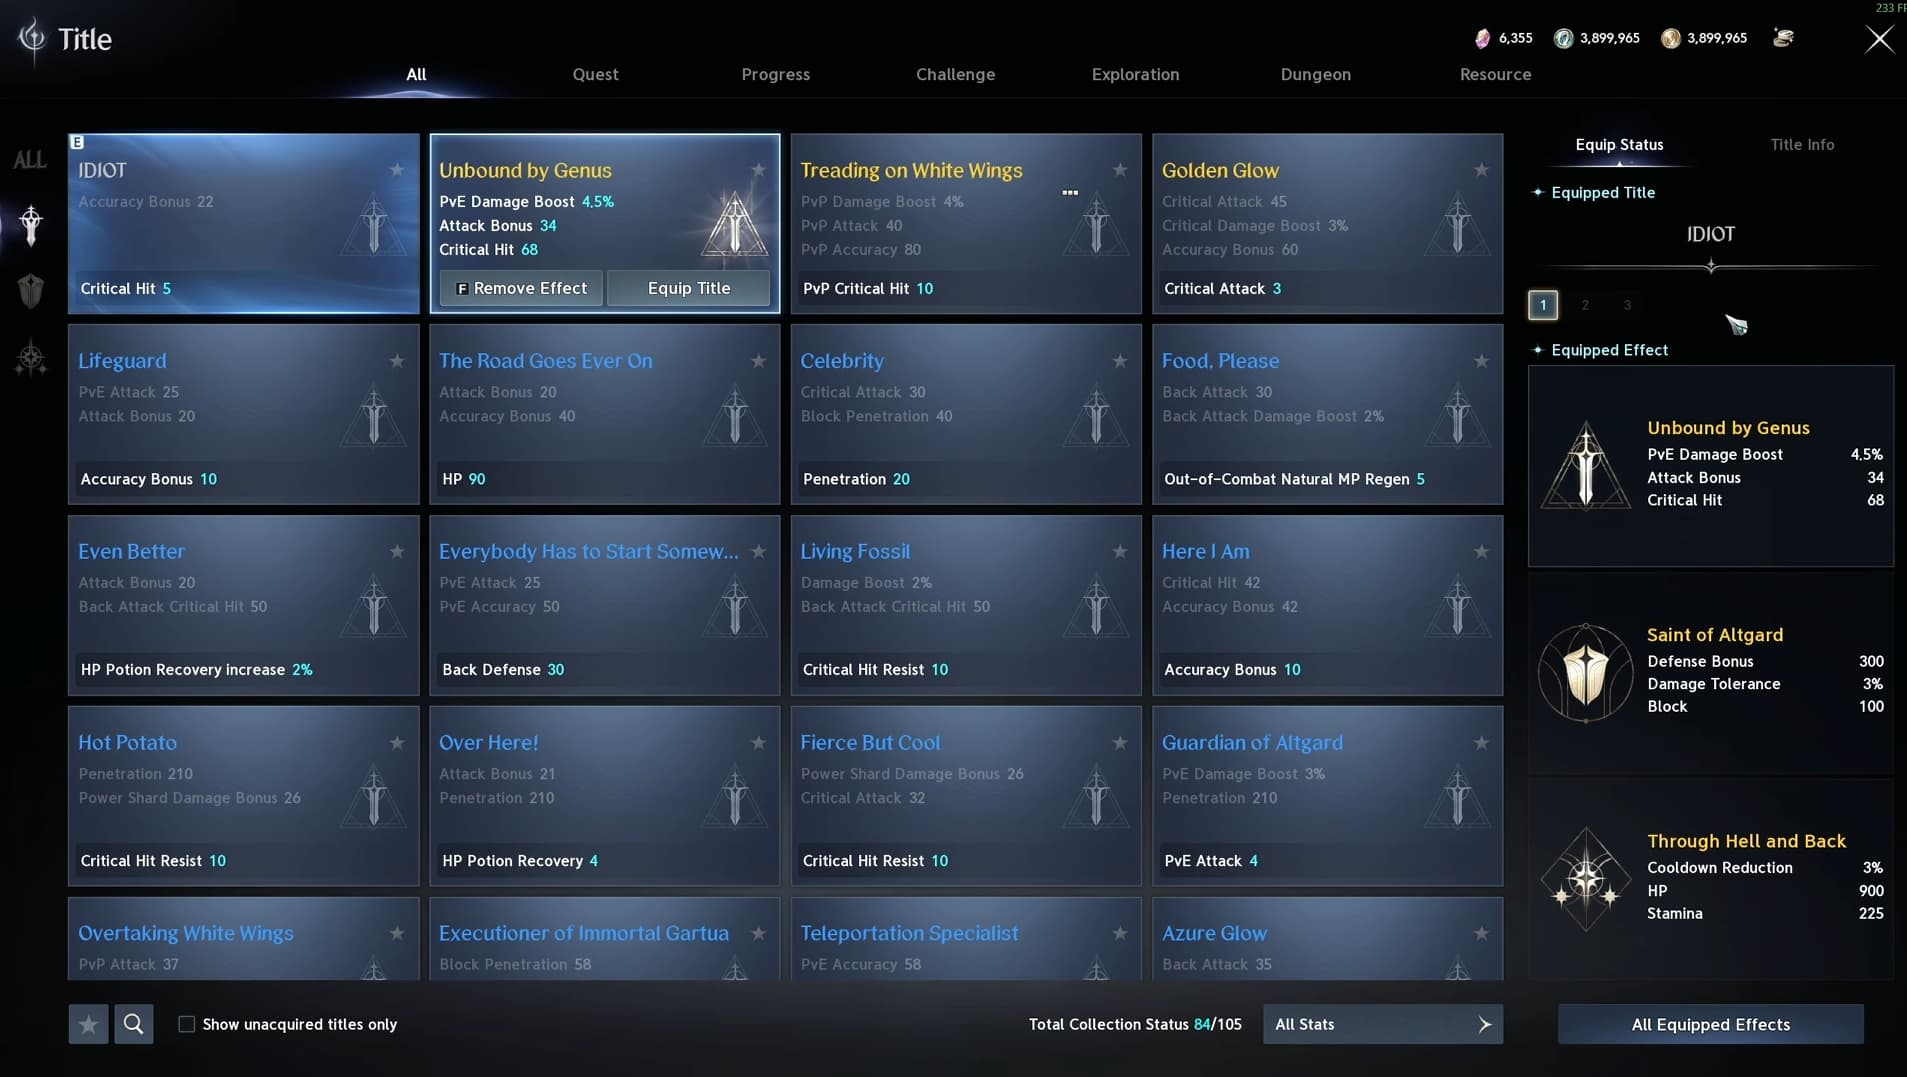
Recommended Titles
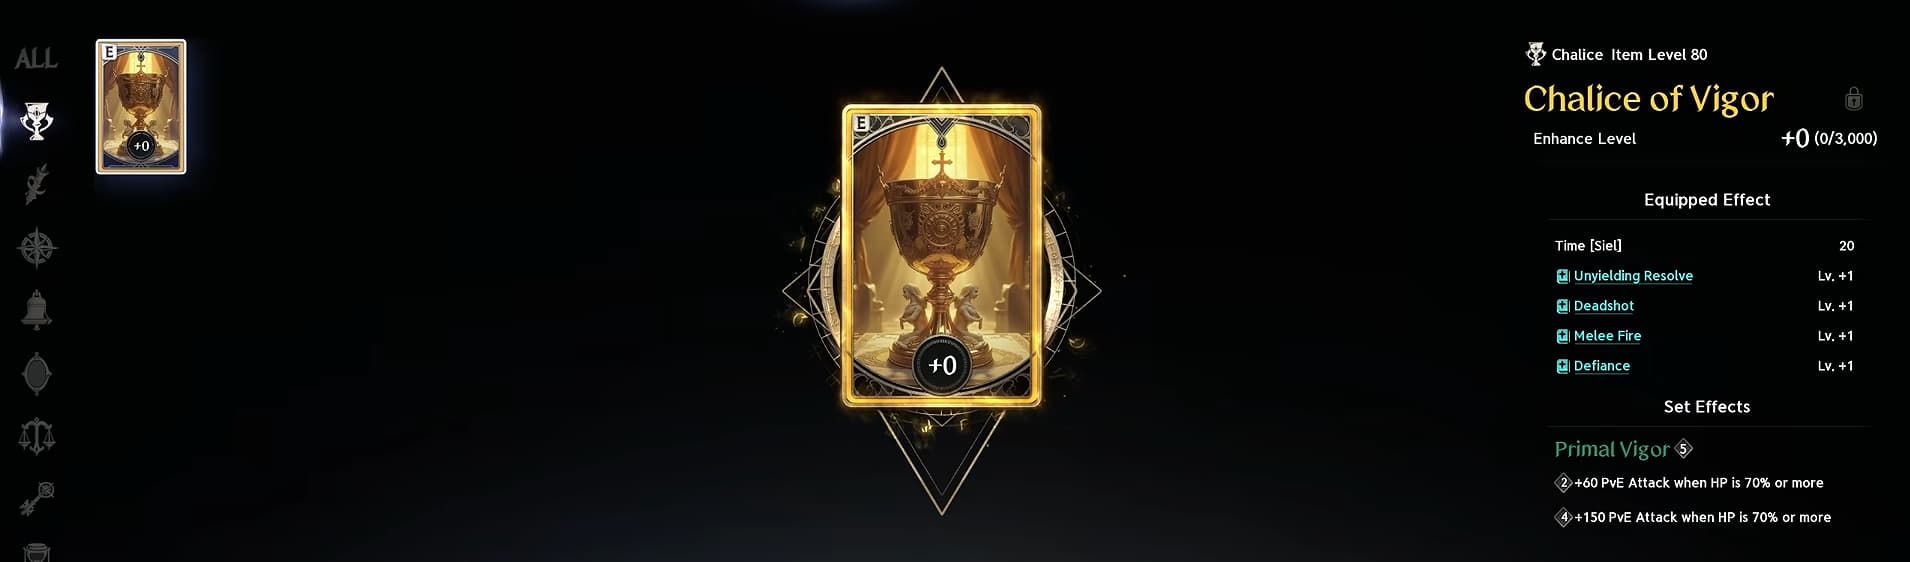
Develop your title choices alongside Genus Insight, wing collection and skin collection.
Unbound by Genus
Unlock Unbound by Genus by raising all five Genus Insight categories to level 10.
Work towards this while improving the Genus rolls that support the rest of your character.
Dominator of Dimensions
Unlock Dominator of Dimensions by collecting 25 wings.
While developing your collection, Saint of Altgard is an earlier alternative for an Asmodian character progressing the relevant Monolith with feathers.
Empty Closet
Unlock Empty Closet by collecting 700 skins.
This is a long-term collection target. Through Hell and Back, obtained by clearing the relevant Ru sealed dungeon, is a more accessible alternative while you work towards it.
Pantheon and Divine Stats
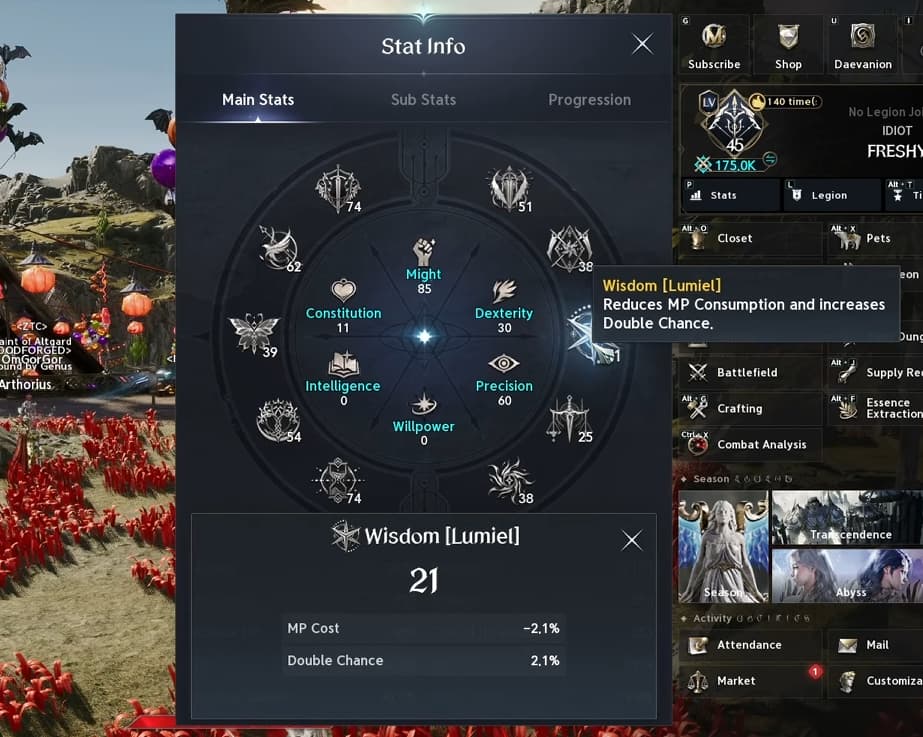
Focus your Pantheon progression on these Divine stats:
Time
Destruction
Wisdom
Justice
Choose upgrades that contribute to these priorities as you develop your collection.
Zikel’s Apparition Statue
Work towards Colossus Zikel’s Apparition through Nightmare.
Its purchase unlocks after clearing Zikel’s Apparition at level 1. You can then obtain it from the Nightmare shop for 14,000 Phantasmal Fragments.
The statue contributes useful Divine stats, making it a progression target alongside your equipment and skill upgrades.
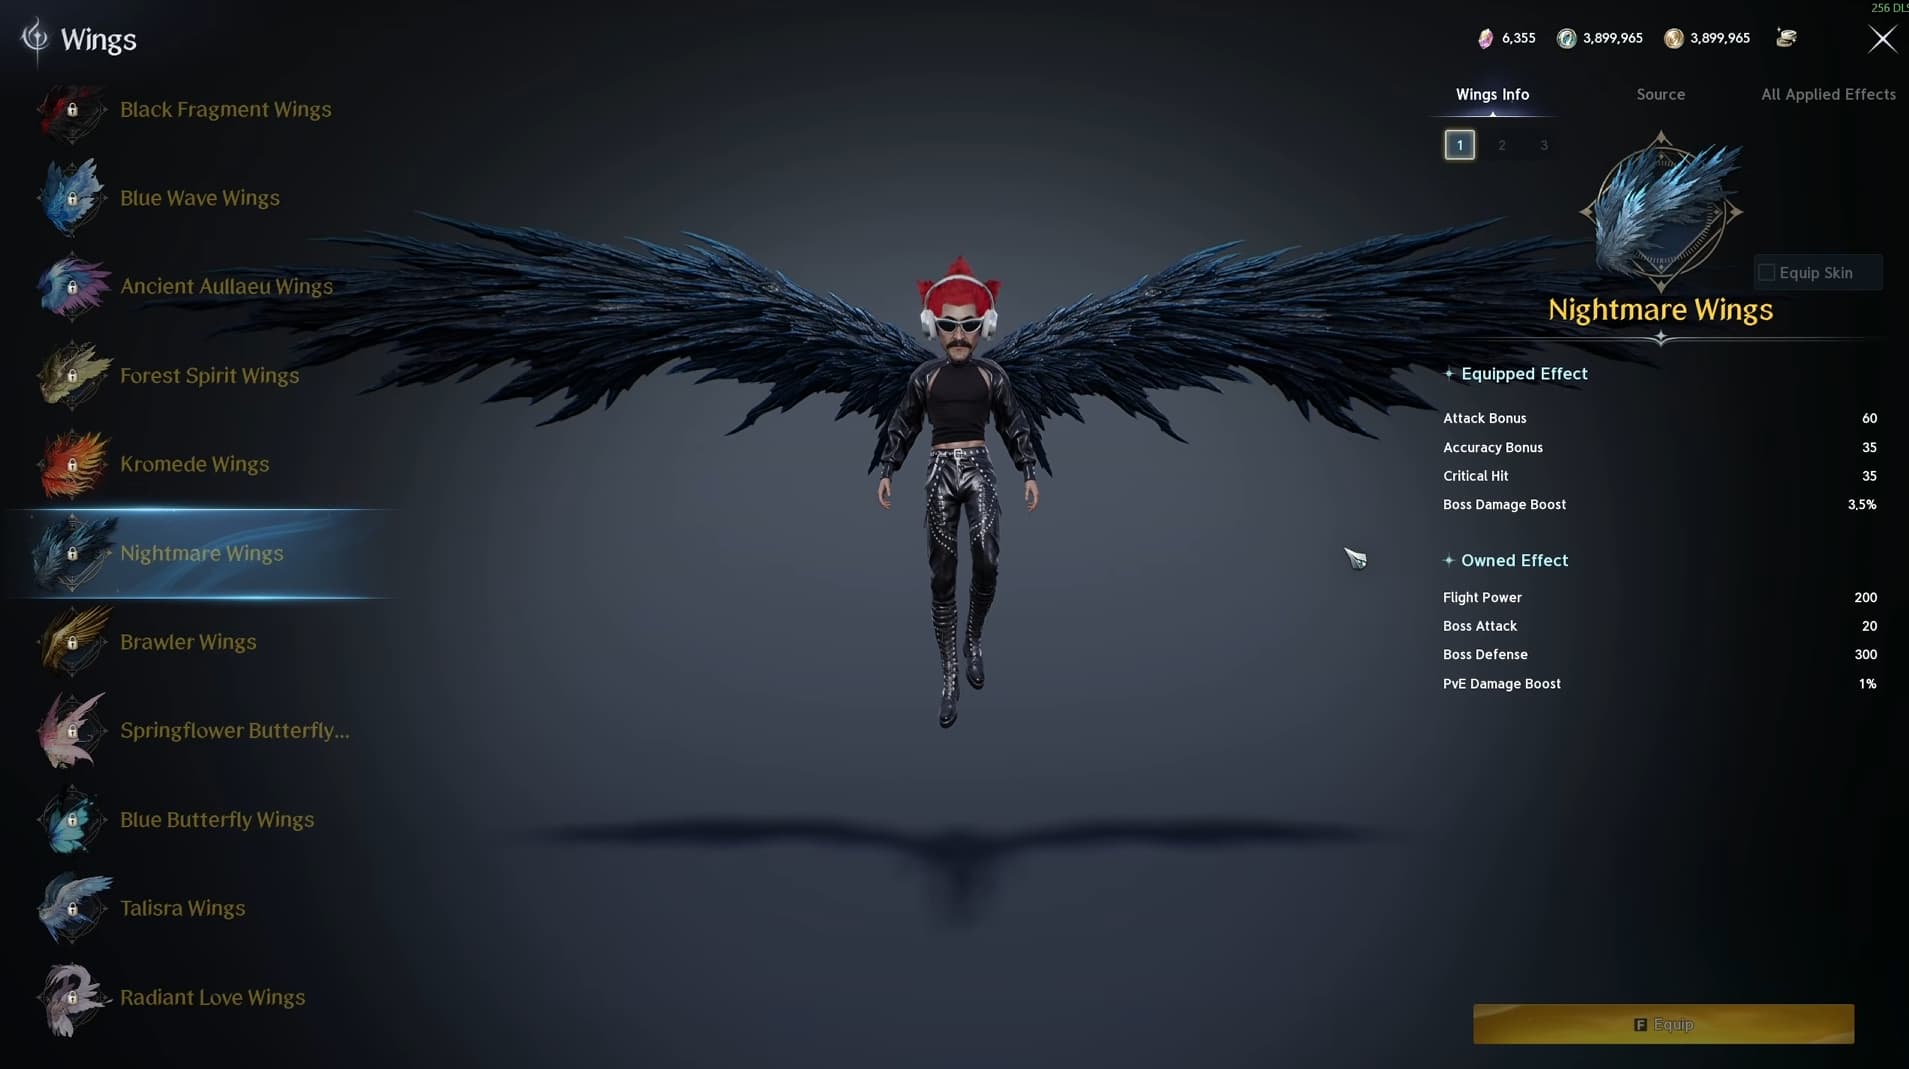
Nightmare Wings are the long-term wing target for this setup, although obtaining them requires a substantial Nightmare grind.
Dark Veil Wings are an alternative while you work towards them. They can drop in sealed form from Ferocious Horn Den and can also be purchased through the market when available.
Compare a wing upgrade with the improvements still available from your skills, Arcana and equipment. With those foundations established, wings provide another way to strengthen your Ranger for harder PvE encounters.
Comments
13
S
StoneShadow•2d ago
Can you please provide a screenshot of the skills bar?
0
S
ShinyKey•13d ago
Dropping a comment to tell you how appreciative I am for this guide! As a MMO newbie everything is very overwhelming, even the guide is overwhelming lol but once I get game mechanics down and start understanding the guide everything will work out prayge
Thank you and Freshy for the help
1
C
CoolShadow•14d ago
Any chance we can get a screenshot of what the skill layout looks like for this one?
0
R
RichFlower•19d ago
PLEASE UPDATE TO LOOK LIKE THE OTHER GUIDES
0
Ulvier•8d ago
Hexed
Which guides are you referring to?
0
2
2Dexter2•20d ago
Please update the whole guide its been a while and most of the stuff is misleading
0
2
2Dexter2•20d ago
where are the Pantheons ? Wings ? Titles ?
0
S
StoneDagger•21d ago
no azphel?
0
M
Mobalytics-Oli
Author
•20d ago
Added!
0
R
RichSun•21d ago
The Daevanion boards in the screenshots do not seem to match in game. Please let me know if the screenshots are now out of date and if you could upload them. Thank you for taking the time and for uploading your build.
0
M
Mobalytics-Oli
Author
•20d ago
All boards have just been updated with Freshy's lastest Ranger Build.
0
B
BoldSun•21d ago
WHY noone show full Daevanion Boards? As example - because words priorities NOT HELPS AT ALL


 Ranger PvE build focuses on powerful
 Deadshot casts, sustained ranged damage and carefully timed buffs. Your main priorities are reaching important skill Specialties, maintaining Gale and Precision, and keeping your offensive buffs available for useful boss damage windows.