This Aion 2Cleric Full Heal PvE Build focuses less on DPS and more on keeping your team alive in group PvE content.
This build is recommended for late-game content, not for early levelling. If you need a more damage-centric build for solo or early-game content, check out our Cleric Condemnation PvE Build.
This guide focuses on the skills you need to heal and buff your team while still providing a small amount of damage on the side. We'll also cover Skill priorities (Active, Passive & Stigmas), combat macros, and when to use your skills/buffs.
If you are still getting familiar with the game’s systems, our Aion 2 beginner guide covers the early steps that help you get started.
Similar to the DPS version of this build, Condemnation is still your main damage priority for Active skills, but what differs with this build is the bigger focus on healing skills.
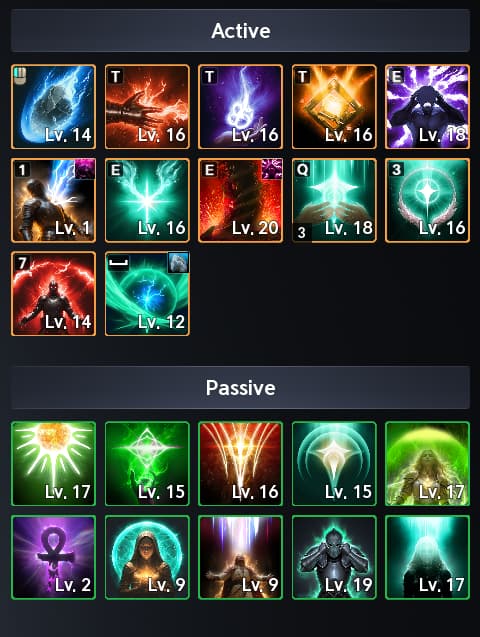
Focus your skills on Light of Regeneration, Healing Light and Radiant Recovery.
Here is an ideal order for levelling your Active Skills:
Radiant Recovery
Healing Light
Light of Regeneration
Condemnation
Earth's Retribution
Judgment Thunder
Chain of Torment
Debilitating Mark
Divine Aura
Bolt
Any extra points can be spent how you would like; however, it is not recommended to put any points into Lightning Strike Scattershot as it is not used in the skill rotation at all.
Active Skills
Radiant Recovery [1/3/5]
Radiant Recovery is a large-area heal for yourself and your party that can remove debuffs.
Specialties: Try to get it to Level 20, so you can run 1/3/5; however, the main ones you’ll want to focus on are 1, which allows you to remove an additional debuff. And 3, which reduces the overall cooldown. Option 2, which allows an additional use, is also fine to run instead of 5, depending on the need for heals.
Healing Light [1/3/5]
Healing Lightis for healing yourself and the lowest-health party member within 40m.
Specialties: Picking up option 1 for +2 additional uses is great, and option 3 gives the chance to remove debuffs. Once you can get the skill level to 20, add option 5 for reduced cooldown.
Light of Regeneration [3/4/5]
Light of Regenerationis a small heal-over-time buff for yourself and your party. Great to open boss fights with and keep up during encounters. The Specialties for this buff are great for making your other healing more potent.
Specialties: Option 3 provides an incoming Heal buff while this is active. Once you can, grab 4 for additional movement speed while active, and later on, grab option 5 to provide Damage Tolerance.
Condemnation [2/4/5]
Condemnation is your main damage skill in this build. It deals massive damage to enemies afflicted with Chain of Torment.
Specialties: You’ll want to pick options 2/4/5 when able; the most important of these is the one you unlock at skill level 12, allowing you to reset Condemnation’s cooldown when it crits.
Earth's Retribution [2/3/5]
Earth's Retributionis your standard auto-attack skill. Use this when you need to gain back mana, or want to proc the Specialty that lowers your Bolt cooldown.
Specialties: Option 2 early on for the Chain Skill trigger chance, then pick option 3 for Multi-Hit on hit, then option 5 to ignore Block and Evasion with the skill, or option 4 if you are consistently using Bolt in your combo.
Judgment Thunder [2/5]
Judgment Thunder is your standard Mana-spending attack, used repeatedly when you want to deal area-of-effect damage/upkeep damage when other things are on cooldown.
Specialties: Option 2 is your best early choice, and when able to, choose option 5, allowing you to double cast the secondary ability, Divine Punishment. (4 is a great choice in the interim between skill level 12-16.)
Chain of Torment [2/4]
Chain of Tormentis the skill required to utilize Condemnation. It provides area damage, reduces enemy PvE Damage Tolerance, and deals damage over time, allowing you to proc Condemnation over that duration.
Specialties: Immediate use option 2 for a longer DoT on the skill. Then add option 4 when available for additional Damage Tolerance reduction.
Debilitating Mark [2/4]
Debilitating Markprovides more area damage that reduces PvE Damage Boost with damage over time.
Specialties: Option 2 will add a Defence debuff for the duration of the damage over time, and option 4 will add additional PvE damage boost reduction to enemies hit.
Divine Aura [3/5]
Divine Aura adds DPS to your rotation. Deals damage over time to your selected target.
Specialties: Option 3 for the attack speed boost. Allows for more passive damage on the side, and later on, pick up Option 5 to reduce the cooldown. Option 4 is a great interim choice, or if you happen to get the skill to Level 20, as it adds a longer duration.
Bolt [2/3]
Boltis a massive charged area damage spell with a fairly long cooldown. (Which can be reduced by picking a certain skill specialty in Earth's Retribution.)
Specialties: Grabbing option 2 early on allows for higher Accuracy. Later on, pick up option 3 for Skill Speed, allowing you to charge it faster.
Passive Priorities
When it comes to the Passive skills, your main focus is going to be around Healing Enhancement and other Passives that increase your healing potential.
Leftover points can go into more offensive Passive Skills.
Healing Enhancement
Great for making your heals more impactful.
Warm Benediction
Immortal Veil
Radiant Benediction
Survival Willpower (Cleric)
Empyrean Lord's Grace
Earth's Grace
Feel free to use any additional points you may have afterward in any way you choose.
Recommended Stigmas
For the most optimal damage setup, the four stigmas you’ll want to choose are:
Absolution
Absolution is a top-tier healing Stigma. Removes debuffs and does an AoE heal to you and your party.
Getting it to Level 5 cuts the cooldown by 30 seconds, making it a great pocket heal for emergencies. Level 10 makes it so that it removes all debuffs, and at max level (20), it also provides a heal over time for a short duration.
Benevolence
Benevolence is the next big heal Stigma to grab. Grants a buff to yourself that restores health every 2 seconds to the caster and party members within 40m for the duration.
Getting it to Level 5 gives it an extra 10 seconds of duration, allowing for more over-time heals, and Level 10 also grants Stamina to you and your party. This is exceptionally helpful when a mechanic requires a lot of stamina.
Max level (20) also grants a debuff-cleansing effect every 5 seconds during the duration, so you're able to keep your party debuff-free for a decent amount of time with this Stigma.
Yustiel's Power
Yustiel's Power is another great Stigma for this, as it increases Damage Tolerance for both PvE and PvP by a percentage for a set duration to you and your party. Level 5 grants a Max HP Percentage Shield to you and your party on cast as well, making it great for absorbing damage.
Later levels add other stats like Block and Evasion, a percentage Status Resist buff, and at max level, increase the Damage Tolerance buff.
Fourth Stigma
The fourth Stigma slot for this Cleric build can be flexed depending on the party's needs.
The typical choice for your fourth Stigma would be Light of Protection; however, depending on your team comp, you may need to switch it off for something else.
For example, if you are running content with a Chanter, their buff Undefeated Mantra will override your Light of Protection buff if the Chanter's buff is higher, so instead of wasting a Stigma slot on a buff that's not being used, pick up Summon Resurrection or Power Burst for help with Stagger mechanics.
This build will focus on having Light of Protection for the fourth Stigma slot.
Light of Protection
Light of Protection is a buff that provides Damage Boost and Damage Tolerance to you and your party.
Higher levels also add Accuracy and Max HP to the buff, as well as an incoming Heal buff.
Cleric Combat Rotation
The Full Heal Cleric’s rotation revolves around maintaining debuffs on the enemy, executing your Condemnation combo, and keeping your team healed and buffed, so you can keep them alive even in the most dire situations.
Damage Rotation
A basic example of your rotation should be as follows:
If it is not active (and is one of your selected Stigmas), ensure that your Light of Protection buff is active.
Apply Light of Regeneration to heal your party.
Apply Debilitating Mark
Apply Chain of Torment
Then, once you’ve applied Chain of Torment, you should be able to cast Condemnation while Chain of Torment is active.
Debilitating Mark and Divine Aura should be maintained throughout combat, so reapply them whenever possible.
Use Earth's Retribution and Judgment Thunder when other skills are on cooldown.
Healing Rotation
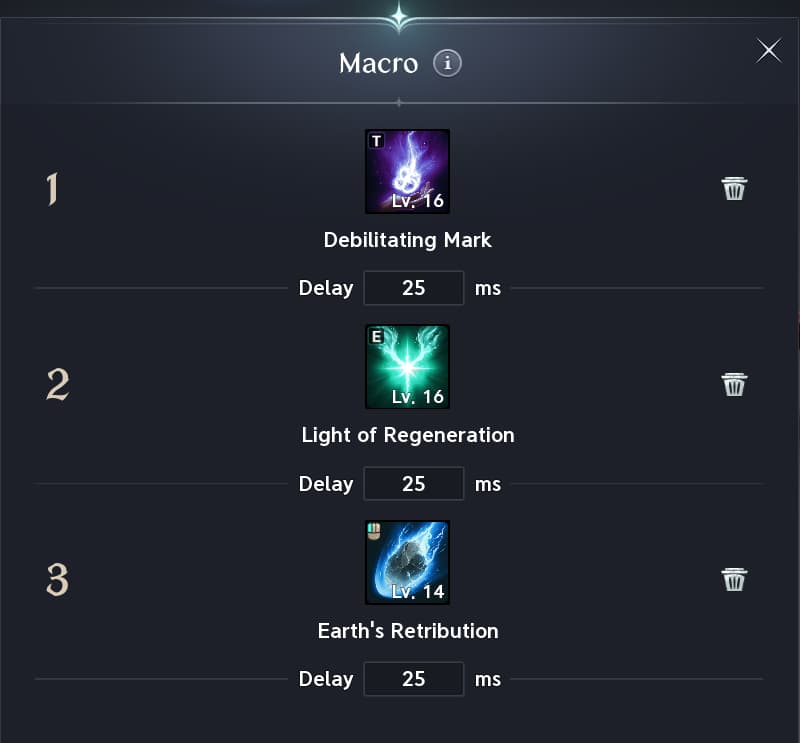
Instead of worrying more about a rotation for your healing upkeep, pay attention to your team’s health pools while you are in any team fight. The macro already includes Light of Regeneration, so it should be upkept throughout any combat encounter.
Make sure to keep Absolutionavailable for a large burst heal and cleanse, or to react to a heavy damage mechanic during a boss fight.
Benevolence is also handy for keeping your party healthy with its heal over time.
Otherwise, you should be able to upkeep other healing with Healing Light and Radiant Recovery.
The key principle is simple: do not spend every defensive cooldown immediately. Keep major protection skills available for mechanics that can threaten the entire party.
In-Game Macro Setup
The in-game macro system is a simpler way to handle much of the rotation, so you don’t have to worry about the bulk of the setup.
Check both your macro and quick-slot assignments when setting it up. Your damage skills, buffs, and conditional attacks still need the correct bindings; assigning a macro key alone does not configure the full rotation. Test the setup on a training dummy before taking it into a dungeon. Watch to ensure your attacks activate correctly and your debuffs are applied as intended.
For targeting, boss orientation indicators, and other useful control options, check our Aion 2 settings guide.
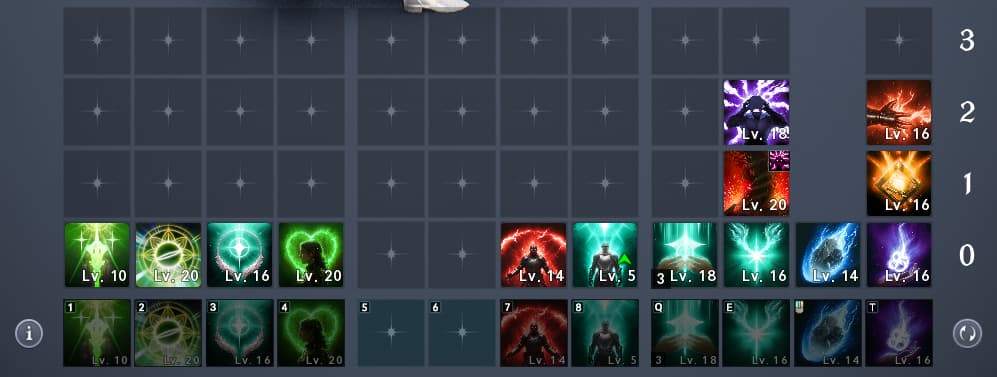
The macro relies more on your quick-slot assignments and key-bindings than it does on a specific rotation of skills to cycle through. Below is one example of how you will want to configure your key-bindings to allow an optimal casting order.
Set your macro key to your right-click and set up your Skills on that hotkey in the order of:
0 - Debilitating Mark
1 - Divine Aura
2 - Judgment Thunder
On your (typical) E hotkey, you'll want to set your skills in this order:
0 - Light of Regeneration
1 - Condemnation
2 - Chain of Torment
This setup with your macro allows a few things: It allows your buff, Light of Regeneration to always be applied when able, and it keeps your debuffs, Debilitating Mark and Chain of Torment applied to the enemies whenever possible. It also allows for Condemnation to be cast whenever it is triggered.
Adding Earth's Retribution to the macro allows for your auto-attacks to be woven in, allowing you to keep your Mana levels healthy.
There are some builds that run Condemnation "above" Light of Regeneration in the hotkey order, but that is solely up to whatever playstyle suits you best. However, in this full heal build, it is recommended to keep Light of Regeneration first, as it applies a heal-over-time effect for you and your team, keeping you healthier without having to micromanage it.
Daevanion Board Priorities
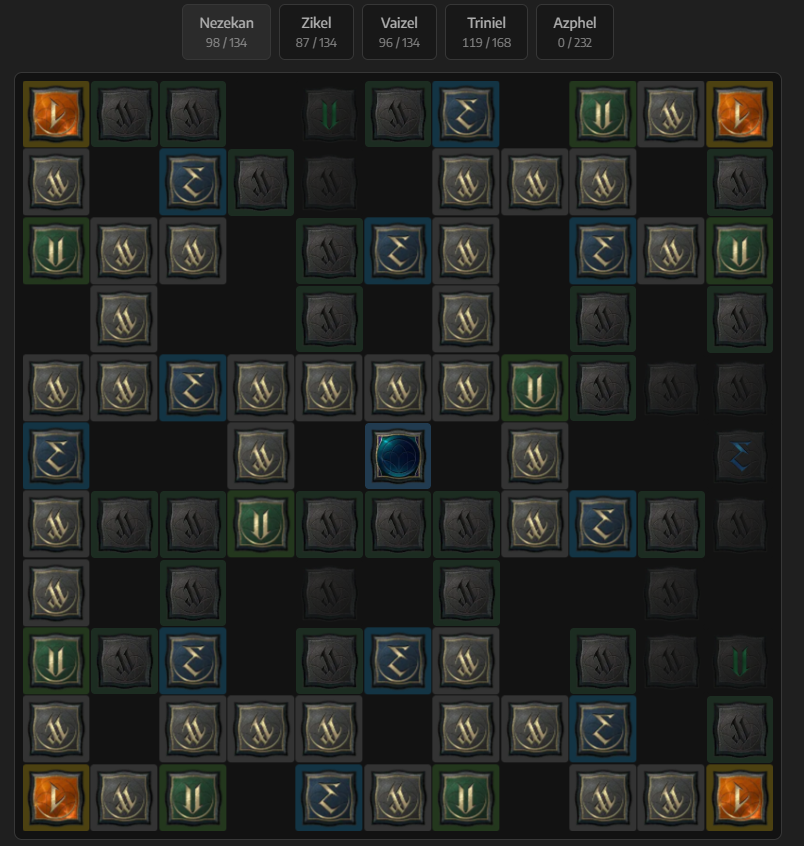
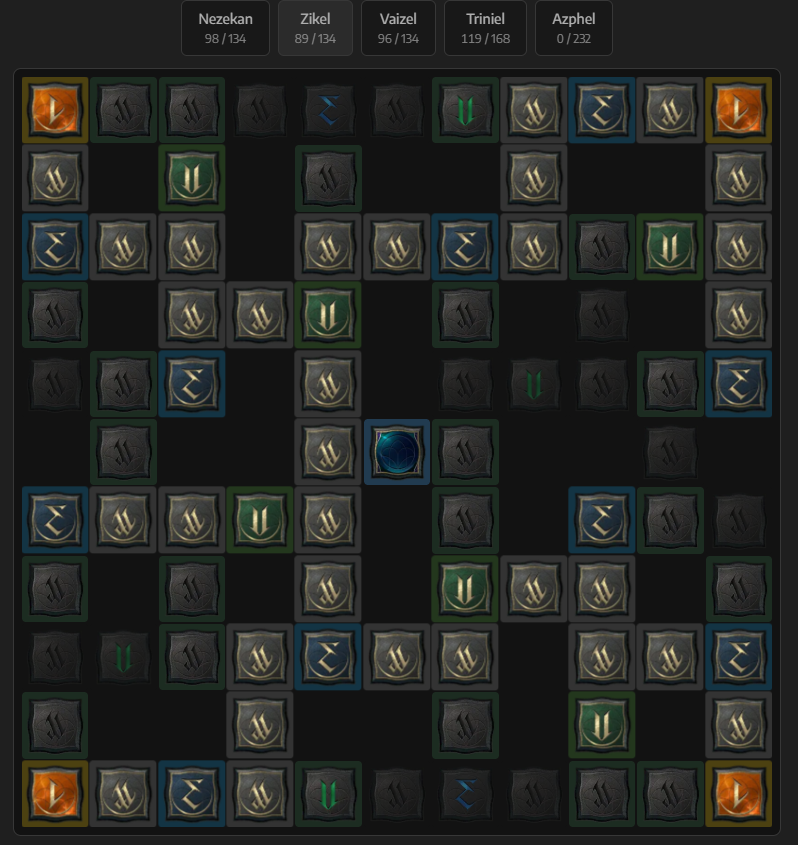
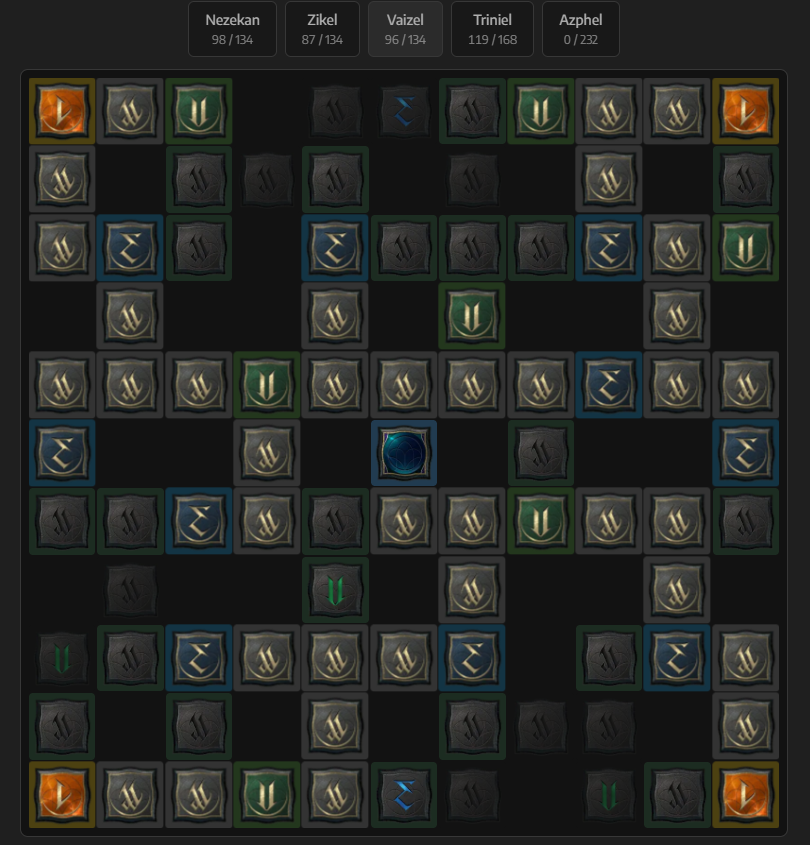
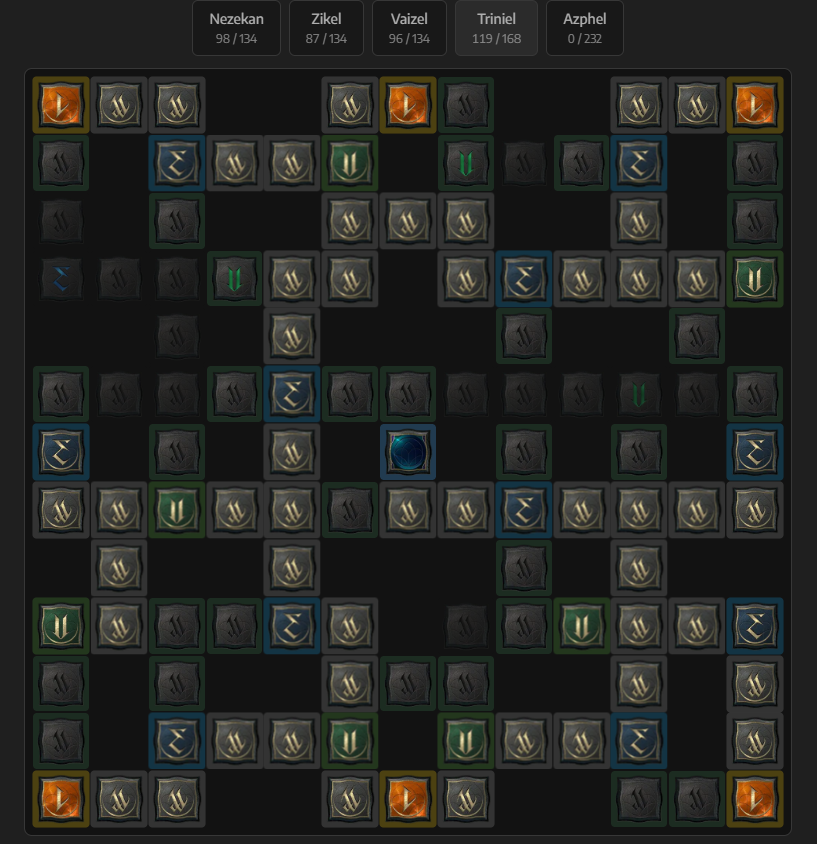
For your Daevanion Board, start with nodes that improve Light of Regeneration and Radiant Recovery. Once you’ve acquired the important nodes and begin needing to fill out your board, you can use these examples for paths to follow:
Keep in mind, the Daevanion Boards are NOT designed to eventually be entirely filled out.
Nezekan Example
Zikel Example
Vaizel Example
Triniel Example
Build Recommendations
Wings & Titles
Wings
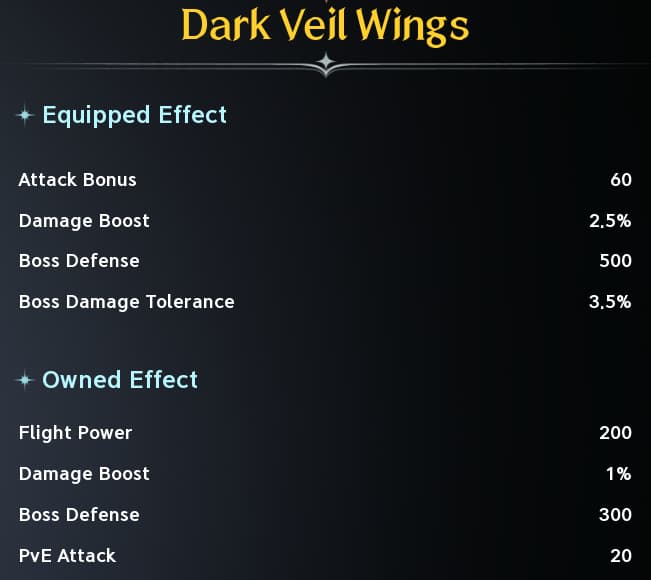
Dark Veil Wings are your best "early" option. Nightmare Wings and Forest Spirit Wings are also good alternatives if you are unable to acquire Dark Veil.
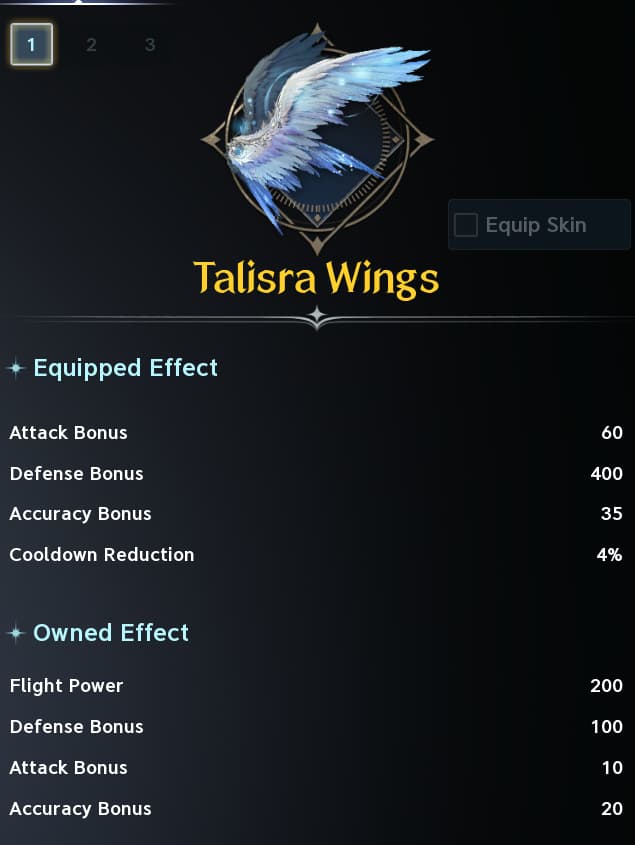
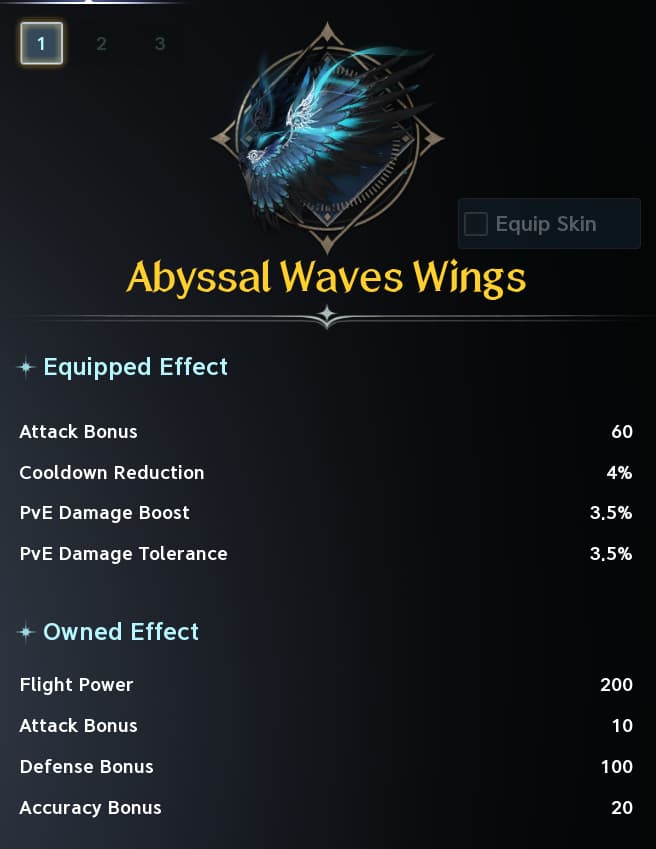
The ideal set of Wings you'll want for late game is either Talisra Wings or Abyssal Waves Wings.
Titles
Recommended Offensive Titles
Golden Glow
Unbound by Genus
RecommendedDefensive Titles
Rule All Creation or Saint of Verteron/Altgard
Best for early game until able to acquire the later titles.
Dominator of Dimensions
Hero's Footsteps
Recommended Other Titles
Through Hell and Back
Good pick for early on.
Empty Closet
Pantheon Stats
Focus on stats that raise your Cooldowns, HP and MP.
Good due to this build being fairly Mana intensive, plus extra protection.
Arcana, Genus Insight & Pets
Arcana
For your Arcana cards, you will want to follow the default of 4 Vigor Cards + Bell of Magic, as your healing scales with your Attack damage; however, you can opt for at least 2 Magic Cards if you find your team is giving you heavy Mana pressure.
Focus your cards on Healing Light and Light of Regeneration for group PvE. For solo play, target Condemnation and Earth's Retribution.
For more information on Arcana, check out our Arcana Guide.
Genus Insight & Pets
Early on, farm for pets in the Cogni tree. Cogni pets boost your Might, HP and Critical Hit; all 3 stats that are useful for a Cleric.
Natura is a good alternative, as it gives you a bit more survivability with Stamina, Critical Hit Resist and Precision.


 Cleric Full Heal PvE Build focuses less on DPS and more on keeping your team alive in group PvE content.