 League of Legends
 Teamfight Tactics
 Valorant
 Lost Ark
 Destiny 2
 Diablo 4
 Download APP
 Collapse
LoL Guide for Beginners (Everything You Need to Know)
Welcome to our absolute beginner’s guide for League of Legends, in this guide we’ll cover the fundamental basics of how LoL is played.
Whether you’re thinking about playing the game, just downloaded it, or still learning the ropes, this guide is for you!
We thought it was a good time to release this guide since a lot of people are downloading League for the first time to play TFT and may eventually want to try it out.
Chapters
- What is League of Legends?
- LoL Champion Basics
- The Five LoL Roles
- What is a Team Comp?
- Fog of War and Vision Control
- The River, Jungle, and Camps
- The Three Phases and Scaling
- How to Get Better at LoL
- Additional Beginner Resources
1. What is League of Legends?
League of Legends is a multiplayer online battle arena, also known as a MOBA. It’s been one of the most popular games of all time and currently one of the biggest esports.
In a standard game of League, ten players are split into two teams of five and battle it out on a map called Summoner’s Rift.
Each of these players controls a single character, known as a champion.
What is a champion?
All ten players in a League of Legends match controls a single champion.
There are currently over 140 champions with new ones being continuously added over time.
Every champion has special abilities and powers with unique playstyles.
Before a game begins at champ select, each team takes turns selecting champions.
There’s a lot of strategies involved as you work with your team to create teams with champions that work well together (more on this later).
Every game you play can be vastly different since every champion has their own feel and gameplan.
How do you win?
The ultimate goal of LoL is to destroy the other team’s base, but it’s not easy.
Your enemies will do everything they can to kill you and destroy your base.
Each base has a series of turrets and waves of minions that constantly spawn.
If you started a game and tried to run straight to the enemy base, you’d certainly die, not just because the enemy team would be trying to stop you at all costs, but also because you may be too weak and die.
League is sort of like a role-playing game (RPG) that takes place in a very short amount of time.
You begin at level 1 and gradually get stronger throughout the game by gaining experience and earning gold to buy items.
The two teams continually grow in power and collide. Eventually, one team is able to get the upper hand and make a final push for a victory.
What is Summoner’s Rift?
This is the standard map that the professionals play on and it’s where you’d be if you were trying to climb the ranked ladder.
There are other maps in League, but for now, we’ll focus on Summoner’s Rift since it’s where you’ll likely be spending most of your time.

Here are the basics of the Summoner’s Rift map:
There are two teams of five players: the blue team (base at bottom left corner) and the red team (base at the top right corner).
To achieve victory, one team has to destroy the opposing team’s Nexus (basically the core of their base).
During a match, minions will continually spawn from each base’s Nexus and proceed through the three lanes (the paths are shown in the graphic above).
The three lanes are known as top lane, mid lane, and bot lane. In all three lanes, there are turrets which will attack enemy champions and minions. Summoners must destroy all turrets in at least one lane and then destroy the last two towers that protect a Nexus before being able to attack and destroy it.
Turrets and Inhibitors
Destroying turrets and other structures called inhibitors rewards players with gold and allows the minion waves to push through the lane (since there aren’t any turrets to stop them).
Inhibitors are structures that are behind the initial turrets inside a base. If an inhibitor is destroyed, upgraded minions, called Super Minions, will spawn until an inhibitor respawns after a few minutes. A team can often use the Super Minions to successfully siege a base that was previously difficult to attack and create an opportunity to push to victory.
The Fountain and Shop
At the beginning of each game, you’ll begin at your fountain. You’ll revisit your fountain because it’s where you’ll respawn when you die and it’s where your shop is located. You can return to your fountain at any time during a game to heal or purchase items. All you have to do is use the Recall ability which every summoner has access to – just be careful and use it safely because you can be interrupted while casting it.
Income and Items
As we mentioned earlier, killing a minion, structure, or enemy champion grants players gold which can be used to purchase items at the fountain’s shop.
The ultimate purpose of gold is to give players to have flexibility in their stat growth and play styles. Whether you want more damage, survivability, or utility, there are a wide variety of items to fit your needs.
We recommend checking out our LoL item guides series if you want to learn more about what different items do and when to build them.
2. LoL Champion Basics
Now that we understand the basics of the map, let’s get back to talking about champions. Champions are the heart and soul of League of Legends as they’re often what players resonate with most.
While Summoner’s Rift stays constant, the different combinations of champions that are chosen by the ten players in game can create vastly different rhythms and feels.
Right now there are currently over 140 champions, each of them representing a different playstyle and experience. Some are simple and easy to play while others may take a hundred games to master. Whether you like dealing damage from afar, brawling at close quarters, or helping your team with utility, there’s a champion for you.
In the next few sections, we’ll discuss different aspects of champions, such as their abilities, stats, and scaling.
Auto-attacks and Abilities
Every champion has auto-attacks and abilities at their disposal. Auto-attacks, also known as “basic attacks” occur when a player right clicks on a target. Doing so will cause a champion to continually attack a target until it dies.
Abilities are cast using Q, W, E, and R. Every champion has abilities that are unique to them for each of these buttons. Here’s Ashe’s W, Volley, in action below:

All champions also have access to two abilities, using D and F, called Summoner Spells. These are up to a player’s personal preference, we’ll discuss these later on.
Lastly, champions can also cast abilities from items such as Redemption and Tiamat, using the number keys, 1-7.
Champion Stats
A major aspect that sets champions apart is the distribution of their stats. Stats represent a champion’s make up as far as how hard they are to kill, how much damage they do, and how fast they move or attack.

From left to right: attack damage, ability power, armor, magic resist, attack speed, ability haste, critical strike chance, movement speed.
For the purpose’s of this beginner guide, we won’t be getting too technical about stats. Here are the basics:
Health (indicated by a green bar)
- Health represents the amount of damage you can take before dying and being sent to your fountain.
Ability Resources: Mana, Energy, and others
- Abilities cost resources in order to cast them, most champions use mana, energy, or fury.
- The majority of champions, such as Lux and Vel’Koz, use mana.
- Mana is indicated by a blue bar below the health bar and regenerates over time.
- Champions such as Akali and Kennen use energy.
- Energy is indicated by a yellow bar and also regenerates over time but at a much faster rate. These champions often have ways to get energy back as well, such as by auto-attacking.
- The tradeoff is that unlike mana, you cannot increase the amount of energy you have through buying items.
- Other champions use other sources, such as their health, fury, rage, or courage.
- Using health is straightforward, your champion basically takes damage in order to cast their spell.
- Fury, rage, and courage, are dependent on their champions. Be sure to check them out for more details.
Attack Damage (AD)
- Attack damage, also known as physical damage, represents the damage dealt by basic auto-attacks.
- Depending on a champion, AD can also empower abilities.
- Numbers from abilities and items that refer to attack damage are displayed as orange.
Ability Power (AP)
- Ability power primarily makes your abilities (QWER) more powerful, however, AP can also strengthen some items and runes.
- Numbers from abilities and items that refer to ability power are displayed as green.
Armor
- Armor is a defensive stat that mitigates physical damage. Building it will help you survive against champions with a lot of attack damage.
Magic Resist (MR)
- You probably guessed it, but magic resist is the counterpart to armor that mitigates damage from ability power.
Attack Speed (AS)
- Attack speed represents how fast your champion auto-attacks. In general, this is a good combination with attack damage if you’re looking to increase your physical damage output.
Ability Haste
- Abilities have “cooldowns” representing how long it will be before you can cast it again. Items that give you ability haste allow you to cast abilities more often.
Critical Strike Chance
- This stat represents your chance of landing a critical strike – critical strikes cause your auto-attacks to deal double its damage.
- For example, if you have 50% crit chance, your attacks will likely crit 50% of the time. If you have 100% crit chance, they will crit every time.
Movement Speed (MS)
- Movement speed represents how fast your champion moves around the map. This can be increased with abilities and items such as boots.
Experience and Leveling up a Champion
In League of Legends, every champion starts at level 1 and continues to level up until the max of level 18.
Champions gain experience by farming minions and jungle camps or killing (or assisting in killing) champions.
Note that killing jungle camps or monsters will only provide experience for the player who landed the killing blow.
Destroying turrets and inhibitors grants experience to a whole team globally.

Even at this range, Aurelion Sol will get experience when the minion dies.
You can also gain experience by being within range of enemy minions or enemy champions dying. This radius is about equal to around 3x a champion’s auto-attack (exactly 1600 range).
Gaining levels and experiences allows champions to grow in power. While buying items allow champions to have freedom in choosing which stats to gain, gaining levels activates predetermined increases to a champion’s stats.
For example, at level 1, Ashe will have around 539 base hp. At level 18, she’ll have 1984. This growth applies to health, health regen, mana, mana regen, attack damage, attack speed, armor, and magic resist.
Leveling up also grants skill points which are used to increase the power of a champion’s QWER abilities.

The effect of skill points can be dependent on the champion and the ability itself. In the example above for Ashe’s W, Volley, increasing from ability level 1 to 2 will yield an increase of damage from 20 to 35 and a reduction in CDR from 15 to 12.5 seconds.
Summoner Spells
Beyond their QWER abilities, every summoner also must choose two summoner spells for their champion. Summoner spells act as two additional abilities with their own purposes and cooldowns.

They offer flexibility in helping you adapt at champ select and allow you to play toward your preferred playstyle. When you first start playing, you’ll gradually unlock them over time (check out the section at the bottom for more info). In this section, we’ll be going over what each one does and why you’d want to take it.
Heal (240 second cooldown)

- Heal instantly replenishes some of your health (based on your level) and increases your movement speed by 1%.
- It also heals one other ally. You can choose which one it targets by hovering them when you cast Heal. If you don’t specifically with your cursor it will automatically heal the ally closet to dying.
- This is most commonly seen at a bot lane by the ADC role or sometimes, the Support role. This is because it heals two allies at once, giving it more value there than compared to other roles.
Ghost (180 second cooldown)

- This summoner spell grants a large amount of increased movement speed (based on level) for 10 seconds and allows you to run through units (champions, monsters, minions).
- Ghost makes a great choice for champions that rely on chasing down their opponents or want to stay at a safe distance.
- It’s a lot less flexible than its counterpart, Flash, so you’ll often see it paired with Flash rather than replacing it.
Barrier (180 second cooldown)

- Barrier instantly grants you a shield (based on your level) that is great for mitigating burst damage.
- You’ll often see Barrier for the Mid lane role but it’s also taken by ADCs and Supports.
Exhaust (210 second cooldown)

- Exhaust slows a champion and reduces their damage output by 40% over 2.5 seconds.
- This is primarily used defensively but can be used as a crowd control option for chasing opponents.
Flash (300 second cooldown)

- Flash is by far the most popular summoner spell. It allows you to blink a short distance in any direction.
- This may sound very simple at first but the flexibility Flash offers let’s it be equally viable in offensive and defensive situations.
- You can use it to engage and surprise an enemy, or use it to escape over a wall or out of harm’s way.
Teleport (360 second cooldown)

- This summoner spell allows you to instantly teleport to an allied ward, minion, or tower.
- Be aware that this takes 4-seconds to channel and it can be interrupted by a stun or other forms of crowd control.
Smite (210 second cooldown)

- Smite allows you to instantly cast a high burst damage spell upon a minion, monster, or pet (a minion controlled by a champion’s abilities).
- This is a jungler’s core summoner spell and is required in order to play the role.
- Smiting objectives (see the objectives section) allows you to secure them more reliably to get the last-hit before your foes.
- It also helps clear jungle camps and offers increased damage or a slow based on the jungle item upgrade you purchase.
Cleanse (210 second cooldown)

- This summoner spell is sort of like a get out of jail free card as it removes all disables (except for being airborne from knockouts or being suppressed).
- It allows you to get out of an otherwise tight situation and also increases your tenacity, which means that it makes you temporarily resistant to additional incoming crowd control effects.
Ignite (180 second cooldown)

- Ignite is a spell that lasts over 5 seconds and inflicts burning damage.
- It can often help you secure a kill as an enemy is trying to escape if you’re able to land it in time.
- It also decreases the amount of healing a champion can receive so it’s useful against champions with healing effects.
- This also implies that it counters the Heal spell, just make sure to cast Ignite before the Heal goes off.
Runes
League of Legends is all about discovering the best way for you to play based on your personal preferences. On top of summoner spells, runes provide another way for you to tune your champion to either maximize their strengths or to help keep their weaknesses in check.

In this section, we’ll be covering the overarching themes of each of the five main rune trees and explaining how to equip rune pages.
The five rune trees are Precision, Domination, Sorcery, Resolve, and Inspiration.
Precision

- Focuses on empowering auto-attacks making it ideal for ranged carries like Ashe or a melee fighter like Tryndamere.
- Example: Press the Attack rewards you for continuously attacking the same target by increasing your overall damage output.
Domination

- Improves your ability to instantly burst or kill a target, it’s no surprise that you’ll often see assassins like Katarina or Talon take Domination.
- Example: Predator grants you a huge burst of movement speed to allow you to quickly chase down your prey.
Sorcery

- Sorcery augments your abilities but also provides a good amount of utility. It’s most commonly taken by mages and casters like Karma or Lux.
- Example: Summon Aery improves the punch of your spells and also increases the potency of supportive spells by shielding an ally you cast on.
Resolve

- If you’re looking to bolster your defensive capabilities, this is your rune. Beefy tanks and engagers like Nautilus and Leona love the Resolve tree.
- Example: Aftershock provides a burst of bonus armor and magic resist if you immobilize an enemy.
Inspiration

- Inspiration is all about breaking the rules with wacky powers and capabilities. It can be used by many different champions but is very situational.
- Example: Unsealed Spellbook allows you to switch your summoner spells to other ones, rewarding your ability to adapt and think ahead.

At summoner level 10, you’ll receive full access to customize your rune page. You can create a rune page in your client outside of game or during champ select. Either way, your created rune page will stay saved until you delete it for another one or change it.
When creating a rune page there are three main components:
- Primary tree
- Secondary tree
- Shards
Note that choosing runes can be tricky because you can only choose one rune per row, so make sure to keep that in mind.
The primary tree grants you access to a rune tree’s most powerful choices, known as a keystone. In total, you’ll get four rune choices from your primary tree so make sure they’re in line with what your champion excels at.
The secondary tree only provides you with two choices, you’ll want to use this to compliment your primary tree.
Lastly, you get three choices of shards. Shards provide a little bit of flexibility independent of the five trees. For example, you can choose between having additional raw damage, more attack speed, or shorter cooldowns.
Shards aren’t as powerful as your primary and secondary tree but can allow you to have more flexibility to cater to your playstyle or help prepare you against a bad matchup.

A suggested rune build from Ashe’s champion page.
Understanding optimal rune builds can be difficult, especially as a beginner. Be sure to try them all out and check out our champion pages where we curate and constantly update the best rune pages for every role.
3. The Five LoL Roles
In a standard game of League of Legends, each of the five players on a team is assigned to one of the five specific roles. The five roles are Top, Jungle, Mid, ADC, and Support.
Before a match, you have the opportunity to select a primary role which indicates the role you’d prefer to play, as well as a secondary role which represents a backup choice.
Since roles vary in popularity, keep in mind that you are not guaranteed to get either of your primary or secondary choices. You can also choose an option to “Fill” which means that you don’t mind playing any of the roles.

From left to right: Top, Jungle, Mid, ADC, Support, and at the bottom, Fill.
If you’re a brand new player, we suggest that you spend time playing a few games of each role to get a feel for where each one operates and what each one does. Eventually, you do want to settle on a “main” role because it can really help you improve faster and learn to specialize a particular skill set.
For more reasons on why you should pick a main role and some guidelines for understanding the expectations of the five roles, check out our infographic below:

Keep in mind that these were just guidelines regarding the five roles. The champions that are played within each role and the expectations for each often change over time as players experiment and optimize.
For example, in Season 8, many champions that would be normally found in mid lane became temporarily commonplace at the ADC role (this is a story for another time).
 Use these guidelines to get a solid foundation for what each role in the game’s current state (circa Season 9) to get you off your feet, but as you get better, don’t be afraid to try things out in a Normal match. If you find a new way to play a role that works well, put it to the test in a ranked match!
4. What is a team comp?
Since League of Legends is a 5 vs 5 team game, the combinations of champions that your team assembles at champ select can be incredibly important. Often times, you can greatly increase your chances of winning by synergizing the abilities and strengths of your choices.

An easy example to understand is an area-of-effect team (AoE) composition. This team combines five champions who have spells and abilities that can either deal damage to multiple champions or hold multiple champions in place with crowd control.
Every team comp tends to have a goal in mind, known as a win condition. The win condition of an AoE comp is to catch and kill multiple team members at once. If the AoE comp is able to do so, they will likely win a fight.
Another example of a team comp would be the skirmish comp. Skirmish team comps utilize champions that have high mobility and like to fight in messy fights from multiple angles.
A skirmish team comp would likely beat an AoE team comp because an AoE team comp would struggle to lock down multiple skirmishers at once if they play their cards right.
Since the AoE team comp relies on powerful spells that have long cooldowns, while skirmishers have attacks and abilities that are weaker but can be cast more often, the skirmish team comp can play around the abilities of the AoE team comp.
In the infographic below, we cover the strengths and weaknesses of the most common team compositions:

If you’re learning about the game as a new player, don’t worry too much about creating the perfect team comp at champ select. You’ll want to focus more on just playing your comfort champions and mastering them.
We just wanted to introduce you since it is something that will be mentioned often in game and in other places such as if you watch pro-play or streamers.
5. Fog of War and Vision Control

In League of Legends, you must make decisions with incomplete information. This is because you cannot see everything that is happening on the map due to something called the “fog of war”
The fog of war is shown on the minimap as a darkened area, as shown to the left. It conceals enemy movement and you want to be careful not to wander through it unless you have company or if you have a good understanding of where your opponents are.
Likewise, your team can use the fog of war to hide your movements and strike your enemies from the shadows.
You and all of your allied champions and structures provide vision for your whole team. If you can see it, so can your teammates.
Outside of these sources of vision, you also have the ability to create more vision using items called “wards”.
At the beginning of the match, every player in the game has access to a free item, called the Warding Totem, which is also known as the “yellow ward”.
Use the yellow ward to protect yourself by alerting your team of enemy movement. In the image below, the ward placed in the bush spots an enemy Vi that is moving around top lane.
If the ward was not there, you or your teammates who were near the top side of the map may have been blindsided and killed.
The vision control here allows your team the opportunity to retreat or set up a counter trap to kill the Vi.

These wards will last a limited amount of time and will eventually expire, so be sure to keep an eye on its time remaining.
You’ll know how much time is left on a ward by clicking on it or seeing the white bar (seen in the image above), which ticks down as time passed. If the time runs out, it’ll disappear.
Take note that the ward also has a green health bar comprised of three blocks. This is a good time to let you know that wards can be destroyed by the enemy team. Each block on the green bar represents an auto-attack hit, so it would take three hits to kill the Warding Totem.
There are different types of wards in League of Legends (we’ll cover them in this article). This type of ward stays invisible unless it is revealed by the enemy team by a Control Ward or Red Trinket.

Control wards take four hits to be destroyed but are visible to everyone. Within a certain radius, control wards block the vision of enemy wards and reveal where they are.
You can strategically use control wards to deny enemy vision from an important area on the map or to clear a ward that you know had been placed.
The other major method of clearing wards is the Oracle Lens, also known as the red trinket. The red trinket allows a player to walk around and expose enemy wards around them (shown in the image below).

Clearing enemy wards throughout a match is incredibly important as it denies their ability to track your teams movements and also allows you to find gaps in their defenses to attack.
It’s important that everyone contributes to this cause and it’s normal for every team to eventually have 1-2 red trinkets dedicated to seeking and destroying enemy wards.
The last type of ward is the Farsight Alteration, also known as the blue trinket. Blue trinket allows a player to place a ward at a much further distance, and it will remain there until it is destroyed.

The downside is that it is visible to the enemy team and dies in one hit – because of this, this is the most situational ward and is mostly only used by the most vulnerable member of your team or a champion that relies on very long range attacks.
It’s a common mistake for newer players to forget about fighting for vision control (even experienced players forget to prioritize it). Remember that the more information you have, the better decisions you’ll make. Make a conscious effort to do your part in placing wards and denying your enemies of vision and eventually it’ll be second nature.
6. The River, Jungle, and Camps
In between the lanes, you may notice the river that runs across the map as well as large sections of forest areas.
These areas are crucial because a lot of action occurs here as players move about to fight and contest monster camps and objectives.
Unlike minions which belong to a particular team, these monster camps are neutral and can be slain by any player.
Some camps are weak enough for one champion to clear on their own. This gives your team an additional source of income outside of the constant stream of minions.
Since these camps respawn over time, there’s a role in League of Legends completely dedicated to collecting these camps and moving throughout the jungle (check out jungler in the role section).
Several of these camps also provide additional utility and temporary upgrades called “buffs” It’s important for your team to secure these buffs to give you the edge over your opponents.

For example, killing the Blue Sentinel grants the Crest of Insight (also known as “blue buff”) which grants increased mana regeneration and ability haste (more on these champion stats later).
Slaying the Red Brambleback gives Crest of Cinders (also known as “red buff”) which grants increased health regen and causes your auto-attacks to slow your enemy and deal additional damage.
Jungle Plants
As you travel around the map through the river and jungle, you’ll notice interactive plants popping up. They don’t provide gold, experience, or buffs, but if you use them correctly, they can often save your life or help you facilitate a good fight.
The Blast Cone
The red plant you see in the jungle is the blast cone. Blast cones cause any champion within its radius to fly and land at a set distance.
In the picture below, you can see Rammus next to a cone and a red circle outline on the other side of the wall to his right.
 If Rammus or any other champion would auto-attack the blast cone, Rammus would trampoline and land on the red circled outline. Spells and abilities will not affect the blast cone.
The blast cone allows champions that could not otherwise jump over or through walls to do so, allowing for more efficient movement and creative angles for ambushing opponents.
A well-timed blast cone jump can often give you enough distance to escape from a pack of enemies chasing you.
However, do be careful of your auto-attack timing as you may accidentally blast yourself towards your pursuers or launch an ally into danger.
Scryer’s Bloom
Scryer’s Bloom grants you a short glimpse into darkness as it reveals enemy champions or enemy wards (items that grant vision).
In the image below, if Rammus auto-attacks Scryer’s Bloom, it will create a cone of cleared vision in the direction that Rammus is facing.
 Although it may not seem like much at first, don’t underestimate this plant’s ability to help you track down an enemy that would have otherwise escaped or allow you to reveal an assassin stalking you from the shadows.
Honeyfruit
The last type of plant you’ll see around the map is the Honeyfruit. These spawn along the river and grant health and mana if you pop the plant with an auto-attack and walk over its fruits.
In the picture below, Sona has auto-attacked the Honeyfruit and is replenishing her resources.
This grants an opportunity for her to return back to battle when she may have otherwise needed to return back to base.
 Now, it probably seems like a no-brainer to try to get Honeyfruits whenever they’re available but you’ll actually have to be careful when you do so.
As you walk over the fruits, each one will actually slow down your movespeed. If you’re being chased, you may want to consider skipping the fruit to maximize your chances of survival.
This also means that if a foe you’re hunting down runs close enough by the plant, you may be able to slow them down by hitting the Honeyfruit.
The Scuttle Crab
Along the rivers, you’ll see a neutral monster, called the Scuttle Crab that walks back and forth near the Dragon pit and Baron pit. Slaying the crab will grant vision in the river near the openings of each respective pit.
The Scuttle Crab is incredibly easy to kill because it doesn’t fight back but it can be hard to consistently take because it will be highly prioritized due to the free vision it provides. If you’re a jungler, be sure to prioritize this camp as a stop as you travel the map, and if you’re another role, be ready to help your jungler if the enemy team is looking to stop them.
Elemental Dragons
All League of Legends dragons spawn at the bot side dragon pit. The 6 elemental dragons, also known as elemental drakes, grant team-wide buffs to ALL players on the side that kills them.
Here are their names and their effect:
- Cloud Drake = increased movement speed when you aren’t fighting
- Infernal Drake= grants ability power and attack damage
- Mountain Drake = increases damage against objectives (turrets, Dragon, Baron)
- Ocean Drake= grants missing health and mana regen when you aren’t fighting
- Hextech Drake= empowers auto-attacks
- Chemtech Drake= extra attack speed

The drakes spawn at random and you can get the same element multiple times. Each effect stacks up to three times and becomes more powerful. For example, slaying one Cloud Drake will grant your team +15 bonus movement speed out of combat – if you’re able to get three, you’ll have a total of +45 bonus movement speed.
Getting an elemental dragon won’t help you win instantly but can make the game easier for you and your teammates overtime. They’re quite powerful in the early to mid game so they will often require multiple team members to slay, especially if the other team is looking to contest it.
The Elder Dragon
The Elder Dragon, also known as Elder Drake, spawns in the late game and is the most powerful dragon in the game. Slaying an Elder Drake grants a buff that multiplies the effects of all the elemental dragon buffs that your team currently has by 50%.
If you’re able to kill two Elder Dragons, all of your elemental buffs will be multiplied by 100%. It also grants additional damage to non-turret targets (such as champions and monsters).

This makes Elder Dragon one of the best late game monsters to help your team secure a victory in a close match, especially if you were successful in taking elemental dragons earlier in the game.
Rift Herald
The Rift Herald is a monster that resides in the Baron pit before Baron is slain or spawns near 20 minutes.
The Herald is quite tanky so you may need multiple members of your team to kill it. A crucial tip to remember is that it has a weak spot on it’s back that will inflict additional damage if you hit it.
 After a team kills the Herald, a purple item, called Eye of the Herald, will drop that one allied team member can pick up (it cannot be touched by the team that did not kill it). When picked up, the item will replace the player’s trinket slot and will remain there until it is used.
The effect of the Eye of the Herald is one of the most devastating in the game, so it’s not surprising that it only has one use. Activating the Eye will summon the Herald to fight for your team by attacking enemy structures until it dies. Here it is below:
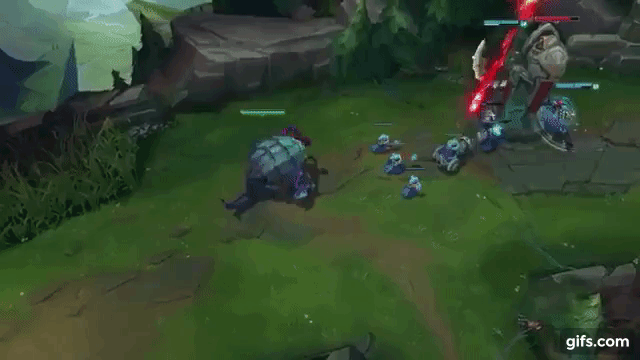
As you can see, the Rift Herald inflicts a massive amount of damage. It can often help you take the first turret in the game which can help swing an even game into your favor.
One last tip is that activating the Eye requires a short amount of channeling time – if the player using it is interrupted by a hard crowd control effect such as a stun, silence, or knockup., they will fail to summon the Rift.
So if you’re using it, be sure to do so safely away from combat. If you know the other team is looking to use it, try to keep vision on them and look to CC them while they’re channeling.
Baron Nashor
The last monster you’ll need to know about is the Baron Nashor, also known as just “Baron”. Baron is the most powerful monster in Summoner’s Rift so you’ll need multiple team members to slay it unless a match goes on for a very long time (eventually few or even one champion may be able to slay it on their own).

Since Baron is so strong, teams can often win by killing a team that’s low on health because they tried to take it at a bad time. It can often be the site of a “final battle” at the end of a close game as the winning team can use it to get a big enough lead to secure a victory.
So what does slaying Baron do exactly? It grants a buff, called Hand of Baron, that is given to all living members of the team that slayed the Baron. This means that if you died while fighting Baron or for Baron, you will not receive the buff if you are still dead when the final blow is made.

Hand of Baron temporarily grants AD and AP and strengthens minions that you are close to. This makes it much easier to push toward the enemy Nexus since it’s harder for the enemy team to kill the empowered minions and easier for your team to defend them.
If you do not outright win by pushing with Baron minions, the enemy base will likely be destroyed enough to make your future attempts much easier. So don’t be too greedy and overextend. If you can only get a few turrets and inhibitors, that’s still a good gain.
7. The Three Phases and Scaling
These concepts are leaning more towards being intermediate than beginner, but we want to quickly go over them since you’ll likely hear the terminology of the three phases: early game, mid game, and late game.
The phases aren’t set in stone and act more as guidelines as every game is different in its own way, but they tend to hold true to regarding how the majority of games turn out:
Early game (the first 15 minutes)
- This is when all the turrets are up and everyone is in their lane except for the junglers.
- Until the jungler arrives, top and mid will mostly be 1v1 and bot lane will mostly be 2v2.
Mid game (15 to 30 minutes)
- At around 15 minutes, or when the first turrets begin to be destroyed, the mid game begins.
- During the mid game, a match becomes messier than lane phase as some players will remain in lane while others will begin to roam around the map to help destroy other turrets or contest dragons or Rift Herald.
Late game (after 30 minutes)
- The mid game usually ends and around the 30 minute mark when all of the first turrets in the lanes are destroyed (sometimes even more are gone by then). This is the late game.
- At this point, champions have acquired many of their major items and teams begin to group for large teamfights around Baron and Elder Dragons.
So why are the three phases important? In League of Legends, every champion is designed to be good during a certain time period. Some champions are designed to be strong in the early game but fall off the longer the game goes while others are designed to be weak early but get continuously stronger as the game goes on.
When a champion is at their strongest, it is known as a “power spike”. The process of getting gradually stronger and achieving your power spike is known as “scaling”. We won’t get too into detail here but know that scaling is usually influenced by a champion’s ability kit and their stat ratios as they buy more items. Let’s cover a few examples.
Blitzcrank: Early game power spike

Blitzcrank is one of the scariest early game supports because of his signature move, Rocket Grab, which pulls an enemy toward him. One well-timed grab can pull a vulnerable target and turn a 2v2 into a very quick 1v2 death.
His whole kit revolves around making picks and gaining an early advantage for his team. As the game goes on, however, Blitzcrank’s grab loses power because it becomes harder for him to grab his ideal target.
Instead of worrying about weaving his grab through a minion wave, he has to worry about getting it through a frontline of tanks during teamfights. His ability is also outclassed by better engage options that can target multiple champions instead of just one.
Ahri: Mid game power spike

The mid game is all about quick rotations with messy skirmishers and unpredictable team fights. Ahri hits her power spike during this time because she is a mage that utilizes a high amount of mobility and lower cooldown abilities that can be cast often.
Mid game fights are often fought from different angles and uneven numbers (3v2’s, 2v4’s, etc) so being mobile and flexible has more value. She can use hit and run tactics and move around the map quickly to help her laners that are still trying to take their turret or her jungler who is contesting objectives.
She isn’t necessarily bad in the early game but will be outdamaged by champions that have less mobility and more punch, and she tends to fall off in the late game since she doesn’t have strong late game scaling compared to other champions.
Kog’Maw: Late game power spike

When the late game arrives, you’ll start to see large scale teamfights with high stakes. One false move can mean all five of your allies dying and a charge by the enemy team to destroy your base.
Kog’Maw is a champion who’s easy to kill when alone but able to deal an insane amount of damage when he’s protected (some team comps are even built around him). In the organized situations during the late game where you have multiple frontliners and a backline of damage dealers, Kog’Maw is at his best.
He hits his spike during the late game because he also has access to most or all of his items. During the early game he’s focused on farming and won’t do that much damage and in the mid game, he’s vulnerable during skirmishes since they often happen from multiple angles.
How to learn power spikes
You can learn power spikes over time by just playing but you can study them at any time by checking out our champion pages:

The bottom line is to look to fight when your champion is at their most powerful state and to be wary of enemies when they are about to hit their power
spike. Also, be aware of factors like farm and experience level – if it’s the late game but a Kog’Maw hasn’t farmed very well, they’re likely to be more at a yellow state than a green state.
8. How to get better at League of Legends
If you made it this far through the article, respect! You’re genuinely interested in learning LoL and becoming a better player. As you can tell, League is an incredibly deep game with a lot of information to take in and understand. To really improve, you’ll need to commit time to reach your goals.
To save you a lot of time, we have a ton of tools designed to make getting better and climbing more efficient and easier. Just click here to sign up for a Mobalytics account, it’s free!
In this section, we’ll go over some of our features and how they can help you improve as a League player.
The Gamer Performance Index (GPI)
In order to develop at a consistent rate, it’s crucial to understand your identity as a player. This includes being able to evaluate your strengths, weaknesses, and overall playstyle. After all, if you don’t have a clear picture of what you’re good at or bad at, you may be working on things that you don’t need to and ignoring gaps in your gameplay that you may not have perceived.
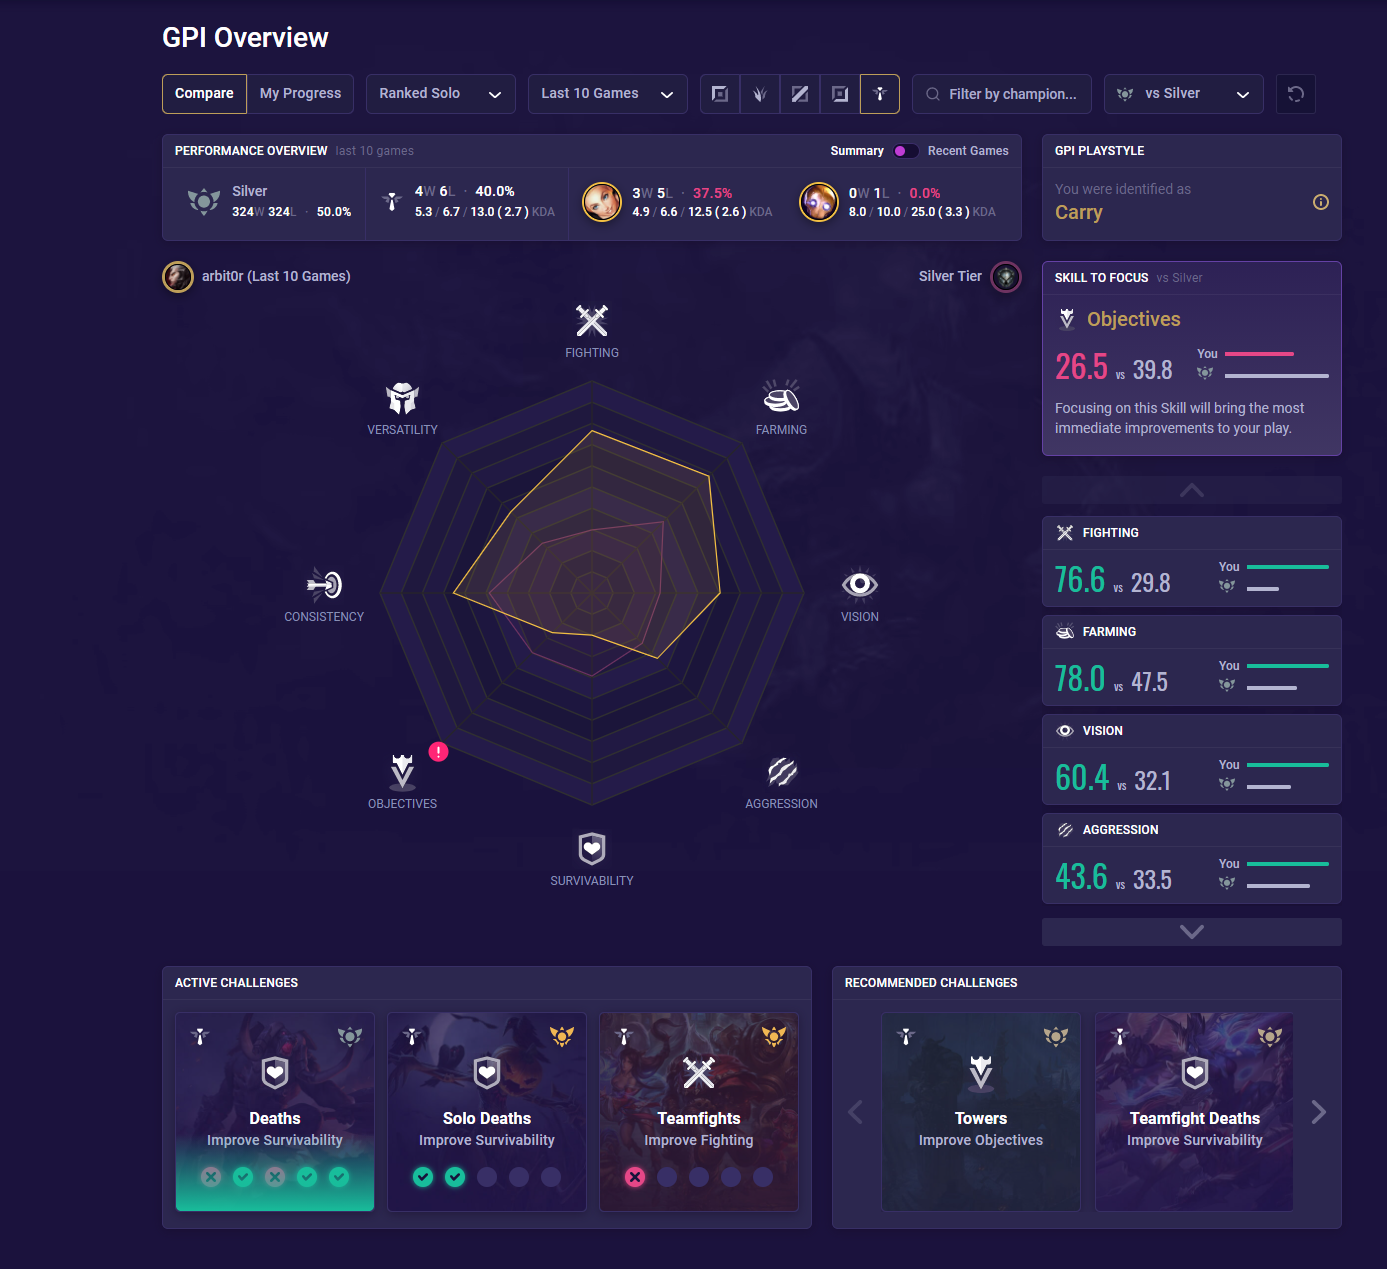 The GPI is designed for this specific function, illustrating your unique fingerprint as a player as a graph. We run all of your games and the stats from those games through our GPI system to define this graph.
Above, you can that the GPI is comprised of 8 main skills:
These 8 skills comprehensively cover all the essential performance areas that are critical to succeed in League of Legends. Based on your scores, the GPI will provide you with specific advice to help you improve your areas of weakness. Here’s an example:

You’ll see all types of advice: tips and tricks, infographics, videos, article links, the list goes on! Once you’ve mastered an area, you’ll be guided to another skill to focus. So what are you waiting for? let’s check out that GPI!
Live Companion
We created the GPI to help you understand who you are as a player and help you improve your individual skills. The GPI however, requires multiple games (usually around 5-10) to see trends in your performance. If you’re looking to prepare for your very next game, you’ll want to use our Live Companion tool.
On the left side, it has info on all the players in your match, such as their ranks, win rates, and information about their playstyle. On the right, you’ll get everything you need to know to about how to play your champion, such as runes, skill order, and items. You’ll also be able to see advice for playing against your lane matchup and advice for playing against all enemy champions.

It can seem like a lot of information but the truth is, we wanted to equip players with all the information they could ask for. In most cases, you’ll only need to brush up on a few things, such as advice for your lane matchup and scouting power spikes. Since every player is different and prepares in different ways, we decided to give you pretty much everything you need and then some.
Challenges
Another awesome feature for beginners is Challenges! This tool is designed to improve your skills by giving you in-game goals.
The in-game goals are based on your role, rank, and GPI scores. For example, if you’re need help with Farming, you’ll automatically be given Challenges to help you improve those scores.

Here’s a quick look at how they work. To complete a Challenge, you must succeed in completing the objectives in three of your next five games.
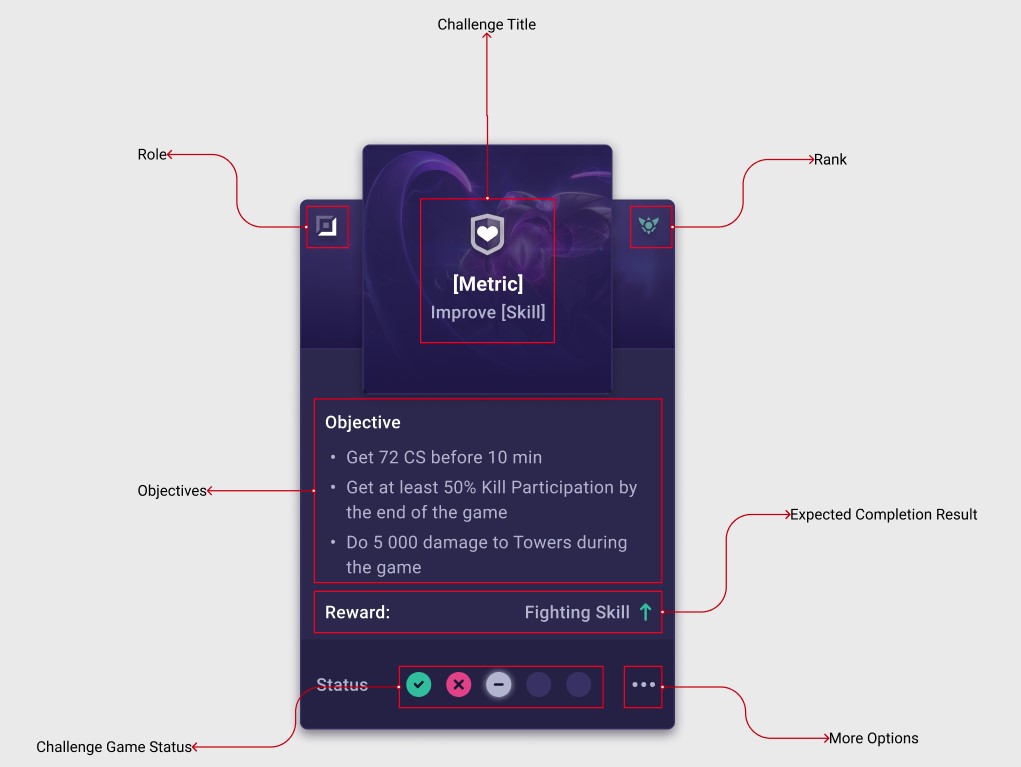
Once you succeed, you’ll be able to progress to the next stage of that skill’s Challenge difficulty. Overtime, you’ll be able to see your GPI graph grow and become more full!
9. Additional Beginner Resources
Recommended reading list:
- Terms That Every League of Legends Player Should Know
- LoL Item Guides
- 5 Reasons Why You’re Not Getting Better in League of Legends
- How to Recognize your Win Conditions
- How to Start Playing Ranked
- How to Peel
Level Progression (as of Season 11)
If you’re starting from level 1, here are the big things you’ll unlock on the way to level 30 (which is when you can play ranked).
Levels:
1. Reward – Summoner Icon Border (Profile)
- Unlocks
- Co-op vs AI (5v5)
- Heal and Ghost (Summoner Spells)
- New Player Free Rotation
2. Reward – 450 Blue Essence
- Unlocks
- Practice Tool
- Pick a champion
- Ahri
- Darius
- Lux
- Master
- Miss Fortune
3. Reward – 450 Blue Essence
- Unlocks
- Blind Pick 5v5
- ARAM (all random all mid) game mode
4. Reward – 450 Blue Essence
- Unlocks
- Exhaust and Barrier (Summoner Spells)
5. Reward – Poro Pal Emote and 450 Blue Essence
- Unlocks
- Hextech Crafting
6. Reward – 900 Blue Essence
- Unlocks
- Mark and Clarity (Summoner Spells specifically for ARAM)
7. Reward – 900 Blue Essence
- Unlocks
- Flash and Teleport (Summoner Spells)
8. Reward – Random Ward Skin Permanent and 900 Blue Essence
- Unlocks
- Default rune pages, excluding Keystone.
9. Reward – 900 Blue Essence
- Unlocks
- Smite, Ignite, and Cleanse (Summoner Spells)
10. Reward – New rune pages and 900 Blue Essence
- Unlocks
- 90% XP given for Co-op vs AI
- Custom rune pages
- 5v5 Normal Draft (if you have at least 20 playable champs, including free to play)
- Feature Game Modes
11. Reward – Random 1350 champion shard and 130 Blue Essence
- Unlocks
- Free Champion Rotation
12. Reward – 450 Blue Essence
13. Reward – 450 Blue Essence
14. Reward – 500 Blue Essence
15. Reward – Random 4800 champion shard
- Unlocks
- First Win of the Day Mission
16. Reward – 500 Blue Essence
17. Reward – 500 Blue Essence
18. Reward – Two random 1350 champion shards
19. Reward – 600 Blue Essence
20. Reward – Random Summoner icon permanent and random 4800 champion shard
- Unlocks
- 80% XO given for Co-op vs AI Bots, reduced further to 65% after 180 minutes of game time that day
21. Reward – Blue Essence
22. Reward – Random 3150 champion shard and 20 Blue Essence
23. Reward – 725 Blue Essence
24. Reward – 725 Blue Essence
25. Reward – Random Ward Skin permanent and Random 4800 champion shard
26. Reward – 725 Blue Essence
27. Reward – Random 3150 champion shard and random 450 champion shard
28. Reward – 725 Blue Essence
29. Reward – Random 3150 champion shard and random 450 champion shard
30. Reward – Glorious Champion Capsule and Summoner Icon Border
- Unlocks
- 75% XP given for Co-Op vs AI Bots reduced to 55% after 180 minutes of game time that day
- Ranked queues (5v5)
Thanks for reading and welcome to your journey as a growing League of Legends player! Join our Discord community to find other new players and mentors to learn from. See you on the Rift!
Recommended from Mobalytics

League of Legends Tier List Patch S25.13 Best League of Legends Champions to Climb with in Solo Queue
League of Legends 15.22 Patch Notes Breakdown
Subscribe to our newsletter:
Don’t miss out on all of the latest LoL content!