This Enshrouded Necromancer build combines summoned Hollow allies with ice spells and mobile wand attacks. Your summons help occupy enemies while you attack from a distance, group targets together and cover them with area damage.
The setup revolves around Eternal Hollow Wretch II, supported by Necromancer and a Gem of Greater Necromancy for additional allies from kills. An ice wand, Blizzard and Ice Bolt provide your own damage, while healing and mana recovery help you maintain pressure throughout longer encounters.
For help with your first base, crafting unlocks and early progression, start with our Enshrouded Beginner Guide.
The skill tree combines summoning, wand attacks, staff damage and Intelligence-based survivability. Take the connecting attribute nodes needed to reach each branch, then use the sections below to understand the role of the main skills.
Intelligence is a central investment. It supports your magic damage and several effects used throughout the build, including additional health from Life Essences and the shock damage produced by critical-hit skills.
Pick up Exalted for additional Intelligence based on your Flame level. Keep developing your Flame alongside your equipment to improve the value of this investment.
The complete setup requires points across several branches. If you are still developing your character, our Enshrouded Leveling Guide covers ways to continue progressing.
Summoning Skills
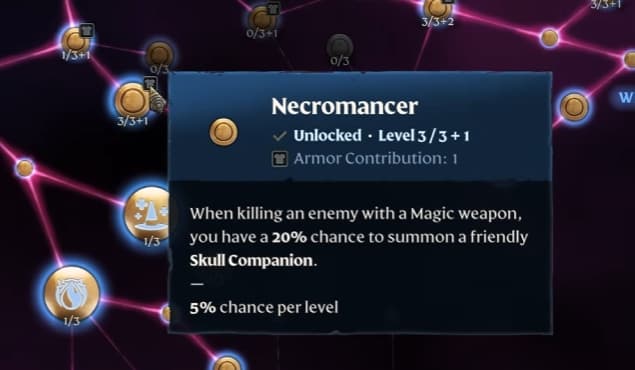
Necromancer gives kills with magic weapons a chance to summon a friendly Skull Companion. This adds allies as you clear enemies, helping your army grow during a fight.
Advanced Necromancy increases the maximum number of Hollow allies you can summon through spells. This is the key supporting skill for Eternal Hollow Wretch II, allowing you to establish several summons before relying on kills to generate more support.
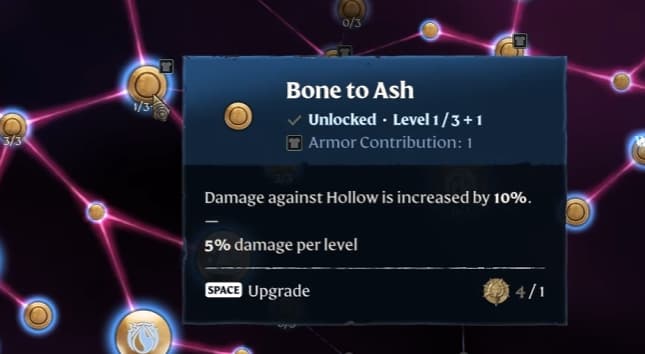
Take one rank of Bone to Ash along this route. It increases damage against Hollow enemies, and the recommended pants provide additional ranks.
These effects serve different purposes. Eternal Hollow Wretch II gives you a summon you can cast directly, while Necromancer adds companions after qualifying kills. Maintaining your spell summons gives you support at the start of an encounter.
Ice Damage and Critical Hits
Build your direct damage around Mage Apprentice, Iceman and Wizard. Mage Apprentice improves wand and staff damage, Iceman strengthens your ice damage, and Wizard increases critical strike chance with both magic weapon types.
Critical hits also activate several useful effects:
Blast and Cast strengthens a subsequent staff attack after a wand critical hit, rewarding you for alternating weapons.
Terror gives spell critical hits a chance to stun enemies.
Chain Hit adds shock damage against another nearby target.
Mass Destruction adds nearby shock damage from qualifying magic critical hits.
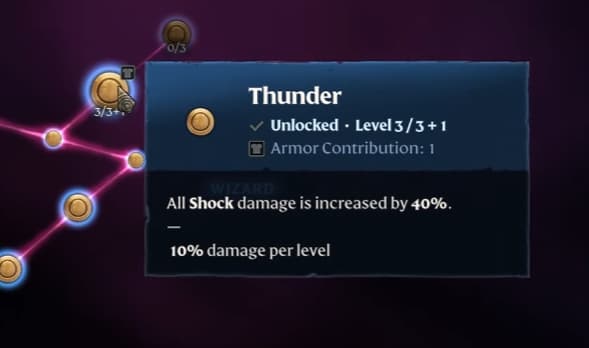
Take Thunder to strengthen the shock damage produced by Chain Hit and Mass Destruction. Although ice remains your main element, these skills give your critical hits another source of damage against groups.
Spellslinger improves staff damage, while Quick Charge reduces spell charge time. Together, they make your damaging staff casts more effective and easier to fit between enemy attacks.
The setup also includes one rank of Counterstrike, but it is a minor supporting investment rather than a main source of damage.
Wand Attacks and Mobility
Your wand provides regular damage between staff casts. Take Wand Mastery to strengthen its attacks, Sting to reward repeated hits and Arcane Proliferation for additional projectiles.
Wand Specialization unlocks your wand’s special ability. Build Focus through attacks, then use the grouping effect in this setup to bring enemies together before casting Blizzard.
Wand Evasion Attack lets you attack while evading, helping you maintain pressure as you reposition.
Aerial Wand Attack is another important part of the setup. With a wand equipped, hold the attack input during a jump to release an explosive projectile. An ice wand makes this another source of ice area damage. The attack costs mana, so account for it when managing your casting resources.
For movement, take Double Jump and Updraft, then add Blink, Blink Attack and Emergency Blink.
Blink helps you create distance, while Emergency Blink lets you escape a stun. It does not prevent the initial stun, so react quickly when you need to get away.
Mana Recovery and Healing
Summoning and staff casting can consume mana quickly. This build combines several recovery effects so you can return to your wand between more expensive casts.
Start with one rank of Mana Currents. Additional investment is an option if mana remains a problem and you have spare points.
Take Blood Magic to restore mana at the cost of health when its low-mana condition triggers. This helps you continue casting, but makes the build’s healing important.
Unity provides a chance to recover mana through damaging wand hits. The recommended Stellar Wand also offers Mana Leech, giving you another reason to keep attacking while your resources recover.
Bloodletting gives spell critical hits a chance to create resource orbs. Collect these when it is safe to recover health, mana or stamina.
For healing, max Healer and take Water Aura with Waters of Life. Add Life Burst for recovery from magic-weapon kills and Life Essences for additional maximum health based on Intelligence.
The setup also takes one rank of Eternal Spark for wand durability support and includes Arcane Deflection, which restores mana after a successful parry. Parrying is a secondary recovery option here, since much of your defense comes from movement and distance.
Defensive Skills
Take one rank of Frost to slow an enemy that hits you with a melee attack. This helps you create space after being caught, but does not completely freeze the attacker.
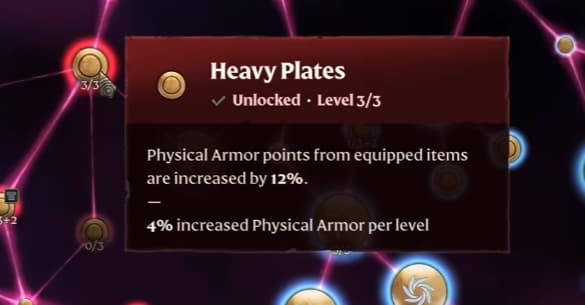
The defensive branch includes a Constitution investment, three ranks of Heavy Plates and three ranks of Shiny Plates. These improve the protection provided by your equipment, with the recommended pants adding further ranks to Shiny Plates.
Take Tower and Warden for additional physical and magical resistance when at least three enemies are nearby. Their conditions make them particularly useful against groups.
Earth Aura is an optional addition if you want more protection and have enough points to reach it.
Continue avoiding attacks even with these defenses. Your summons can occupy enemies, but you still need to respond to anything that reaches you or attacks from range.
Necromancer Weapons and Gem
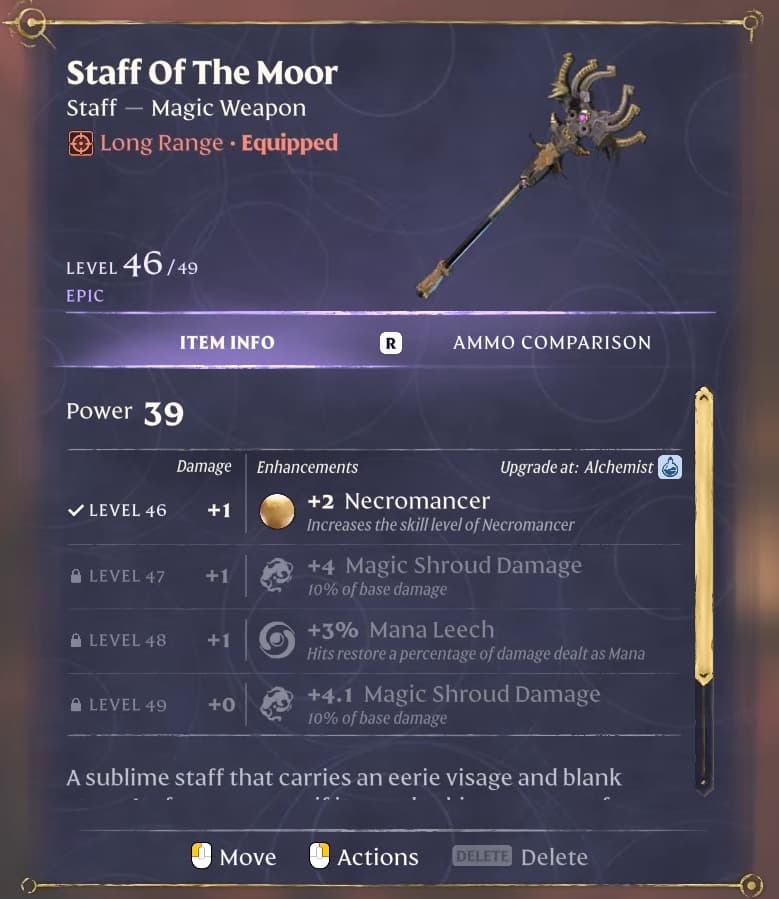
Staff of the Moor
Use Staff of the Moor for its bonus ranks in Necromancer. These support the summon-on-kill portion of the build when you use the staff.
The Necromancer bonus is the main reason for choosing this weapon. If you find an alternative with comparable support for your summoning setup, compare its unlocked bonuses before switching.
Stellar Wand
Stellar Wand provides ice damage, critical strike chance and Mana Leech, matching the build’s damage and recovery needs.
Use it for regular attacks, evasion attacks and aerial attacks while your summons occupy enemies. Its ice damage benefits from your investment in Iceman.
Another suitable ice wand can work while you obtain the recommended weapon. Compare its damage, critical bonuses and resource recovery.
Gem of Greater Necromancy
Socket a Gem of Greater Necromancy into your wand for a chance to summon an allied Hollow Reaper after a kill.
The Reaper adds another frontline ally alongside your other summons. This gem supports one active Reaper at a time; triggering another replaces the existing one.
Check your gem’s tooltip for its current activation chance and summon level.
Necromancer Spells
Eternal Hollow Wretch II
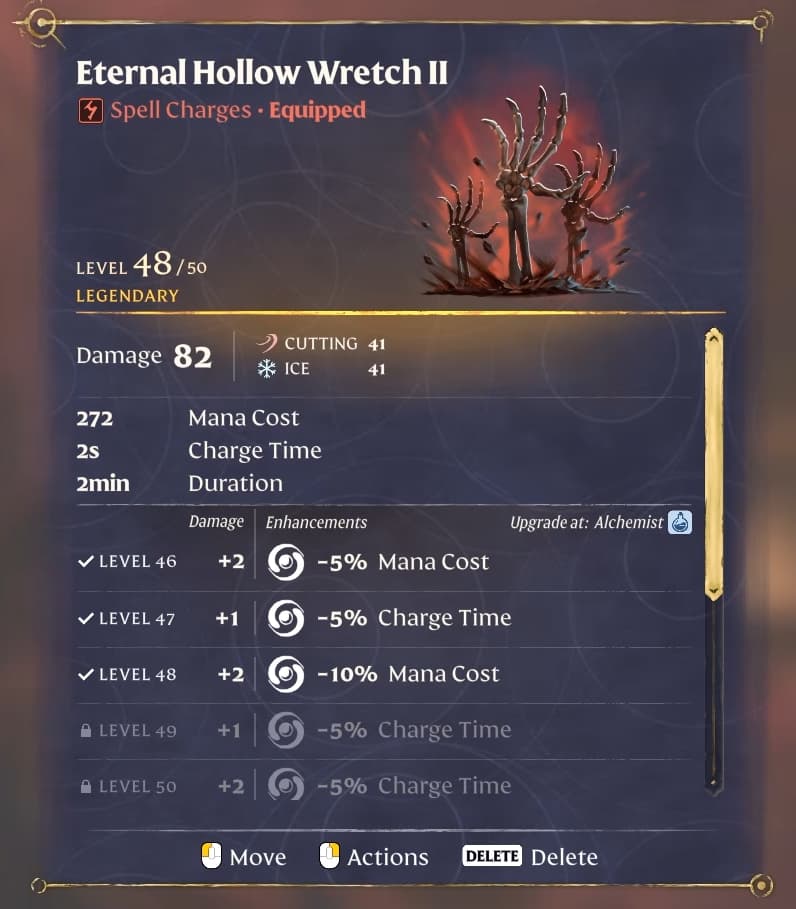
Eternal Hollow Wretch II is the build’s main summoning spell. Cast it before engaging enemies to establish your frontline, then replace summons as needed during the fight.
As an Eternal spell, it does not consume spell charges, but each cast still requires mana. Its upgrade bonuses can reduce mana cost and charge time.
Craft it through the Collector using:
100 Ectoplasm Aggregate
3 Icy Giant Bones
2 Diamond Dust
2 Archaic Core
The recipe requires the Collector and unlocks after obtaining an Archaic Core.
The material route takes you through later-game content. Gather the relevant ectoplasm from the Veilwater Basin Hollow Halls, bring Icy Giant Bones from your Albaneve Summits progression, process Diamonds into Diamond Dust at the Mill, and obtain Archaic Cores in Cinder’s Cradle.
Blizzard
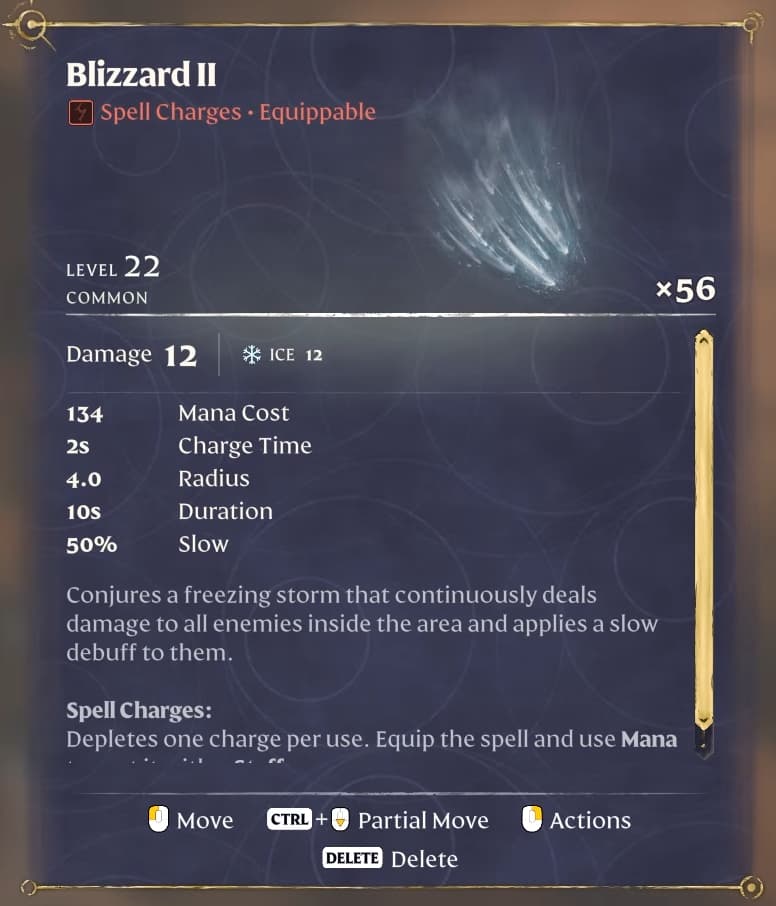
Blizzard provides area damage and slowing effects. Use it where several enemies are gathered so you can damage the group while your summons keep them occupied.
It works particularly well after using your wand’s grouping ability. Bringing enemies together makes it easier to cover them with the same spell.
Ice Bolt
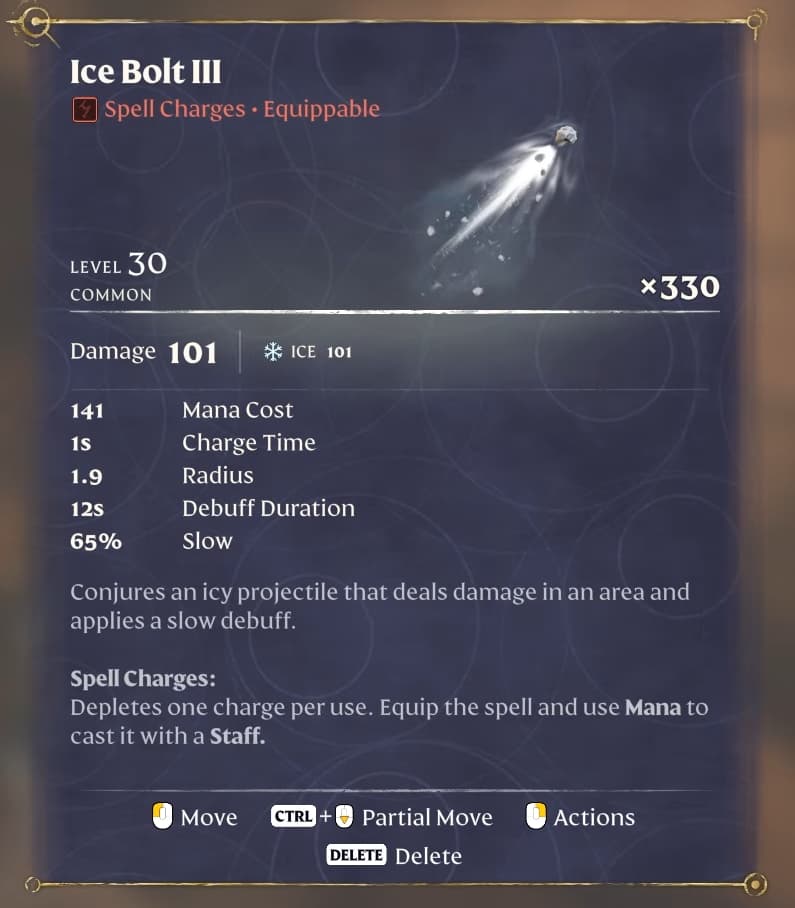
Ice Bolt gives you a direct projectile spell for attacking from range and finishing enemies outside your main area effects.
Ice spells make the most straightforward use of this setup’s Iceman investment. A shock spell is a possible adjustment if you want another damage option, but the core spell selection remains focused on ice and summoning.
Necromancer Armor
Choose armor for its useful skill bonuses alongside health, mana and protection. Check the rarity and unlocked upgrades on each piece, as copies of the same item may not provide every bonus immediately.
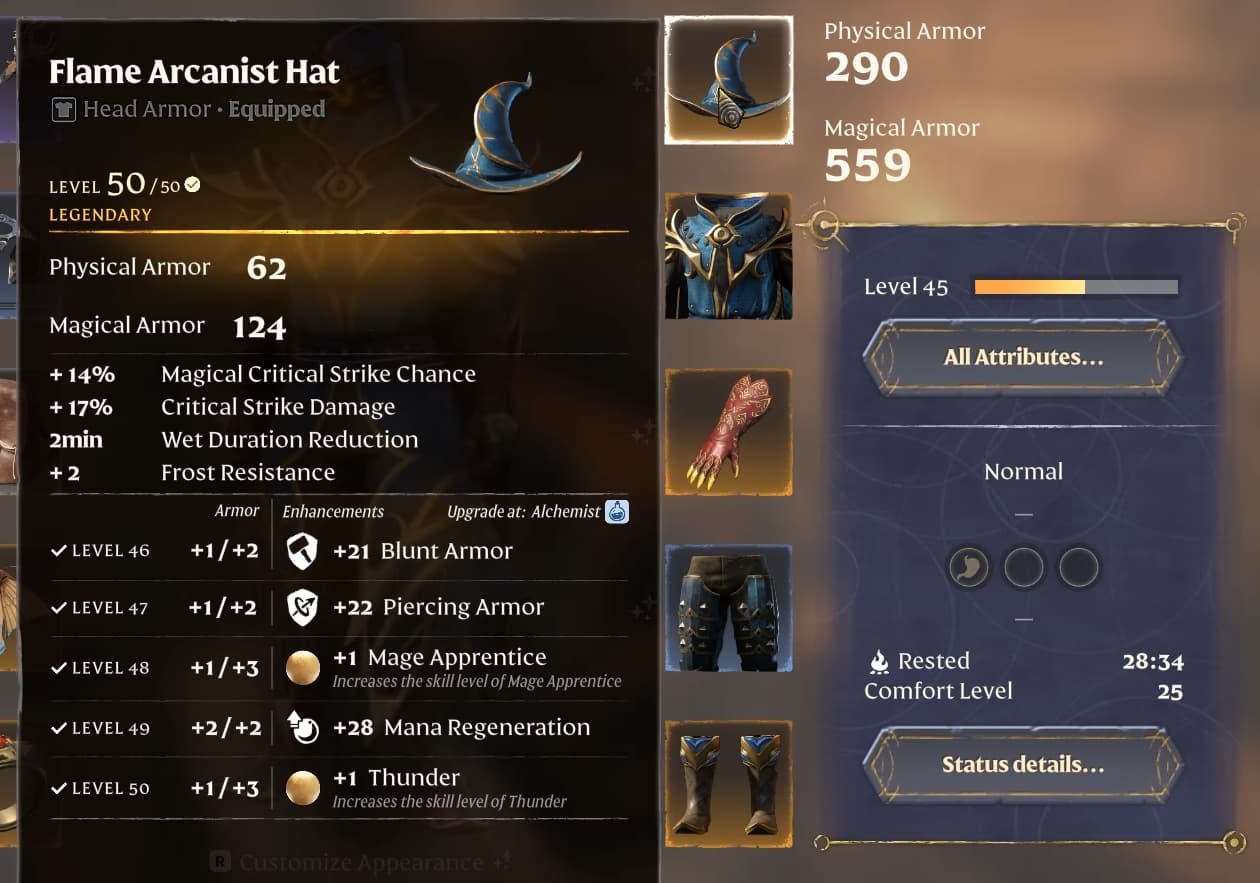
Flame Arcanist Hat
The Flame Arcanist Hat supports critical hits and Mage Apprentice. A fully upgraded Legendary version also provides Thunder, strengthening the shock effects generated by your critical hits.
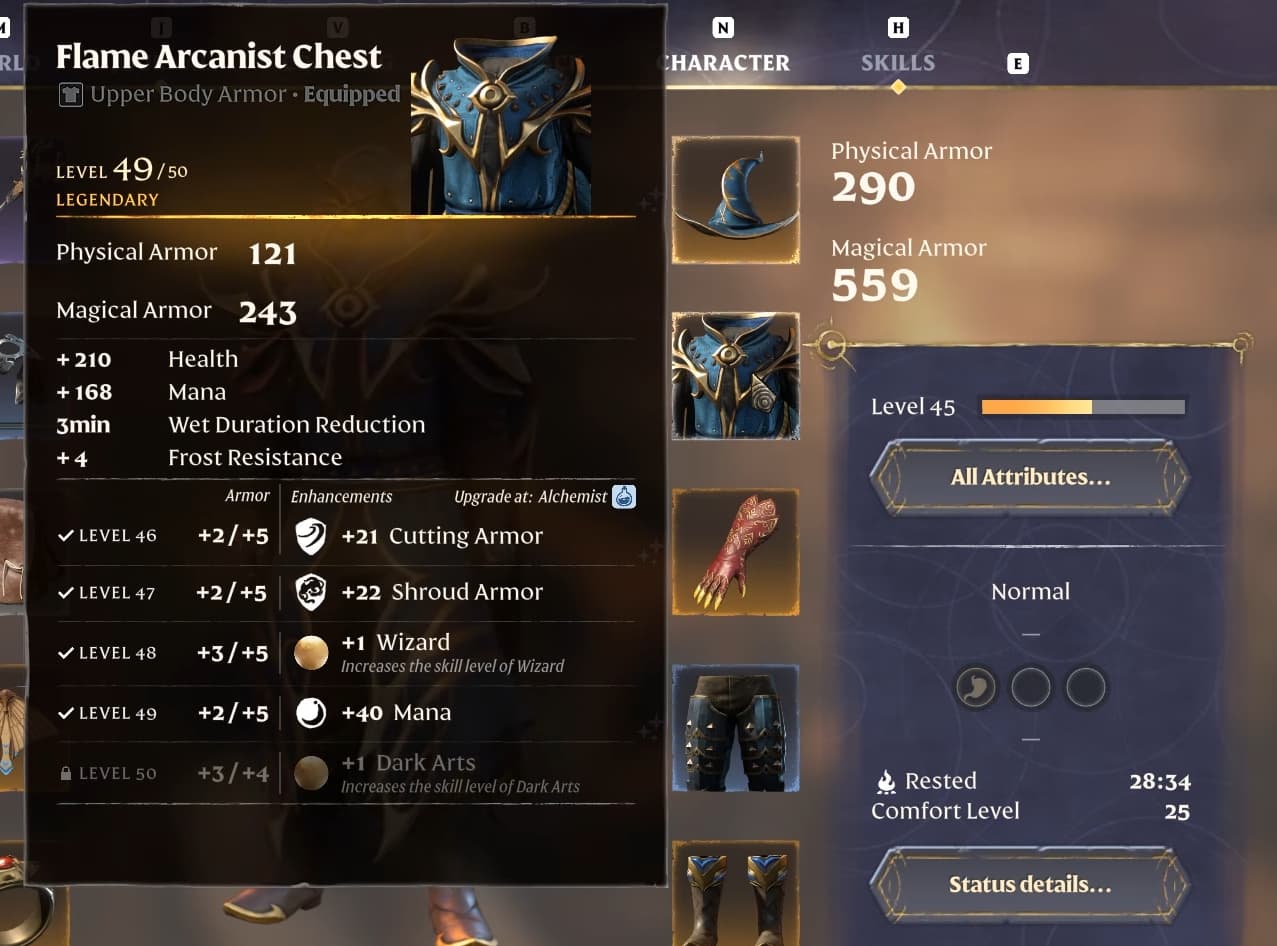
Flame Arcanist Chest
Use the Flame Arcanist Chest for health, mana and its Wizard bonus.
The later Dark Arts upgrade supports Shroud damage, which is not a priority for this ice-focused setup. You can leave that upgrade until after more useful investments.
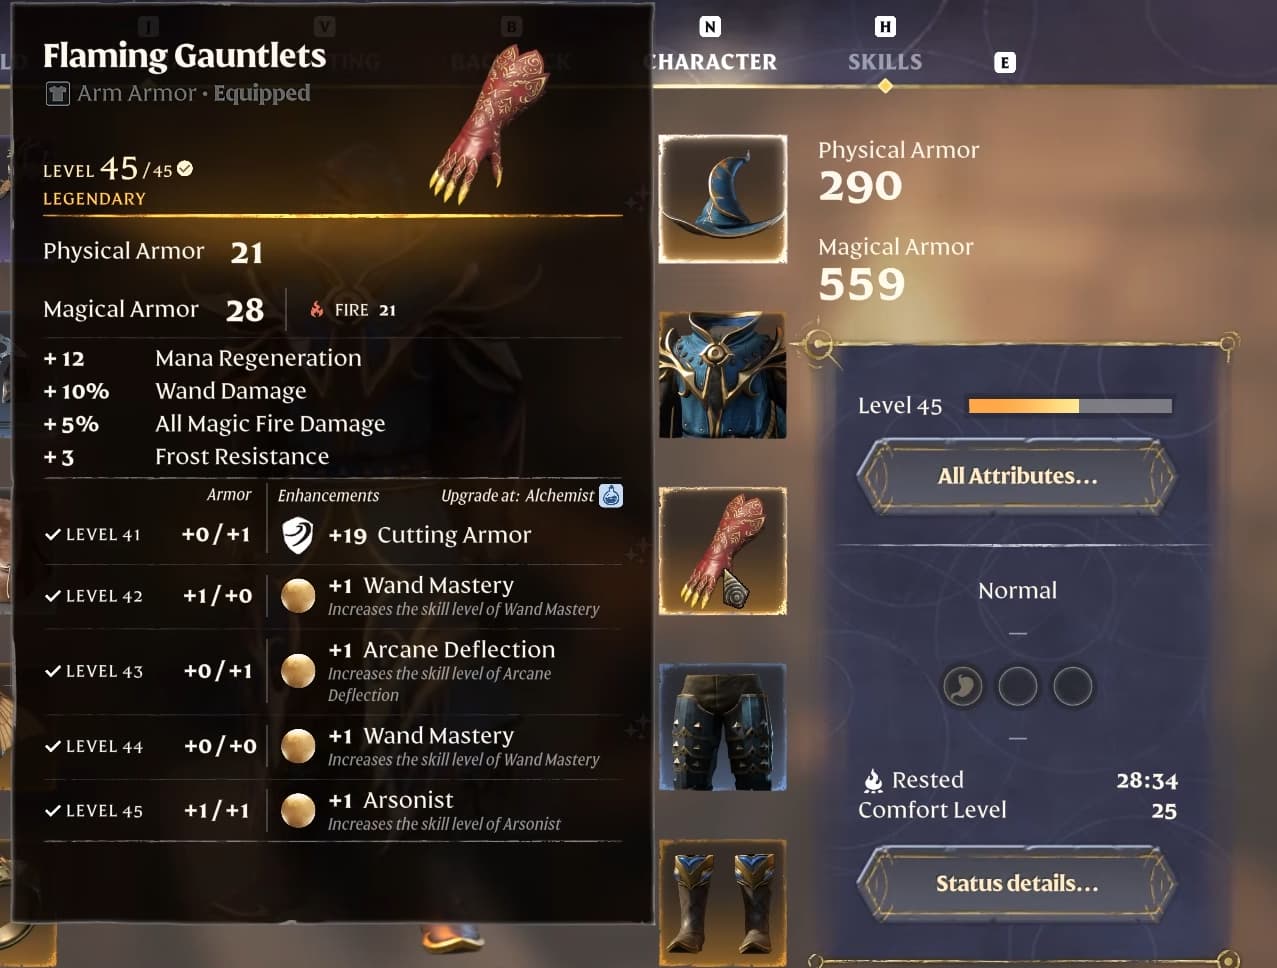
Gauntlets with Wand Mastery
Prioritize the Gauntlets’ Wand Mastery bonuses, wand damage and mana regeneration.
The gloves used in this setup also include fire-related bonuses, which contribute little to the main ice loadout. Their value here comes from the wand and recovery benefits.
Adding fire skills would be a separate adjustment to the build. You do not need to change your main damage plan simply to use every bonus on one equipment piece.
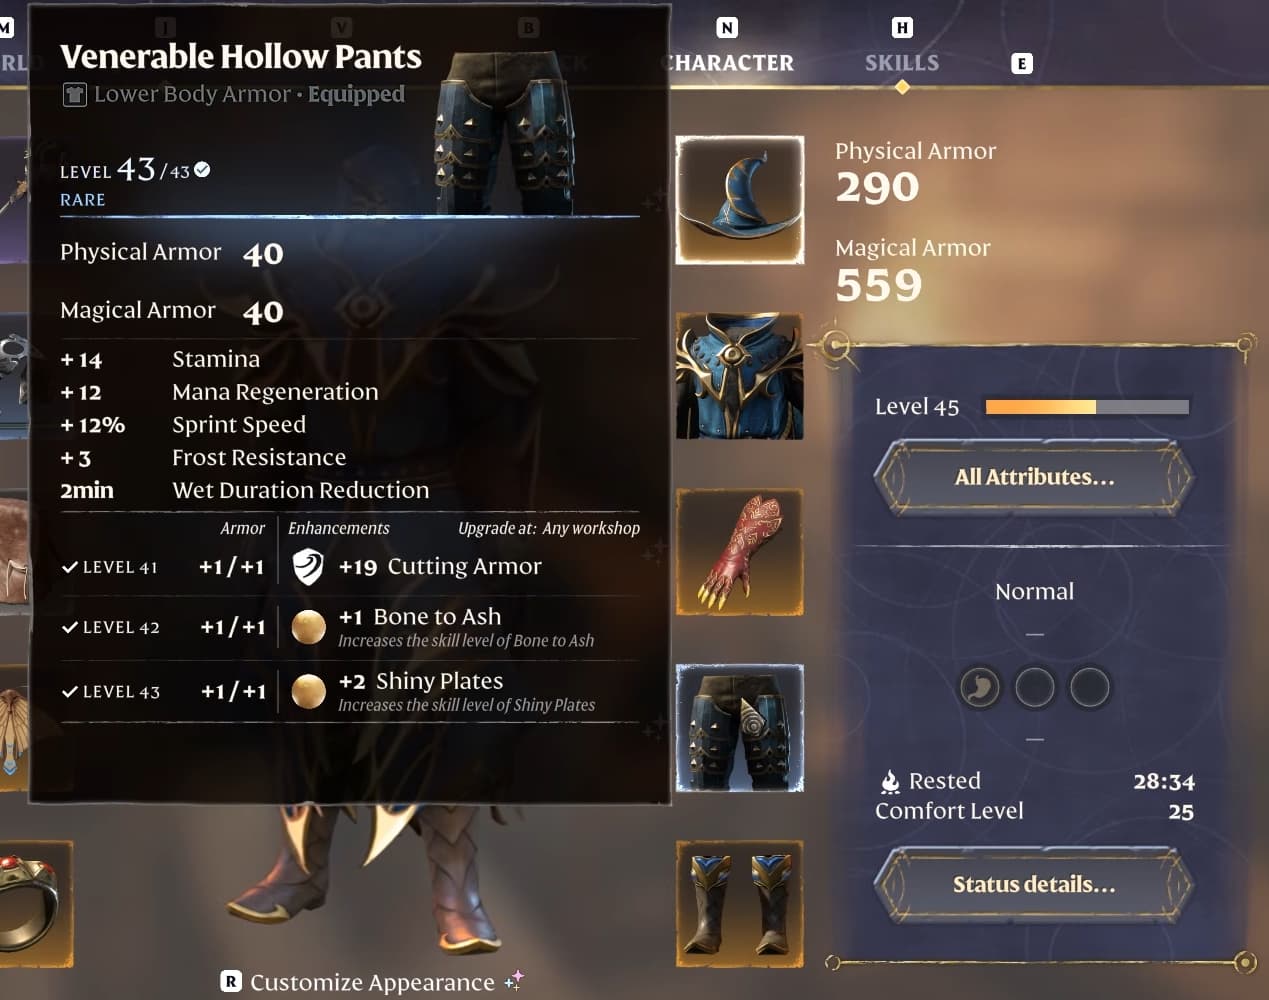
Venerable Hollow Pants
Venerable Hollow Pants provide Shiny Plates and Bone to Ash bonuses alongside useful stamina, mana regeneration and movement benefits.
The additional stamina helps support the build’s movement, while Shiny Plates improves your magical armor.
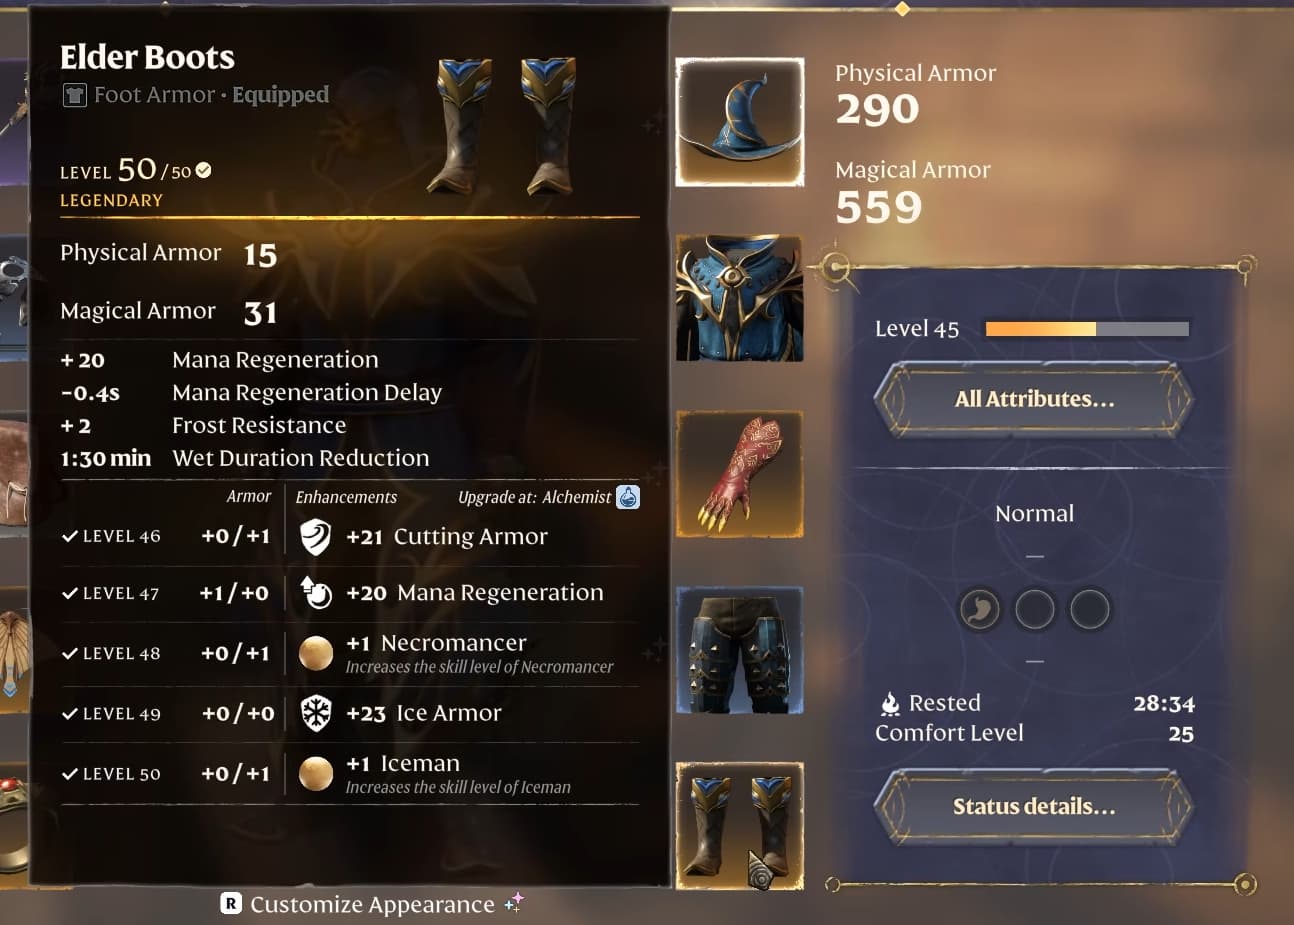
Elder Boots
Elder Boots provide bonuses to Necromancer and Iceman, supporting both summoning and ice damage.
This mixed armor setup places substantial emphasis on magical protection. Keep using distance, movement and your summons to limit incoming melee attacks.
For help checking equipment bonuses before spending upgrade materials, see our Enshrouded Tips and Tricks.
Rings and Ward
Use an Ultimate Ring of Mana for additional mana and recovery, with Wizard and Spellslinger available through its upgrades. An Ancient Ring of Mana is another option to compare as your equipment improves.
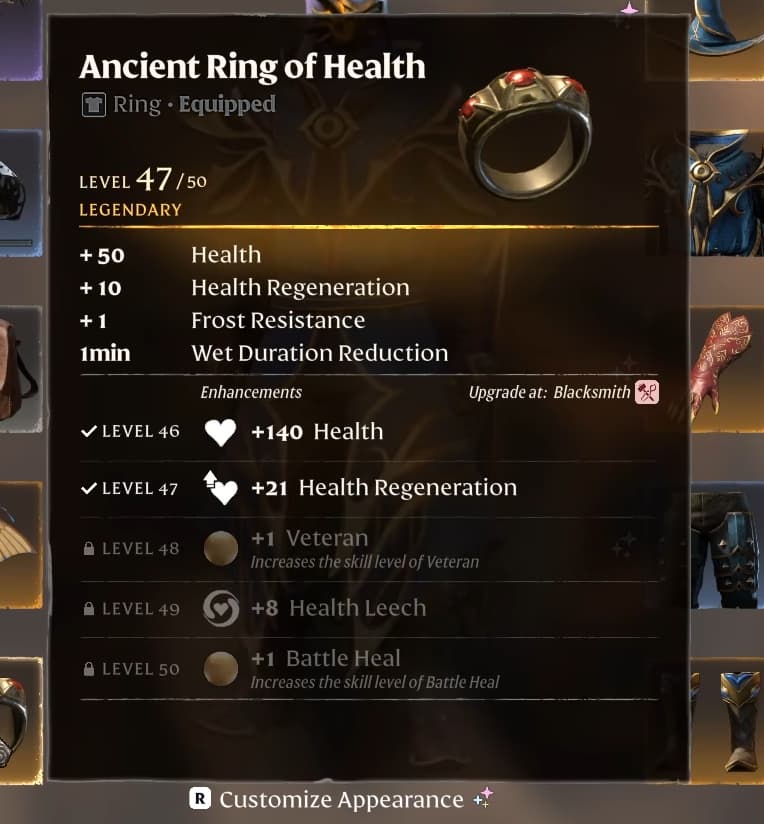
The second slot uses an Ancient Ring of Health for additional survivability. Treat this as a flexible slot and compare other magic-focused rings you find. Fully upgrading the health ring is not a priority for this setup.
Your ward is also flexible. Use one with helpful defensive or resource bonuses, but prioritize the weapons, summoning gem and armor bonuses that drive the build.
A ward still gives you the option to block or parry when needed, even though your usual approach relies heavily on movement.
How to Play the Necromancer
Prepare your summons before a fight, then alternate wand attacks and staff spells while keeping enemies occupied.
Summon your Hollow allies. Cast Eternal Hollow Wretch II before engaging, up to your current summon limit.
Attack with your ice wand. Maintain damage, build Focus and benefit from your mana recovery effects.
Group enemies together. Use the wand’s special ability when available, then cast Blizzard over the group.
Mix in aerial and evasion attacks. These add damage while helping you reposition.
Follow wand critical hits with a staff attack. Use the Blast and Cast opportunity when you have time to cast safely.
Maintain your resources and summons. Collect useful orbs, recover through wand attacks and replace lost summons when needed.
Use Ice Bolt against targets outside your Blizzard area, and Blink away when enemies get too close.
Kills can generate additional allies through Necromancer and the gem, making the build particularly comfortable while clearing groups. Against an isolated enemy, place more emphasis on your directly cast summons, movement and reliable recovery.
Your summons create openings, but your wand and spells remain an active part of the build’s damage.