menu
MobalyticsUse your favourite features in-game with our Desktop App
Gamebase Guide

Radiant Paladin Build - Enshrouded 1.0

By Fervor
Updated on Oct 26, 2026
Oct 26, 2026

Overview

This Enshrouded Radiant Paladin build combines one-handed melee combat with fire damage, healing auras and a shield. Radiant Aura burns nearby Fell enemies, while Water Aura provides recovery and your weapon handles enemies that are unaffected by the damaging aura.

This midgame setup uses Dragonsbane, blocking-based gem effects and parry skills to strengthen both damage and survivability. In this guide, we will cover the skill choices, weapons, gems, armor, rings and combat approach used to bring those parts together.

For help with your first base, crafting unlocks and early progression, start with our Enshrouded Beginner Guide.

More Enshrouded Builds

Find a build for your playstyle

Radiant Paladin Skill Tree

The skill tree combines Intelligence-based auras with Strength-based melee damage. Take the connecting attribute nodes as you develop each branch, including Constitution for health and Spirit along the magic route.

Start with Merciless Attack and Double Jump. Merciless Attack gives you a powerful follow-up against overpowered enemies, while Double Jump helps with exploration. Add Updraft when you can fit it into your progression for better gliding.

Take the Endurance point and Runner for additional stamina and cheaper sprinting. Stamina remains important even with strong defenses, since attacking, blocking and repositioning all depend on it.

The sections below explain the main skill groups. If you need more points to develop the setup, our Enshrouded Leveling Guide covers progression and Shroud Root rewards.

Auras and Fire Damage

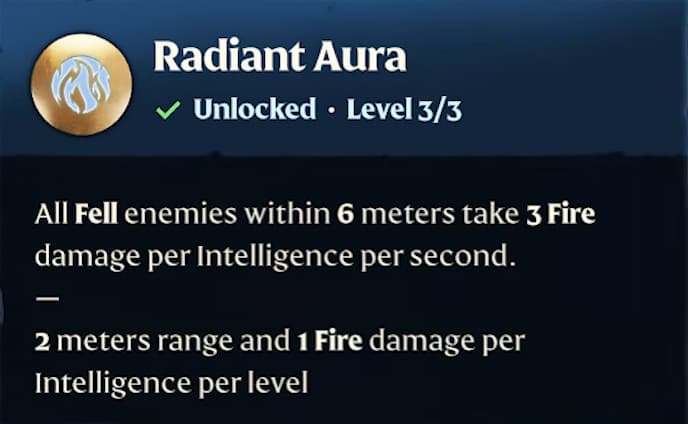
Radiant Aura deals ongoing fire damage to nearby Fell enemies, scaling with Intelligence. It is particularly useful when those enemies stay close while you fight with your melee weapon. It does not damage every enemy type, so your weapon remains essential outside Fell encounters.

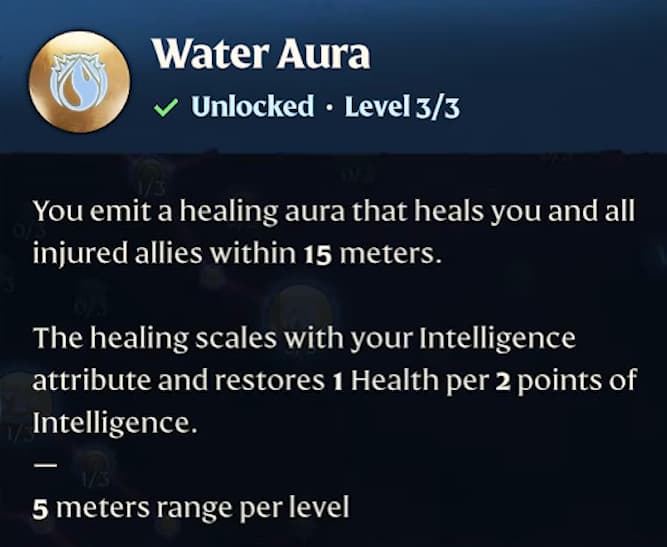
Water Aura heals you and injured allies within range. Its healing also scales with Intelligence, allowing the same attribute to improve both your recovery and Radiant Aura’s damage. One rank is enough for this solo setup; additional ranks expand the radius for group play.

Take Exalted to gain additional Intelligence based on your Flame level. Continue strengthening the Flame as you progress to improve the value of this skill.

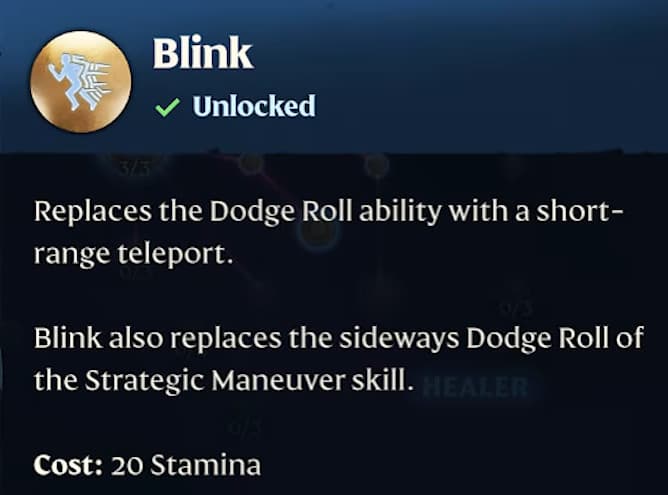
Blink replaces your normal dodge with a short teleport. Add Blink Attack so blinking into enemies produces a fire burst. Use it to reposition while adding damage when the movement is safe.

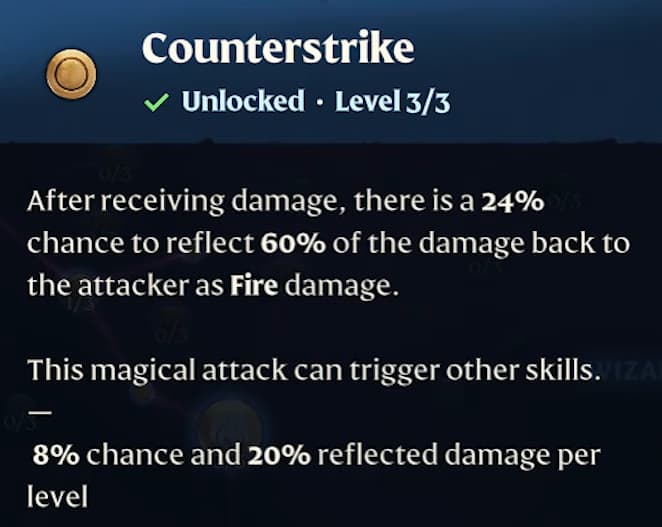
Counterstrike gives damage taken a chance to return part of that damage to the attacker as fire. Treat it as supporting damage at this stage, with further investment and equipment bonuses offering room to develop it later. Continue avoiding dangerous attacks instead of deliberately taking hits.

Melee Skills and Parrying

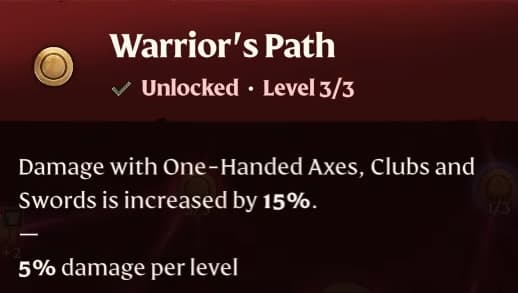
Max Warrior’s Path to support your one-handed weapon, then take Slasher for cutting damage. Pick up the Strength nodes along these routes to improve your melee damage.

One-Handed Specialization unlocks your weapon’s special ability. Build Focus through attacks and use the ability when you have an opening. Swift Blades increases one-handed attack speed, improving your regular melee pressure.

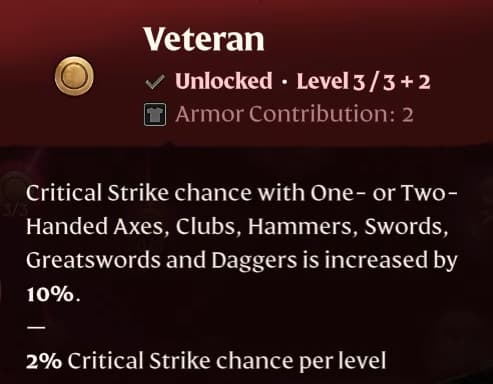
Take Veteran for melee critical-strike chance and one rank of Battle Heal for healing from melee critical hits. These work alongside Water Aura and the health leech on your main weapon.

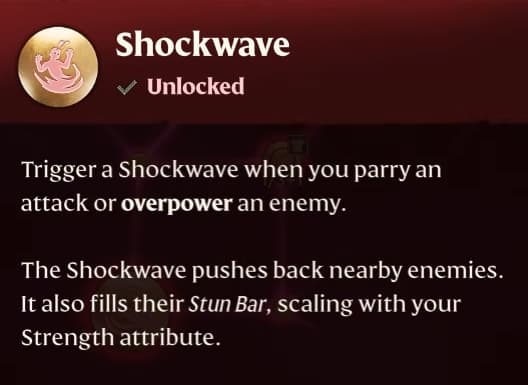
Shockwave activates when you parry or overpower an enemy. It pushes nearby enemies back and adds to their stun bars, with the stun contribution scaling from Strength. Follow up with Merciless Attack when an enemy becomes overpowered.

Take Barbarian for additional Strength based on your Flame level. This is the attribute skill, separate from Barbarian’s Path for two-handed weapons.

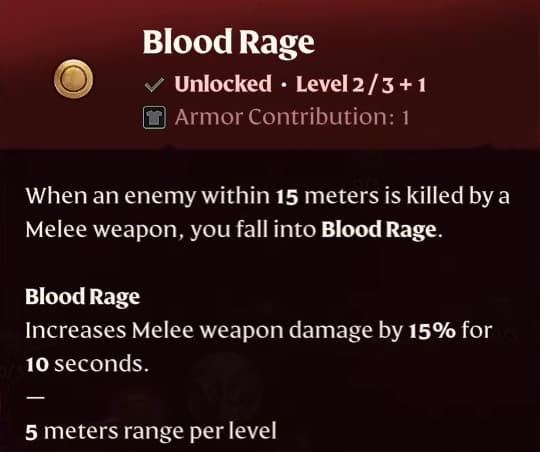
Finish this part of the setup with Blood Rage, which temporarily increases melee damage after a nearby enemy is killed with a melee weapon. This helps maintain damage through groups, including enemies that Radiant Aura cannot hurt.

Armor and Shroud Skills

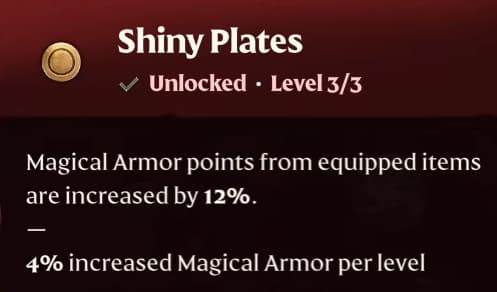
Invest three ranks in Heavy Plates and three in Shiny Plates to improve the physical and magical armor supplied by your equipment.

The magic branch also includes three useful Shroud skills:

  • Shroud Mitigation gives damage dealt with a magic weapon a chance to restore some Shroud time to you and nearby allies.
  • Shroud Resistance reduces incoming Shroud damage.
  • Shared Misery temporarily increases Shroud resistance for nearby players after you take Shroud damage.

These cover different needs. Shroud time determines how long you can remain inside the fog, while Shroud resistance protects against that damage type. Keep watching your timer even with these skills.

Dragonsbane and Weapon Gems

Dragonsbane

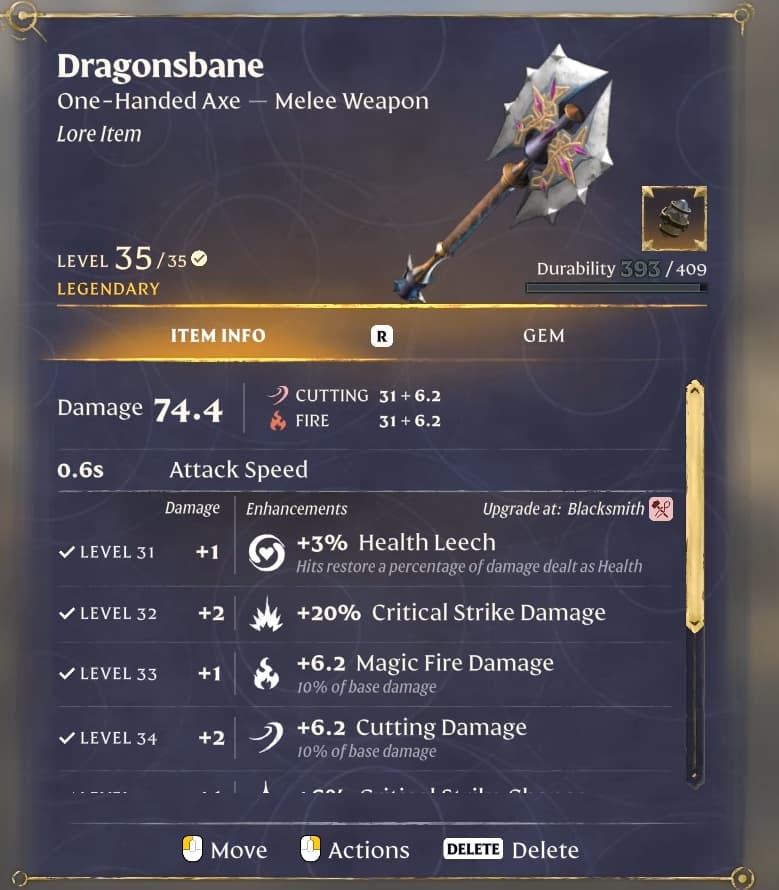
Use Dragonsbane as your main one-handed weapon. This axe combines cutting and fire damage with health leech, critical-strike damage and critical-strike chance.

Its critical bonuses support Veteran and Battle Heal, while health leech adds recovery during regular attacks. The fire damage also fits the build’s overall damage theme.

While working toward this weapon, our Enshrouded Early Game Weapons Guide covers useful setups for earlier progression.

Where to Find Dragonsbane

Dragonsbane can be found at Skeleton Excavation Camp “Ony” in the Albaneve Summits, in a nest on top of the large dragon skeleton’s head.

Reach the upper part of the skeleton, deal with the enemies guarding the area and check the nest for the weapon. Prepare for the region before attempting the trip.

Gem of Focused Light

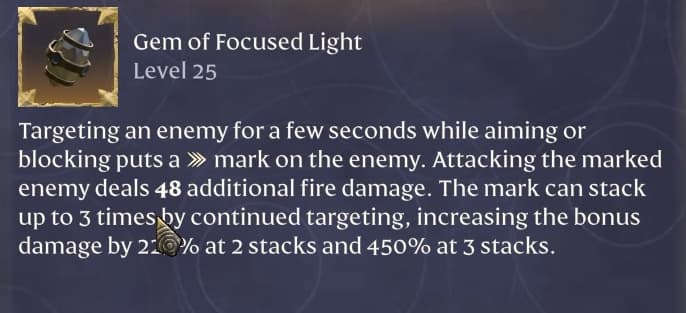
Socket Gem of Focused Light into Dragonsbane for additional fire damage against marked enemies.

Keep an enemy targeted while aiming or blocking to apply a mark. Continued targeting can build up to three stacks, increasing the fire damage added when you attack that target.

This fits the time you already spend defending against dangerous enemies. Build the mark while watching their attacks, then strike when an opening appears.

Gem of Cold Composure

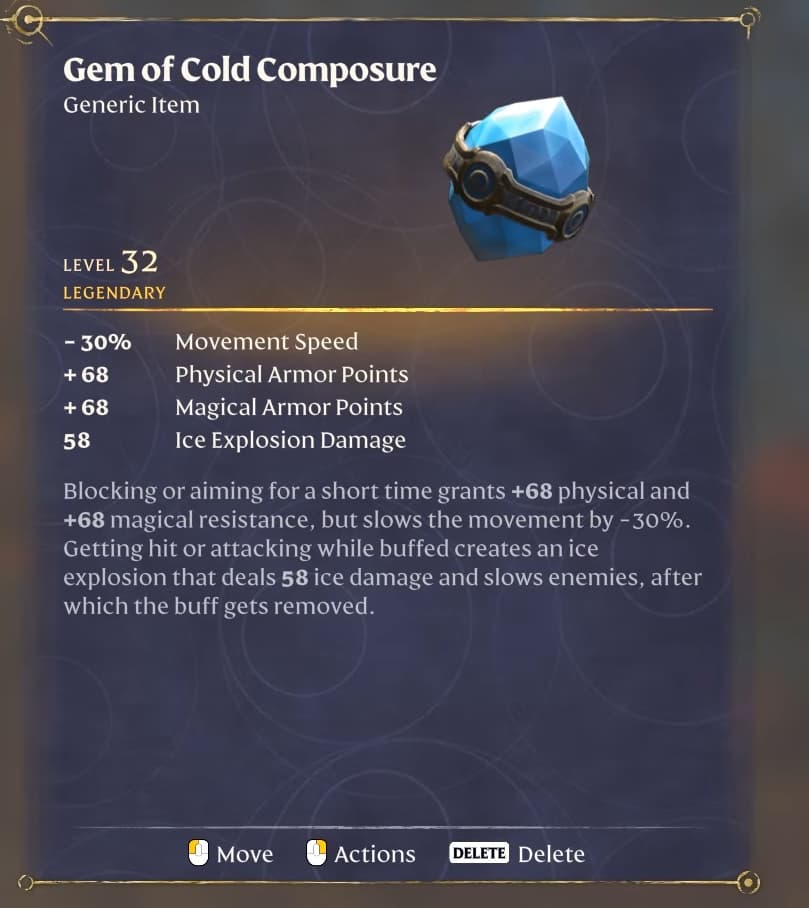
Gem of Cold Composure is an alternative if you want more protection.

Blocking or aiming for a short period grants physical and magical resistance while slowing your movement. Taking a hit or attacking while the effect is active releases an ice explosion that damages and slows nearby enemies, then removes the buff.

For this option, consider a shield with stronger blocking capabilities instead of choosing entirely around parry power. Use it as a defensive alternative to Focused Light.

Supporting Weapons and Shield

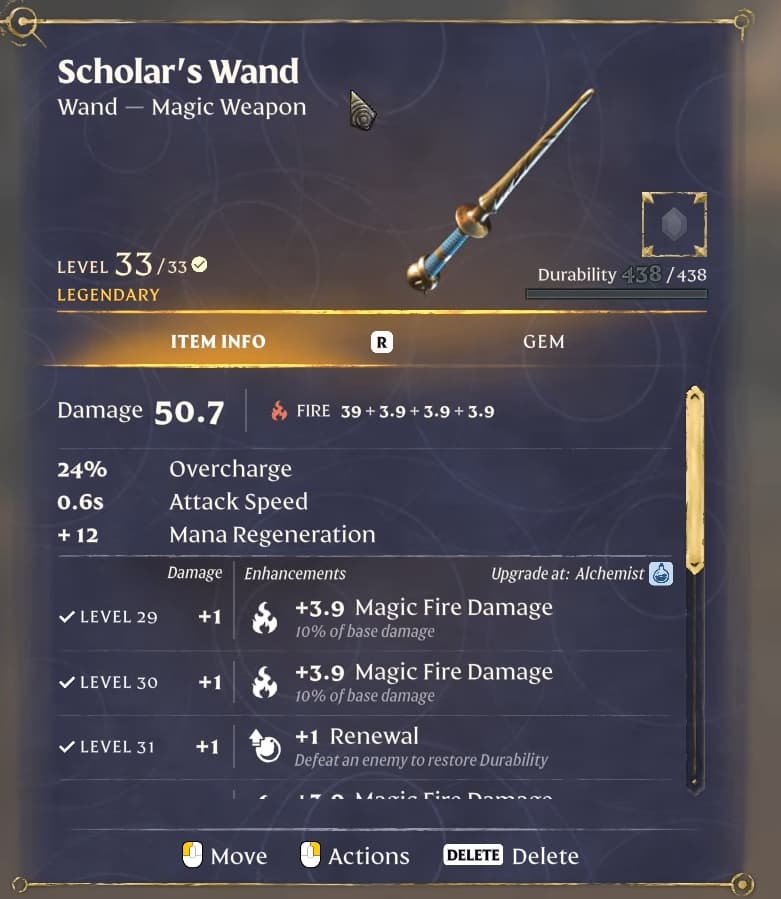
Scholar’s Wand

Use Scholar’s Wand for a ranged fire option. Its fire damage fits the setup, allowing you to attack when closing into melee is inconvenient.

A suitable fire wand with Multishot is another option as your equipment improves. Compare what you find instead of treating this particular wand as mandatory.

Clearwater Staff

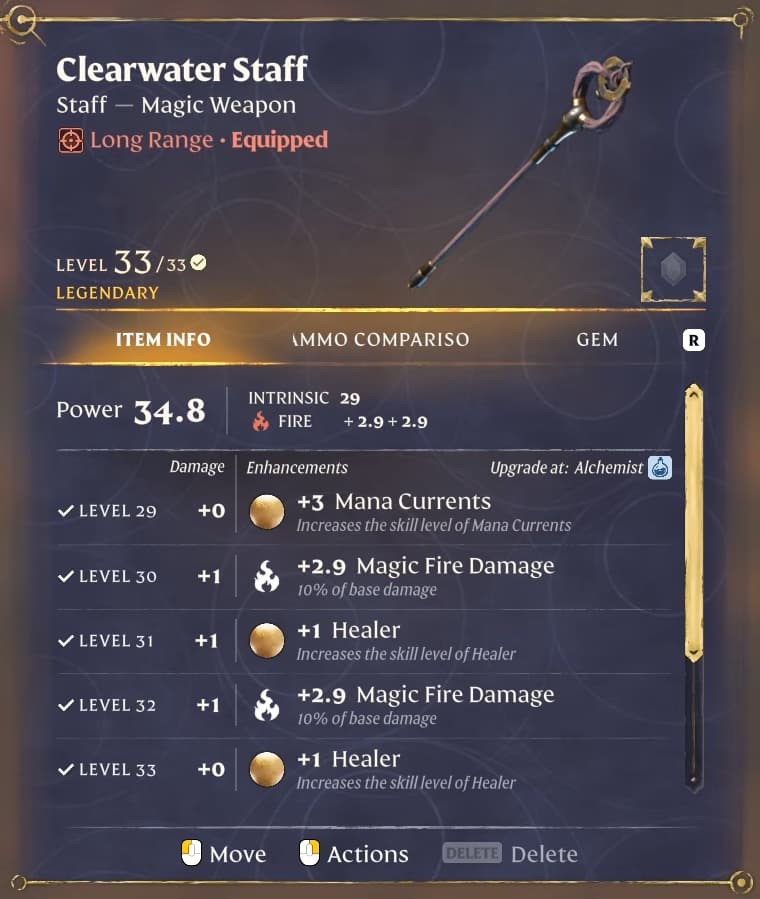
Clearwater Staff supports the setup through Mana Currents, Healer and magic fire-damage bonuses.

Its upgrades include three additional ranks of Mana Currents and two separate Healer bonuses, making it a useful supporting staff for mana recovery and healing. Check the rarity and unlocked upgrades on your copy when comparing its benefits.

These bonuses improve skills you have already learned. Unlock the relevant skills in your tree before relying on the staff’s additional ranks.

Backup Melee Weapon

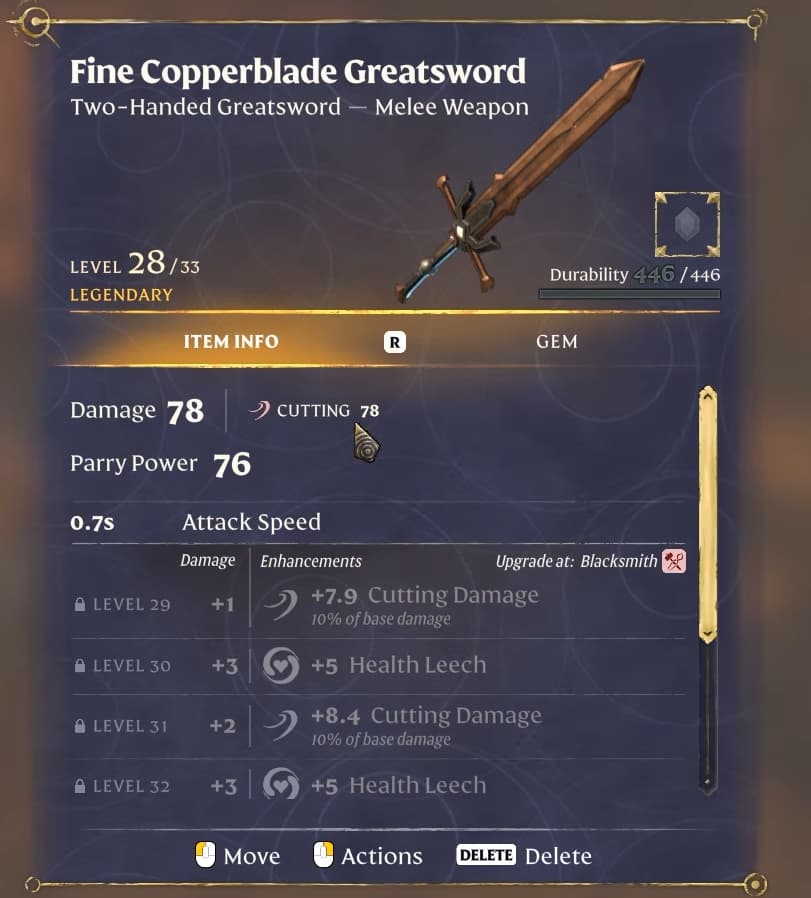
Carry a spare melee weapon for situations where Dragonsbane runs out of durability. Fine Copperblade Greatsword fills that backup slot in this setup.

It is a convenience choice, so another usable spare can serve the same purpose. Your main one-handed weapon, shield and supporting skills remain the priority.

Mountain’s Shadow Shield

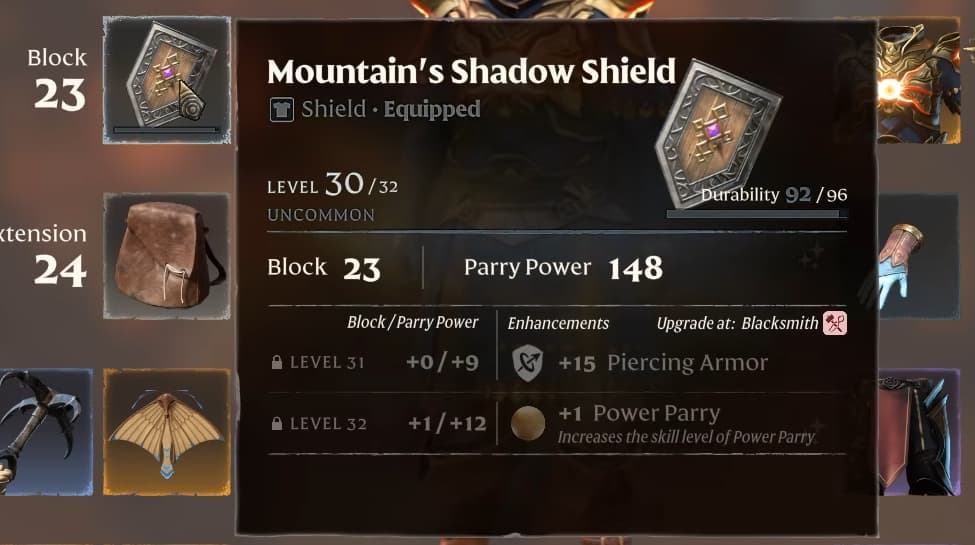
Use Mountain’s Shadow Shield for its parry power. Successful parries support Shockwave and help create Merciless Attack opportunities.

The exact shield is flexible. Compare parry power on upgrades suited to your current progression, or give blocking more weight if you choose the Cold Composure variation.

Radiant Paladin Armor

This midgame setup mixes pieces for protection, health and stamina. Several slots are temporary, so replace them when you find equipment that better supports your melee damage, recovery and defenses.

Eagle Eye Helmet

Eagle Eye Helmet provides stamina support, defensive bonuses and frost resistance for mountain exploration.

It is a practical progression piece rather than a core damage item. Its ranged-oriented bonuses are not the reason to use it, so compare alternatives as your equipment improves.

Radiant Paladin Chestplate

Radiant Paladin Chestplate is one of the stronger fits in this equipment setup. It combines physical and magical protection with health, stamina and frost resistance.
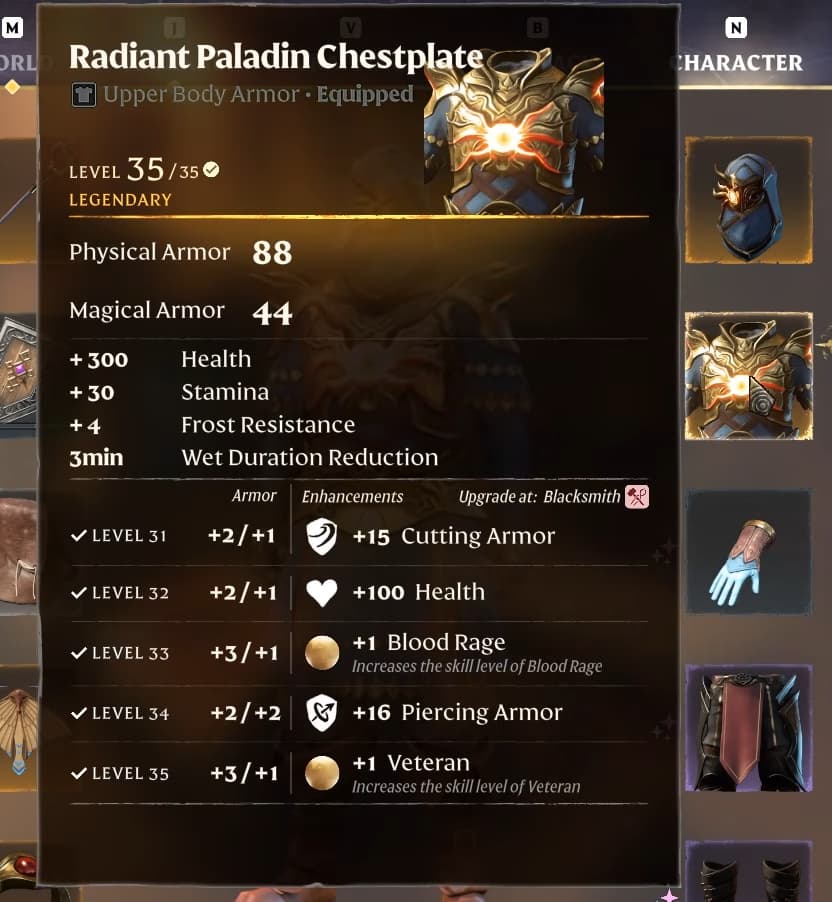
Its upgrade bonuses include additional health, Blood Rage and Veteran. These support both survivability and melee damage, making the chest useful while progressing toward your later equipment.

Hellcaster Gloves

Hellcaster Gloves provide armor and wand-damage support for your ranged option.
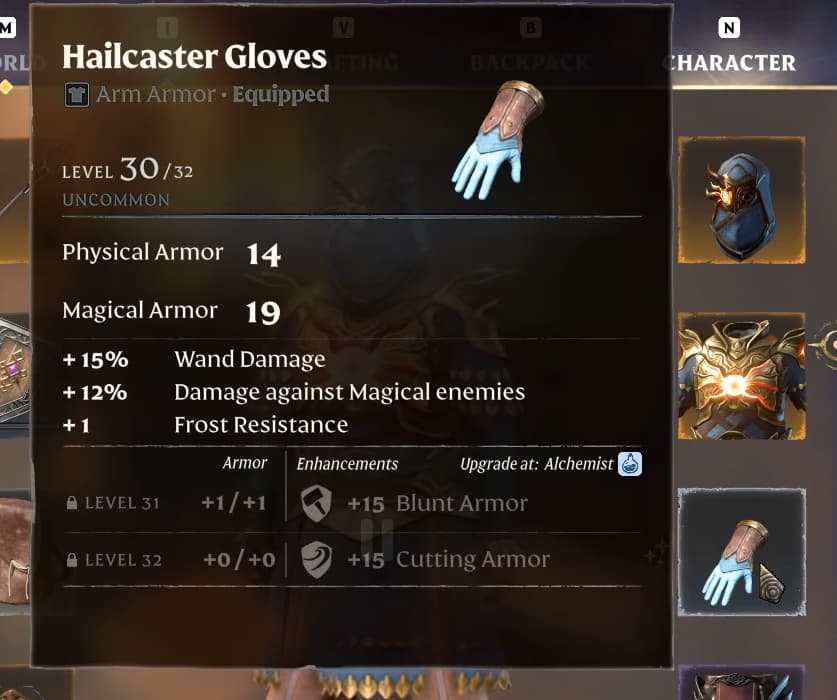
They are a temporary upgrade rather than an essential part of the melee setup. Keep them while useful, then compare replacements with stronger benefits for the build’s main priorities.

Knight Trousers

Knight Trousers supply health and stamina regeneration. These are useful general bonuses while you look for a better replacement.
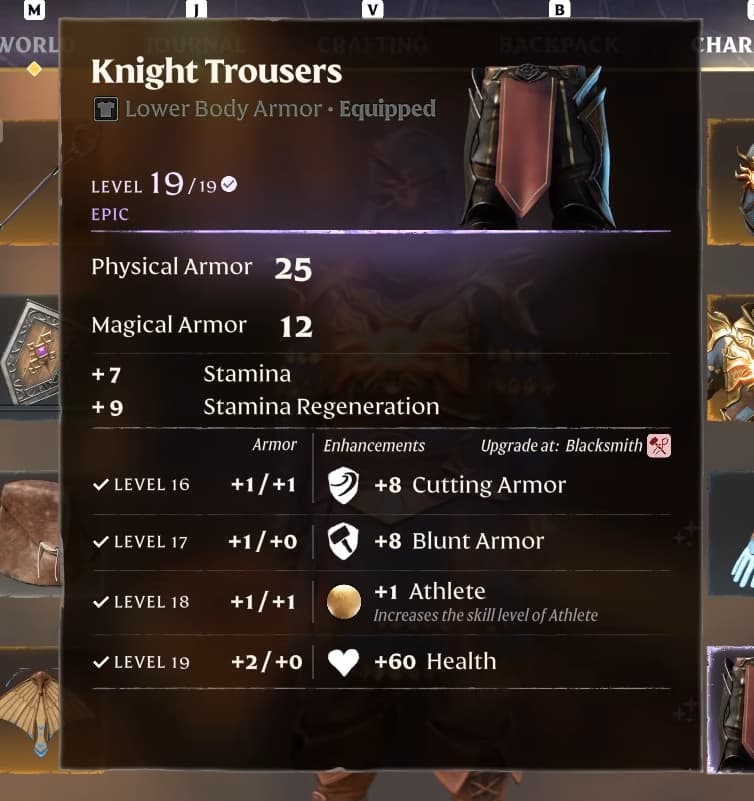
The build does not depend on this specific pair, so keep checking upgrades that improve recovery and protection.

Eagle Eye Boots

Eagle Eye Boots add stamina support, stamina regeneration, a Runner bonus and fire protection.
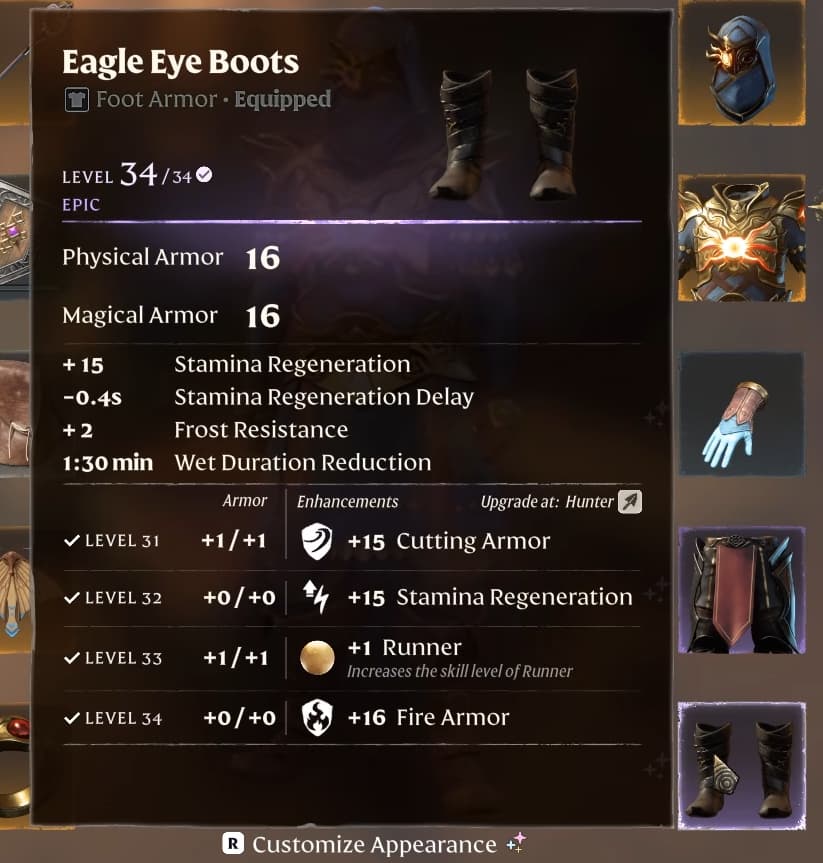
Their value here comes from helping you keep moving and manage stamina. Compare future boots against those practical benefits rather than choosing solely by armor rating.

Rings and Equipment Priorities

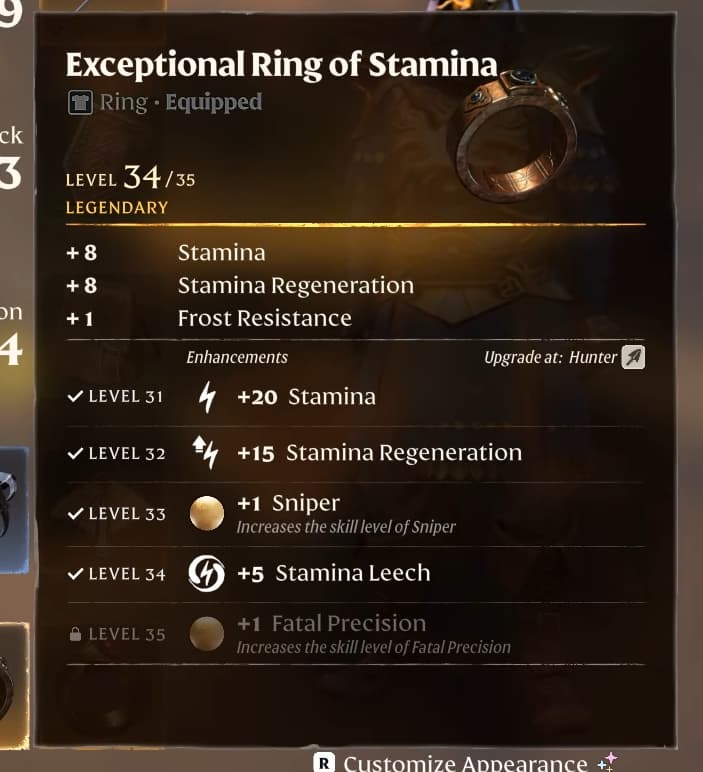
Use an Exceptional Ring of Stamina for additional stamina and stamina regeneration, with stamina leech available through its upgrades. These benefits support longer encounters and repeated defensive actions.

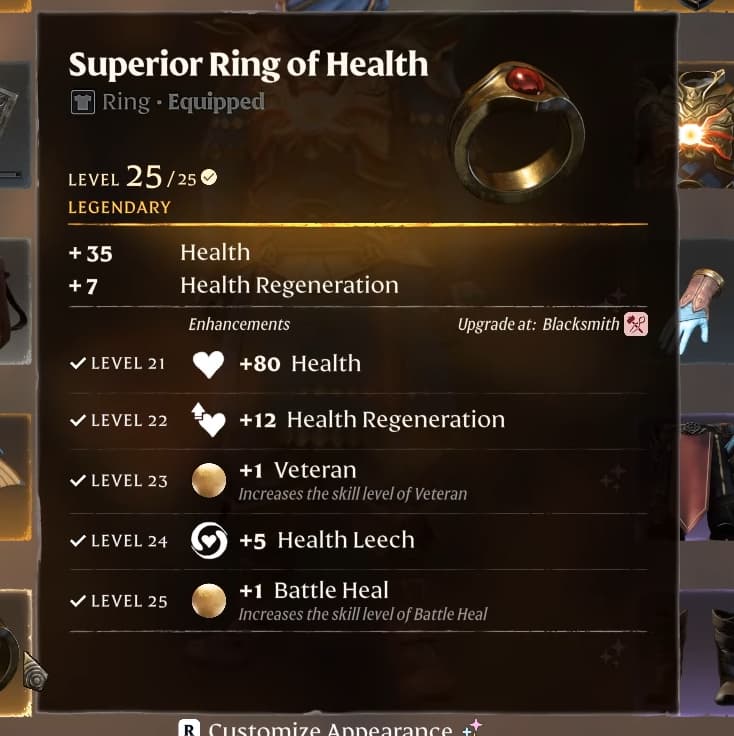
Pair it with a Superior Ring of Health for health, health regeneration and a Veteran bonus. This adds survivability while supporting melee critical hits.

Check which bonuses are unlocked before comparing two items. A higher-level piece is most useful when its available stats support the way you actually fight.

As you replace temporary equipment, pay particular attention to health regeneration. This setup already invests heavily in armor, but recovery remains an area to improve.

For more help with equipment checks and useful gameplay features, see our Enshrouded Tips and Tricks.

How to Play the Radiant Paladin

Fight primarily with Dragonsbane and your shield, using the fire effects to support your melee attacks.

  1. Defend while preparing your next hit. With Focused Light equipped, keep your target selected while blocking to build the mark.
  2. Parry attacks when safe. Trigger Shockwave to build stun and create openings for Merciless Attack.
  3. Attack between defensive windows. Regular melee hits build Focus and let health leech contribute recovery.
  4. Use your special ability when ready. Spend Focus during a safe opening for additional damage.
  5. Reposition with Blink. Blink Attack adds fire damage when you connect with an enemy, but staying safe takes priority.

Against Fell enemies, staying within Radiant Aura’s range adds ongoing damage. Against other enemies, rely more heavily on your weapon, gem and melee skills.

Use the wand when you need range, and give Water Aura time to contribute healing when you pull back. As you progress, improve regeneration and replace the temporary armor pieces while keeping the main weapon, aura and parry combinations intact.

Comments

0

Video

Table of Contents

See More

5 Tips for Faster XP and Progression in Enshrouded 1.0
Updated on Oct 26, 2026
Radiant Paladin Build - Enshrouded 1.0
Updated on Oct 26, 2026
Paladin Build - Enshrouded 1.0
Updated on Oct 26, 2026
Enshrouded 1.0 Builds
Updated on Oct 26, 2026
Enshrouded 1.0: Best Early Game Weapons
Updated on Oct 26, 2026

Like our guides?

Add Mobalytics as a preferred source on Google!