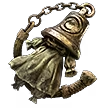
Above you will find an example gear set with desirable modifiers, as a point of reference.
Regex
While looking for gear at the vendor, you can press Ctrl+F and Ctrl+V to paste this string into the search bar:
"mov|st sp|ll da|os da|um li|vel o"
This will highlight items with movement speed, maximum life, bonus level of skills, cast speed, increased spell damage and increased chaos damage.
Weapon
You can either use a Wand or a Staff.  Withered Wand is the optimal base, because you want to be using the
  Chaos Bolt to apply Wither stacks that increase the chaos damage taken on your enemies.
Weapon is by far the most important piece of gear. You need to keep looking for upgrades all the time, and spend majority of your currency to keep your weapon up to date. I recommend having your loot filter highlight normal Withered Wand bases and crafting them with spare transmutations and augmentions. When it comes to modifiers, you want the following ones:
- + to level of All Spell Skills / All Chaos Spell Skills
- Increased Spell Damage / Increased Chaos Damage
- Cast Speed
- Mana/Mana Regeneration
Here are the item level requirements for different Spell Skill level bonuses, so that you know when you can look for an upgrade. Don't spend your currency if you can't get a better bonus than you currently have.
Level of Chaos Spell Skills on wands:
- +2 to Level of all Chaos Spell Skills (ilvl 18)
- +3 to Level of all Chaos Spell Skills (ilvl 36)
- +4 to Level of all Chaos Spell Skills (ilvl 55)
Level of All Spell Skills on wands:
- +2 to Level of all Spell Skills (ilvl 25)
- +3 to Level of all Spell Skills (ilvl 55)
Focus
If you're using a wand, you'll also want to be using a Focus. You can opt for a Shield if you find yourself doing great single target damage, but lacking survivability, but typically this build needs the extra damage from a Focus.
Prioritize + to Level of All Spell Skills, increased Spell Damage and increased Chaos Damage.
Level of All Spell Skills on a Focus:
- +1 to Level of all Spell Skills (ilvl 5)
- +2 to Level of all Spell Skills (ilvl 41)
Chiming Staff
In your secondary weapon set, I recommend using a 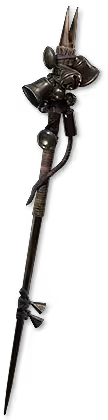 Chiming Staff. Set all of your active abilities to only work with your main weapon set, to automatically swap to the correct weapons, and use
  Sigil of Power right before a boss fight starts, for extra damage. Chiming Staff becomes available after level 25.
Boots
Prioritize crafting boots, over other pieces of armor, until you have movement speed on them. Nothing else matters on boots during leveling. Of course life attributes and resistances are always good to have, but you should highly prioritize MS.
Here are the item level requirements for different movement speed modifiers on boots:
- 10% movement speed (ilvl 1)
- 15% movement speed (ilvl 15)
- 20% movement speed (ilvl 30)
- 25% movement speed (ilvl 50)
- 30% movement speed (ilvl 70)
- 35% movement speed (ilvl 82)
Armour
Wear Energy Shield gear primarily, since it will be the easiest to meet the attribute requirements. If you can equip hybrid Energy Shield gear with Evasion or Armour, that will help your survivability, especially early on. You're going to be scaling Energy Shield as your primary defensive stat, so make sure to wear decent bases that are close to your level.
Life modifiers will give a lot of survivability, so look for items with as much Maximum Life as possible. Resistances and Attributes (Strength/Dexterity/Intelligence) on suffixes are very desirable. Remember that extra Strength will give you more Maximum Life.
Helmet
Besides the regular defensive modifiers, you can also find + to Level of All Minion Skills - this is useful early to boost the levels of your  Unearth, but after act 1 you should prioritize the best defensive stats over it, as we will only use Unearth in the first couple of acts.
Jewelry
Jewelry is the hardest to upgrade, as it drops in very limited amount and is not widely available at the vendor. Make sure to learn all of the guaranteed jewelry drop spots during the campaign, to increase your chances at getting a decent piece of gear.
- Guaranteed Iron or Lazuli Ring at the Cemetery
- Guaranteed Amulet in Keth ruins
- Guaranteed Resistance Ring in Buried Shrines
- Guaranteed Ring in Sandswept Marsh - Hanging Tree
Prioritize Life and Resistances. If you get lucky you might also get Increased Chaos Damage and Increased Cast Speed on rings or Increased Spell Damage and + to Levels of All Projectile Skills on an amulet, which will boost the levels of your  Essence Drain.
Currency
Majority of your currency, should be always spent on the gear slots that can increase your damage: weapon, focus, rings, amulet. You should always think about what you're trying to get from your Transmutes and Augmentations. Don't just throw them on every item you have. Be purposeful.
For example - if you haven't found movement speed boots in the early game, and you already have a decent weapon, you can spend Augmentations on boots with an elemental Resistance suffix and an open prefix, to fish for a Movement Speed prefix.
Always take stock of your gear and try to figure out what's your weakest piece.
Sockets and Runes
You want to always use  Iron Runes in your weapon, to increase your spell damage. Elemental and other runes can be spent on your good gear pieces, to boost your defensive stats.
 Contagion and is the best archetype for doing the Abyss mechanic right from the very start of the game. It's a great choice for a league start, because it does not require any gear to progress through the game. That being said, you definitely want to know how to gear properly to improve your single target damage and survivability, which this guide will help you with.