Wylder has a lot of options when it comes to Gnoster because they are weak to fire damage. Gnoster is, however, a pretty challenging fight because it is a duo fight, meaning it has two bosses with the same HP bar. Wylder can dodge one of the more annoying attacks in phase 2 rather easily, using his grappling hook, and charged attacks work wonders against this boss since the only way to deal big amounts of damage is during the time he spends staggered on the floor.
Nightreign Build Wylder
Gnoster Expedition Wylder Build
Intro
Equipment Loadout
Armaments
Best-in-slot
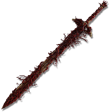
 Blasphemous Blade
 Grafted Blade Greatsword
-
 Mohgwyn's Sacred Spear
 -
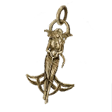
 Magma Wyrm's Scalesword
 - Any weapon dealing Fire Damage
Alternatives


Gnoster is only weak to fire damage, which is one of the most found damage types. This means it should not be hard to find a weapon dealing that kind of damage, but we still summed up the best available ones in the best-in-slot section! You can also use frostbite or rot since Nightlords tend to be tanky.
Talismans
Best-in-slot
 Erdtree's Favor
 Axe Talisman
 Warrior Jar Shard
 Fire Scorpion Charm
Axe Talisman is especially great against this boss because we really want to use charged attacks against it. You can also use the Fire Scorpion Charm because it increases your fire damage by a significant amount.
Alternatives
 Green Turtle Talisman
- Any Defensive talisman with Holy or Physical Resistances.
-
 Claw Talisman
Consumables
Best-in-slot
 Boiled Crab /
  Boiled Prawn
 Neutralizing Boluses
 Pickled Turtle Neck /
  Exalted Flesh
 Stonebarb Cracked Tear /
  Spiked Cracked Tear
Dormant Powers, Passives, and Relics
Dormant Powers
Best-in-slot
 Improved Physical Attack power
 Improved Physical Damage Negation
 Improved Stance-Breaking
Alternatives
- Improved Stamina Recovery
- Improved Affinity Damage Negation
- Raises attacks of magic, fire, lightning, and holy affinities (8%)
Relics
For the best results, here you have to buy the Wylder Goblet from the Jar shop in the Roundtable Hold.
Green Relics
- Physical Attack Up + X
 Grand Tranquil Scene
 - Standard Attacks 1 Level Stronger + X Grand Tranquil Scene
 Night of the Beast
Yellow Relics
- Strength + X
 Grand Luminous Scene
 - Partial HP Restoration upon Post-Damage Attacks + X Grand Luminous Scene
- Physical Attack Up + X Grand Luminous Scene
Weapon Passives
Best-in-slot
 Improved Attack Power When Two-Handing (10%)
- Improved Guard Breaking (+45%)
- Improved Damage Negation (Any element and any %)
Alternatives
- Improved Jump Attacks (12%)
- Improved Fire Damage Negation (12%)
Blasphemous BladeGreatsword • Lvl Required 10
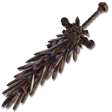
Grafted Blade GreatswordColossal Sword • Lvl Required 10
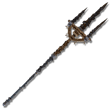
Mohgwyn's Sacred SpearGreat Spear • Lvl Required 10

Magma Wyrm's ScaleswordCurved Greatsword • Lvl Required 7
Erdtree's FavorTalismans
Axe TalismanTalismans
Warrior Jar ShardTalismans
Fire Scorpion CharmTalismans

Boiled CrabConsumables

Boiled PrawnConsumables

Neutralizing BolusesConsumables

Pickled Turtle NeckConsumables

Improved Physical Attack powerDormant Powers

Improved Physical Damage NegationDormant Powers
Improved Stance-BreakingDormant Powers
Improved Stamina RecoveryDormant Powers

Grand Tranquil SceneRelics

Night of the BeastRelics
Improved Attack Power When Two-Handing (10%)Weapon Passive
Improved Guard Breaking (+60%)Weapon Passive
Improved Affinity Damage Negation (+15%)Weapon Passive
Improved Jump Attacks (12%)Weapon Passive
Game Plan and Pathing
Day 1
Almost every map has the fire modifier on Encampments or Cathedrals. Plan your route moving towards one with the eye on a Church right after. First, get level 2 from some nearby enemies, and then go on that path. Be sure to do Forts, Encampments, or Cathedrals on your way to the destination. This should net you both a weapon we can work with and a minimum of level 6. After this, we can kill some field bosses and extra area bosses to reach level 8-10. While moving around the map, if you move past the central castle, check what enemies have spawned inside. If Trolls are spawned inside, avoid going there on day 2.
Day 2
On day 2, what we do depends on our findings from day 1 and if any shifting earth events are active. If there are no Trolls inside the central castle, that is option 1.
Option 2 would be any shifting earth event besides the Frozen Mountain. These can be done after the circle grows smaller, or at the start of day 2. Once we have done one of these options, kill Elite Field Bosses to pass the time and maybe discover better weapons than the ones you have while grinding runs to level up to 15.
Day 3
With this guide, we are fighting Gnoster, so next are some tips for fighting them. Gnoster will start the fight off as two separate entities: a Butterfly and a Lobster.
We usually want to focus on the lobster, but be careful since almost all of his attacks are delayed, so don’t dodge too early. Sometimes the Lobster will go into the grind, making the Butterfly fly lower, making you able to damage it. The Butterfly is even weaker to fire than the Lobster, allowing you to deal even more damage.
The biggest danger throughout the entire fight is the poison, since this is not normal poison. If you get poisoned eventually, a parasite grows out of you, dealing constant damage and staggering you. The only way to deal with this is by dying in solo or by attacking an ally in multiplayer.
Once the boss reaches around 50-60% HP, they will transition into phase 2, where they combine into one entity. The Butterfly will still shoot projectiles during this phase, but there is one especially annoying attack where the Lobster will charge forward while the Butterfly shoots a ton of projectiles forward, making it very easy to be damaged by this. It’s best if you use your grappling hook to hook onto the side or sprint because otherwise, you cannot dodge it consistently. Try to keep using Charged attacks to knock them down and deal massive damage from the front!
Additional Tips
- You want to 2-hand almost always, unless you know how to parry. Bosses, however, cannot be parried.
- Use consumables on bosses since you find them easily everywhere.
- If you dash in a direction and then use your grappling hook without being locked on, you can grapple away something, making undodgable attacks dodgable.
- Your ultimate does a ton of stagger damage but also makes you immune while charging it. This is especially great to do against Gnoster when they charge at you to cancel that attack.


