Here we'll showcase a handful of recommended builds to help guide you during the early to mid game. Specific stats and items aren't required, making them a solid entry point to jump into.
If you're just starting out and haven't unlocked the second Skill Slot yet, simply skip to the next priority node in the meantime.
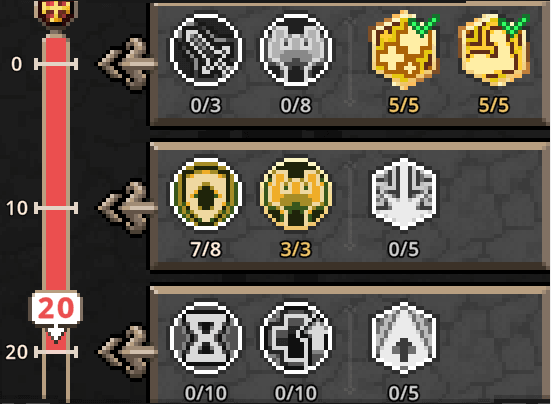
Level 20 Priest - Tank / Support Build
This build puts the Priest on the frontline as the Tank/Support of the team. Feel free to regularly adjust Skill Points early on to better suit your needs.
If you're feeling squishy, you can invest into Heal and Max HP. Alternatively, you can optimize offense for farming by leveling up Blessing of Might and Attack Damage.
Skill Point Priority
Level 1-10
- Heal 1/5
- Blessing of Might 1/5
- Max HP 8/8
Level 20 (Reallocate)
- Heal 5/5
- Blessing of Might 5/5
- Damage Absorption 3/3
- Armor 7/8
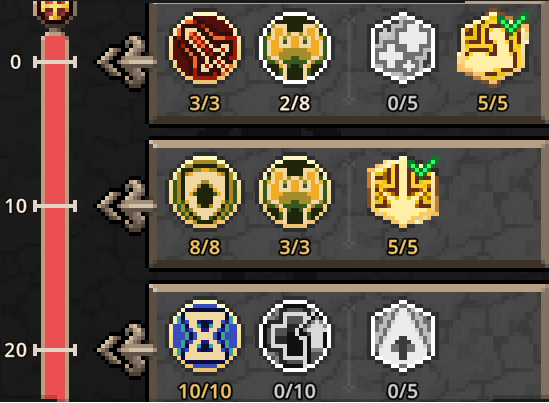
Level 20 Priest - DPS Build
This setup allows the Priest to pack a real punch in exchange for more supportive options. It's effective at farming weaker stages that don't threaten you.
However, you can potentially use this build more reliably IF you invest enough into Life Leech.

Skill Point Priority
- Blessing of Might 5/5
- Attack Damage 3/3
- Max HP 2/8
- Wrath of Heaven 5/5
- Damage Absorption 3/3
- Armor 2/8
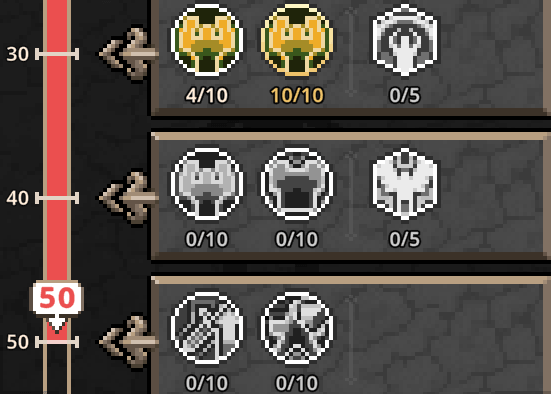
Level 30 Priest - Tank / Support Build
At this point you have options. Sanctuary and Heal are interchangeable, depending whether you want a larger AoE heal or a small single-target heal. If you opt for the latter, you have the option to adjust your Skill Points (replacing Max HP) since Heal + Blessing would fulfill the minimum 10.
However, from our experience, Sanctuary tends to be the better option (at least early on). Oftentimes Heal can go wasted as it'll be cast during weaker waves of enemies. Then once tougher foes appear, the amount healed just isn't enough to sustain the fight.
While Sanctuary does have a significantly longer Cooldown, it's healing is far more effective. It can often restore your party to full health and/or keep them topped up throughout its duration. It's also a great way to counteract the AoE strikes from Act Bosses.
Note: This can change depending on the stage and frequency of needed healing. Additionally, once you progress later into the game, Heal may become the better option due to its consistency and percentage-based scaling.

Skill Point Priority
- Blessing of Might 5/5
- Max HP 5/8
- Damage Absorption 3/3
- Armor 7/8
- Sanctuary 5/5
- Armor 8/8
- Cooldown Reduction 4/10
Level 30 Priest - DPS Build
We now get to invest into Cooldown Reduction to have more uptime on Wrath of Heaven. The defensive nodes are essentially just there to meet minimum Skill Point requirements.

Skill Point Priority
- Blessing of Might 5/5
- Attack Damage 3/3
- Max HP 2/8
- Wrath of Heaven 5/5
- Damage Absorption 3/3
- Armor 2/8
- Cooldown Reduction 10/10
Level 40 Priest - Tank / Support Build
A continuation from the level 30 build, now with more Damage Absorption. Alternatively, you have the option to max out the Cooldown Reduction node instead for more frequent Sanctuary casts.
We recommend avoiding Skill Heal as Sanctuary is already effective enough on its own.

Skill Point Priority
- Blessing of Might 5/5
- Max HP 5/8
- Damage Absorption 3/3
- Armor 7/8
- Sanctuary 5/5
- Armor 8/8
- Cooldown Reduction 4/10
- Damage Absorption 10/10
Level 40 Priest - DPS Build
No extra offensive options just yet, but Damage Absorption is still useful.
Skill Point Priority
- Blessing of Might 5/5
- Attack Damage 3/3
- Max HP 2/8
- Wrath of Heaven 5/5
- Damage Absorption 3/3
- Armor 2/8
- Cooldown Reduction 10/10
- Damage Absorption 10/10
Level 50 Priest - Tank / Support Build
Once you reach this point you'll have some more Max HP to work with, then later beyond you can pick up some Elemental Resistance, Armor, Cooldown Reduction, and more.
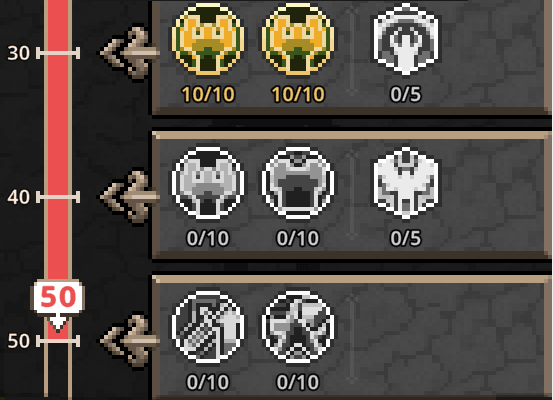
Skill Point Priority
- Blessing of Might 5/5
- Max HP 5/8
- Damage Absorption 3/3
- Armor 7/8
- Sanctuary 5/5
- Armor 8/8
- Cooldown Reduction 4/10
- Damage Absorption 10/10
- Max HP 10/10
Level 50 Priest - DPS Build
Similar to level 40, there isn't much for offense here, so take this opportunity to bolster your Armor and fill in the existing nodes.
Later on you'll be able to invest into Physical Damage (unfortunately Wrath of Heaven is Lightning), and also increase the Area of Effect of Wrath of Heaven.
Skill Point Priority
- Blessing of Might 5/5
- Attack Damage 3/3
- Max HP 2/8
- Wrath of Heaven 5/5
- Damage Absorption 3/3
- Armor 2/8
- Cooldown Reduction 10/10
- Damage Absorption 10/10
- Armor 8/8
- Armor 4/10