Warding in League of Legends is incredibly important for every role and every game you play. It is a necessity for everyone to know when to ward, where to ward and how to become better at warding. Without adequate vision control, you will find it difficult to survive the early game, win the mid-game and close out the late game. Understanding the fundamentals of warding and how you can use it to your advantage can really help you win more.
In this Mobalytics guide, we will go in-depth about warding and give you everything you need to know about providing your team with vision. Everyone can learn something from this guide, from High ELO to Low ELO, from pros to regulars. This guide is aimed at anybody who wants to improve their vision and warding strategy.
Note that this guide will be very in-depth, and we will go into great detail about the things listed. Similar to our wave management everything guide, we’ve added chapters to help you skip around the guide and help you digest the information that is presented.
Everything you see in this guide is highly situational, and you should use your own discretion and view when it comes to placing a ward. This guide should be used as guidance for you to make your own judgment of ‘worthwhile wards’ and this may mean that you disagree with some of our warding suggestions. Furthermore, some icons may look slightly misplaced in some images. This is for clarity reasons and to make it obvious where the intended ward location is. Again, this is just to make things visually clear, and there is no other reason behind it.
Introduction to Warding
If you already understand the different types of vision in the game and know about basic vision control, you can skip this introduction.
Before we get into the subject at hand, we have to go back to the beginning of where it all started. Back in the day, there were no free wards and Riot made you pay for every single ward that you wanted to place. Thankfully, they introduced the trinket system back in Season 4 and provided trinkets for everyone. Wards were in the game prior to this historic event, but they were not always utilized like they are today.
There are a few different types of wards in League of Legends and in this section, we will talk about what grants vision and what destroys vision. We will also touch upon what champion can do to provide vision around the map without purchasing wards.
A ward is a deployable unit that removes the fog of war in a certain area of the map. Vision is not just buying and placing wards. It is not always a unit, and it can be granted through champions as well as items that they purchase.
At the start of the game, the player can choose between two different types of trinkets. It is important that the champion picks the correct one to assist them in the laning phase. For the majority of champions, you would want to take the Warding Totem because it grants you vision that will allow you to ward your lane. The other option (which is not as favored because of its limitations) is the Oracle Lens. This is an item that can deny vision around the map.
This item is generally not purchased in the early game because it doesn’t benefit yourself nor your team. Instead, it is picked up during the mid game by the Jungler and purchased after the Support has completed their warding quest. Some pros however take this item at level 1 to secure their Jungle or deny strategic areas early on.
Warding Totem Wards (also known as Yellow Trinket, Green Wards, Stealth Wards)*
The most common source of vision in League of Legends is from Warding Trinkets. Warding Trinkets, also known as Stealth Wards or Totem Wards, are wards that are invisible to the eye and can only be destroyed by Control Wards, Oracle Lenses, before they go invisible or by running out of time. Each ward has a lifespan which grows per level with their base life being 90 seconds long. The ward duration grows as the game goes along with its growth based on your teams average level. Each one of your warding totems has 3 health points and can also be Teleported on by allied champions.
*In this guide, we will give these types of wards multiple different names but they all mean the same thing.
You are limited to 2 stacks or charges on your Trinket for this specific ward, but generally, you should never have two stacks on your Trinket. It is important that you use your trinket in the early game because it will allow you to have a much safer and better laning phase. There are a few other reasons why you should never have two stacks on your Trinket, but the main reason is that you will not be providing as much vision for your team as you could.
The maximum amount of trinket wards that any player can place is 3 on the map at any one time. The fourth trinket ward will destroy the first and oldest ward that had been placed. Keep this in mind if you are placing multiple wards around the map. It’s important to keep this limitation in mind when you are thinking of placing your wards.
The limit that is put upon us can be quite devastating for Supports compared to any of the other roles because nobody else will place 3 of wards at any given time. If you do not purchase a Trinket before leaving the base, this ward will be given to you automatically.
Control Wards
The second most common ward is the Control Ward. These are wards that stay on the map and are visible to the enemy, unlike the Warding Totem. They do not adhere to a time limit, and instead, only die if they are destroyed by an enemy or another one is placed (only one Control Ward can be placed per character). After Patch 8.23, Riot nerfed the number of Control Wards one can hold from 3 to 2. This was quite a big nerf to the Support role specifically, which puts more emphasis on other roles picking up the slack.
Control Wards, unlike Warding Trinkets, have an additional interaction. They can reveal and disable enemy wards and reveal stealthed traps such as Jhin’s E, Teemo’s Shrooms, Nidalee’s W and Shaco’s Boxes’. They also can spot camouflaged enemies like Evelynn or Twitch, but not champions with true stealth, like Akali or Shaco. This makes them a necessity when you’re against champions such as Evelynn who use their camouflage to gank lanes.
These wards have 4 hit points compared to the Warding Trinkets with 3. This means that it takes longer to clear them. This can be used to your advantage by deploying an alternative ward and wasting the enemies time clearing the ward and refusing them gold.
Control Wards are incredibly important for everybody to buy and you should always try to purchase them whenever you have inventory space. As a Support, you should be picking up a lot of these wards and frequently replacing them as the game develops. As a sololaner, you should purchase a Control Ward in the early game and keep placing them when you can as the game continues. Placing your Control Wards in high traffic areas is very useful in spotting the enemy as well as allowing your team to take objectives safely.
I hear a lot of people asking the same questions over and over again and I’m going to clear up this misconception. You do not need to aim for a vision score by a certain period of time. You just need to continue buying Control Wards and placing them throughout the game. Do not buy too many of course as you will fall behind in items and gold. You will need to find a healthy balance between getting items and buying wards in relation to the game’s context
If you look at the pros and study them, they do not aim for a score. They just place them when they need them. Pros frequently purchase more than one at a time, and in pro play they always return to lane with at least 1 Control ward. Also, and they always place more than one a game! If you do not place any Control Ward or place so little, how do you expect to become good at vision control?
Oracle Lens (Red Trinket)
The Oracle Lens is a trinket that activates around your champion for 10 seconds. This trinket reveals and disables wards and reveals stealth traps quite like a Control Ward. Wards that are temporarily disabled only see a localized area such as the champion auto attacking the ward to clear it. The Oracle Lens can be used to spot enemy champions that are nearby or over the terrain as well as champions who are hiding in bushes. Champions, as well as any visible traps or wards, are displayed as a silhouette inside of the radius which can help you identify where they are before running into them.
I do not recommend that you take this trinket at level one because it doesn’t necessarily benefit you as much compared to the Warding Totem. However, like every other trinket and ward we are going to talk about, the cooldown of this item is reduced every time you level up. This trinket is fantastic when it comes to invading or roaming as it will allow you to spot invisible wards such as the Yellow Trinket wards which are normally invisible. There is also an added bonus to the drone: as it has a big spotting radius, it can help you find wards and disable them which will allow you to walk through them without being completely spotted.
If you are a Jungler, you definitely want to pick up this trinket as soon as you can to help you ganking lanes. Clearing wards will give you a higher success rate when it comes to ganking lanes as the enemy will be in the dark. As the Support, as soon as you are about to complete your warding quest, make sure to change your trinket to this one to take advantage of the ability to clear vision. Because you’ve completed your quest, it wouldn’t be worth holding on to it, so you may as well change the trinket to the Oracle Lens.
Farsight Alteration (Blue trinket)
The final trinket that we haven’t discussed yet is only available after level 9. This trinket is only really purchased by the Top, Mid or ADC and it should be done not long after hitting level 9. I recommend that only these 3 roles use this item because the other two roles should take Red Trinkets instead. The Farsight Alteration is a ward that can be placed from up to 4000 units away and reveals the area for 2 seconds and champions inside for 5. This trinket has a very long cooldown which is, as you guessed it, reduced by level.
The Farsight Trinket should be used to spot enemies that are doing objectives such as Baron or Dragon. It is important to hold onto this trinket when an objective is spawning just to make sure that you can see the objective and tell if the enemy is taking it. The other use (which is not as beneficial) is to ward around the map to check bushes before you walk into them. This can be very helpful if the enemy are all missing and hiding in a death bush.
How to Ward During Laning Phase
Now we’ve come to the main information section of the guide. We wanted to include everything so far because we wanted this Mobalytics guide to be the complete one-stop-shop for all things vision related. For us to achieve this, it was important that everybody knew what the basics were before we move on. We will try to be consistent by giving you examples of good warding locations when you’re in a winning match up, an even matchup and in a losing matchup.
Level 1 Warding and Positioning
At level 1, there are a variety of different warding strategies and tactics that you can prepare but not all of them are always going to be worth warding. Before that, I want to discuss how you can save your first ward by positioning better before the minions start to spawn. As we all know, you should position in an area to scout the enemy in case they try to invade. Each role has a (sort of) designated spot where they should stand to spot the enemy.
If you stand in these areas like suggested, you will not have to place your ward at level 1, nor will you have to walk into the unknown when you make your way to your lane after leashing for your Jungler. Walking into the unknown can be very dangerous and you may have to blow your Flash early or you may have to recall even before getting to lane which can mess up your early game. While this is not always the case for the top or mid lane, it can very well be the norm for the bottom lane.
Standing in an area like suggested will help you save your first ward as you will not need to use it early to spot the enemy as you would be using yourself as a ward. There are some exceptions to this rule, however, such as playing against a Blitzcrank or Thresh who can hook you level 1 or if the enemy is notorious for invading before minions spawn. When something like this occurs, you should stay in this position up until you spot them and then start running away. Before doing so, you should drop and place a ward so you can see if the enemy continues to chase you.
It is beneficial to not place any wards pre 1:25. This is because the information they will give you is next to nothing and you could actually save yourself using a ward just by positioning better.
Depending on your lane, I would recommend that you use your ward at level one in between one side of the river in the river bushes. Warding at 1:25 will help your Jungler and your team out by knowing if the enemy is taking that side of the map’s Scuttle Crab as well as the knowledge of a level 2 gank or an invade. Since they spawn at the 3:15 mark, the ward would last long enough to spot the enemy. Depending on what side your Jungler starts on, you should place a ward on the other side of the map. For example, if the Jungle starts on the bottom side and receives a leash from the bottom lane, either the Top laner or the Mid laner should go and ward the bush on the opposite side of the map. Whereas if they start on the top side of the map, the Support or Mid laner should ward at 1:25 in the river bush on the bottom side of the map.
I recommend positioning and warding here because: I’ve already touched upon why you should ward in these selected bushes, but I’m also going to go into detail on why I recommend standing in these positions before the minions spawn as well as warding in the specific areas at 1:25.
First of all, it will allow you to know if the enemy is invading level two to try to kill you or steal away your other buff. It will also allow you to know if the enemy has gone for the Scuttle Crab at the 3:15 mark and also tell you if the enemy is not doing it which means that you can take it.
If you are against a champion who is notorious for level 2 ganks such as Shaco, Twitch, Jarvan, or Camille, warding here can potentially prevent an early gank as you would be able to spot them going through the river if they were to take this route.
Now let’s move onto why you should stand in the areas suggested at level 1. There’s no fancy reasoning to stand here, except that it tells you if the enemy is invading you or not. Standing in one of these bushes and consistently walking around once inside will allow you to spot the enemy in case they try to enter your jungle. I recommend that you keep moving while in these bushes in case the enemy tries to hit you with abilities. We’ve all been hooked at level 1 by a Blitzcrank right?! That means you shouldn’t be tabbing out when the game has started. Make sure that pre minions spawning, you’re in a position to see the enemy in case they come.
I feel it’s about time we start with the first major example of warding in lane. It’s important to note that we have used these three terms to make it relatable to your own gameplay. By which we mean if you’re in an even matchup, it means none of the towers have gone – such as in the early laning phase, if you are in a winning or losing match up, it means that one of the towers have gone- like after 10 minutes.
How to Ward Top Lane (Blue side)
Let’s start with the blue team’s top lane. So in the early game, there are not many valuable warding locations. The reason for this is simple, there are limited areas where you can ward that will consistently provide you with information.
Depending on the matchup, you may be able to place a Control Ward or a trinket ward in the river bush close to your lane. In the majority of matchups, you will start off by placing a Green Ward in this bush during the early game. If you are pushing, you can switch up this ward and place a Control Ward in the top lane river bush instead. However, if you are freezing or playing evenly, you should not place a Control Ward here.
This is because the enemy will be able to clear it and you will not be able to do anything about it. This ward would be considered an ineffective ward as it wouldn’t survive for long. Unless you can physically 1v1 the enemy or fight them for vision dominance in the river, it’s better to place a Control Ward further down in the river as it will be more cost efficient for you because it will stay alive for longer. Do not place a Control Ward in the top lane river bush if you’re not pushing the wave or able to fight the enemy. Instead of this, you would want to just place a trinket ward here.
Furthermore, I do not recommend that you place in a Control Ward in the enemy’s bush as they would easily be able to clear it. Again, this would be considered an ineffective ward as it wouldn’t last for long as the enemy could just clear it.
I would not prioritize any vision in the top 3 bushes for the majority of matchups, as they (generally) do not provide you with much information. I would recommend that you (generally) avoid warding these bushes. I would not suggest completely throwing out the idea of warding these three bushes though- especially if you in a matchup where the enemy can jump on you such as a Rengar or if you’re coming close to having two stacks on your trinket and are unable to ward elsewhere. I wouldn’t prioritize warding these bushes as there are much better alternatives around.
Now let’s talk about losing your lane and let’s assume that the enemy is sticking to their lane and trying to pressure your tier 2.
For you to be able to continue farming safely, you need to make sure that your jungle is warded and that you have wards nearby to protect you. It is important to have your jungle warded not only for your safety but the safety of your Jungler. Wards in these areas give your team a lot of information of the whereabouts of the enemy if they decided to leave your lane. For example, if the enemy was to rotate to the mid lane, go to the Rift Herald or try to take away a jungle camp- you would know about it.
I recommend that when you are moving further away from your base that you only use Trinket Wards to ward the map. This is because if the enemy decides to push their lane, they will easily be able to clear your Control Wards and you would have wasted gold. However, I recommend that there is a Control Ward in the river bush or alternatively one near your blue buff. This is because, if the enemy is to place a ward nearby, it would be spotted and it could be taking off the map easily.
Furthermore, there are many warding locations for the enemy to ward in this area and placing a Control Ward here prevents a lot of them. When you are on the back foot, it’s important to place valuable information that can help your team know where the enemy is. There is no point placing offensive wards in a losing match up as the enemy will always be on your side of the map. I would suggest that you place even or defensive wards instead.
When you are winning your matchup and applying pressure to the enemy, you have a wider range of warding spots.
The further you are up in the lane, the more vision you need deeper into the enemies jungle as this will give you the longest reaction time to the enemy moving towards you. There are also some defensive warding spots that can protect you against flanking manoeuvres or potentially enemy encirclement.
Because you are so far up in lane, I would recommend that you place Green Wards in the enemies jungle to protect you. I do not recommend Control Wards in this situation as you maybe unable to contest them. Furthermore, the enemy could easily clear them if they were to check the bushes. As the Green Wards are invisible, the likelihood of them staying alive for longer is probable.
Also, some of these warding locations can tell you if the enemy is taking a jungle camp as well as tell you if it is up or not. This will allow you to steal away their camps. Again, we’ve gone for even wards in the river to protect you against flanks as well as allow you to know if the enemy is rotating or not.
How to Ward Top Lane (Red Side)
When you are the red team Top Laner, you have a variety of warding locations for your early laning phase. We will start off by talking about where to ward when you are in an even matchup.
As you can see, there are a range of different wards placed here. Just like the blue team, you should place a Control Ward in your side bush. As you are the Top Laner and you’re the red side, you can place either a more forward ward or choose for a defensive one. I would recommend that you place a Control Ward defensively if you are not pushing the wave or playing aggressively.
If you are playing aggressively, then you can place a Control Ward in the river. I recommend that you do not place a Control Wards in either of these two bushes if you are playing under tower or are having a rough time in lane. If you cannot place them in either of the bushes, then go and take a walk down the river and place a ward in the middle of the river bush.
When you are playing aggressively and are pushing your lane, you can place a Green Ward over the small wall near your lane to provide you with vision of the jungle plant. Many Junglers use this plant as a means to gank the top lane. If you see the enemy attempting to use this, you can back off in time without fear of being killed. Alternatively, you can manually destroy the plant to prevent the enemy from using it. Like we said with the blue side, you can place wards in the top 3 lane-bushes, however, they are not always going to give you information, so keep that in mind if you intend to ward them.
It’s not uncommon for you to lose lane and in a good portion of your games you will unfortunately lose. It may be your fault, it may be your team’s fault, or it may just be an unfair matchup. Either way, whenever you are losing your lane, you have to adapt and ward around your lane to provide you and your team with protection.
As you should be playing relatively safe, you cannot afford to place Control Wards deep around the map. You have to either go for defensive wards or even wards. This is because the enemy can easily clear a Control Ward that is placed further down the lane. Because it is difficult to ward deeply when you are being pressured, I would recommend that you do not push up to far forward and only ward when it is safe to do. I recommend the use of your trinket for this as it will be the most reliable way of gaining vision.
It is beneficial to have Control Wards in your own jungle to see if the enemy Top decides to rotate through your teams Jungle or is attempting to take away any camps or buffs. This will also give some added security for your Jungler when they approach the top side of the map.
When you are winning your lane, you may want to continue applying pressure by pushing your lane.
In order for you to do this safely, you will need to provide sufficient ward coverage around the lane and the enemies jungle. The protection this provides is valuable and without it, you can get killed and lose your lead. If you were to die in this situation, the enemy may be able to come back from their disadvantage and you may have to start adjusting your gameplan.
As you are pushed up into the enemies side of the map, I would recommend that you prioritize placing Vision Wards rather than Control Wards as the enemy will easily be able to clear them and you may not be in a position to challenge them for it. It is a good idea to place Control Wards in the top side of the map as well as in the river to prevent any counter movements from the enemy.
A good Control Ward in the top bush will deny any vision for the enemy which can come in handy to prevent a TP play or the enemy spotting your Jungler. I recommend that you place Green Wards in the enemies top jungle rather than Control Wards as they will be invisible and unlikely to be found.
You should prioritize a Green Ward directly in the middle of the topside jungle- just outside of the blue buff. This is a fantastic place to put a ward because it will show you a variety of different measures the enemy could take to get to you. Arguably, the ward in the middle is the most beneficial of them all because it has many different spotting zones which can give you plenty of time to back off. This is because it grants vision of people coming into the jungle, coming from the top side of the Jungle, coming from mid lane as well as coming from the wolf pit.
How to Ward Mid Lane (Blue Side)
The mid lane requires priority when it comes to warding. Many Supports and Junglers like to ward around the mid lane because it is the core section of the map. Splitting the map in two, the river and the middle lane are considered high traffic areas with plenty of different warding locations that need to be conquered. The mid laner is unable to ward the whole of the mid side of the map which means it’s up to the Jungler and the Support to help them ward.
Naturally, the Mid lane has more possible warding locations associated to it because of the architecture of the map. Compared to the other lanes, there are more possible direct ganking routes for the enemy as the Mid lane is wide open. This means that vision needs to be placed in more areas to stop potential ganks.
As you can see demonstrated by this picture, when you are the blue team’s Mid laner, you need to have wards that will provide you with as much information prior to the enemy getting face to face to you. The deeper the ward, the easier and the longer amount of time you have to react to it.
I like to have a Control Ward placed in the side bushes to deny enemy vision as well as being able to set up ganks for the Support or Jungler. It is recommended that you place this ward closer to your side of the map rather than the enemies as the enemy will have to overextend if they want to clear it. While the range of the ward doesn’t change nor does the job of it, putting the ward real close to your side in the bush will make it difficult for them to clear it. This is especially true if the ward you have placed is a Control Ward.
Having it over your side can prevent the enemy from destroying it over the wall. Depending on how the game is going, you may find it difficult to decide on which side of the map to put your Control Ward. I recommend that you put the Control Ward on the side that your team needs more vision on. If there is already a ward in the bottom side of the middle lane, then you should place a ward on the top side of the lane so you have vision on both sides.
When things go wrong, one of the most efficient ways to get back into the game is by farming and gaining experience. When you are not as strong as the enemy, you have to respect them and prepare for them to jump on you at any given time. To counter this, you should avoid areas where they are and instead rely heavily on good vision control.
In this image, we can see that there are a wide range of mixed wards. This is because when things are going wrong, you have to protect yourself as well as your team. As many Mid laners can roam and are able to move around the map with ease, it is important that you provide your team with deep wards to spot any potential roam from the enemy.
A ward that is slightly underrated is a ward that is placed in the middle of the lane. You might see your allies do this occasionally and you may think why they would waste a ward by putting it in the middle of the lane. Placing a ward in the middle of the lane has a few benefits. One of them is that it allows the team to know which way the Mid laner has gone if they have left lane to roam, backed or gone to pick up the blue buff. It also tells you if any other enemies are coming mid to siege the tower.
When you’re winning lane, you need to continue to apply pressure to the enemy by having wards inside their jungle to prevent them from entering or moving around the map. If you know where the enemy is at all times, you can capitalize on that and prevent them from doing anything
Like always, you want to have wards inside of the enemies jungle in areas that are high traffic and where the enemy Jungler or Mid may be walking through. Having invisible wards here will allow you to know where they are at all times and allow you and your team to set up a potential trap. It can also allow your other lanes to play aggressively knowing that the enemy Jungler is somewhere else on the map and unable to counter them.
It can also be beneficial for you to have Control Wards as well as other wards inside and near bushes. This is because it can allow you to sit and pitch a tent and try to execute an enemy as soon as they walk by. This is a really good way of snowballing your lead.
How to Ward Mid Lane (Red Side)
As the red team’s Mid laner, you too have a range of different warding locations. Just like the blue team, you should prioritize having wards that are slightly further out rather than close by to give you a longer reaction time to react to potential ganks.
As pictured above, there are a wide range of wards that can be placed in the bottom side of the map. I feel that this is very good area to focus on as I feel (but could be wrong) that many Junglers prefer to gank from the bottom side of the map compared to the top side.
Likewise, you would also want to ward the side bushes with either Control Wards or Warding Totems on your side of the map. Having a Control Ward close to your side will allow you to deny enemy vision if they place it in that bush and the enemy will not be able to clear it without overextending.
Many Junglers like to hide in the darkness around the mid lane where they do not expect any wards to be. Waiting for the optimal opportunity to go in and surprise you is what they want to do. This is why is it important to have wards that are in the enemies jungle, around the mid lane, and in the river.
Warding in these three locations will allow you to spot the enemy before they are able to do anything which will allow you to play safe and not fall into the trap. This is a huge benefit for your team because some players like to wait for quite some time before doing anything. This means you can waste their team by ‘baiting them’ without putting yourself in danger.
On occasion, you will find yourself on the back foot and you may have lost lane. It’s important that you don’t give up and try to get back into the game by warding efficiently and going for risk-free trades. Having wards that are even on the map will allow you to spot the enemy if they try to take objectives, as well as then running around the map.
Like suggested throughout this section for both teams, many Mid laners are able to kill and burst you down if you fall into their trap. This makes it incredibly difficult to roam around the map and get things done when you’re behind. One way of countering this is by warding every nook and cranny and not going alone around the map. Having areas warded around objectives such as the Baron and the Dragon will allow you to know if the enemy is doing it. This will make it much safer when you try to contest them. During the later stages of the game, face checking is no easy business and if you face-check at the wrong time, you could give the enemy the objectives for free.
Depending on how the game is going, you may prioritise top vision as it’s easier to ward. However, you should try to keep wards on both sides of your lane to prevent the enemy from invading your jungle and snowballing their lead into another lane. After level 9, you will find it slightly safer to ward if you pick up a Farsight Alteration on champions like Syndra or you can opt for a Red trinket as a roamer to keep the paths clear.
When you are winning your lane and have got the first tower, it’s important that you continue to apply pressure around the map. One way of applying pressure is a by warding the enemies jungle and taking away their camps whenever they are up. Mid laners are able to clear the camps pretty quickly if they have AOE abilities.
If the enemy Jungler decides to walk through their jungle and does not respect you, having vision of them may allow you to kill them if they are low enough. Having a plethora of wards inside the enemies jungle will not only benefit you, but it also benefits your Bot lane, your Top lane and your Jungler. Understanding where the enemy Jungler is at all times will allow your team to apply pressure as well as take objectives if they know that the enemy Jungler is someone else on the map.
Many Mid laners are assassins of such and like what we said with the blue team, you want to have wards in high priority- high traffic areas so you are able to kill the enemy if they start to roam or move around the map. If you know an area is not warded, you could hide in this bush and wait for the enemy to walk by and then assassinate them. A good bush to try this would be on the way to Baron or on the way to the Dragon.
How to Ward Bot Lane (Blue Side)
When it comes to the bottom lane, you need to have vision around your lane and in the river. As stated previously, the Support has to ward in the mid lane, the river, as well as the bottom lane. This is why there are quite a few wards outside of the bottom lane in this upcoming image.
When you are the blue team bot lane, your goal is to provide vision for you and your lane partner as well as wards for your team. This is why there are wards around the map. Vision in the river is very good as it can tell you if the enemy is doing the Scuttle Crab or if they are going for the Dragon.
Control Wards are also good in this situation as it can also tell you if the enemy is roaming through the river to either invade your jungle or to gank the Mid laner from behind. This is why these two Control Wards are pretty good when placed there.
Depending on how the lane is going, IE if you’re pushing or getting pushed in, you may want to place a more-aggressive Control Ward in your lane. Whereas if you are being pushed in, you cannot place a Control Ward in the bottom line river bush at all as the enemy will easily be able to clear it and you would have wasted some gold.
Compared to the top lane, you can ward the lane bushes inside of the lane at the bottom side of the map. This is because the enemy Support usually hides in this position in order to engage on you without being seen. If you keep a ward here, you can tell when the enemy is going to jump on you. If you are pushing, you could place a Control Ward in the bush behind you so your Jungler can lane gank. Having a Control Ward in this position will deny the enemy any vision of the Jungler of being there.
The blue team’s bottom side of the map has more warding locations compared to the enemies bottom side. This is because of the architecture of the map and how many bushes there are compared to the enemies. This means that you need to ward the correct bushes at the right time in order to provide your bottom lane duo with enough vision that it can protect both of you.
As you can see, the wards are mostly in the bottom side of the Jungle as well as in the river. Like always, you need to have even wards in the river so you can spot the enemy coming in and out of your jungle as well as if they start to roam or rotate. You also want to have wards that are in your bottom side jungle so the enemy does not ambush you when you are rotating from lane to lane.
You may ask yourself, why is there not many Control Wards directly connected to the bottom lane? There are a few reasons for this but the main issue is that is a waste of gold as the enemy can easily clear them resulting in them being ineffective. Control Wards, unlike Green Wards, are visible and if they were to walk through a bush, they can easily spot it. This means that you need to keep wards in this area invisible to the enemy so they do not clear them.
We do have one Control Ward in the bot side river bush which is there just for cheese! When you’re walking to lane or walking around the map, you generally do not check this bush when you are ahead. This Control Ward is used solely to abuse the enemies ignorance and hopefully, it will stay alive for long enough. This is the reason why we have a Green Ward here because it can be quite useful if you have started to push back.
When you are winning, you obviously want to have a mixture of even and deeps wards in the enemies jungle. This will allow you to know if anybody is roaming from another lane to come bot side or if the bottom lane starts to move around the map and match your roams.
Because you are far up in the lane, you need to have wards that would protect you when you are overextended. I do not recommend that you have obvious Control Wards placed in the enemies jungle as once they push the wave back, you would forfeit all of them. This is why you want to have them strictly in bushes and not just in plain sight like Green Wards.
It’s nice to have wards that give you and your other laners information. These wards will also give you enough time to back off if anyone comes to your lane to defend. As you are in enemy territory and overextended, they would have the advantage in chasing you down. This is because you have more of a distance to travel in order to escape which gives them a better chance of killing you.
How to Ward Bot Lane (Red Side)
As the red team, you need to prioritize vision that is on equal terms during the early levels and then move on to wider vision when the game starts to progress. On first glance, the wards seem pretty similar to the opposing teams bottom lane and that is true. However, there are a few specifics differences between the two teams.
First of all, you may notice a defensive mix of wards on your sides tri-brush. I would only recommend warding here if you are losing your lane or playing relatively safe. For example, if you are being pushed under your tower, then you would definitely want to ward here because it provides you with a defensive ward that will allow you to back off if need be. This is the only acceptable circumstance to warding this bush. You do not ever want to ward here if you are winning or even.
I wouldn’t recommend that you place a Control Ward in the enemies tri-brush because they quickly clear it if they decide to push the wave. This would mean that you have wasted an expensive ward. You can place a Control Ward in the bottom lane river bush if you are even or are pushing. This will allow your Jungler to possibly gank your lane. Once again, we have placed a ward in both bushes which can help you out if the lane is even. You can put a Control Ward in your side bush if you are pushing to enable your Jungler to lane gank, but you wouldn’t want to place a Control Ward here if the enemy is pushing you under tower as they can easily clear it.
When things aren’t going too well, you’ll need to bring back your wards and start to ward inside your own Jungle to prevent your Jungler from falling just as behind as you. When you are behind, it’s important to not allow the enemy to continue their snowball and put other laners behind. This is why it is important that you ward your own jungle and lane.
As we can see by this image, there are a lot of wards that in the bottom jungle. This is because it will allow your team to know if the enemy is going through your jungle in order to take away any camps as well as steal away any buffs that may be up. Having vision in the river will also allow you to know if and when they have left.
There are two separate Green Wards in the middle of the Jungle. This is to prevent any potential a bush by the enemy who may be hiding behind a wall or in the darkness. The areas that are warded are known “hotspots” for the enemy where they try to pounce on unsuspected targets. If you have these areas warded, you will not fall for their trap and instead, you can master a plan in order to kill them.
When you are behind, the enemy may run through your side of the jungle in order to get to the mid lane in attempts to take down the tower. If you have vision here, you would be able to follow the enemy without fear of face checking or being surprise attacked by them. It will also give time for your Mid laner to react and back off or clear the wave if they see the enemy coming.
When you are dominating the lane, you need to adjust your warding style. As you can see by this image, you should try to put wards around the enemies jungle to spot any potential Jungler interaction within your lane.
Vision is incredibly important when you are pushed up in the enemies side of the map. When you are ahead, it is important that you continue to applying pressure to the enemies bottom lane. However, if you were to get caught out in enemy territory, you may throw your advantage and give the enemy an opportunity to get back into the game. This is why vision is incredibly important because it can allow you to escape before the enemy gets a chance to group and collapse on to your lane.
Depending on the matchup and how far ahead you are. You may be able to place an aggressive Control Ward in one of the main bushes in the enemies jungle (see the mixed ward.) If you are not completely destroying the enemy, you may be unable to place a Control Ward here, but this is a very good bush to ward in general as it is considered a high traffic zone. Having a ward here will tell you if anybody is coming towards your lane which will leave just enough time for you to escape.
How to Ward After Laning Phase
We’ve discussed the laning phase, where you could ward, and we’ve discussed a lot of vision information, but we haven’t really touched on what to do after the laning phase has ended. Continue to buy Control Wards in the early game, the mid game and the late game. Just because you buy a Control Ward in the early game and it’s still alive, it doesn’t mean that you should not buy another one and place it somewhere else. If your Control Ward is alive but the game has moved on, place another Control Ward in a different area.
Here is a guide to where you could look to ward if the game is even and it’s practically a stalemate. A lot of the Control Wards suggested are just like the wards in laning phase and that is a pretty common sign you’ll see throughout this section.
Blue Team Control Wards
Even wards are a great way of providing your team with information of the Jungler if they enter the river or if anybody has left their lane. River wards or even wards are vision that is placed evenly along the map. If you were to cut the map in half, they would be along the joining line. Warding here is great because it can tell you if the Jungler is entering your jungle, leaving your jungle or going to gank a lane. It can also tell you if somebody has left lane in order to roam, rotate or go to an objective.
However, if the game is not going too well and you are losing, it’s important to adapt your warding situation and bring your wards slightly further back. You want to still have a mixture of even wards but many protecting your own jungle and their entrances. As the game will be fought more on your side of the map, it is better to have wards that are closer to your side than the enemies.
This is because it will give you more concrete information about them moving around your jungle and your side of the map. I feel that it is pointless warding the enemy’s jungle when you are behind because the enemy will most likely not be using their jungle as much as yours. For example, they would be prioritizing moving around your jungle compared to theirs and they would be stealing away all your camps. Furthermore, if you were to go and ward in the jungle you may get caught out of position which could allow the enemy to take an objective.
If the game is going incredibly bad and the enemy is knocking on your nexus towers, you would need to adapt your warding placement again and go for some defensive wards and a few even wards. Warding your own base is not always effective however it can be useful if the enemy is trying to siege a tower. Warding just outside of the towers range will allow you to destroy any wards that may be placed over the wall. Make sure to keep the ward out of range of the enemies auto attack so they cannot destroy it over the wall.
I recommend placing a mixture of wards evenly in your jungle and a Control Ward or two in your base to give you a wider knowledge of the enemies map movements. If you were to not ward your jungle and not place wards evenly, you would be unable to see if the enemy are trying to ambush you nor would you be able to see if they go to Baron or the Elder Dragon. It is a good idea to place wards that are in ‘kill zones’ as they can prevent you from being ambushed by the enemy (especially against assassins or mages.)
As the blue team, you have a wide range of warding places when you are winning. Without good ward coverage, you will not be able to abuse the enemies as much as you could have and this may give the enemy an opportunity to get back into the game. This is why it is important that you continue to apply pressure even when you are winning and give the enemy no room to get back into the game. If you do not continue to apply pressure to the enemy, you are not going to improve as a player because you have an advantage but you are not abusing it.
As we can see by this image, there are a lot of different warding places you can put your Control Wards when you are winning. Depending on where your team is focusing, you may want to stick to one side of the map compared to both sides. For example, if you are sieging the bot lane, you’d want to stick Control Wards around the bottom side of the Jungle. This will allow you to catch out enemies and also siege more effectively. And if you are trying to siege the top lane, you would focus on warding the top side. Experience will tell you where and when you should prioritize placing your Control Ward. These wards will help you to prevent flanks from champions like Jarvan.
We have suggested that you place more wards around the enemies jungle compared to the river or inside your own jungle. This is because you want to catch the enemy out before they are able to get too far out of their base. If they were able to freely roam around the jungle, they would soon be able to catch up in gold and farm.
Red Team Control Wards
Just like the blue team, when you are playing as red team, you should prioritize having wards that are even on the map when a game is pretty close. Warding in these areas like suggested will give your team a lot of information and protect your team thanks to the location of many of them.
You will see a lot of similarities between the two pictures and you can technically use both if you are on either side of the map. So make sure to use both of the ‘even warding’ images to your advantage for future reference.
Just like before, if the game is looking rough and you are losing across the board, it’s time to start bringing your Control Wards back into your own jungle to give you some security and protection.
There are some even wards and more defensive wards. The even wards will provide you with some security if the enemy decides to invade your jungle. Defensive wards will provide you with information once the enemy has entered your jungle. Additionally, having a Control Ward around at the back end of the Baron pit will prevent you from walking into the unknown and face checking a potential ambush from the enemy which could result in the enemy being able to take the Baron.
When you are on the back foot, you definitely need to keep your side of the map warded and you need it warded properly to get back into the game. Without sufficient warding to protect your team, you will start to fall behind in farm, gold, and experience and it will give you little to no chance to get back into the game.
When you are at such deficit, you need to rely on getting picks and the enemy throwing. This cannot be achieved if you do not have enough warding around your base and the surrounding jungle. So it is important that you have a mixture of wards inside your base, inside your jungle and in the river. Just like the previous image, warding in bushes that are high priority or have heavy traffic (generally speaking) will prevent your team from being ambushed and the enemy taking away objectives, which again, would give you little to no wiggle room to get back into the game.
When you are winning, it is important to give no room for the enemy to breathe by consistently applying pressure to them wherever they are on the map. Without constant pressure, you may give the enemy an opportunity to get back into the game which is something you want to avoid. It may also cause the game to last longer which will also give them a higher chance of getting back into the game and you throwing.
When you are winning, you should have more offensive wards and wards placed in their jungle. This will prevent them from being able to rotate around the map as well as take their jungle own camps including their blue and red buff.
As you can see from this image, there are some wards around the bottom side, the top side and near the Baron pit itself. We’ve also included wards outside of the mid lane entrance to prevent the enemy from placing wards over the wall. Having Control Wards around the area that we’ve suggested will allow you to siege and flank the enemy as they will not be able to see you coming.
We’ve talked about ambushing and how important it can be for the enemy, but you can also use it yourself. If you (as a team) set up in a bush that is traditional pathing to the Baron, your team could hide and ambush them as soon as they walk up towards you. Control Wards would work heavily in your favor as they would not be able to see you hiding there.
Where to Ward While Sieging
We have already discussed a lot about warding and where you should ward during the laning phase for when you are behind or ahead. Now it’s time to discuss where you should look to ward when you are attempting to siege objectives. We have indirectly touched upon the subject already, however, now we’re going to go into slightly more detail and give you advice for specific team orientated sieging.
Warding while you are sieging objectives is incredibly important for the safety of your team. When you are trying to take an objective, the enemy will try to stop you at all costs. If you have sufficient vision coverage around the objectives, it will allow your team to take the objective more safely or back off if you are unable to secure it.
To keep this section short and sweet, we’ll try to provide you with the information for all the major towers that are hard to siege. This includes tier 2 towers and the inhibitor towers.
Blue Top Lane Siege Wards
The top lane tier 2 is probably one of the easier objectives to take out everything we are listing because the top lane is usually left alone for a good portion of the game. It doesn’t really get touched unless somebody is split pushing or the minions are advancing. While this isn’t the case for every game, there is more pressure in the bottom and mid side of the map compared to the top lane.
Let’s start with the blue team once again. When you are attempting to siege the top tier 2 tower, you will be quite far from base as it’s one of the furthest places you can be on the map away from your base. When you are trying to siege this tower, you need vision in the top side of the enemy jungle to protect you and your team from being flanked by the enemy.
There are many warding locations that you can use to your advantage and some of the wards we have suggested can come in handy. It’s important to note that this section, in particular, would benefit from a lot more team-oriented wards as the more vision you have in the enemies jungle, the easier it is to siege an objective.
Depending on the situation, you may find it valuable to place a Control Ward in the open of a choke point. This is good as it can prevent the enemy from being able to place wards over the wall near the tower. This can deny the enemy vision of anybody who may be attempting to jump over the wall in order to tower dive. Of course, you may be unable to do this if you are not able to dive or apply pressure to the tower directly.
It’s good to have a mixture of offensive and defensive wards when you are far up in a lane. We will definitely be repeating ourselves, but when you are in the enemies territory, you need to have wards that are aggressive and defensive in case you have to back off. Whether you are split pushing or sieging objectives with your team, having these types of wards will give you enough time to back off in case of a flank.
They can also provide you with a lot of other useful things. One example is that if a bush is housing a Control Ward and you are split pushing, your Jungler could wait in this bush and you together could try and kill the enemy. This sort of bait is perfect when it comes abusing the enemy and taking a valuable tower.
Sieging an inhibitor can actually be slightly easier in comparison to a tier 2 tower in some retrospect. This is because gameplay can be quite repetitive without many options to what the enemy can do to stop you from taking the objective. I’m not saying that these towers are super easy to take and they can, in fact, take a long time to destroy. What I am saying is that: what the enemy will do to stop you is almost always scripted.
This is one of the reasons why there are not as many warding spots for you when you are sieging the top lane inhibitor tower. There are some very obvious wards that are recommended to prevent the enemy from flanking you and to help you escape. But, the most effective wards are the wards that deny the enemy vision.
Utilizing your Trinket as well as a Control Ward can deny the enemy any vision just outside of their base. This could make it very difficult for them to leave. When you want to ward outside of their base, make sure that they will not be able to destroy it over the wall. I recommend that you place a Control Ward directly away from the base and have it close to the jungle wall to ensure that they cannot auto attack it.
Red Top Lane Siege Wards
Sieging for the red team is actually pretty good when it comes to this specific scenario. Once you are in the enemy’s jungle, it can be difficult for them to get you out. Having decent ward coverage when you are trying to take this objective can make it even harder for them to do so.
I recommend that you ward all the major entrances to the middle of the jungle. If they try to take you on from the side, you would be able to see them- which will allow you to back off in time before they initialize their team fight. Having wards that directly cut the access into the top side of the jungle will also allow you to swap objectives once you take down their tower.
Having wards in the wolf’s pit as well as the brush near the mid lane will allow you to see if the enemy starts to rotate from the mid tier 2 to the top tier 2 as well which could give you the opportunity for some of your team to collapse on them and switch targets.
While it may not always be possible, after taking the object, you can rotate through their jungle and try to pressure the Baron. As the enemy will have no ward coverage in the jungle, you may be able to ambush them or just take the objective straight up.
After you have taken the tier 2 tower, it’s time to siege the inhibitor. Many of the wards are the same as previous except for the noticeable Control Ward outside of their base as well as the one that placed inside of their base. Having a Control Ward outside of their base will prevent the enemy from being able to spot you if you decide to back off or move from the top lane to the mid lane.
It will also allow your team to have a slight (theoretical) advantage of the enemy would not be able to poke you as efficiently as they will not be able to see where you are. You can use this to your advantage to siege the tower in reasonable health which allow you to start a team fight if the enemy decides to jump on you. Furthermore, having a ward in the enemies base will allow you to poke them effectively in order to make them back off which can give you ample time to take the objective.
Blue Mid Lane Siege Wards
The mid lane requires perfect vision throughout when you are trying to apply pressure and siege their objectives. This is because the mid lane is more open compared to the other side lanes so it requires adequate vision on both sides of the map in order to protect you and your allies while you try to take the towers. This is no easy job for the Support or the Jungler and it needs the whole team to work as a unit in order to ward both sides.
When attempting to siege the mid lane, you will find yourself struggling to ward effectively as there are more warding locations and potential flanking opportunities for the enemy. At first glance, you may think that many of the wards are going to be similar to other lanes and other images we’ve already showing you and while that is true to some extent – sieging the mid lane is very difficult and it is near impossible for you to ward every possible area around mid to prevent a counterattack.
As the mid lane is…you’ve guessed it, in the middle of the map, you have possible flanking opportunities and warding requirements for both sides of the lane. As you can see by the first image, you need to have deep wards inside the enemies jungle. Having deep wards inside the enemies jungle and wards outside of their jungle can allow you to spot and poke the enemy if they try to defend the objective. It can also allow you to switch focus if you see the enemy trying to attack you from the side.
I recommend having Control Wards inside of the enemies jungle near the wolf pit to prevent them from being able to ward over the wall. This will allow you to clear their vision with ease as well as prevent them from being able to hit their skill shots on you as they would be in the blind.
When you are attempting to take the inhibitor towers, you will need vision inside and outside their base to prevent them from being able to see your team. Unlike the top or bottom lane, you will need vision on both sides of the tower and a Control Ward on both sides of the outer wall of their base.
The call for wards on each side of the tower is to ensure that you can see the enemy if they move around their base. It will also allow you to hit the enemy more successfully while also denying the enemy poke potential as they will be unable to see you.
It’s not unknown for a siege in the mid lane to occur before the tier 2 towers in the side lanes have been taken. Having Control Wards around the enemies jungle will allow you to rotate to those objectives if you are unable to effectively siege the mid lane.
Red Mid Lane Siege Wards
For the red team, warding is rather similar to the blue team except for the fact that it’s on the other side of the map. It is important that you have wards on both side of the lane ot allow your team to know the whereabouts of the enemy while you’re sieging an enemy tower.
We’ve got wards placed near and afar on both sides of the map to ensure that if an enemy tries to flank your team or tries to catch somebody of guard, your team will know about it and you would be able to react to it in time.
As you’re sieging the mid lane, you can place a Control Ward in the bottom side Jungle bush. This would be a good ward to place if you have bottom side priority as it can allow your team to quickly rotate to the bottom lane if you want to continue a siege. I would not recommend warding here if you do not have priority though because the enemy will easily be able to clear it and use this bush to set up an engage.
To get priority on one side of the map, you should have a member of your team nearby in the jungle that can prevent the enemy from advancing. For example, 4 members of your team could be in the mid lane, while one member is off to the side in the bottom side near the bush. This is usally a split pusher like Ahri, Fiora or Darius. Once again, when you’re knocking on the enemies base, you need to have vision that is in the enemies base and a mixture of defensive wards to stop the enemy from getting a flank on you.
Warding in the top side of the enemy’s jungle can be useful after you’ve sieged the objective. This can allow your team to move swiftly to the Baron after you’ve left the mid lane. Alternatively, if the Baron is not up, having wards placed in the bottom side of the jungle will allow you to rotate to the Dragon or Elder Dragon.
Vision around the lane when sieging an objective is for a few things. It can prevent yourself from getting flanked, prevent the enemy from engaging on your team, prevent the enemy from spotting your team and also allowing your team to quickly rotate to another lane or another objective after your initial siege. The mid lane is the core of the map, so if you can conquer the mid lane, you can take over the map.
Blue Bot Lane Siege Wards
When you are trying to siege an objective in the bottom lane, you need to have vision inside the enemies jungle to prevent them from collapsing on you. Whenever you are sieging any tower in the game, you are in enemy territory. Any engagement or trade with the enemy on their turf can give them the advantage when you are overextended.
Sieging the red teams tier 2 tower can open up the bottom lane for your team and allow you to take away the bottom side jungle for the enemy. Taking away resources and denying the blue buff for the enemy mid is a great way to play the war of attrition. When you are attempting to siege it, you will need to have defensive Control Wards in the main bushes behind you.
Warding in these areas is very nice as it can prevent the enemy from making teleport plays and deny any potential flank opportunities. Control Wards specifically are very helpful at this as they can deny the enemy clear vision to make these plays. There are also a lot of deeper wards that are indirectly benefiting you when you are sieging.
These wards are further out and can spot the enemy if they decide to rotate or roam down. These wards cover all the major entrances and exits that are safe to ward and are guaranteed to provide you with information. Many of these wards are specifically placed in the middle of any choke point because they will grant vision in multiple angles.
The Green Trinket ward that is placed right in the middle of the enemies jungle grants vision of four key points of entry. This ward is invaluable because for only one ward it provides so much information.
When it’s time to knock at their inhibitor towers, things can get pretty messy. I recommend that you ward aggressively while also providing your team with some defensive wards in case the enemy decides to make a play.
There is no real warding strategy when you are trying to take down and inhibitor as you may already have seen, but remember to always place a Control Ward outside of the enemy’s base to prevent them from placing any wards over the wall.
I’d like to remind you that it needs to be out of range of the enemies auto attack so they can not clear it and that should be able to spot any wards that are placed over board!
Like before, you also want to place a ward inside the enemies base, but outside of the towers range to spot any enemies that are possibly looking to engage. When your team is sieging like this, it is important that you keep an eye on where the enemy is and on the map the whole time to prevent them from getting a flank attack off on you.
Red Bot Lane Siege Wards
When you are playing as the red team and are in the sieging bottom lane, it is important that you have ward coverage that is nice and safe to place.
In this image, we can see that there are not that many wards that will directly help you siege the bottom tier 2 tower. The reason for this is simple, it’s too risky to ward deeply on your own as being caught out could ruin the siege completely, this is especially true for squishy champions like Lulu or Janna. However, if you were sieging mid and then decided to rotate to the bottom lane – vision would not be like this and you would be able to place much deeper wards- as they would be on route to the bottom lane. We are going slightly off topic, but this is an example of adapting to your situation and your environment to improve your warding capability.
The majority of wards that are placed are going to be nearby to where your team would be. This is because they are less risky to place but also provide just as much information as deeper wards. This is because they are placed in (potential) high traffic areas that are slightly out of the way to provide your team with enough information and reading time so you can back off before the enemy gets to you.
When you are trying to siege the bottom lane inhibitor, you need to make sure that the enemy is in complete darkness. If they cannot see over the wall, they will be trapped in their base and may be unable to engage. Use this to your advantage by placing Control Wards outside of their base so they cannot scout or place any deeper vision.
Specifically attempting to siege this tower requires vision around the enemies jungle to prevent them from escaping or trying to pick off members of your team. If you can deny them vision via good Control Ward placement and efficient sweeping of their wards, then sieging becomes a lot easier.
While we suggested some very specific wards and where some of the pictures didn’t have many vision wards placed, it is important to note that the more wards you have when sieging,- the easier it is to take the objective. Just because we didn’t include a suggested ward, it doesn’t mean you can’t ward there.
Faelight Tips and Tricks
Faelights are a new feature in Season 26 (2026) for League of Legends. They are located on the map: 2 on each side of the river, and 2 near each team's base gates. When you place a ward on the Faelight locations, they grant a large scope of vision, which allows you to spot the enemy Jungler, collapsing enemies or any champions walking around Summoners Rift. You can see the locations of themon the image below.
In the early game, it is recommended to place wards on these locations (for side lanes) as they can grant a lot of vision and deny you dying to first blood. You’ll want to do this around 30 seconds before the scuttle crab spawns.
There is another set of Faelight locations near the river entrances to the jungle. These can be good locations to place wards, especially control wards, and they’re good at spotting Junglers who tend to gank from afar such as Nocturne, or use invisibility spells like Twitch or Shaco, as you can see them before they go invisible.
When taking objectives, it is important to place vision on these Faelights and, ideally, put a control ward or a normal ward on both, as it can provide a lot of information and help prevent flanks. However, you will also want a control ward in the pit to deny vision and prevent potential theft from the enemy Jungler!
You may have noticed that there are also Faelights near each base, just outside of the gates. These can be good warding locations for the defending team, as it can grant vision into your jungle, which would offer some safety if you need to check your jungle, or run to the Drake. Placing a ward here is a good idea and helps prevent face-checking.
However, these are also effective against teams. If you place a control ward in this Faelight, it prevents the enemy from getting any vision over the wall, which is ideal.
General Faelight Tips and Tricks
Now lets discuss some tips and tricks to help you while playing LoL.
Use the Faelights instead of face-checking objectives. They will help you avoid getting ambushed or killed by the enemy!
As a Support, while you should prioritise warding, do not go alone as you’ll be an easy target for the enemy. Wait for your team to help you.
Only place a control ward in your lane (top and bot lane) if you’re constantly pushing or winning the lane, as the enemy will just destroy it, and you’ll waste 70 gold.
If you’ve recalled and running to the dragon, placing a yellow ward in the one Faelight near your base could be a good option to scout for vision in case the enemy is setting up a flank.
Jungle Control Warding
Having wards placed in your jungle as well as the enemies jungle is a great way of knowing where the enemy Jungler is at all times. Vision like this can be quite risky to place especially if you are going into the unknown. This means that you need to go into the enemy jungle at times when it is safe to do so. In this section, we will go into detail about where you should place wards in the enemies jungle for maximum guaranteed information and where you should ward your own jungle if you are being invaded frequently.
Blue Team Jungle Wards
Let’s start with blue side. When you are the blue team, you have a wide range of warding locations that you can use to your advantage when you are trying to ward the enemies jungle. Each ward has its strengths and its weaknesses and it is important to note that warding the enemies jungle is all about trying to get information on their whereabouts.
This means that you want to prioritize wards that are in areas that are high priority or frequently used jungle routes. As you can see, we have put emphasis on areas where the Jungler is most likely going to walk through in their jungle and prioritized those populated areas compared to areas or paths that are less regularly taken.
As we can see by the image, we have gone for a mixture of deep and shallow wards but every ward could provide information. We have gone for wards that are generalized and less specific because they will give you a higher chance of gaining information. For example, we do not have many direct wards at the jungles entrance as these only show the jungle when they are coming in and out.
In simple terms, if you know that the Jungler has entered his jungle, you’re gonna lose sight of them as soon as they go in. Whereas if you place a mixture of shallow and deep wards you will be able to see them throughout.
When you want to provide vision inside your own jungle, you have to prioritize the jungle entrances rather than having deep wards. One of the reasons for this is it will allow your team to have information of the enemy entering your jungle before he actually takes away your camps. This will give them enough time to react and come to your assistance when possible. Furthermore, many Junglers go into the enemies jungle in order to gank a lane. It is not uncommon for players to do this especially if they want to dive the enemy so having wards near your jungle entrances makes sense.
I would recommend that you try to ward the river as well as your own jungle entrances to ensure maximum information to the whereabouts of the enemy Jungler while also providing valuable information to your team in case they do not invade.
You wouldn’t start warding your Jungle directly unless you are forced to. For example if you are behind or the enemy is good at invading. Unless you have to, you should try to prioritize wards in the river and the enemies jungle.
Red Team Jungle Wards
Now let’s discuss what you can do as the red team to ward the enemies jungle. Like we just said, there is a range of wards that you can place and we have put wards at every single jungle entrance in the blue sides jungle. This will give us a lot of information about the location of the enemy jungler if they intend to gank a lane.
The bottom side of the jungle is the easiest to ward and the majority of Supports can easily go into this side of the jungle to place deep wards, especially tanks like Leona, Thresh or Nautilus. This is why we have included three separate spots for either Control Wards or Trinkets to be placed.
The top side jungle is harder to ward in a some aspects and I feel like the majority of jungles prioritize the bottom side of the map. Additionally, there are “no real good” Control Ward locations in the top side of the enemies jungle that can provide you with valuable information that won’t be destroyed instantly except for the one that we have suggested.
Once again, if you have to ward your own jungle, you want to prioritize wards that are in the river or near your jungle entrances. This will provide you with the most information possible and can prevent the enemy from invading you. However, you can include some Control Wards inside your own jungle if you are frightened of being 1v1’d by the enemy. This is especially true in the top side bush when many have been sacrificed rip brothers and sisters.
Warding Objectives
When it comes to taking a major objective such as the Elder Dragon, an elemental Dragon or The Baron, you will need to have enough vision around the objective to make it safer to take. As both teams are practically the same, we will discuss both the warding locations for both teams in one go. This will allow you to adapt to each situation and allow you to know where to ward when you’re on both sides of the rift.
The further the wards are from the objective, the longer length of time you will have to react to the enemy. If you’re unable to finish the objective in time, you can back off and let it reset or if you can take it- try to burn it down and finish it off. If you are able to turn on the enemy and fight them, then you can also do that if you’re sure can win the team fight. In a lot of situations, fighting for a 50/50 Baron is not worth it so having good ward coverage can definitely help you out.
It is recommended that you also place a mixture of wards that can be sacrificed to slow down the enemies advance. While it’s not ideal, making the enemy waste time is a good way of gaining a small advantage when it comes to finishing of the objective. I do not recommend that you use this as a general rule as it is a waste of wards, but it is something to keep in mind when you’re trying to rush and take an objective.
Depending on what side of the map you’re on, you always want to have dedicated vision in the enemy’s side of the map. These wards will tell you if enemy decide to contest the objective. For example, if you’re the red team, you would want to ward over and around the Dragon to spot the enemy. You would not want to ward your own jungle as the probability of the enemy coming from your jungle is near impossible. As the Dragon pit is on the blue side of the map, to spot the blue team, you need to ward the blue side of the map around the pit.
Compared to the blue team, when you wanted to take the Dragon, you should ward the red side jungle. This is also true for the Baron. As the blue team, you would want to ward evenly and in the enemies jungle to make it safer to take the objective. Where as for the red team, you would want to ward evenly and ward the blue side top jungle.
Warding in the enemies jungle as well as evenly across the river is the best way to take one of these major objectives. Like suggested in the sieging section of this guide, the more wards you have, the better. So if your team has wards to spare, don’t be afraid to put them closely around the object to make it safer.
Before taking the objective, make sure that you use your sweeper to spot out any wards. Furthermore, you should put a Control Ward in the pit itself to clear wards if you don’t have your Sweeper ready or block out any potential new vision. Keep in mind how wards work, if there is a Control Ward placed, it will block out vision and not show the objectives health after a brief period of time. If there is an ally Control Ward and an enemy Control Ward in the pit, they will not cancel each other out and the enemy will be able to see the health.
Finally, if the enemy places a normal ward when you are taking the objective, DO NOT ATTACK IT! Attacking the ward will show the enemy the HP of the objective which may allow them to steal it.
Clearing Enemy Vision
Clearing vision is just as important as placing it and it’s the job of every role to contribute. When you think of clearing vision, you would usually think of the Support and the Jungler who go out to seek and destroy the enemies vision and while that is true to some extent, it is important that everybody buys Control Wards to try and limit the enemies map presence.
There are three main ways of clearing vision in League of Legends and I would like to experiment with a fourth suggestion that could be considered a way of denying vision.
1. Buy Control Wards
The first and most obvious way of denying vision is by purchasing Control Wards. Control Wards are a great way of spending your money as they can provide your team with a lot of information. They can tell you if a bush is warded or not which will allow you to set up ganks for your Jungler. They can also tell you if an objective is warded.
Control Wards sound great right? Yet not everybody purchases them. You might pick up one or two a game which on the surface seems like a good amount, however it is not nearly enough. It is important to buy Control Wards throughout the game to continue denying and applying pressure to the enemy.
I cannot tell you how many Control Wards to purchase as it depends on what role you are playing, how the game is going, where your team is focusing on and loads of other situational stuff. The way to understand it is, try to buy as many Control Wards as you can throughout the game and place them in areas that could provide you with information.
As a Support, it’s good to have a few on you at any given time so you can place them as you move around the map. It is good to note, however, that you should not put your core build behind by purchasing too many wards.
2. Use a Sweeping Lens (Red Trinket)
The second way of denying vision is by purchasing and using a Sweeping Lens. This is not going to be ideal for every role and it is only really the Support and the Jungler are who will use a Sweeping Lens. Sweeping Lens allows you to block out and deny enemies vision around the map which means it is a valuable resource when used correctly.
A good place to look is throughout the river. If you are roaming, you definitely want to use your Sweeping Lens as you go along to look for wards and clear them.
The Sweeping Lens blocks out wards that have been found. You can use this to your advantage by walking through the river without being seen. You can also use it to deny vision around objectives such as the Baron or Dragon. The Sweeping Lens will however show you on the map if you decide to order auto attack it and it will also show you briefly before it cuts off. Control Wards do not get switched off when they are being swept by a Sweeping Lens- so keep that in mind when you try to clear them.
When I use my Sweeping Lens, I try to take advantage of the big radius of it and walk through as many bushes as I can in order to try and find any vision. One way of doing this is by walking in the middle of the river and taking advantage of the range.
For Supports, remember to change your Trinket as soon as you are about to complete your quest in order for you to start being able to deny vision more thoroughly. As you do not need another set of wards on your trinket, it’s best to go with this option as you can stop denying vision in a wider radius. I’ve said it enough and for good measure, remember not to waste it as use it appropriately.
3. Use auto-attacks and auto-attack resets
The third way of denying vision, which may not be available for everyone in the early game, is by destroying wards through auto-attacks. Many champions will be able to do it in the late game, as their attack speed increases. The Warding Totem or Green Trinket has 3 hit points. Before it goes invisible, it remains visible and is able to be seen by the enemy. If the enemy were to auto-attack the ward 3 times before it goes invisible, it would be destroyed. You can use this short delay to your advantage by trying to destroy wards before they goes invisible.
Depending on who you are playing and if you are in a solo lane or a duo lane, you may find great success in being able to destroy these wards before they go invisible. For example, the Mid laner may not be able to destroy any of the enemies wards in the early game of as they lack attack speed. This may also be true for the Top laner and the Jungler. Bottom laners have more success in being able to destroy the enemies vision as there are 2 people in the lane which gives them more of a chance to destroy it. If you know that you can destroy the ward before it’s about to go invisible, try to attack it and destroy it.
Many champions have abilities that allow them to have an auto attack reset. This is a huge bonus when it comes to clearing wards as it gives you a free auto attack. Many champions including; Leona, Lucian, and Dr. Mundo have this ability which give them the added advantage of being able to destroy wards. If your champion has one of these abilities, make sure that you utilize it and try to destroy the enemies vision in lane.
4. Avoid certain parts of the map
The final method (which isn’t really a method, more of an idea) is by denying vision by avoiding certain areas of the map. Thanks to the vision ping, you can communicate with your Jungler to tell them of an area being warded.
If the Jungler or another roamer knows that an area is warded, they could take an alternative route or avoid a certain part of the map to prevent the enemy gaining any information of the whereabouts of them. This could be seen as a way of denying vision as the enemy would not get any information from the ward.
Now you know about all the major ways of denying vision, it’s now time to take this into practice. Out of the four methods, the easiest way of improving your ability to clear wards is by purchasing Control Wards throughout the game and placing them in areas of high importance since this is something you can do across all five roles.
Real Game Scenarios
Just like our wave management guide, we found great success in helping players understand different situations by giving example scenarios and what we think you should do in them. In this section, we are going to give you some popular matchup and specific warding techniques to help you understand where you can ward against certain enemies to have an easier time in lane. We won’t be covering every scenario for every role and every champion, so if the one you’re looking for isn’t covered, try to apply some of the concepts from the examples we listed.
Playing Mid against Shaco or Twitch: Levels 1-3
There are a few main warding techniques you can use when playing against a Shaco or Twitch. This is a big problem for many mid laners because of their invisibility and notorious level 2 gank potential. This can make it quite difficult to play aggressively at level one or two.
I recommend warding in either of these locations on each side of the lane to protect yourself. Warding slightly outwards is good because it will allow you to see them before they go invisible which will allow you to back off in time and not get killed by them. Furthermore, warding outwards gives you more protection as a whole because the enemy may go through different routes to get to your lane. Again, they are good at this because of their invisibility.
Playing against Nocturne: Level 6
Up until level 6, Nocturne will struggle to get around the map and gank lanes. One of the reasons is because he has no real way of getting onto the enemy without the enemy disengaging or escaping thanks to his lack of hard crowd control (his E is a form of crowd control, however, it is easy to escape from which makes it difficult to work around). This is why we see many Junglers power farming until level 6 and then going to gank lanes.
As Nocturne’s Ultimate range is huge, it can be difficult to ward against him because he will never be close to wards as he will always come from afar. This means that short or shallow wards against him are rather pointless. Instead, you should place deeper wards in and around the map to be able to spot him.
Here are some of the places where you can ward against him to prevent some of his ganks or at least see him before he Ults you. As you can see, there are some deep wards in there which can be difficult to get down alone. If you are frightened of meeting him in the enemy’s Jungle, do not go alone or wait for assistance from your team. If they cannot come and help you, you could go when Nocturne is spotted some else on the map as this will be the safest time to place wards.
Conclusion
It’s time to wind down this vision guide with a small reminder and a remark that you should think about when warding in the future. League of Legends is an incredibly situational game and you have to adapt to every scenario when a head and behind. We have done our best to provide you with valuable information that can help you overcome each situation and improve your warding game.
You may agree or disagree with some of our ward suggestions and that is fine, as every game is different, it is understandable that everybody can have different opinions on where to ward and where not to. At the end of the day, is very important to remember one key thing and that is better to have ward then have no wards.
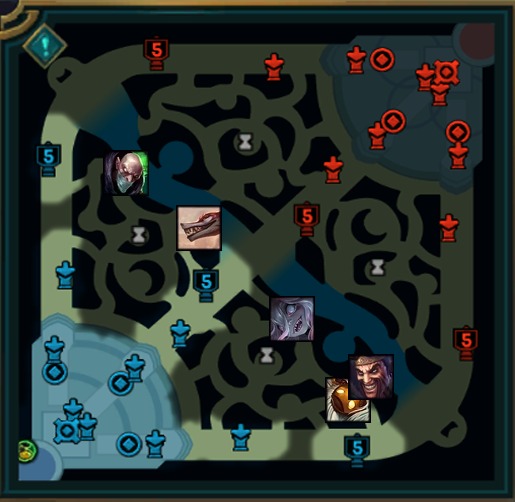


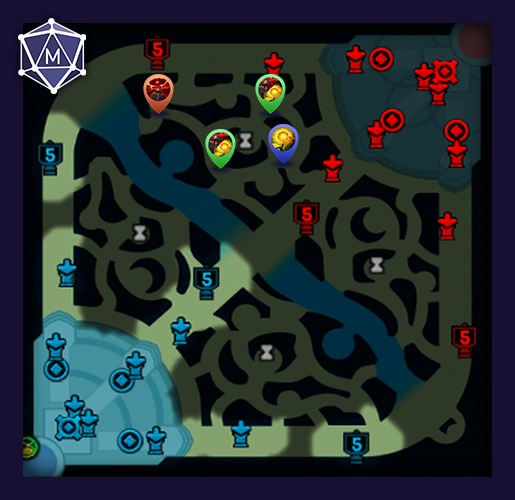
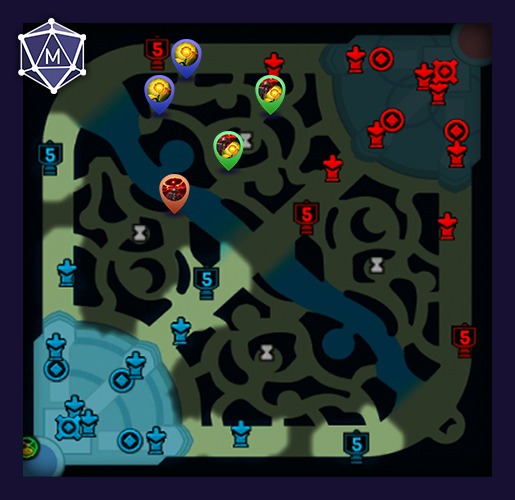


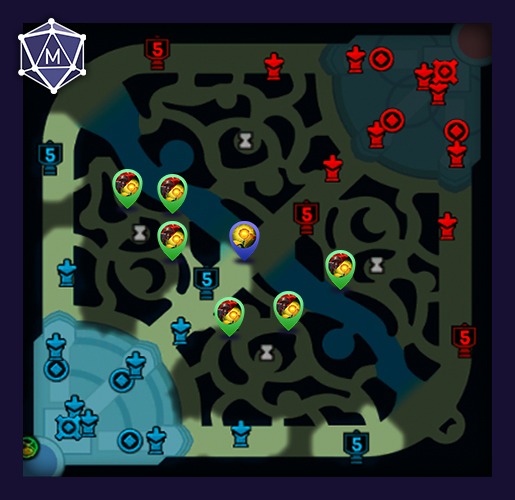

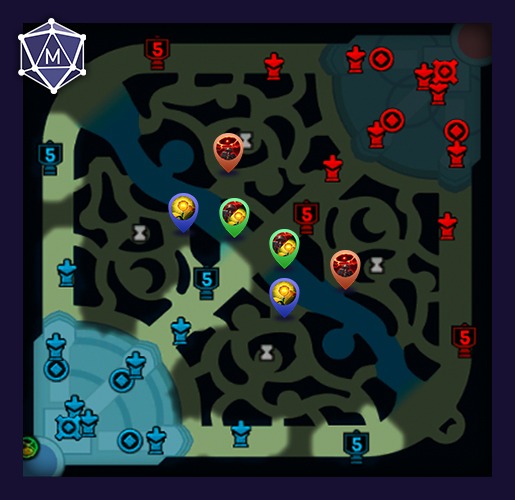
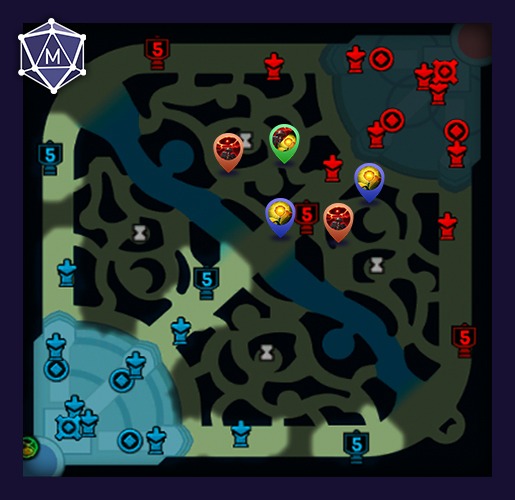
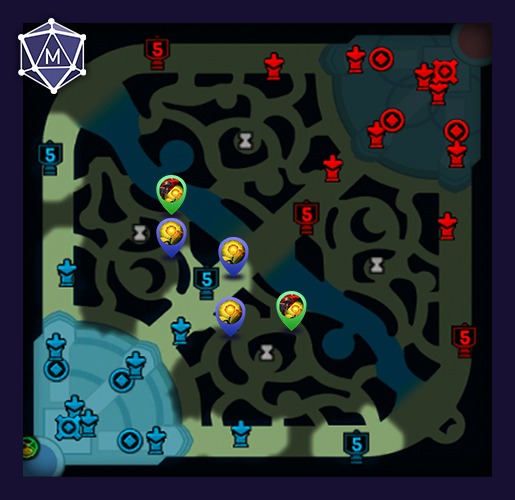
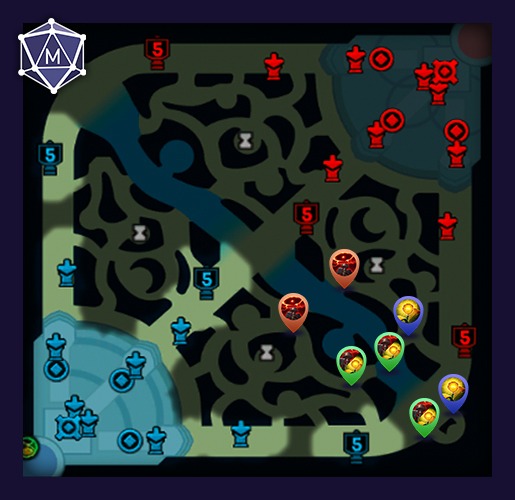
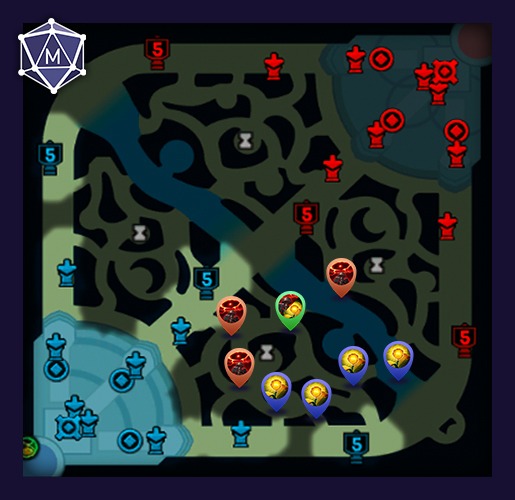
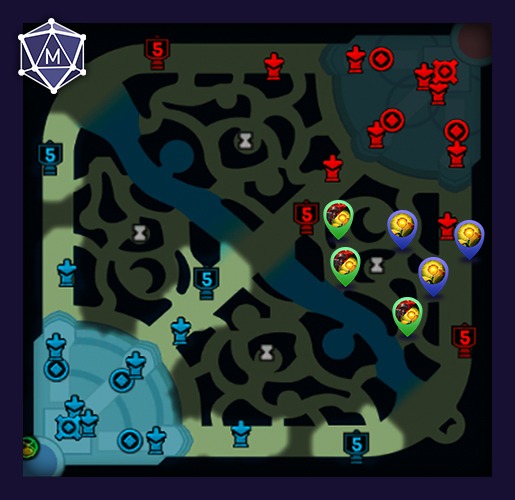
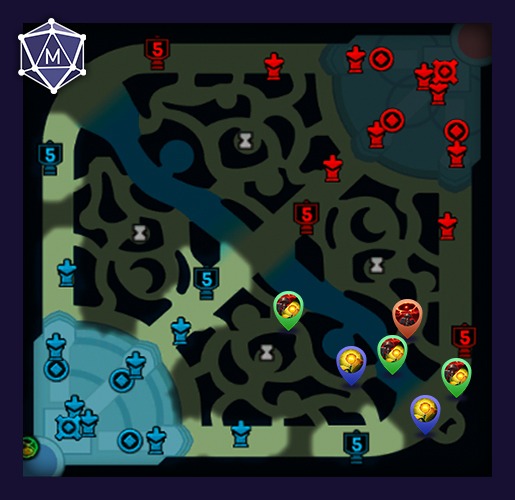
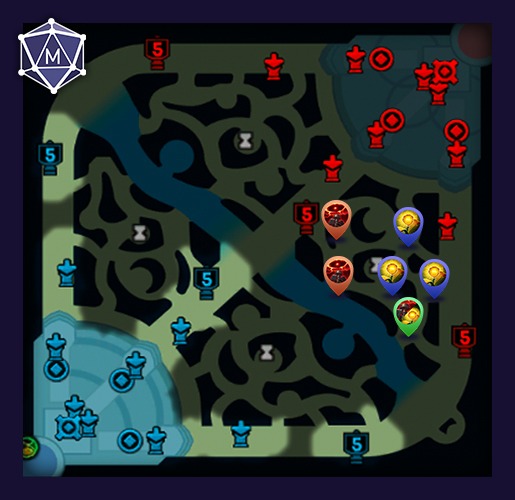
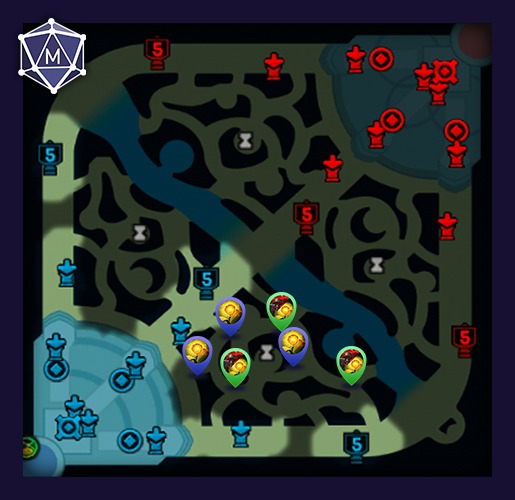
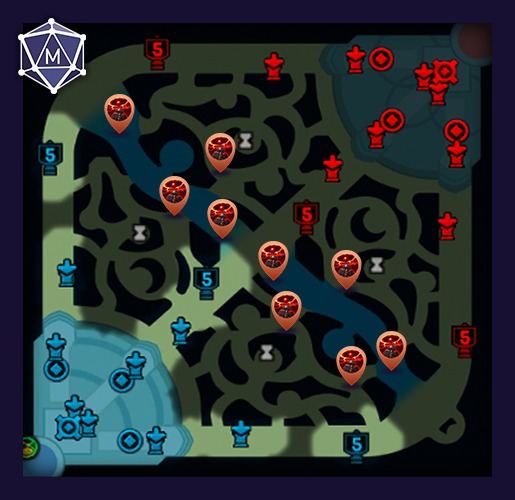
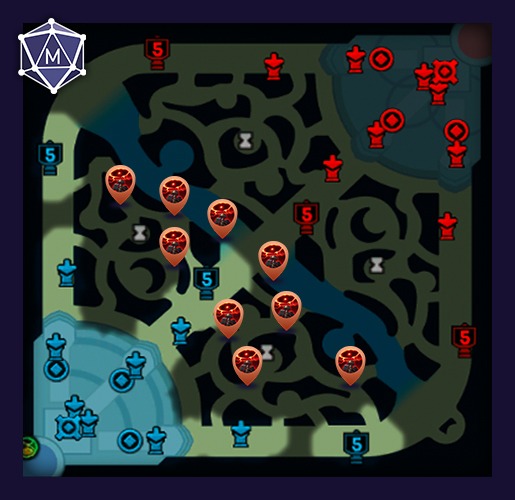
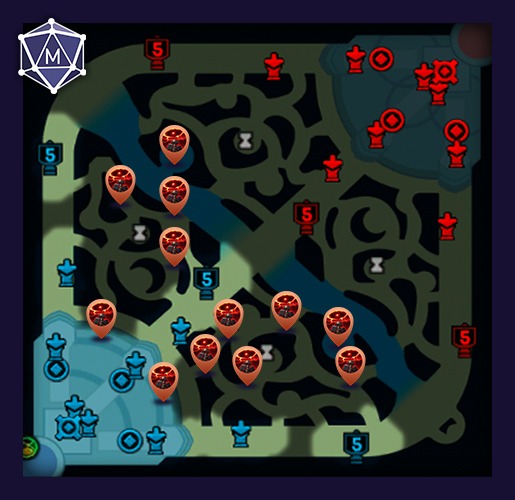
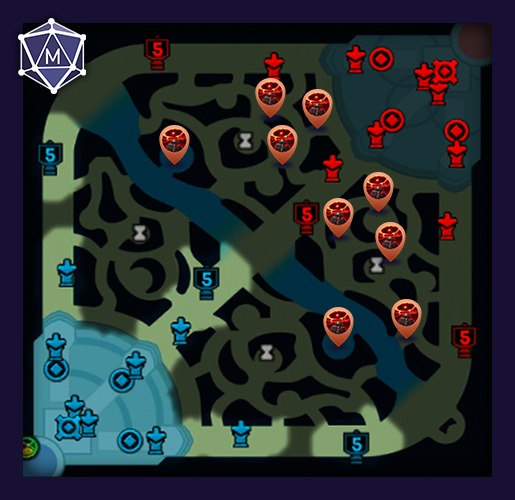
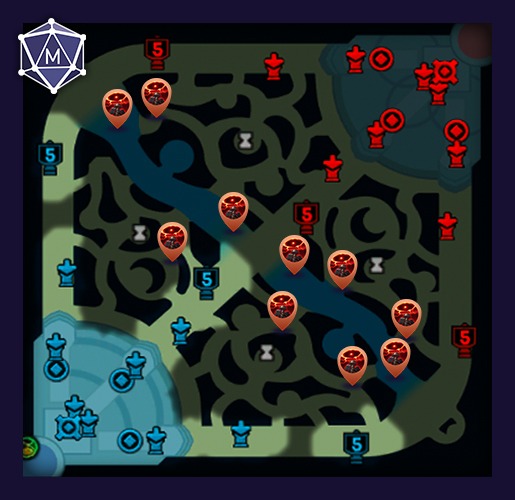
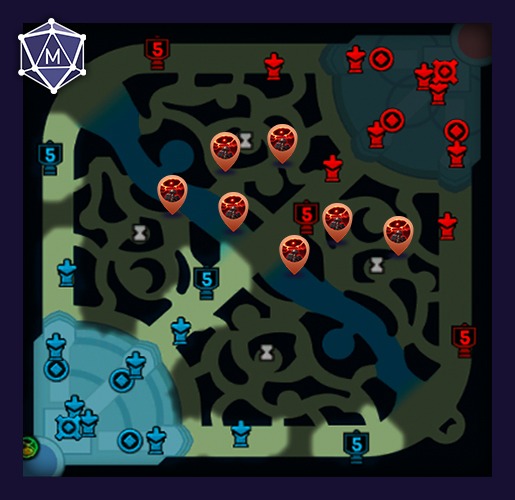


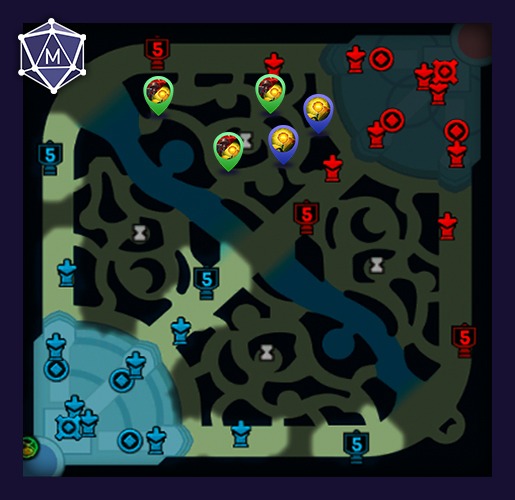
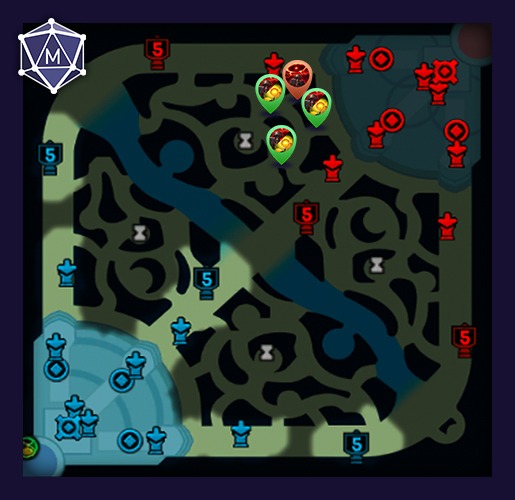
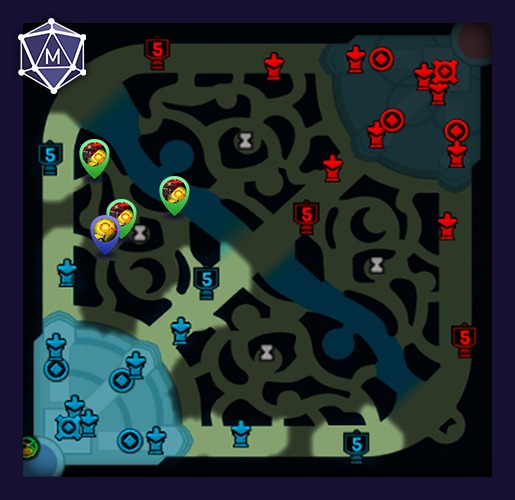

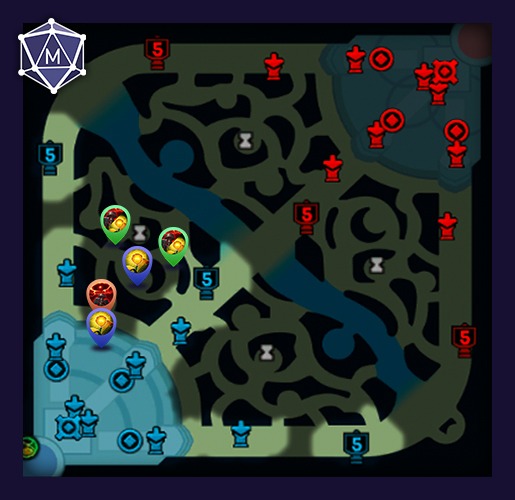
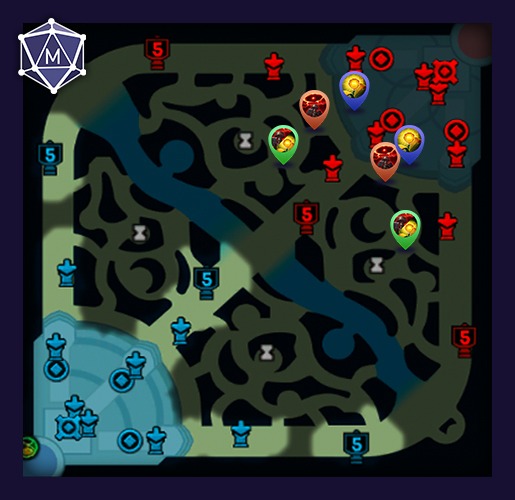
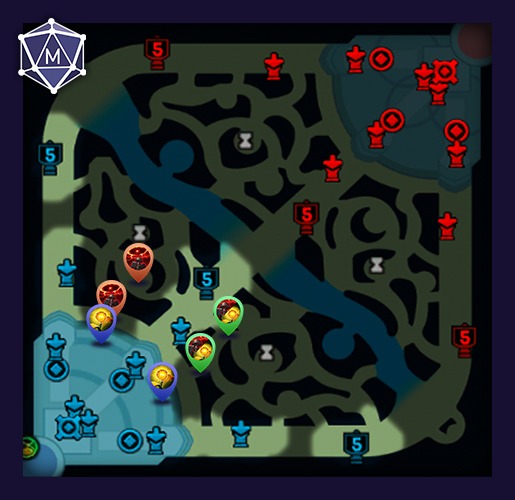
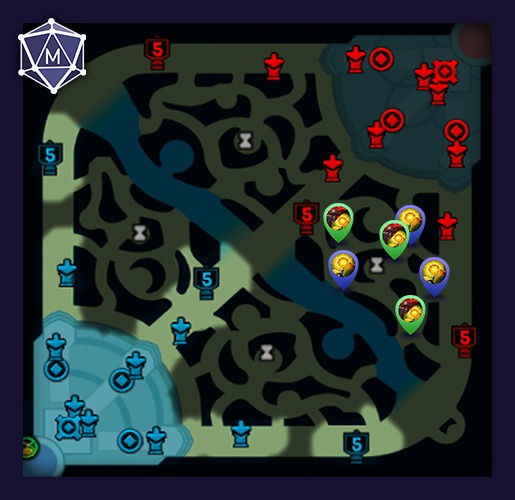
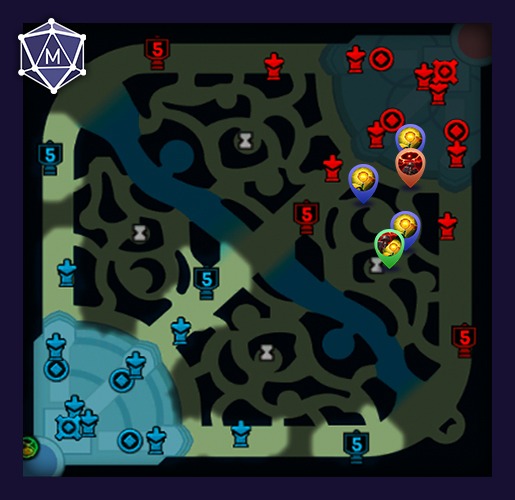
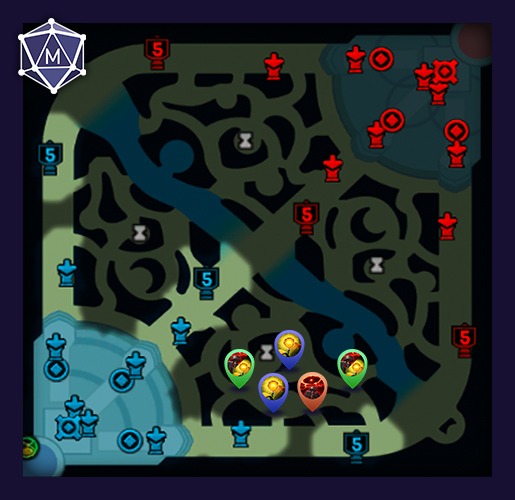
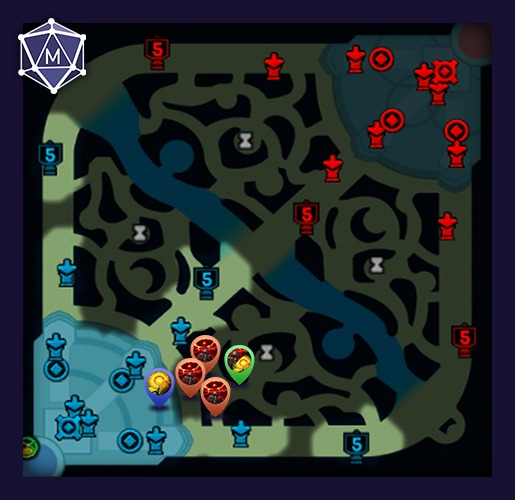
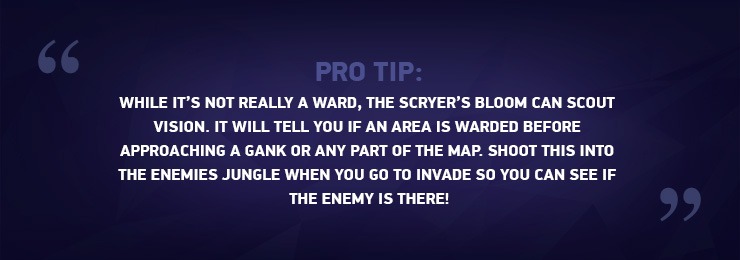
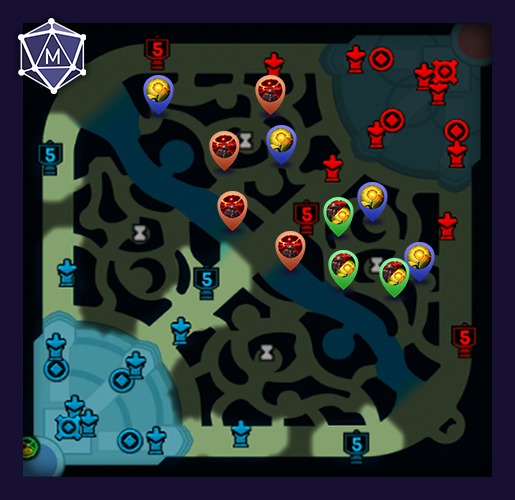
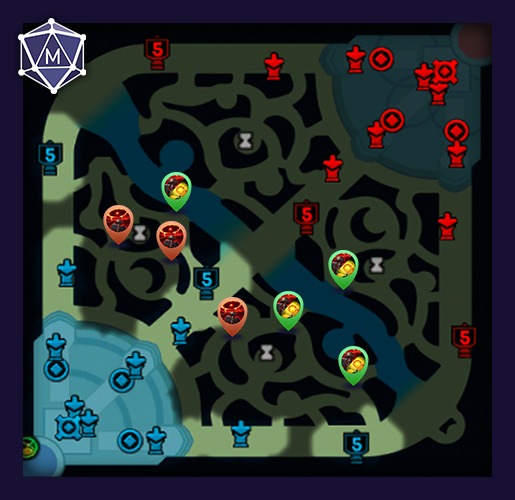
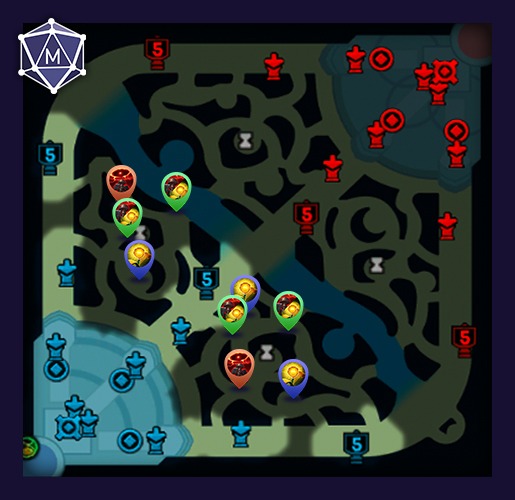
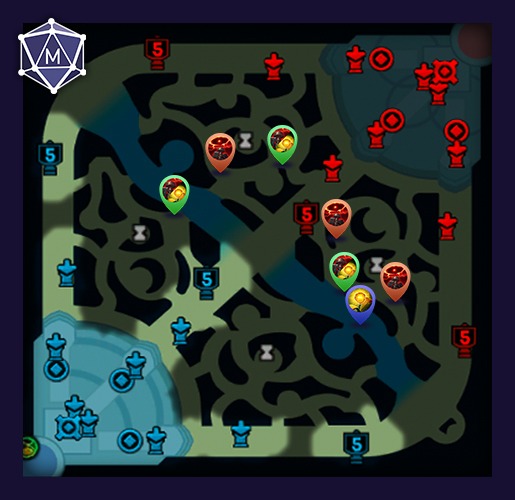
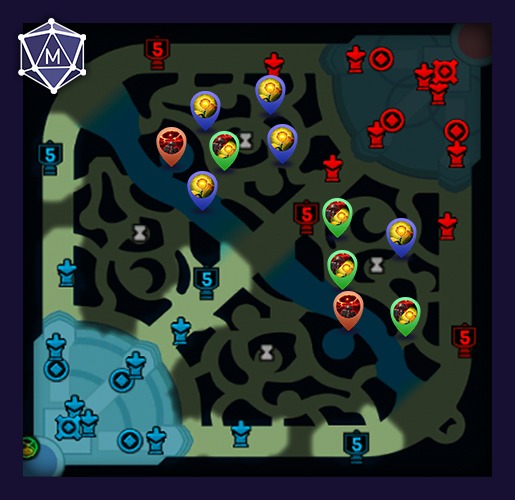
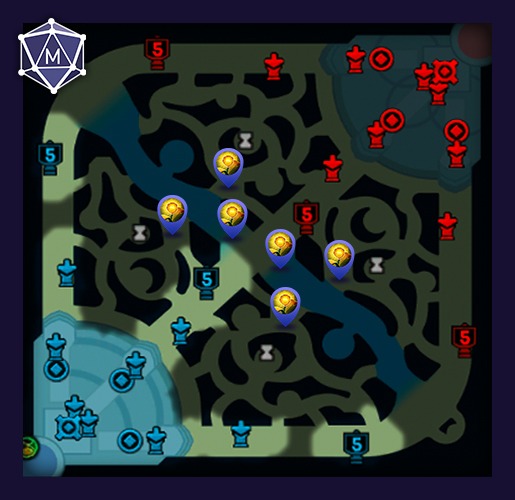
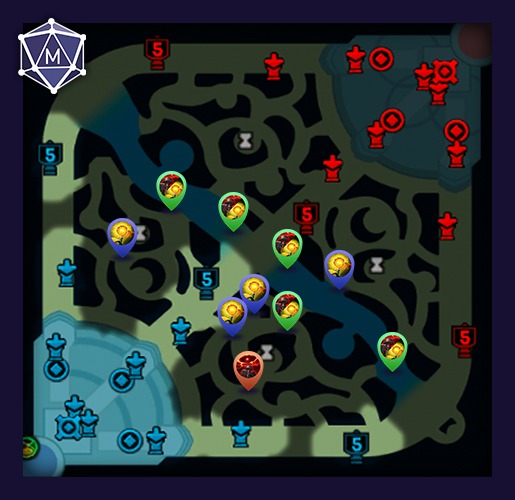
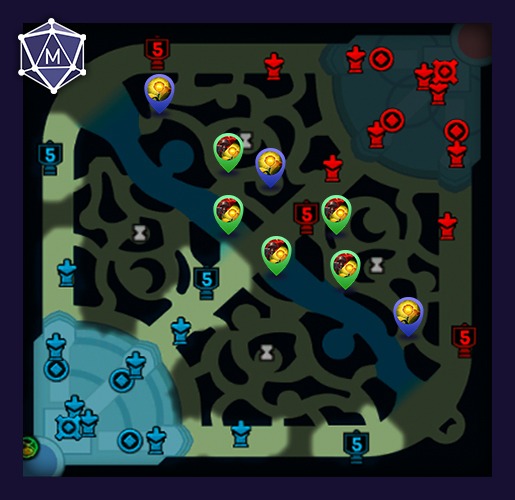