Warding is crucial in every single League of Legends game that has ever existed, and it will continue to play a major part in the foreseeable future. Buying Control Wards, and using your trinkets are a necessity for each and every game, and it is important to place informative wards.
Having low warding in your vision score, or not using your trinkets in the correct way is a big no-no. If you compare yourself to some of the higher rated players, they consistently have high warding scores and they are always purchasing and placing Control Wards around major objectives and the map.
Stay updated with the latest League of Legends news, with articles, how-to guides and information to help you climb, which can all be found on the Mobalytics Blog.
Before we talk about vision denial, we must first know what the main types of vision denial are. The first and most obvious way of denying vision is by purchasing and placing Control Wards around the map.

Control Wards are a 75-gold item that reveals and disables wards. They reveal camouflaged champions (not always, learn the specifics) and stealth traps as well. They have 4 health points and do not die after a certain period of time. The next type of vision denial is a sweeper. There are 2 types of sweepers in League of Legends. The first is the Sweeping Lens which is unlocked at level 1, and the Oracle Alteration which is unlocked at level 9.
Warding During the Laning Phase
Warding during the laning phase is crucial to playing safe. It can directly dictate how you play and how useful you will be for the rest of the game. Every laning phase tends to have the same basic concept, however, there are a ton of different scenarios that you have to adapt to.
Good Wards
If you’re pushing against the enemy and are safe to continue doing so, you can place your Control Ward offensively in the river bush. This is a great place to ward because it can give you information and time to back off if the enemy ganks your lane. I would only recommend using your Control Ward in this position if you’re pushing though.
If you’re not pushing, then it’s not worth warding here as it will get cleared quickly. you shouldn’t be wasting wards and you should not place a Control Ward in a place that is likely to be instantly cleared. Only place a Control Ward in the (bot side) river, if it is going to stay up for at least a little while. If a Control Ward gets cleared instantly by the enemy bot laners then you should not place it there in the future.
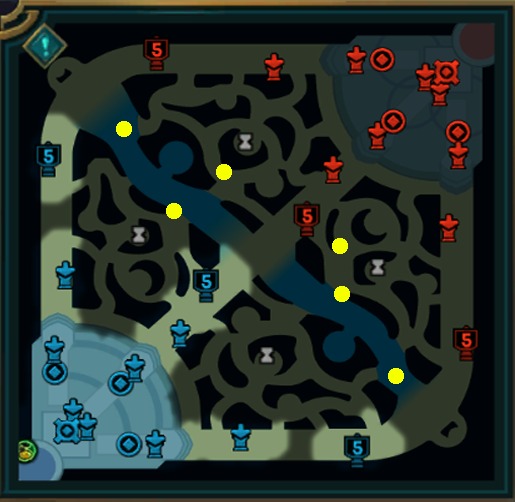
Here are some places you can place Control Wards if you’re pushing as the Blue Team. If you are not pushing, then you should not ward offensively in your lane, but instead- in the river.
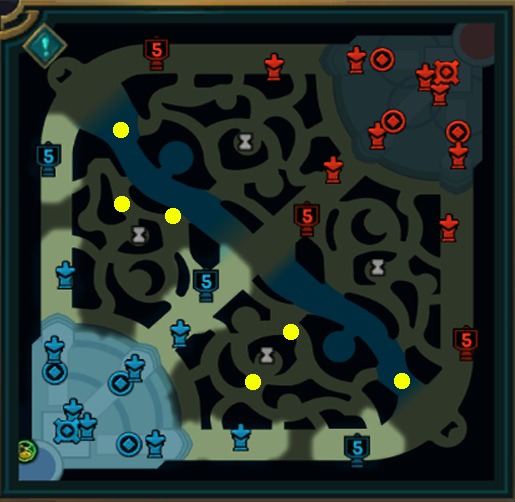
You can place Control Wards in these areas if you’re pushing as the Red Team.
Bad Wards
Unlike what many players think, there are some very bad places you can place a Control Ward. To avoid confusing users, we will not include where these bad locations are. You need to keep in mind whenever placing a Control Ward that it needs to stay alive for a reasonable time, and it must be in a location that will give you information.
If a ward dies instantly or gives no information- then this is considered a bad ward.
For example, if the enemy is bound to push you under tower, placing a Control Ward in the river bush is not the smartest of ideas. This is because they will quickly clear it, and you would’ve wasted a ward that cost 75 gold.

Warding Objectives
Warding objectives such as Baron and Dragon is one way of gaining vision control and making objectives risk-free. Placing a Control Ward in the pit itself will deny the enemy's vision of it and allow you to take it. It is important to always place Control Wards and vision in around the general area of the objective in question to deny enemy knowledge of you doing it.
Even when you have already placed a Control Ward that is still alive and well, placing a new ward at the objective can be beneficial. A common misconception between players is that once you’ve placed one, that’s the only one you can place. In fact, while you can only have one alive at any given moment, you should replace your Control Wards throughout the game and adapt to each map movement.
Objective Tips and Tricks
- If you’re doing an objective like Dragon or Baron, placing a Control Ward will block enemies vision of the objective- if the objective is warded.
- Using a yellow ward will only give you brief information if there’s a Control Ward there. This means you will not granted consistent vision.
- If the enemy places a yellow ward when you have a Control Ward already placed, avoid hitting the ward because it will show the objectives health bar.
- Avoid standing near enemy trinkets if you’ve placed a Control Ward as this can show that an ally in nearby or doing an objective.
- You can keep vision if you place a Control ward in an objective with an enemy Control Ward. Control Wards do not cancel each other out.
Vision Around The Map
While having previous Control Wards placed is a good thing, you should update them frequently and replace them throughout the game. As the game continues, the vision changes too and you need to ward differently. You can place Control Wards around objectives, around the map and in the river. Like normal vision wards, you should place your Control Wards in high traffic areas where your team is focusing.
Key takeaways:
- Place a Control Ward in high traffic areas around the map.
- Place Control Wards and normal wards to the side of your team to prevent flanks.
- Clear enemy vision with your trinket and Control Wards.
- Do not fall behind with your core item build, find a healthy balance between vision and items.
Late Game Vision Control
Warding during the later stages of the game is just as important as mid game and early game warding. However, it is slightly more important that you ward with your team to avoid being caught out. If you die in the later stages of the game, then it can cost you the objective and even cost you the game. Do not go to ward alone, wait for your team to come and help you ward the objective.
If the enemy is good at snowballing their advantage, then it will be extremely hard to get back into the game. League of Legends has a snowballing effect. Avoid dying in the later stages of the game to deny them the possibility of sneaking the objective and snowballing their lead.
Clearing wards is incredibly important because it will deny the enemy vision and give your team some vital information. The best way to clear vision is by placing Control Wards and using your trinket.
As soon as you get your warding item, you want to change your trinket to the red Sweeping Lens. You should then keep that until you hit level 9 when you can upgrade to the Oracle Alteration.
How to Find More Wards
It is very easy to auto-pilot and use your Sweeping lens without thinking of where you are or what you’re doing. It is important to focus and read the map. If you know that the enemy has been around a certain area lately, then you should only use your Sweeper around that area. If the enemy has not been near a specific part of the map, then Sweeping this is useless because there will be no wards there.
Wards do not last for long, but how long they do last can be disrupted by your Sweeper. So, it is important not to waste your Lens on an area where nobody has been and instead- use it in an area where the enemies have recently been.
General Tips and Tricks
- If you’re pushing against the enemy you can place either an offensive or defensive Control Ward.
- If the enemy is pushing against you, you want to place a defensive Control Ward or place it somewhere else around the map. Placing it in an offensive position is useless because the enemy can quickly clear it and you will not be able to contest. You would have wasted 75 gold and it would have given you little to no valuable information.
- You should try to purchase as many Control Wards when possible, however you should not fall behind on your core items. Experience will teach you when to buy them and when not too.
- Only use your trinket if you believe there could be vision there.
- Casting your Sweeping Lens will deny enemy vision. However, they will know that you are still around if you’re auto-attacking and destroying the ward.
To Conclude
Control Wards are one of the best ways of getting consistent and efficient information. They can help you win games alone by telling your team where the enemy is, and where the enemy is not. In the words of the great Shia LaBeouf- JUST DO IT.
This guides intention was to allow you to understand why Control Wards and vision denial in general is important. Mobalytics hopes that you now have a better understanding on using Control Wards and denying vision!