Act 4 is unusual in that the areas can be completed in any order. This layout guide will take you through each zone in this Act with some suggested routes, as well as a suggested order for both 100% and Speedruns.
These layouts are very generic guidelines and don't go into the hyper-specific details that you can find in the Campaign Codex Discord, and in the links that will be provided in each specific zone.
A big thank you to everyone in the Campaign Codex who helped collect images, spend time to make discoveries and contribute to this ongoing project, especially CrimsonCasts, who contributed a ton of information for this Act 4 guide, GuyThatDies, Lundburgerr, Angormus, FireMCG for their continued layout analysis and discoveries and Arko for many of the layout images used in this Act 4 guide. If you'd like to join the Discord to get involved with the PoE 2 speedrunning community, you can click the link here: Campaign Codex Discord
Whakapanu + Singing Caverns, Shrike Island, Abandoned Prison + Solitary Confinement (in any order)
Arastas
Ngakanu
Big thanks to lundburgerr for sharing this suggested routing!
Guide
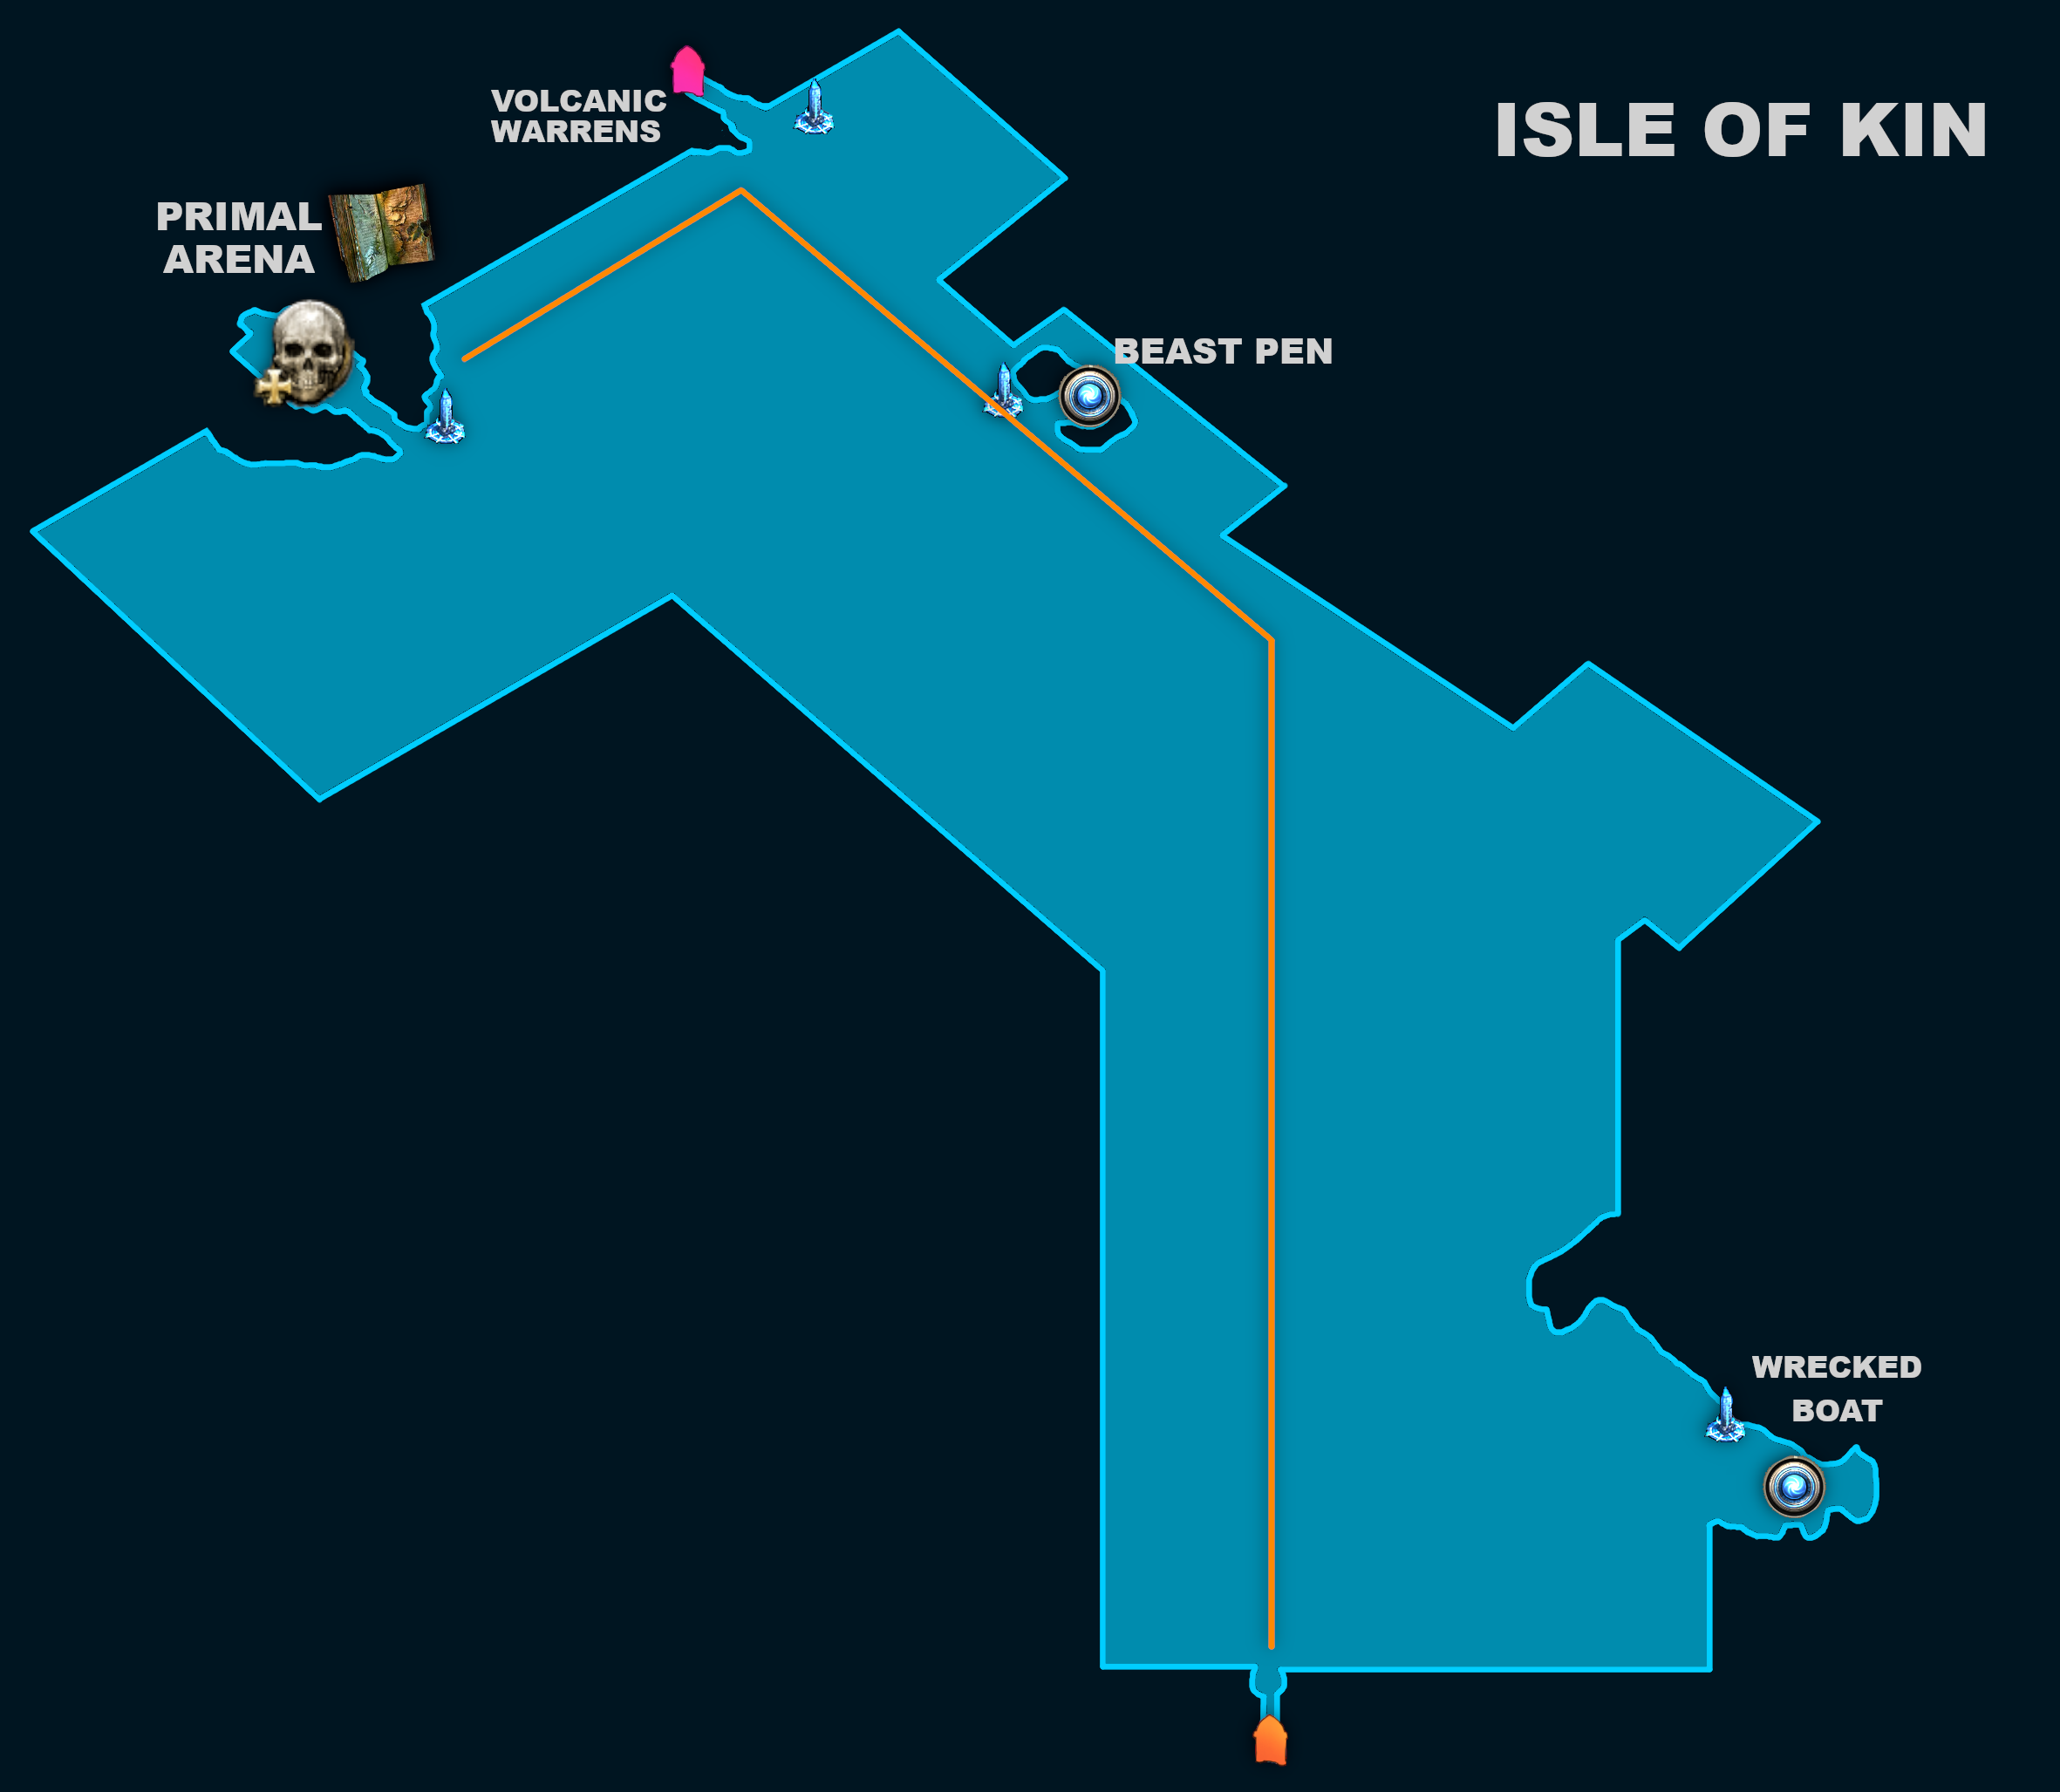
Isle of Kin
After leaving the dock, head in the opposite direction. If you hit a wall, follow that wall that takes you in the direction opposite of the exit. This area also contains the Primal Arena with a boss that can be defeated for a Book of Specialisation.
Goals
Find the Primal Arena, which is often situated at the far end of the area along the back wall and defeat the boss for a Book of Specialisation CHANGED IN 0.4 THIS IS NOW GRANTED BY COMPLETING DARK MISTS IN JOURNEY'S END
Locate the entrance to Volcanic Warrens, which is located on the far end of the area along the wall furthest from the start
Optional Points of Interest
Beast Pen: Defeating the beasts grants an Uncut Skill and Support Gem
Wrecked Boat: Contains a Torn Map Piece
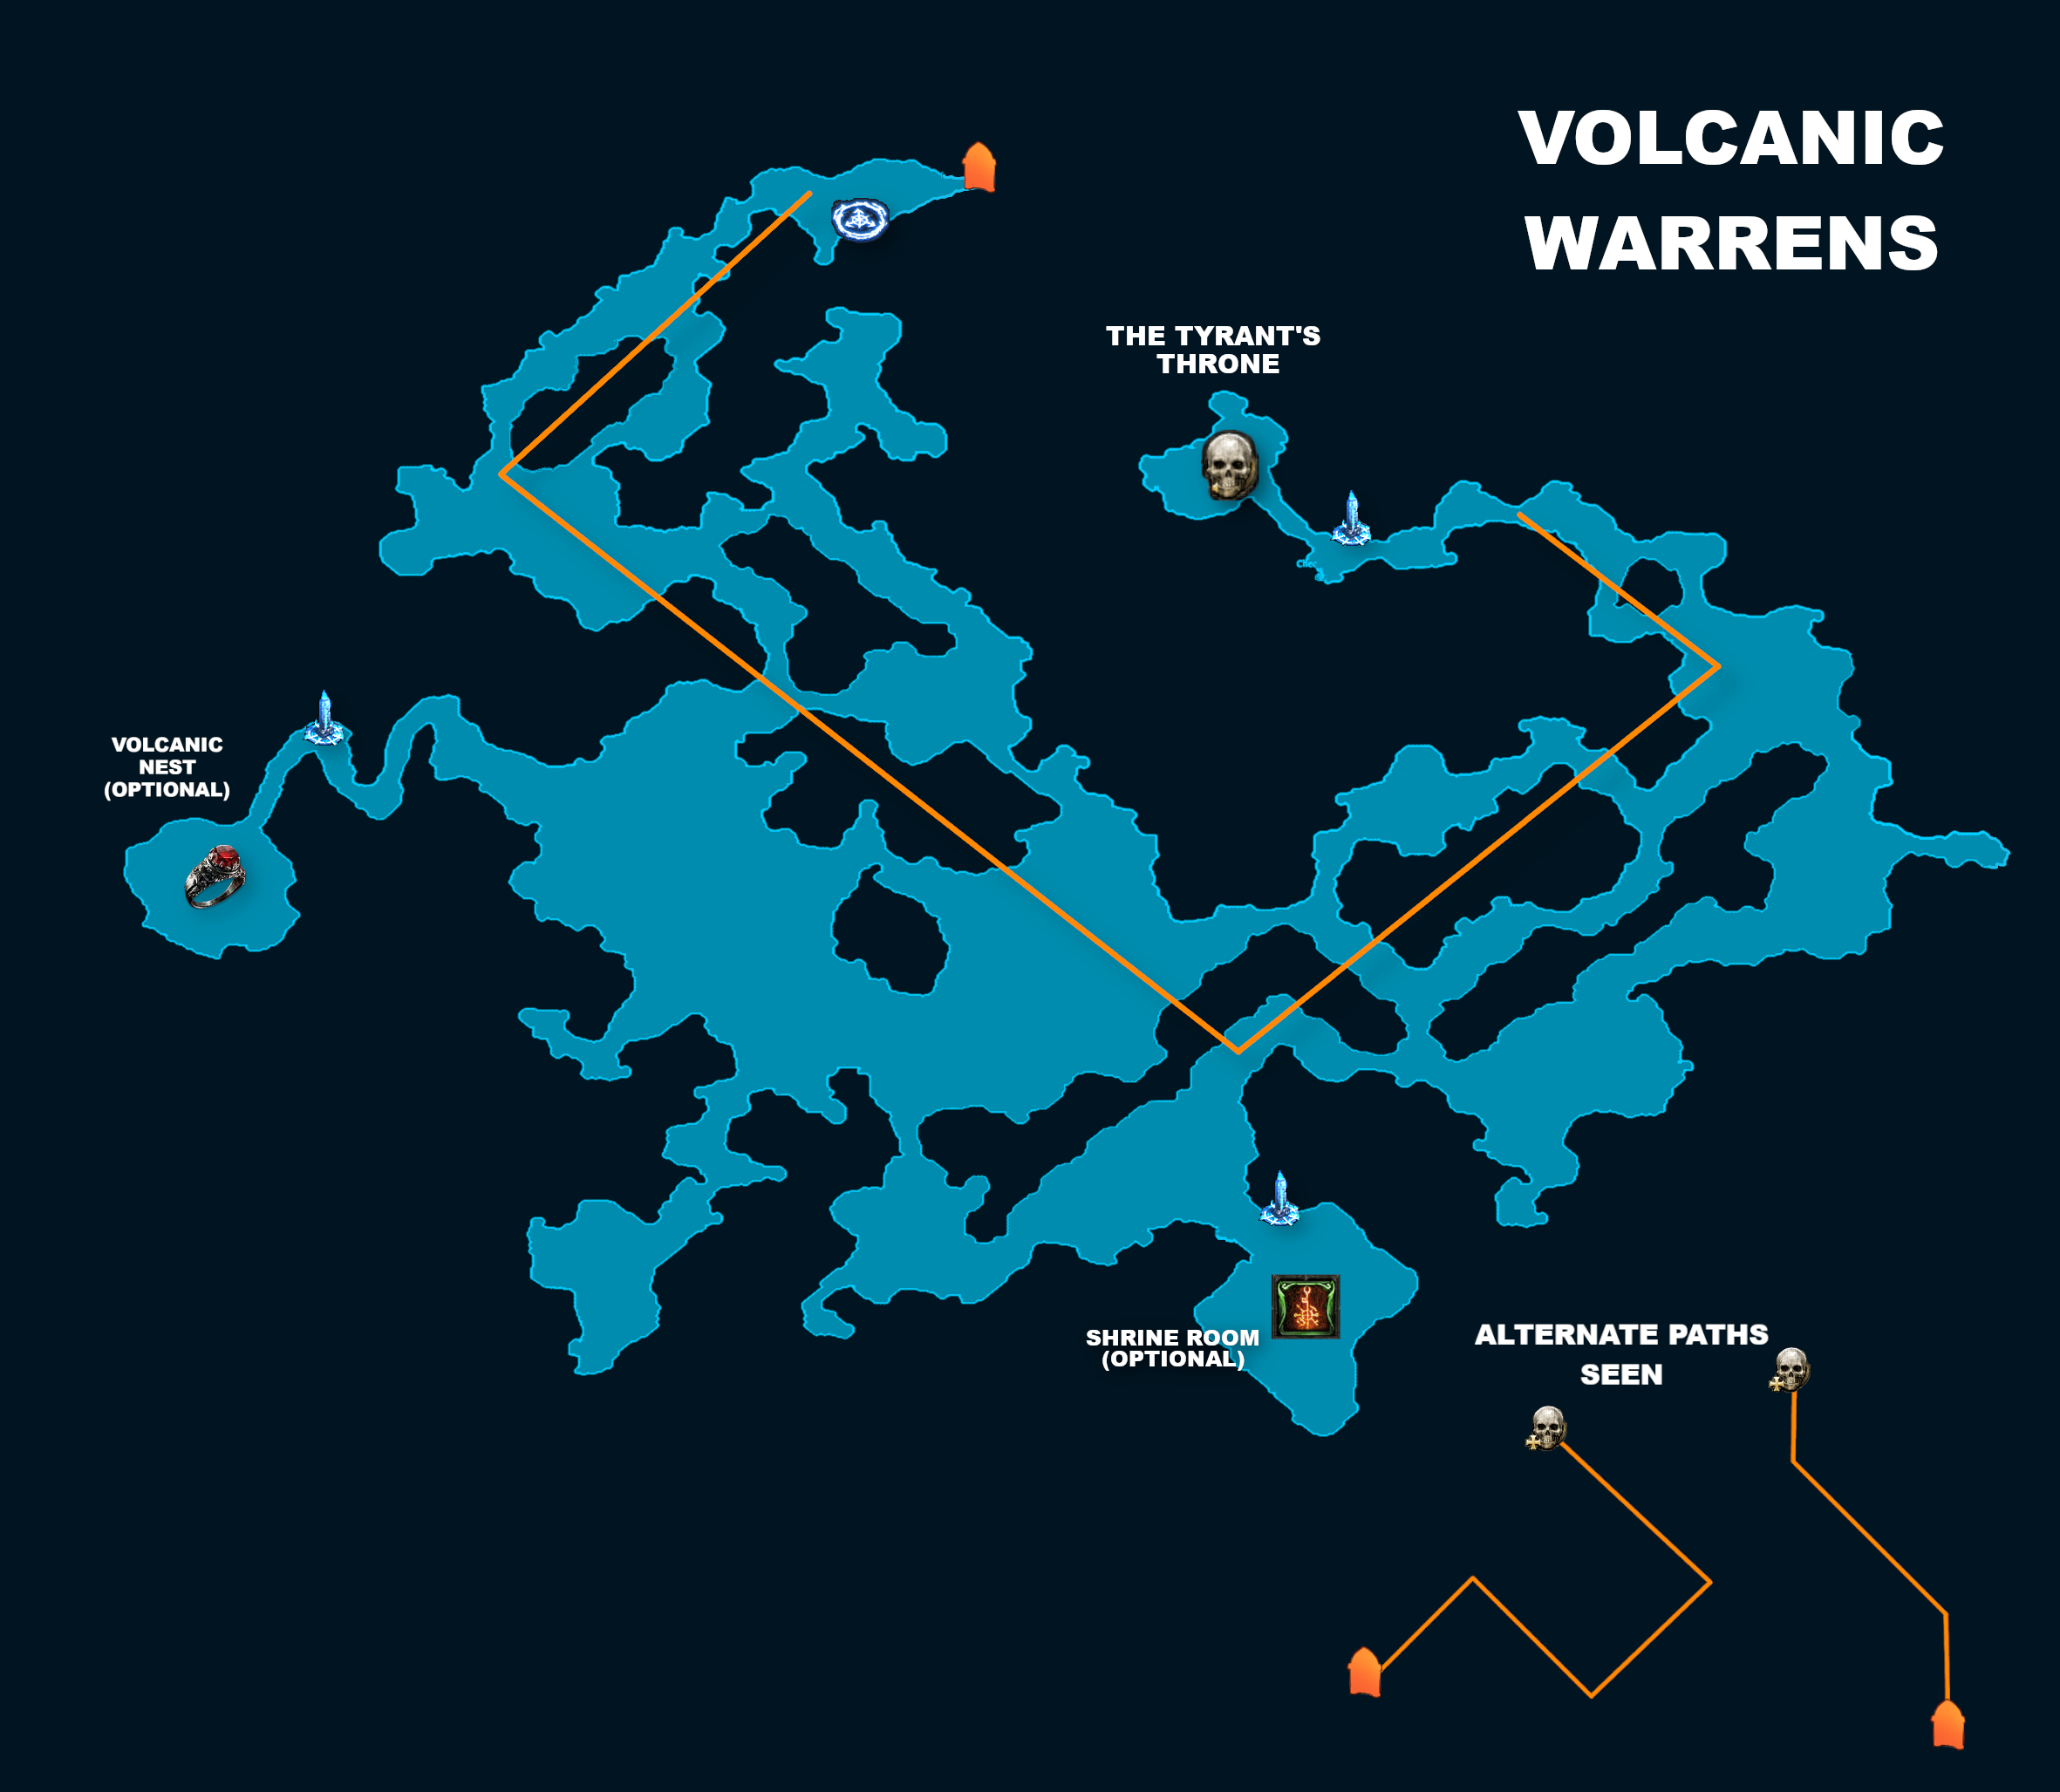
Volcanic Warrens
The Volcanic Warrens is a long and winding area, with the Boss spawn on the opposite side of where you enter. This area isn't solved and is fairly easy to get lost in without studying the zone further, but some discovered routes can be seen in the image below
NOTE: In the current 0.3 patch of 0.3, we have to free Matiki here to open the way to Eye of Hinekora, but it has been stated that he will be captured by a different boss each league and may not be found here in 0.4 and future patches.
Goal
Defeat the Boss in the area
Optional Points of Interest
Volcanic Nest: Two Rare enemies can be defeated for a Rare Ruby Ring. This room is preceded by a Checkpoint and seems to spawn in line with the entrance
Shrine Room: There is a room that contains a Shrine in which the player will be attacked by swarms of enemies. Not particularly worth doing
________________________________________________
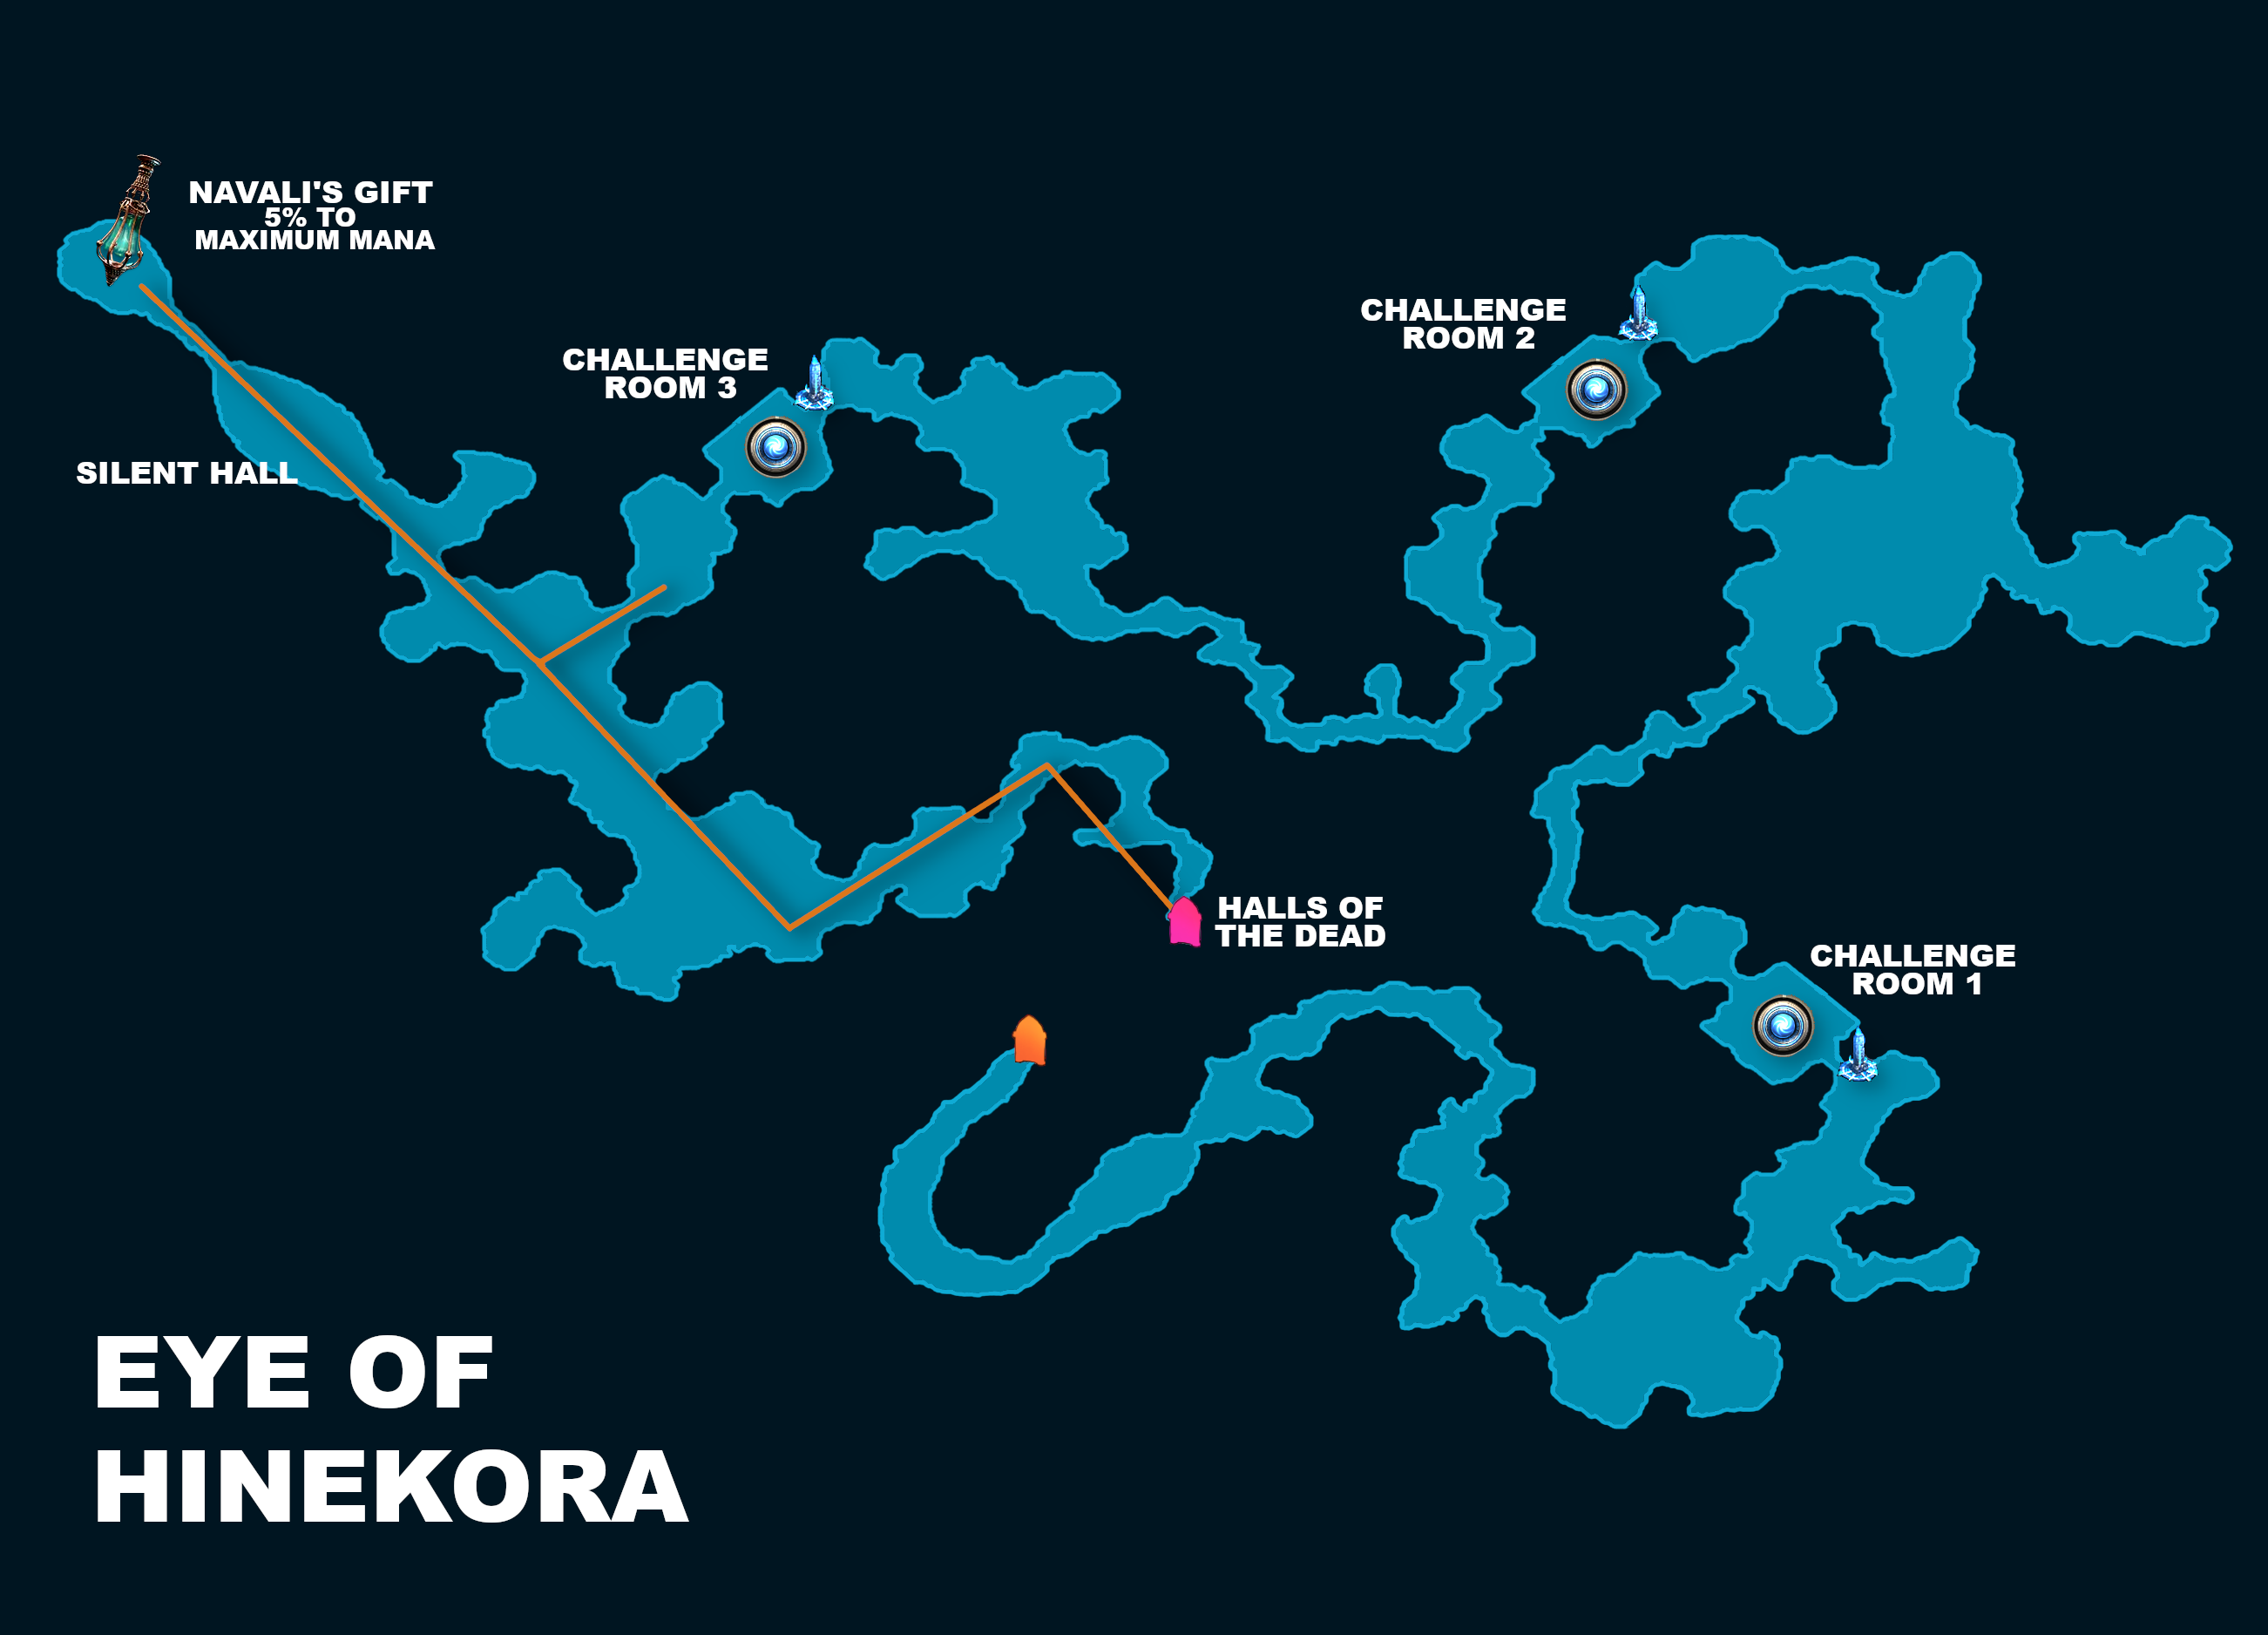
Eye of Hinekora
This area is a snake-like funnel in which it is fairly hard to get lost. In this zone, there are three challenge rooms that you must complete to progress. After the third challenge room, the zone will split off in two different directions. The one direction will lead you to The Silent Hall, where you can acquire Navali's Gift for a Permanent Buff that grants 5% to Maximum Mana, and the other direction will lead you to the Halls of the Dead
Goals
Locate Navali's Gift in the Silent Hall for a permanent buff that grants 5% to Maximum Mana. This is located after area splits off into two directions after the third challenge room
Locate the entrance to Halls of the Dead
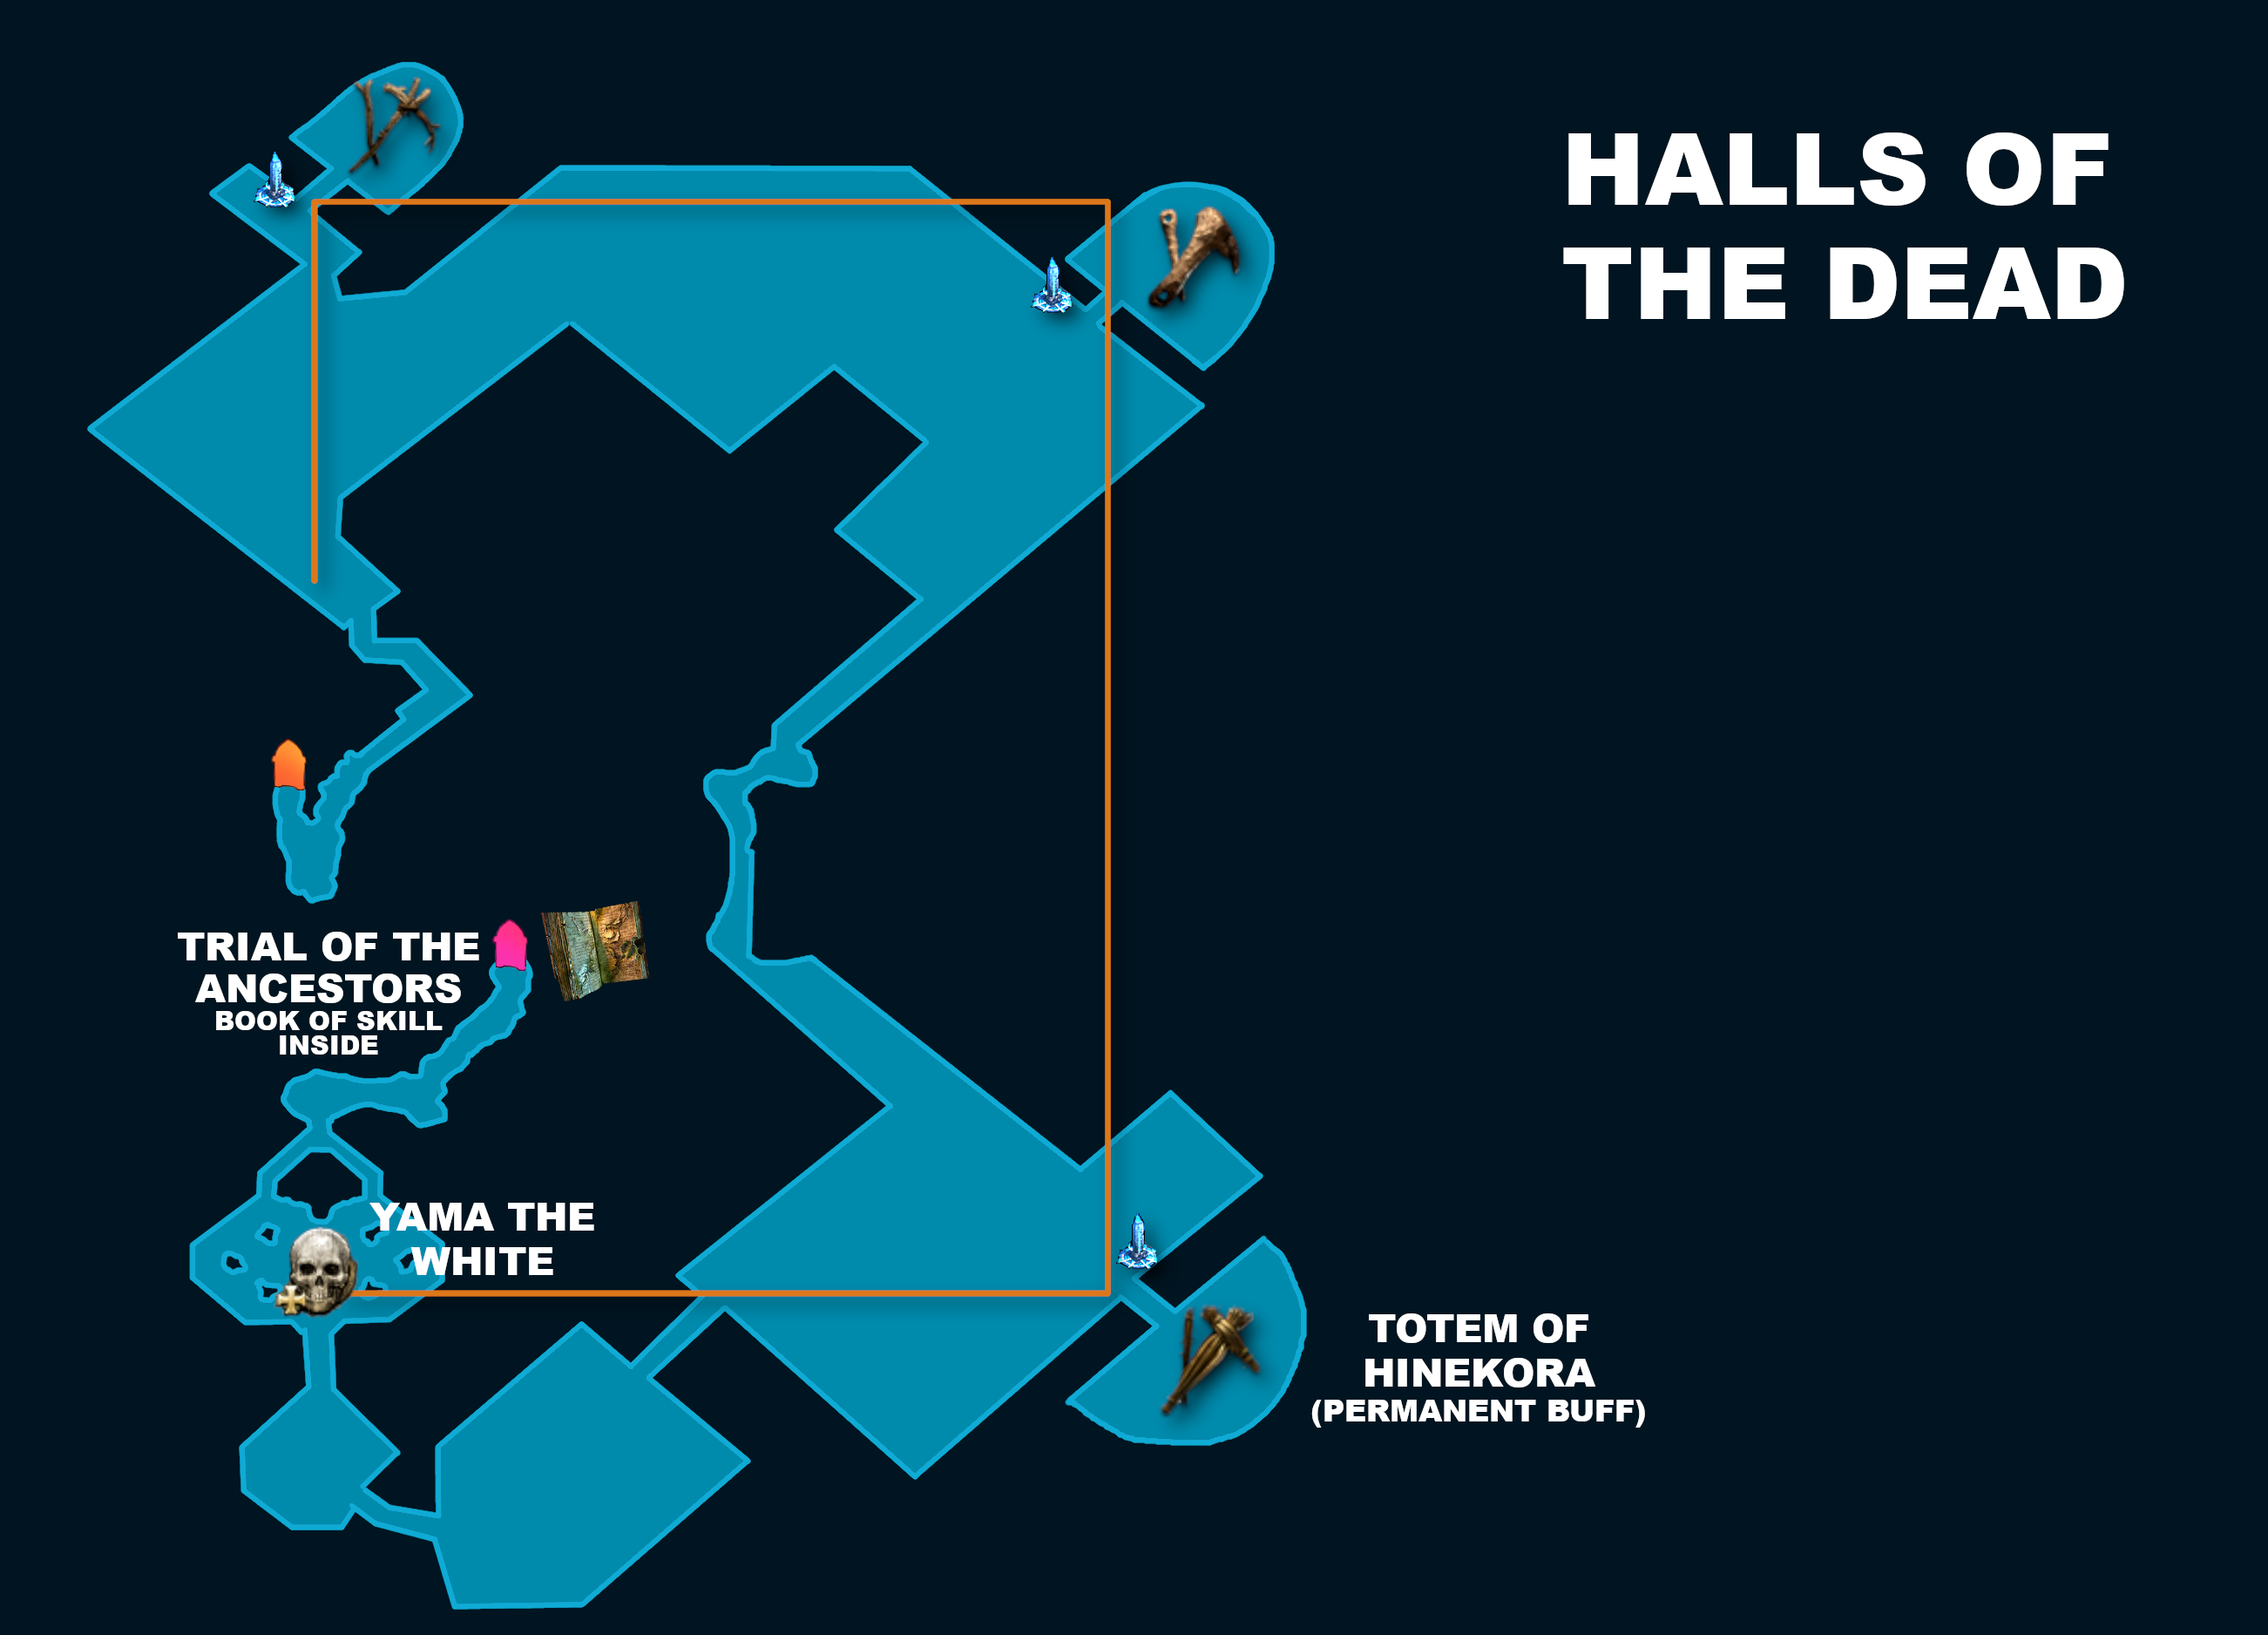
Halls of the Dead
In this area, you'll need to find the three Hinekora Totems and complete the fights to get Permanent Buffs in the form of Tattoos that grant either Resistances or Attributes before continuing to the end of the area where you will fight Yama the White to gain access to Trial of the Ancestors.
Goals
Hinekora Totems: If you imagine the zone laid out like a 9:16 vertical rectangle, the Totems can be found on the corners of that rectangle. Try entering the zone, hugging the left-hand wall and when you find the first Hinekora Totem, keep hugging that same wall to find the next one
Defeat Yama the White: Yama can be found by continuing along the imaginary rectangle that you can see in the image above. After defeating him, enter the Trial of the Ancestors to gain another Book of Specialisation
________________________________________________
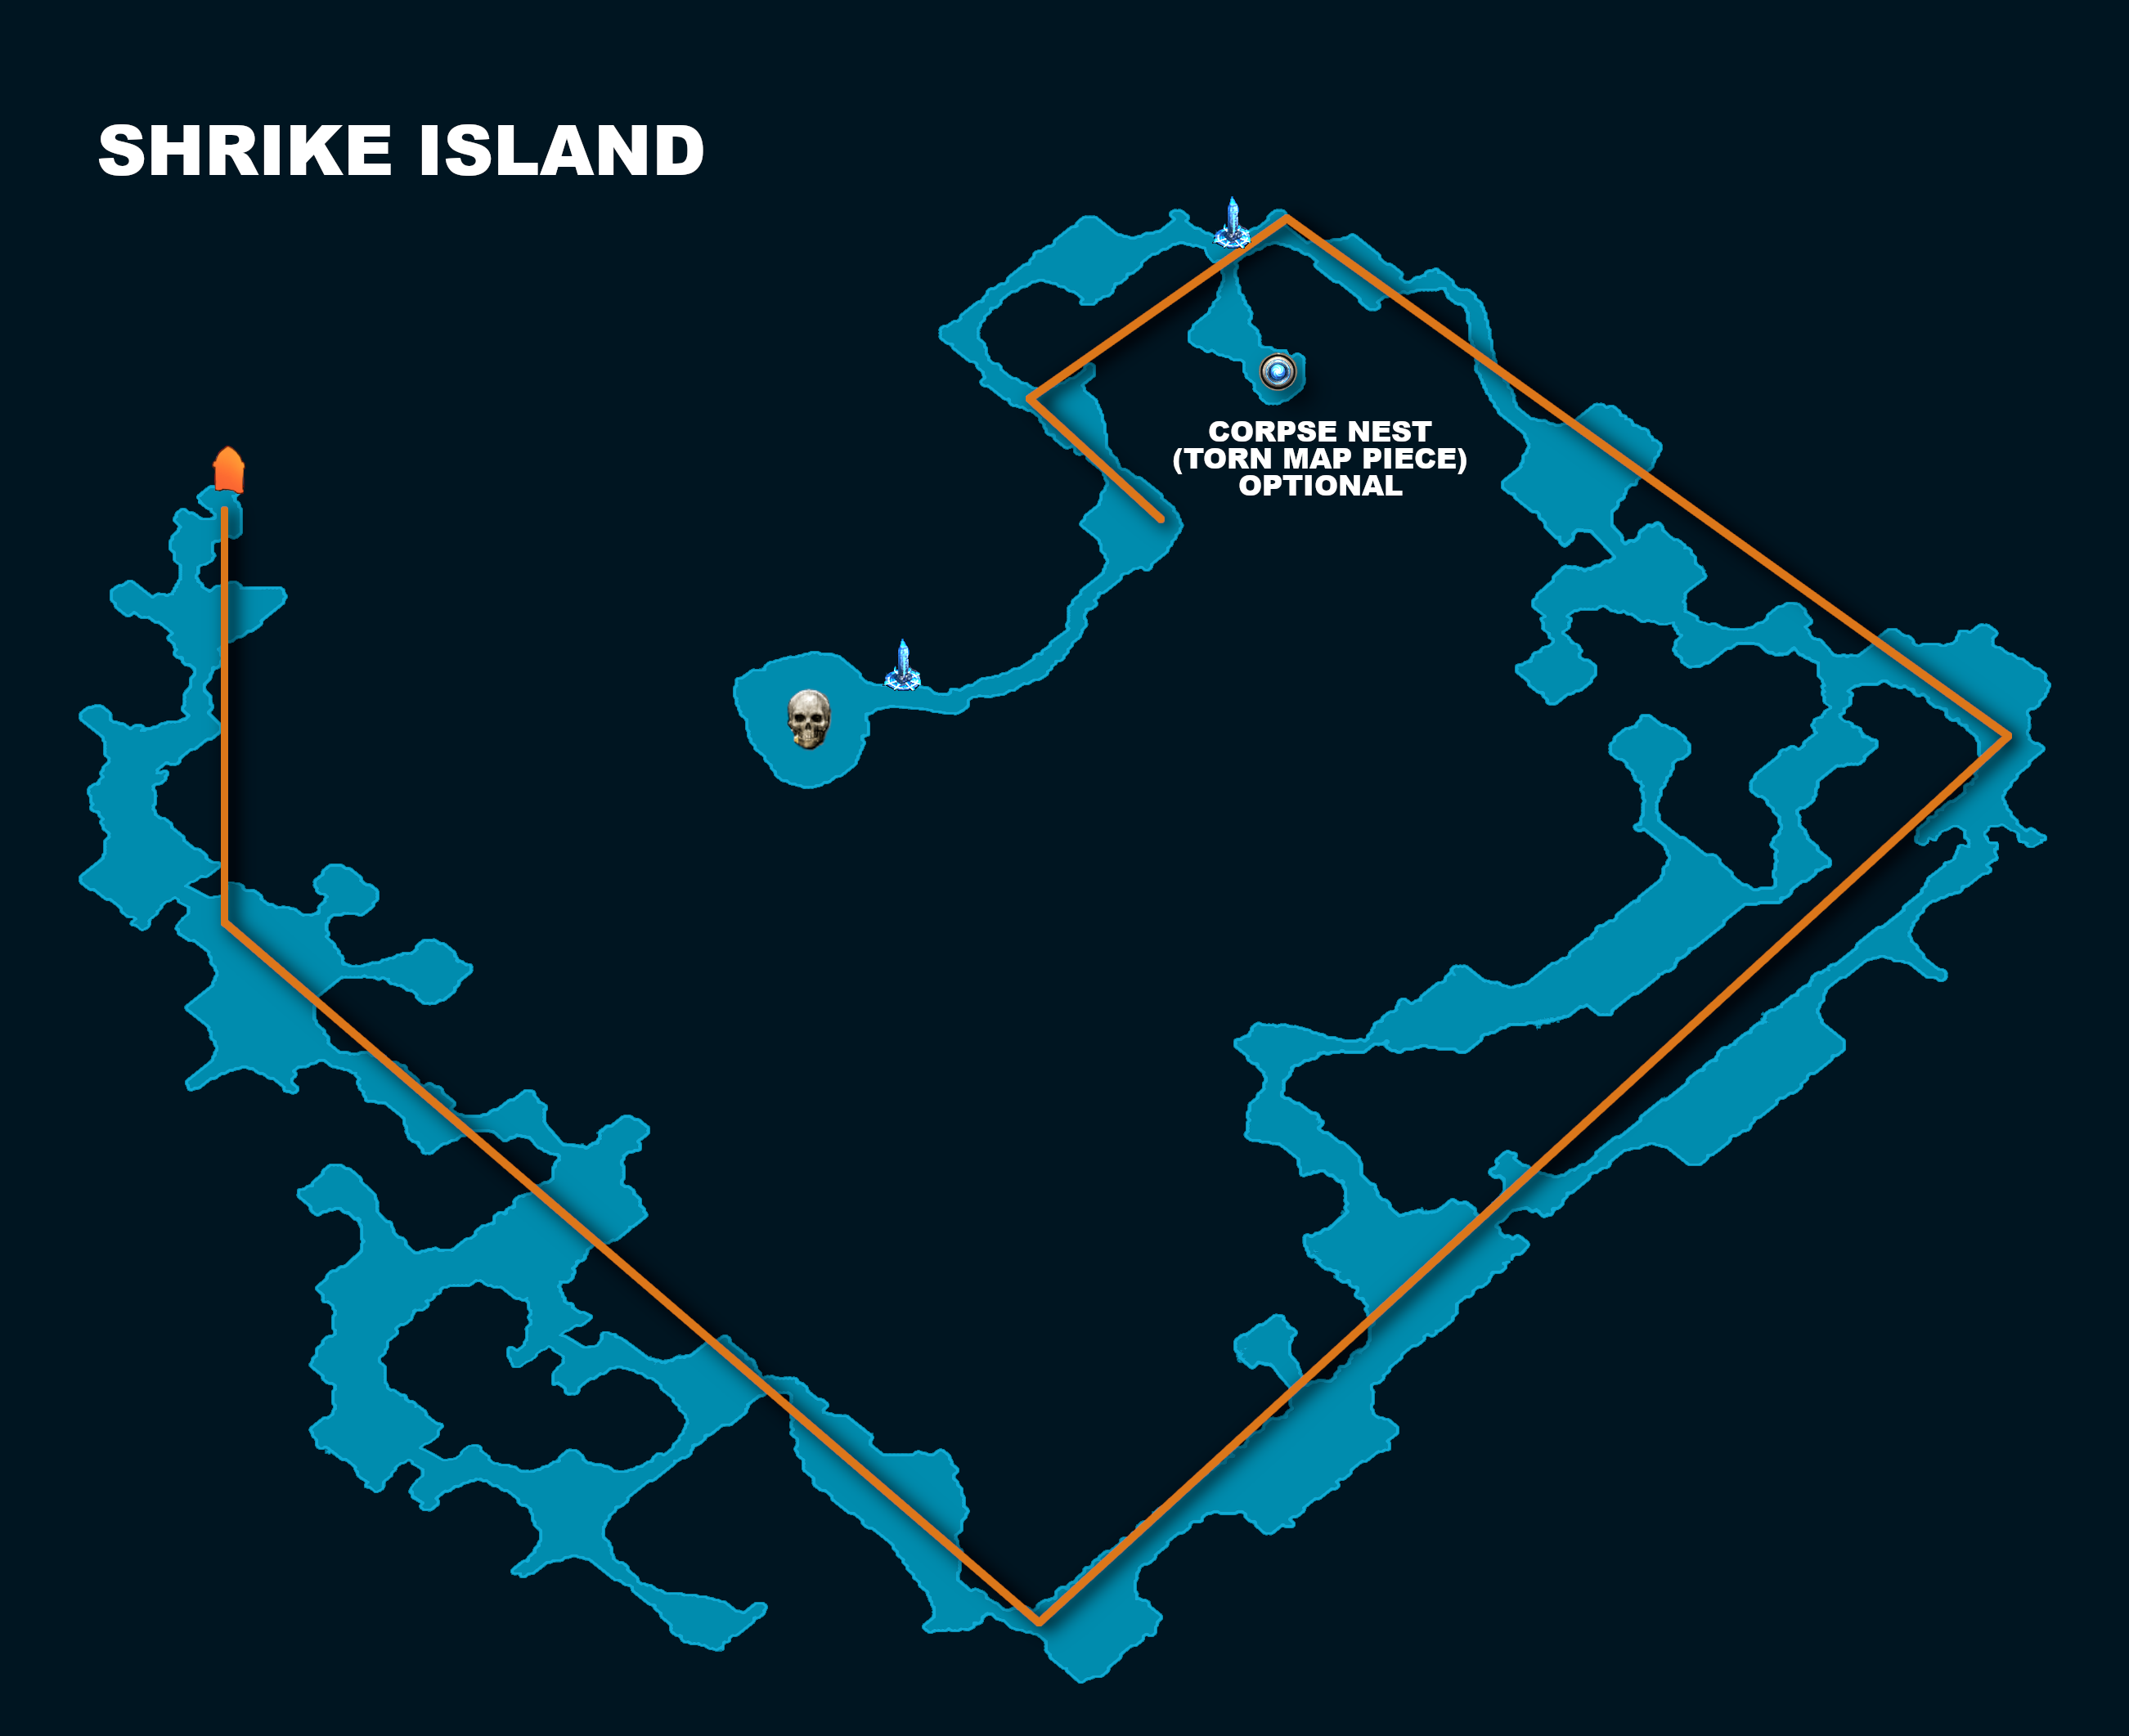
Shrike Island
Shrike Island is an incredibly linear layout that will force you in the correct direction even if you have no idea where you're going. The Boss will be found at the end of the long and winding road.
Goal
Kill the Boss, Scourge of the Skies
Optional Points of Interest
The Corpse Nest can be found beside a Checkpoint, and inside you can find another Torn Map Piece
________________________________________________
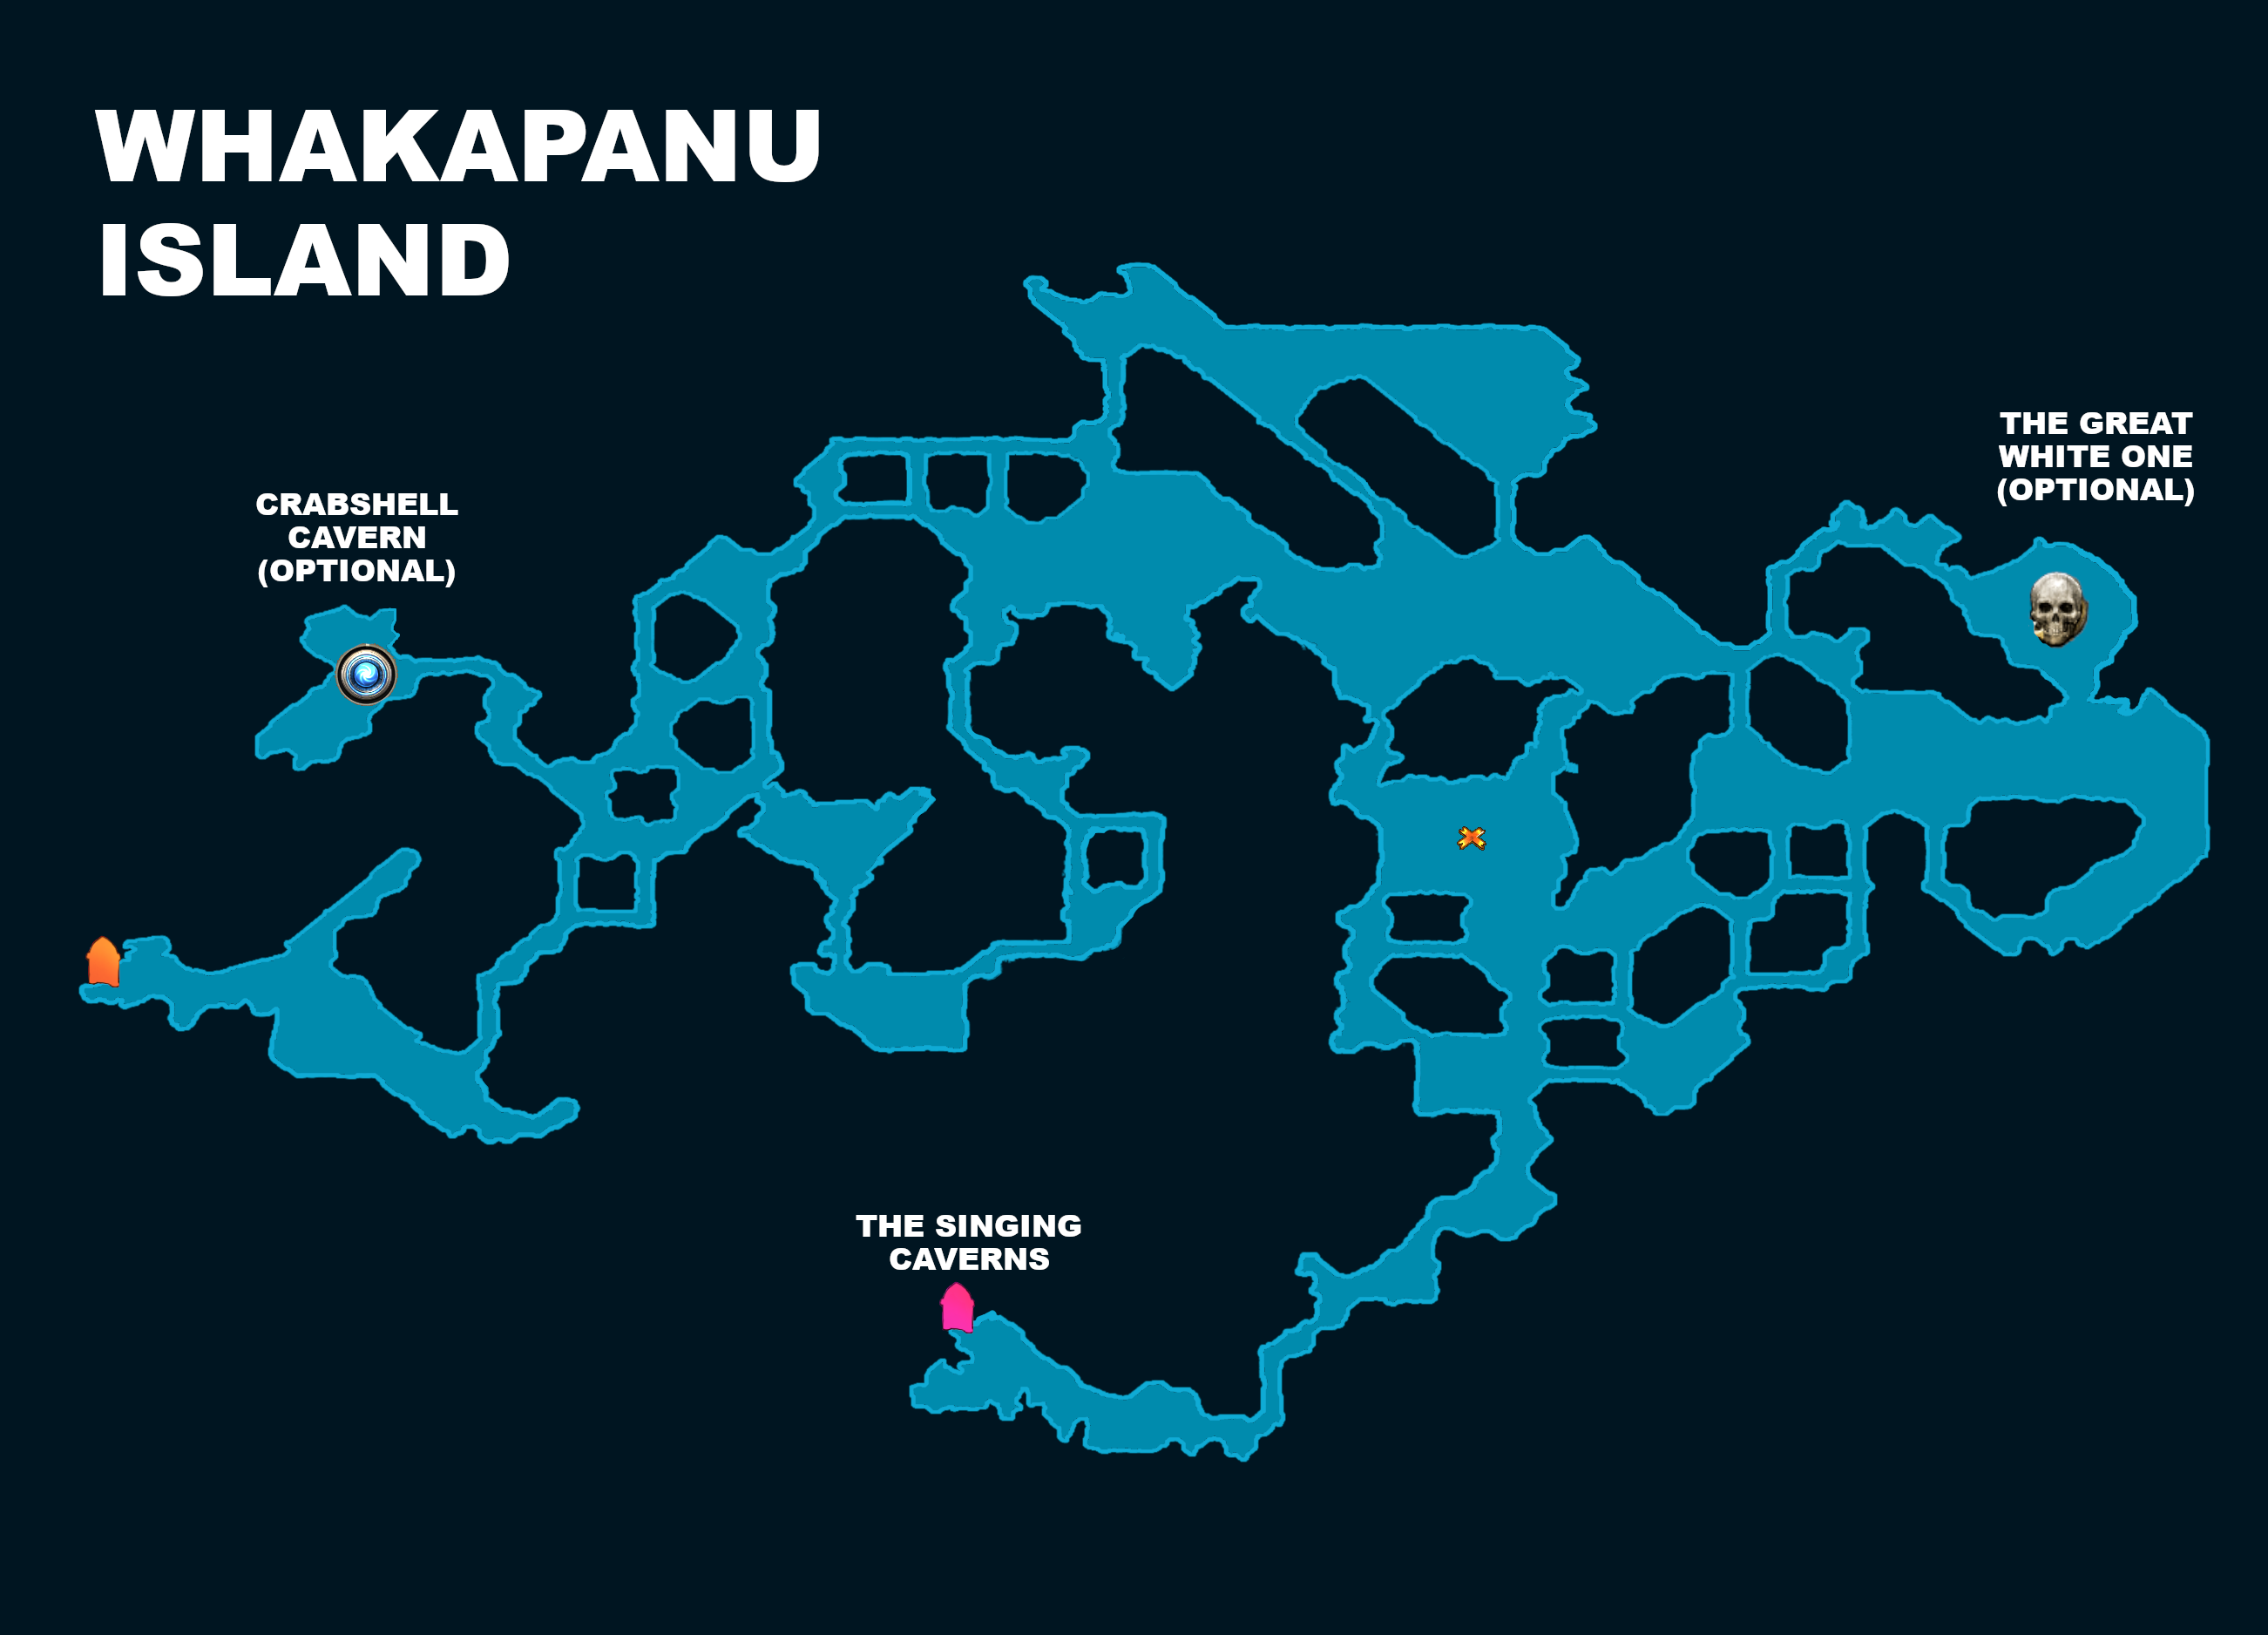
Whakapanu Island
Whakapanu Island is a completely solved zone, but is also one of the most complex areas to learn. The exit direction can be determined, but requires knowledge of MULTIPLE complex layout tells. You can learn more about this in the Campaign Codex or from lundburgerr's Whakapanu Island Guide which both Angormus and CrimsonCasts helped to work on.
Advice from CrimsonCasts: "Use this area as a way to catch up on XP, because you will end up wandering around". Hey, at least it's pretty here, right?
Goal
Find the Entrance to the Singing Cavern
Optional Points of Interest
Defeat the Great White One: grants a Shark Fin that can be returned for an Uncut Skill Gem. This is currently never worth doing.
Petrified Pirate: Another Torn Map Piece can be found from a petrified pirate you may stumble upon
Crabshell Cavern: Contains Clawcrunch, a rare Crab monster that drops an Uncut Support Gem
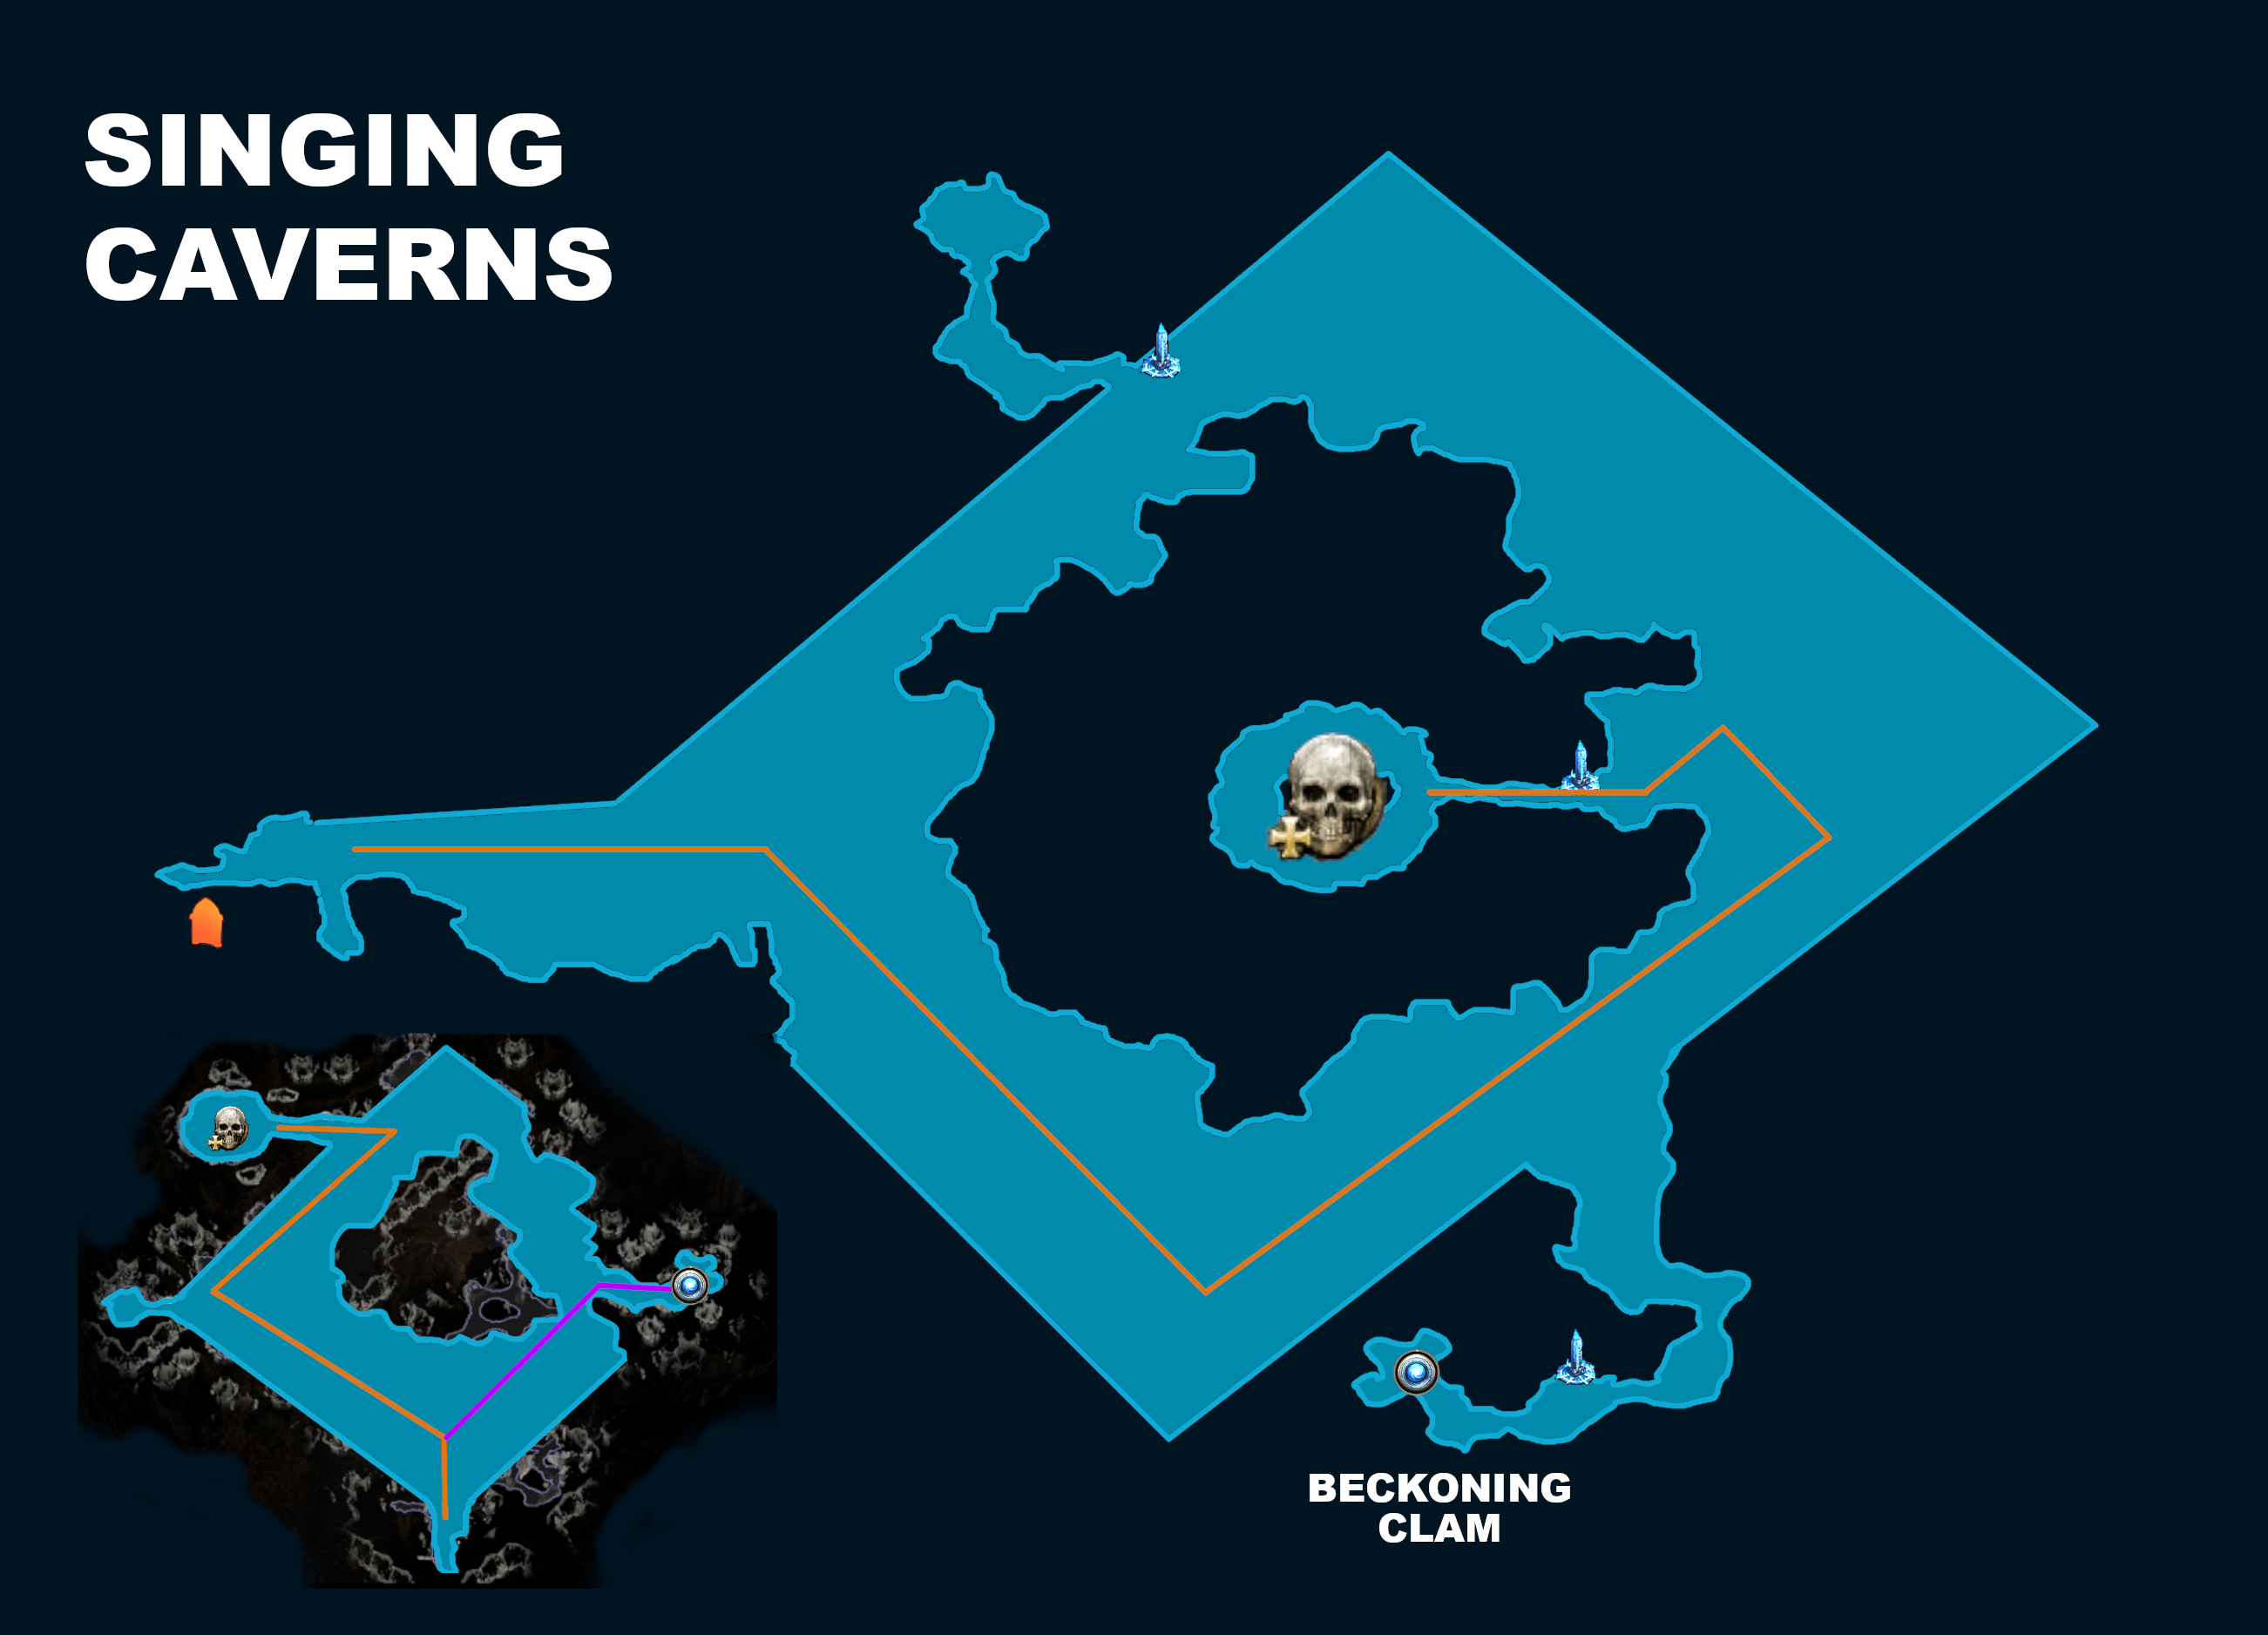
Singing Caverns
This zone is solved with 4 distinct layouts, but has a fairly simple layout that isn't too hard to understand.
The area is laid out in a circular or diamond shape, with the Boss located on the opposite side of the "square" to the left or right, or directly opposite and in the middle of the zone.
The Beckoning Clam can also be found to get the Humming Pearl which can be returned to Rog for a Rare Pearlescent Amulet. This is often a useful upgrade and is worth seeking out. On the exact opposite side of the Beckoning Clam (almost always) you can find the Egg Cave guarded by a Rare monster which will drop an Uncut Support Gem when defeated
I recommend checking out Lundburgerr's document to get an idea of the various layouts in this zone: Singing Caverns by Lundburgerr
Goals
Locate the Beckoning Clam and take the Humming Pearl
Defeat the Boss of the area, Diamora, Song of Death
________________________________________________
Abandoned Prison
This area is 100% solved with 4 distinct layouts, but has no simple solution without studying the layouts and tells along the way. There is no simplified solution for this area which is why I recommend checking out this document from Angormus which goes over the four variants that you can find in Abandoned Prison: Angormus' Abandoned Prison Guide
Goal
Locate the entrance to Solitary Confinement
Points of Interest
Goddess of Justice: Requires Chapel Key (drops from random Monster in Area) to enter. Permanent Buff with a choice between 30% increased Mana or Life Recovery from Flasks
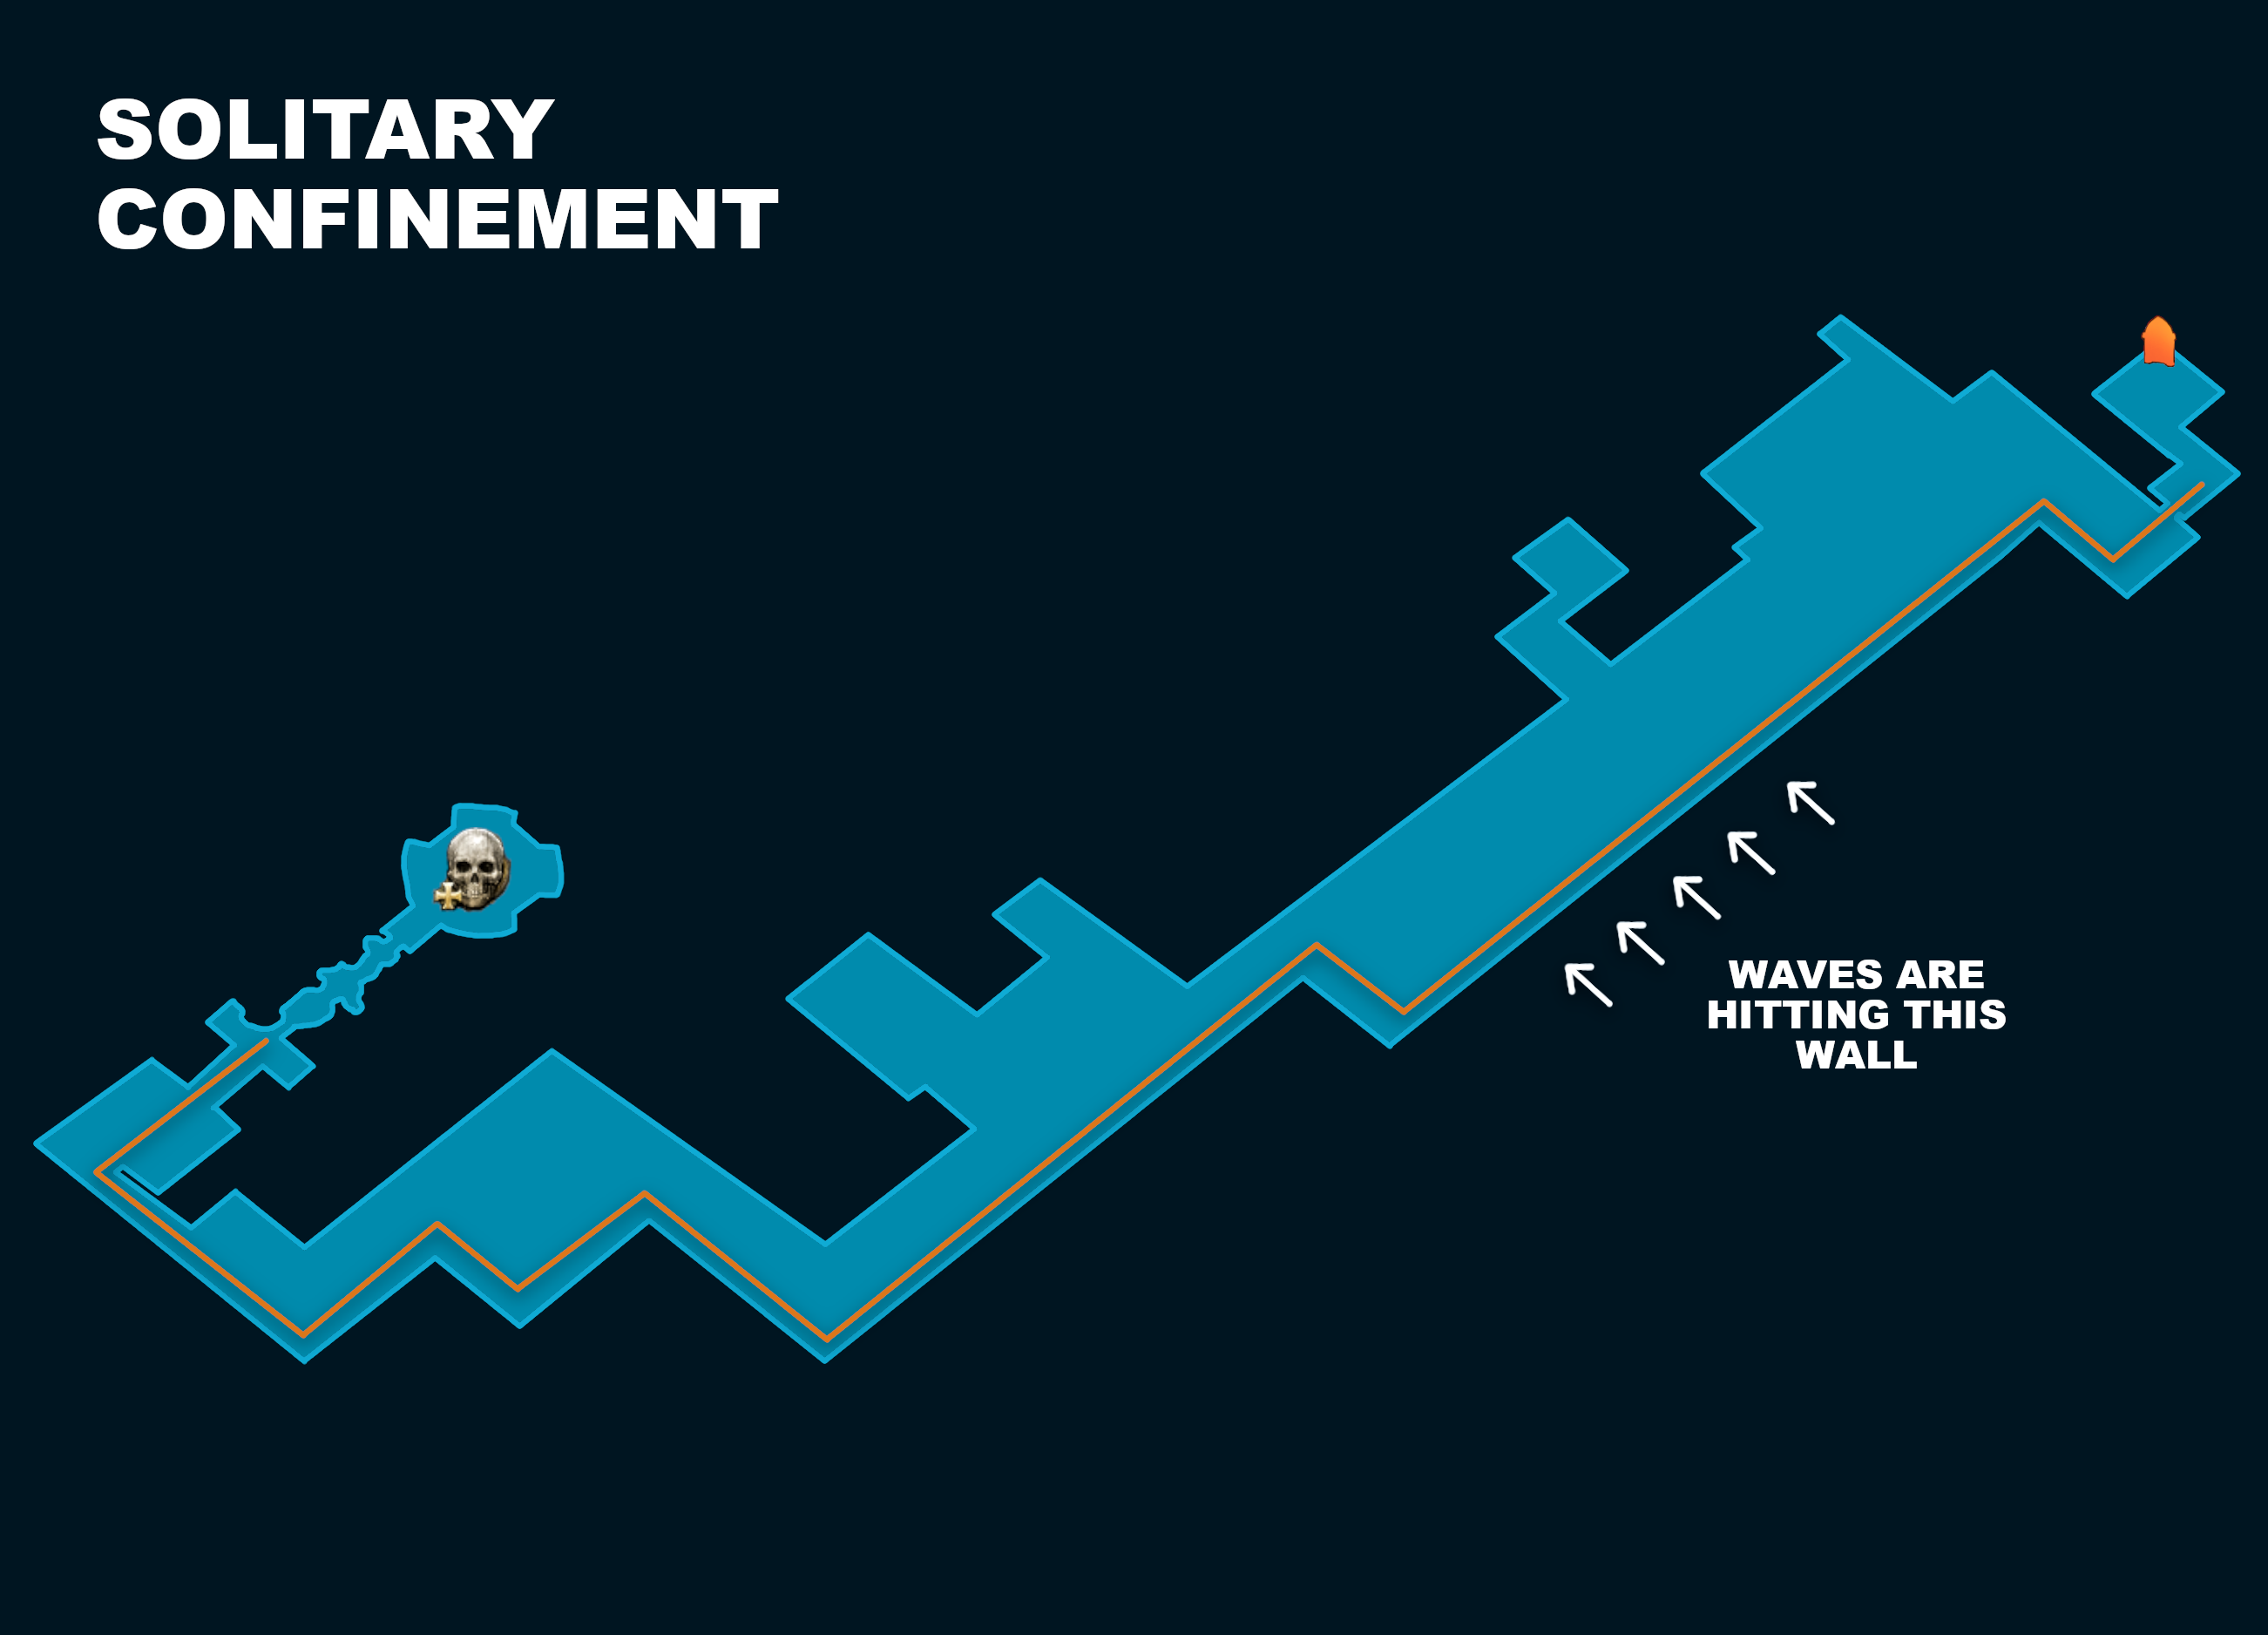
Solitary Confinement
This area is 100% solved with a very linear layout. CrimsonCast's advice is: "Hug the wall that the waves are crashing into"
Goal
Defeat the Boss of the area, The Prisoner
________________________________________________
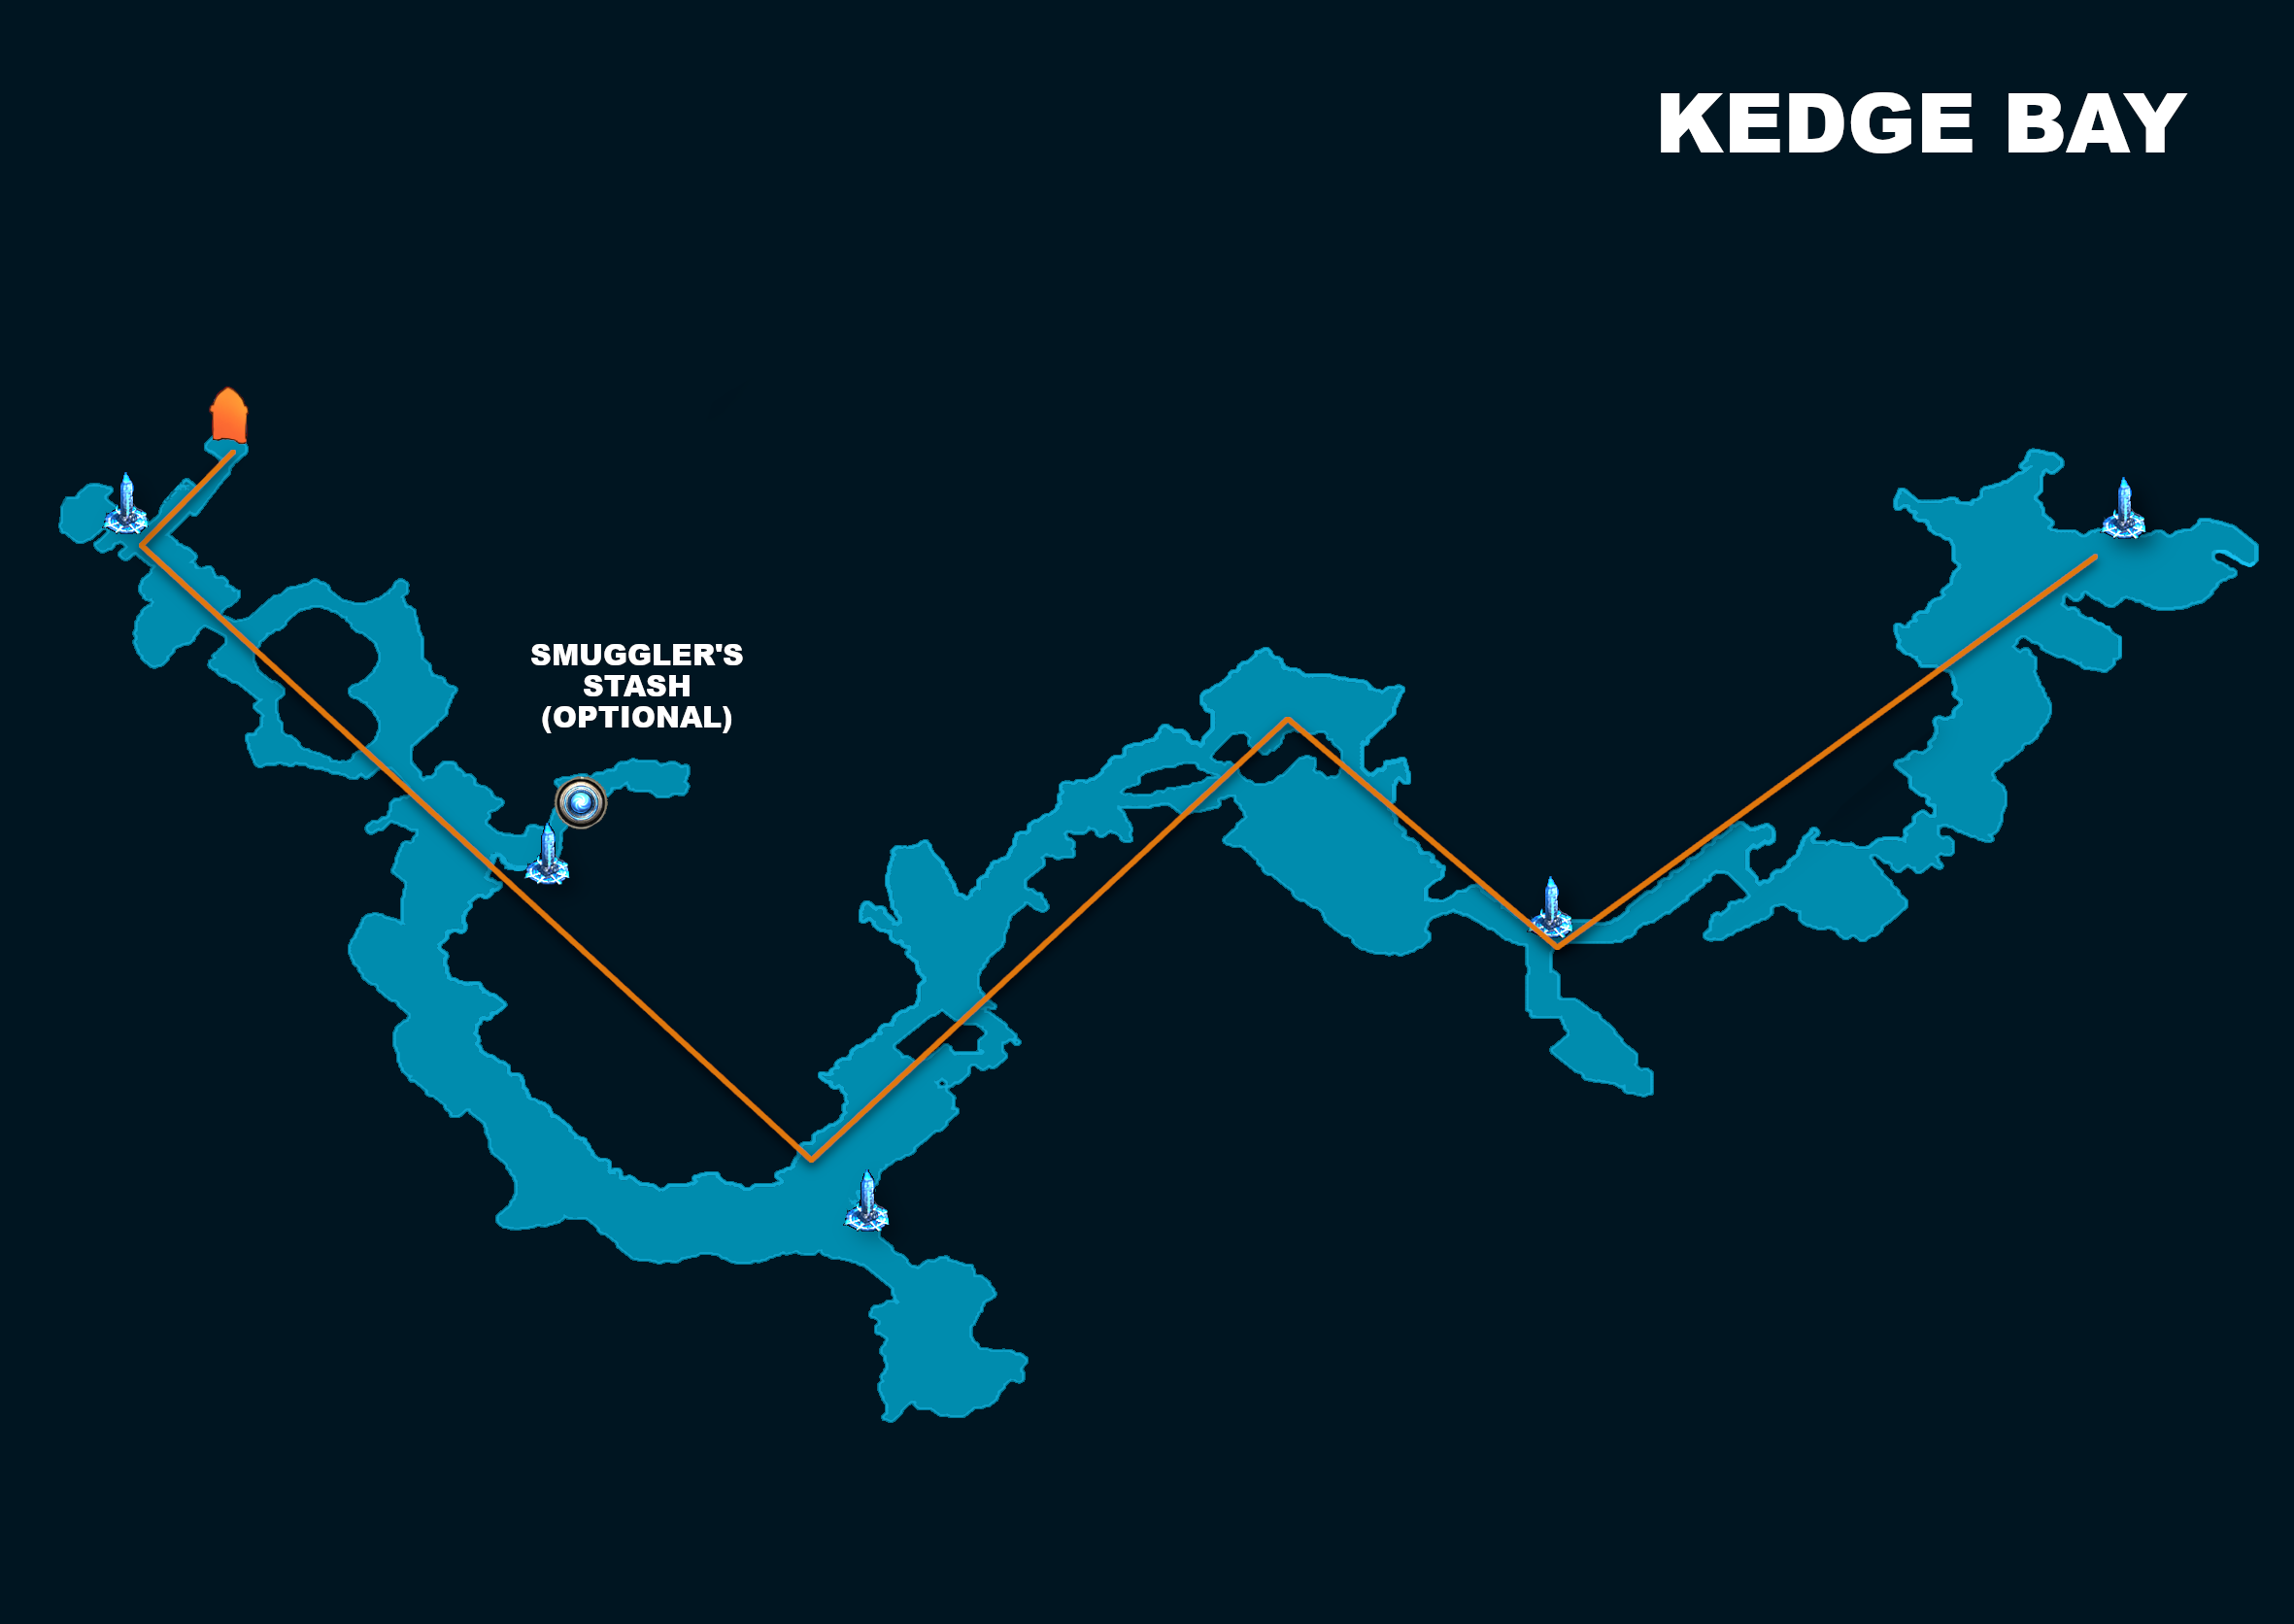
Kedge Bay
Kedge Bay has a very easy layout and all that is needed is to follow the path and make it to the other side.
There are small side areas that players can enter that have Checkpoints on the outside, and an Abandoned Ship can be found that contains a Rare Chest.
A Smuggler's Stash can also be found next to a Checkpoint in which you can find another Torn Map Piece, behind which is a Cave full of Gold. These can be ignored if your goal is to get to the end as quickly as possible
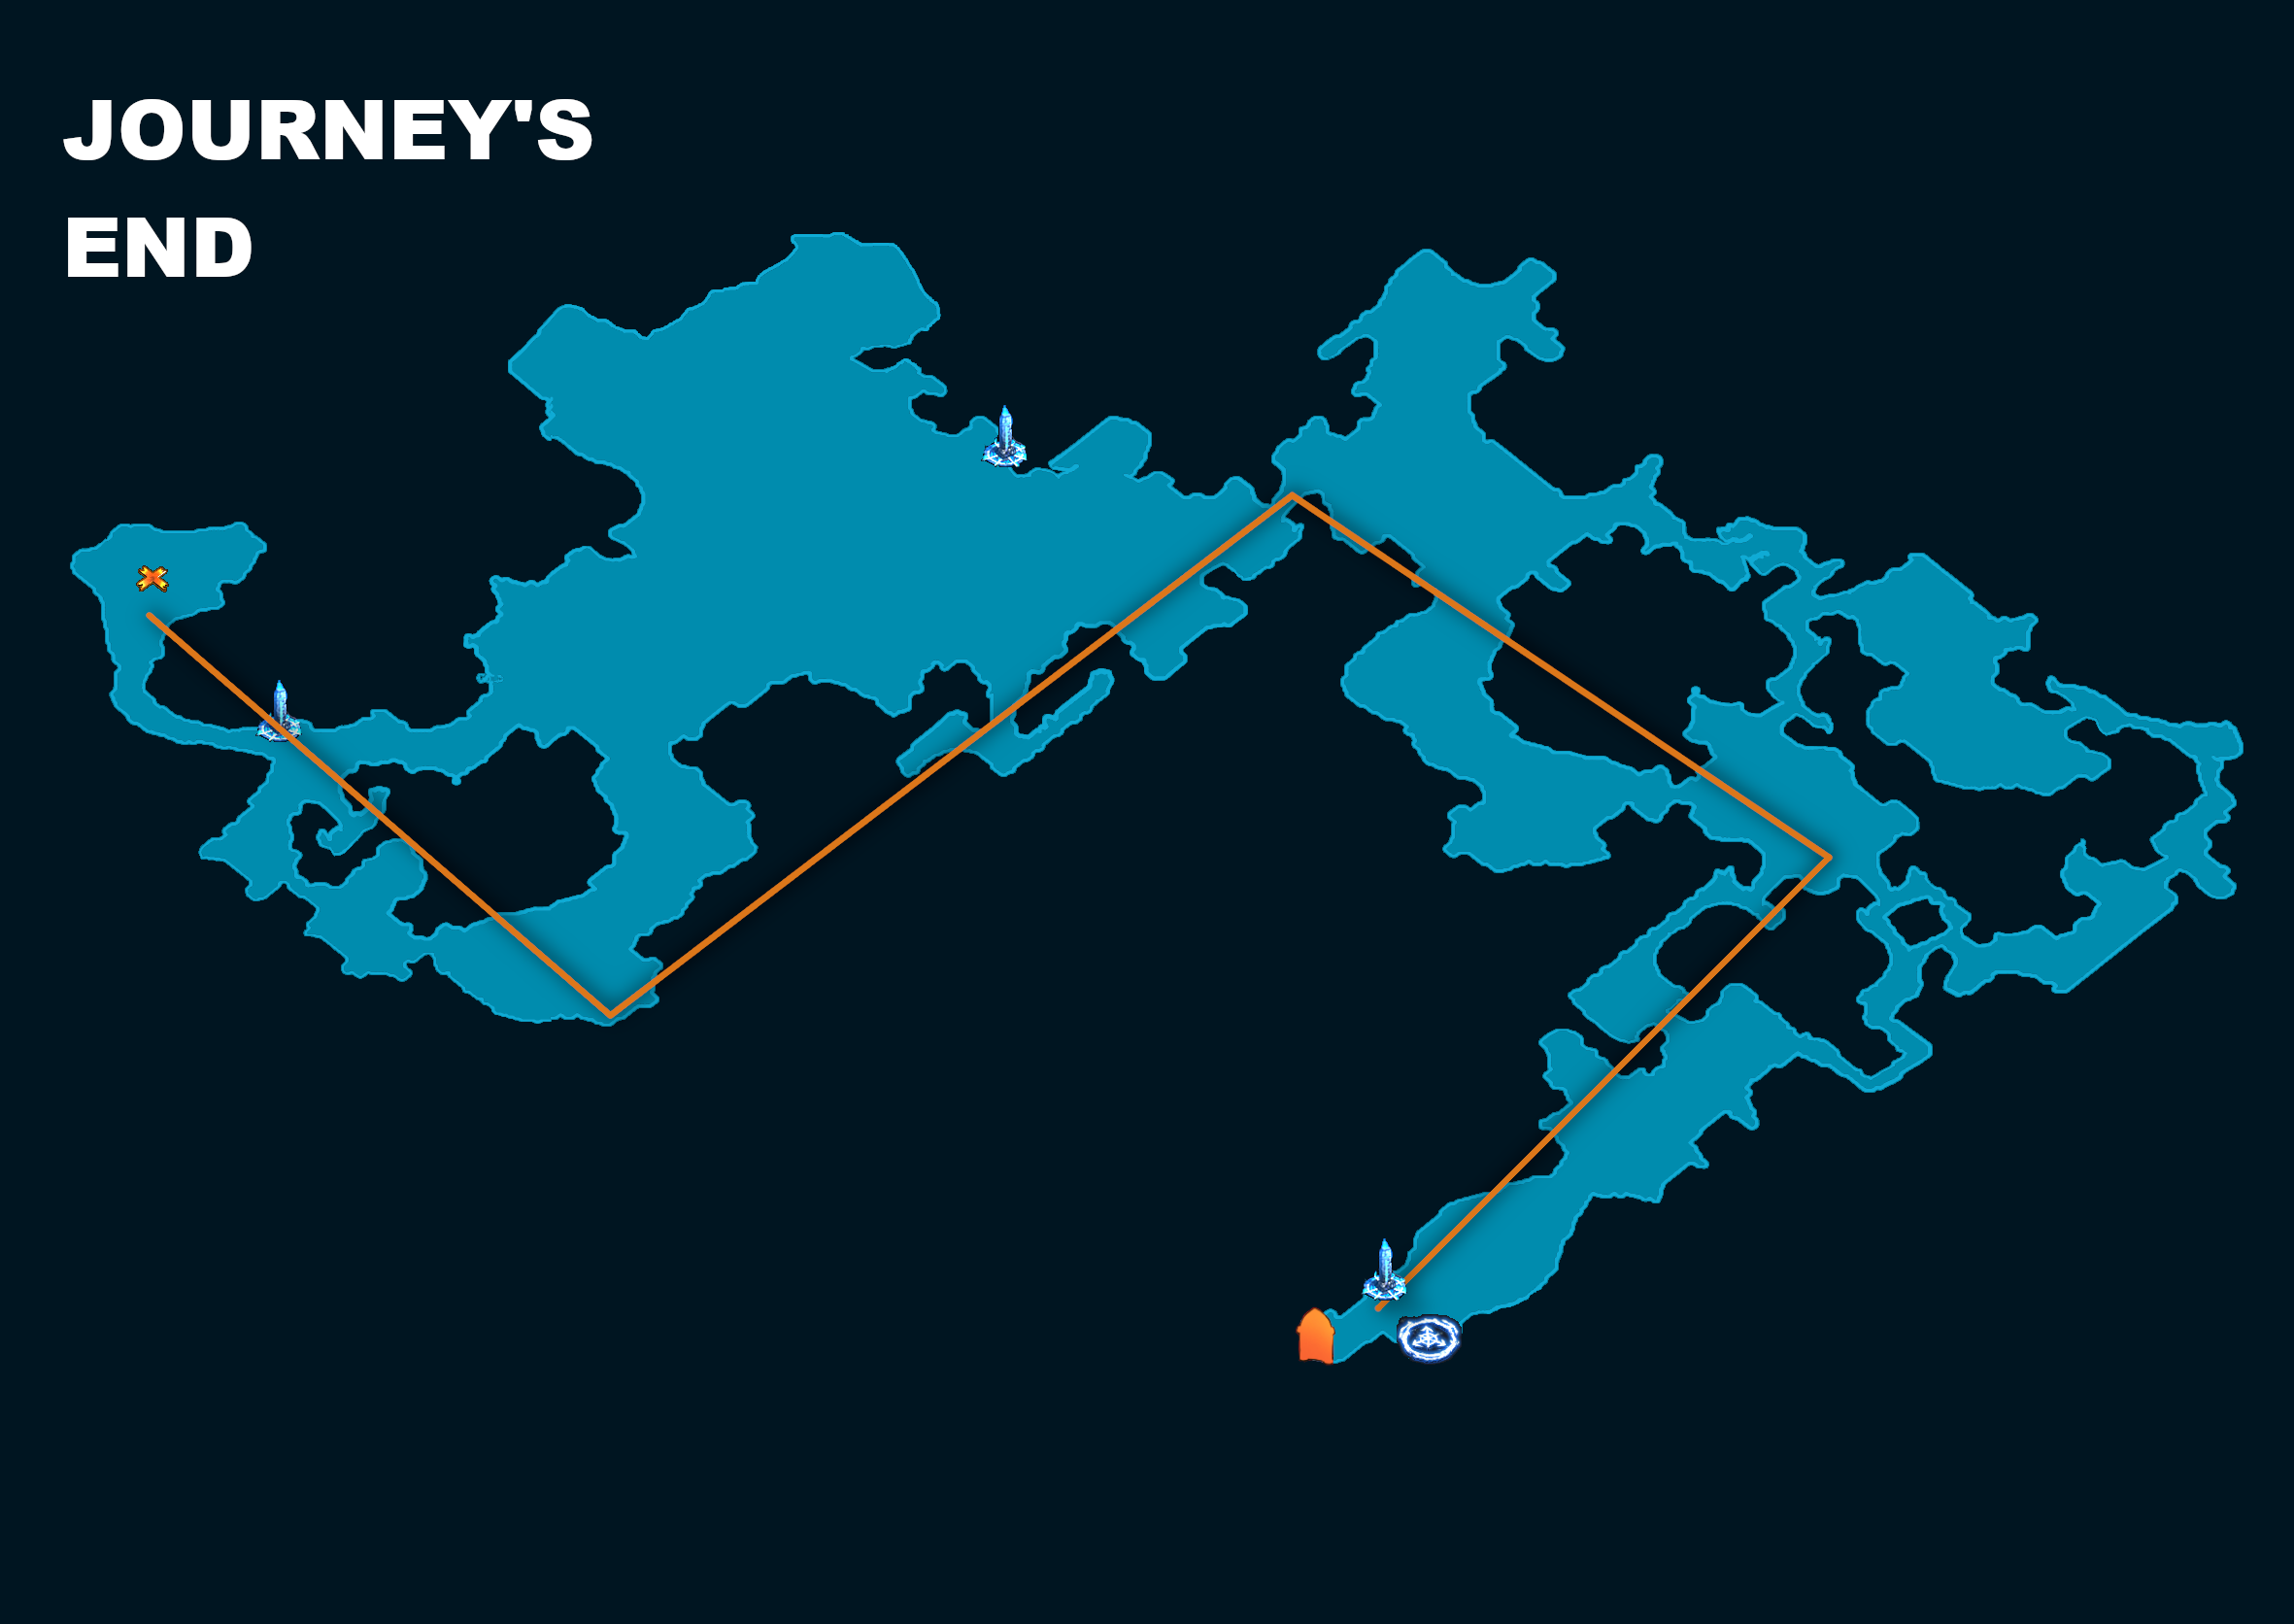
Journey's End
This area hasn't been thoroughly studied, but the goal is to get to the "opposite" side, furthest from where you came in. This is a fairly long and winding area, but the map will push you in the correct direction, with smaller offshoots with some additional content.
MAJOR CHANGE IN 0.4
Completing the Dark Mists Quest (defeating Omniphobia) will now grant +2 Weapon Set Skill Points
________________________________________________
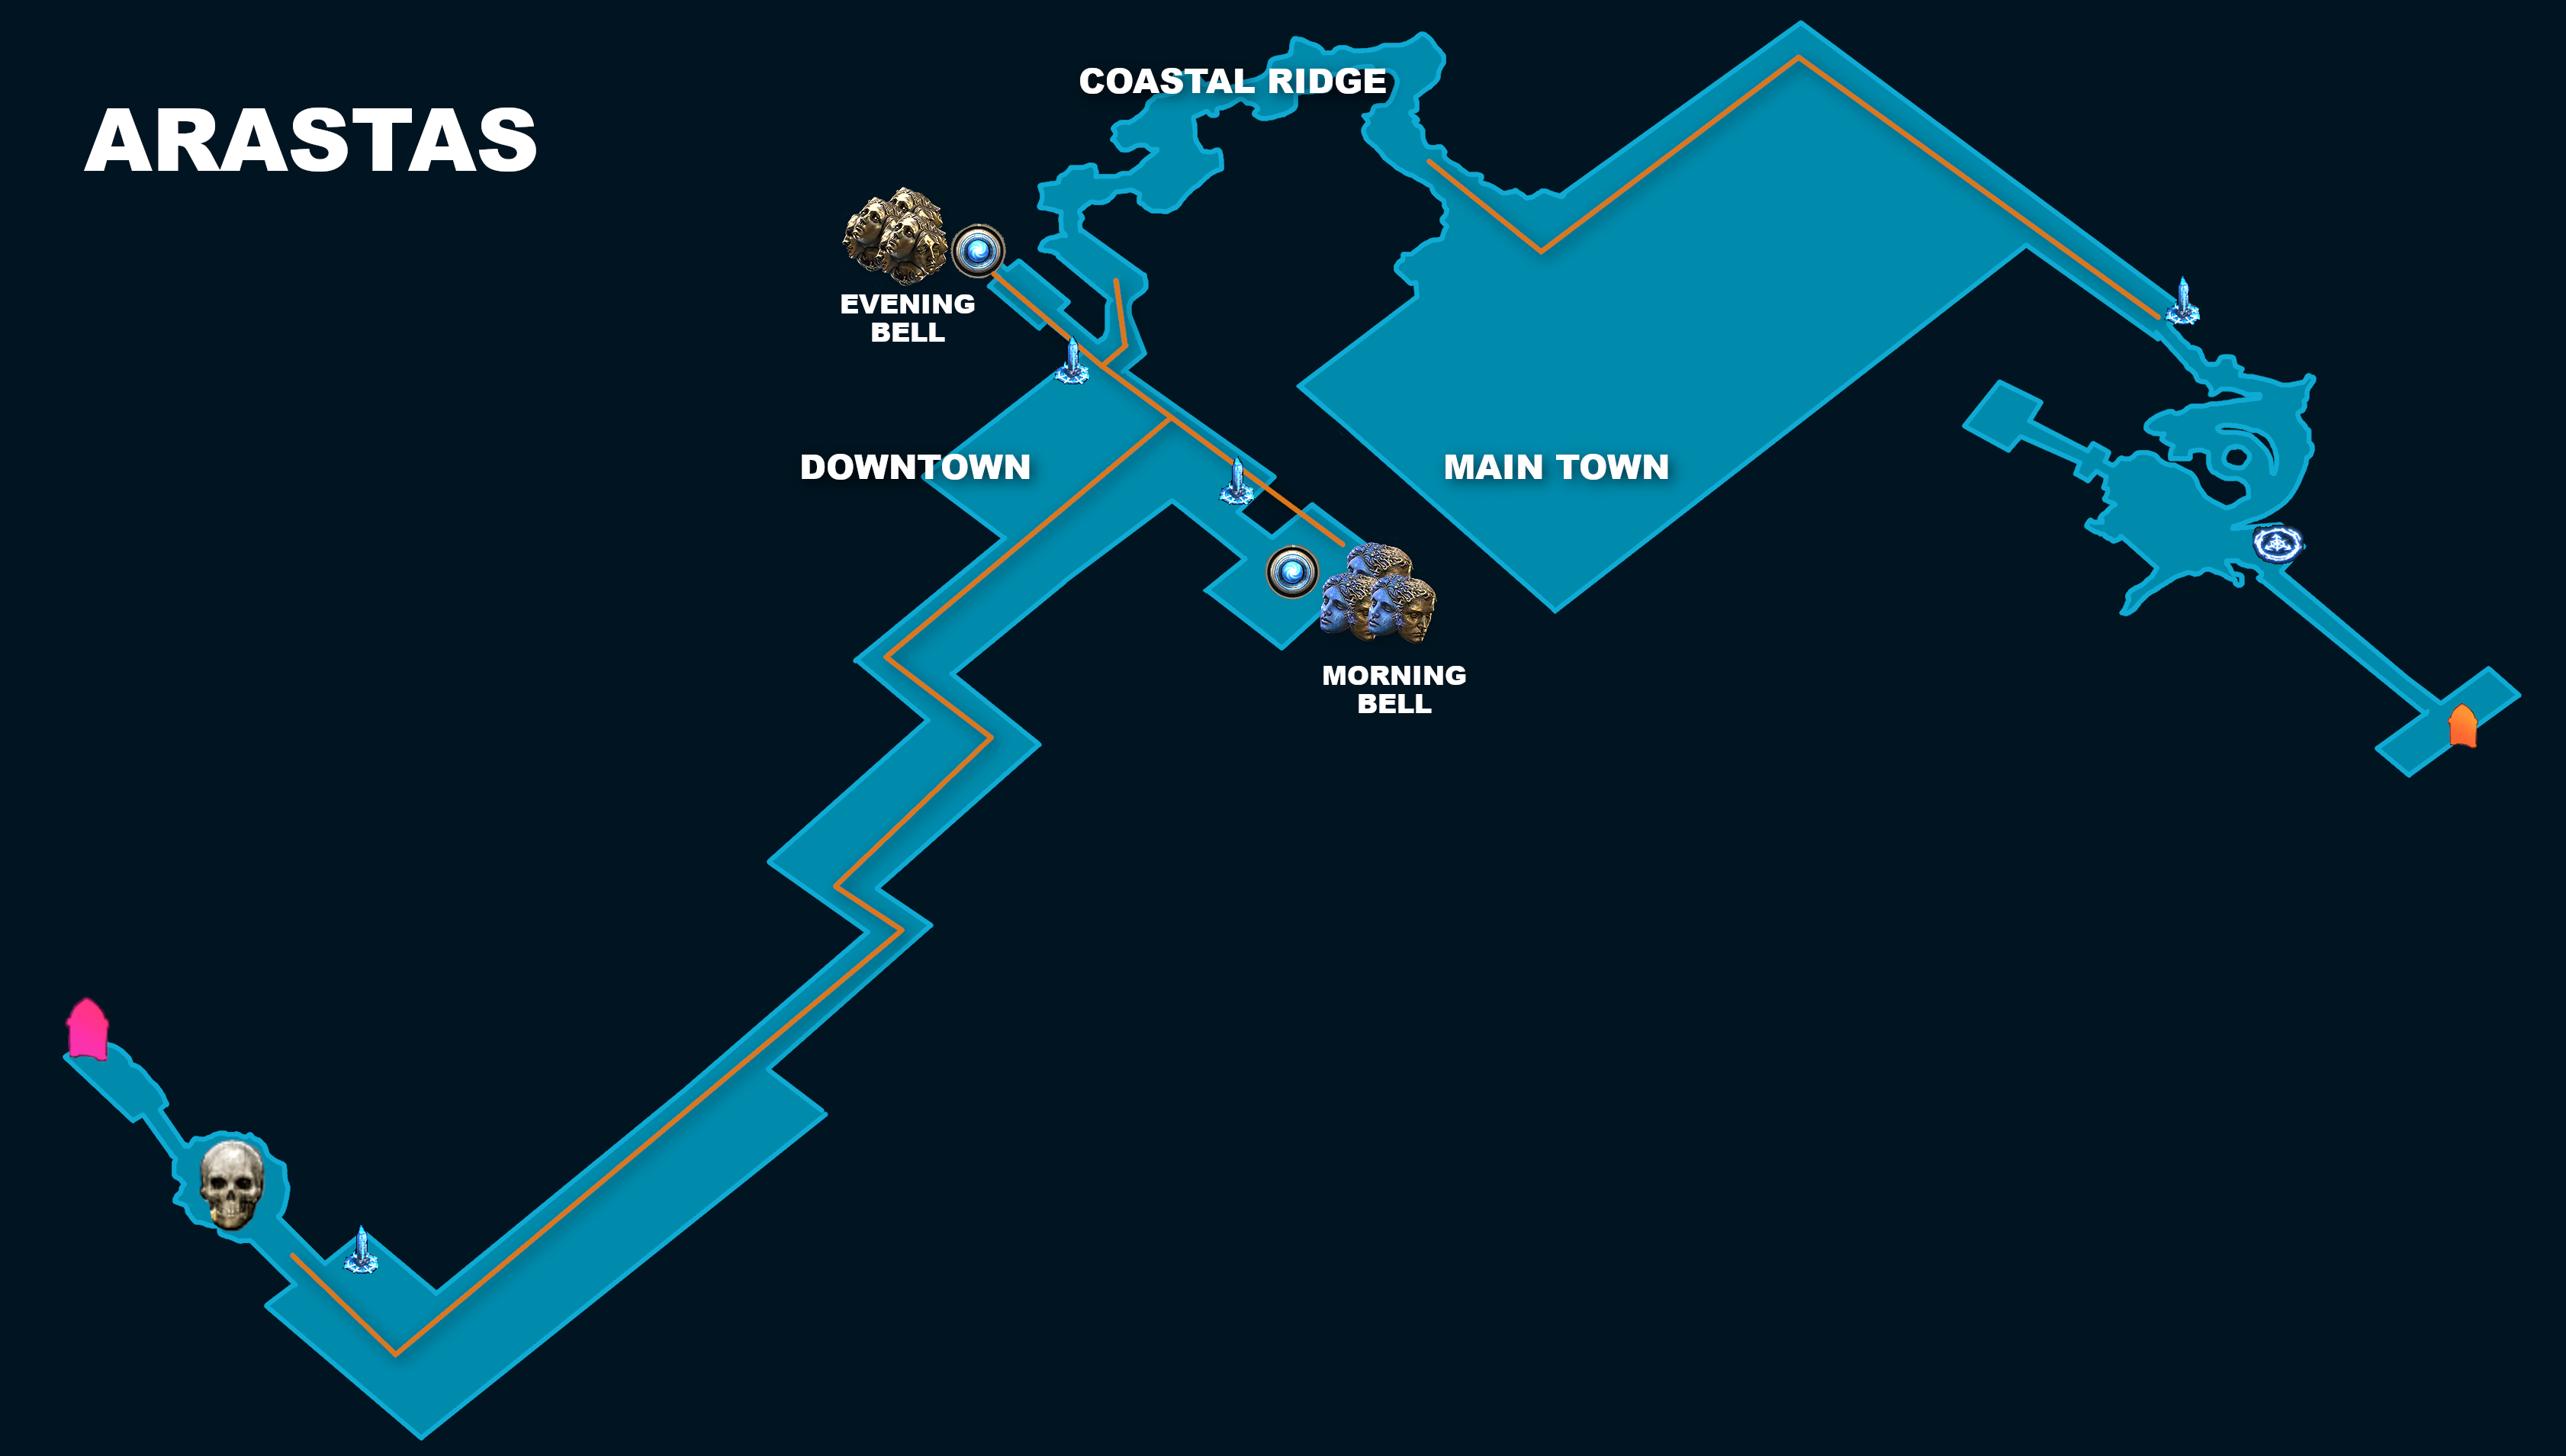
Arastas
CrimsonCasts has provided some very helpful notes for this area: "This area has been solved and currently has four possible layouts, but only one can occur in each league"
This area can be broken up into two sections: "Main Town" and "Downtown" connected by a Coastal Ridge. The Main Town is where you start that contains several buildings, before opening up to a coastal ridge that connects to Downtown with fewer buildings and a more natural rocky/grassy pathway.
Step 1: Get out of Town; there's nothing of note here.
Step 2: As soon as you get out of Town, hug the top wall and you should encounter a Checkpoint that leads you up a Bell - clicking this will grant you 3 Exalted Orbs
Step 3: Directly in line with this Bell, on the opposite side of the Ridge area, you'll find another Bell that will grant you 3 Regal Orbs
Step 4: Return to the central main path, continue down until you find the arena where you will face Torvian
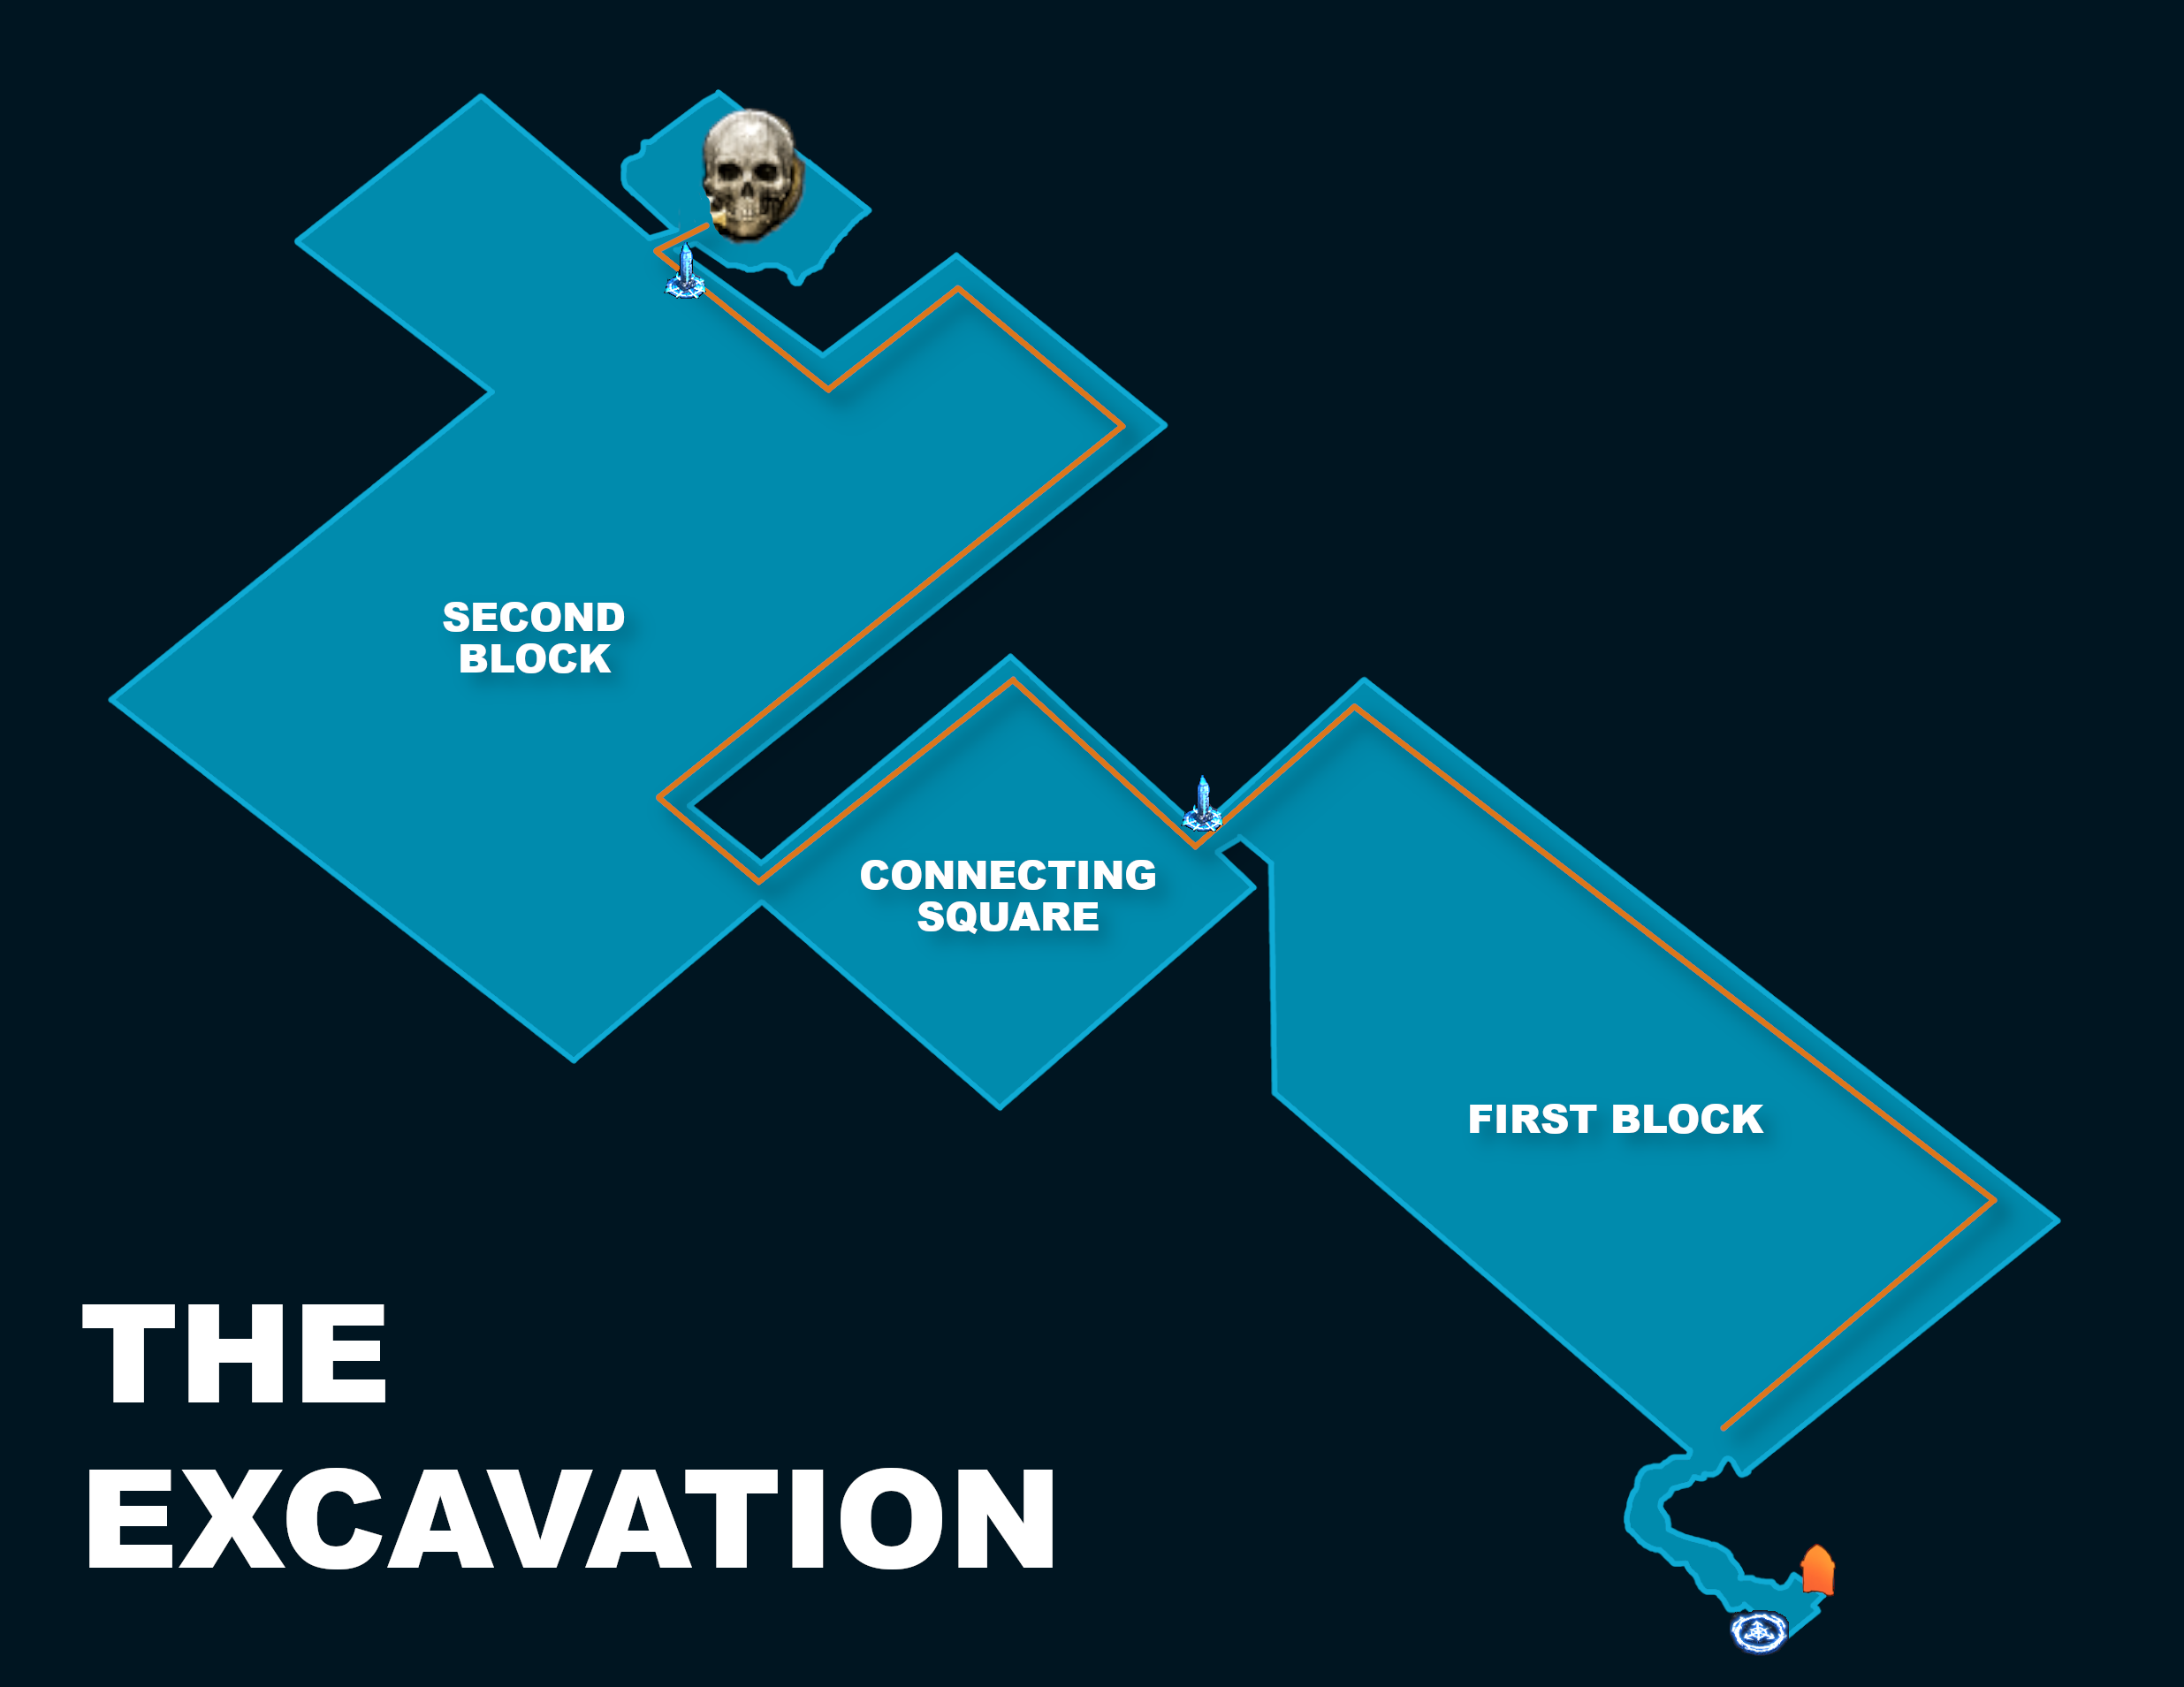
Excavation
Basic Solution: Pick a wall and hug it, until you make it to the Boss
A more complex, racer-level solution for this area exists, but a more simple way to think of it is as two big blocks connected by a small square. The goal should be to exit the first block, travel through the connecting central square (which usually has a Checkpoint at the start of it), then check the far edges of the second block for the boss arena. This can be done fairly easily if you choose to hug one wall and follow it. This method isn't optimal, but it is easy to follow and better than blindly running through the zone.
________________________________________________
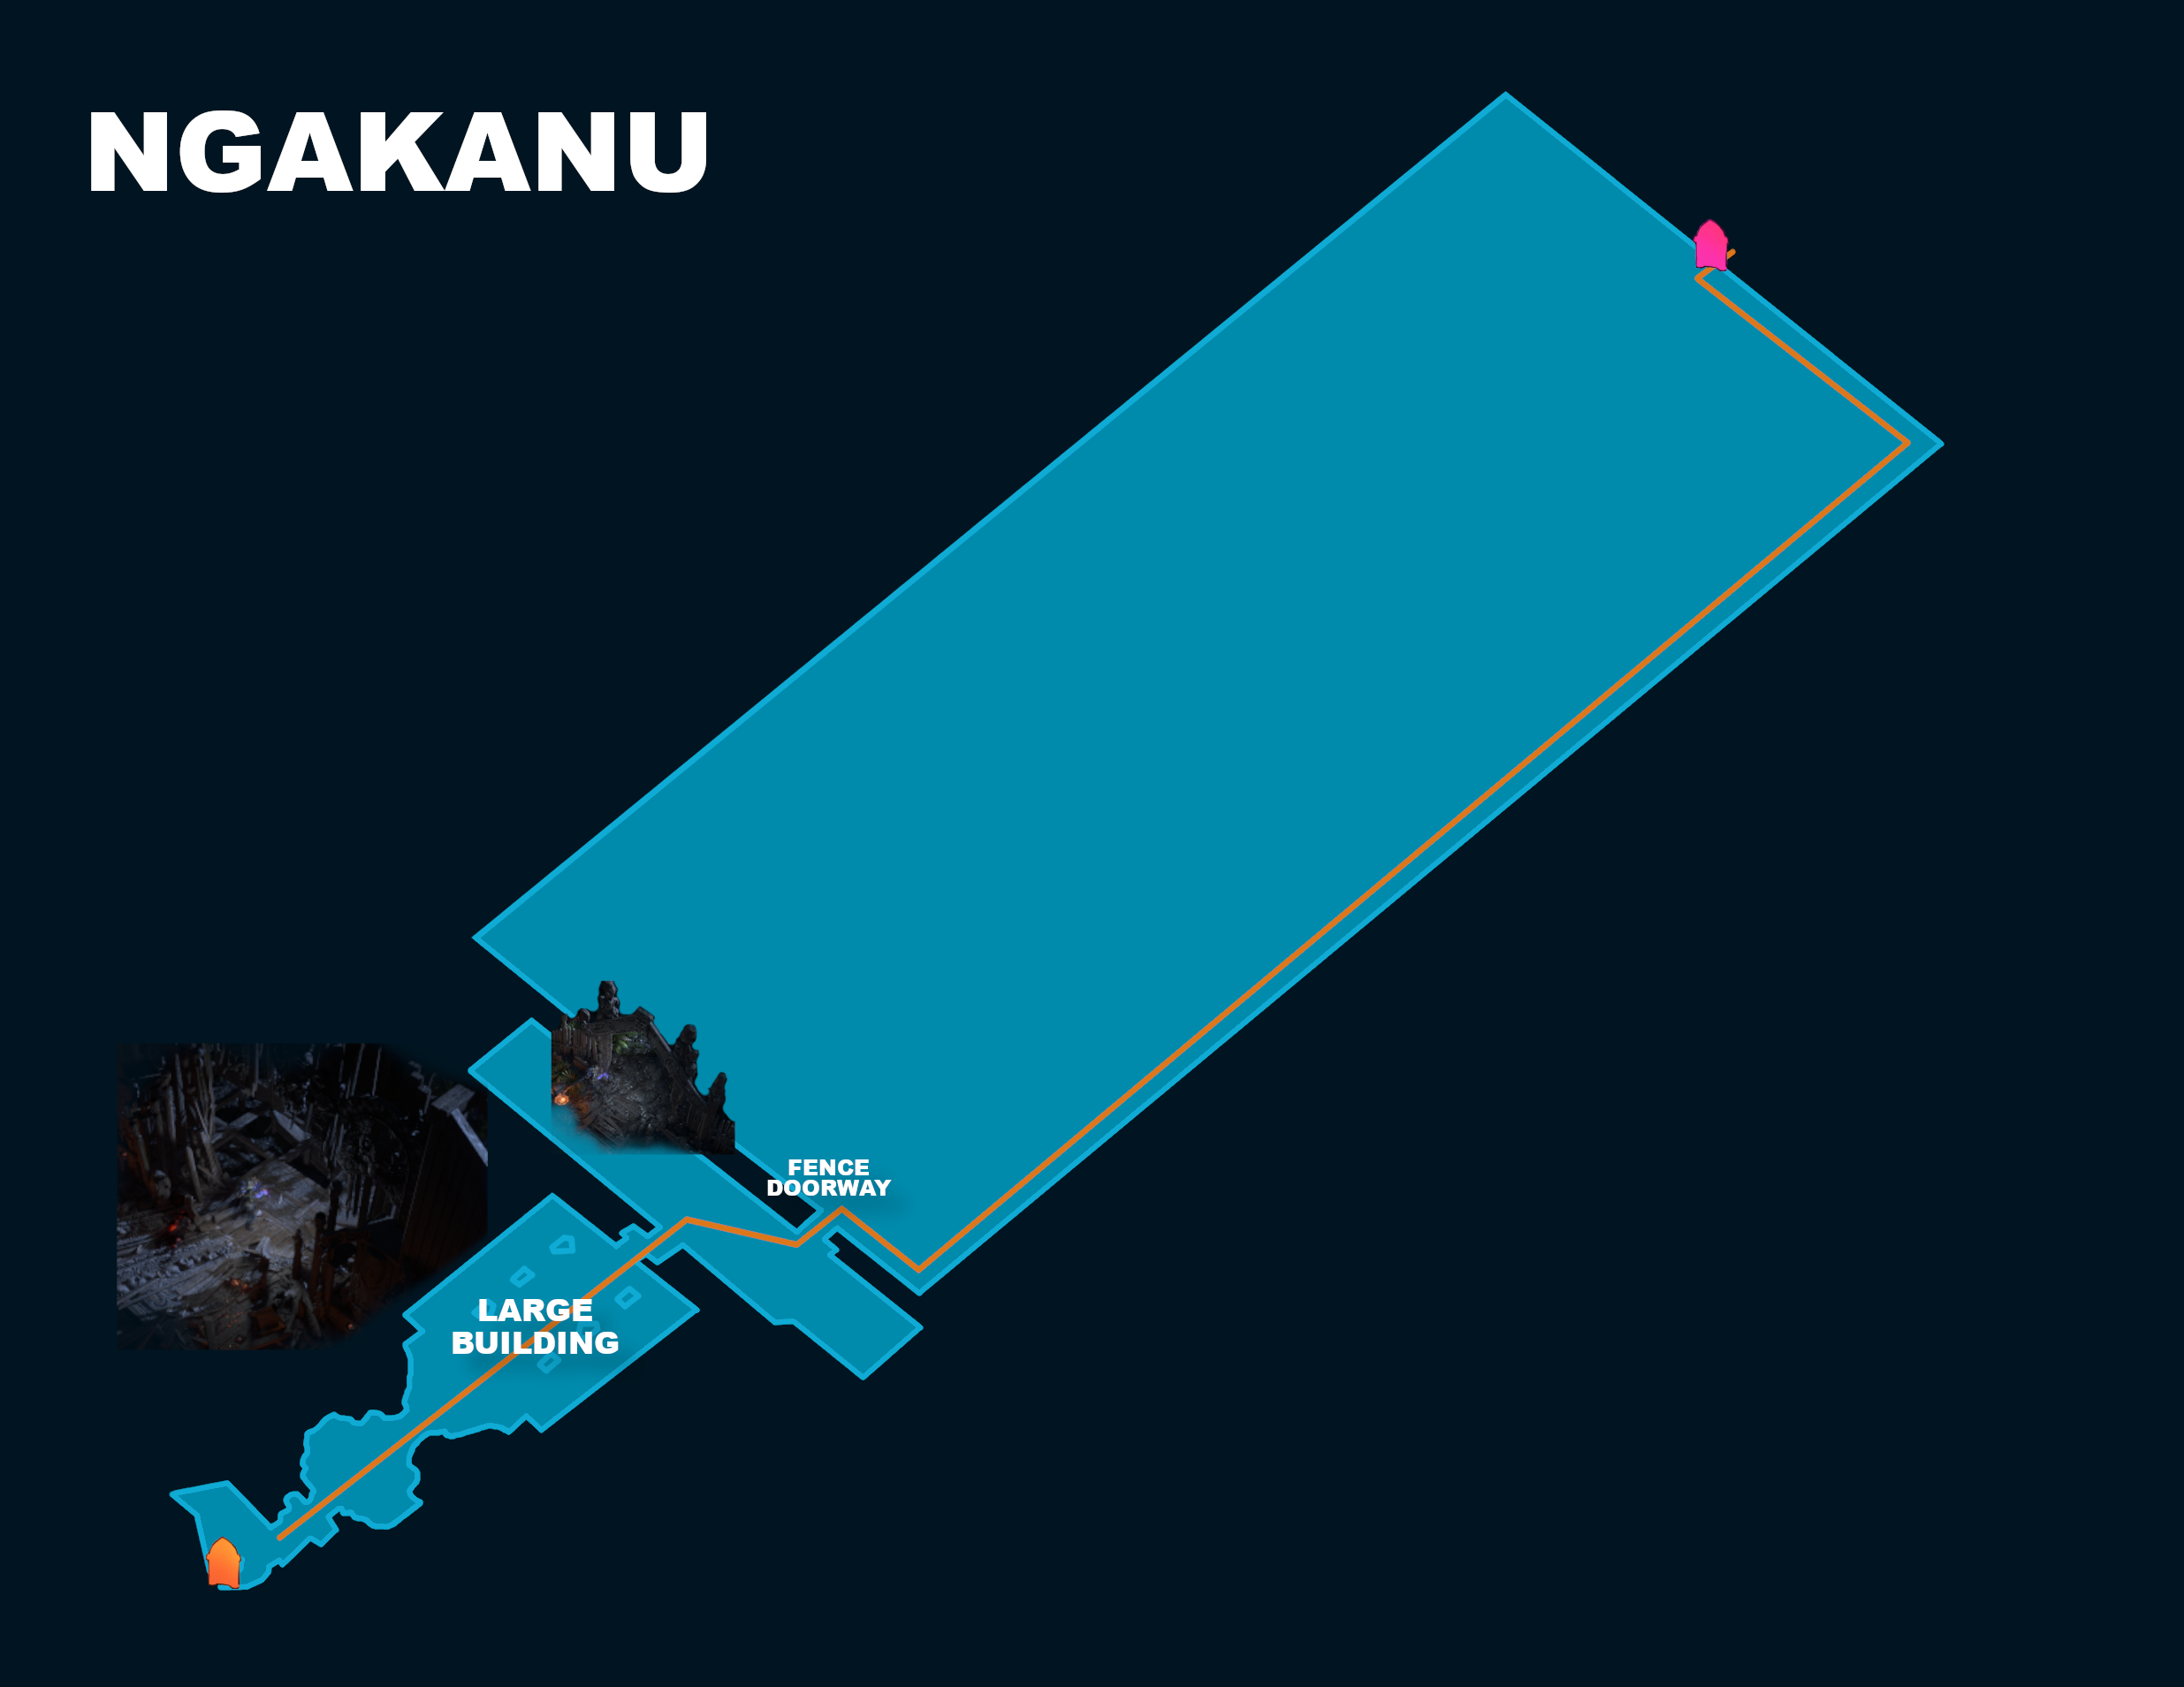
Ngakanu
This area is incredibly easy to navigate with CrimsonCast's Solution: After getting off the boat, you will enter a large building. After leaving the building, you will find a fence with a doorway opening. After passing through this fence doorway, you will be in the main area of the zone. Try to find the boundary edge of the area, then follow that all the way up and it will lead you directly to Heart of the Tribe.
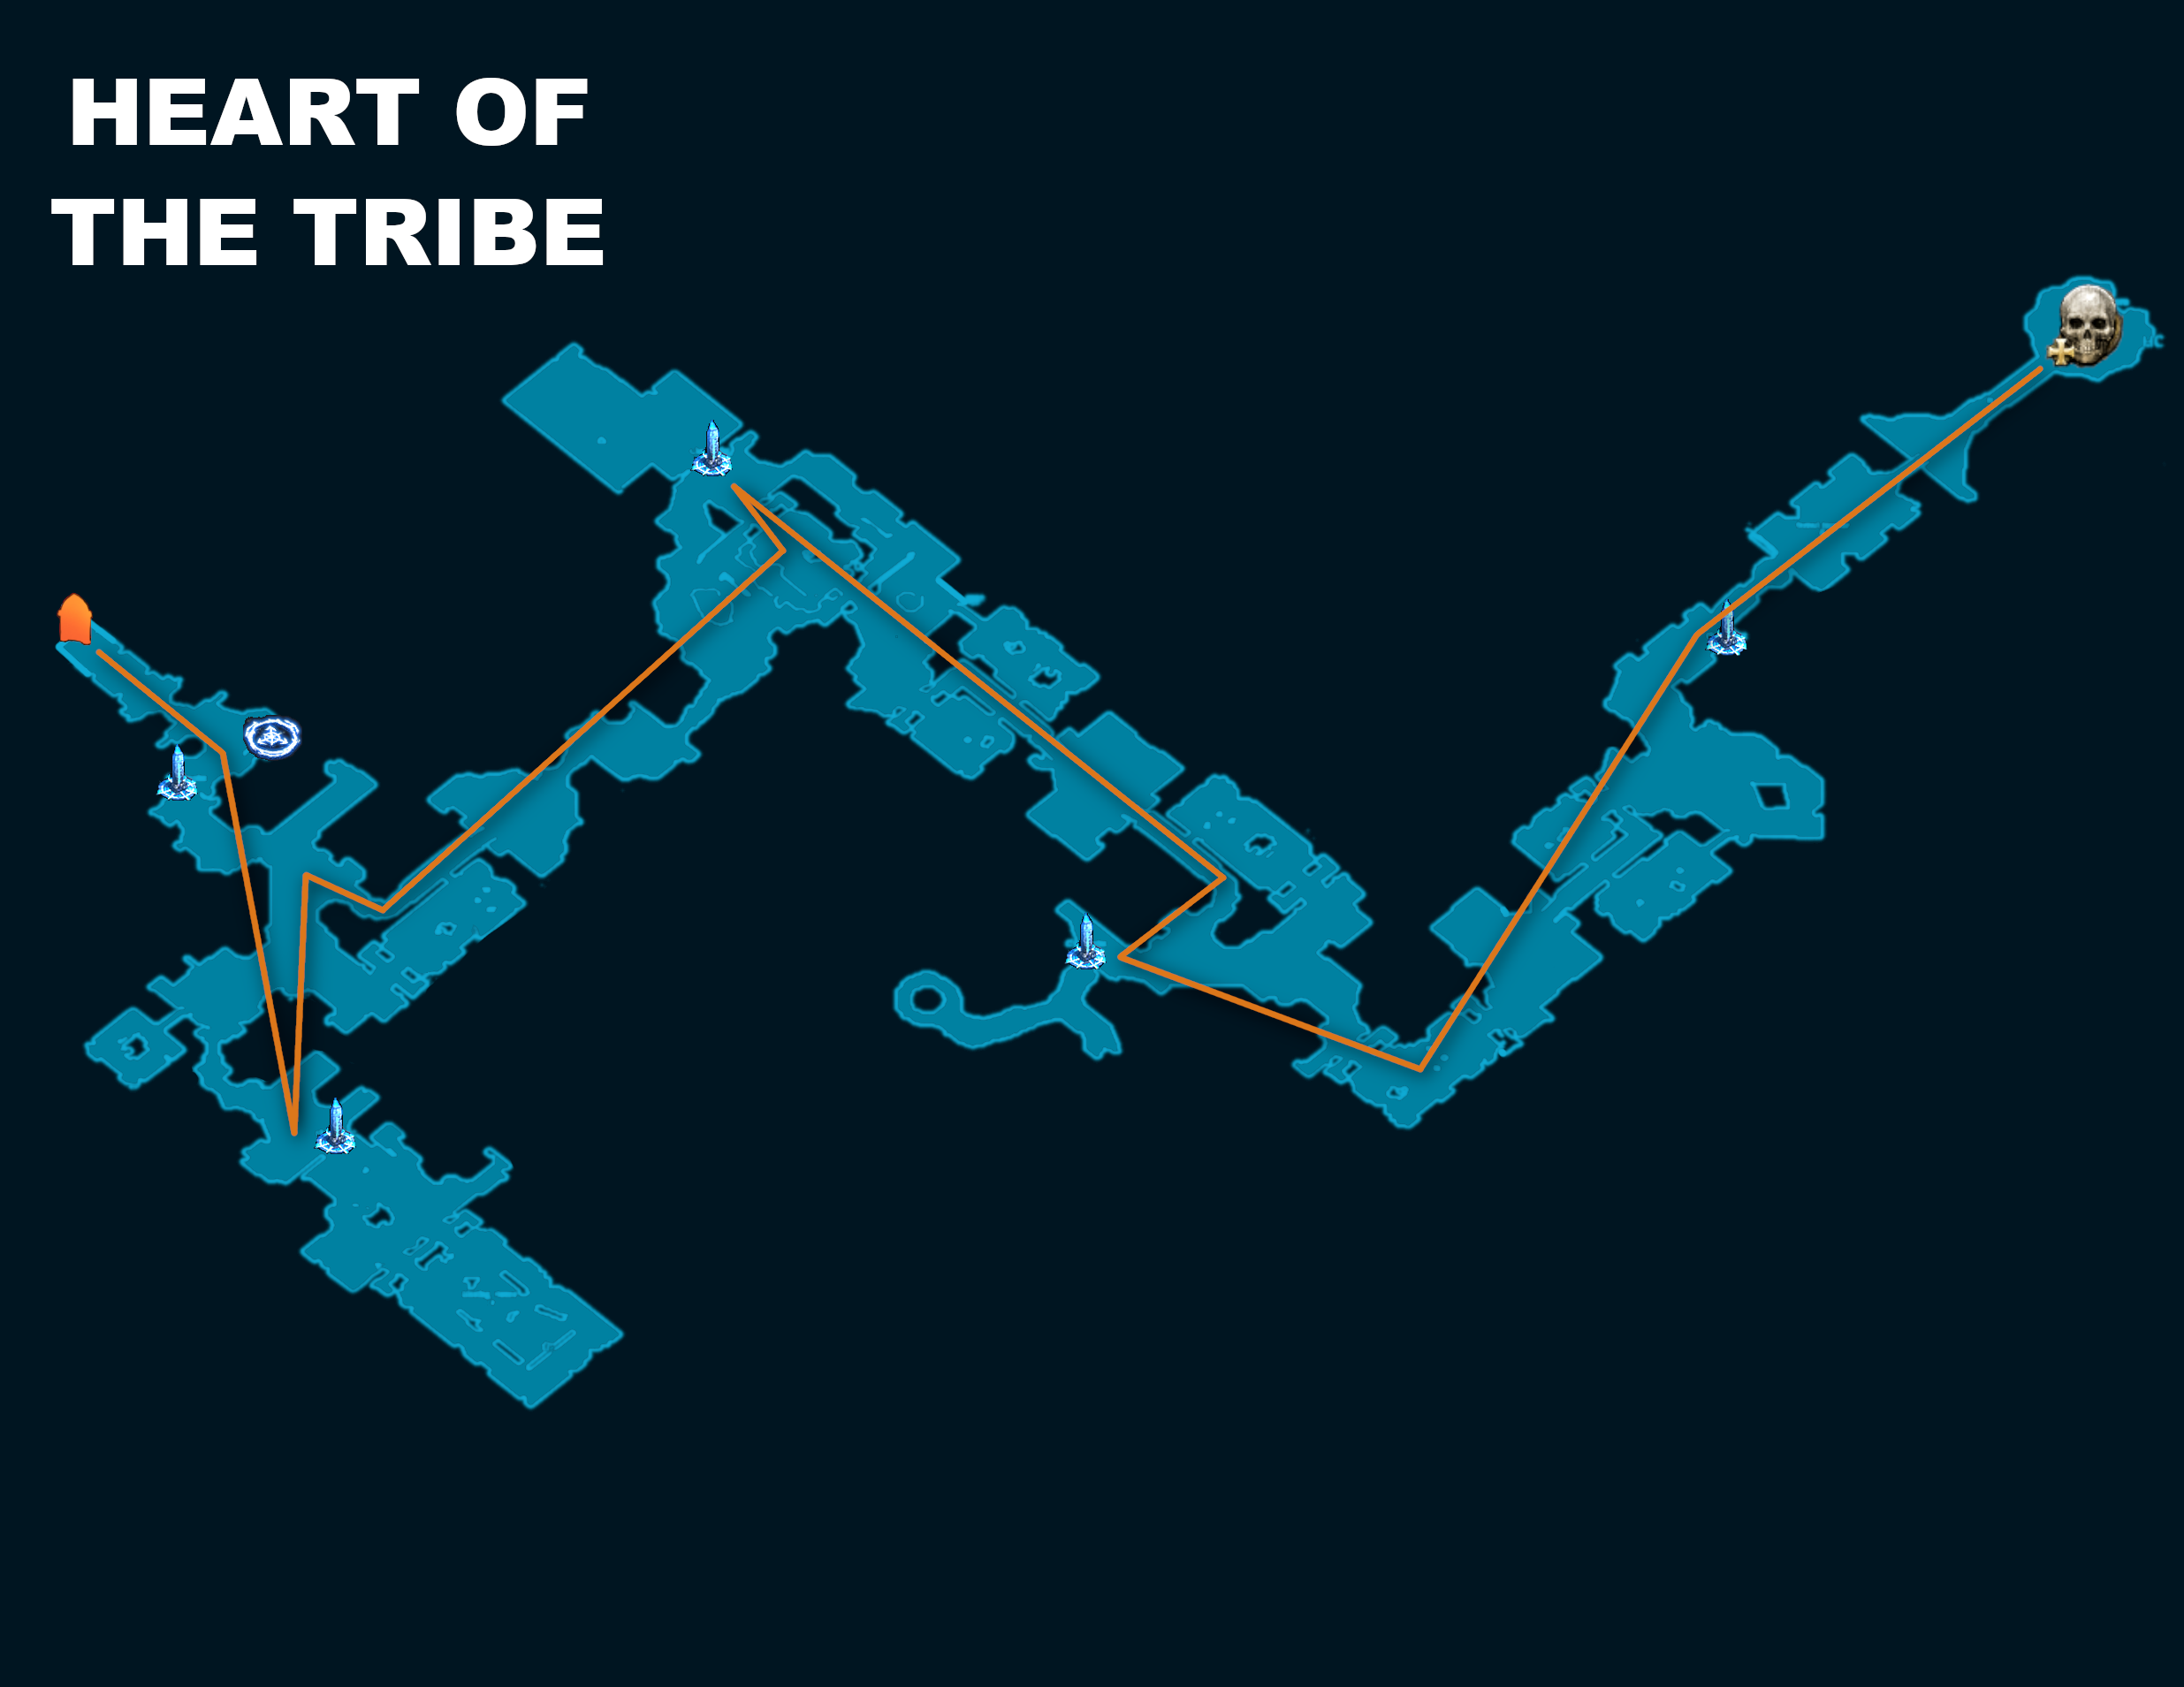
Heart of the Tribe
Crimson's advice for Heart of the Tribe is to enter the zone and continually try to head in a Northerly direction. If you see a Checkpoint, walk in the OPPOSITE direction of that Checkpoint and continue on until you find the final Boss of Act 4