menu
MobalyticsUse your favourite features in-game with our Desktop App
PoE 2 Guide

Campaign Layout Guide: Act 1

Beginner
Updated on Mar 22, 2025
Mar 22, 2025

Overview

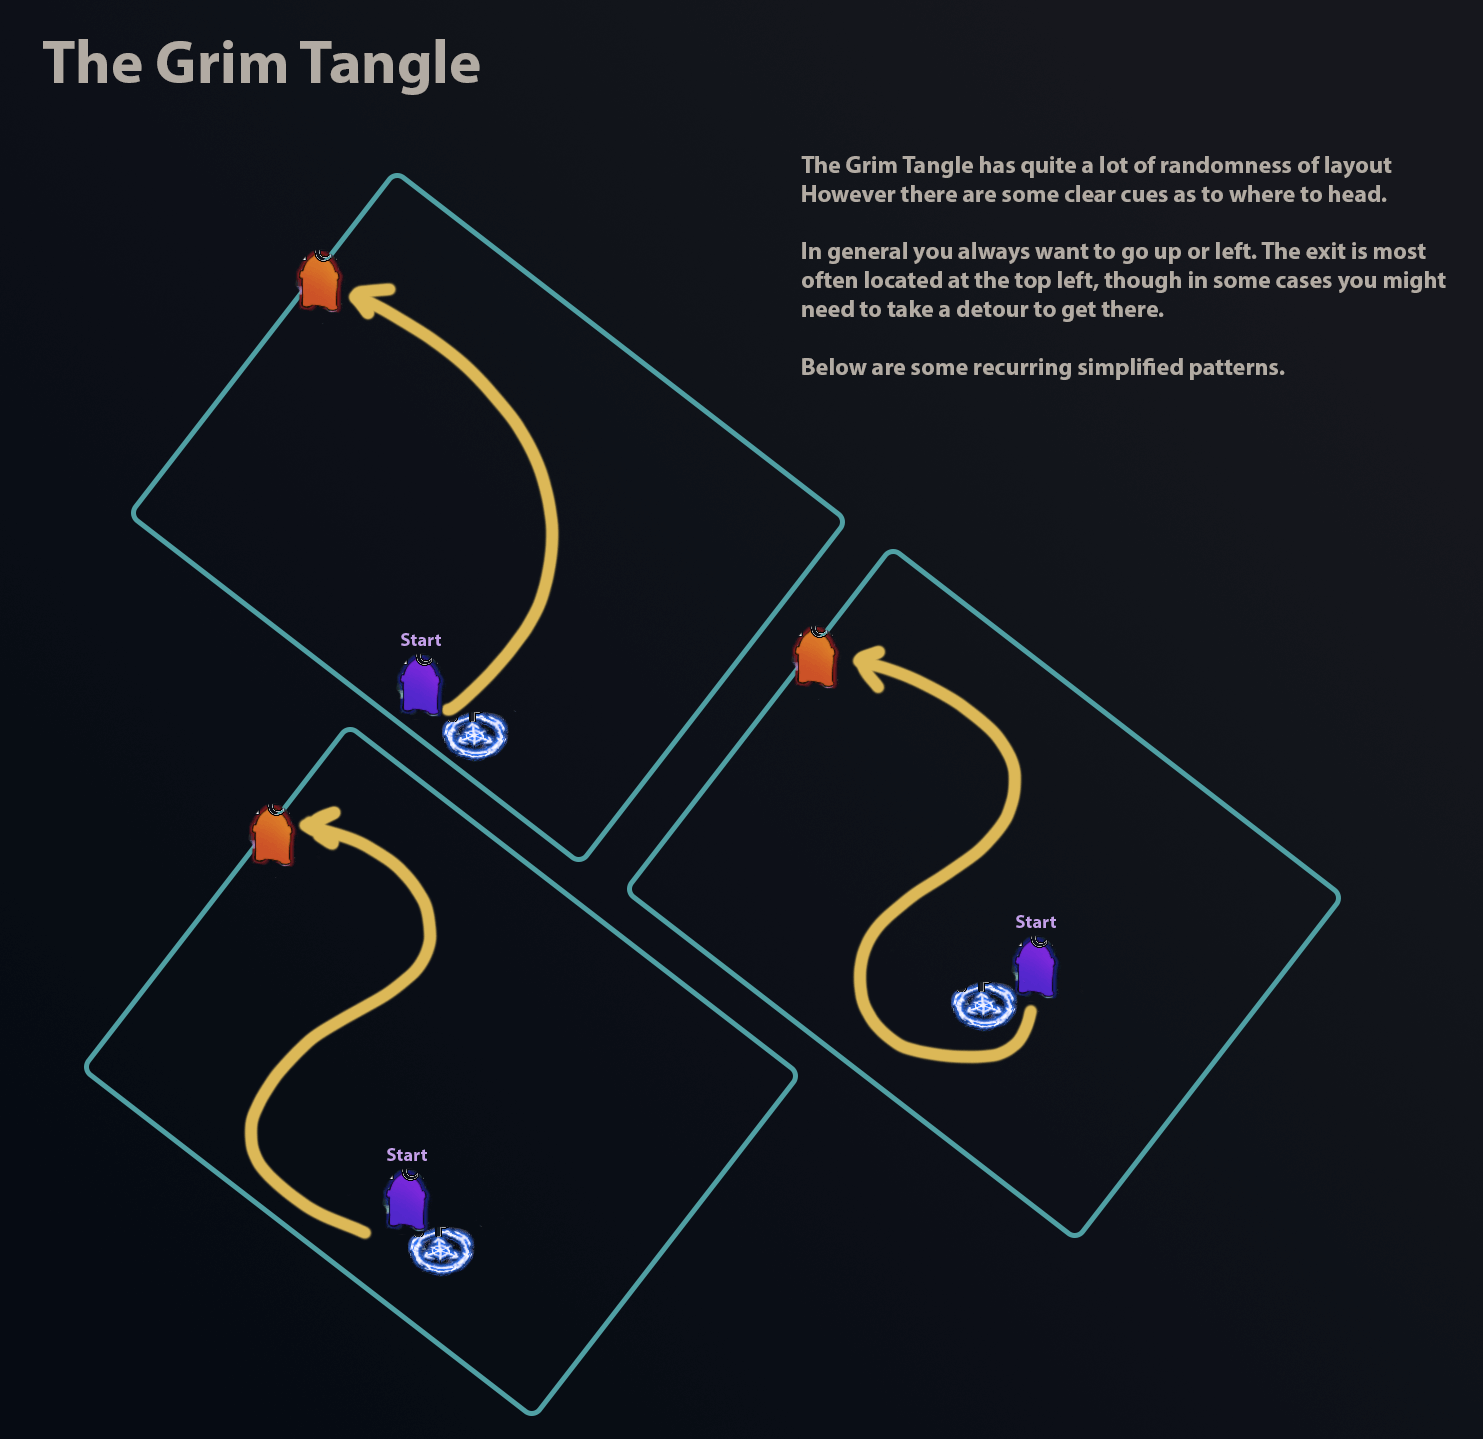
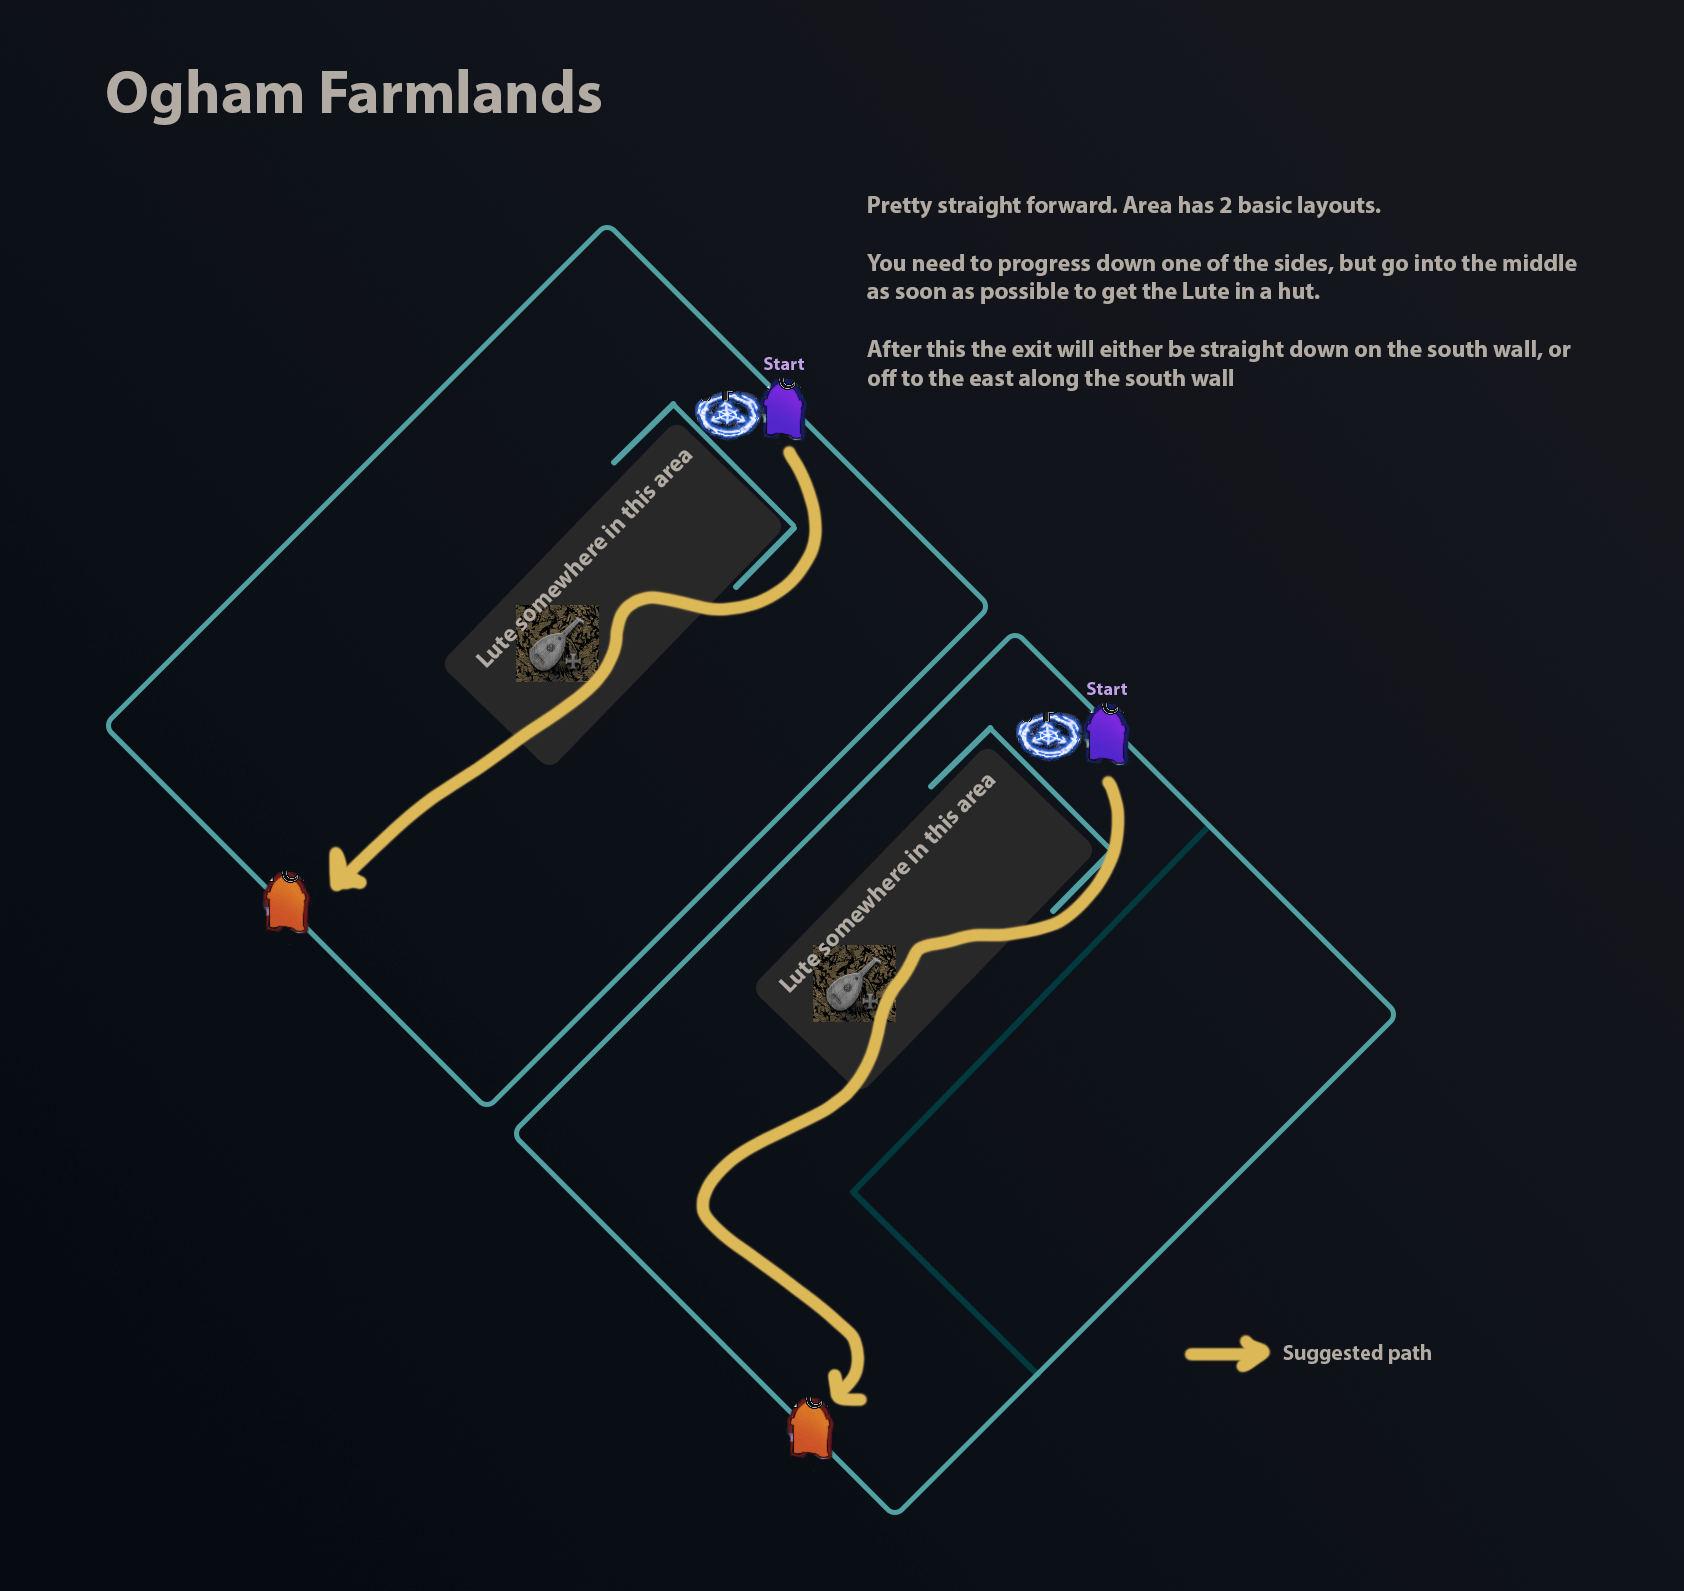
Although somewhat randomised, many of the zone layouts throughout the Path of Exile 2 campaign are fairly readable which can help making get through them more quickly.

This guide covers layouts in Act 1.
For Act 2, click here: Campaign Layout Guide: Act 2
For Act 3, click here: Campaign Layout Guide: Act 3

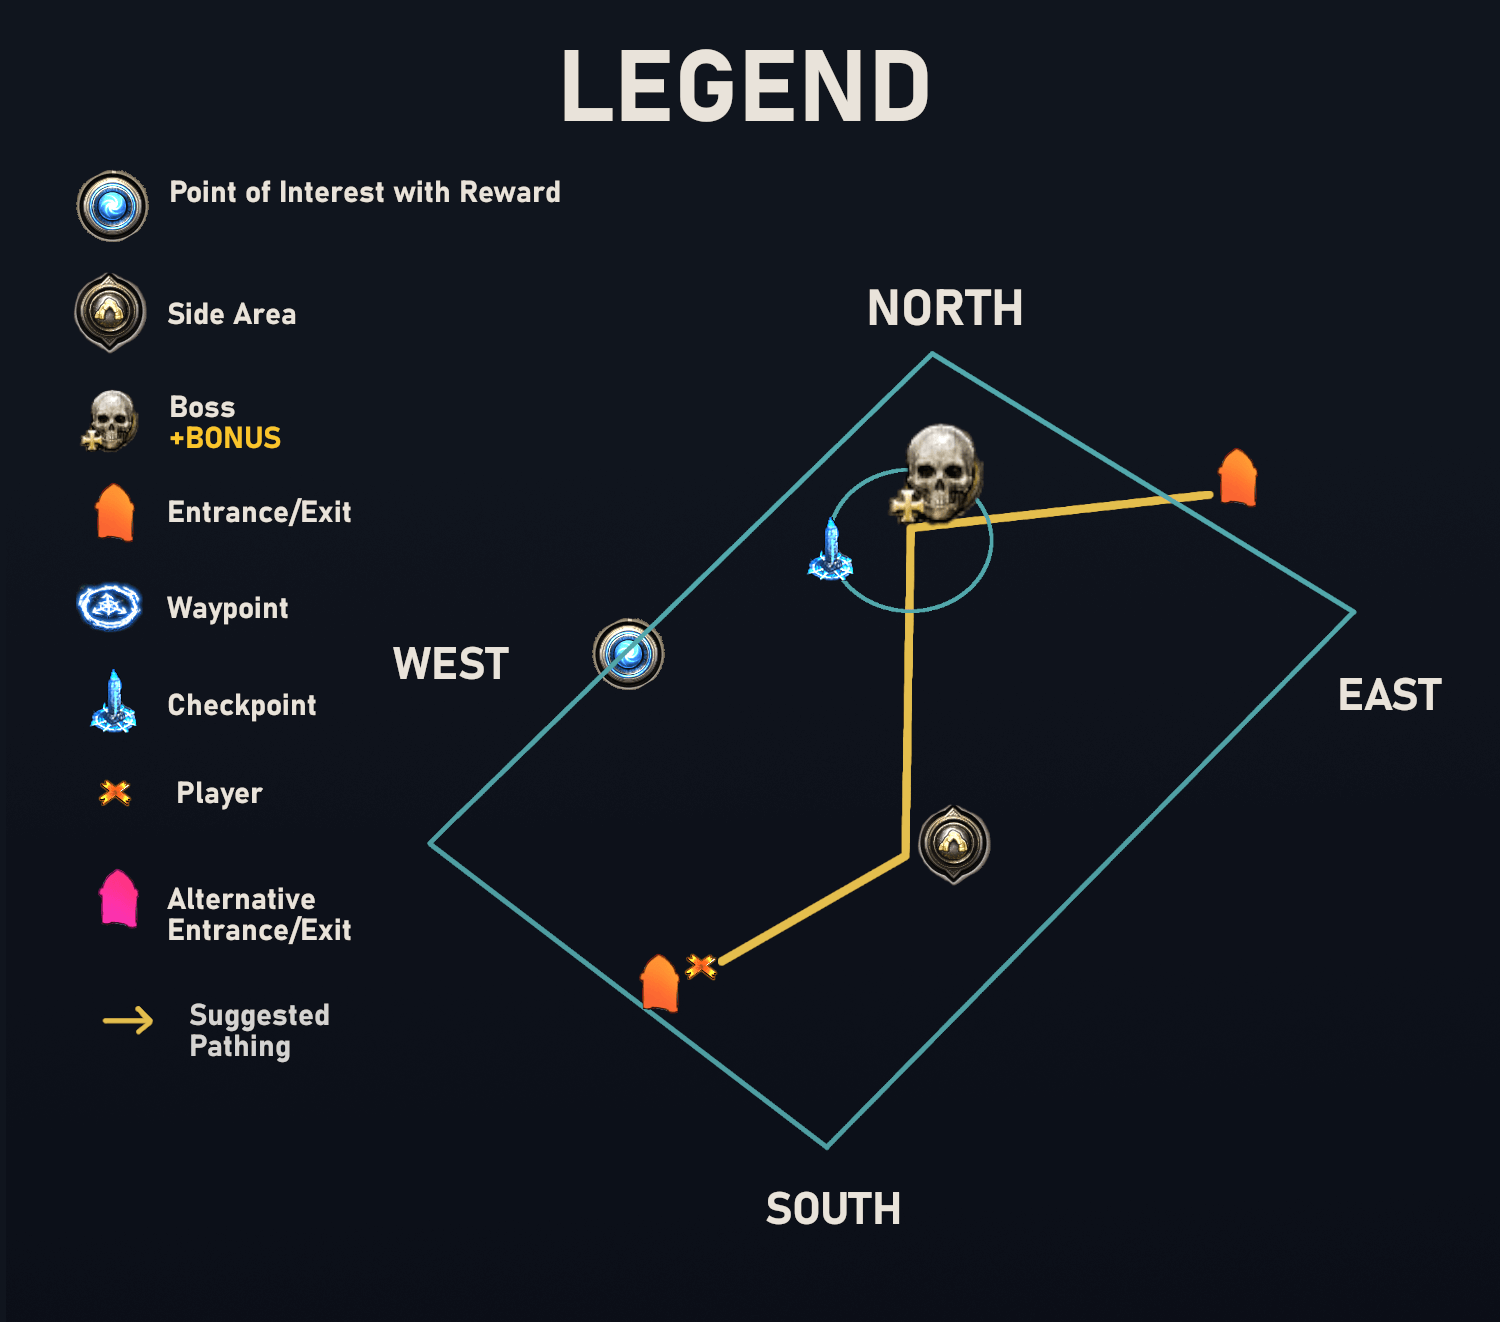
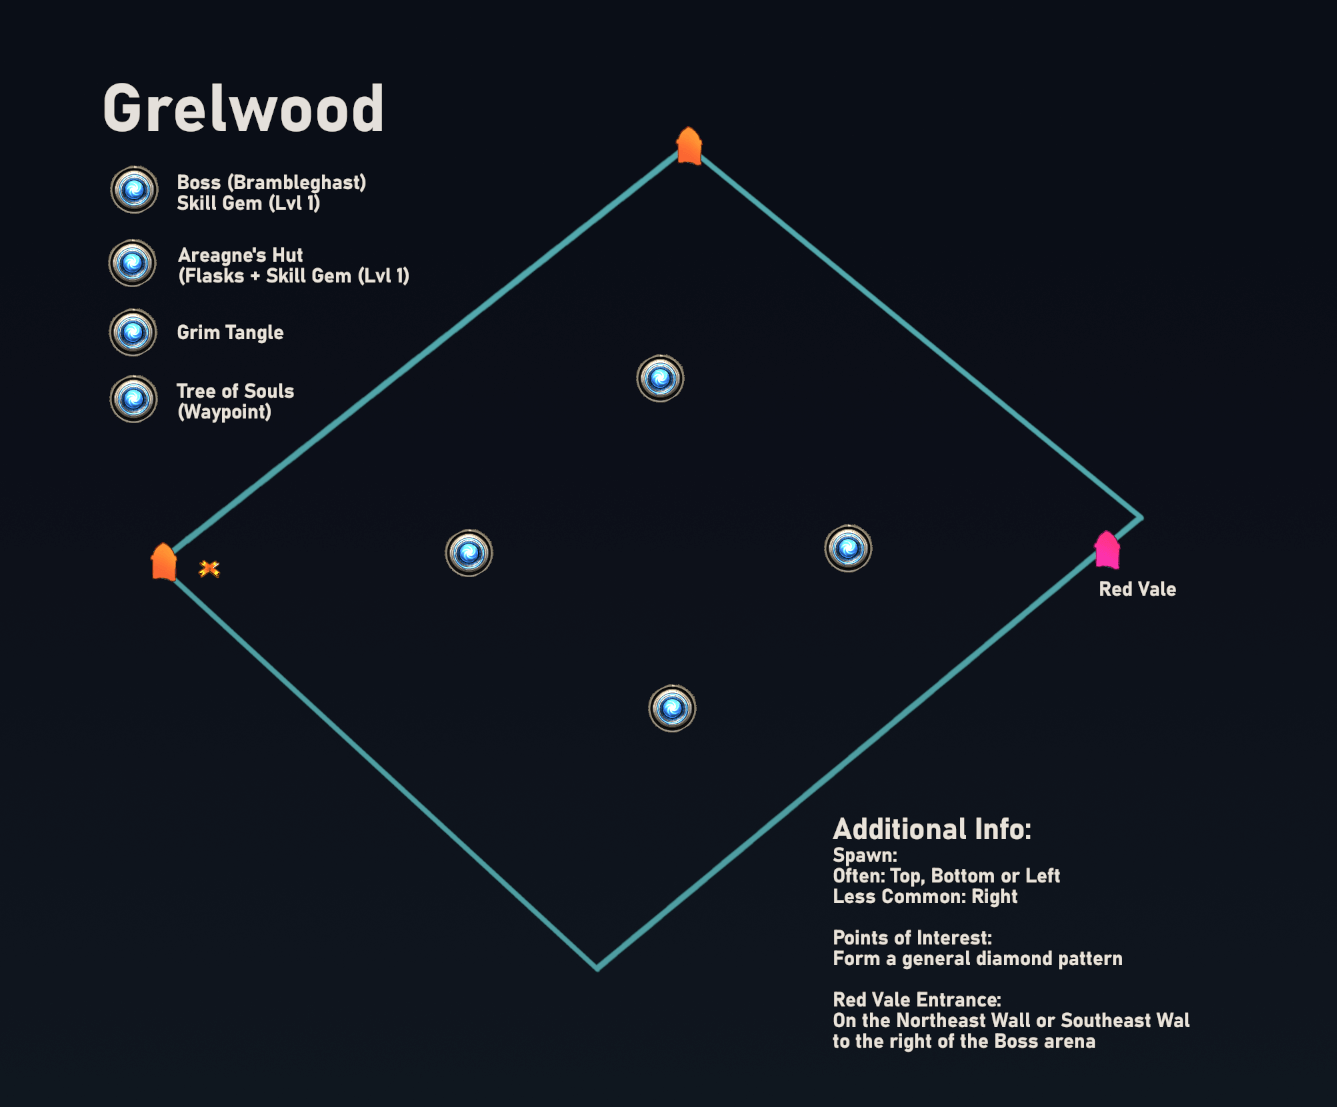
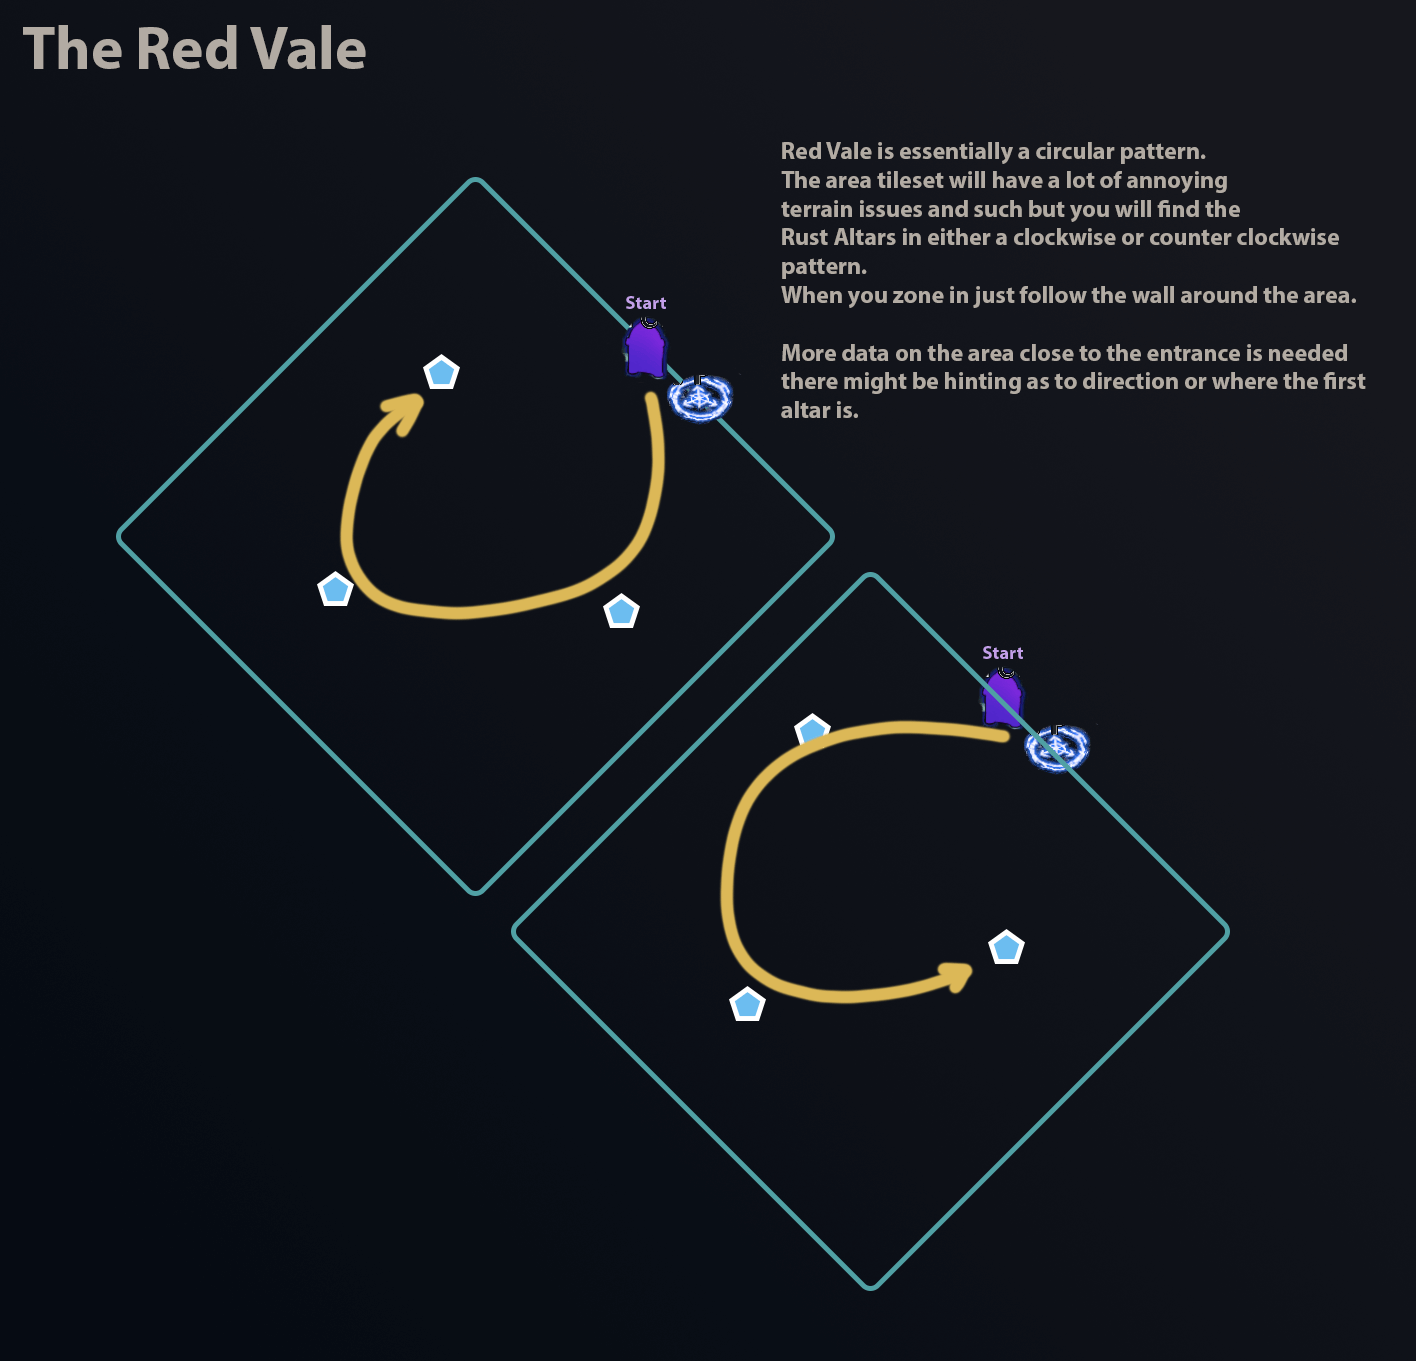
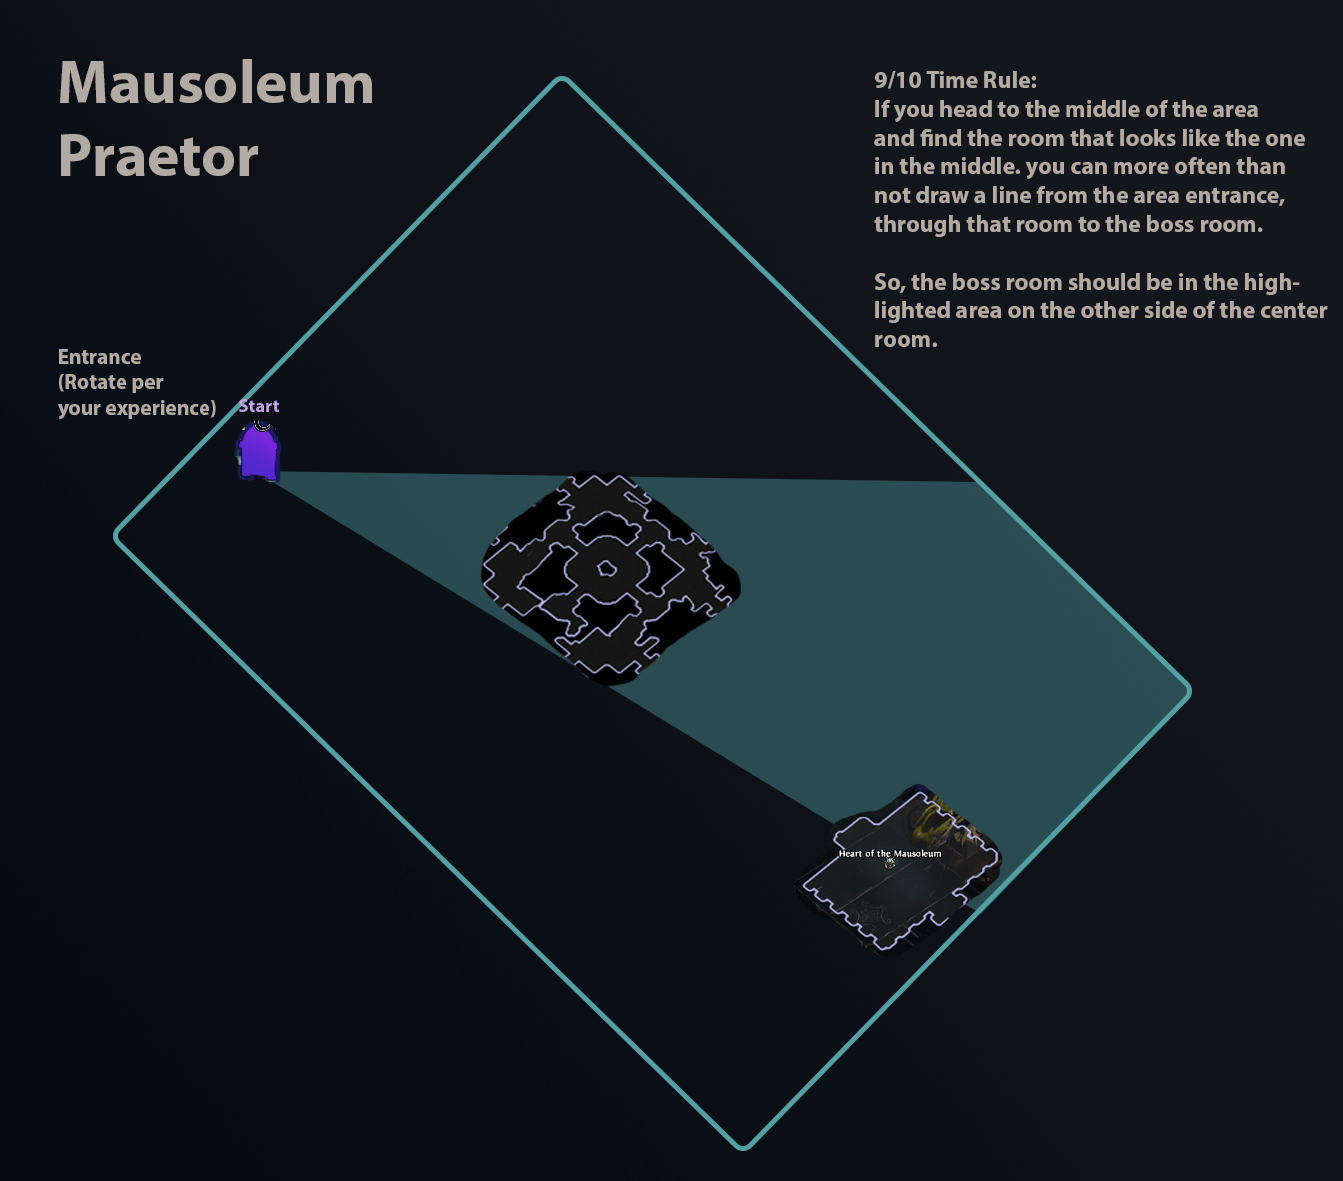
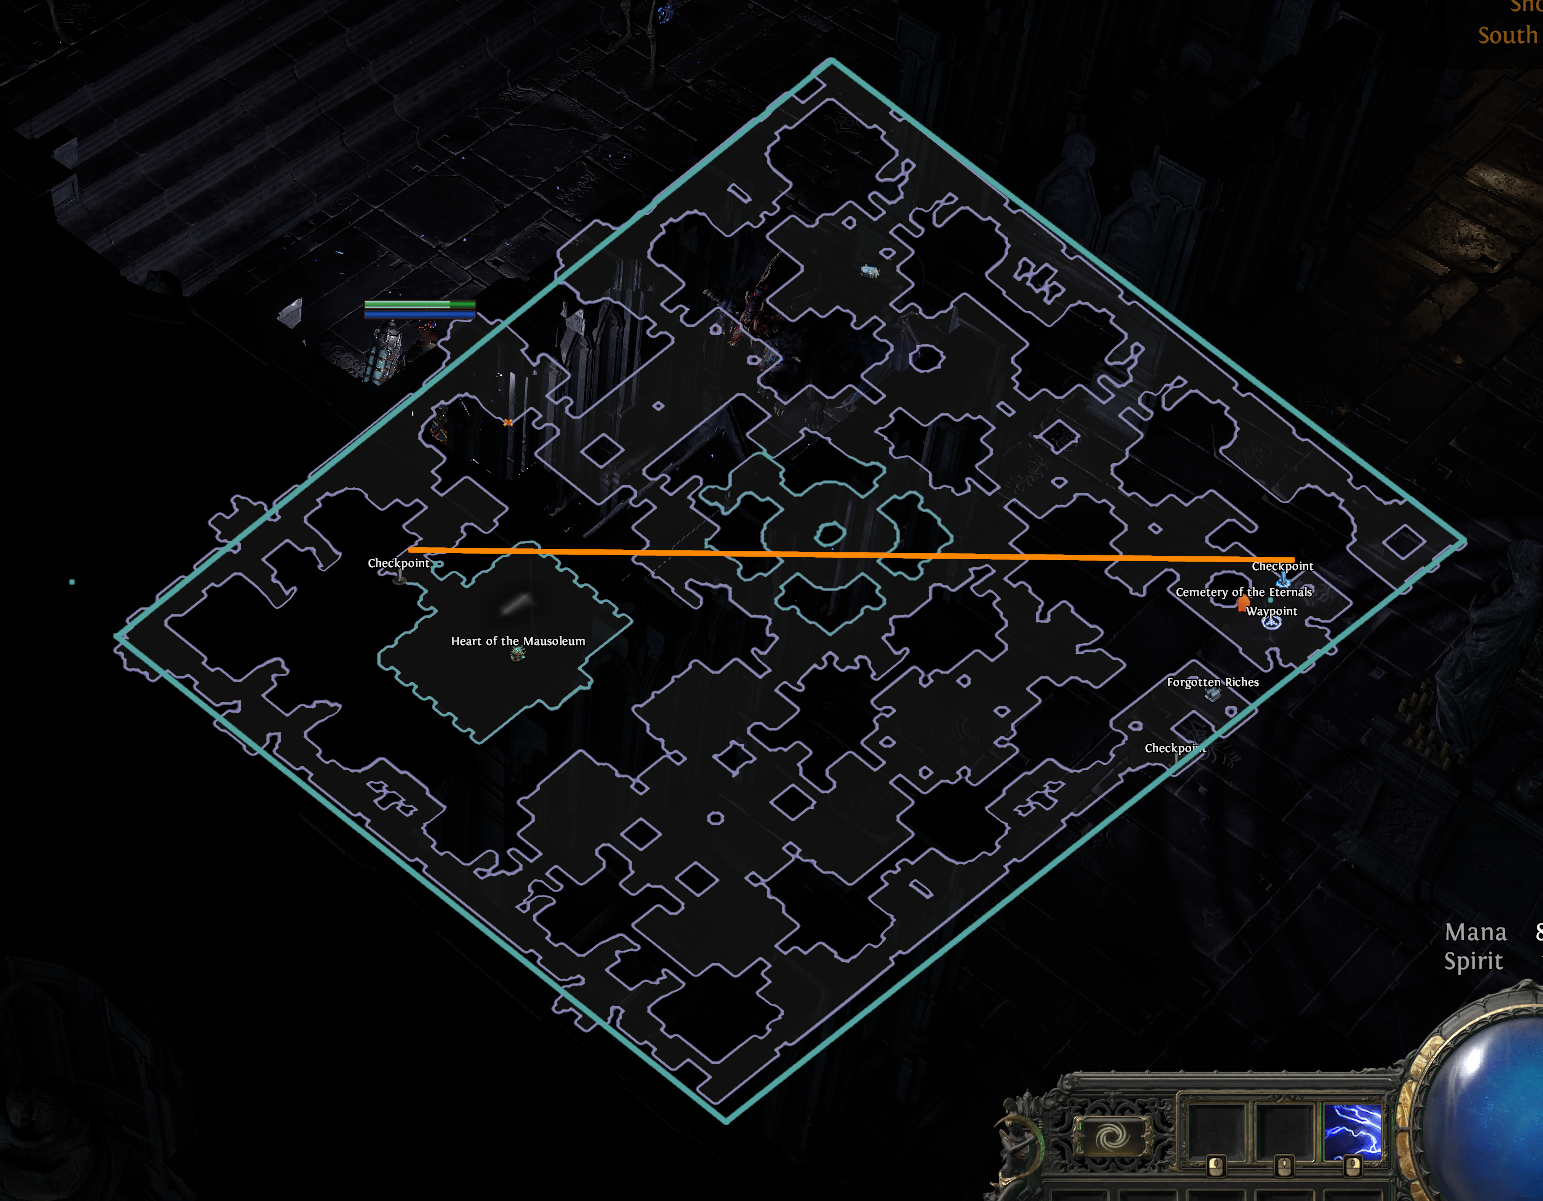
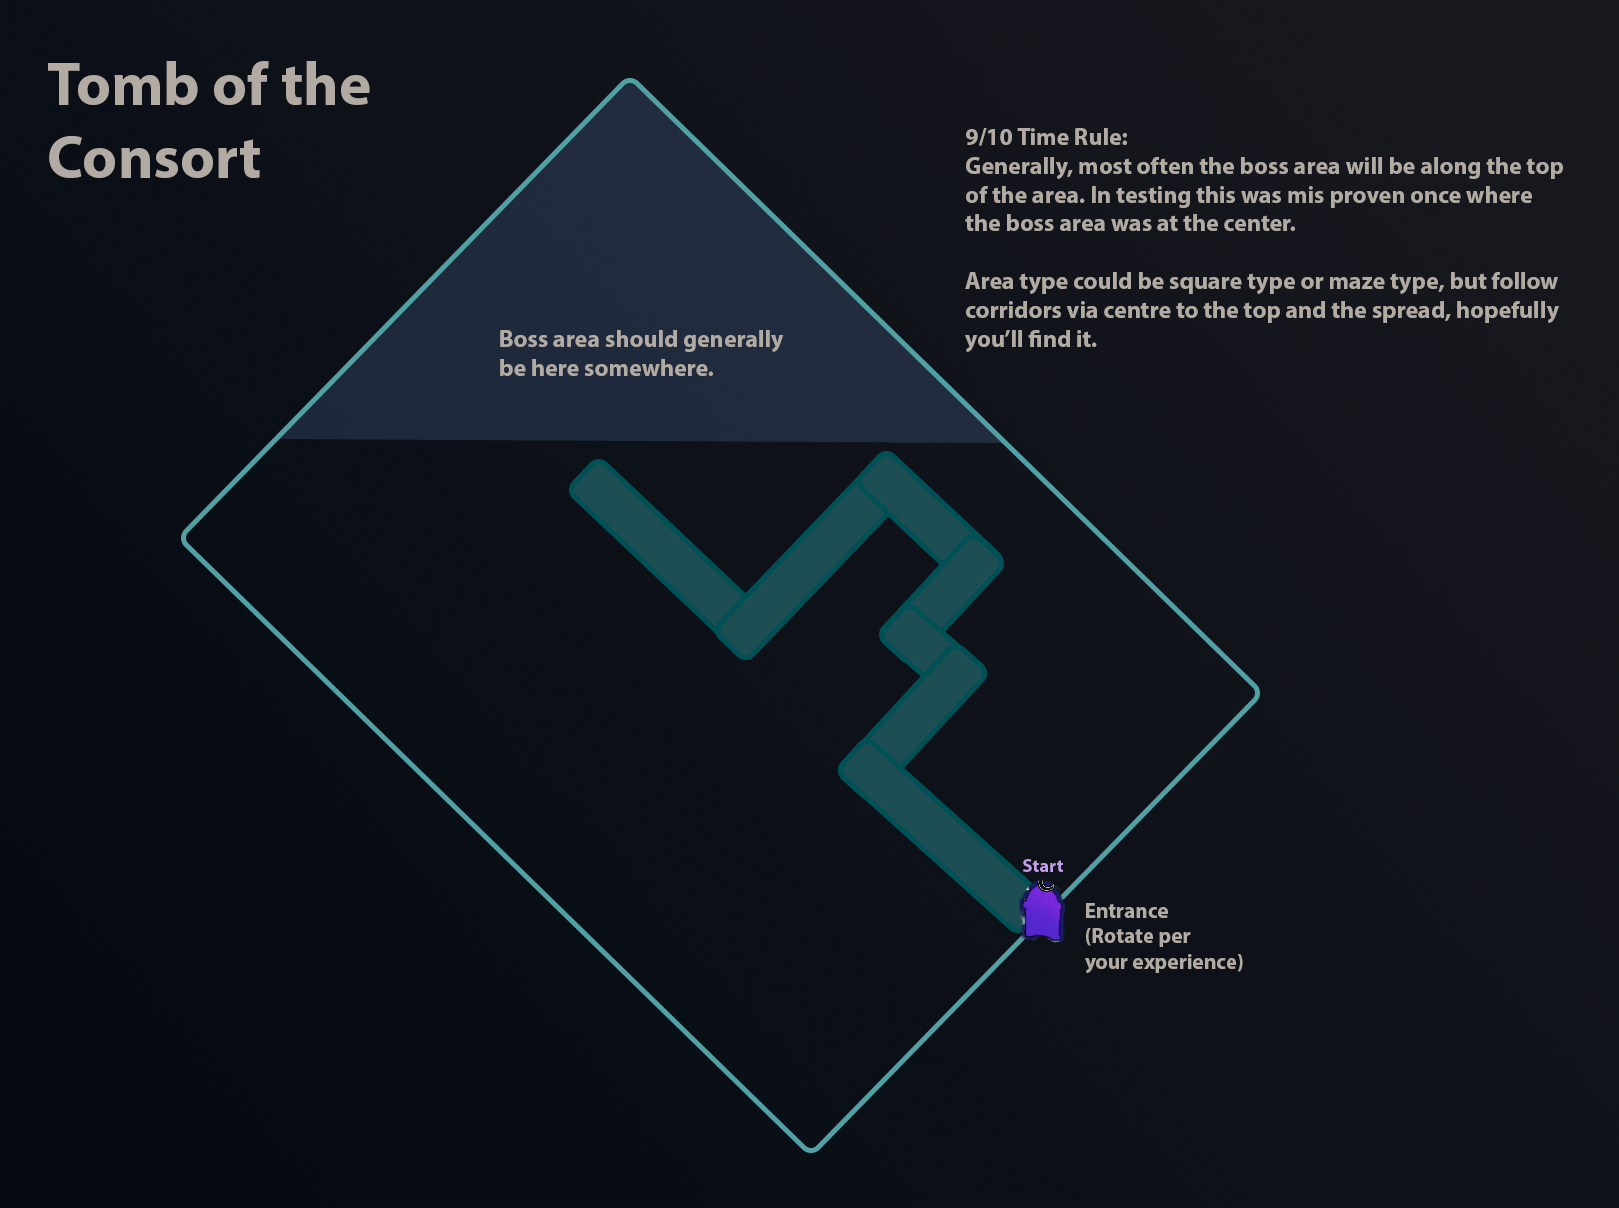
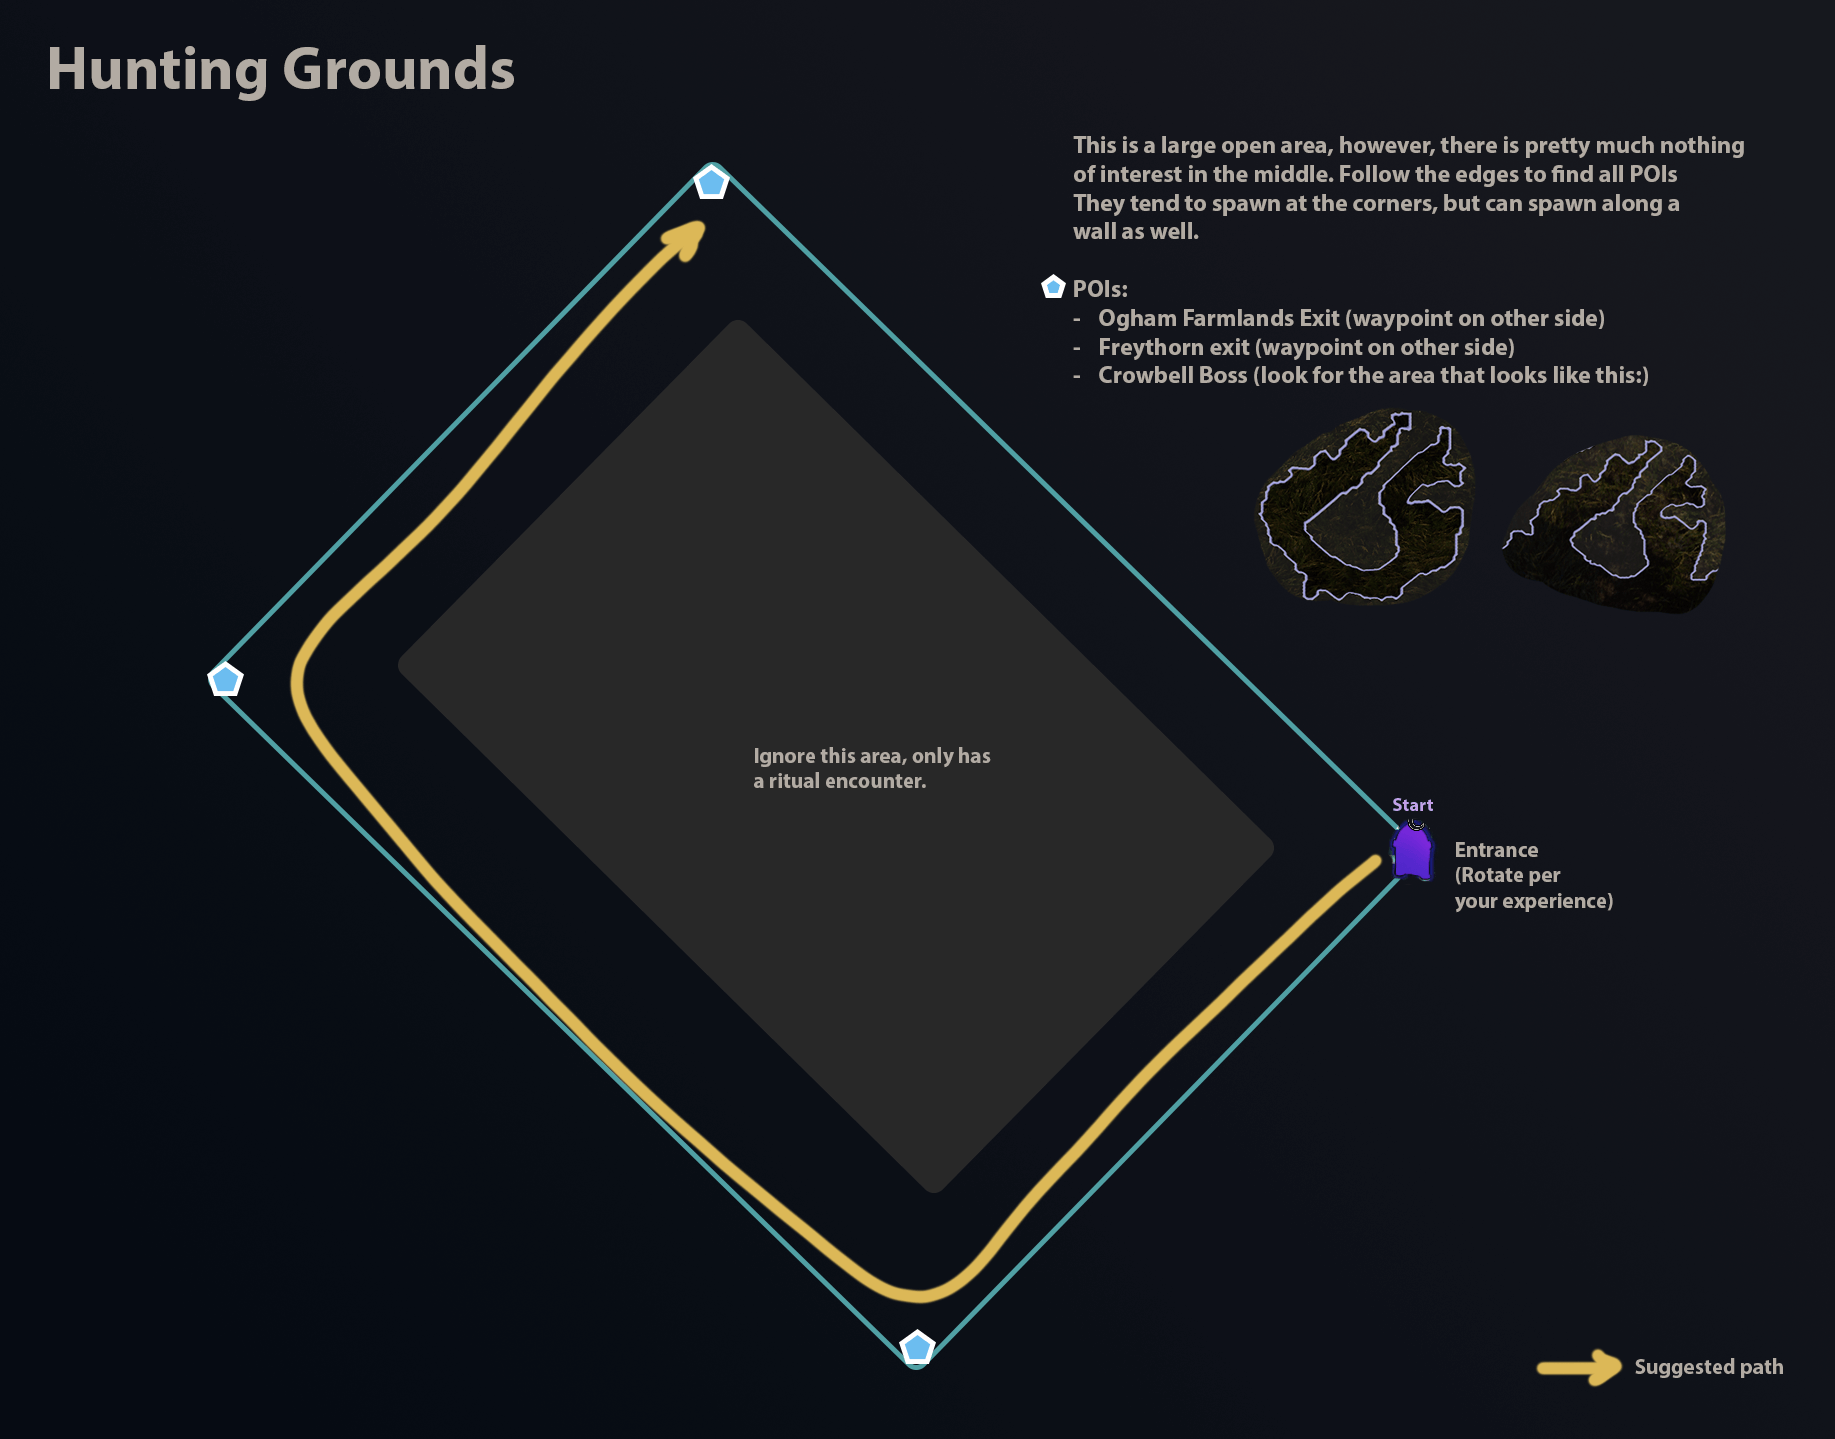
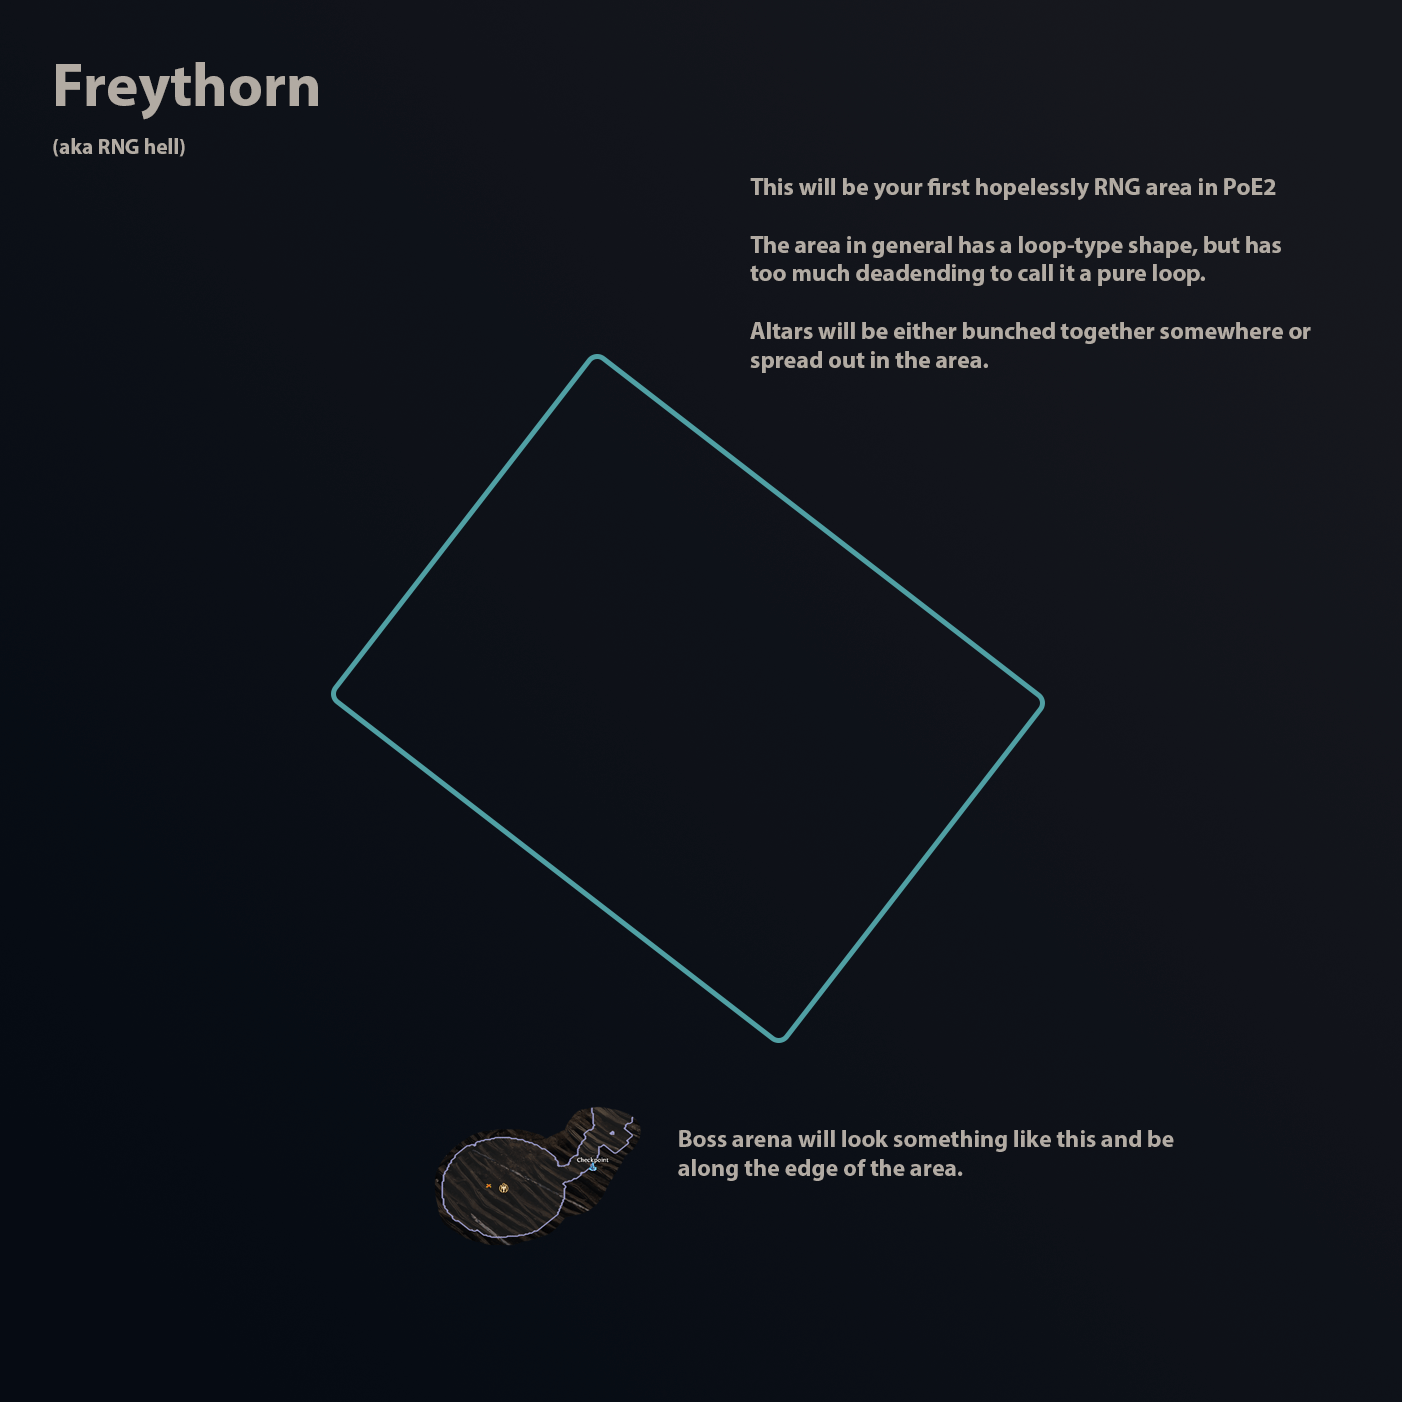
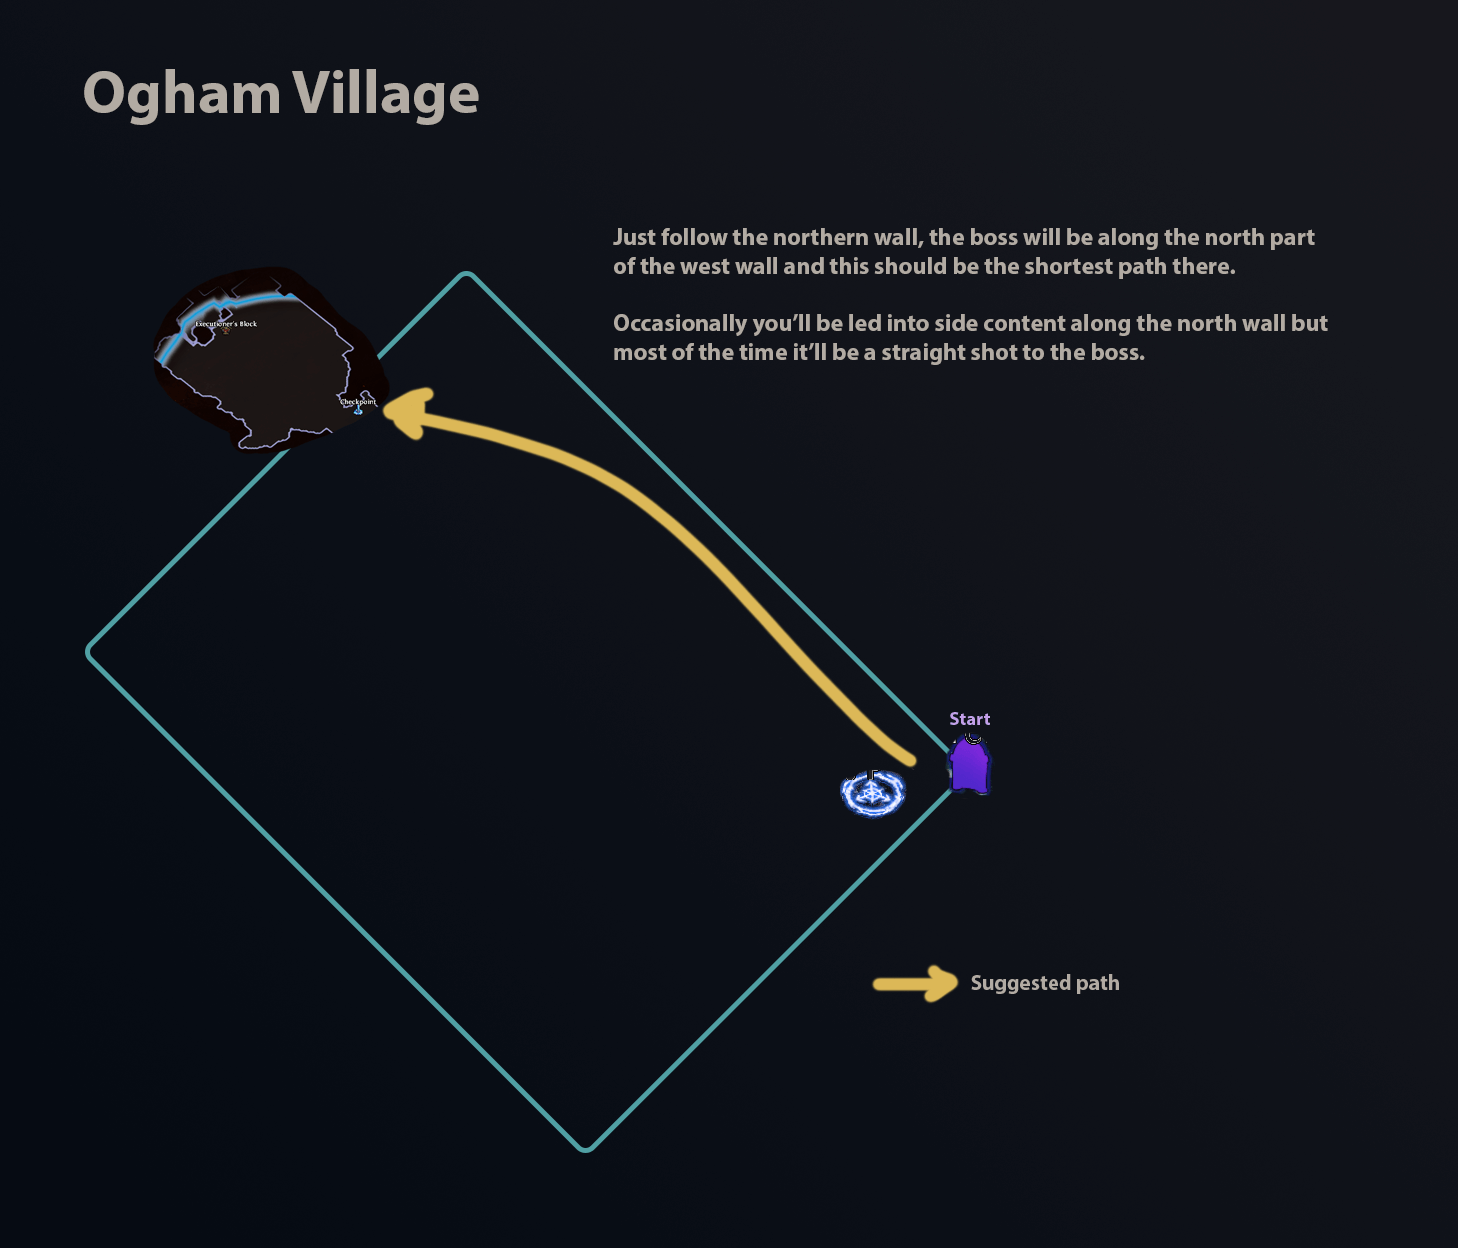
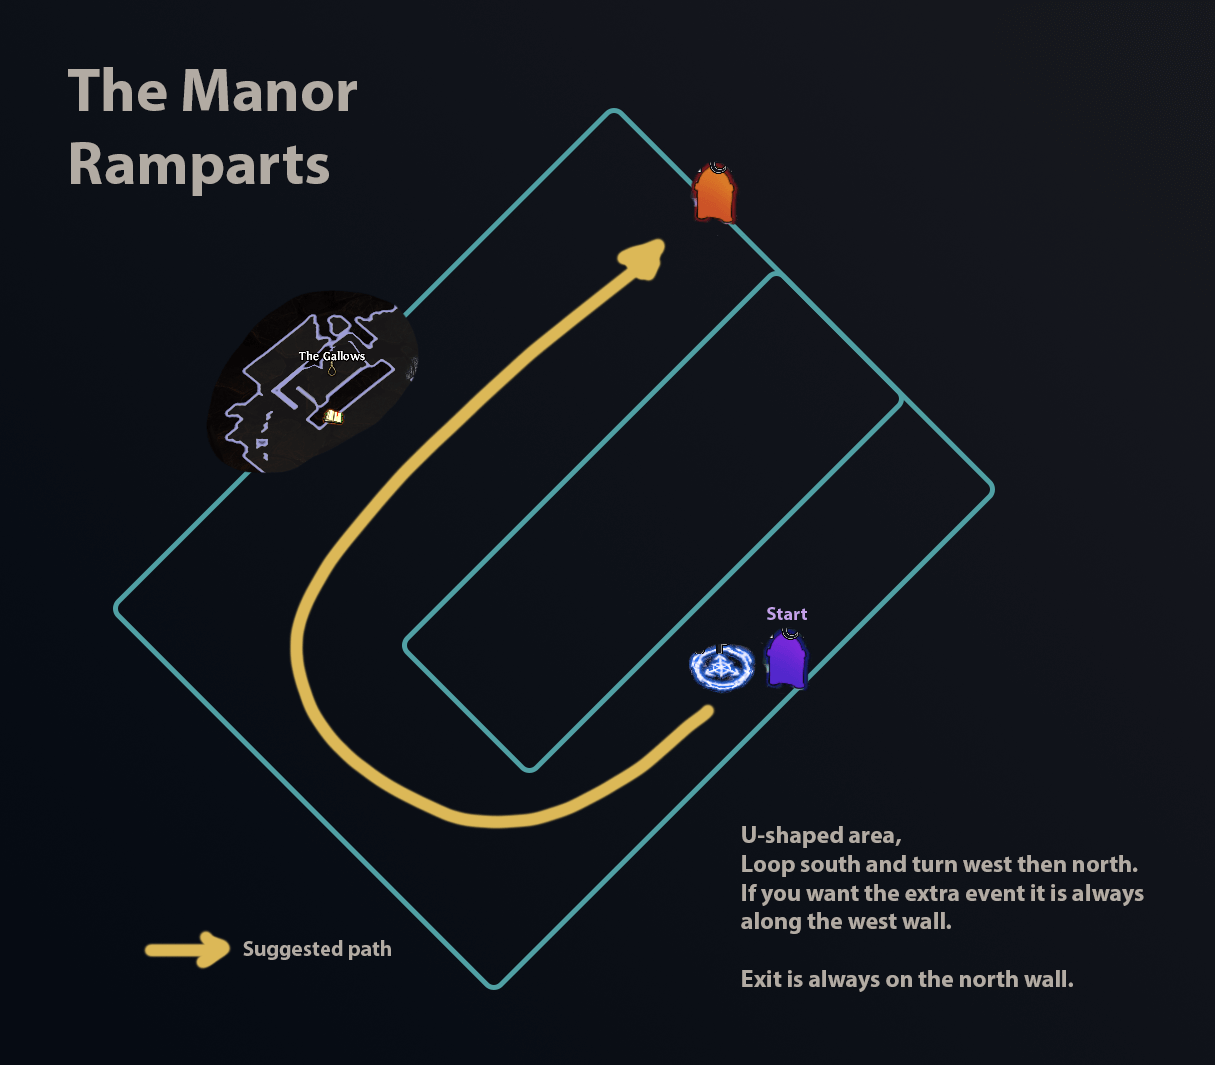
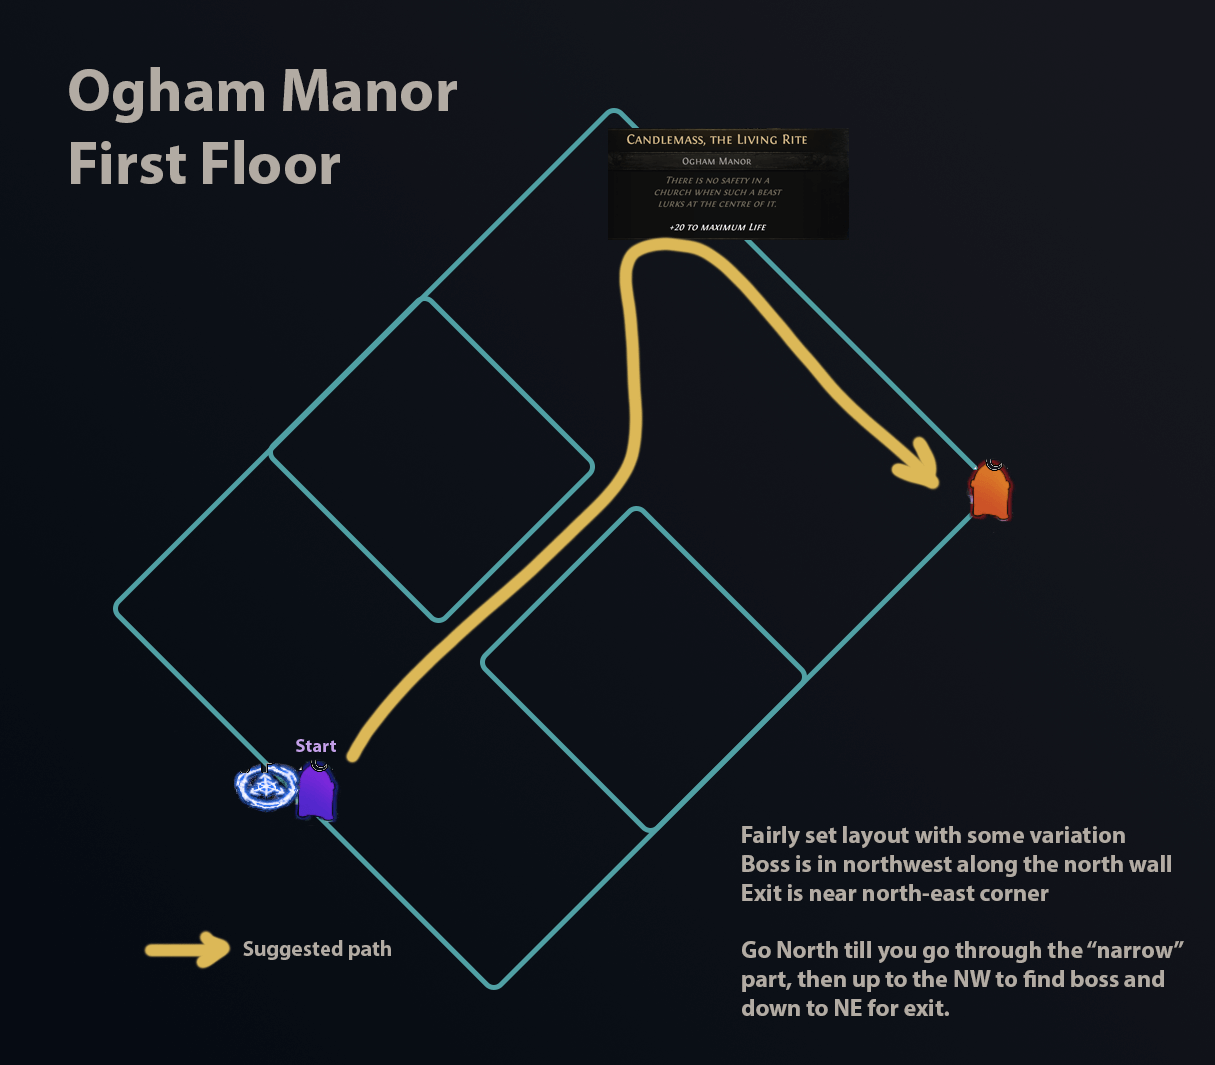
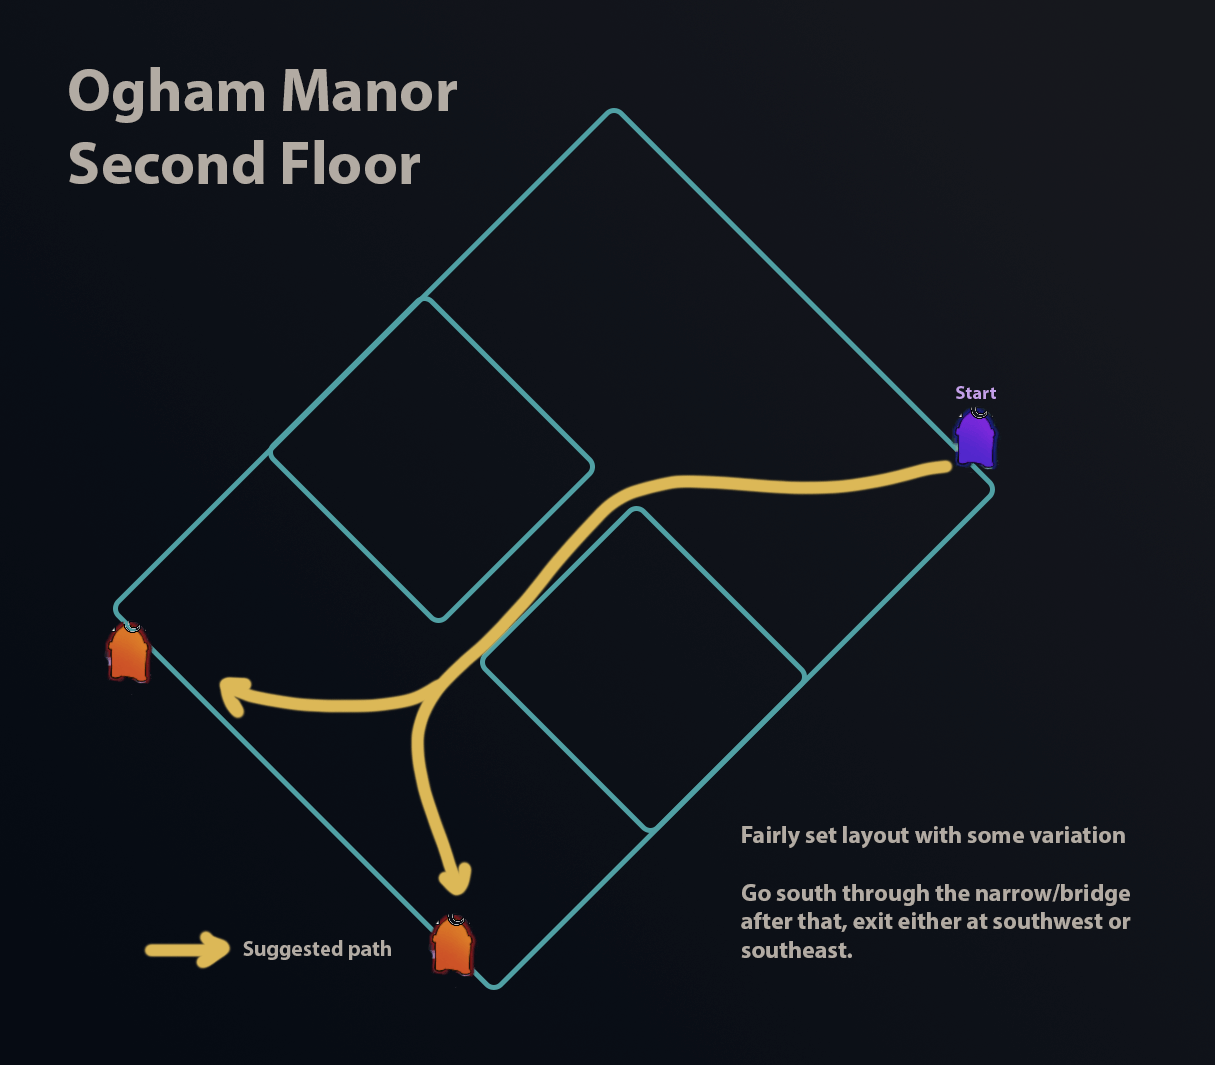
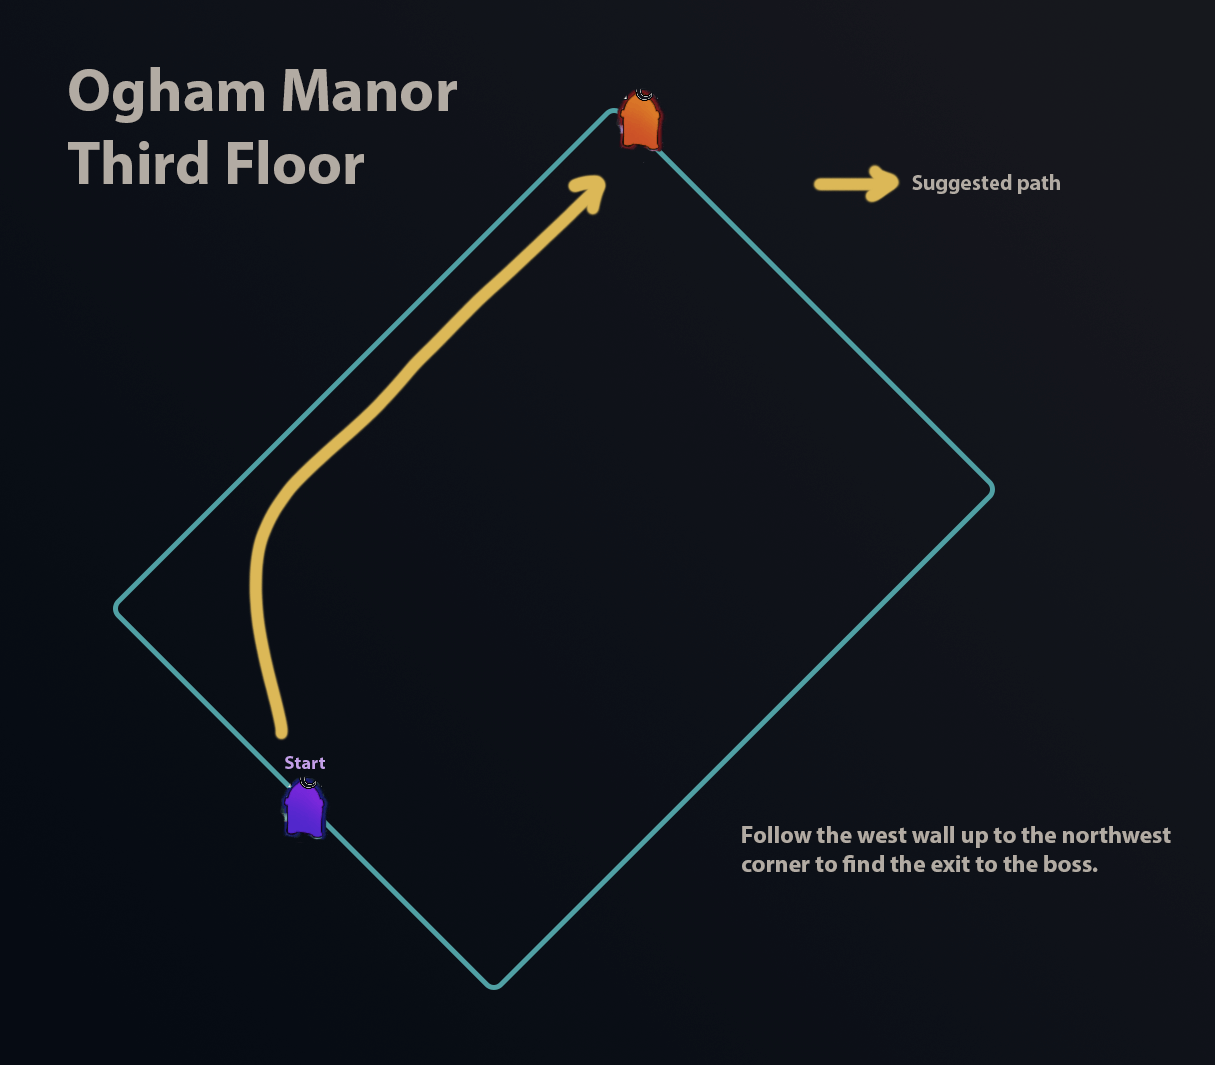
The images in this guide were created by looking for consistent patterns in each area to create a generalised method for running each zone. The images you see won't perfectly match what you have in game, and your zone orientation and locations of points of interest may be different, but these images do serve as a good guideline. Try to understand the pattern they demonstrate rather than blindly following them and expecting your in-game maps to look identical.

Big thank you to the Campaign Codex team, especially Haddoq for his analysis of zone layouts as well as the early layout images that you can see in this guide, and also to Guitaraholic for his huge amount of data collection, collation as well as the Campaign Codex Discord server which players can join to share their layouts and insights. The Discord server can be found here: discord.gg/Jdd8589DBy

Seeds and Generation

Seeds and Generation

From our analysis of a fairly small sample size of zones (around 30-40 per area), it has become clear that layout seeds exist in PoE 2. This becomes most obvious when comparing Softcore and Hardcore layouts, however this likely only partially explains these different layout seeds.

The good news:

In almost all circumstances, a different seed just means that a layout will be rotated, entrances and exits will be swapped, or a point of interest will be mirrored to an opposite side of the area. From our investigation almost all layout patterns are maintained between seeds save for these variations, which means that the logic of how to run the zone is similar, but rotated

Orientation

Orientation & Legend

It's sometimes hard to describe exactly in which direction to move, so we have opted for using North, East, South and West which correlates to the Top, Right, Bottom and Left-hand side of your screen.

Occasionally there will be tips like "hug the right-hand wall" from the entrance. In this case, if your character enters a zone facing West with a wall behind them, their right hand would lead the character in a Northerly direction

I have also added a confidence level to convey how sure we are of the consistency of the pattern that we have established.


Clearfell


Confidence: Very High

Clearfell has a very static, simple layout. In the north you will always find the Boss, which grants +10% to Cold Resistance. To the left and right of the starting zone, there will be two points of interest that can swap depending on your seed.

  1. Mud Burrow entrance and Waypoint
  2. Mysterious Campsite that has a Chest with a Level 1 Uncut Skill Gem


Points of Interest

  • Boss: +10% Cold Res
  • Mysterious Campsite - Skill Gem (Lvl 1)
  • Mud Burrow - Boss drops Lvl 2 Uncut Skill Gem, Quest reward is Uncut Support Gem. Usually ignore this.

Suggested Route

  1. Head to the North to kill the boss for the +10% to Cold Resistance buff
  2. Optional: take a detour to the right or left to the Mysterious Campsite for an additional Lvl 1 Uncut Skill Gem
  3. Mud Burrow: Grants a Lvl 2 Uncut Skill Gem (Boss Drop) and Lvl 1 Uncut Support (Reward). Not often worth doing.


The Grelwood


Confidence: High

The Grelwood has four points of interest, most commonly set in a diamond pattern. After entering the zone, head straight and try to find the first point of interest, then head diagonally up or down to find the next and so on. The entrance to The Red Vale is almost always (87% of the time), in the same quadrant of the Brambleghast boss arena


Points of Interest: Diamond Pattern

Each Point of interest has a chance for:

  • Tree of Souls + Waypoint
  • Boss (Brambleghast) - Uncut Skill Gem (Lvl 1)
  • Grim Tangle Entrance
  • Areagne’s Hut - Flasks and Uncut Skill Gem (Lvl 1)

Suggested Route

  1. If you find the Grim Tangle, enter the zone, grab the waypoint and go back out
  2. If you find The Red Vale before finding the Waypoint, you can go in, grab the Waypoint and head back to Grelwood, or clear the Red Vale First
  3. Follow the diamond pattern


The Red Vale


Confidence: Low

The Red Vale is, on a very shallow level, a circular pattern. In this area, you will need to find the three Rust Altars to complete the Quest. It seems like there are a few set layouts or environmental clues, but we need a larger sample size to establish a pattern. This might be equivalent to the Mud Flats quest in PoE 1 where something might connect each of the Rust Altars, but we aren't certain yet.


Suggested Route

Follow a general loop pattern. The Rust Altars are fairly spread out but occasionally form a vague line or triangular pattern. Occasionally one will spawn in the middle of the zone next to the blood river.

Additional Info

A member of the Campaign Codex, tobethebest, has done extensive research on this area if you're interested. It seems there are approximately 8 different potential layouts that can be learned

The Grim Tangle


Confidence: Average

The Grim Tangle tends to have a spawn either at the top of the area with an exit at the bottom, or vice versa. The direction in which the area "opens up" usually leads you to the exit. There may be more clues to look out for, but by simply heading in the opposite direction of your entrance, you should be able to navigate the area with a bit more confidence


Known Seeds & Suggested Route

  1. Bottom: Exit will be at the top
  2. Top: Exit will be at the bottom (Image above flipped)

Points of Interest

  1. Boss - The Rotten Druid: Uncut Support Gem Lvl 1

Speedrun Tip
After Una spawns in the area, click her to begin her song and immediately press Esc and Respawn at Checkpoint. This will skip her song so you can proceed more quickly

Cemetery of the Eternals


Confidence: Low - NEEDS FURTHER INVESTIGATION

In this area, you'll need to locate both the Tomb of the Consort and Mausoleum of the Praetor. Currently, there isn't an obvious pattern of where these spawn in relation to the entrance, but Haddoq notes that fairly often (57% of the time, based on 30 layouts observed), one of these Tombs will spawn alongside the same wall as the Lachlann boss arena


Suggested Route

  1. Fairly often (57+%) one Tomb will spawn alongside the same wall as the Boss arena, so hug one wall and head in that direction, then check the other side
  2. Other than that it seems Tombs tend to spawn along the side walls, where the Sarcophagus with the Normal Rarity Ring seems to favor the far opposite wall.
  3. Likely you’ll have to circle the area and hope for the best for now until we establish a more clean routing pattern

Points of Interest

  1. Tomb of the Consort
  2. Mausoleum of the Praetor
  3. Ancient Ruin Sarcophagus: Normal Rarity Ring

Speedrun Tip

After defeating Draven and Asinia, open the gates beside the Waypoint and trigger Checkpoint afterwards, then hit Esc and Respawn at Checkpoint - this will skip his long dialogue before the fight


Mausoleum of the Praetor


Confidence: Low/Medium - NEEDS FURTHER INVESTIGATION

In this area, you'll need to find the boss arena to defeat Draven for the Sorrow Among Stones quest. Currently there isn't an obvious pattern, but some people have noted small things that could be found useful

The boss tile in this area has a very distinctive ribbed outer edge that you can fish for and keep a look out for while running the rest of the area. If you see this edge, you'll know you've found the boss arena


Suggested Routes

  1. The Boss arena seems to often spawn in the opposite quadrant of your entrance tile
  2. Haddoq's suggestion (above): "If you head to the middle of the area and find the room that looks like the one in the middle, you can more often than not draw a line from the area entrance, through that room to the boss room."

Tomb of the Consort


Confidence: Low - NEEDS FURTHER INVESTIGATION

In this area, you'll need to defeat Asinia for the Sorrow Among Stones quest. No obvious pattern has yet been established, but further investigation will happen to see if any environmental or layout clues can be found.


Suggested Route

1. Haddoq's Clues: "Generally, most often the boss area will be along the top of the area. In testing this was disproven once where the boss area was at the center. Area type could be square type or maze type, but follow corridors via the centre to the top and hopefully you’ll find it."

Points of Interest

  1. Haunted Treasure: spawns a Rare Eternal Knight that drops an Uncut Support Gem Lvl 1


Hunting Grounds


Confidence: High

This area has a fairly obvious layout with each point of interest located roughly in each corner of the zone, with an obvious environmental clue that points to The Crowbell boss of the area. A Ritual Encounter can also be found somewhere in the middle of this area and completing it will grant you an Uncut Skill Gem Lvl 4, however this often isn't worth going out of your way to locate.


Suggested Route

  1. Follow the edges and avoid the middle. A point of interest will be found in each corner, or close to the corner, of the area
  2. If you find the entrance to Ogham Farmlands, go in, get the Waypoint and go back to Hunting Grounds
  3. If you find entrance to Freythorn, go in, get the Waypoint, and go back to Hunting Grounds
  4. Crowbell Boss: The tile below precedes the boss room. The Boss arena is preceded by a narrow funnel that leads you to the first area of the fight


Points of Interest

  • Crowbell Boss (Book of Specialisation)
  • Ritual Encounter in Middle of Area: Uncut Skill Gem (Lvl 4)
  • Ogham Farmlands Entrance
  • Freythorn Entrance

Freythorn


Confidence: Low - NEEDS FURTHER INVESTIGATION

A truly cursed layout in which you will need to find three Ritual enounters before fighting The King of the Mist boss for +30 to Maximum Spirit and your first Uncut Spirit Gem. Currently there is no obvious pattern, but further investigation into layouts and environmental tells may help solve this area.


Suggested Route

  1. Make a loop and hope for the best
  2. The boss arena seems to spawn opposite the entrance fairly often, but not always


Ogham Farmlands


Confidence: Very High

The Ogham Farmlands has a very clear layout with an obvious environmental clue that points you to Una's Hut in which you'll find her Lute for a Book of Specialisation as a quest reward.


Points of Interest

1. Una’s Hut with her Lute Box will be found behind a long hut beside some carts blocking the way. You’ll need to go around, but will know her hut is behind this hut/cart combo every time


Suggested Route

Exit is always on the opposite wall of the entrance

  1. Head the opposite direction from the entrance. Find the Lute Box
  2. Continue in the opposite direction from the entrance until you hit the wall. If the exit isn’t there, follow the wall down and you’ll find the entrance to Ogham Village

Known Seeds

  1. Area entrance is Northeast and heads Southwest
  2. Area entrance is Southeast and heads Northwest (same pattern but rotated)


Ogham Village


Confidence: Very High

Ogham Village has a very set layout with The Executioner boss arena always spawning in the Northern portion of the area.


Suggested Route

1. Hug the right-hand wall from the entrance and head up (North) toward the boss arena

Point of Interest

Renly's Tools: You will need to find Renly’s Tools in this area to unlock the Smithing Bench. This will spawn in a room with a Checkpoint that you will often find by hugging the North wall, but if you don’t find it while following this wall to the boss, take the Waypoint, follow the left-hand wall that leads you South and you will find the Checkpoint with the opening to the room with the Tools in it very shortly

Known Seeds

  1. East-wall spawn: Hug the right-hand wall and go North
  2. South spawn: Hug the right-hand wall and go North


The Manor Ramparts


Confidence: Very High

This area has a very set layout that follows a U-shaped pattern. Two known seeds exist with the U-shaped pattern being mirrored, but this is easy to read from the start of the area and the pattern remains consistent


Suggested Route

1. Follow the U-shaped pattern. If the area opens up to the bottom left (Southwest), the entrance to The Ogham Manor will be in the North/Northeast

Known Seeds

  1. Downward U-shape: Exit is on the Northeast wall
  2. Upward U-shape: Exit on the Northwest wall. For this one, if you head to the southwest, you’ll hit a dead-end very quickly and instantly know that it’s a flipped pattern

Point of Interest

Gallows: Clicking the hanging body will grant you an Uncut Support Gem (Lvl 1)

  • Seed 1: Gallows will be found on the Northwest wall
  • Seed 2: Gallows will be found on the Southwest wall

The Ogham Manor: First Floor


Confidence: High

The Ogham Manor First Floor has a fairly set layout with points of interest maintaining their position, regardless of the seed.

The overall pattern of floors 1 2 and 3 means that you'll be heading in the opposite direction from floor to floor


Suggested Route

  1. Head Northeast, cross the bridge, keep heading North and kill Candlemass for +10% to Fire Resistance
  2. From there, head to the right (Southeast) to find the Entrance to Level 2

Point of Interest

Candlemass (Boss) will always spawn along the Northeast or Northwest wall

Known Seeds

Swapped Entrance and Exit

The entrance and exit may swap, but layout is consistent. If you enter from the Northeast, Candlemass will still be found in the same position as the alternate seed, but you'll need to head Southwest to find the second floor instead.

Notes

Entrance/Exit: Appears as “Stairs” not “Doors” with an arch with a short staircase leading to the next floor


Ogham Manor: Second Floor


Confidence: High Medium

Again, head in the opposite direction of the direction of which you entered the zone, cross the bridge and find the entrance to the third floor. Your seed may flip the layout, but the pattern should be fairly consistent.

Occasionally this area forms more of a loop than is suggested in the image below and further investigation must be made to understand when this happens


Suggested Route

  1. Head in the opposite direction of the entrance, cross the bridge, and keep going Northeast to find the Entrance to Level 3
  2. The area may turn in you in more of a loop than a straight line with a slight detour but this detour isn't often too large

Known Seeds

  • If you entered from the Northeast, head Southwest
  • If you entered from the Southwest, head Northeast


Ogham Manor: Third Floor


Confidence: High

The third floor of Ogham Manor follows a similar pattern where you'll want to find the bridge that leads to the boss room where you fight the Count of Ogham to complete Act 1.


Suggested Route

  1. Head in the opposite direction from the entrance, find the bridge and the shouting Count of Ogham and head down the elevator to fight the boss


Summary

This is an early summary after a week of investigation of a fairly limited sample size of zone layouts. We will continue working to make more discoveries that give us a better picture of the campaign zone layouts. We are currently working on Acts 2 and 3 and will release a similar guide once we have established some understandable routes and patterns.

If you'd like to join the Campaign Codex project, join the Discord here: discord.gg/Jdd8589DBy

Video

Table of Contents

Latest Guides

Campaign Layout Guide: Act 3
By LolcoholUpdated on Mar 24, 2025
Beginner
Beginner
Campaign Layout Guide: Act 1
By LolcoholUpdated on Mar 22, 2025
Beginner
Beginner
Campaign Layout Guide: Act 2
By LolcoholUpdated on Mar 22, 2025
Beginner
Beginner
PoE 2 Huntress - Release Date, Overview, Skills, and Guide
By MobalyticsUpdated on Mar 22, 2025
Classes
Classes
Advertisement
Remove Ads
Remove all adsSay goodbye to ads, support our team, see exclusive sneak peeks, and get a shiny new Discord role.