


This Tiel Build will have you slicing and dicing your way through your first playthrough and into NG+ with ease! It utilises a variety of interesting and powerful weapons/items throughout it's development. This gives you an excellent flavour of what the class has to offer! Let's get into it!
 Use your favourite features in-game with our Desktop App
Overview
Body Text
Tiel Stasis Axatana High Burst Starter Build — Skills, Tar Stones, Weapons & Item Location

Tiel Build Overview
This Tiel build is designed to shred through both your first playthrough and endgame with a combination of Shadow Strike burst damage, poison detonations, critical hits, stealth, and crowd control.
The build comes online very quickly and doesn't require a huge amount of gear to get started. As you progress, however, it scales extremely well into a specialized endgame setup built around the Axatana, Duality Stone, Torper Stone, Acolyte Stone, and critical-hit synergy.
The core gameplay loop is simple:
Enter stealth → Shadow Strike → apply poison → detonate poison → retreat → re-enter stealth → repeat.
Once the build is fully online, you'll be able to chain Shadow Strikes while exploiting critical damage, Stasis, Fragile, and poison detonations to delete enemies before they have much opportunity to fight back.
Build Strengths:
- Excellent burst damage
- Very strong critical-hit scaling
- Poison-based AoE and burst
- Excellent mobility and survivability through Shadow Dash
- Strong crowd control through Stasis
- Scales from early game into endgame
- Relatively easy early-game gear requirements
- Extremely strong against bosses when fully optimized
Recommended Progression:
This guide uses three stages:
- 14-point starter build — Get the core mechanics online quickly
- 23-point midgame build — Add Resolve generation, backstab damage, and stealth scaling
- 40-point endgame build — Maximize burst, critical hits, stealth duration, and survivability
How the Tiel Build Works:
Tiel's biggest strength is her ability to constantly move in and out of stealth.
Your primary attack is Shadow Strike, which benefits from a huge amount of synergy throughout the skill tree. Shadow Strike can apply Poison and Fragile, benefit from increased Critical Hit Chance and Critical Hit Damage, and eventually trigger additional effects through Shadow Dash and other stealth-related skills.
The result is a highly mobile playstyle where you rarely want to stand and trade blows.
Instead:
- Enter Shadowed.
- Approach your target.
- Land a Shadow Strike/backstab.
- Apply Poison and Fragile.
- Detonate your Poison stacks.
- Retreat using Shadow Dash.
- Re-enter stealth.
- Repeat.
Against tougher targets, you can stay in Shadowed for longer to build additional damage before committing to your attack.
14-Point Starter Build

The first priority is getting Tiel's Shell Affinity to Tier 3 as quickly as possible.
This allows the build to come online much faster and gives you access to the key skills that make Shadow Strike so effective.
3 Points — Escalation
Your first major investment should be Escalation.
At three points, this significantly increases Shadow Strike damage and ensures that Shadow Strike applies 10 Poison stacks.
This is important because we're immediately pairing it with Poison Burst.
Why Escalation?
The extra Poison stacks give us a reliable way to create additional damage every time we use Shadow Strike.
This means that even during the early game, we're not relying solely on the initial hit. We're building toward a second burst of damage when those Poison stacks are detonated.
1 Point — Poison Burst
Next, put one point into Poison Burst.
Whenever you use Shadow Strike against an enemy with Poison stacks, Poison Burst detonates them.
With Escalation providing the stacks, this becomes a core part of the early-game damage loop.
The basic sequence is:
Shadow Strike → Poison stacks → Shadow Strike/stealth interaction → Poison detonation
This gives the build surprisingly strong burst damage for such an early investment.
3 Points — Death Mark
Next, invest three points into Death Mark.
Death Mark provides:
- Increased Critical Hit Chance on Shadow Strike
- Increased Critical Hit Damage
- 10 Fragile stacks whenever Shadow Strike lands
Fragile is particularly valuable because affected enemies take bonus damage from weapon attacks.
This is also the beginning of the build's critical-hit scaling, which becomes much more important once we start adding the late-game Tar Stones.
Why Death Mark Is So Important
The build eventually becomes heavily focused on critical strikes.
Death Mark therefore isn't just an early-game damage increase — it establishes the foundation for the endgame version of the build.
1 Point — Night Stride
Put your final starter point into Night Stride.
This increases the Shadow Dash activation window, making the ability significantly easier to use.
Shadow Dash is one of the most important defensive tools in this build.
It allows Tiel to escape danger, reposition, and return to stealth rather than standing in melee range and trading hits.
For newer players, this makes the build considerably more forgiving.
How to Play Tiel Early Game:
The most important thing to learn is the in-and-out rhythm.
You don't want to remain in melee range longer than necessary.
Instead, approach enemies from stealth, land your Shadow Strike, trigger your poison/critical effects, and immediately disengage.
As you become more comfortable with the class, you'll find that this creates a very satisfying flow:
Stealth → burst → disengage → recharge → stealth → burst.
The combination of Shadow Dash, Shadow Strike, and your charges allows you to repeat this cycle extremely quickly.
23-Point Midgame Build
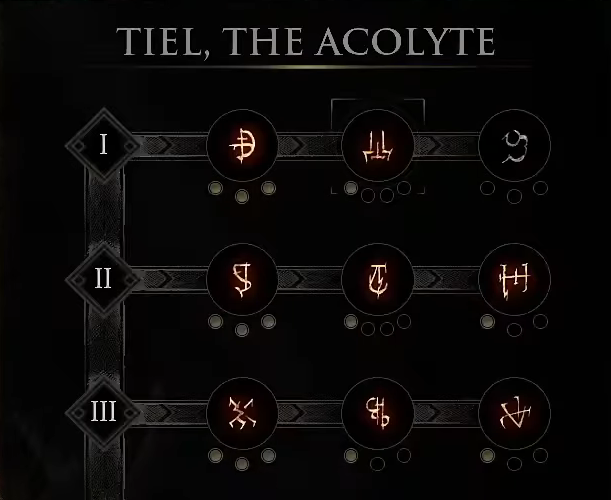
Once you've established the core 14-point setup, it's time to start investing into the skills that make the build much more consistent.
3 Points — Lethality
Invest three points into Lethality.
Lethality gives you 20 Resolve whenever you kill an enemy, helping you maintain your charges more consistently.
This is particularly useful when clearing groups because every kill helps keep your Shadow-based abilities cycling.
The result is less downtime and a much more aggressive playstyle.
Lingering Shadow
Tiel also has a chance to immediately reactivate Lingering Shadow.
This can allow you to dodge and then return to the animation, effectively giving you another opportunity to land a backstab.
When this effect triggers, the damage output can become extremely high because you're repeatedly exploiting the same stealth/backstab mechanics.
1 Point — Ambush
Take one point in Ambush.
This provides a large flat damage increase to backstab attacks.
Although this is only the beginning of the investment into Ambush, we'll return to this node later when completing the 40-point build.
1 Point — Shadow Stalk
Put one point into Shadow Stalk.
Shadow Stalk rewards you for spending time in Shadowed.
For every half-second spent in Shadowed, you gain additional damage.
This is particularly important for boss encounters because you can deliberately remain in stealth before committing to a huge burst attack.
Shadow Stalk becomes even stronger when paired with Lasting Legacy in the final version of the build.
Midgame Weapons and Infusions:
The early and midgame versions of this build use the Axe and Dagger.
This is an accessible weapon combination that lets you get the build functioning without waiting for the endgame weapon.
For your infusion, there are two good options.
Arbiter's Prize
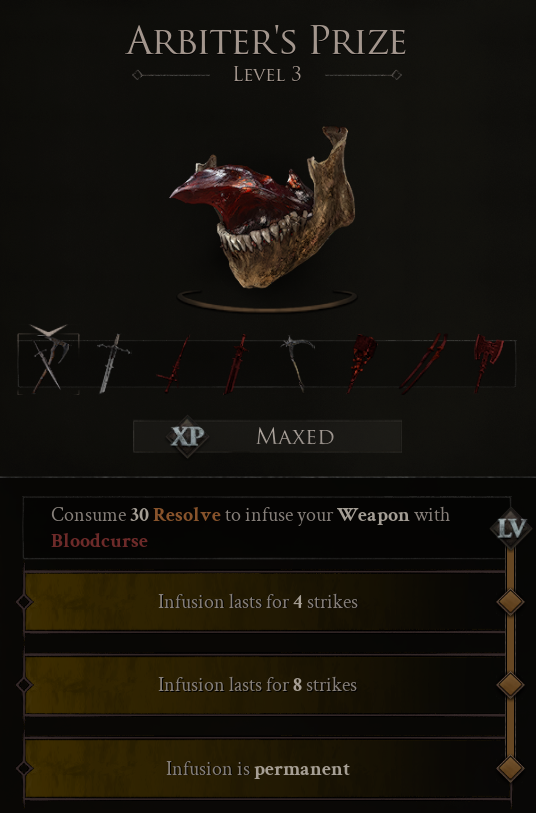
Arbiter's Prize allows you to build toward Blood Curse.
Once Blood Curse reaches 100%, it removes a significant chunk of a boss's health.
This is particularly effective against bosses because it provides another source of burst damage that works alongside your normal Shadow Strike rotation.
Serpent Stone
If you want to lean harder into the poison version of the build, use Serpent Stone.
Serpent Stone provides additional Poison stacks, making it a natural fit for the Poison Burst setup.
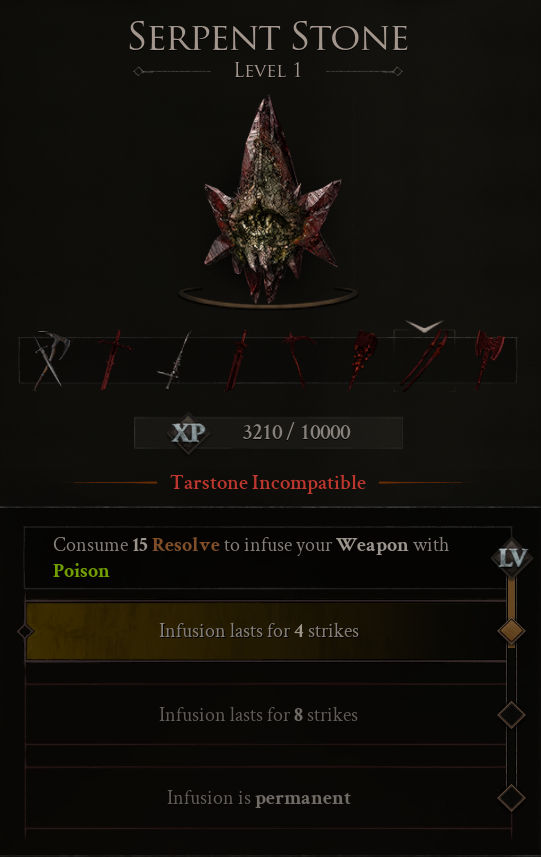
Which Should You Use?
Arbiter's Prize: Better if you want additional boss damage through Blood Curse.
Serpent Stone: Better if you want to maximize the Poison Burst synergy.
Both are viable, so use whichever one you acquire first and adjust later.
Duality Stone — Core Tarstone
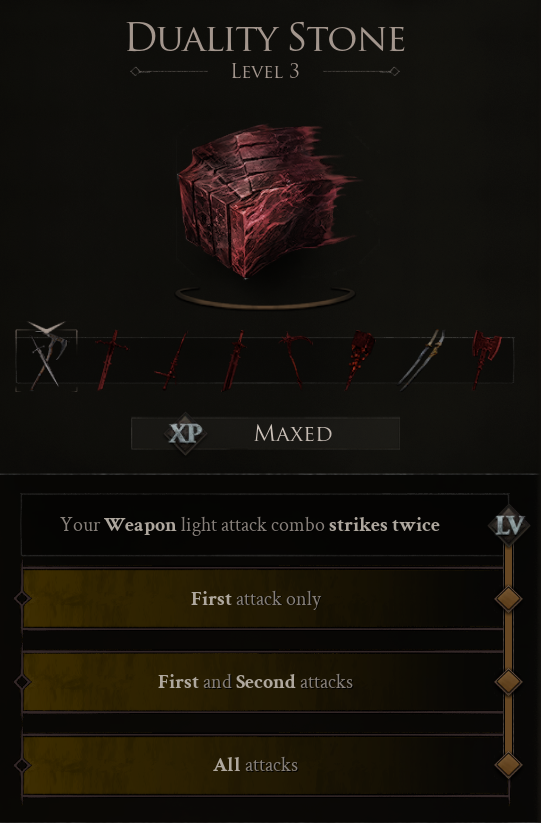
The Duality Stone is mandatory for this build.
It allows your Light Combo attacks to strike twice.
This is an enormous damage increase and remains useful throughout the entire build.
Because the endgame version uses a fast-swinging weapon, Duality Stone becomes particularly powerful when combined with the Axatana and additional infusion effects.
Recommendation
Get the Duality Stone as soon as possible and start upgrading it early.
It's an investment that remains useful throughout the entire progression of this build.
Endgame Build
Once you reach the endgame, the build transitions from a general Shadow Strike/Poison setup into a much more specialized critical-hit burst build.
The key pieces are:
- Axatana
- Duality Stone
- Torpor Stone
- Acolyte Stone
- Auspicious Stone
- Headman's Stone
- Death Mark
- Ambush
- Shadow Stalk
- Lasting Legacy
- Critical Roll
- Shadow Dash
Torpor Stone — Essential Endgame Tarstone
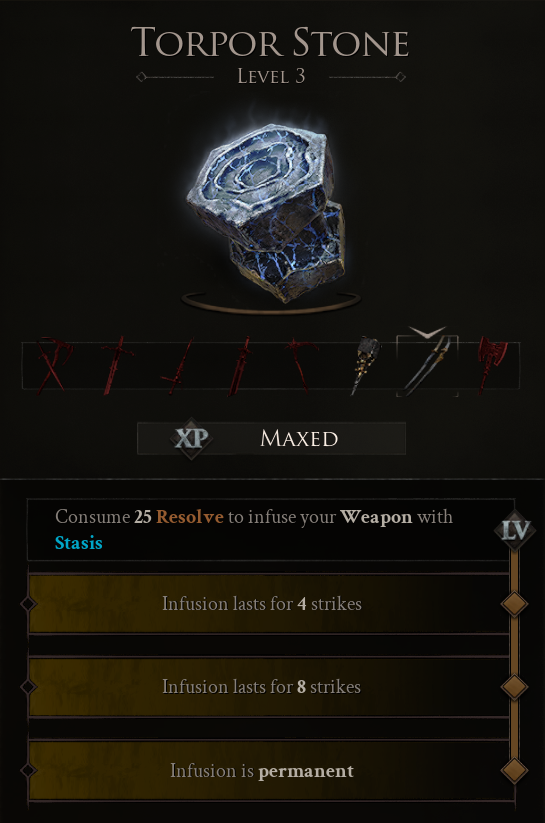
The Torpor Stone is one of the most important pieces of the finished build.
It provides a permanent Stasis infusion on your weapon.
Stasis massively slows enemies as its stacks build up, giving you far more time to execute your attacks.
This is especially powerful against bosses.
As you repeatedly hit an enemy, Stasis stacks build up. Once enough stacks have accumulated, the enemy becomes dramatically slower.
That gives you time to:
- Charge attacks
- Position for backstabs
- Re-enter stealth
- Set up critical hits
- Safely execute your Shadow Strike rotation
For this build, that additional control is extremely valuable.
Axatana — Endgame Weapon
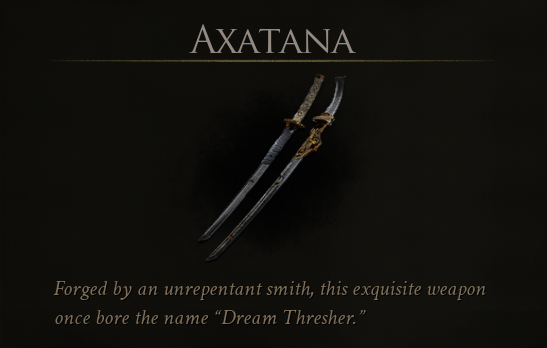
The Axatana replaces the Axe and Dagger in the final version of the build.
It's an excellent fit for this setup because it works exceptionally well with:
- Duality Stone
- Fast attacks
- Critical Hit Chance
- Critical Hit Damage
- Stasis
- Other weapon infusions
The Axatana is therefore the recommended endgame weapon for this build.
Acolyte Stone
The Acolyte Stone synergizes extremely well with the Axatana.
At Level 3, it provides:
- Increased Critical Hit Chance on charged attacks
- Increased Critical Hit Damage
- Reduced Resolve cost
This is exactly what the final version of the build wants.
Once an enemy is stunned or slowed by Stasis, you have a much easier time landing charged attacks and taking advantage of the massive critical-hit bonuses.
Auspicious Stone
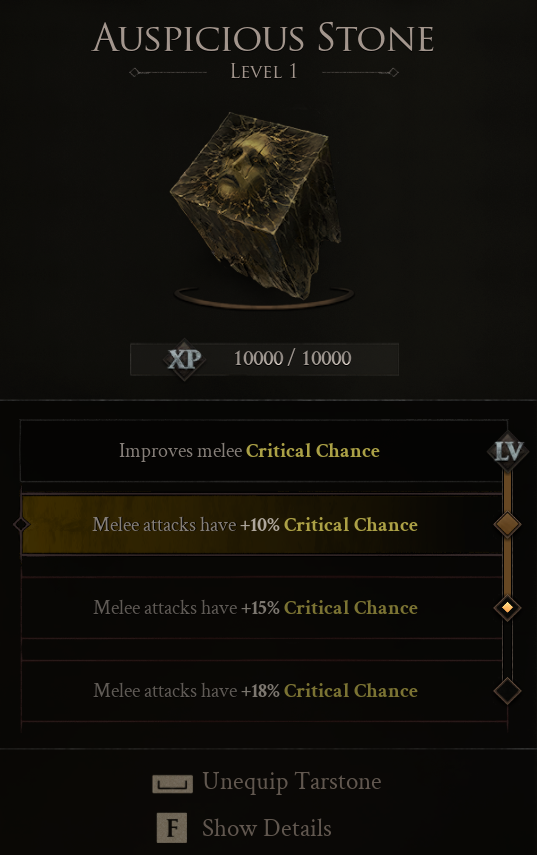
The Auspicious Stone provides additional Critical Hit Chance.
At Level 3, it gives a substantial critical-hit boost, further improving the consistency of your Shadow Strike burst.
This stacks extremely well with Death Mark, Ambush, Acolyte Stone, and the other critical-focused components of the build.
Headman's Stone
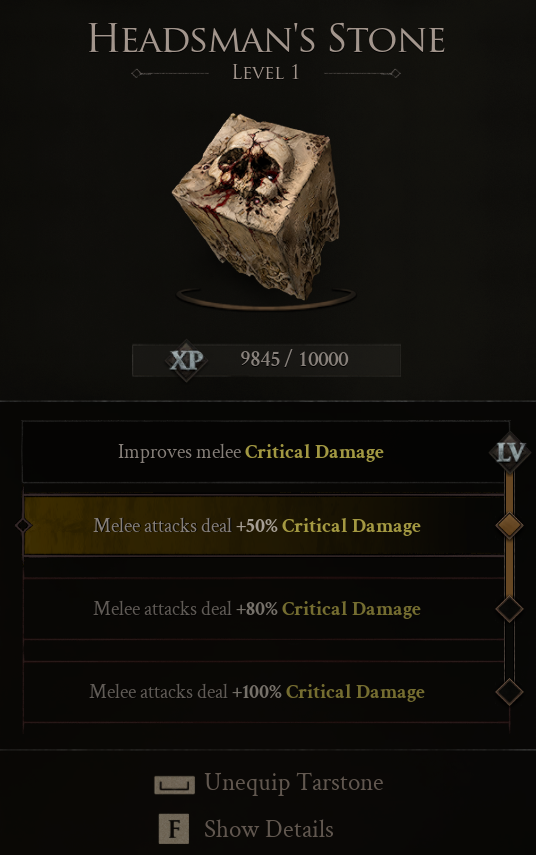
The Headman's Stone provides a large increase to Critical Hit Damage.
This is another key piece of the final build because we're stacking multiple sources of critical-hit scaling.
The result is that your biggest attacks can hit extremely hard once the rest of the build's conditions are met.
40-Point Skill Tree
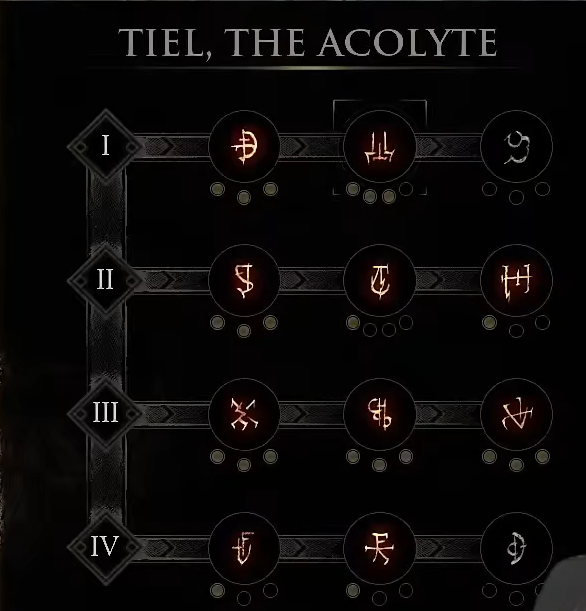
The final version of the build focuses heavily on burst damage.
3 Points — Ambush
Finish investing in Ambush.
This gives a significant increase to backstab damage while also adding further Critical Hit Chance and Critical Hit Damage.
This is one of the biggest damage investments in the final build.
1 Point — Critical Roll
Take one point in Critical Roll.
After using Shadow Strike, your next melee attack becomes a guaranteed Critical Hit.
This is extremely powerful because it gives you a reliable way to convert your Shadow Strike rotation into another high-damage attack.
1 Point — Shadow Dash
Invest one point into Shadow Dash.
This causes a Shadow Clone to remain behind after Shadow Dash.
Enemies that strike the clone receive Poison stacks, and the effect can trigger multiple times.
This feeds directly back into the Poison Burst mechanic used throughout the build.
So even a defensive movement ability becomes another source of offensive pressure.
Final Skill Point Options
The remaining points can be used in two different ways depending on how aggressively you want to play.
Option 1 — Full DPS
If you're confident with Tiel's movement and dodge timing, lean fully into damage.
Invest into:
Shadow Stalk
This increases the damage gained while remaining in Shadowed.
Lasting Legacy
Lasting Legacy provides additional Shadow stacks, allowing you to stay in stealth longer and continue building your Shadow Stalk damage.
This is the highest-damage option and is particularly strong against bosses and other high-health targets.
Option 2 — Defensive Variant
If you're still learning Tiel or want a more forgiving build, you can shift some of the Poison investment into Night Stride.
Remove points from:
- Poison Burst
- Escalation
- Shadow Stalk
- Lasting Legacy
Then invest those points into Night Stride.
This provides additional Shadow Dash utility, including increased stagger damage and a significantly larger activation window.
The result is a safer version of the build that's much more forgiving when learning enemy attack patterns.
Which Version Is Better?
Full DPS: Best if you're comfortable dodging and want maximum burst.
Defensive: Best while learning the game, learning Tiel, or tackling difficult content where surviving mistakes matters more than maximum theoretical damage.
Both versions perform extremely well.
Endgame Gameplay Rotation
Once the build is complete, the combat loop becomes extremely aggressive.
Look for an opening, enter Shadowed, and position yourself behind your target.
Then:
- Build your stealth-based bonuses.
- Land Shadow Strike.
- Apply Poison and Fragile.
- Trigger your critical-hit effects.
- Detonate Poison.
- Use Shadow Dash to disengage.
- Let Stasis continue slowing the enemy.
- Re-enter stealth.
- Repeat the rotation.
Against weaker enemies, this frequently results in one-shot kills.
Against bosses, Stasis gives you the breathing room needed to safely charge attacks and stack your various damage multipliers.
The more confident you become with Tiel's movement, the more aggressively you can stay in Shadowed and build your damage before committing to the attack.
Where to Find the Build Items
Axatana

The Axatana is the most complicated item to acquire.
Access to the area containing it is locked behind a boss in the southern part of the map.
Once you've defeated the required boss, you'll gain access to the Silent Steps area.
From the Silent Steps Beacon:
- Head down toward the water.
- Continue until you reach the large Stasis area.
- Move to the right and follow the route around.
- Avoid or fight the giant slugs.
- Continue upward.
- Cross the bridges.
- Continue past the enemies.
- Drop down at the small ledge.
- Blast through the area and quickly look upward.
- Make your way toward the island containing the Forgotten Tower.
- Enter the tower and climb the stairs.
- Find the bell underneath the structure and shoot it.
- This raises a platform on the bridge.
- Cross the bridge and drop down.
- Find the button on the left.
- Deal with the enemy guarding the area.
- The Axatana is located here.
Arbiter's Prize
Arbiter's Prize can be found just south of Widow's Overlook near the beginning of the game.
The exact source can be either the deceased NPC in the area or the nearby boss/mini-boss drop.
If you're collecting it early, check both sources.
Torpor Stone
The Torper Stone is located inside Withered Shaws Gate.
Travel to Oenite Falls.
The Stone can be found behind the Beacon inside the waterfall.
Look for the hidden entrance behind the waterfall and search the chest inside.
Auspicious Stone
The Auspicious Stone is located at the entrance to Mushroom Village.
You can reach it easily from the nearby Beacon or simply approach through the front entrance.
Look for the chest containing the Stone.
Headman's Stone
The Headman's Stone is located near Mammon's Outskirts.
From the Mammon's Outskirts Beacon:
- Cross the bridge.
- Continue until you reach the indicated area.
- Drop down.
- Move to the left of the archway.
- Follow the route around.
- Be careful not to fall.
- The chest containing the Headman's Stone is at the end of the path.
Duality Stone
The Duality Stone can be found at the Noctean Gate Beacon.
The Beacon needs to be cleansed first.
It's located on the western side of the map near the West Gate.
Axe and Dagger
The Axe and Dagger are located inside the Shrine of Trials dungeon.
Accessing the dungeon requires the Chapel Key.
To obtain the Chapel Key:
- Travel south of the Mushroom Village waypoint.
- Look through the archway.
- Approach the indicated area.
- Find the key attached to the rope.
- Take the key to the Chapel.
- Open the dungeon.
- Complete the dungeon puzzle to obtain the Axe and Dagger.
Recommended Build Summary
Stage | Key Skills | Weapons | Key Tar Stones |
|---|---|---|---|
14 Points | Escalation, Poison Burst, Death Mark, Night Stride | Axe & Dagger | Early-game options |
23 Points | + Lethality, Ambush, Shadow Stalk | Axe & Dagger | Duality Stone |
40 Points | + Critical Roll, Shadow Dash, Ambush, Shadow Stalk/Lasting Legacy | Axatana | Torper, Acolyte, Auspicious, Headman's, Duality |
Final Thoughts
Tiel's strength comes from combining stealth, burst damage, poison, critical hits, and mobility into one extremely fluid playstyle.
The early-game version is already strong with very accessible gear, while the midgame build introduces the Resolve generation and stealth scaling needed to keep your damage flowing.
Once you transition into the Axatana and the full Tarstone setup, the build becomes a serious endgame powerhouse.
If you're confident with dodging, use the full DPS variant and maximize Shadow Stalk and Lasting Legacy. If you're still learning Tiel, the Night Stride defensive variant is much more forgiving and still deals excellent damage.
The most important thing is to embrace the class's hit-and-run playstyle. Don't stand in front of enemies and trade attacks. Get in, land your Shadow Strike, exploit your Poison and Critical Hit synergies, disappear, and do it all over again.
That's what makes this Tiel build so effective from the first playthrough all the way into endgame.
Video
Table of Contents
1. Overview2. Body Text Tiel Stasis Axatana High Burst Starter Build — Skills, Tar Stones, Weapons & Item Location Tiel Build Overview Build Strengths: Recommended Progression: How the Tiel Build Works: 14-Point Starter Build Why Escalation? Why Death Mark Is So Important 1 Point — Night Stride How to Play Tiel Early Game: 23-Point Midgame Build Midgame Weapons and Infusions: Which Should You Use? Duality Stone — Core Tarstone Recommendation Torpor Stone — Essential Endgame Tarstone Axatana — Endgame Weapon Acolyte Stone Auspicious Stone Headman's Stone 40-Point Skill Tree Final Skill Point Options Option 1 — Full DPS Shadow Stalk Lasting Legacy Option 2 — Defensive Variant Which Version Is Better? Endgame Gameplay Rotation Where to Find the Build Items Recommended Build Summary Final Thoughts
See More





Like our guides?
Add Mobalytics as a preferred source on Google!