


Farming XP for your shells and tarstones can be a massive grind! These 2 farm spots are EXCELLENT for XP and tar stones to speed up to process!
 Use your favourite features in-game with our Desktop App
Overview
Body Text
Mortal Shell 2: Best XP Farms – Fast XP & Tar Stone Farming
Overview:
Whether you're in the early game, mid game, or end game, these two XP farms are incredibly lucrative for both your XP and your Tar Stones.
The first farm is easy to reach even from the start of the game and is an excellent option for the mid game. The second is located in an endgame area, but offers significantly more XP once your character is strong enough to handle it.
If you're looking to level quickly without spending hours wandering around looking for enemies, these two farms give you reliable routes that you can repeat whenever you need another level.
XP Farm #1
- Location: Gate of Mammon
- Best for: Mid game
- XP per run: ~3,700 XP
- Run time: ~1.5–2 minutes
- Difficulty: Moderate
XP Farm #2
- Location: Faithful Shelter, The Unfound Path
- Best for: Endgame
- XP per run: ~7,000 XP
- Run time: ~1.5–2 minutes
- Difficulty: High
- Additional value: Excellent high-level XP farming
XP Farm #1: Gate of Mammon
This first farm is an excellent midgame option and will net you approximately 3,700 XP every 1.5–2 minutes, depending on how efficiently you clear the enemies.
The big advantage here is accessibility. You can reach this area relatively early in your playthrough, making it a fantastic option when you need to catch up a few levels or want to build up some extra strength before tackling more difficult content.
The farm revolves around the creatures hiding inside the coffins in this area.
How the Farm Works
Once you've reached the coffin area, your goal is to get the creatures to emerge from their coffins.
There are several coffins around the area, and you'll need to move between them to get the enemies to spawn.
They're a little finicky at first, so don't worry if you don't get all of them out immediately. Once you've run the route a few times, you'll get much better at remembering where each coffin is and triggering the enemies.
Each enemy gives approximately 413 XP, making the full clear extremely worthwhile.
Once you've cleared the area, simply head back up the hill toward the Beacon and reset the process.
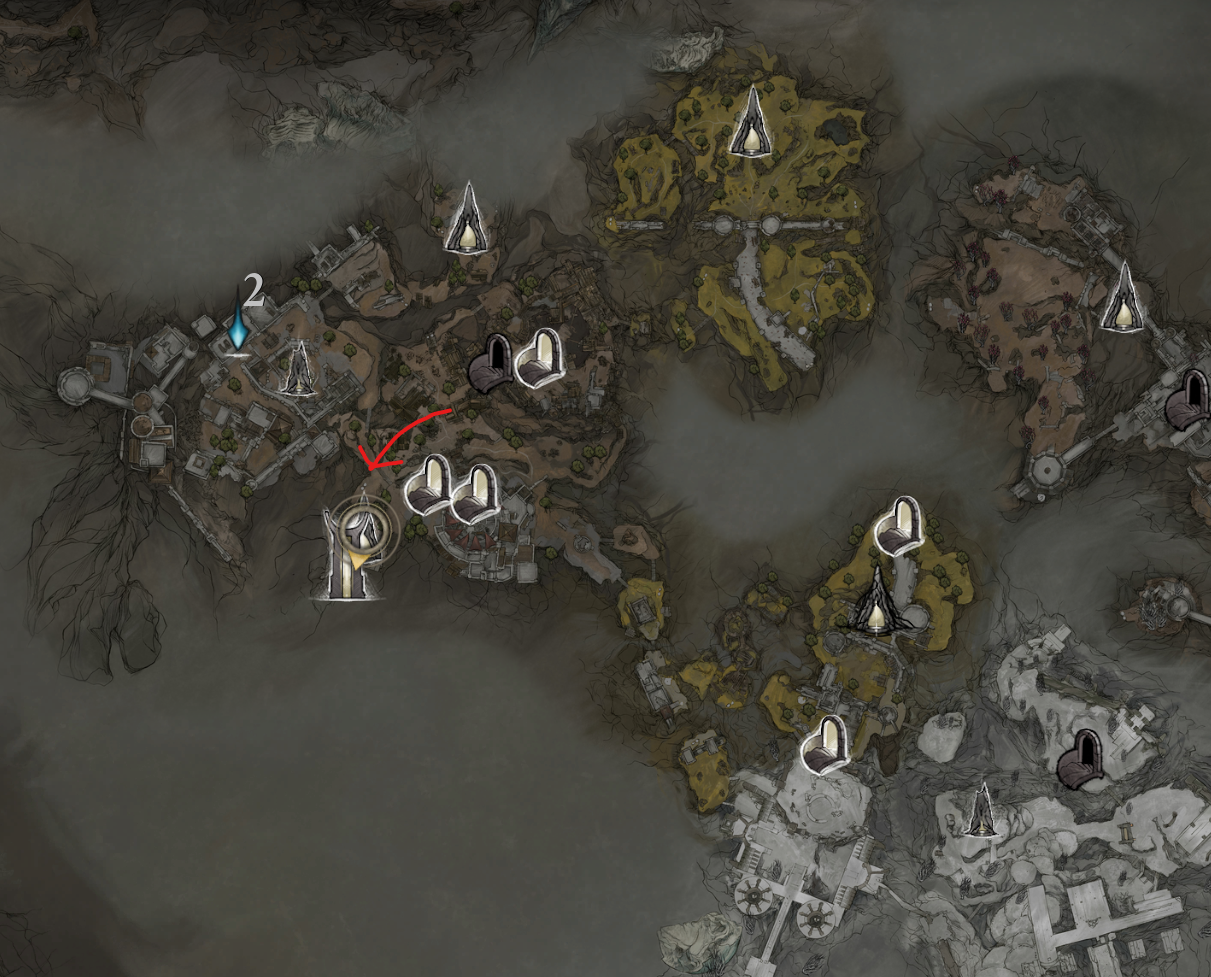
Gate of Mammon Farm Route
- Spawn at the Beacon.
- Head into the coffin area.
- Move between the coffins to spawn the enemies.
- Pull all of the enemies out.
- Kill them as quickly as possible.
- Return up the hill.
- Reset the area.
- Repeat.
The enemies can hit surprisingly hard, particularly if you're under-levelled, so don't get careless. Getting grabbed can be particularly devastating and will completely ruin the efficiency of the run.
For that reason, I'd recommend using this farm once you've got a little bit of strength behind you rather than trying to force it immediately.
How to Reach Gate of Mammon
Getting to this farm is relatively straightforward, even during the early game.
Start at the first Beacon in the south, at the Outskirts of My Mont.
From there, head southwest from the two white markers shown on the map and follow the path.
You can largely ignore the enemies on the way there if you're simply trying to establish the farm.
Cross the bridge and keep moving.
You'll eventually reach an area where you can pick up a map piece if you haven't already collected it. Continue through the area and make your way down the path.
There's another Beacon along the route that you can activate, which makes subsequent trips considerably easier.
Continue down the path, avoiding the enemies where possible, until you reach the familiar coffin area.
Once you're there, head up the hill toward the miner.
The Beacon at the top of the hill is your starting point for the farm.
Tip: On your first trip through this area, you may want to kill the enemies rather than simply sprinting past everything. Once you've learned the route, however, you can ignore most of them and dramatically reduce the time it takes to reach the farm.
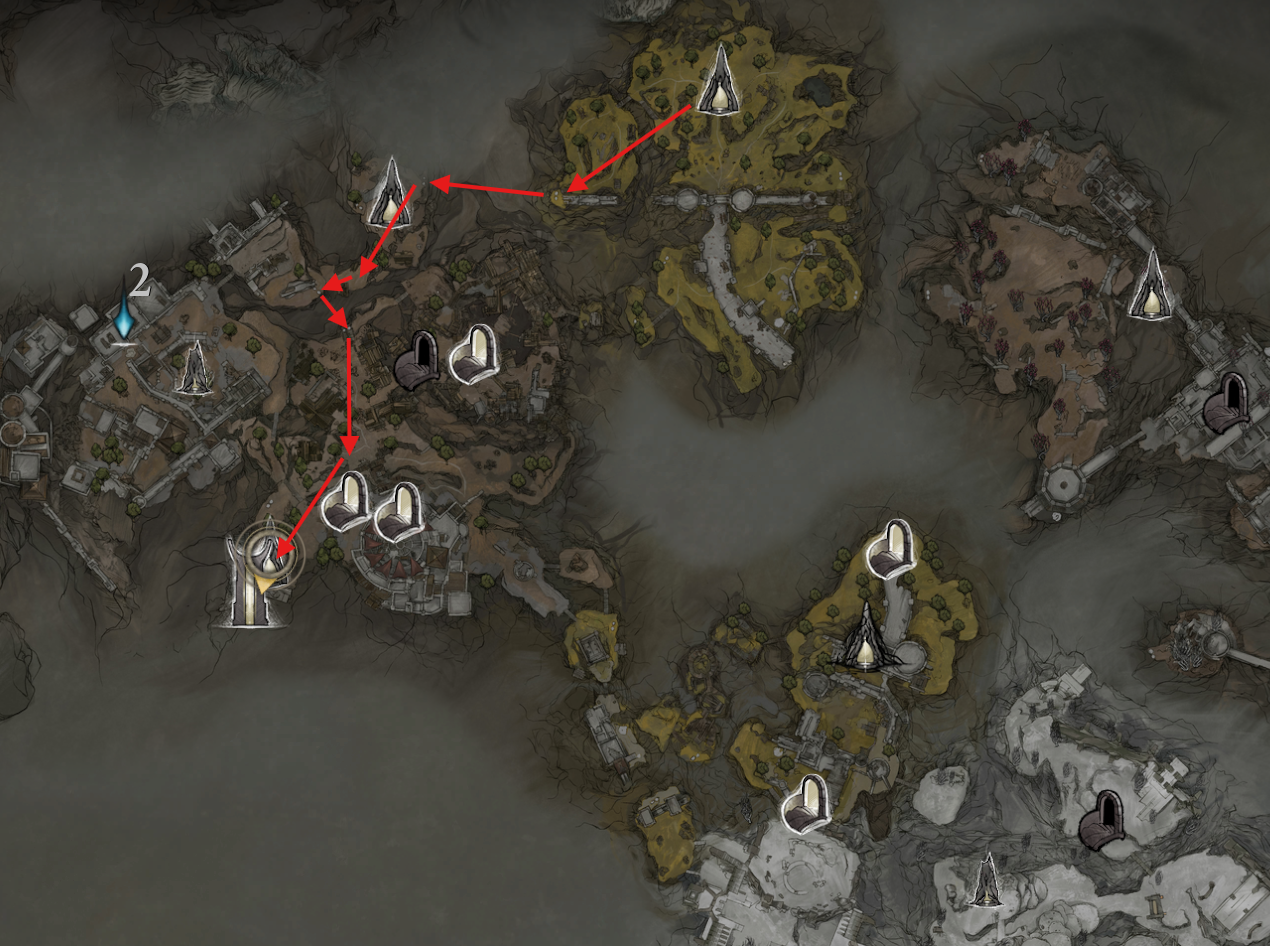
XP Farm #2: Faithful Shelter – The Unfound Path
If you're further into the game and the first farm isn't giving you enough XP per run, it's time to move on to the more lucrative option.
This second farm is located at Faithful Shelter in The Unfound Path.
It's considerably more dangerous, but the XP gain is significantly higher.
You can expect approximately 7,000 XP every 1.5–2 minutes when you're clearing it efficiently.
That's a huge improvement once you're reaching the point where individual levels require tens of thousands of XP.
For example, when you're looking at around 25,000 XP needed for your next level, getting a few thousand XP per run starts to feel painfully slow. This farm is much better suited to that stage of progression.
How the Farm Works:
The basic principle is similar to the first farm, but there are fewer enemies and they're considerably stronger.
When you enter the area, you'll encounter two of the same enemy type used in the first farm.
The difference is that these enemies hit significantly harder.
Because of that, this isn't a farm I'd recommend blindly rushing into. You need enough damage to kill them quickly while also having enough survivability to survive mistakes.
Faithful Shelter Farm Route
- Spawn at Faithful Shelter – The Unfound Path.
- Enter the farming area.
- Buff your weapons before engaging.
- Engage the first enemy immediately.
- Kill it as quickly as possible.
- Move straight onto the second enemy.
- Clean up any remaining enemies.
- Check your XP gain.
- Run back to reset the area.
- Repeat.
With an efficient clear, you can complete the entire process in under two minutes.
That makes this one of the best ways to repeatedly convert a few minutes of gameplay into meaningful character progression once you've reached the higher levels.
Which XP Farm Should You Use?
The answer depends almost entirely on where you are in the game and how quickly you can clear each location.
Farm | Location | XP | Run Time | Best For | Risk |
|---|---|---|---|---|---|
Farm #1 | Gate of Mammon | ~3,700 | 1.5–2 min | Mid game | Moderate |
Farm #2 | Faithful Shelter | ~7,000 | 1.5–2 min | Endgame | High |
Early/Mid Game
Use Gate of My Mont.
It's accessible, repeatable, and doesn't require you to reach the endgame before you can start benefiting from it.
Endgame
Move to Faithful Shelter.
Once you're reaching the point where you need 20,000–25,000+ XP for another level, the higher XP yield makes this farm substantially more attractive.
Don't Forget About Tarstone XP
One of the biggest advantages of these farms is that you're not just earning character XP.
You're also killing large numbers of enemies repeatedly, making these locations useful for progressing your Tarstones.
That makes the farms particularly valuable when you're simultaneously trying to level your character and improve your build.
Rather than spending your time running around the world looking for enemies, you can repeatedly clear a dense, predictable group and make progress on multiple systems at once.
For build-focused characters, that's a particularly useful combination.
How to Make These Farms More Efficient
The biggest factor in XP farming is clear speed.
You don't want to spend five minutes fighting enemies for an XP reward that you could obtain in two minutes with a stronger setup.
Prioritize:
- High single-target damage
- Fast attacks
- Reliable survivability
- Minimal downtime between enemies
- A route that you can repeat consistently
- A Beacon close to the farming location
If you can kill the enemies quickly without taking unnecessary damage, your XP per hour will improve dramatically.
The goal isn't simply to get the biggest XP number per run. It's to maximize XP over repeated runs.
Risk vs Reward
The second farm is undeniably better on paper, but that doesn't automatically make it the better farm for every character.
If you're dying regularly at Faithful Shelter, the additional XP isn't worth much.
A slower but consistent farm can easily outperform a dangerous farm if you're spending time recovering from deaths or repeatedly failing the run.
I'd therefore use this simple rule:
Farm the hardest location you can clear quickly and consistently.
If Gate of My Mont takes you two minutes and you clear it comfortably, while Faithful Shelter takes you two minutes but regularly gets you killed, stick with the first farm until your build improves.
Once your damage and survivability are high enough to comfortably handle the second location, make the switch.
Final Thoughts
These two farms give you a straightforward progression path for XP farming throughout your playthrough.
Gate of My Mont is the accessible midgame option, offering around 3,700 XP every 1.5–2 minutes while also helping you progress your Tar Stones.
Once you've reached the endgame and need much larger amounts of XP, Faithful Shelter in The Unfound Path becomes the better option, offering roughly 7,000 XP in a similar 1.5–2 minute window.
The key is to keep the runs fast, avoid unnecessary deaths, and reset immediately once you've cleared the enemies.
If you're looking to push your character toward those higher levels while simultaneously progressing your build, these are two locations worth keeping in your farming rotation.
Table of Contents
1. Overview2. Body Text Mortal Shell 2: Best XP Farms – Fast XP & Tar Stone Farming XP Farm #1 XP Farm #2 XP Farm #1: Gate of Mammon Gate of Mammon Farm Route How to Reach Gate of Mammon XP Farm #2: Faithful Shelter – The Unfound Path Faithful Shelter Farm Route Early/Mid Game Endgame Don't Forget About Tarstone XP How to Make These Farms More Efficient Risk vs Reward Final Thoughts
See More





Like our guides?
Add Mobalytics as a preferred source on Google!