This Proxima build OBLITERATES everything in Mortal Shell 2! It is easy to gear and will have you blasting through your first playthrough with ease!
For a video version of the guide, check it out at here!
 Use your favourite features in-game with our Desktop App
This Proxima build OBLITERATES everything in Mortal Shell 2! It is easy to gear and will have you blasting through your first playthrough with ease!
For a video version of the guide, check it out at here!
Looking for a Proxima build that can carry you through your first Mortal Shell 2 playthrough? This setup turns Proxima into a fast, aggressive melee fighter that can dish out huge damage while maintaining excellent survivability.
The build revolves around Bio Sampler, Duality Stone, and Arbiters Prize. Duality Stone causes your light attacks to strike twice, allowing you to build Resolve extremely quickly and repeatedly use Bio Sampler. Arbiters Prize then adds Blood Curse to your attacks, giving the build a powerful source of additional damage against tougher enemies and bosses.
The best part is that you don't need a collection of rare endgame items to get started. The core weapons and stones are relatively easy to obtain, making this an excellent setup for your first playthrough.
In this guide, we'll cover the Proxima skill tree, the 14-point starter version, the full 21-point version, the best stones and abilities, how the build works, and where to find the core items.
The core idea behind this build is simple:
This creates a very aggressive playstyle where you're constantly moving between enemies, attacking, dodging, and using Bio Sampler whenever you have the Resolve available.
The real engine behind the build is the interaction between Duality Stone and Proxima's Resolve economy.
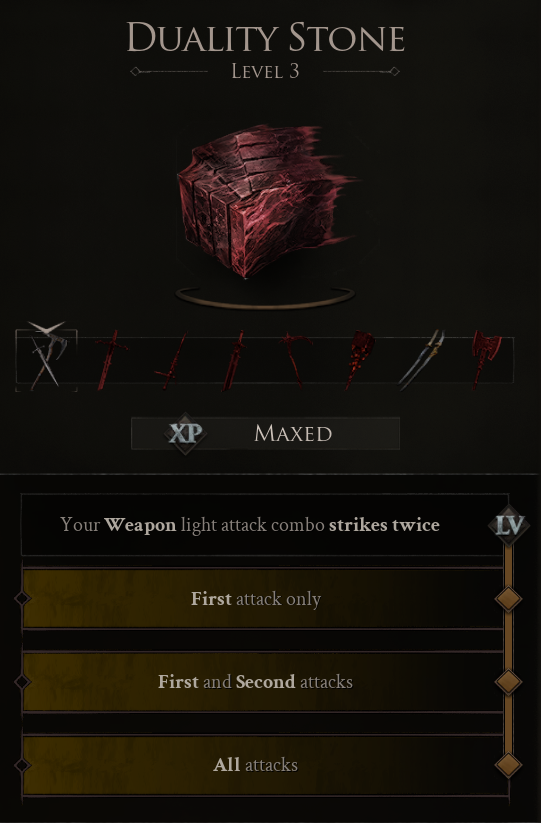
Normally, your light attacks hit once. With a maxed Duality Stone equipped, every attack in the light combo strikes twice. That gives you significantly more opportunities to generate Resolve and activate effects that trigger from repeated hits.
This is particularly powerful alongside Arbiters Prize, because you're able to trigger Blood Curse much more quickly.
The result is a build that feels almost self-sustaining when played correctly: attack repeatedly, generate Resolve, use Bio Sampler, and immediately return to attacking.
There are two important stages of this build: the 14-point starter version and the 21-point version.
The 14-point setup is where the build begins to come together, while the 21-point version adds the extra damage and utility needed to really make Proxima start tearing through enemies.
Your initial priority should be getting Proxima's core nodes online as quickly as possible.
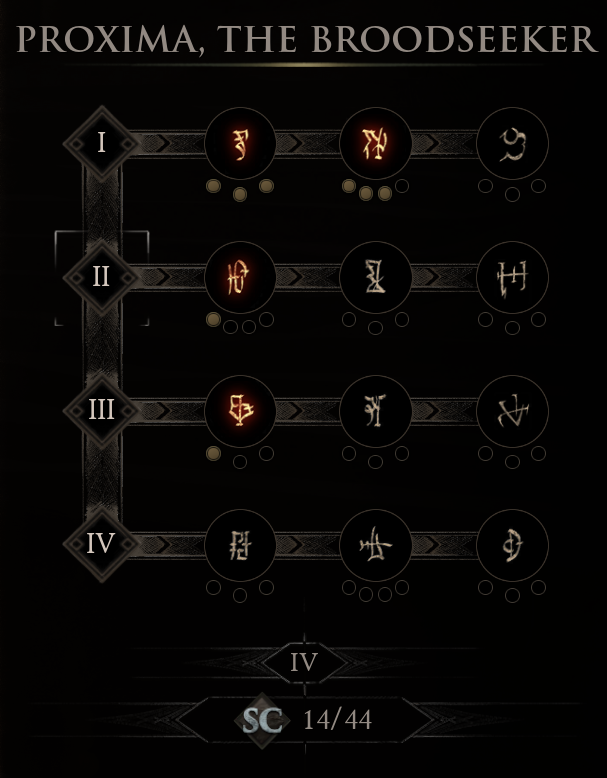
Put three points into Attunement as an early priority.
This reduces the Resolve cost of Bio Sampler by 50%, giving you four charges. Having four charges makes a huge difference because you can repeatedly use Bio Sampler without constantly running out of Resolve.
This also synergizes directly with Duality Stone. Because your light attacks hit twice, you can quickly rebuild the Resolve needed to keep using Bio Sampler.
Three points in Attunement are essentially non-negotiable for this build.
Next, invest three points into Exos Shell.
This provides:
The Bio Sampler mitigation is particularly useful when you're flying into an enemy or boss. You can commit to an attack without being completely exposed to incoming damage.
The dodge-related mitigation is arguably even more important for general gameplay. That brief defensive window can save you repeatedly, particularly when fighting enemies with large attacks.
Three points in Exos Shell are another core requirement for the build.
Biohazard is where the build begins scaling its damage.
The first point gives Bio Sampler a 150% increased damage effect for every time it lands.
This is a huge part of why the build starts feeling powerful once you have the basic setup online.
If you haven't unlocked Tier Three yet, you can temporarily invest additional points into Biohazard while leveling.
Once Tier Three becomes available, unlock Seizure.
The first level causes Bio Sampler to inflict 20 Stasis stacks.
This is extremely valuable because Stasis slows enemies down, giving you more opportunities to attack them.
It becomes even stronger when combined with Duality Stone, since your light attacks are striking twice and giving you more value from every attack.
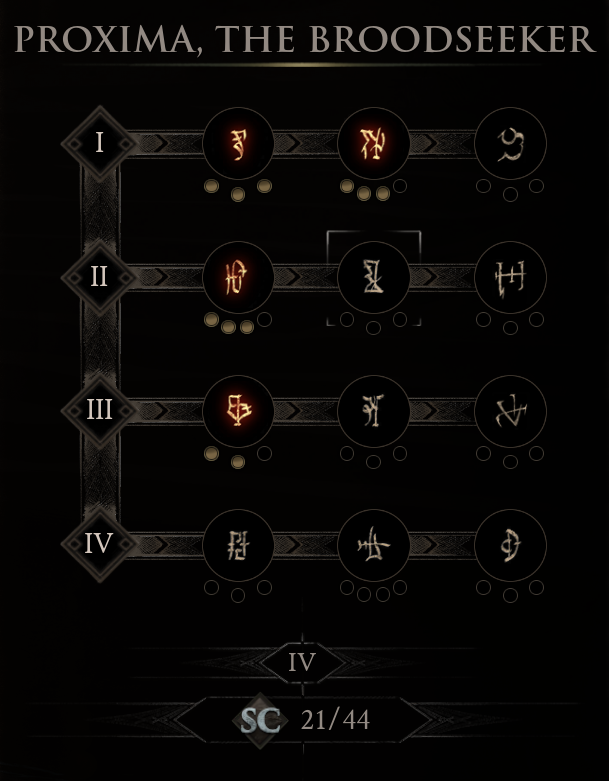
Once you reach 21 points, you can take the starter setup and push its damage much further.
The final 21-point allocation is:
This gives you the additional Biohazard scaling, including Lightning stacks and 180% increased Bio Sampler damage, while Seizure adds Stasis stacks and splash damage.
This is where the build really starts to come online.
The 21-point version is also a great transition point toward a more advanced endgame Proxima setup.
The gameplay loop is straightforward, but there are a few important things to understand.
Bio Sampler is your primary burst tool.
Use it to close the distance, damage enemies, and take advantage of your mitigation from Exos Shell.
Because Attunement significantly reduces its Resolve cost, you can use Bio Sampler frequently rather than treating it as a rare cooldown.
Once you're in melee range, start attacking with your light combo.
This is where Duality Stone becomes extremely important.
With Duality Stone equipped, every attack strikes twice. You're therefore generating Resolve much faster and getting more opportunities to trigger your other effects.
Don't think of Bio Sampler as an ability you use once and then wait for.
The goal is to continually cycle between:
When played correctly, the Resolve economy can feel almost infinite.
Proxima's Exos Shell setup gives you a brief mitigation window after dodging.
This means dodging isn't only defensive. You can use it to stay in melee range and continue your attack sequence without being punished as heavily.
Watch for the blue dust effect that indicates the mitigation has activated.
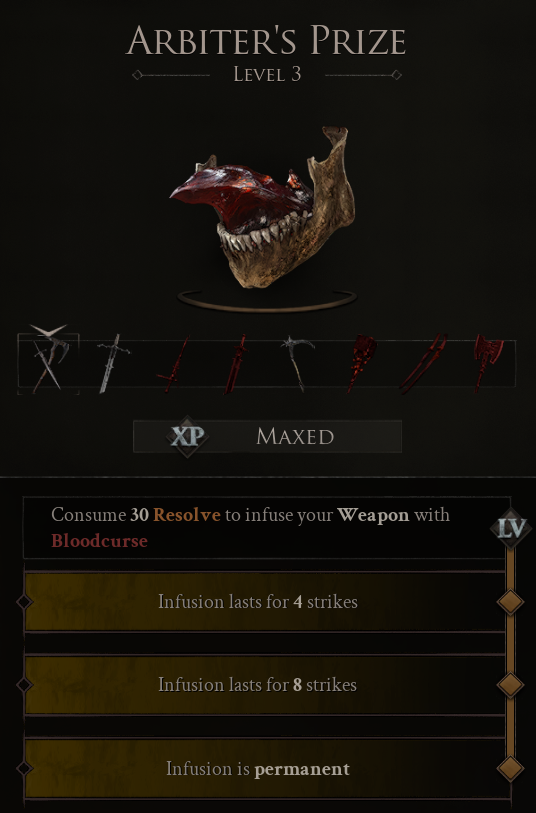
Arbiters Prize gives your melee attacks a permanent Blood Curse infusion.
Because Duality Stone makes your attacks strike twice, you can build Blood Curse very quickly.
Once Blood Curse reaches 100%, it removes a substantial chunk of the enemy's health.
This is especially valuable against bosses, where repeatedly building Blood Curse can significantly shorten the fight.
The build deliberately uses items that are relatively easy to obtain, making it suitable for a first playthrough.
The Axe and Dagger is the main weapon for this build.
It's particularly useful because it's available early in the game, meaning you don't have to wait until the endgame before the build starts functioning.
Its fast attacks also pair extremely well with Duality Stone and Arbiters Prize.
When maxed out, it causes every light combo attack to strike twice.
This is important for several reasons:
If there's one item you should prioritize getting for this build, it's Duality Stone.
Arbiters Prize provides the permanent Blood Curse infusion for your melee attacks.
Blood Curse is particularly effective against bosses because building it to 100% removes a significant chunk of their health.
Combined with the double-hit effect from Duality Stone, Arbiters Prize becomes one of the most important offensive pieces in the setup.
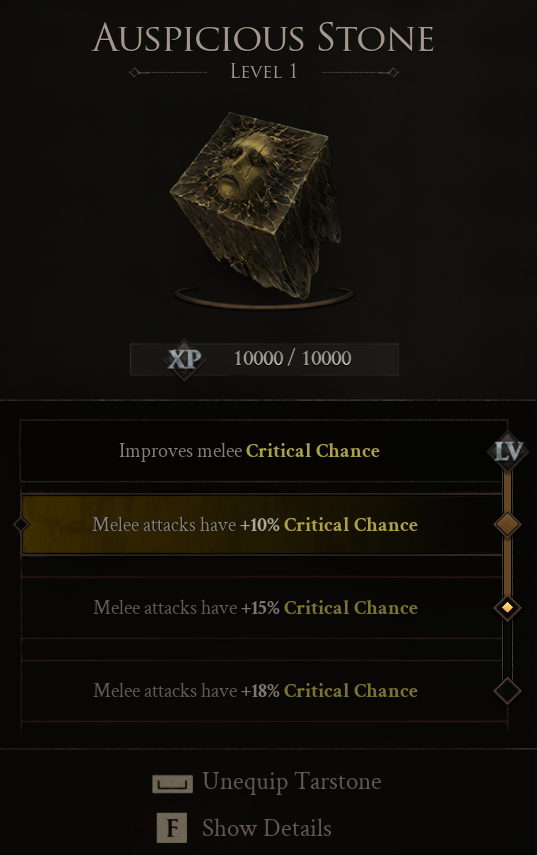
Auspicious Stone provides increased melee critical hit chance.
It works naturally with the rapid-hit nature of the build and gives your melee attacks another way to scale their damage.
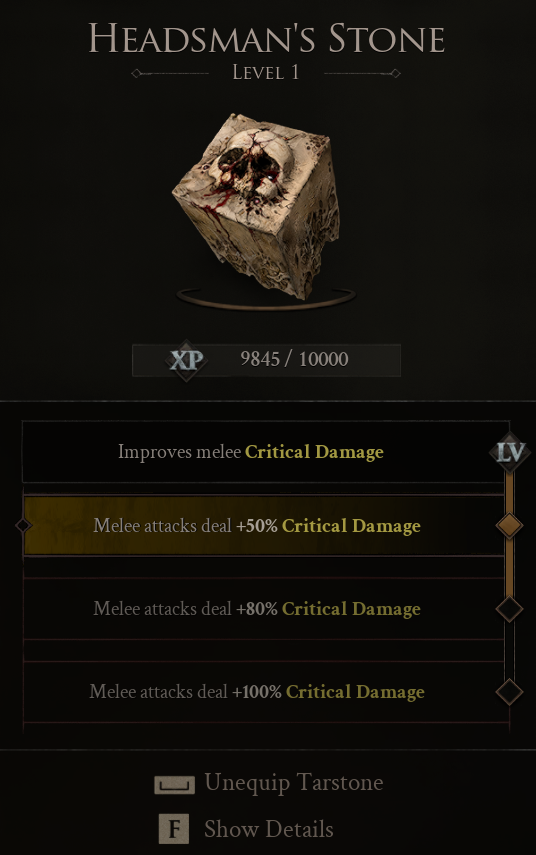
Headman's Stone increases critical hit damage.
Together with Auspicious Stone, it gives the build additional critical damage potential.
You don't need either stone to be fully levelled for the build to feel powerful, but they're strong additions as you continue progressing.
Dead Eye Stone increases critical hit damage on ranged attacks.
It's useful for the ranged portion of the setup, although ranged attacks aren't the primary focus of this build.
Retribution Stone improves repost damage.
It's a usable option while progressing, although it's one of the pieces I'd replace if you find something that better suits your playstyle.
Volatile Fragment provides splash damage to your ranged weapon.
It's another secondary option rather than a core component of the build.
Use Arbiters Prize for your melee weapon.
The permanent Blood Curse infusion is the main reason we're using it.
For your ranged option, use Hag Stone.
This provides poison imbuement and gives your ranged weapon an additional damage effect.
Ranged combat isn't a major focus of this build, however, so this slot is less important than your melee setup.
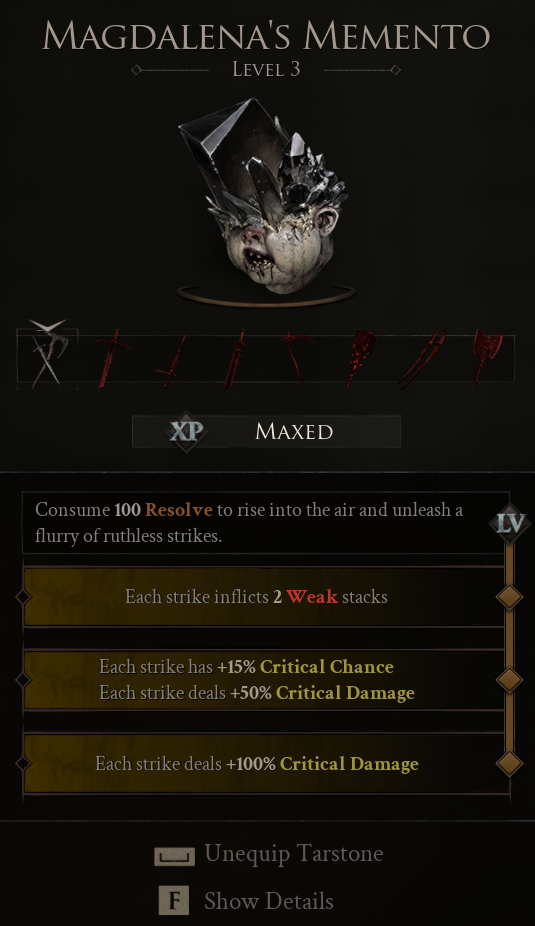
Magdalena's Momento is an excellent choice for this build.
You can acquire it after defeating the first boss.
When upgraded, it provides a significant critical damage boost and inflicts Weak stacks, further increasing the offensive potential of the setup.
It fits perfectly with the fast-attacking nature of Proxima and helps turn her into what is essentially a walking blender.
Confessor's Keepsake provides a powerful charge shot.
Again, ranged attacks aren't the focus of this build, but if you're going to use a ranged ability, this is a strong option.
The 21-point setup can be adjusted slightly when you're specifically fighting bosses.
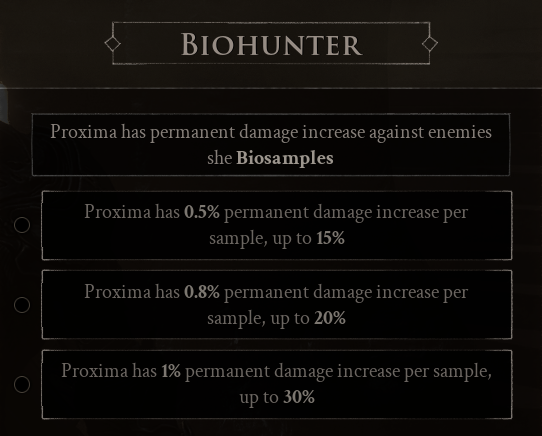
Remove the Bio Sampler splash damage node and instead invest those points into Bio Hunter.
Bio Hunter increases your damage against an enemy the more times you use Bio Sampler, scaling up to:
Because you're going to use Bio Sampler repeatedly during boss fights, this provides a much more valuable single-target damage increase than the splash damage.
For general exploration, keep the splash damage.
For bosses, Bio Hunter is the better choice.
The biggest advantage of this setup is that you don't need to spend your entire playthrough hunting down obscure items.
The Auspicious Stone is located at the entrance to Mushroom Village.
You can reach it easily from the beacon, or approach through the front entrance.
Look for the chest at the entrance area.
The chest contains the Auspicious Stone.
The Headman's Stone can be found by spawning at Mammon's Outskirts.
From there:
Inside you'll find the Headman's support stone.
The Duality Stone is located at the Noctian Gate beacon.
You'll need to cleanse the beacon to access the area.
It's located on the western side of the map near the west gate.
Because Duality Stone is so important to the build, this should be one of your early priorities.
The Ax and Dagger is found inside the Shrine of Trials dungeon.
Getting into the dungeon requires the Chapel Key.
To obtain the Chapel Key:
The dungeon contains the Ax and Dagger.
Arbiters Prize can be found just south of Widow's Overlook near the beginning of the game.
The exact source of the item is worth checking as you explore the area, as it may be associated with the deceased NPC or the boss/mini-boss encounter there.
The build has two clear progression milestones.
Build | Main Goal | What It Gives You |
|---|---|---|
14 Points | Get the core online | Resolve economy, mitigation, Bio Sampler damage and Stasis |
21 Points | Maximize early progression | More Biohazard damage, Lightning stacks, Stasis and splash damage |
The 14-point version is the point where the build becomes fully functional.
The 21-point version is where it starts feeling substantially stronger and gives you a good foundation for transitioning into an endgame Proxima build.
This Proxima build is an excellent way to approach a first Mortal Shell 2 playthrough if you want something that is both aggressive and forgiving.
The important part isn't any single item. It's the interaction between Duality Stone, Arbiters Prize, Bio Sampler, and Proxima's Exos Shell.
Duality Stone doubles your light attacks, those attacks help you generate Resolve and build Blood Curse, Bio Sampler gives you powerful burst damage and mitigation, and Proxima's dodge-based mitigation gives you another layer of survivability.
Start by getting three points in Attunement and three points in Exos Shell, then work toward Biohazard and Seizure. Once you reach 21 points, you'll have a powerful setup that can comfortably carry you through the early and mid stages of the game while giving you a strong foundation for an endgame Proxima build.
For general gameplay, keep the Bio Sampler splash damage. When you switch over to boss fights, move those points into Bio Hunter for the additional single-target scaling.
If you want a fast, aggressive Proxima build that doesn't require a pile of endgame gear before it becomes useful, this is a very strong place to start.
Like our guides?
Add Mobalytics as a preferred source on Google!