Looking for a complete Arknight: Endfield Auto Defense Guide? This guide cover every Imminent Incursions on all Outposts, with strategies to clear them on all levels.
Arknight Endfield is a sequel to Arknight, the famous Tower Defense game. Although Endfield is mostly action-oriented, it inherited some aspects of the Tower Defense.
The main quest leads you into a mini tower defense mode, once you unlock your very first Outpost. Then it opens up more with upgrades and new Outposts.
Here's how to challenge them one by one.
Guide
Rewards
The first clear rewards character upgrade materials, and Headhunting (Gacha) currency.
Clearing Operator Intervention grants temporary Stock Bill Bonus Earning Chance in the Outpost, for 24 hours.
While max Auto Defense gives permanent 20% Stock Bill Bonus Earning Chance.
How Tower defense Work
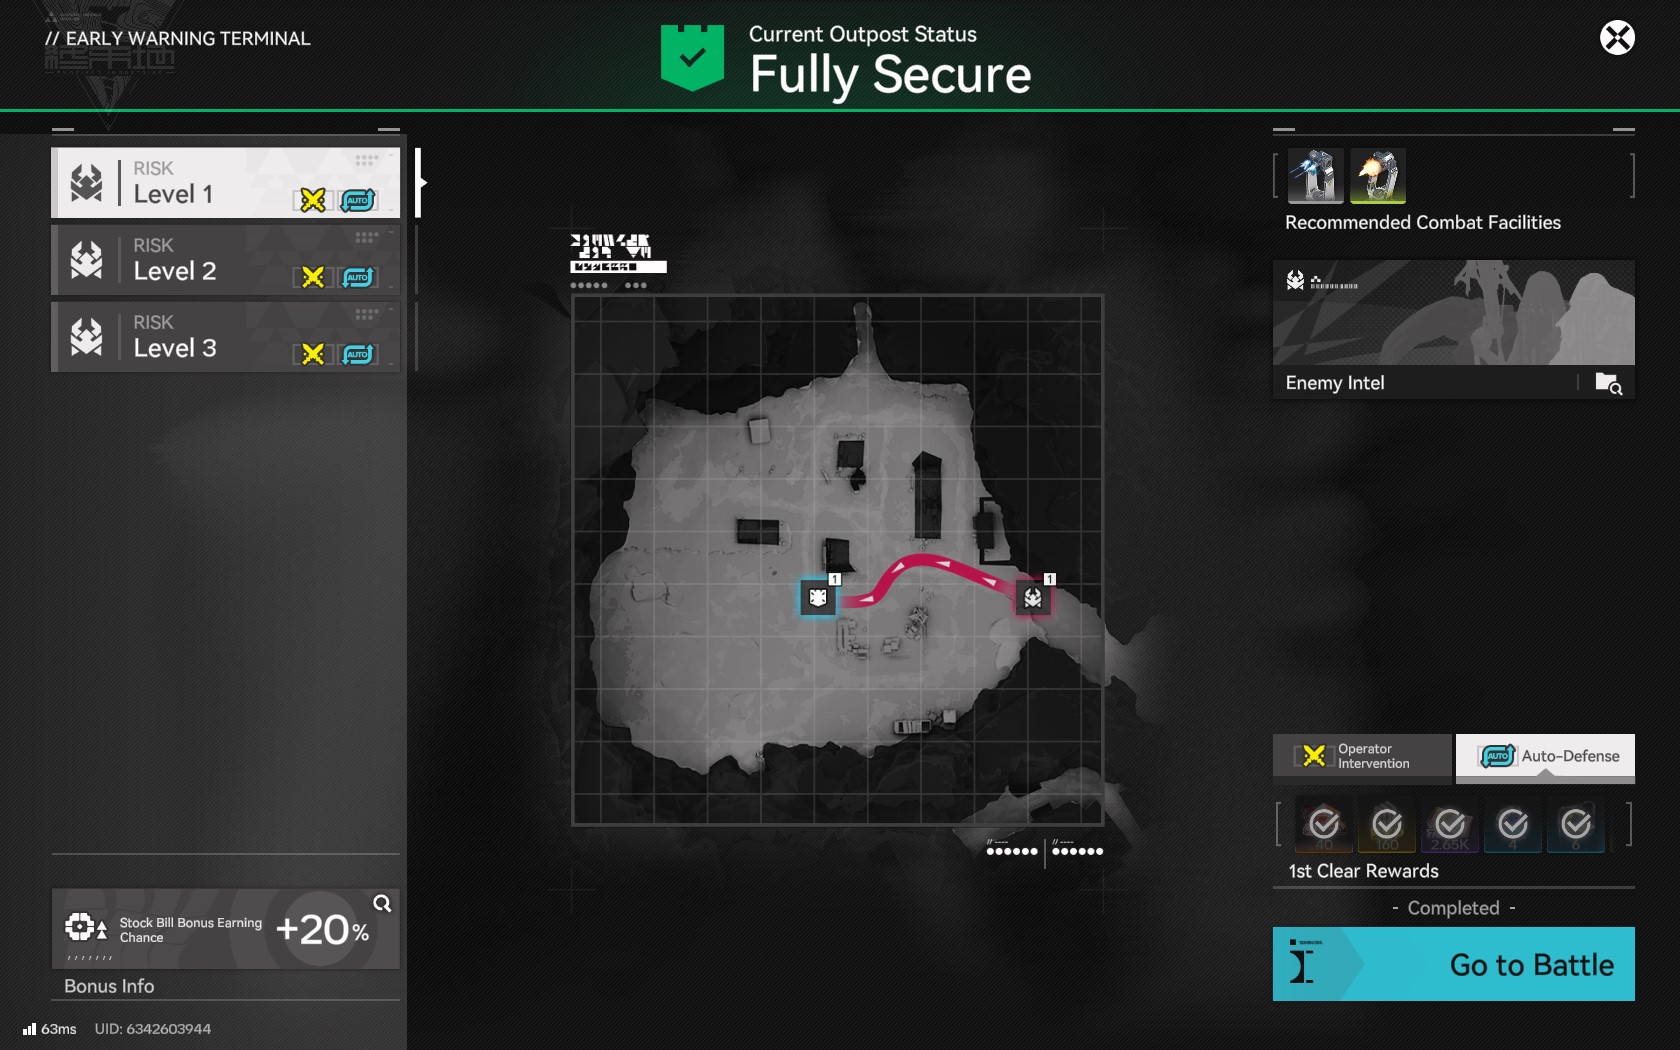
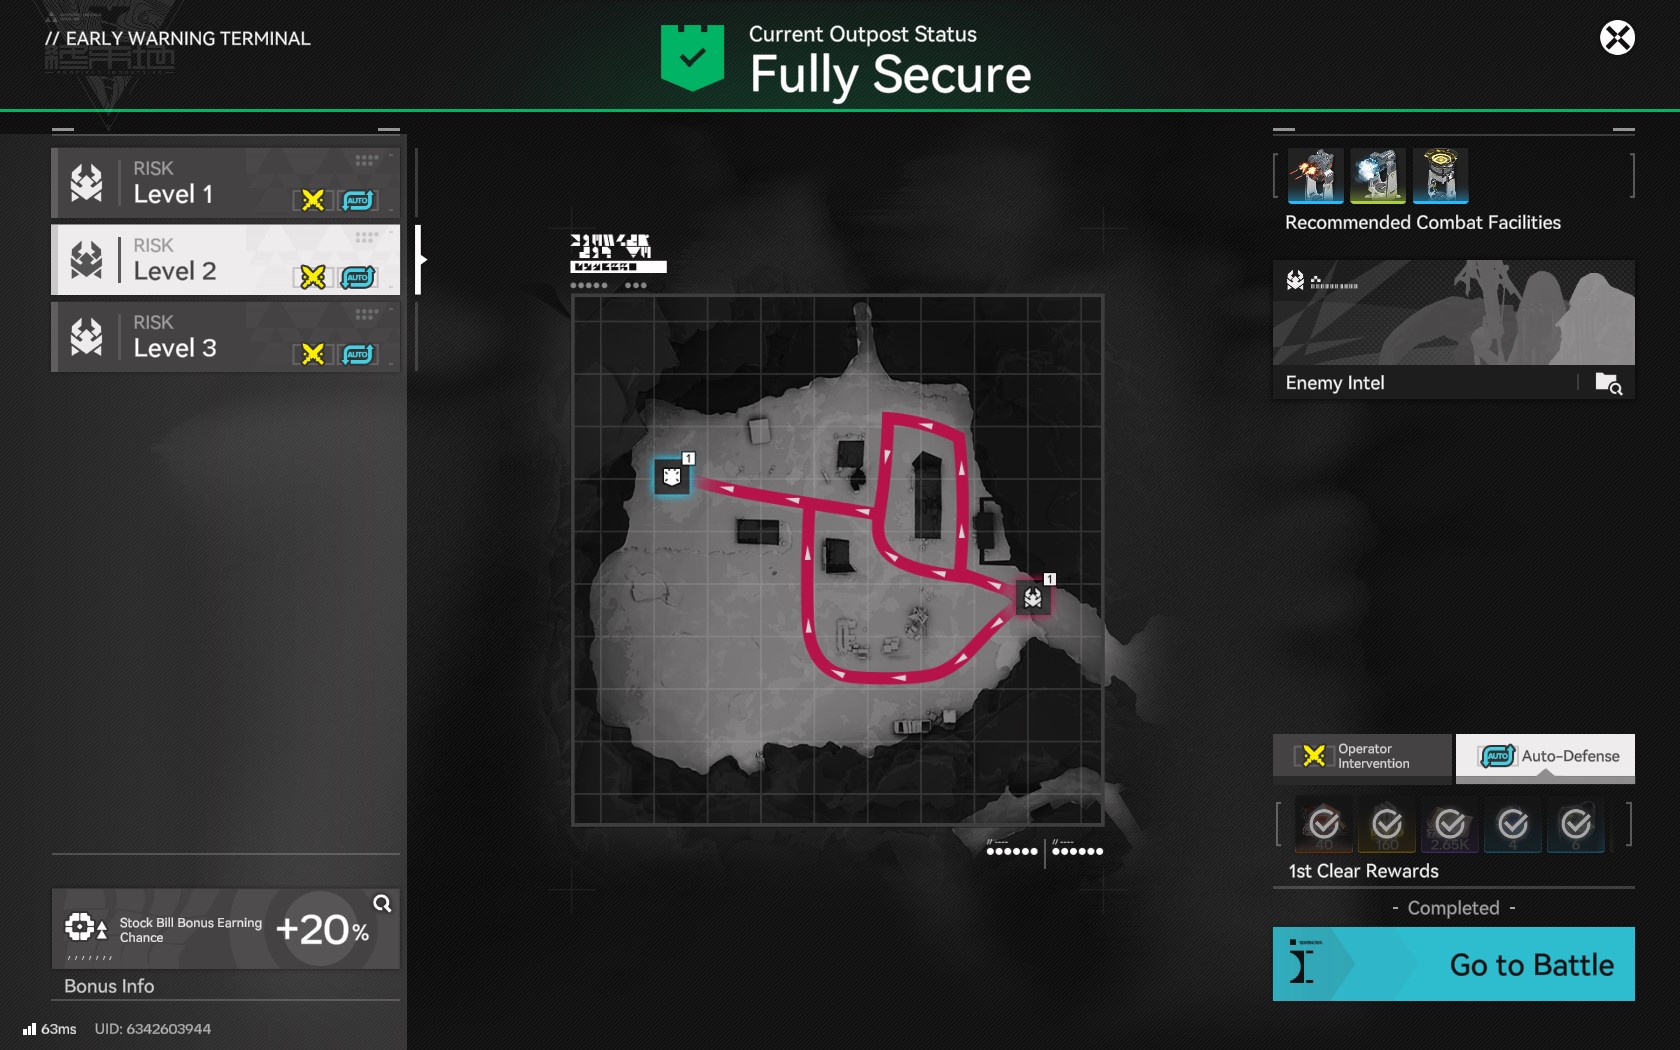
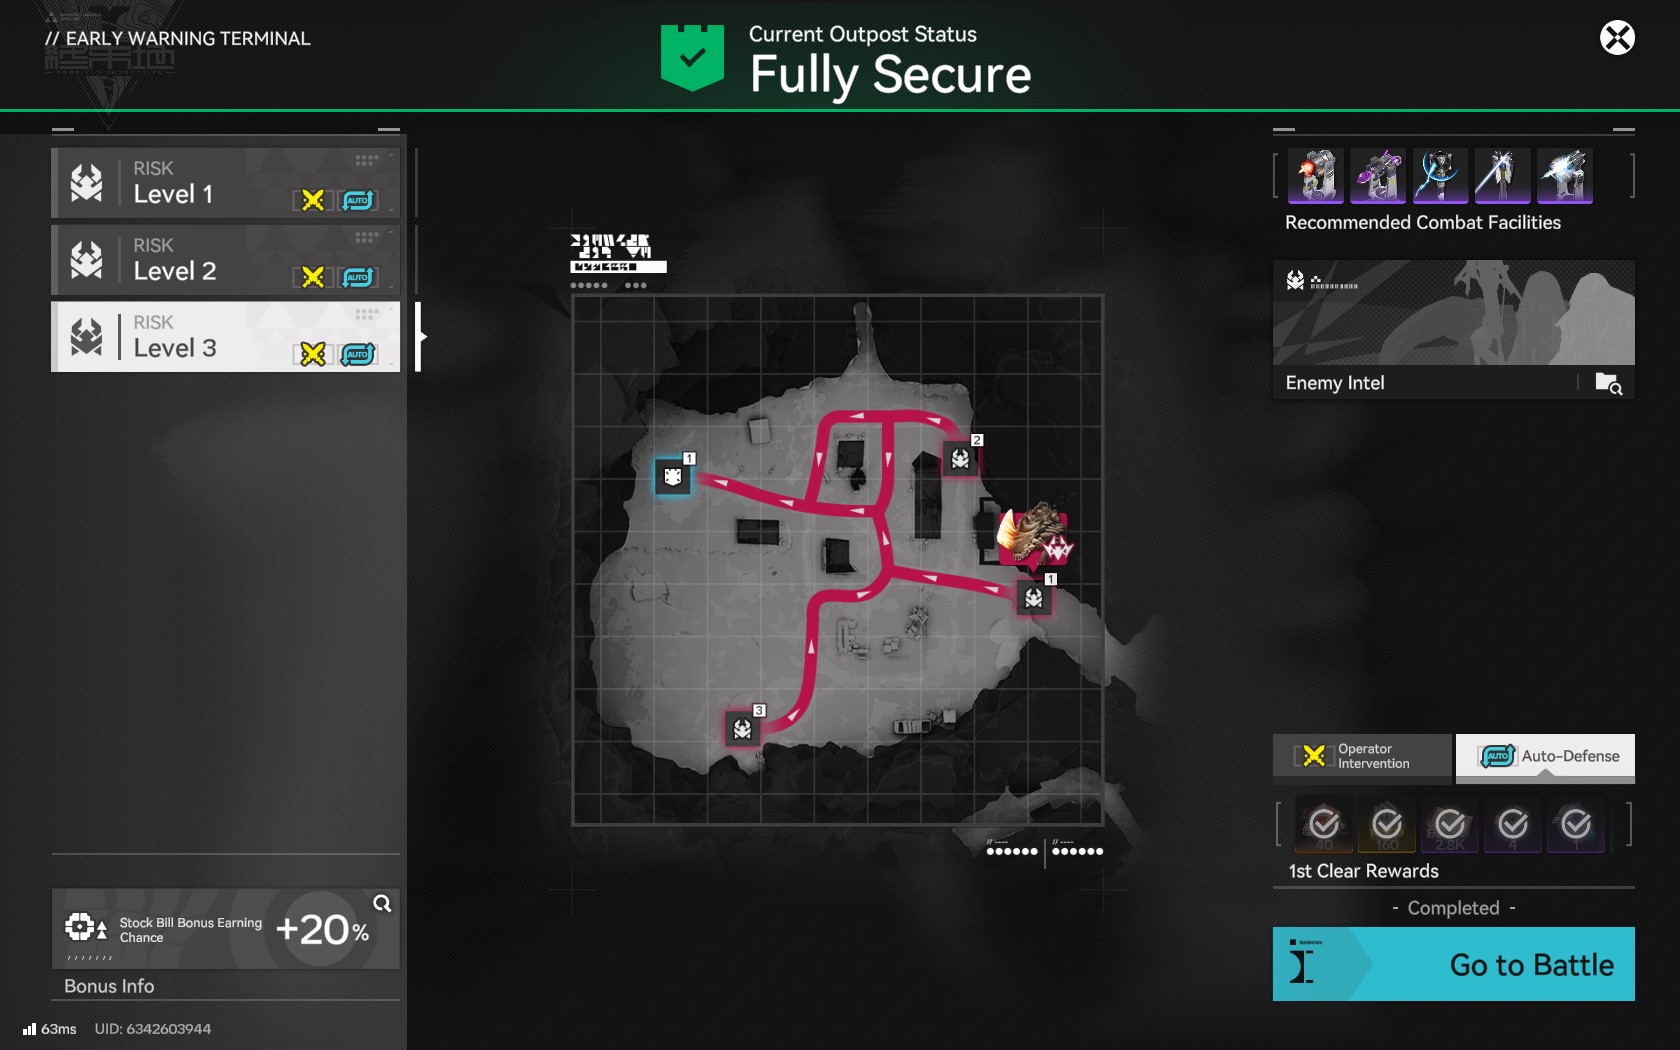
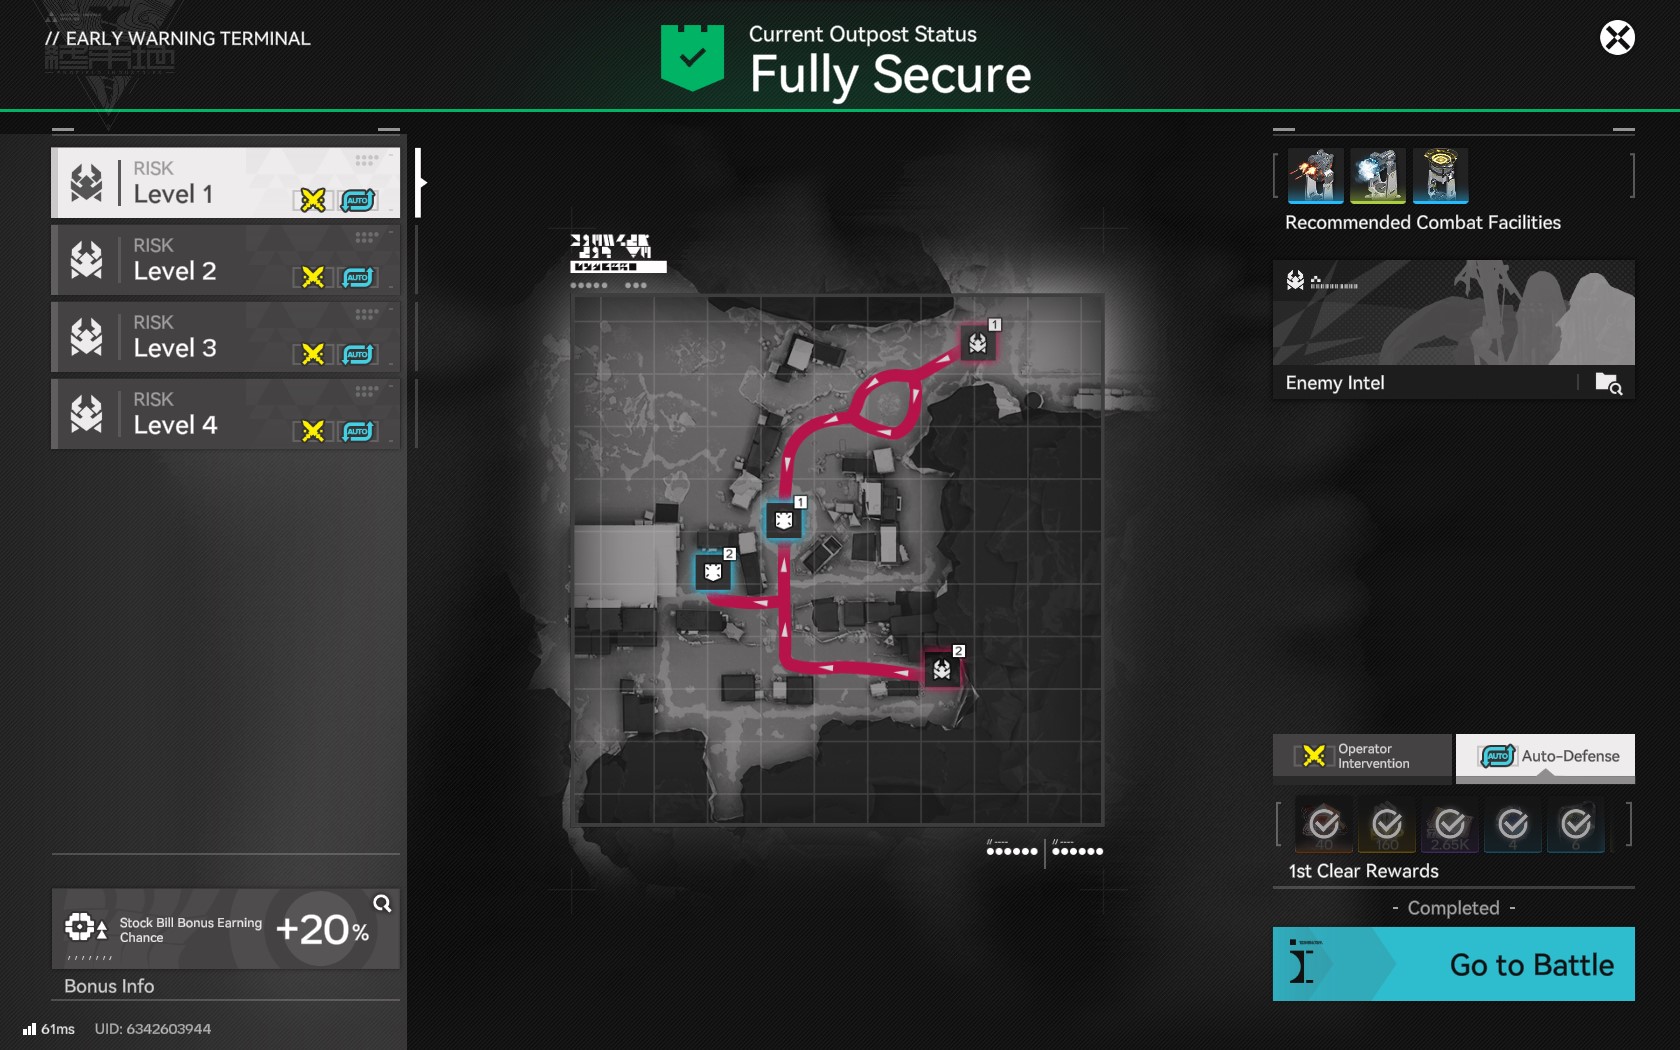
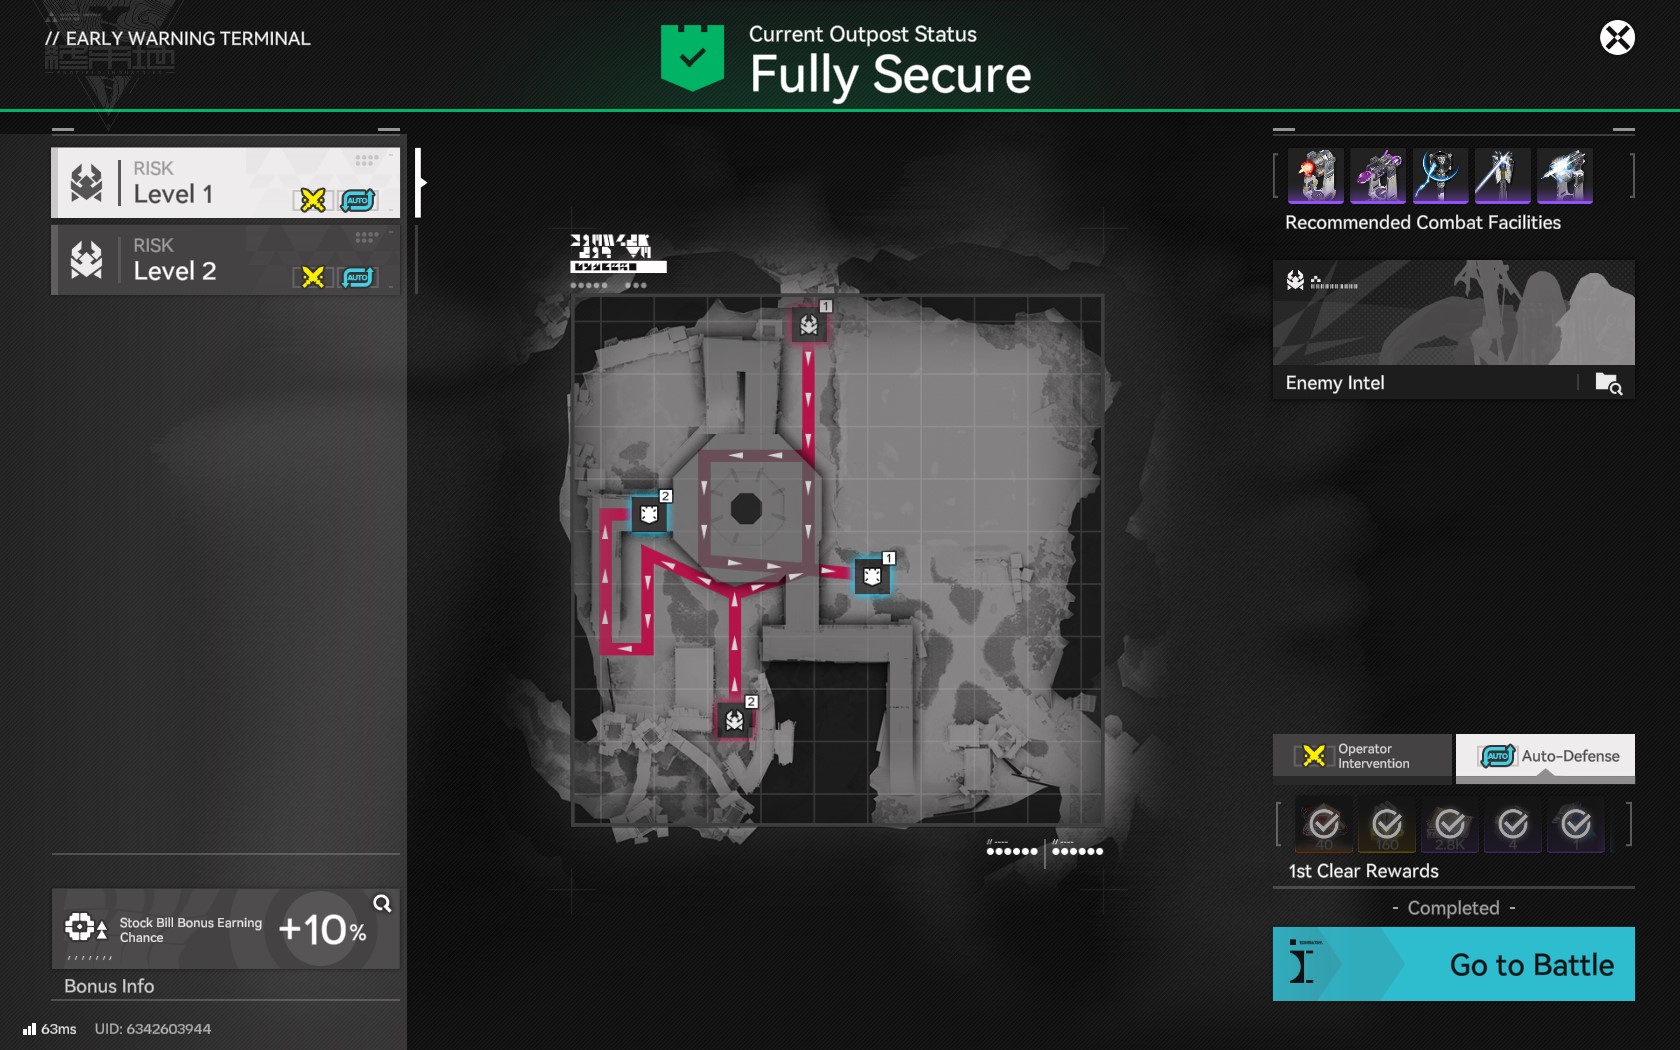
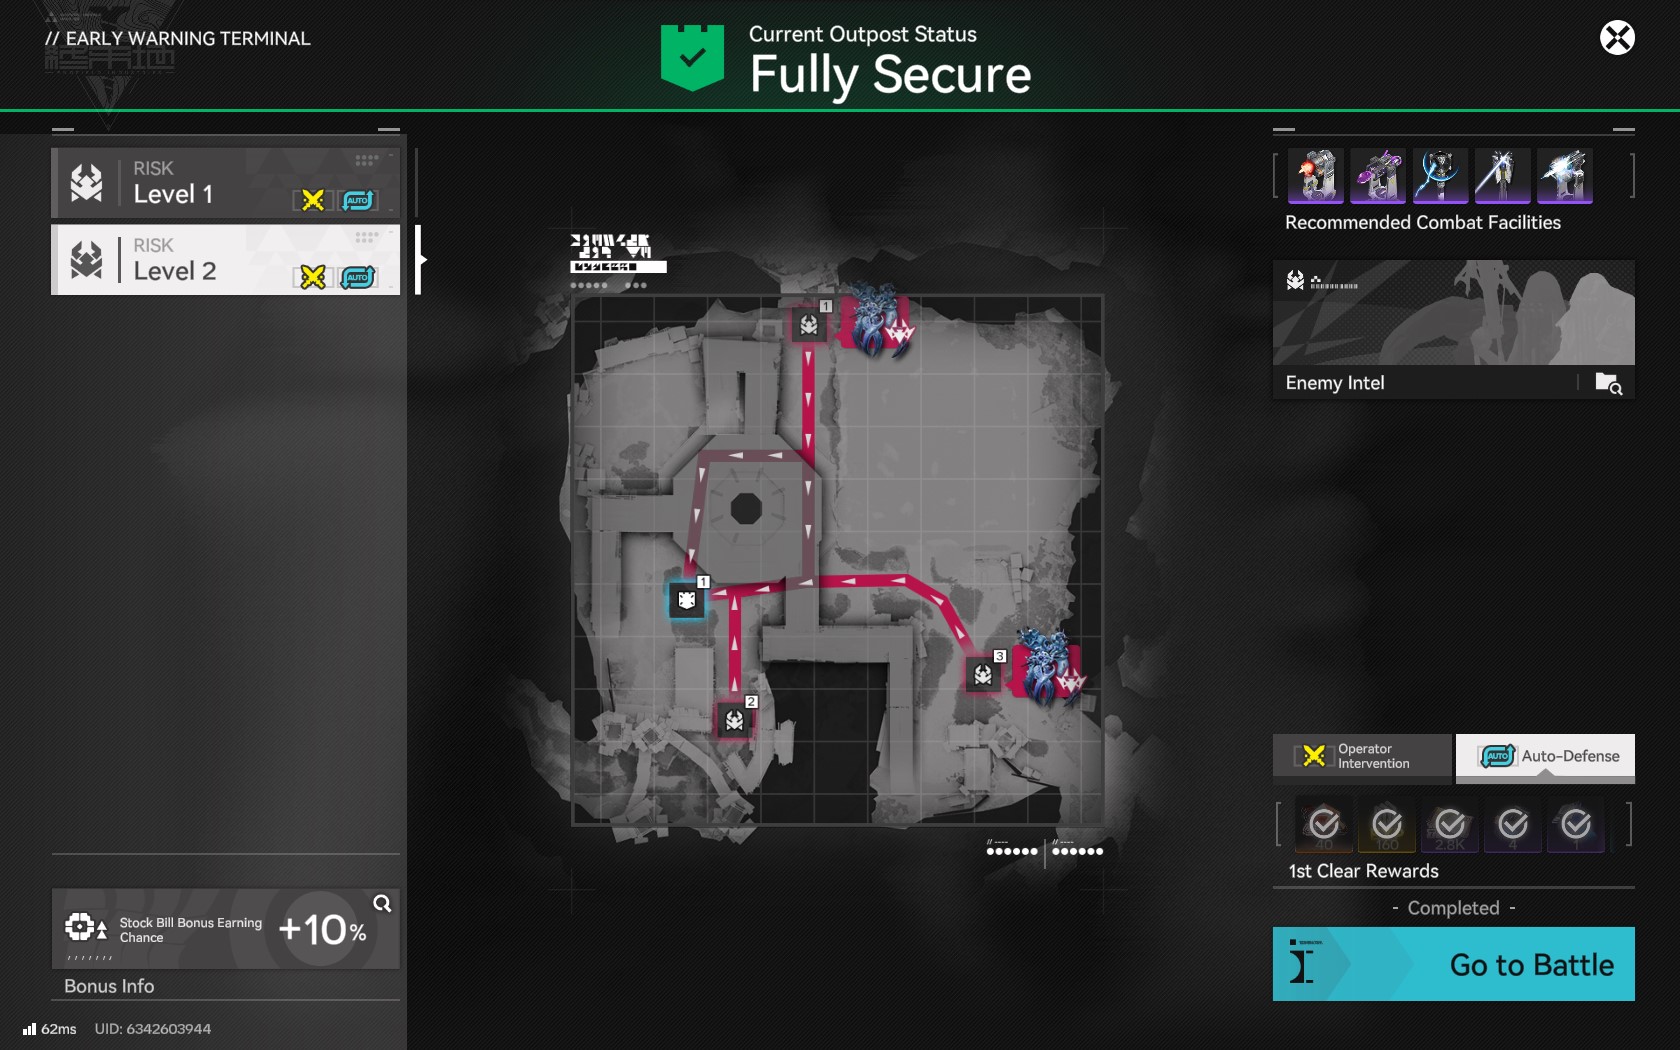
In each Outpost you unlock, you will find an Early Warning Terminal, visible on the mini-map, the full map, and have an alert in Mission reminder on top left corner in your map screen.
Interact with the terminal, and a detailed panel opens up, showing each Risk Level on the left. With Enemy Intel, First Clear Rewards, and recommended towers to beat the stage on the right of screen. And the actual lanes enemies will take on the map in the middle, with the targets you need to protect.
Player have two battle to beat in each Risk level:
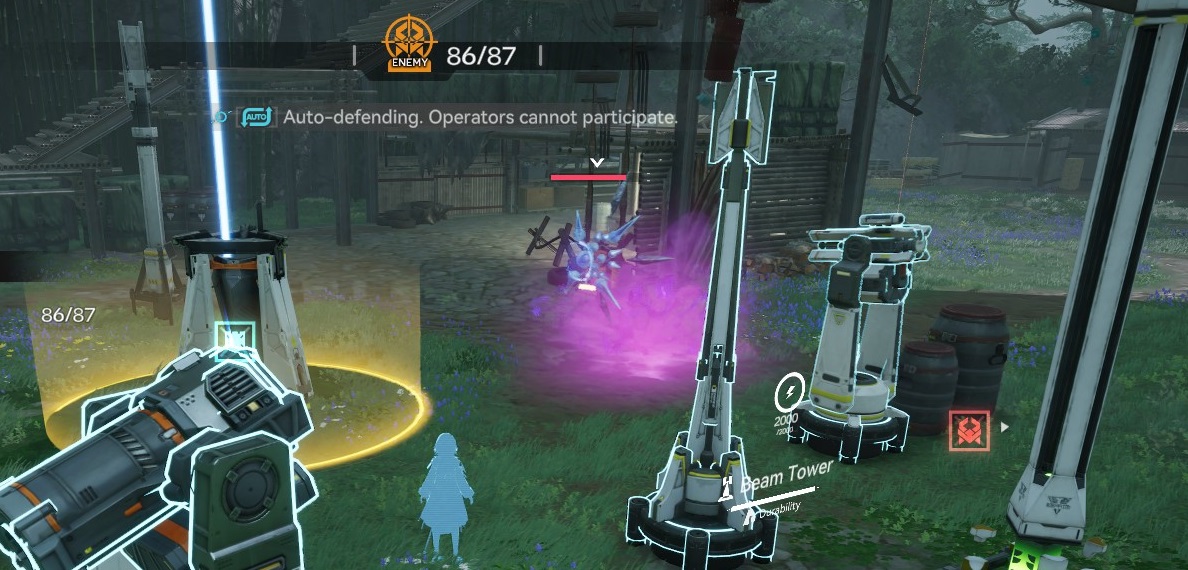
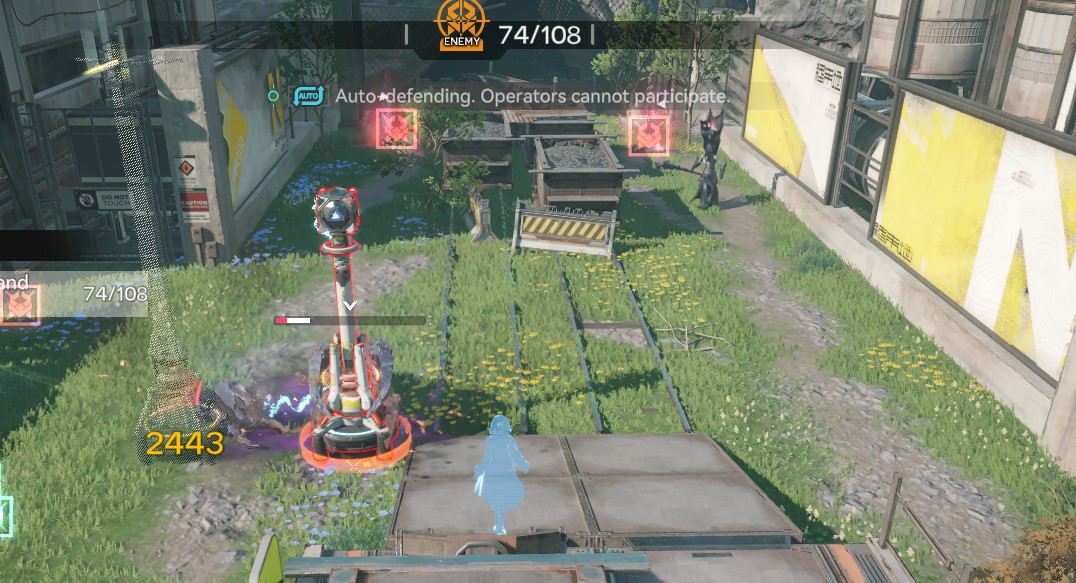
Operator Intervention: Player use their team alongside towers.
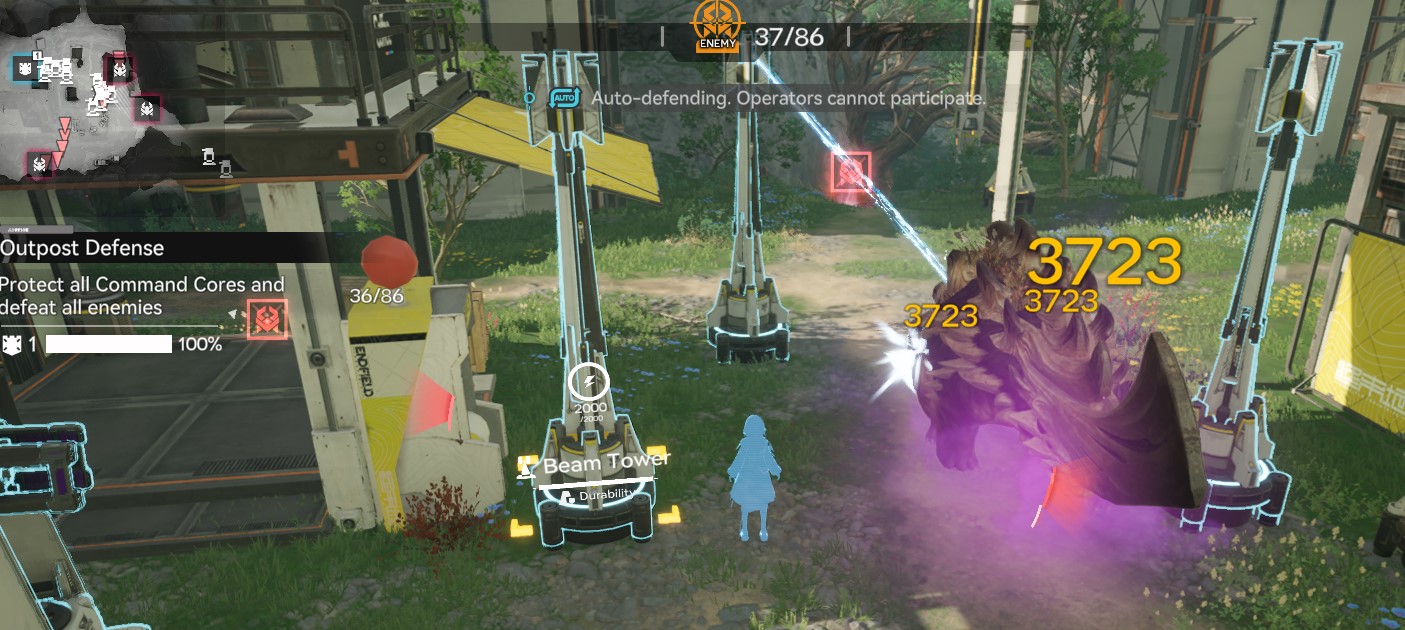
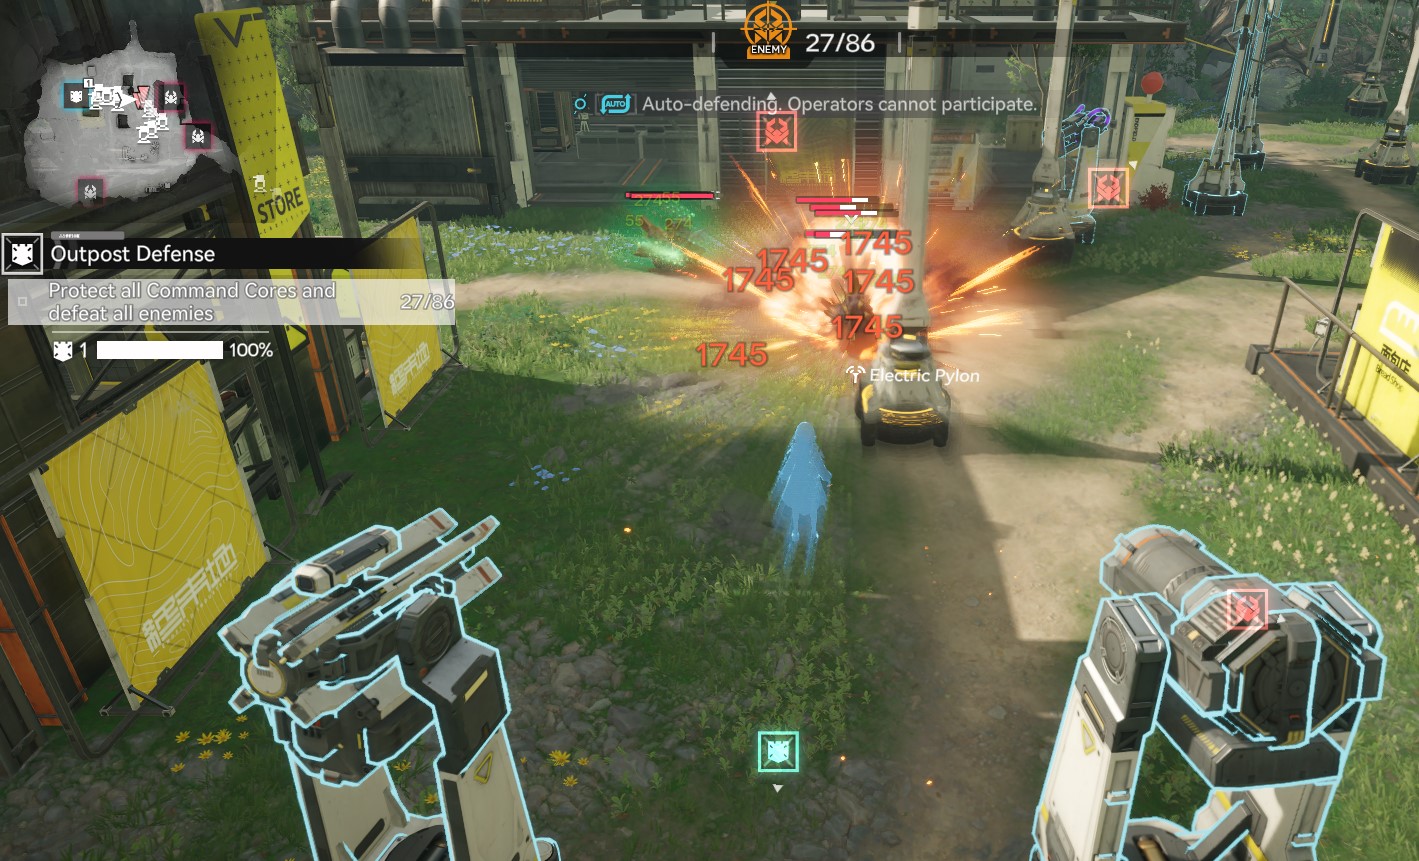
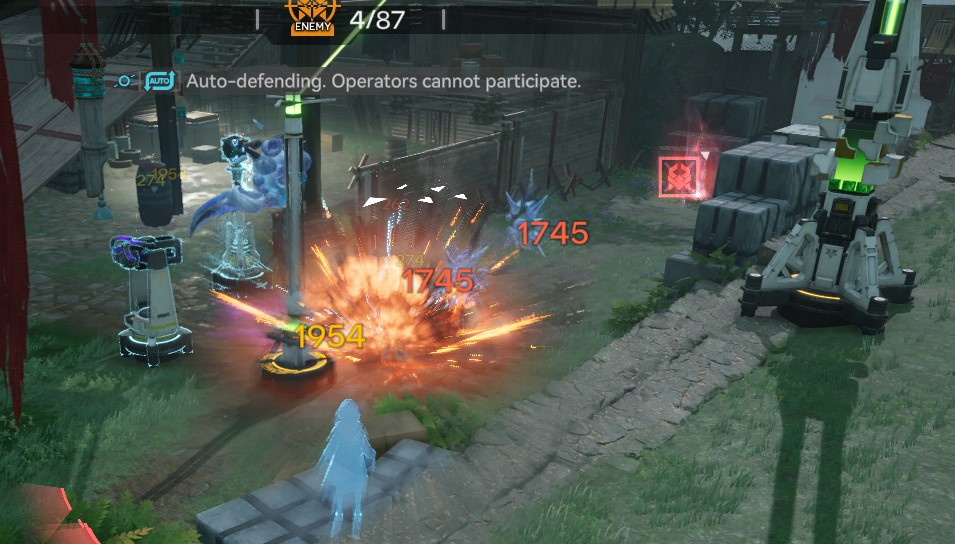
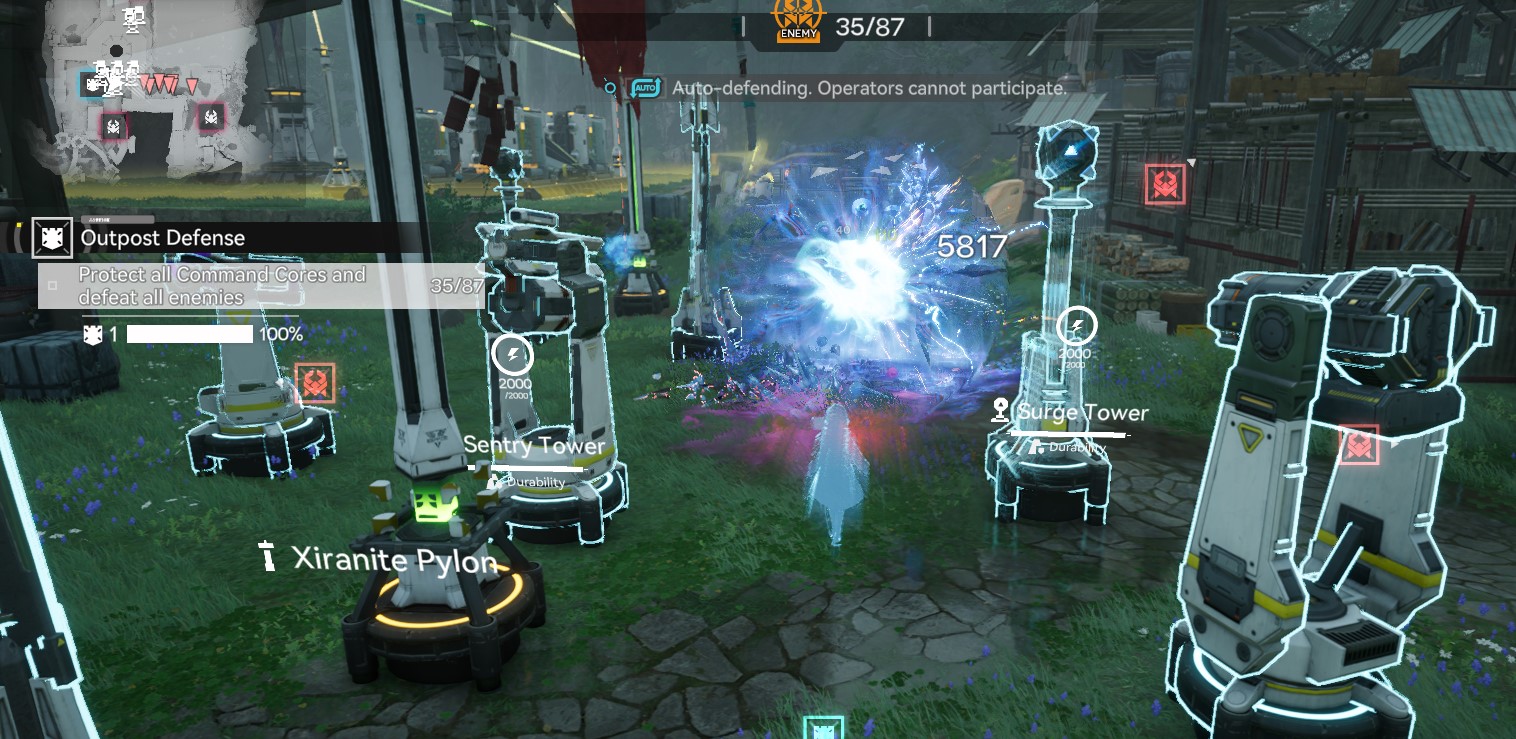
Auto-Defense: Beat enemies with towers only, watch as spectator.
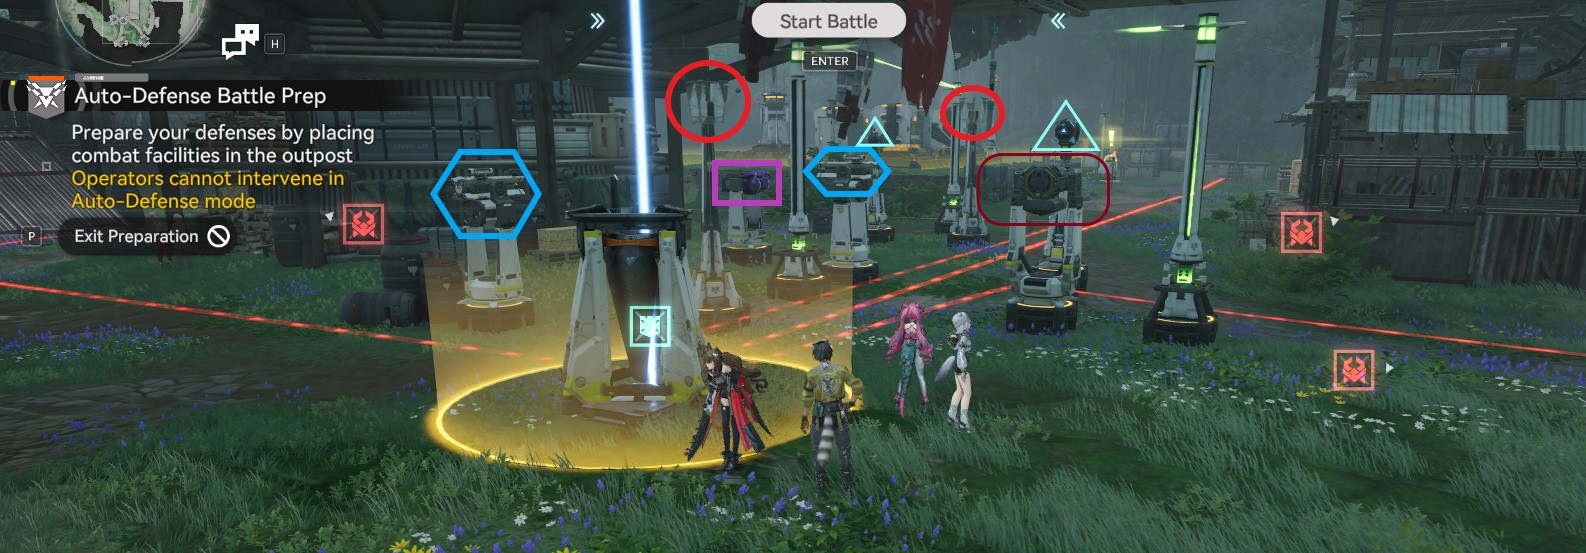
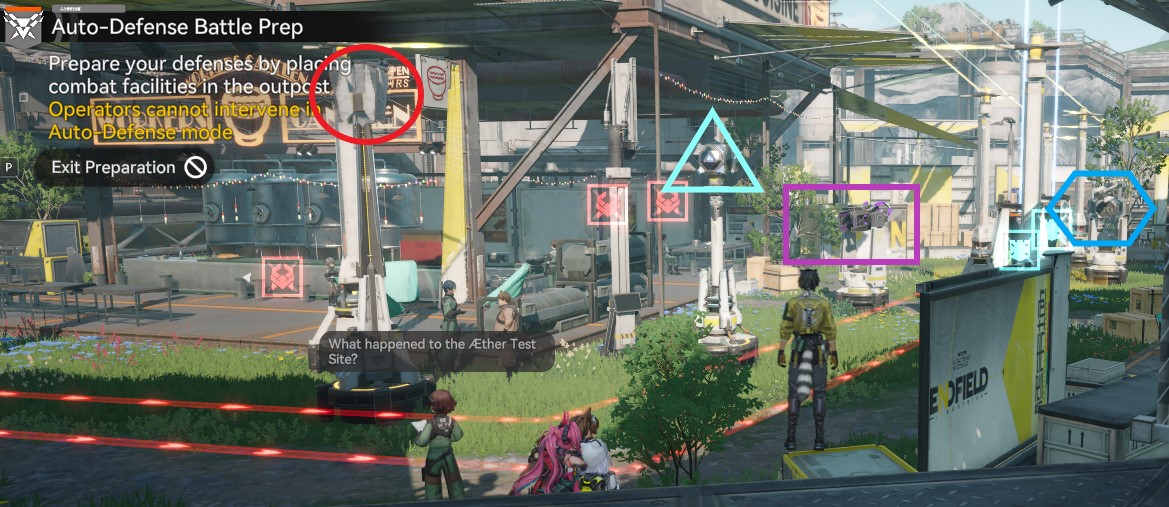
Starting the mission
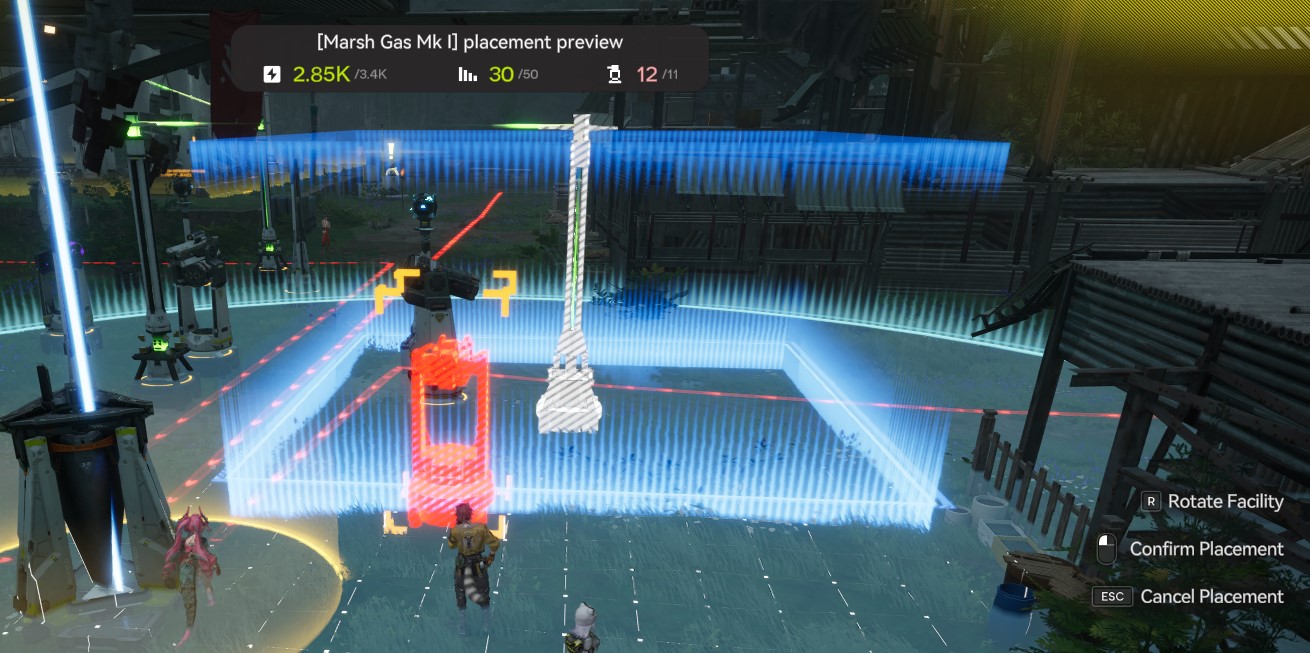
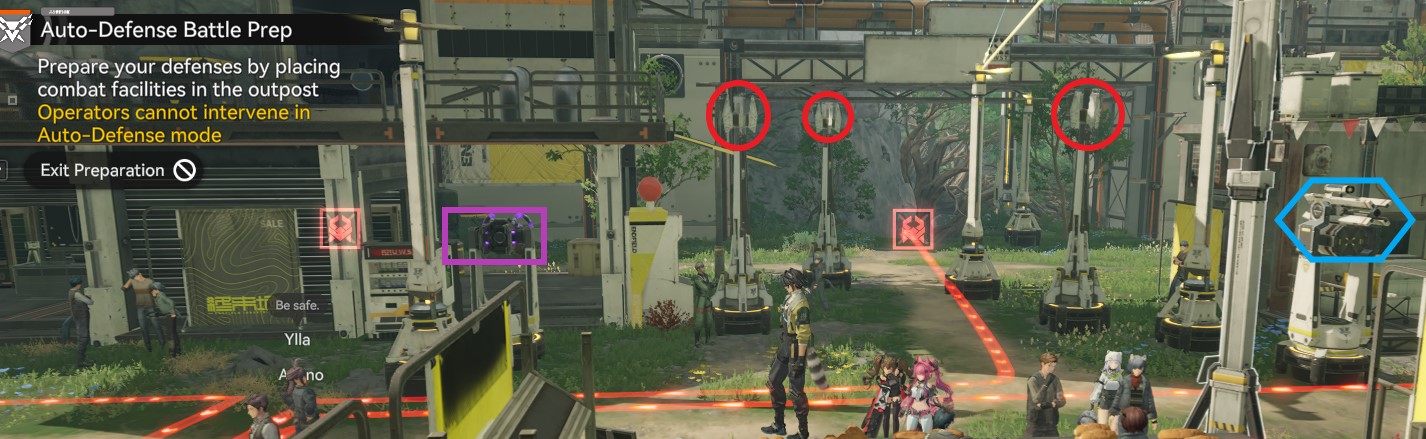
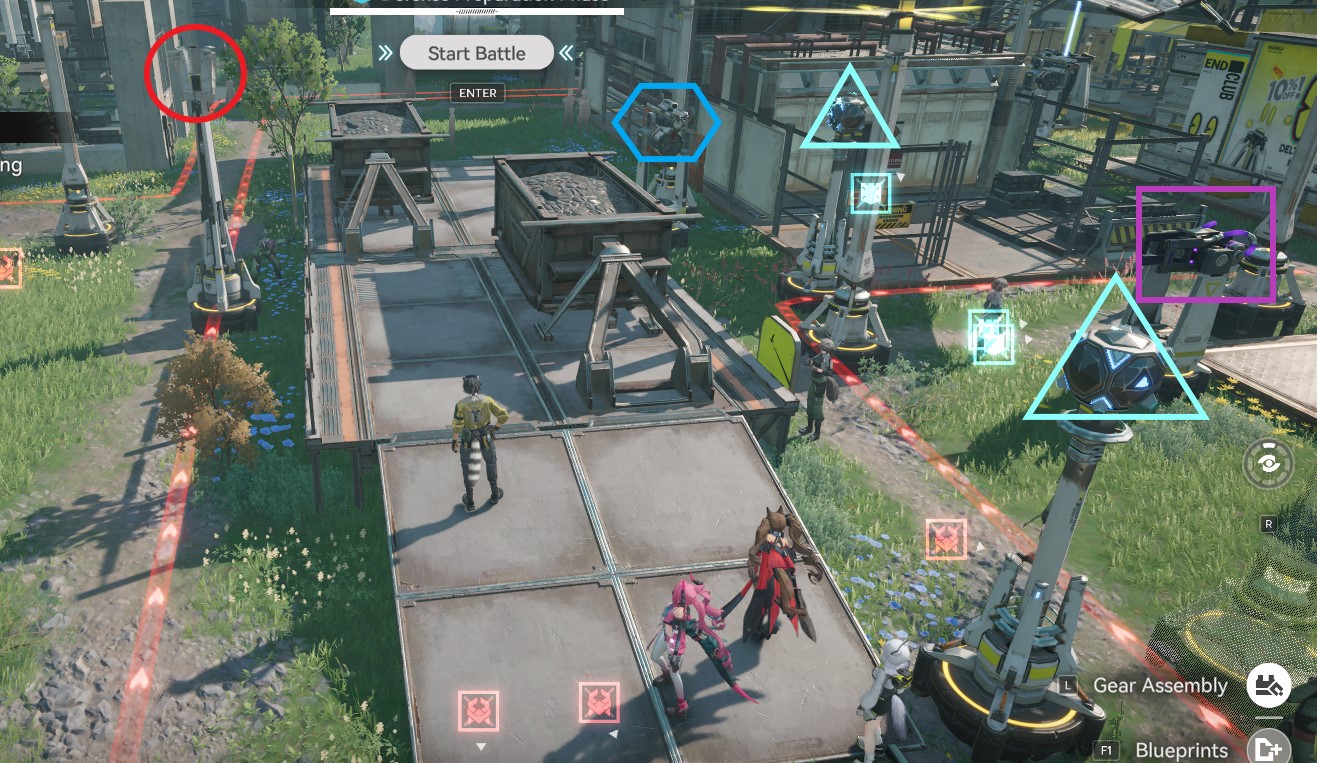
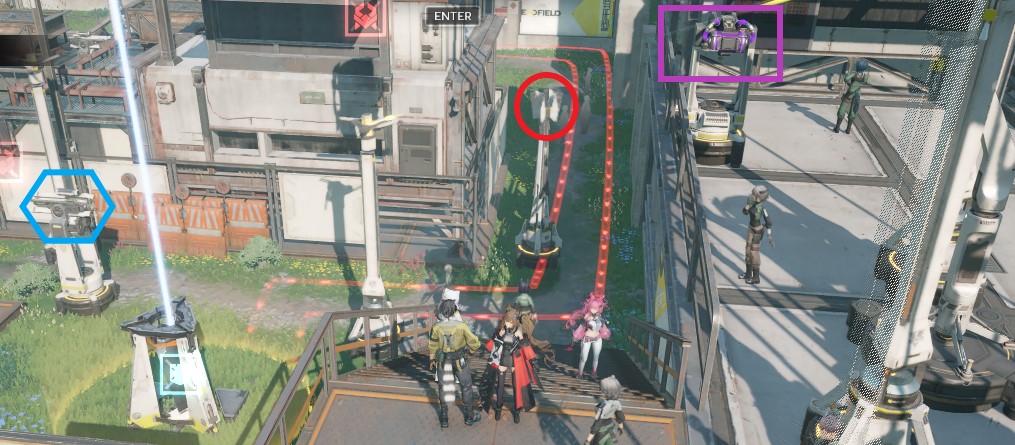
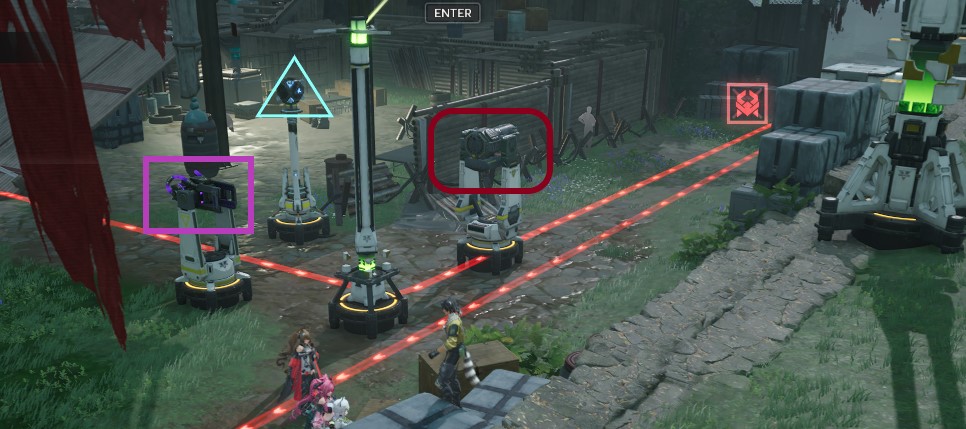
Press "Go to Battle" to enter tower placing mode. Placing towers in the Outpost you defending works exactly the same as placing them in open world. You switch from "Exploration mode" to "AIC mode", open Facility List or use your quick bar, and place the tower of your choice.
Tower placement rules & Limits
Towers must be powered to work, by either placing batteries, or connecting them to the grid with Pylons. And each tower must be at least three tiles away from all other towers in all directions, adding strategic depth to the placement process.
Tower defense missions limits your total towers allowed in Outpost, with the limit increasing for unlocking Auto Battle at each Risk Level. And Risk Levels increasing with Outposts level, with some Outposts having potential to get higher levels and Risk Levels at further updates after 1.0. Tower limits goes to 10 or more.
General Auto Defense Tips
We focus on Auto Defense, since the layouts are the same with Operator Intervention. But intervention is fairly easy to beat, using your team in addition to the Towers. So here's the tips to defeat all enemy waves on auto, regardless of the exact Outpost layout:
Unlocks more power
New Risk Levels often require towers you haven't built—or haven't unlocked yet. Before banging your head against a level:
Check recommended towers in the terminal.
If you're missing them, build what you can. And farm more resources.
If they're locked entirely, progress the main story and explore higher areas, to unlock new AIC plans
Higher-tier towers can brute force earlier levels. Sometimes the best strategy is patience.
Replace, diversify, and alternate — no stacking
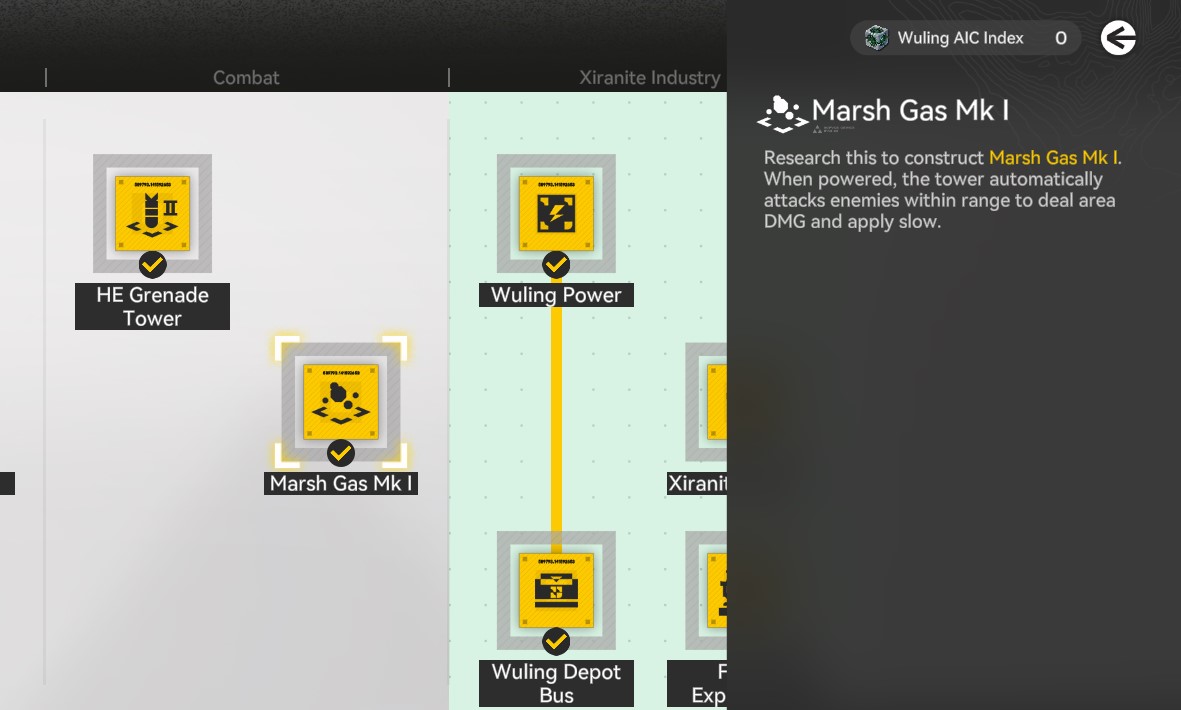
Make sure to remove any older version of the new towers you built, towers slots are limited! Remove LN Towers, to place March Gas MK. Remove Grenade Towers and Gun Towers for HE Grenade Tower. And never use Medical towers.
You have +10 slots at max level, don't use half of them on one type. Place two towers of each purple tier tower. Alternate between different types, to maximize coverage, and avoid overlapping weaknesses.
Control Chokepoints
Find the points where enemy lanes converges, place a tower that slows them (LN Tower, upgraded to March Gas MK), a tower that knocks them back (HE Grenade Tower), and a tower with high AOE (Surge Tower).
Ensure the slowing tower's range never exceed your damage tower. So you don't slow enemies too early and waste duration before they reach kill zone.
Nuke the stragglers and soften the horde
High single target damage towers have long cooldowns, don't waste them. Place them strategically for the situations:
Solo threats: Cover the lane where bigger enemies walk alone.
Cleanup: Nuke stragglers who survive the kill zone.
Pre-emptive strikes: Hit huge packs first, instantly killing some enemies to thin the pack before reaching the main defense.
Beam Tower fits this criteria, with long 8 sec CD, and massive 22k Attack.
Keep the pressure on bosses
Some towers behave as a sniper that target high threat enemy, the Sentry Tower is the prime example. Place it to cover the biggest portion of boss lanes.
The AI will keep picking on bosses and elites even among huge packs. So their shots don't go to waste, and they have massive range to cover multiple lanes.
1. Refugee Camp Outpost - Auto Defense Guide
Location: Valley Pass - Valley IV
Tower limit: [10] at max level
Defense Node Count: [1] across all levels.
Key Strength: Defending one node allow stacking all towers into a massive kill zone. Less strategy required.
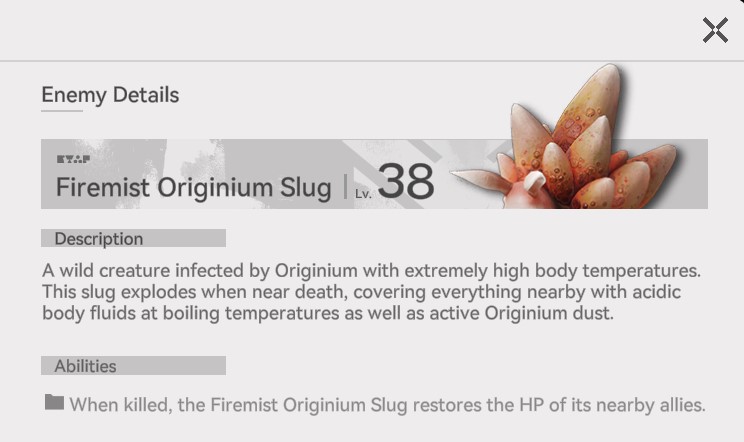
Key challenge: Some enemies enter defensive mode upon hit, requiring more hits to kill. Others frenzy and rush in large, fast-moving groups.
Level-by-level breakdown:
Risk Level 1:
Enemy Count: [21]
Waves: [3]
Max Spawn Points: [1]
Max Enemy Lanes: [1]
Recommended towers: Gun Tower, Grenade Tower
Auto Battle Tower Limit: [4]
This is the tutorial mission, part of the Outpost upgrade quest. The game tells you exactly what towers to use, and forces positioning in the Player Intervention version.
Pro Tip:
Just stack four Gun Towers near enemy spawn point, you don't need to unlock Grenades Towers.
Risk Level 2:
Enemy Count: [37]
Waves: [3]
Max Spawn Points: [1]
Max Enemy Lanes: [3] at 3rd wave.
Far right: Elites.
Middle: Shield troops.
Left: Speedy mob.
Recommended towers: Heavy Gun, LN, Omnidirectional Sonic
Key challenge: Speedy lane leaks, Elite lane detours, and rejoins late.
Layout: The Defensive node position changes entirely. While enemies enter from one spot, they split into three different lanes, then converge into one lane at final few grids. The layout is made to confuse players.
Retrieve all placed towers from Level 1, as old placement won't work here. The spawn point is the same, the lane and pathing isn't.
Build all recommended towers, focusing on the control towers, and the multi hitting towers. Omnidirectional tower stuns enemies, LN tower slows them down, while Heavy Gun towers hits the same enemy several times.
Shield enemies require one extra hit to break their shield
Elites are tanky and need more dps
Speedy enemies need a group stun and slow.
Don't waste a lot of slots on Omnidirectional towers as they do no damage, but place them strategically to setup enemies on the kill zone.
Pro Tips:
Make sure one LN tower hits enemies at same spot your Heavy Gun can shoot, and its range doesn't exceed Gun towers. Then place Omnidirectional towers slightly behind, to stun them once they are out of the slowing ground of LN Tower.
Grenade towers are not bad here, but neither optimal. Enemies are moving in a Single-file. Tight spacing, but small AOE overlap. They may group a bit once they step in LN tower AOE, as first enemy is slowed before second enter. But don't rely heavily on Grenade towers. Or better, omit them from your setup. Unless you managed to get the upgraded HE grenade towers, which deal heavy damage, and knock back smaller enemies, forcing them to group.
Risk Level 3:
Enemy Count: [87]
Waves: [3]
Max Spawn Points: [3]
Max Enemy Lanes: [3] with left lane splitting into two.
Far right: Speedy Mob.
Middle: Boss.
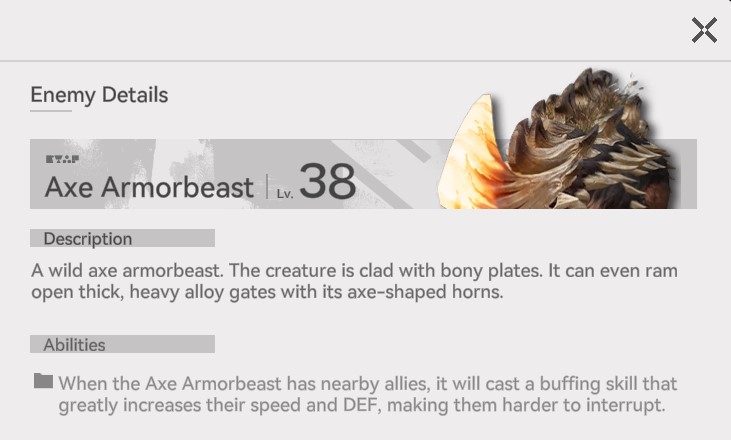
Left: Tanky Mob.
Recommended towers: HE Grenade , March Gas MK, Surge, Beam, Sentry
Key challenge: The boss buff makes enemies so fast and tanky.
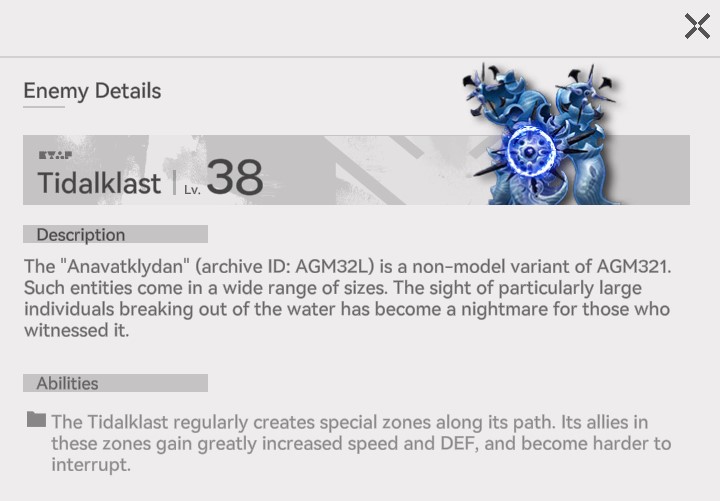
Layout: The Defensive Node position is the same as Risk Level 2, but lanes converge at different points. The boss lane converge with the speedy Mobs lane from the far right. When boss comes near mobs, it buffs their speed and Def. This layout is made to maximize the pressure on the player.
If you placed towers near the Elites lane in level 2, retrieve them now, the path of the right lane has changed.
Your top priority is to prevent boss from buffing the speedy Mobs with Def and even more speed. This is the most lethal thing enemies may do, even if you stack slowing grounds from March Gas MK towers, they will rush between each slow at insane speed.
You might get away with stacking everything in a massive kill zone with all slows and dps at one place when the three lanes converge. But you will suffer leaks and your node will take several hits.
The optimal method is to kill the boss before it comes near the speedy mobs, and be done with it.
Pro Tips:
Frontload three Beam Towers and one Sentry Tower near boss spawn point. Place them strategically so they are closer to the boss, but their max range still touch the mobs lane, so towers switch to mobs after boss die.
The Sentry tower have smart targeting, but the Beam Tower targets by proximity, so they need to always be closer to boss.
Place March Gas MK towers where the lanes converge, and another one in between the first tower and the defense node.
Then place all your AOE towers in same middle area, to create the killing Zone. You have four slots to spread between HE Grenade, and Surge towers.
2. Infra-Station Outpost - Auto Defense Guide
Location: Originium Science Park - Valley IV
Tower limit: [12] at max level
Defense Node Count: [1~3] Varied across levels.
Key Strength: Player has higher tower limit than other Outposts.
Key challenge: Defending two or three nodes across three lanes forces you to spread towers thin. Less room for error.
Level-by-level breakdown:
Risk Level 1:
Enemy Count: [56]
Waves: [3]
Defense Node Count: [2]
Max Spawn Points: [2]
Max Enemy Lanes: [4]
North: 2 lanes, normal troops, agile warbeasts.
South: 2 lanes, shielded troops.
Auto Battle Tower Limit: [8]
Recommended towers: Heavy Gun Tower, LN Tower, Omnidirectional Tower
Key challenge: North lanes doesn't converge with south lanes. Both the shielded enemies and the agile enemies require multi hits to break shield/slow down.
Layout: North lanes splits and converges again, South lanes splits to attack the two nodes.
This is more advanced layout than the previous outpost, and forces player to split their towers. Placing a tower adjacent to the defensive node, might hit stragglers coming from both sides, but it's risky to put defenses far behind. Better to create two separate kill zones, one north, one south.
Place one LN Tower north, and one south, ensure their range doesn't exceed damage towers. Frontload towers in south before lanes split, and backload them in north after the lanes converge.
You may wait before challenging this Auto Defense, until you produce steel parts, and unlock more AIC plans, to create Purple tier towers. Surge Towers will solve most of your problems, because they have low cooldown, chain between enemies, and deal high damage.
Pro Tip:
Use one Omnidirectional Tower against the northern lanes, and none in south. This gives you more room to place damage towers and clear enemies.
There's certain placement in North lane that allow beating the level with only 3 Heavy Gun Towers, and 1 LN Tower, with no Omnidirectional Tower at all.
Risk Level 2:
Enemy Count: [41]
Waves: [2]
Defense Node Count: [2]
Max Spawn Points: [3]
Max Enemy Lanes: [4]
North: Left lane elites, right lane smaller enemies.
South: Elites on both lanes.
Recommended towers: Heavy Gun Tower, LN Tower, Omnidirectional Tower. (Sentry Tower is highly valuable)
Key challenge: Enemy Elites can disable towers!
Layout:
North: lanes splits and converges again.
South: Two separate spawn points, lanes run parallel, then converge.
The two defensive nodes are so far apart, zero chance to overlap defenses.
The northern node closer to the spawn point.
The southern is upstairs in different location.
Strategy:
South:
A good starter is re-positioning your southern towers entirely, so you don't deal with separate lanes.
Put towers upstairs near the defense node, far from elites disabling capability.
Put more towers on the grassy side next to the stairs, not on path leading to the stairs.
North:
Move northern towers up the lane, if you previously had them close to the defense node in level 1.
Place towers towards the right, so elites can't hit him with AOE.
Both: Don't forget to put down more towers, the limit increases on level 2.
Pro Tip:
Always focus on the Elites who can disable your towers. You lose your entire defense in an area for 5 seconds when the Elite hit them in AOE.
If you can build Sentry Tower, it will snipe elites from small mobs, and stun them sometimes. Mix with Surge Tower for easier time instead of solely using classic Heavy Gun towers. LN Towers is a must as always.
Risk Level 3:
Enemy Count: [62]
Waves: [3]
Defense Node Count: [1]
Max Spawn Points: [3]
Max Enemy Lanes: [3]
North & South: A mix between teleporting Elites, frenzied mob, and dense small mob.
Key challenge: All lanes presses on a single node, but from different directions. Enemy Elites teleports forward when hit for the first time, and comes from all directions
Layout:
North: One direct lane.
South: Two separate spawn points, same as before. Though lanes divert to attack the sole defensive node, converges very close to node.
Spread towers along the lanes to reduce pressure on last patch of the lanes, but also prevent leaks.
Frontload Sentry Tower for high single target hit on elites as they spawn. This forces early teleport into your slow/kill zone, so you bring them down before lanes part ways.
Mix Surge Tower, and Beam Tower in the kill zone, as smaller enemies come in dense waves.
Take advantage of the range of purple tier towers, they can cover the two southern lanes at same time. And waves mostly alternate between the two lanes.
North:
Enemy lane is dense here, you can put all towers together for massive slow and skill zone.
Frontload one Sentry Tower similar to south.
Feel free to pull your damage towers back closer to the Defense Node. Towers with high range may help clear stragglers coming from south as well!
Pro Tip:
Place LN towers further back, so it doesn't target elites on sight. You need Elites to take a hit, and finish teleporting, before LN tower slows them.
If this stage proves too challenging, wait until you unlock Wuling AIC Factory plans, and construct March Gas MK Towers instead of LN. This will resolve any issue.
Risk Level 4:
Enemy Count: [108]
Waves: [2]
Defense Node Count: [3]
Max Spawn Points: [4]
Max Enemy Lanes: [4]
North: Boss & Fast mobs.
South: Warbeasts, teleporting Elites, elites that disable towers, frenzied troops, and normal mob,
Recommended towers: Sentry, Beam, Surge, March Gas MK, HE Grenade
Key challenge: Boss buff enemies speed. Elites disable towers. Other Elites teleport on being hit. Lanes and nodes are split. So several layers of challenges.
Layout:
North: One spawn point, with one lane.
South: Massive three spawn points. Two parallel lanes, each one attack different node. Third lane's very close to Node, and converges with bottom lane to attack the same node.
Strategy:
First South Node & parallel lanes:
Frontload a Surge Tower to cover the two parallel lanes, and AOE enemies as much as possible from early on, reducing pressure on later towers. This will be the tower the Elites disable, but don't panic, the heavy hitter towers will survive and nuke them.
Behind it, place March Gas MK tower, with its range covering back up to the first defense node, and up a decent portion of the two parallel lanes. (Don't waste it on the shorter third lane, you will see why)
Further behind, exactly at the first lane turn point, place a Surge Tower, covering only the lane turning towards the first node. This one will do the heavy lifting on this lane.
Finally, put down a Sentry tower with its range touching the first node, while also covering huge portion of second parallel lane, on top of reaching the shortest lane (The one attacking the second southern node). In other words, have this Sentry Tower defend against three lanes.
Second South Node & shortest lane:
Frontload Beam Tower at the turning point of shortest lane, touching the spawn point. While also covering the bottom lane of the parallel lanes. It shall one-shot the teleporting Elites when they attack from bottom lane at wave 3.
Utilize a Sentry Tower as a last line of Defense, placing strategically between the two southern nodes. Not on the exact path of any lane, but have its range touches all lanes. Its main role is to defend the shortest lane, but also assist on other lanes when it's not busy. It will start firing surprisingly early, and keep firing at any Elites coming from any direction. If no Elite is around, it will shoot stragglers and stun them.
Put March Gas MK tower up the stairs, to slow enemies in the final rush towards the node.
Complete the defense with another Beam tower, placed on the narrow path leading to the node, so it doesn't stray and hit any other lane. (Avoid wasting the long cooldown on irrelevant enemies)
North:
We use 4 towers for northern lane, where the boss comes from. This boss buff allies and speed them up, so we have to nuke them hard before they get out of slow.
Frontload Beam Tower, followed by Surge Tower. Both close to the Early Warning Terminal.
Behind them, March Gas MK Tower to slow enemies after the first hit.
Finally place Sentry Tower behind the node itself. So it also overlap with the first southern node, and become the final line of defense for them.
Pro Tip:
Our setup skips using HE Grenade Towers entirely, to condense all other types. Focusing on heavy hitting and chaining attacks instead. This proved to give easier time, but it's not the only strategy to beat this level.
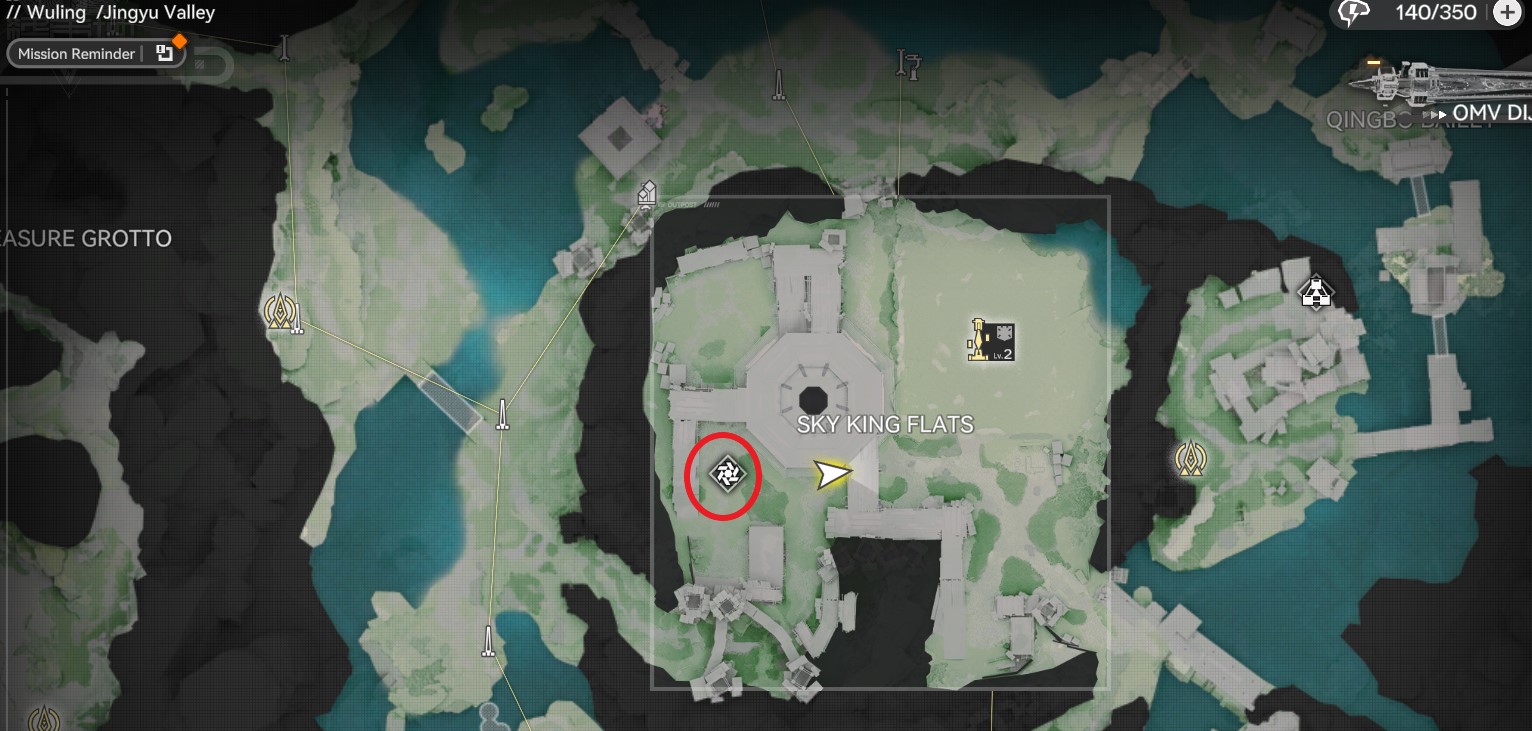
3. Sky King Flats Construction Site - Auto Defense Guide
Location: Jingyu Valley - Wuling
Tower limit: [11] at max level
Defense Node Count: [1~2] Varied across levels.
Key Strength: Very good chokepoints positions, with wide area around, to condense defenses with a lot of towers. Some tower positions may cover all enemy lanes.
Key challenge: Some enemies gain high speed, or let other enemies gain speed.
Level-by-level breakdown:
Risk Level 1:
Enemy Count: [85]
Waves: [3]
Defense Node Count: [2]
Max Spawn Points: [2]
Max Enemy Lanes: [4]
North & South: A mix of Speedy Elites, and enemies that heal other enemies, and normal Mob.
Recommended towers: Sentry, Beam, Surge, LN , and Omnidirectional Towers.
Key challenge: When you defeat some enemies, they heals others. Elites curl up into a fast moving ball. One lane in the south spawn near the defense node, merging with enemies from other lanes, that works as a divergence for your towers, allowing some leaks among the chaos.
Layout: Two lanes coming from northern spawn point, they split to attack each node. Each split converges with the lanes from south.
Strategy:
South:
Frontload a Surge Tower and a HE Grenade Tower towards the spawn point, to kill small enemies before they reach the chokepoint. So they don't confuse your Beam Tower.
Place two Beam Tower behind the first turn in southern spawn point. Each one towards different node, so they only hit the Elites that survive the AOE.
Support your Beam Tower with a Sentry Towers. Its range is massive, so it hit Elites coming from all lanes
Place one March Gas MK Tower further behind, so its range overlap with the Surge Tower range. While also reaching the two lanes coming from north to work as emergency backup.
North:
Similar to South, we Frontload a Surge Tower and a HE Grenade Tower towards the spawn point.
Support with March Gas MK Tower to slow enemies to clear all small enemies before lanes split.
Some Elites will survive with low HP, but Beam towers and Sentry Towers in the south shall finish them before reaching nodes.
Pro Tip:
Sentry Towers hitting small enemies will cause some to die before others, effectively triggering their healing. But between slow from March Gas MK, knock back from HE Grenade, and constant AOE from Surge, you shall finish their waves before the split/turning point, even through healing.
Focus on placement of Beam Towers instead, to finish Elites the moment they come in range.
Risk Level 2:
Enemy Count: [87]
Waves: [3]
Defense Node Count: [1]
Max Spawn Points: [3]
Max Enemy Lanes: [5]
North & South: A mix of Bosses that put ground buff that boost speed and Def of other enemies, Elites that curl up and to be fast, and small Mob.
Recommended towers: Sentry, Beam, Surge, LN , and Omnidirectional Towers.
Key challenge: One lane in the south extremely close to the defense node, and if there's enemies from other lanes, they divert your towers and might cause leaks.
Layout: Two lanes coming from northern spawn point, they split to attack the defense node from different direction. One lane from each southern spawn point, converging to attack the node from same direction.
Strategy:
We use exactly the same setup from level 1, but add more towers up to the limit (11).
South:
Keep the 1x Surge Tower, 1x HE Grenade Tower, 2x Beam Towers, and 1x March Gas MK Tower at their prior position.
Add one more Sentry Tower close to the node, so it hit any Straggler Elites coming from any lane.
Add one more Surge Tower further ahead towards the point where north and southeast lanes converges. To thin out small enemies before the Beam Tower.
North:
Keep the same three towers from before.
Pro Tip:
The bosses comes from north and southeast, and they place areas on the ground that speed up mobs and give them Def. On north it's not a problem, since small mobs rarely survive anyway. On southwest, the lane is very short, but we finish small enemies before they reach any boss range.
That leaves the boss with its small mobs from southeast, where we exploit the speed difference between boss and mob. The boss is slow, and we don't frontload the towers, so mobs rush ahead of boss, out of its buff zones quickly. Then they enter the killing zone on their own, with boss trailing behind. Our towers finish them, before boss catches up.