Learn about the Base System in Arknights: Endfield, how to progress, Blueprints, endgame setups and more.
Endfield Arknights: Endfield Base Guides
Blueprint Guidance
Check out our Blueprint Progression Guide from start to finish
Base Guide Overview
Automating the production of your resources is vital for Arknights: Endfield, as it allows you to create Gear for your operators, utility items for combat, and items to trade for Stock Bills in outposts.
This can be overwhelming for new players, as you unlock a lot of game systems back to back while progressing through the game, making it hard to fully comprehend some of the game mechanics. Learn everything that you need to kickstart your base building and start earning your Stock Bills.
What are Stock Bills
Stock Bill is a currency used to upgrade many game features, craft Gear, or even buy items in a rotating shop. These items include Promotion Materials, Gifts for other operators (to increase their trust level), T-Credits, Pulls and much more.
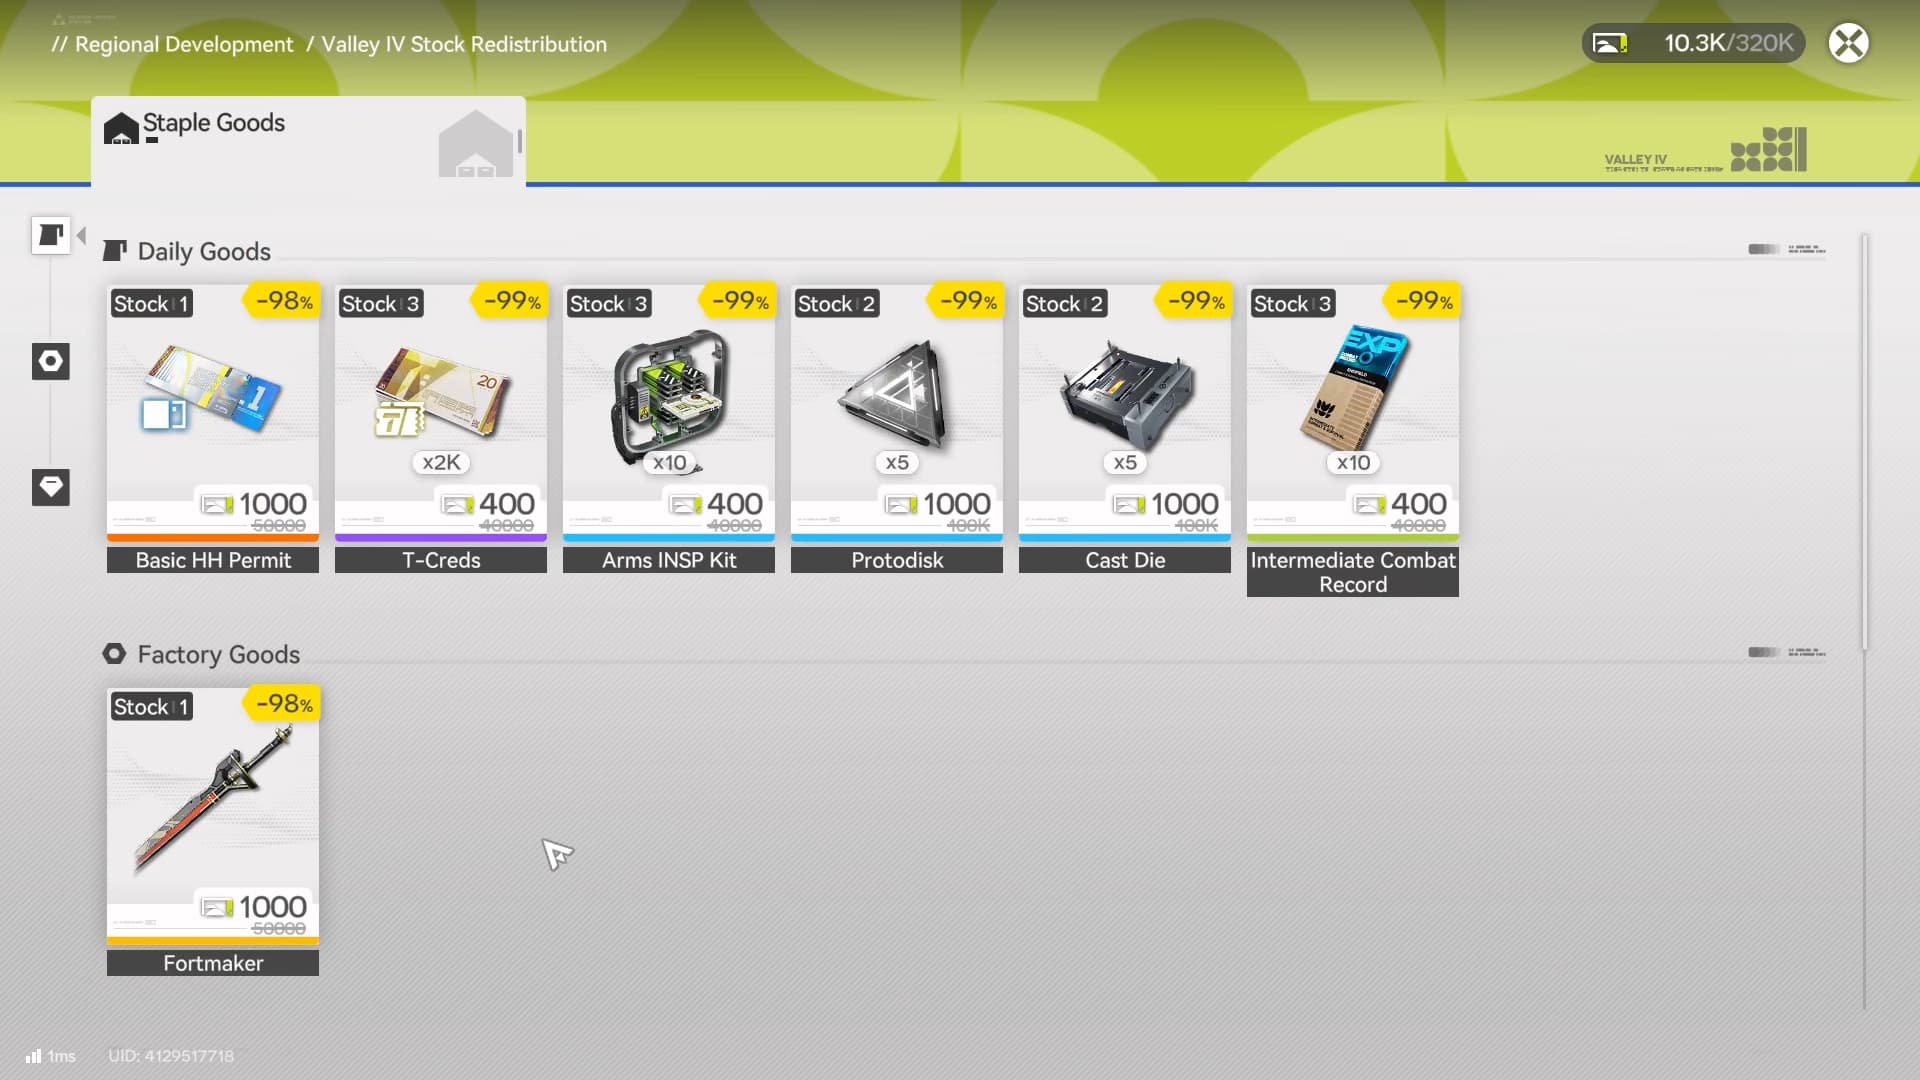
There are many other uses for these Stock Bills, and it’s important to keep generating them and use them to unlock upgrades, as this increases the Regional Development Level, which further increases your Stock Bill cap, mineral efficiency and unlock new features for the region.
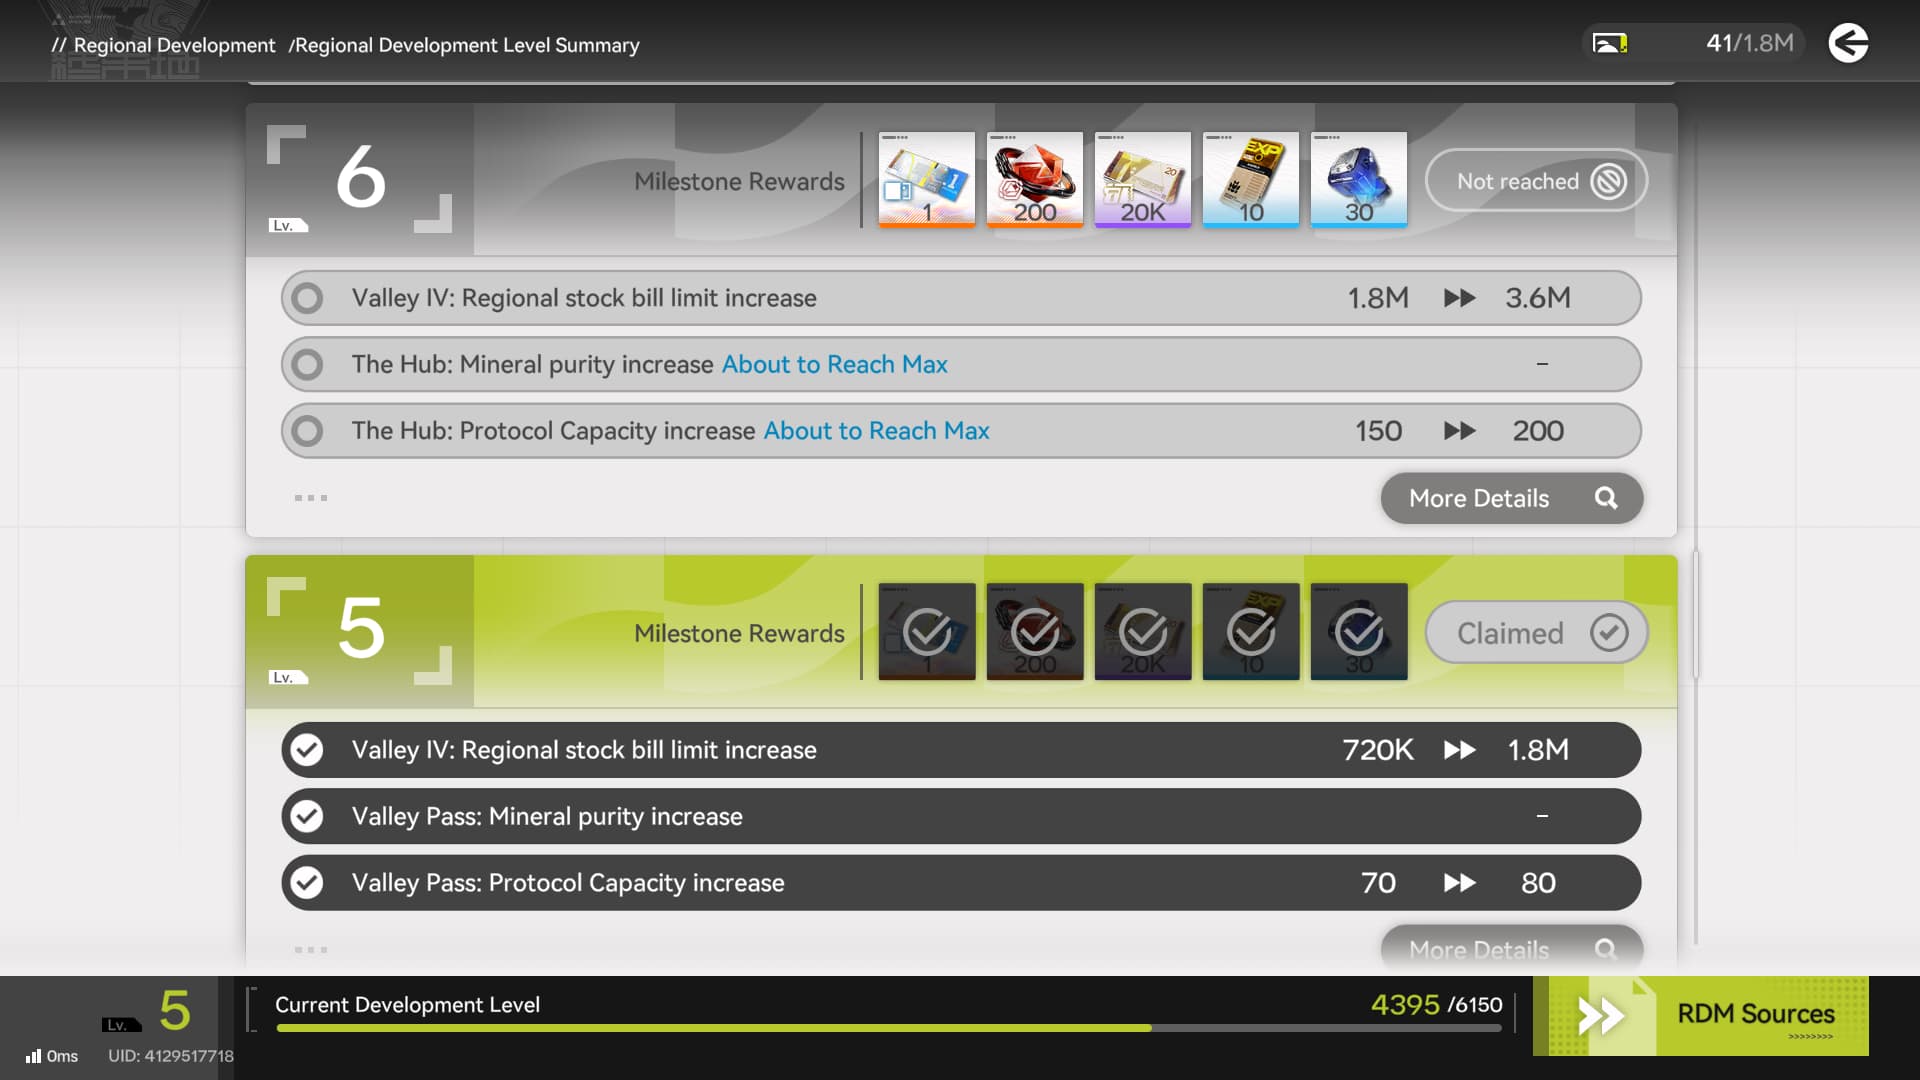
As you explore new regions, you'll be able to develop those Regions by sending them materials. You'll get Stock Bills in return, so it's important to start manufacturing items to send to new regions.
The AIC
The AIC, or Automated Industry Complex, is the Factory or "Base" you will use in order to automate the procurement and production/refinement of items.
Automating the production of one thing is not complicated, the issue begins when trying to automate complex items, as they require multiple facilities and materials before achieving the desired product.
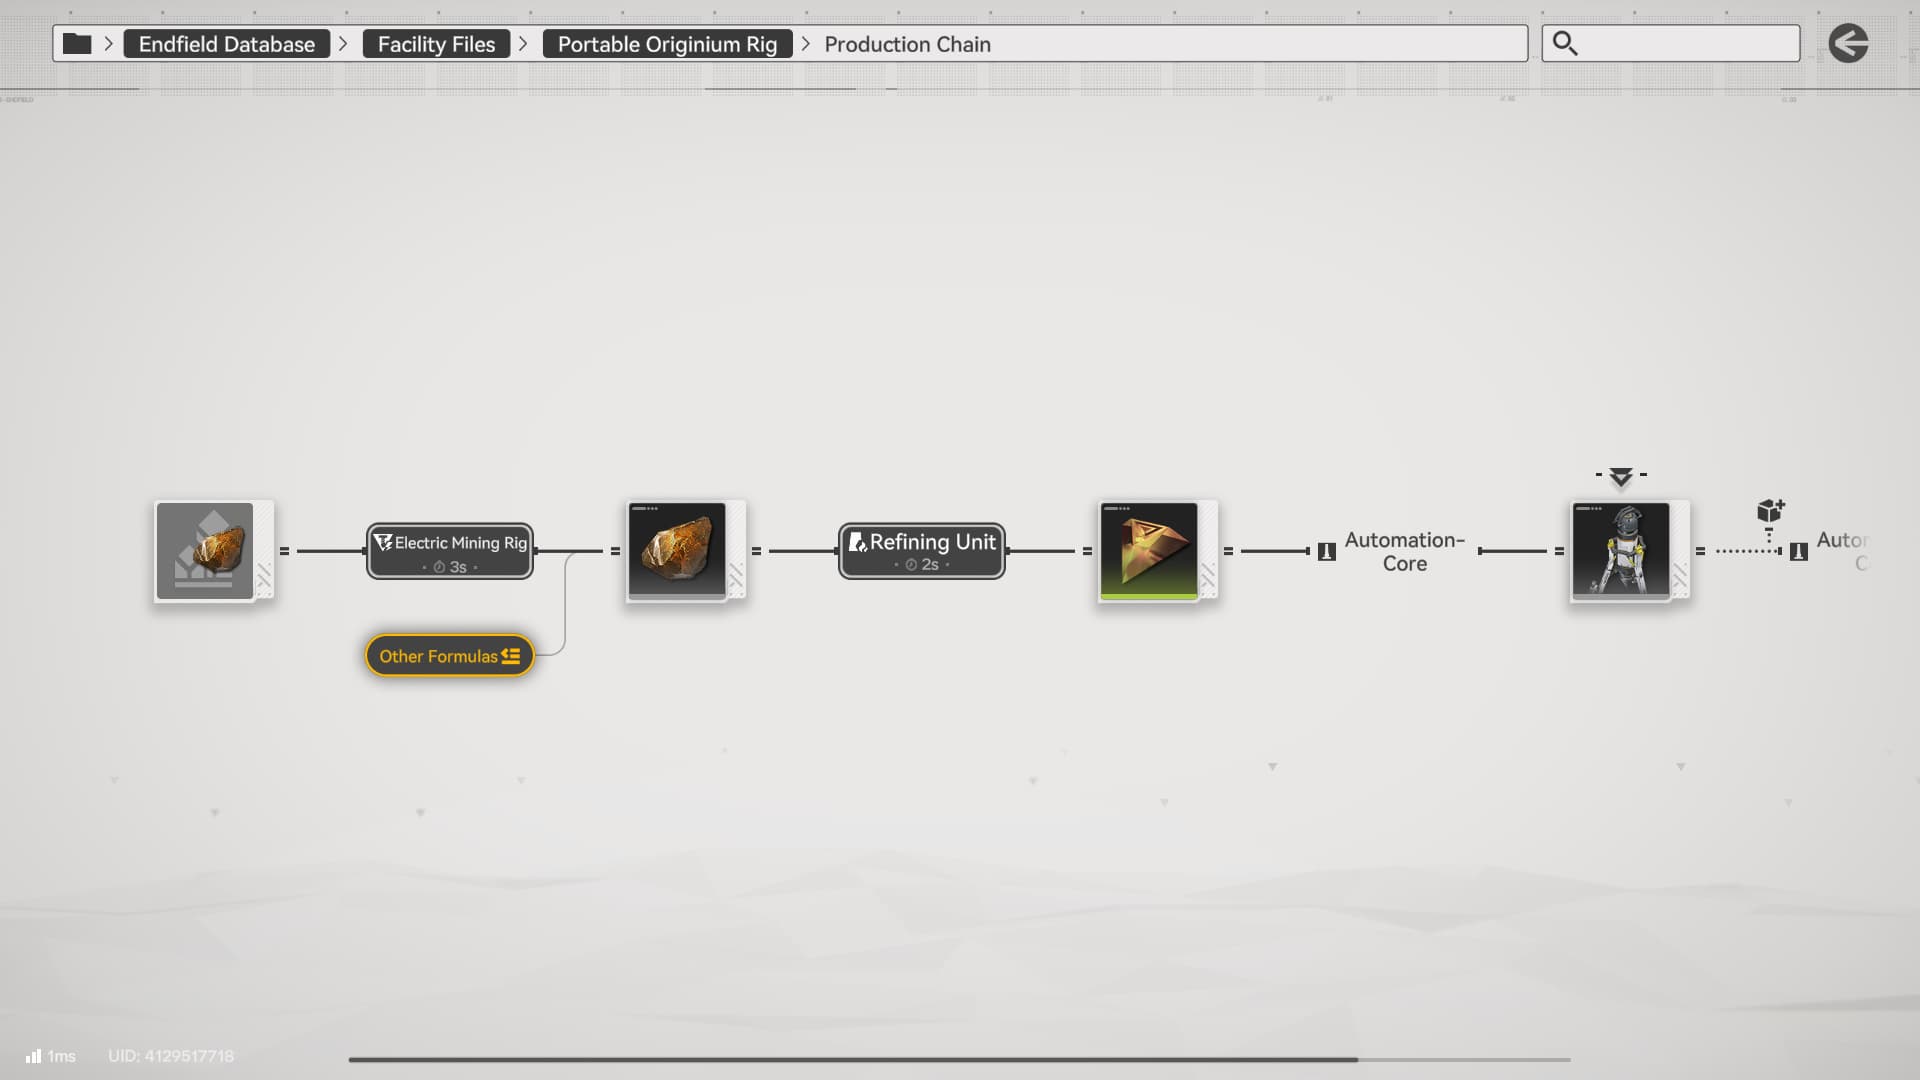
This image outlines the process from mining Originium Ore to Refining it to Origocrust
For example, while playing the Main Story, you might have come across simple setups like this:
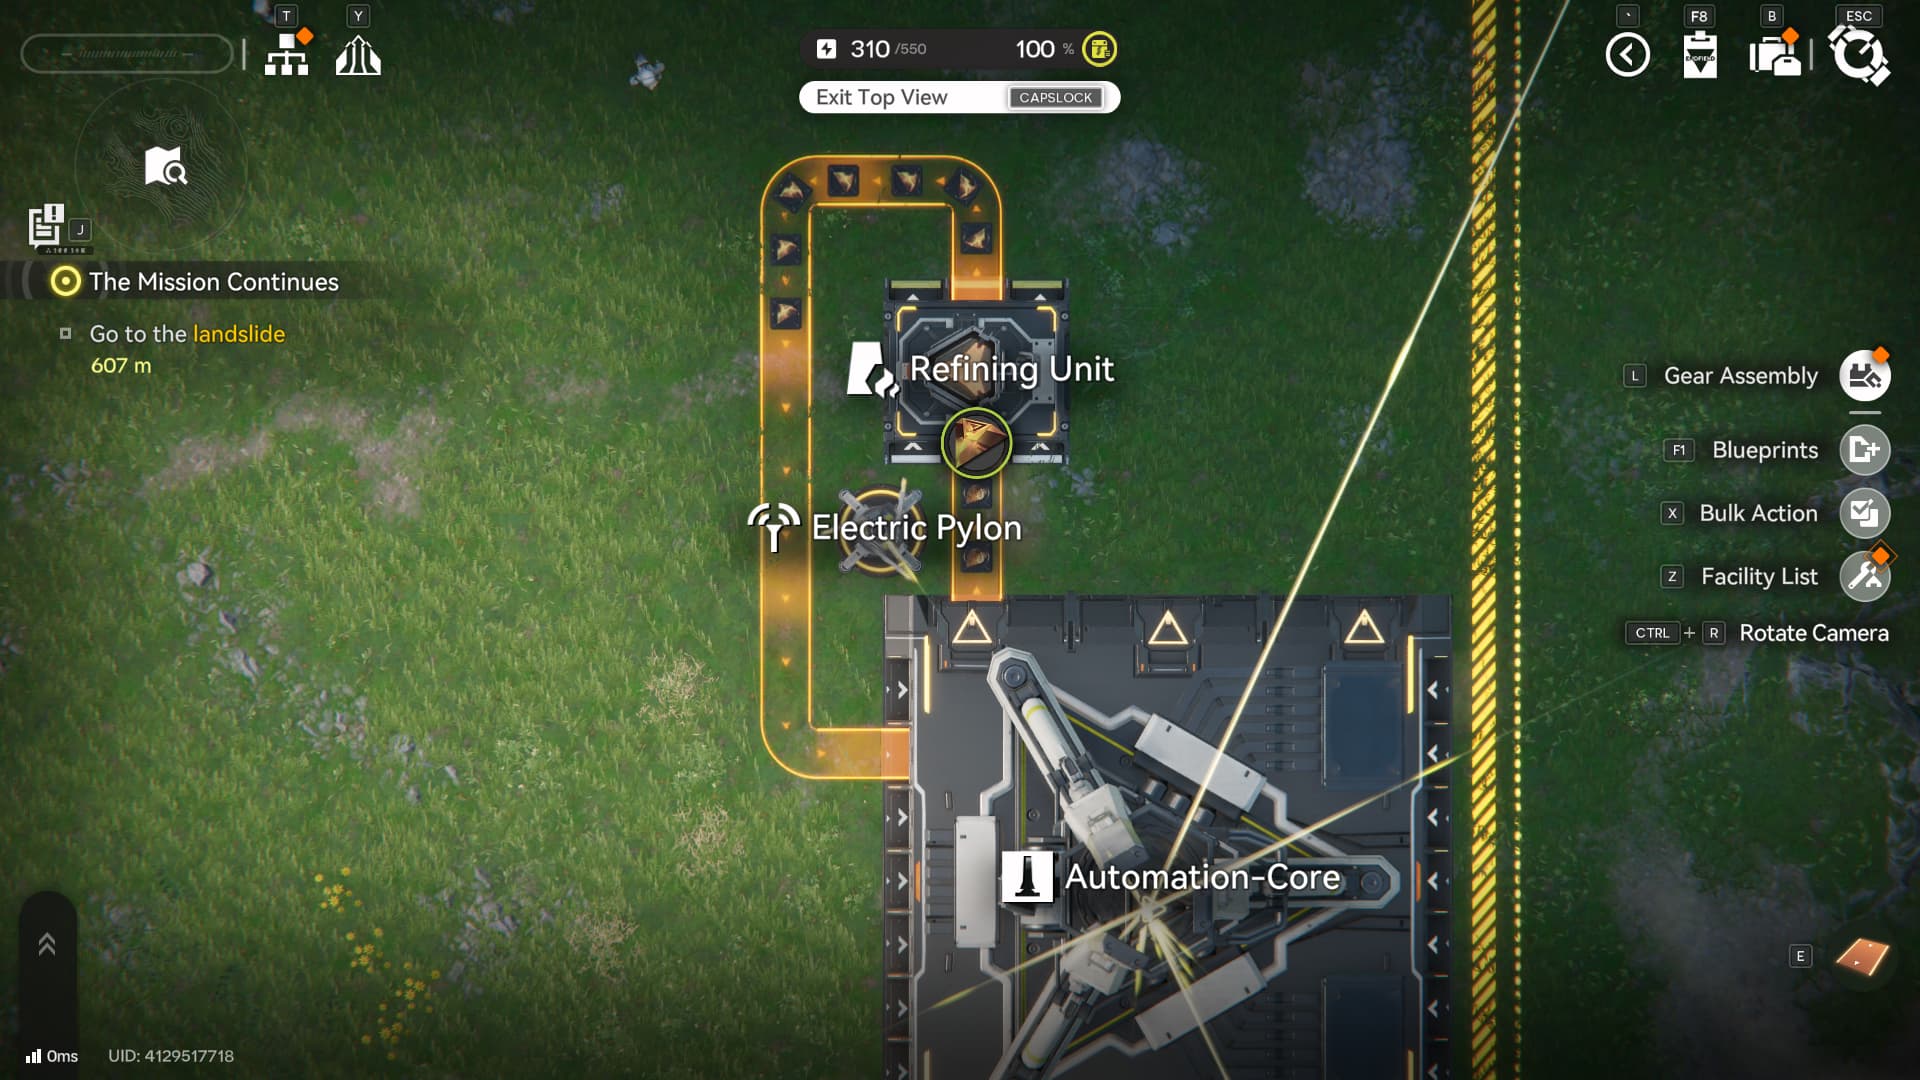
This is a basic processing for Originium Ore, by inserting Originium Ore in a Refining Unit, you get Origocrust which can be used to craft many facilities in the game. By automating this process, you can craft facilities whenever needed, since you’ll always have Origocrust available in your AIC Depot.
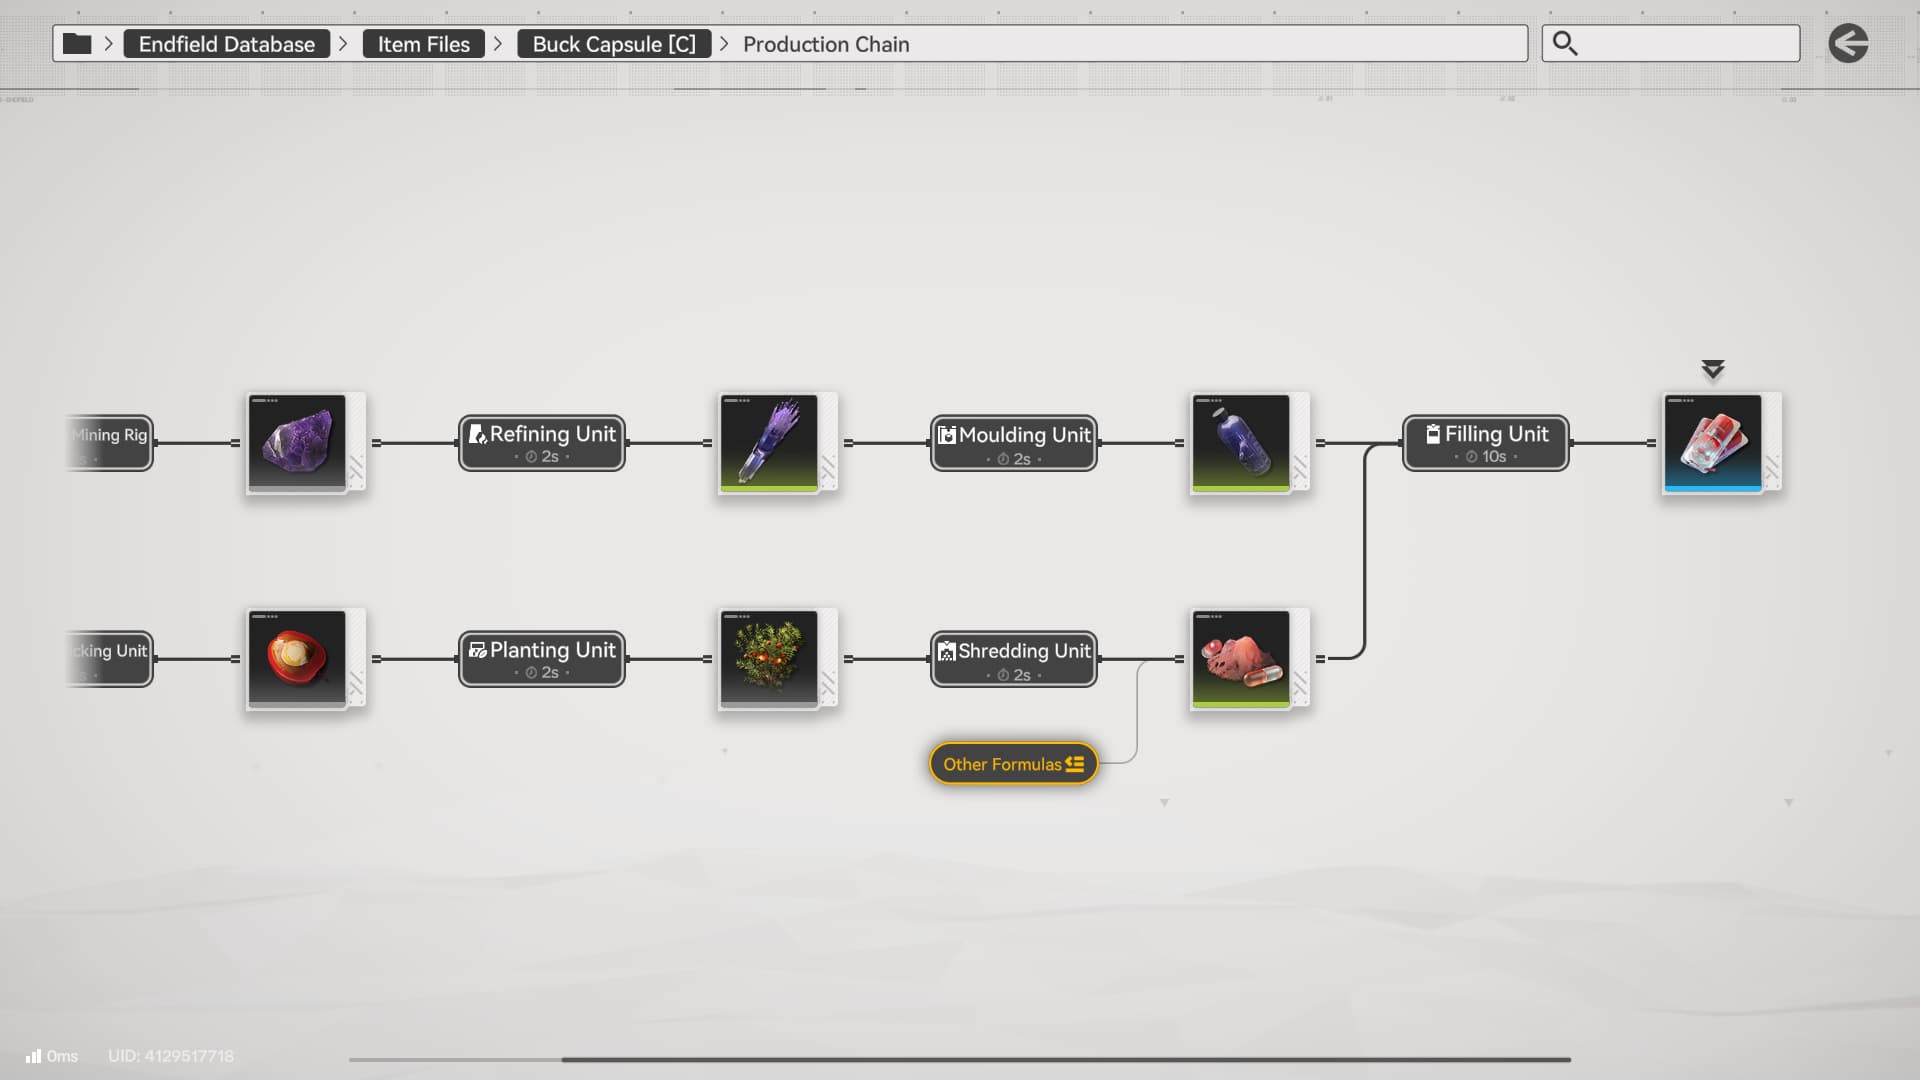
Buck Capsule (C) Formula
The more processed materials you require, the more production lines you’ll need. The example below is one of the items you should focus on producing in order to speed up your outpost development, but it also doubles down as a tactical healing item for your operators!
The Tech Tree
Even though you unlock it early in the Main Story, it’s recommended to wait until finishing the first act of chapter I before interacting with the factory system. That’s because only after this point in the story you will get access to the “Tech Tree”, which unlocks new facilities and upgrades for your production lines.
Dataloggers
To unlock new technologies, you need some Basic AIC Index, which you obtain by interacting with Protocol Dataloggers. They are scattered through the map, and you can use your world map to find them.
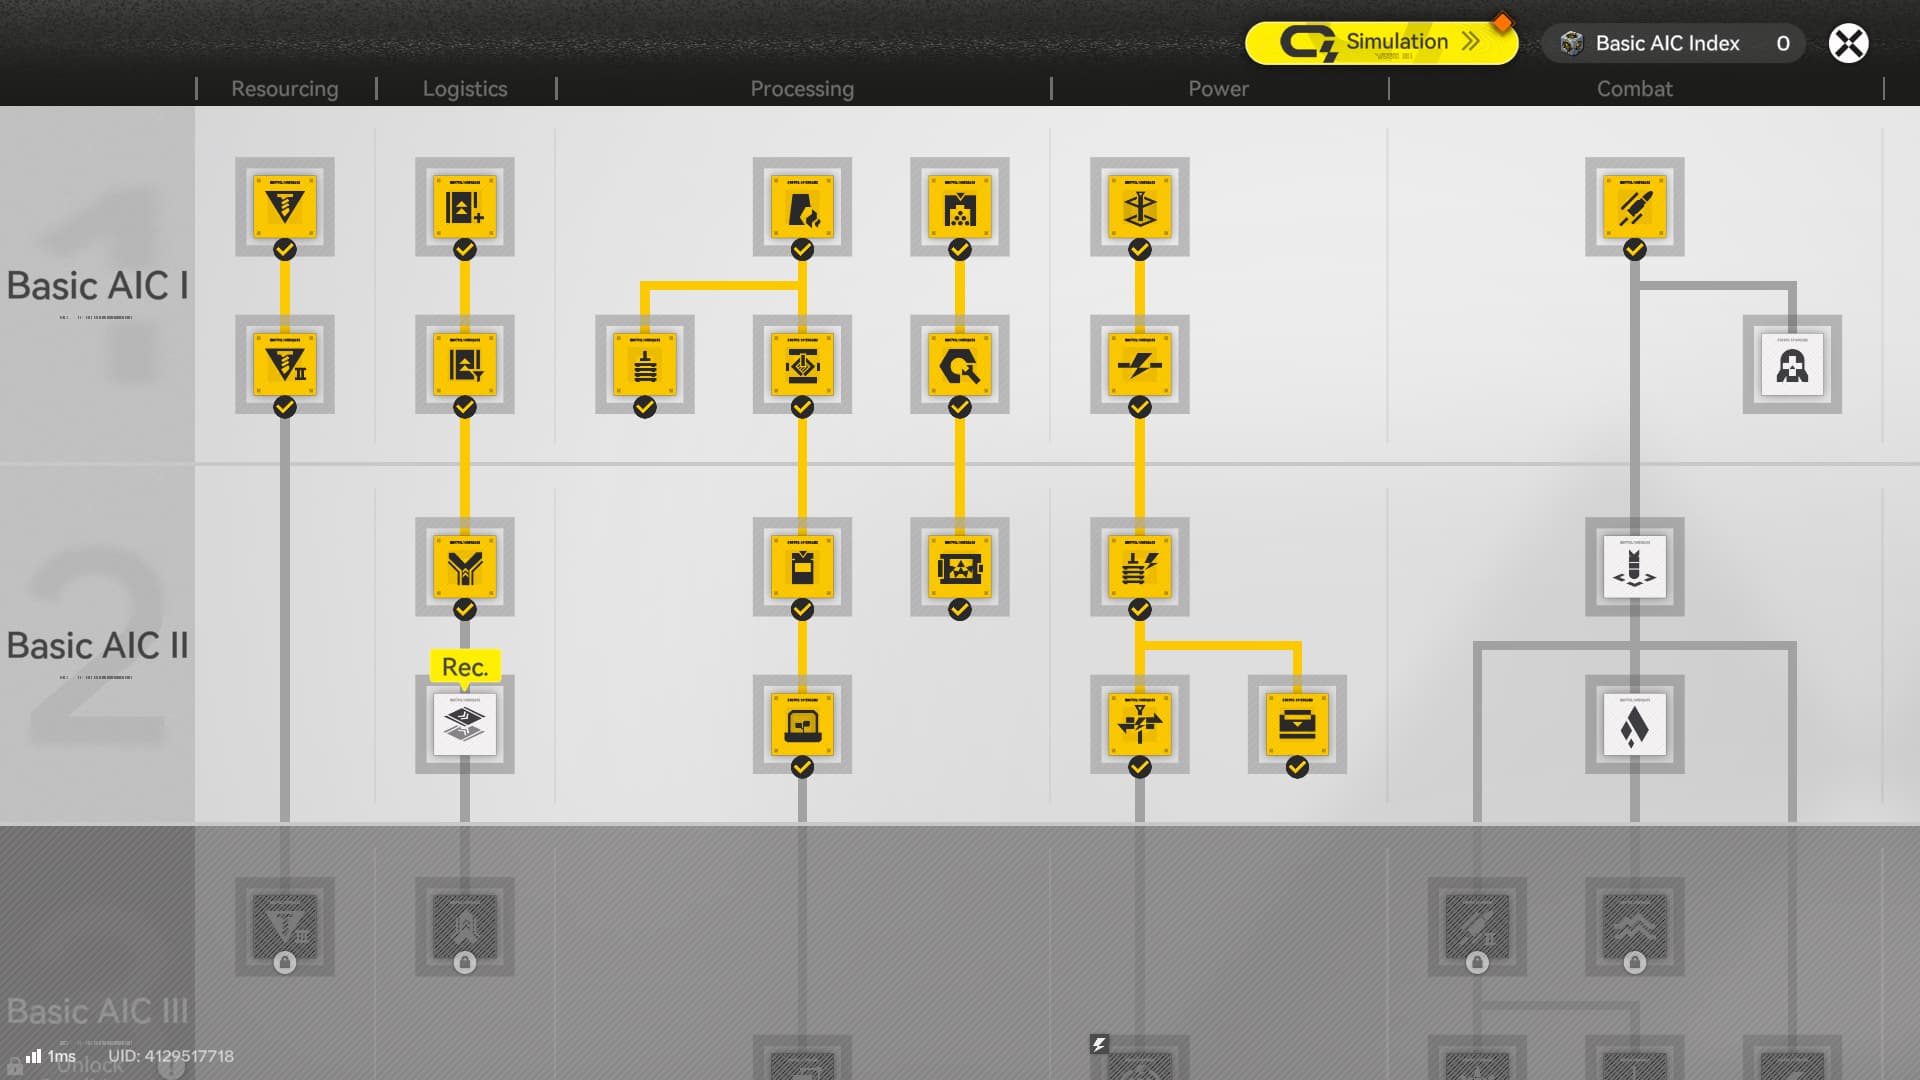
Tech Tree Progression
As part of your main quest, you will be asked to unlock:
Mining II and Gearing Tech
The first node allows you to automate the mining aspect of the game, removing the need to collect minerals and using electric mining rigs that will automatically deliver the minerals to your AIC Storage. The second node is required to craft Components, a material used to craft gears for your operators.
While there is no specific priority for unlocks, it’s recommended to unlock the following nodes as soon as possible:
- Material Moulding (Required to unlock “Planting”)
- Parts Fitting (Required to unlock “Packaging Tech”)
- Field Stash (Not required, but adds a great QoL to your factory)
After progressing in the main story and unlocking the second row (Basic AIC II), prioritize the following nodes:
- Power I (Important to sustain more facilities as your factory grows)
- Solid Filling (Required to unlock “Planting”)
- Planting (Allows farming plants in your factory, removing the need to explore the map for a limited quantity of plants)
- Packaging Tech (Automates crafting Industrial Explosives and Batteries)
These nodes give you access to the first important production lines in your factory, as you will need these items to further grow your factory and craft efficient items for the first outposts you will unlock.
Plant Farm
Self-Sustaining Plant Farm
EFO0172UA40A7I55O0Ai (America)
EFO017i89ao19O55O0Ai (JP)
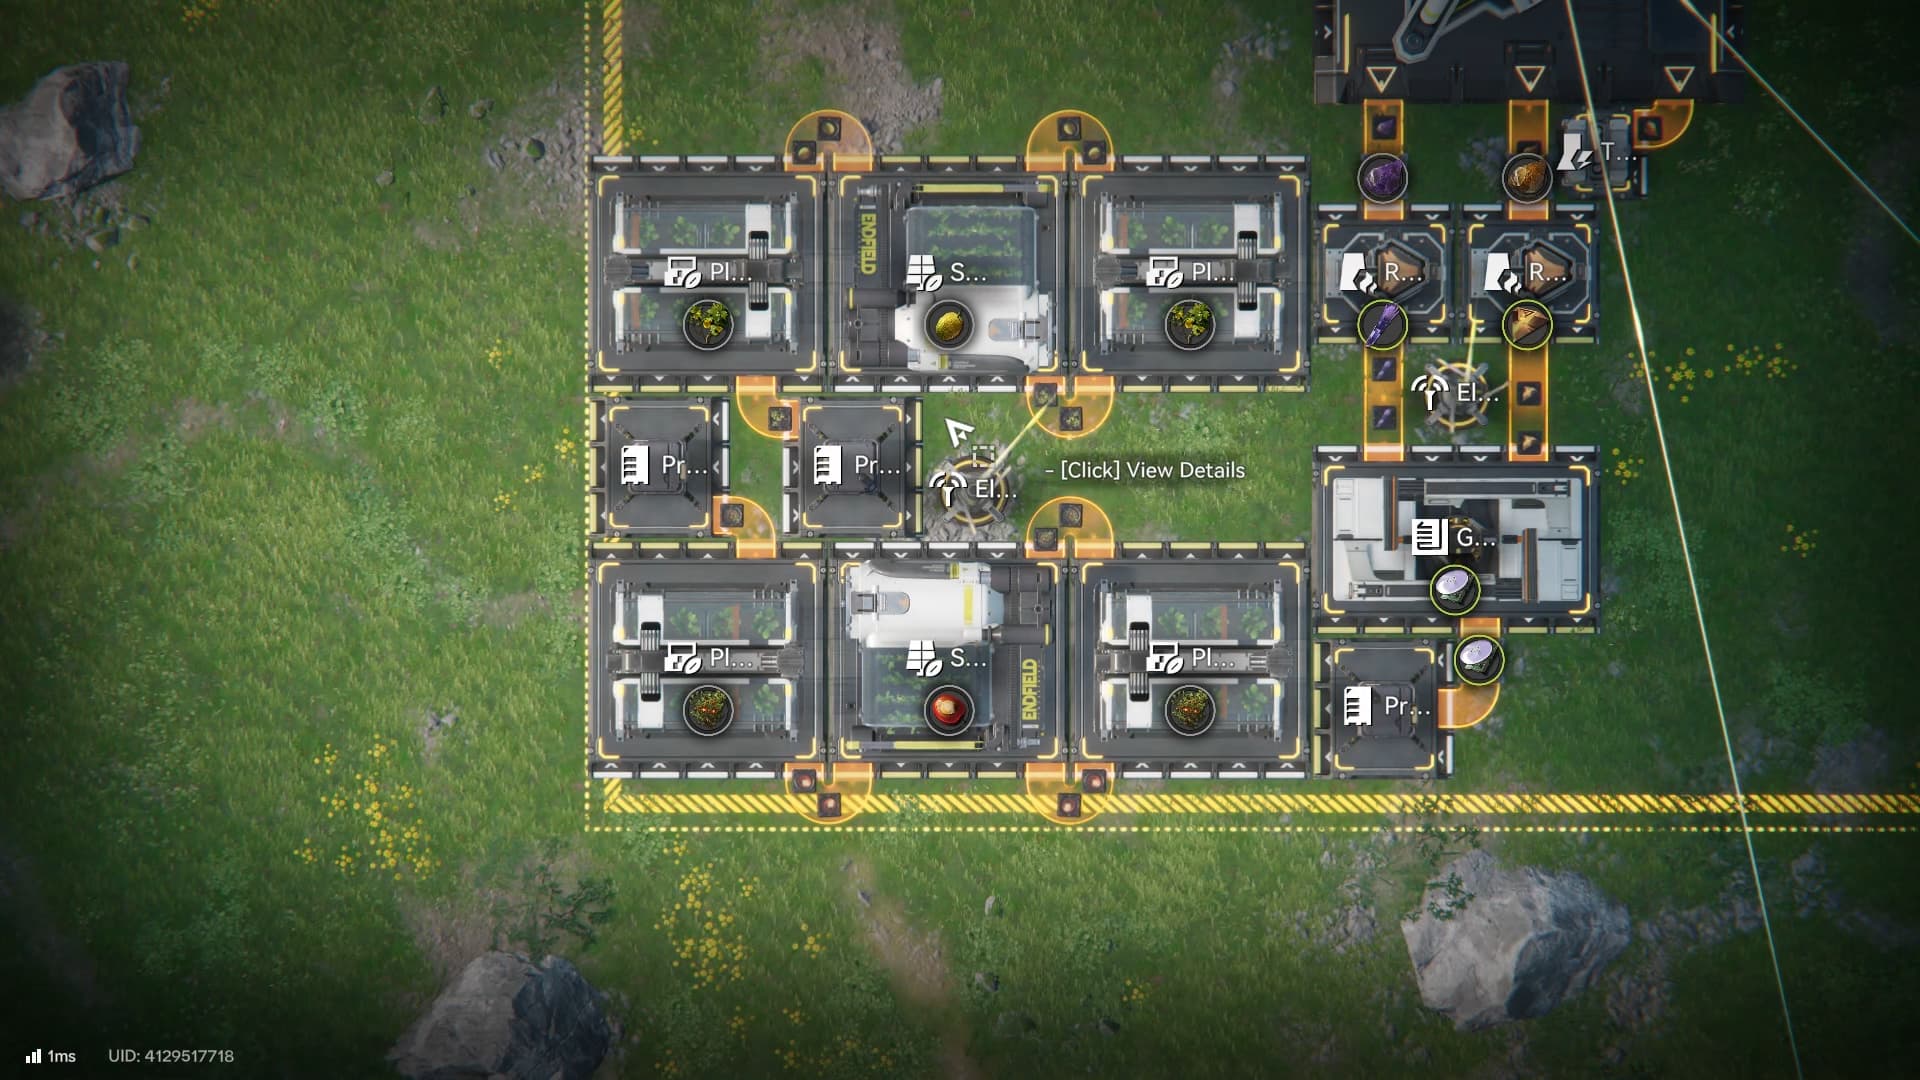
Remember the Buck Capsule [C] Recipe we talked about? It’s time to put some of the tech you unlocked into practice and start crafting it. The above layout is a self-sustainable plant farm. It uses 2 Planting Units for 1 Seed Picking Unit, this allows you to produce plants for the Seed Picking Unit while still producing extra plants that go back to your AIC Depot through the Protocol Stashes.
If you want to, you can copy this by using the above Blueprint.
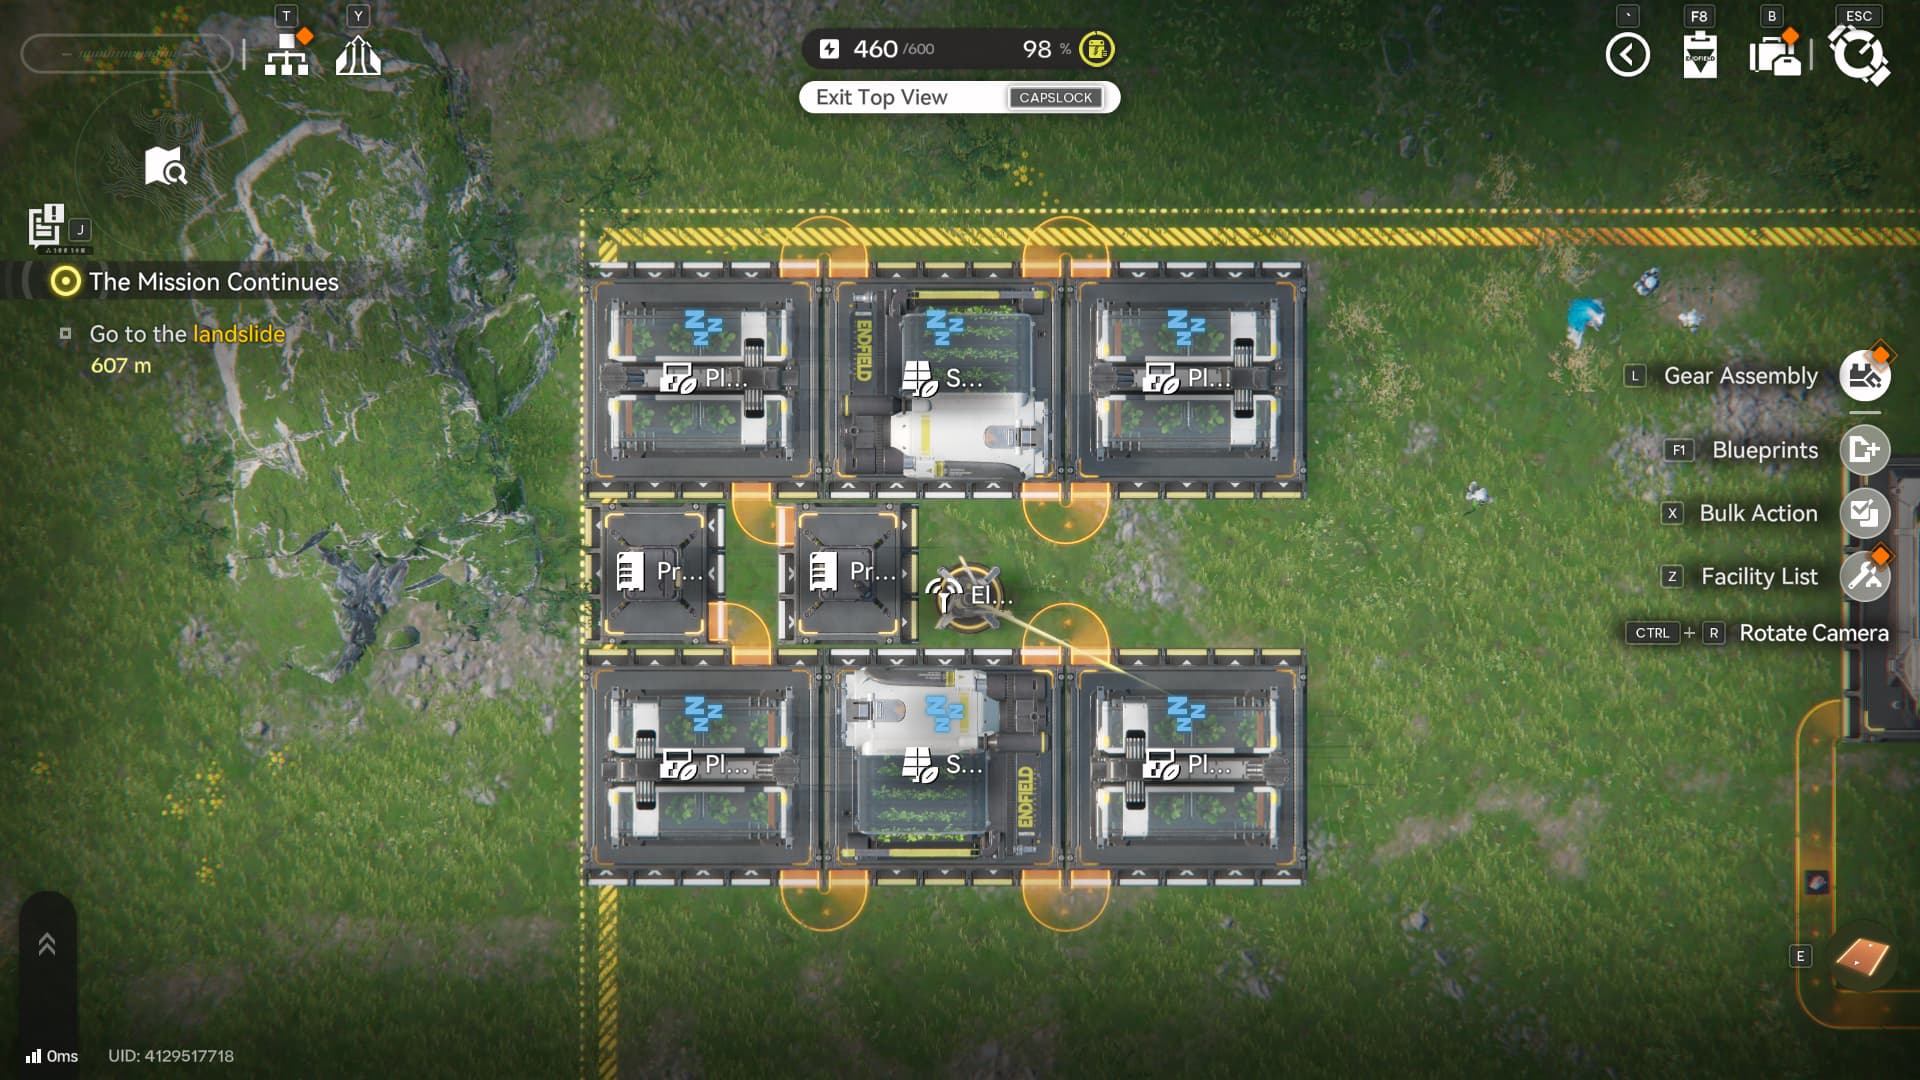
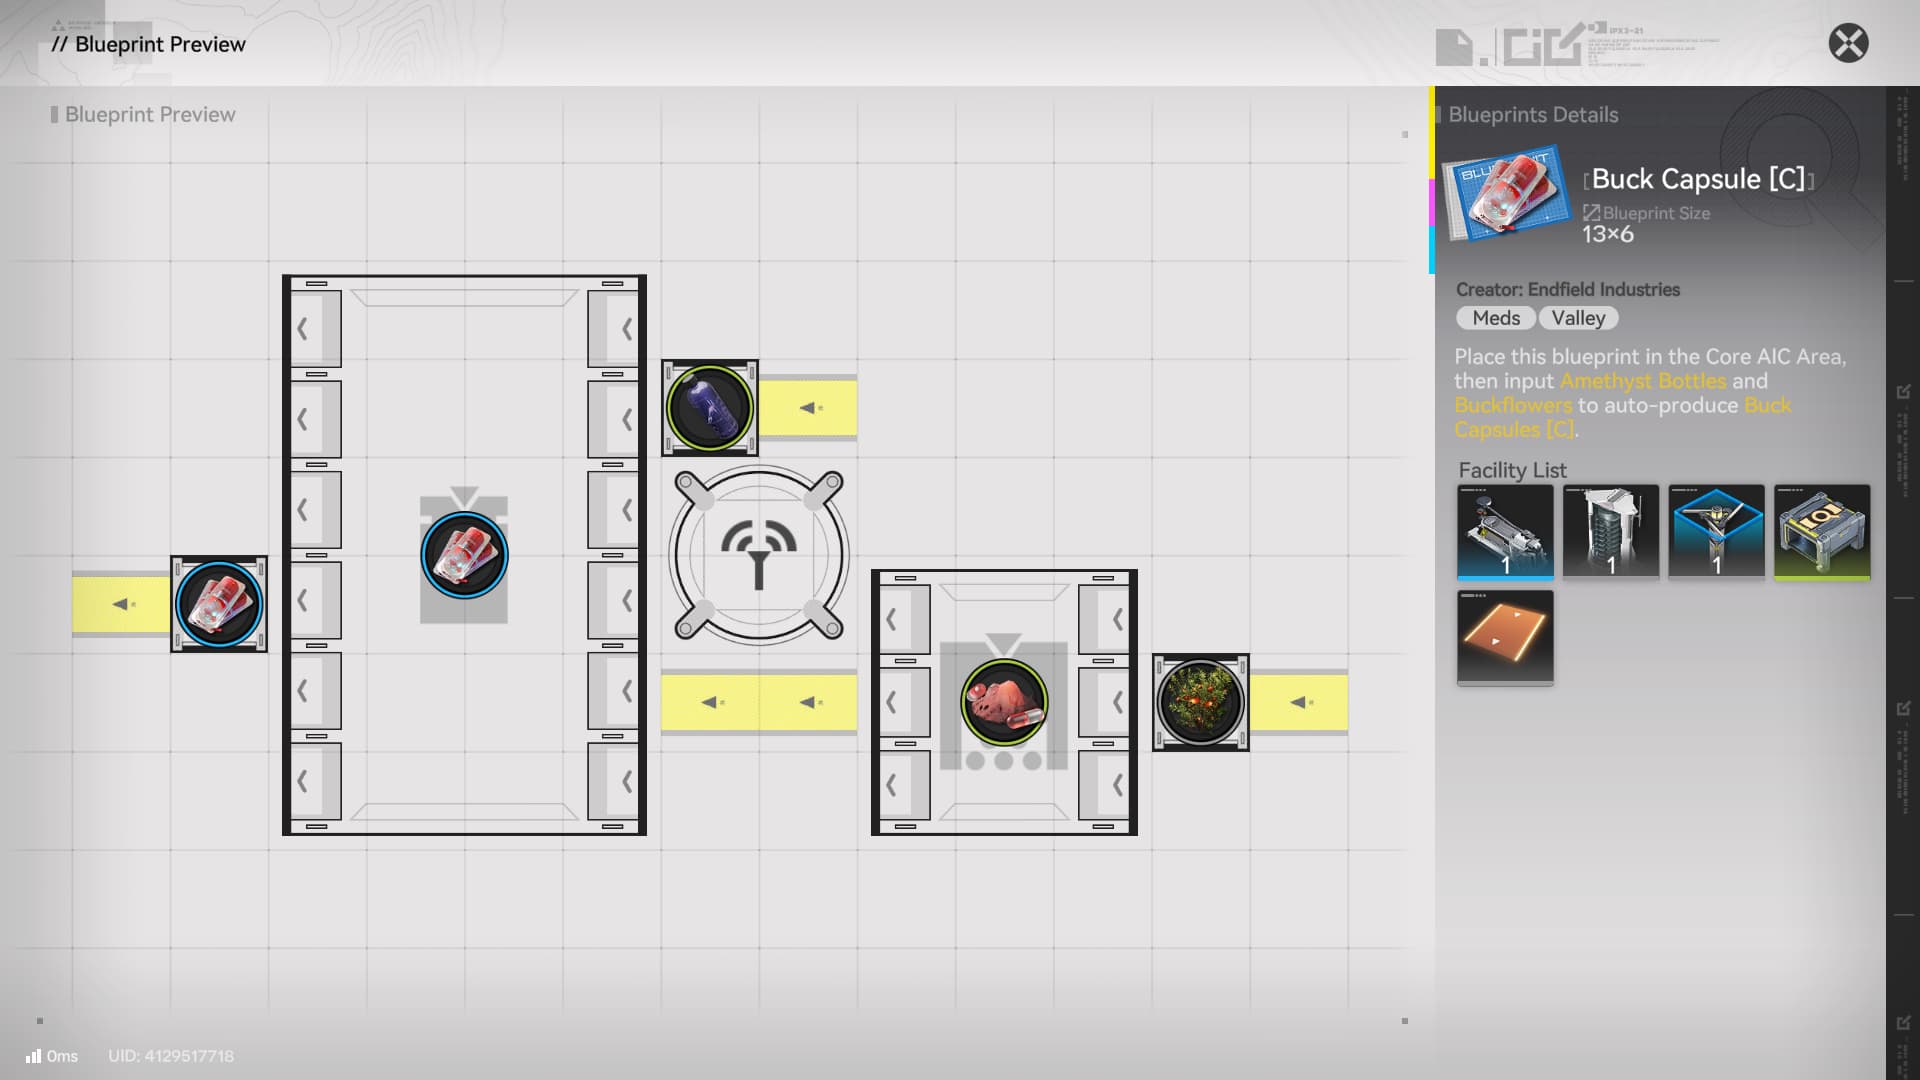
Buck Capsule (C) Automation
Once you have the Plant Farm setup, you can use it to produce Buckflowers without needing to gather them in the wild.
Now that you’re producing buckflowers using your AIC Factory, you can simply add them to a shredding unit and focus on refining your Amethyst for the second half of the Buck Capsule Formula.

And just like that, you automated the production of your Buck Capsule [C]. The Belt takes the Buckflower to the Shredding Unit, which is then transported to the Filling Unit. Then we have Amethyst go from the AIC Depot to the Refining Unit -> Moulding Unit -> Fitting Unit.
This will fully automate the production of Buck Capsule [C]
But if you take a closer look, the Moulding Unit is taking too long to produce Amethyst Bottles, making the Buck Capsule [C] production slower than it should!
Optimizing Automation
If you take a closer look at the above setup, the Moulding Unit is taking too long to produce Amethyst Bottles, making the Buck Capsule [C] production slower than it should!
As you can see, the Moulding Unit is idle, despite the presence of Amethyst Fiber on it.
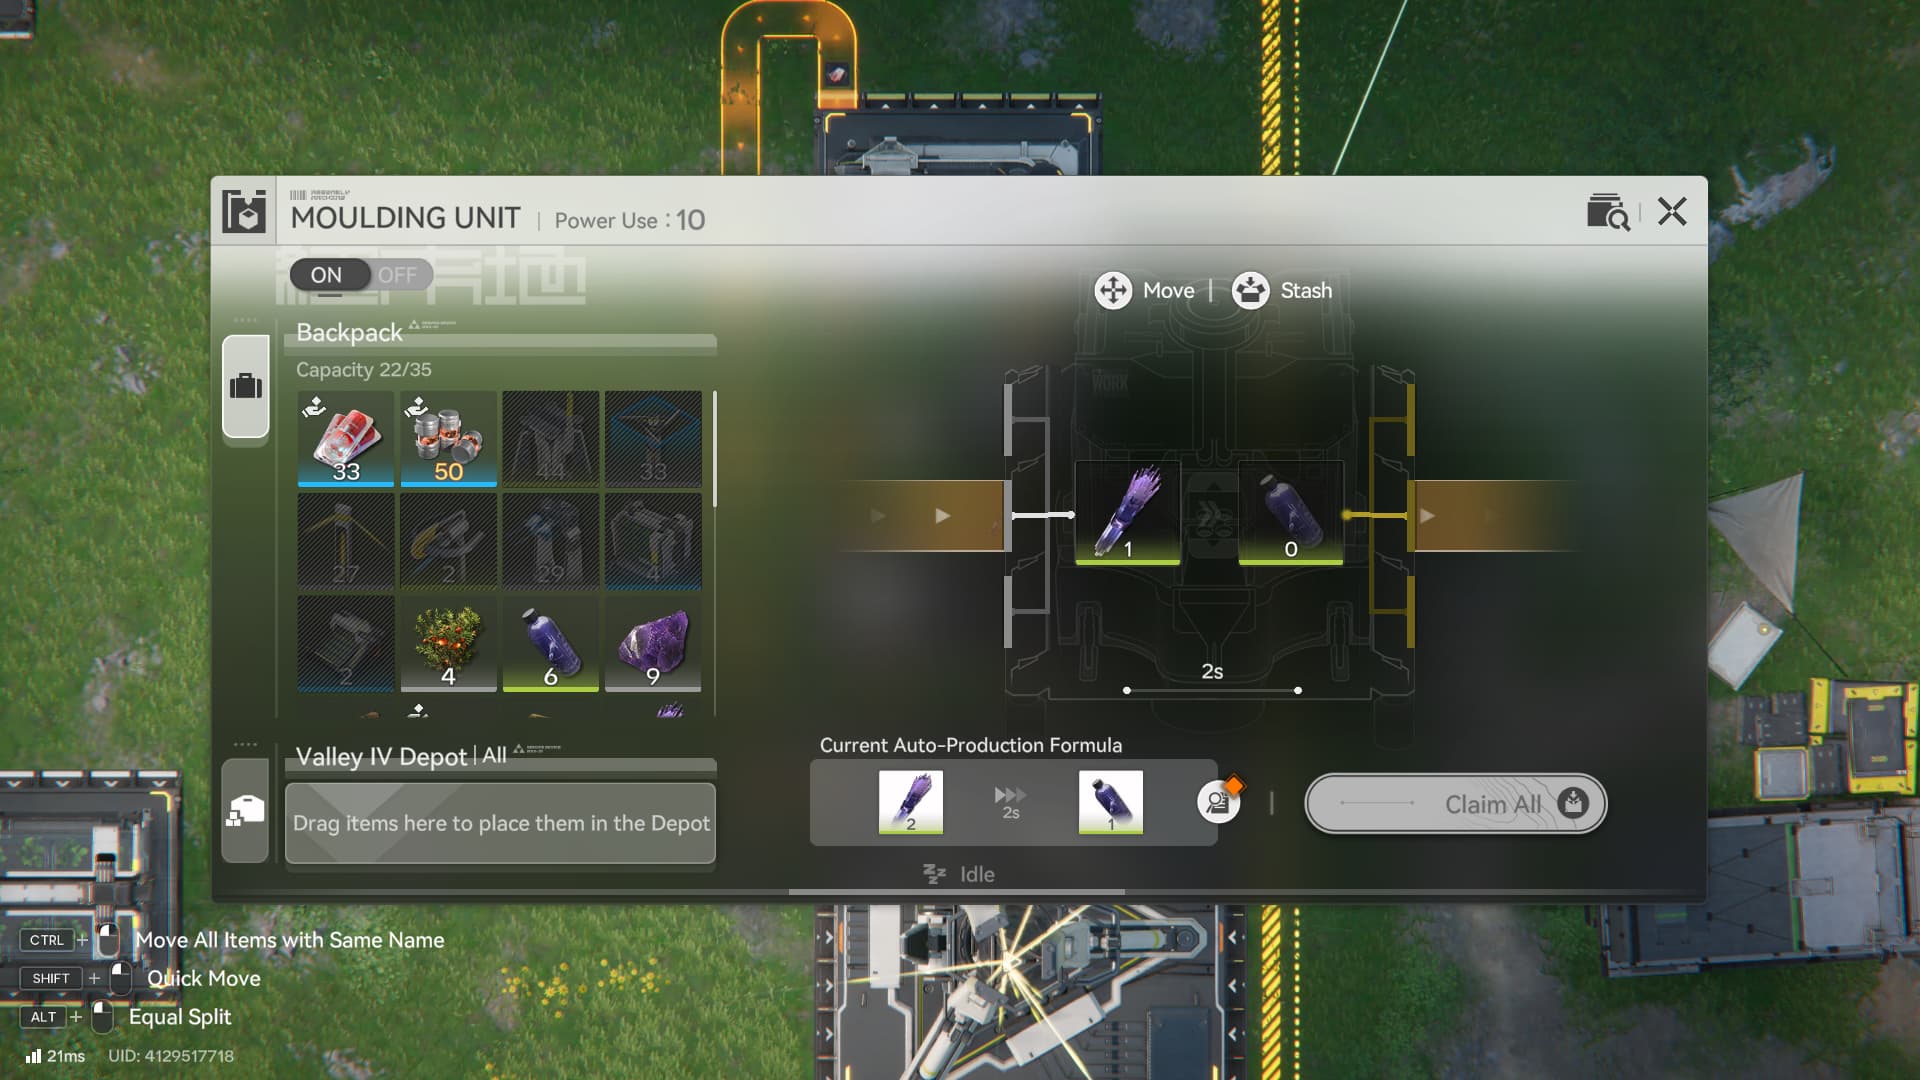
That’s because the Moulding Unit requires 2 Amethyst Fibers for each Amethyst Bottle. Since it takes 2 seconds to produce 1 fiber, your Amethyst Bottle production is taking a total of 4 seconds instead of 2 seconds. This means that you’re getting only half of all the Stock Bills, outpost development and even healing items that you’re supposed to get!
By simply adding another Refining Unit to double the production of Amethyst Fibers, you can fix the problem with your Moulding Unit and double the production of Buck Capsule [C]! To achieve maximum efficiency, it’s important to consider how long it takes to process each item, otherwise you might run into situations like this one where a single bottleneck can hurt all of your production.
Buck Capsule [C] Blueprint:
EFO0136uI1EI3ia9057 (America)
EFO01O4a7i1A7oIA9oe4 (JP)
Outside of Buck Capsules, it’s also recommended to start setting up a production line for Industrial Explosives and another for Batteries, as these are much more efficient in generating power for your Core AIC and can be traded on outposts to help their development as well.
Expanding your Core AIC
You’re probably thinking “How am I supposed to automate so many things if I only have 6 outputs on my Automation-Core / Sub-PAC?”
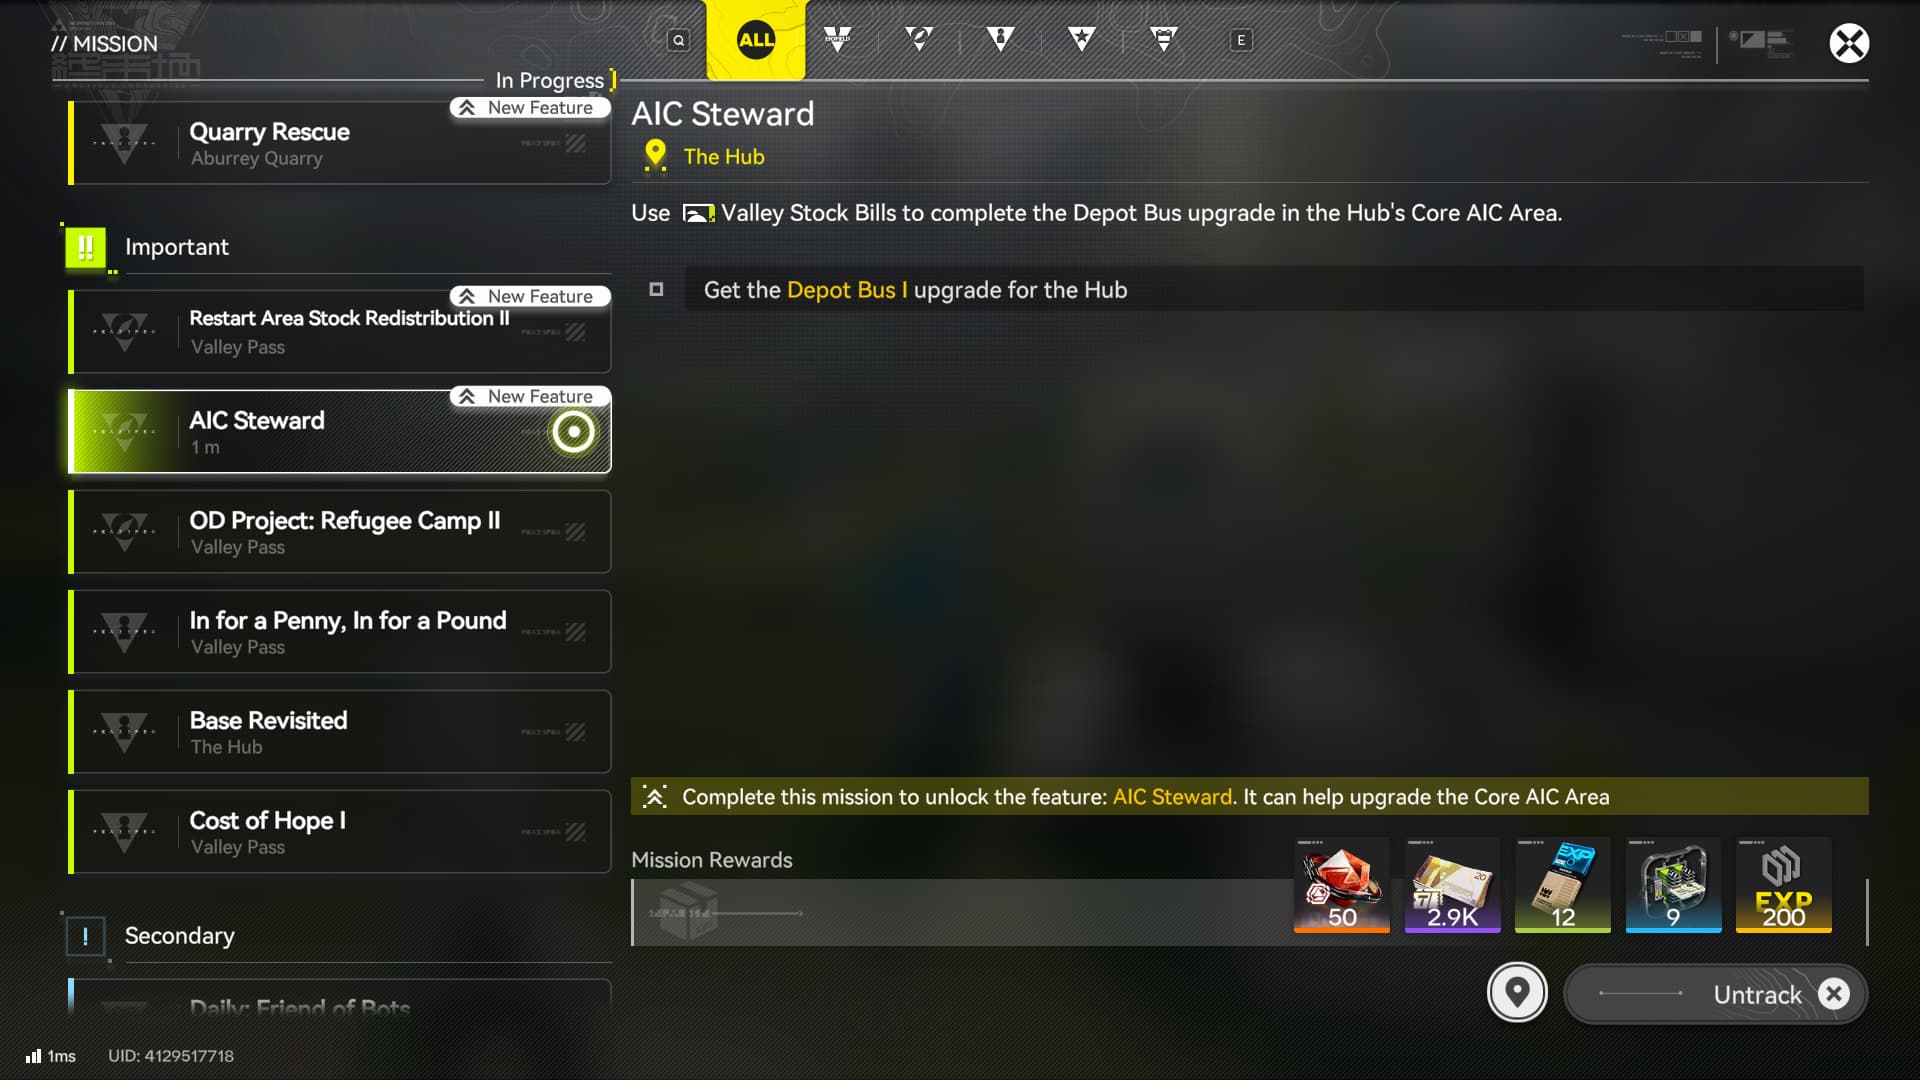
Don’t worry, as you progress through the game, you will unlock a Side-Quest called “AIC Steward”
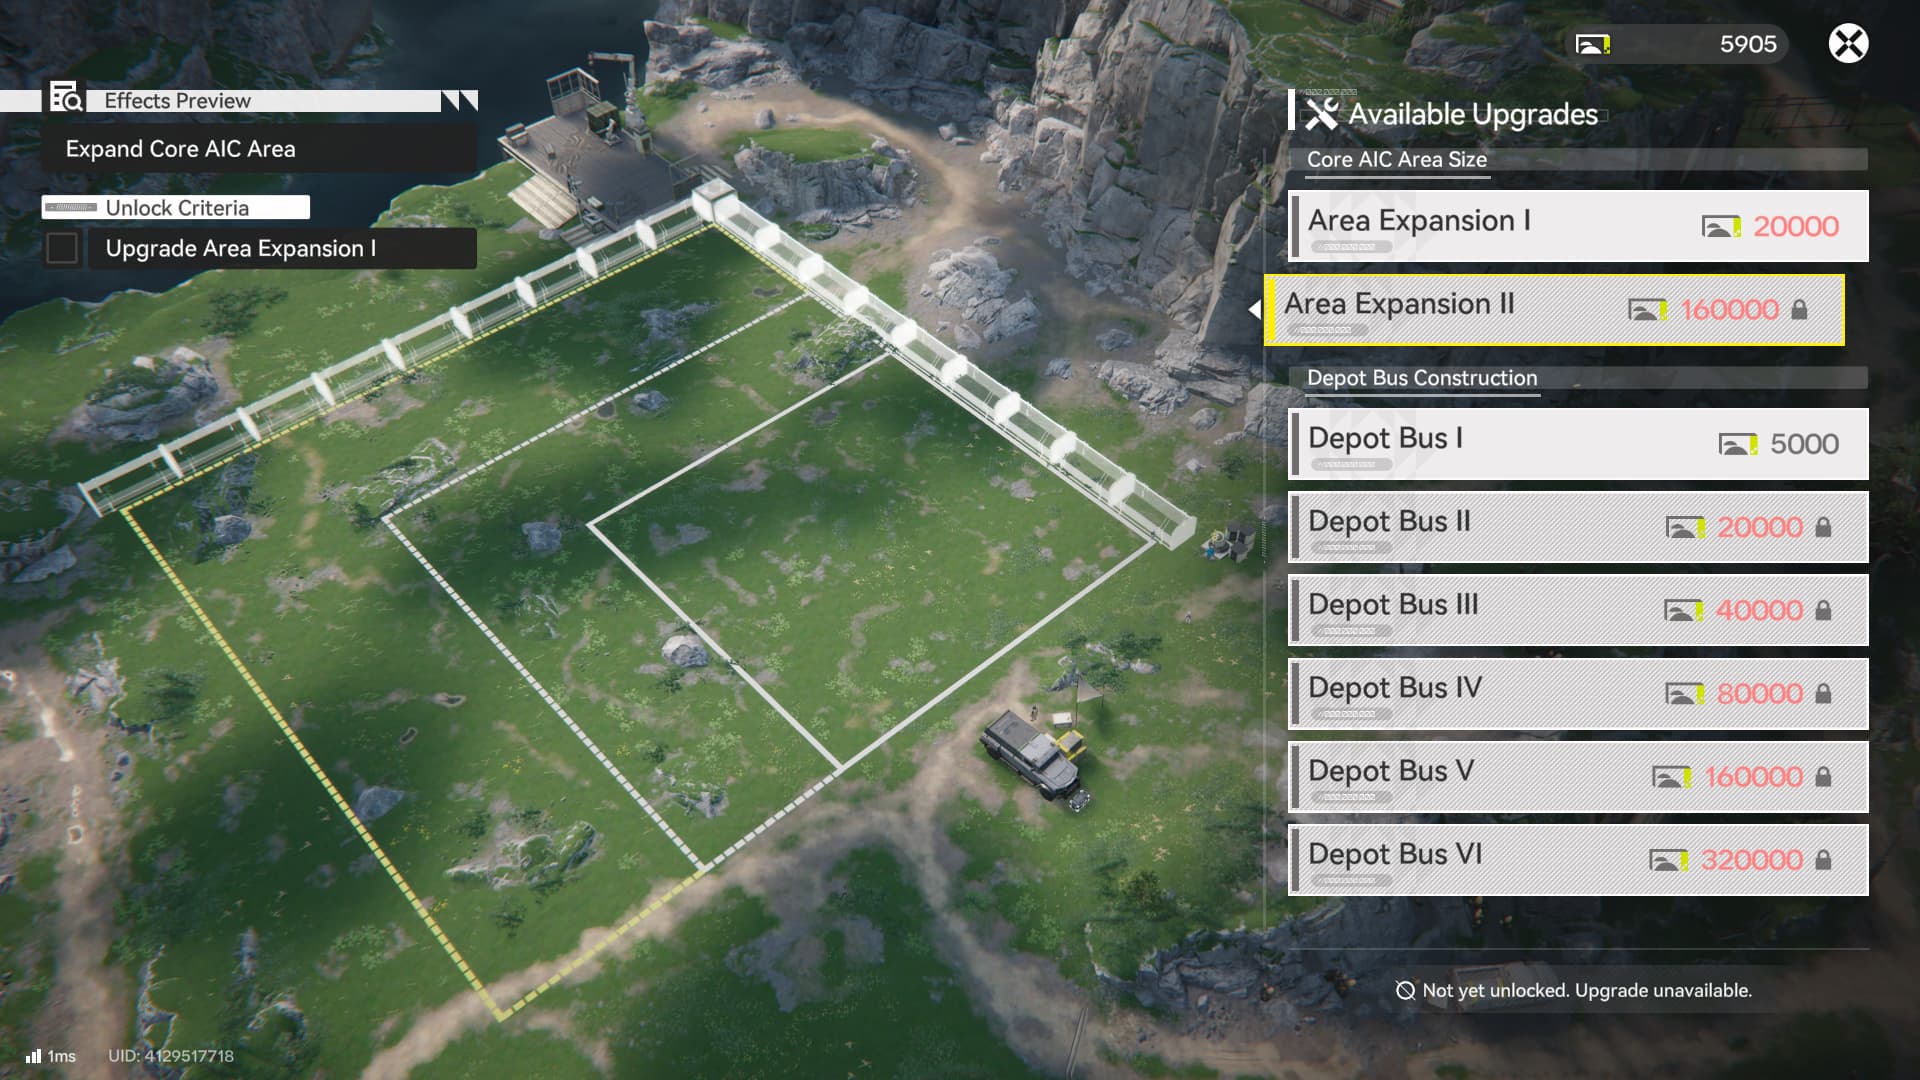
This side-quest unlocks the AIC Steward, which offers upgrades for your Core AIC Area.
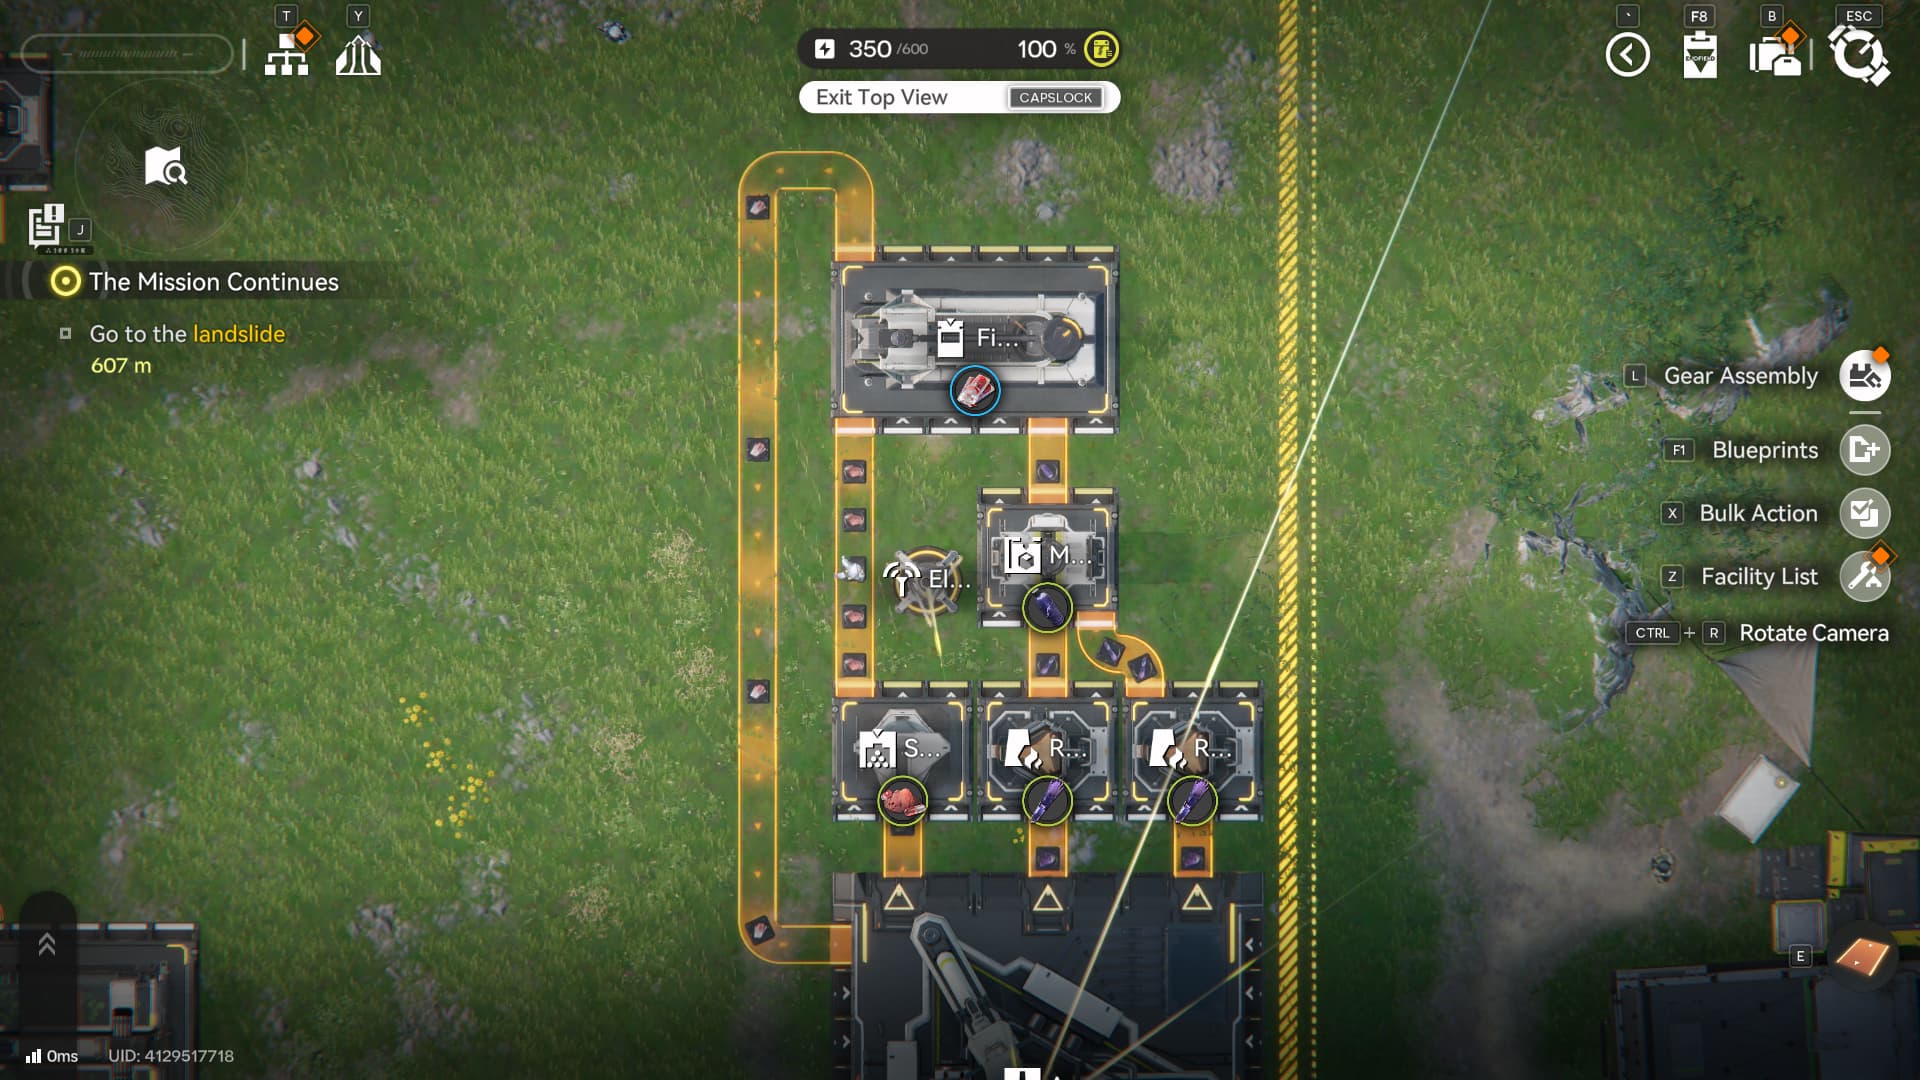
Depot Bus
But most importantly, it unlocks the Depot Bus, an important feature that allows you to interact with your AIC Depot. Once you unlock the Depot Bus, you should also unlock the Depot Bus node on the Tech Tree.
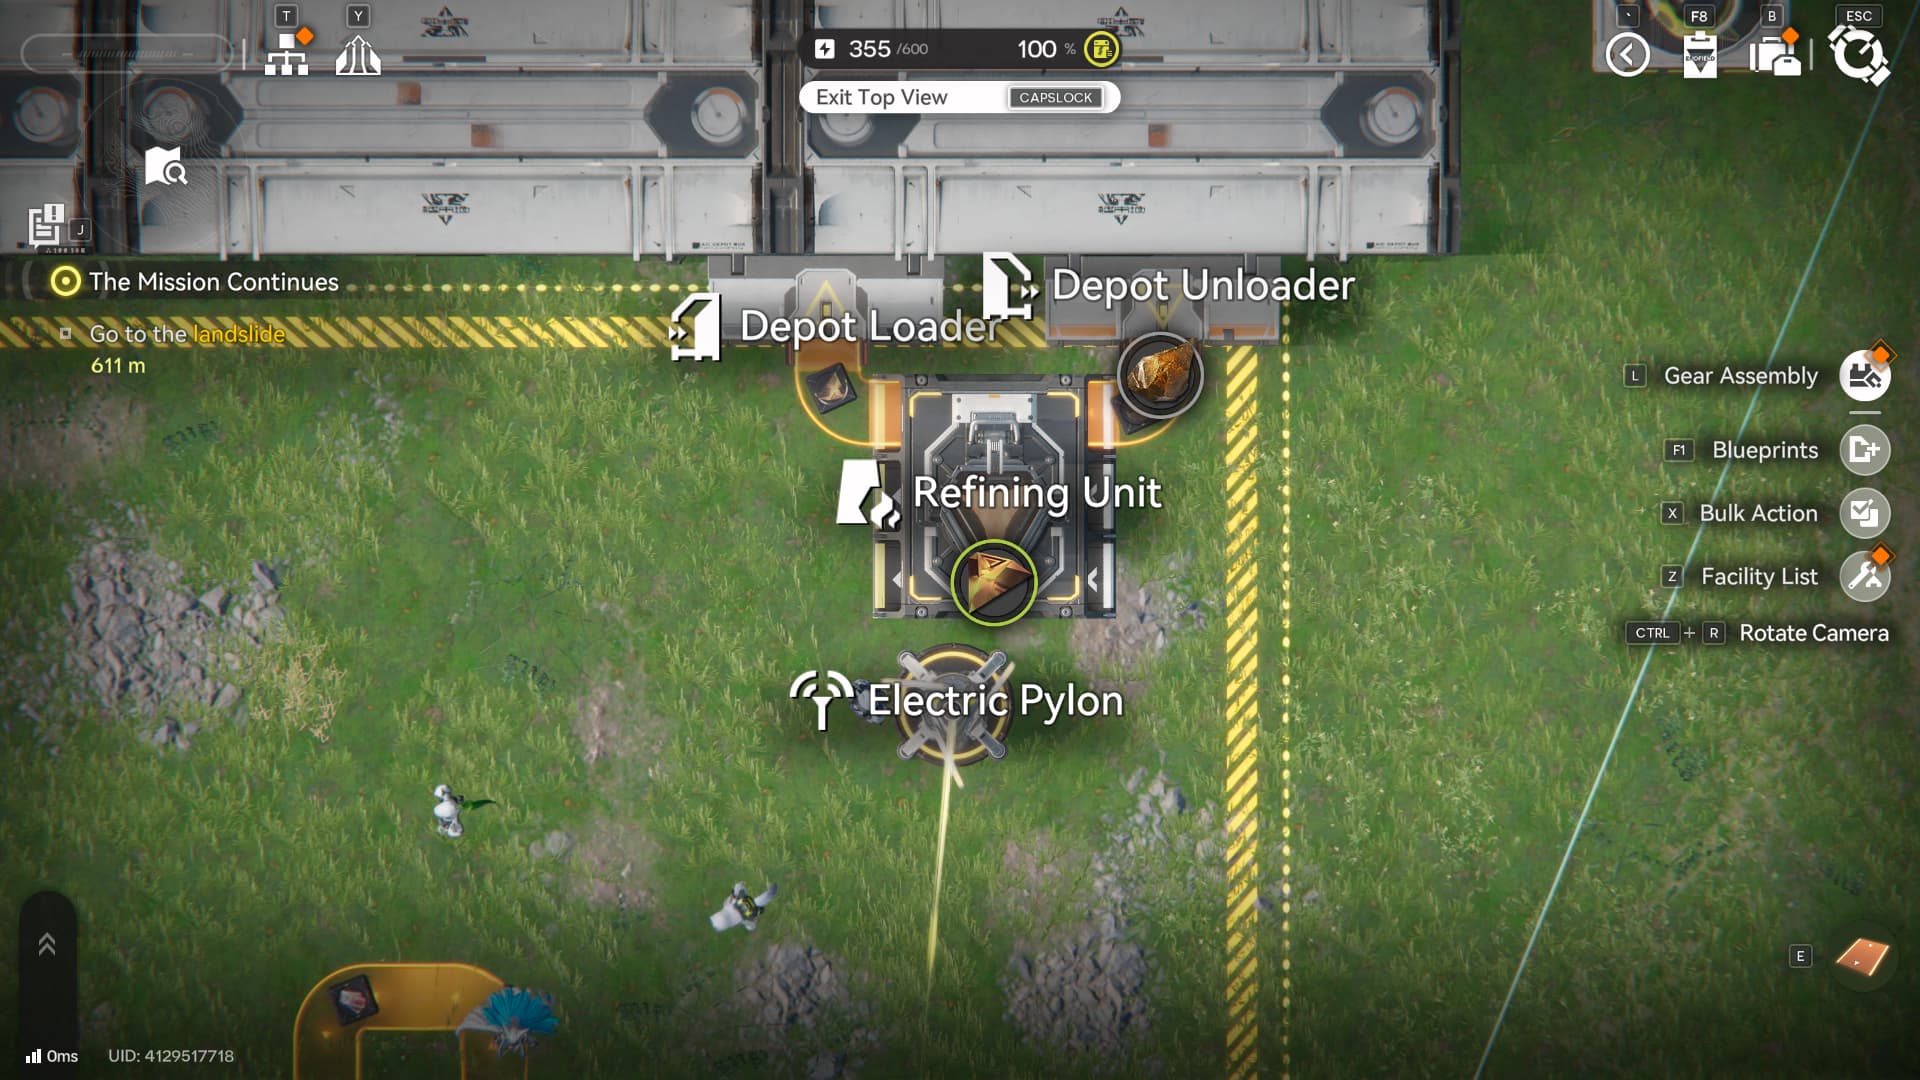
Remember the Origocrust line we set up before? Look at how compact it looks when using Depot Unloaders and Depot Loaders. Unlocking Depot Bus is a massive improvement to your Core AIC Area as it allows you to create new production lines and come up with new layouts that are not restricted by the Automated Core ports.
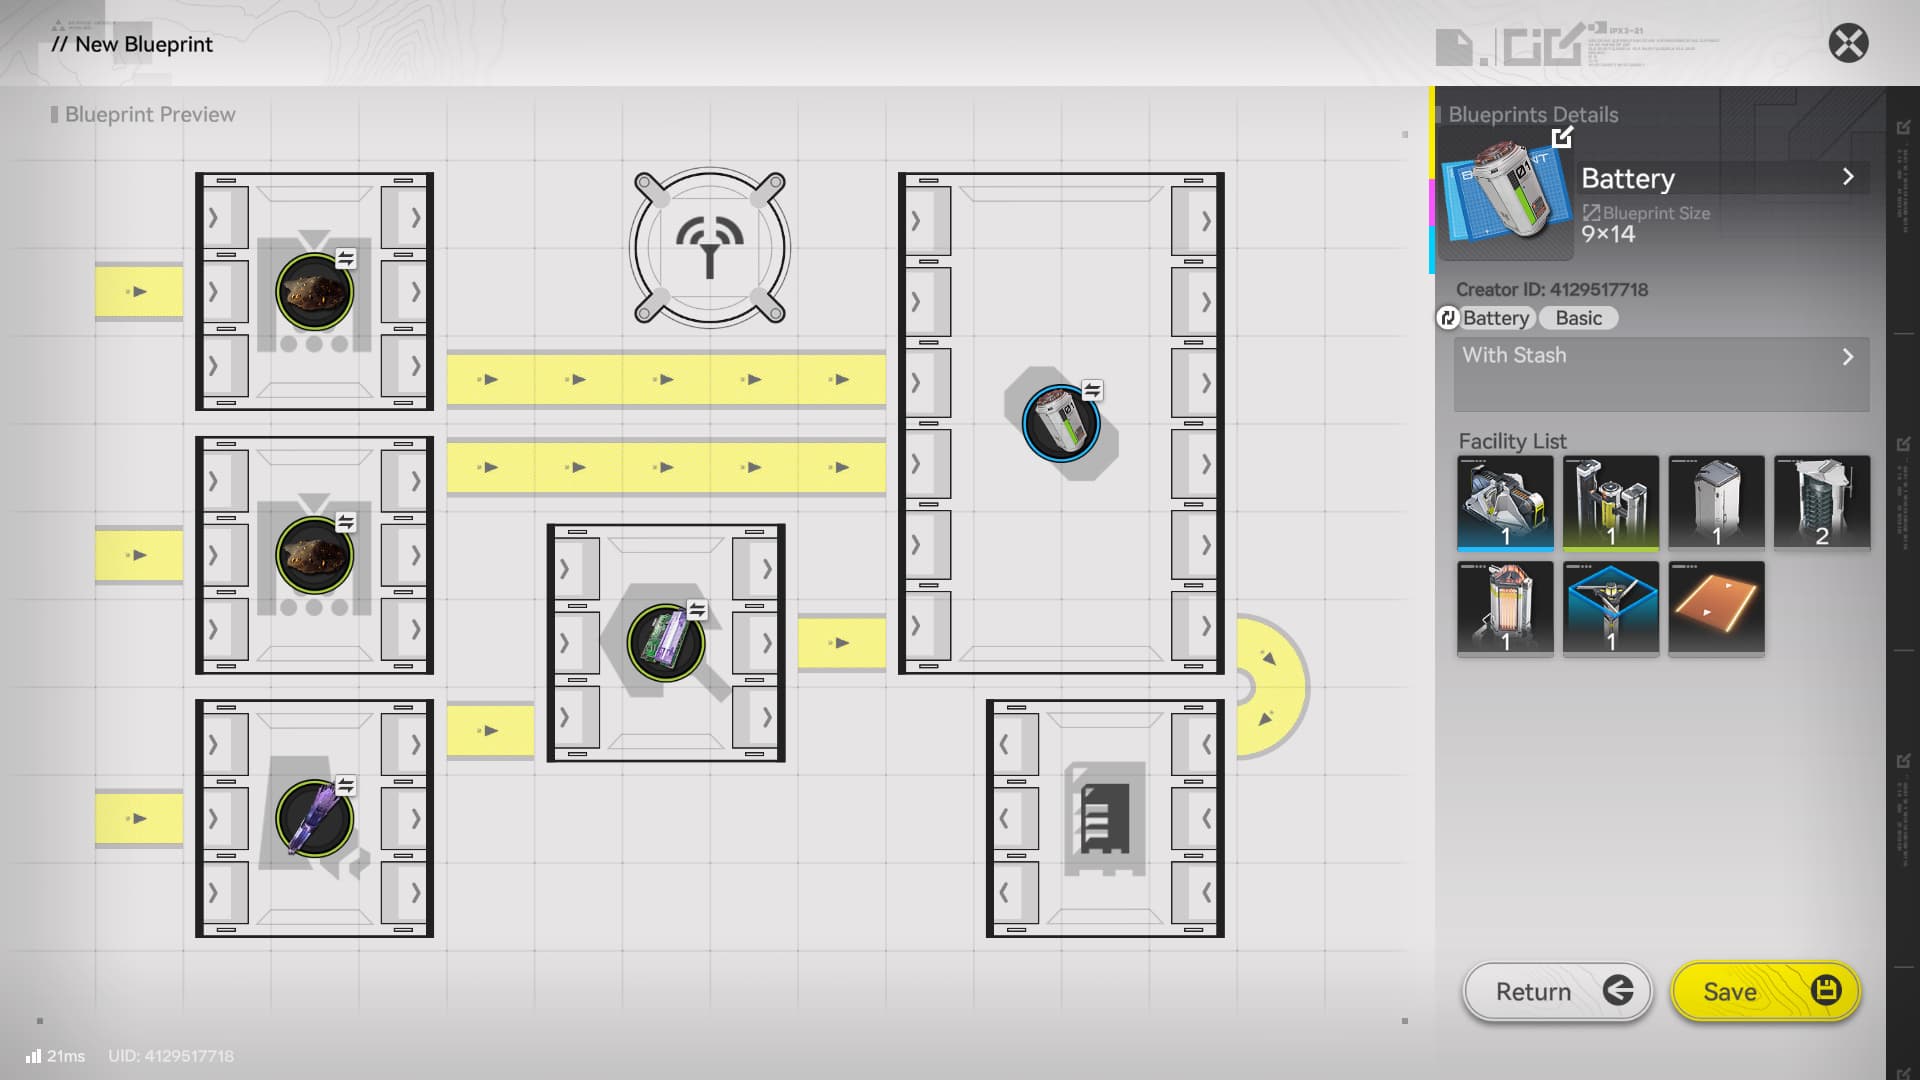
LC Valley Battery
- Blueprint: EFO010U96A8604iaE179 (America)
- Another Similar Setup: EFO01iUIa6u9a42274U4 (JP)

As you build more facilities, you will notice your Power going up. As expected, you need power to run these facilities. The game gives you a Thermal Bank, which you can send materials for it to generate power. Since a Thermal Bank generates power, it does not need to be connected to an Electric Pylon.
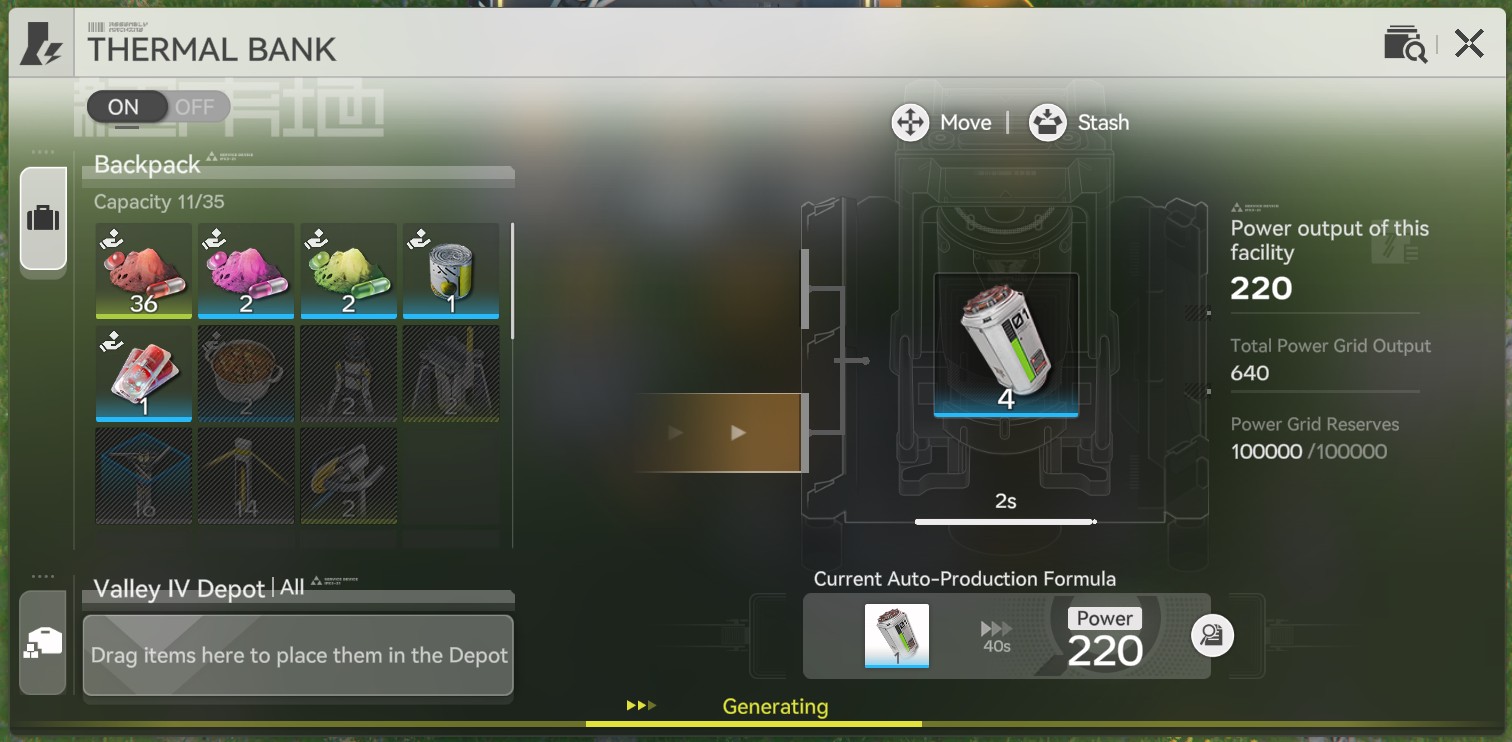
By using LC Batteries, each Thermal Bank can generate 220 power, and only consume 1 Battery every 40 seconds.
Example Setup
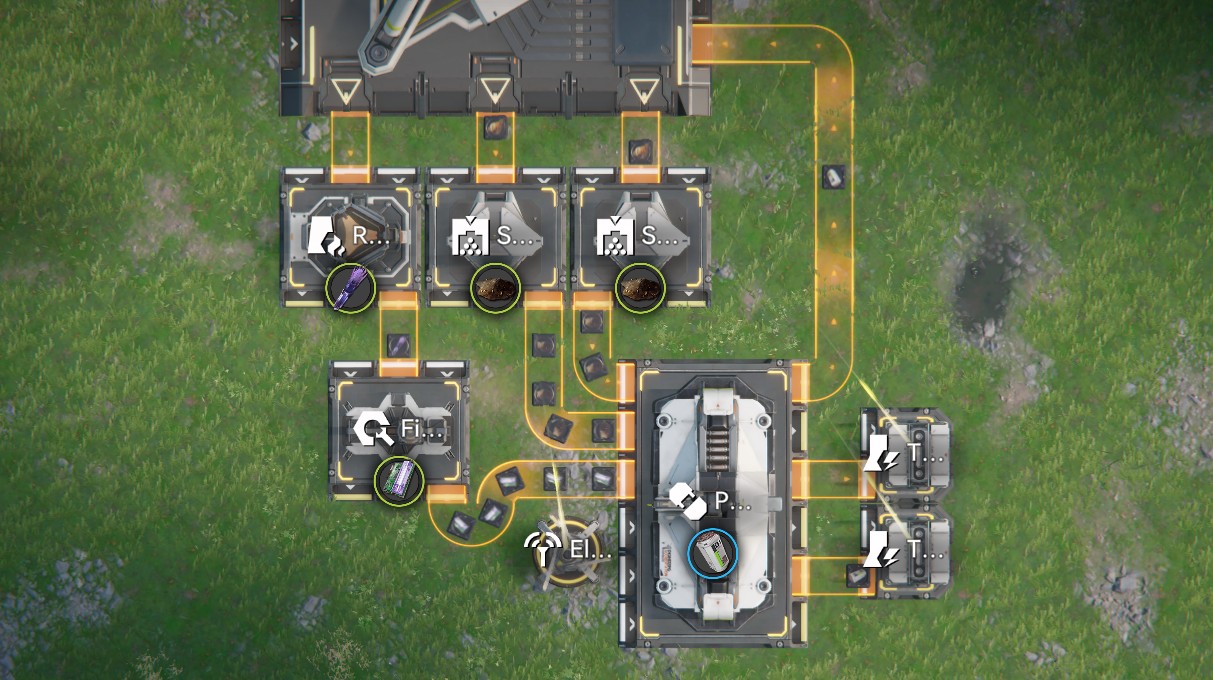
Here's an example setup. The formula for LC Battery is 10 Originium Powder and 5 Amethyst Part. To make this efficient, we have two lines running through Shredders for Originium Powder and one line to go from Amethyst Ore -> Amethyst Fiber -> Amethyst Part.
Then the Packaging Unit will produce 1 Battery every 10 seconds. You'll notice that there are two Thermal Banks at the bottom right. They each consume 1 Battery every 40 seconds, meaning this setup uses 2 Battery/40s. Since the Packaging Unit creates 4 Battery/40s, we send extra back to the Depot to exchange for Stock Bills.
If you want to expand your factory further, you can add more Thermal Banks to up the Power Grid of your AIC.
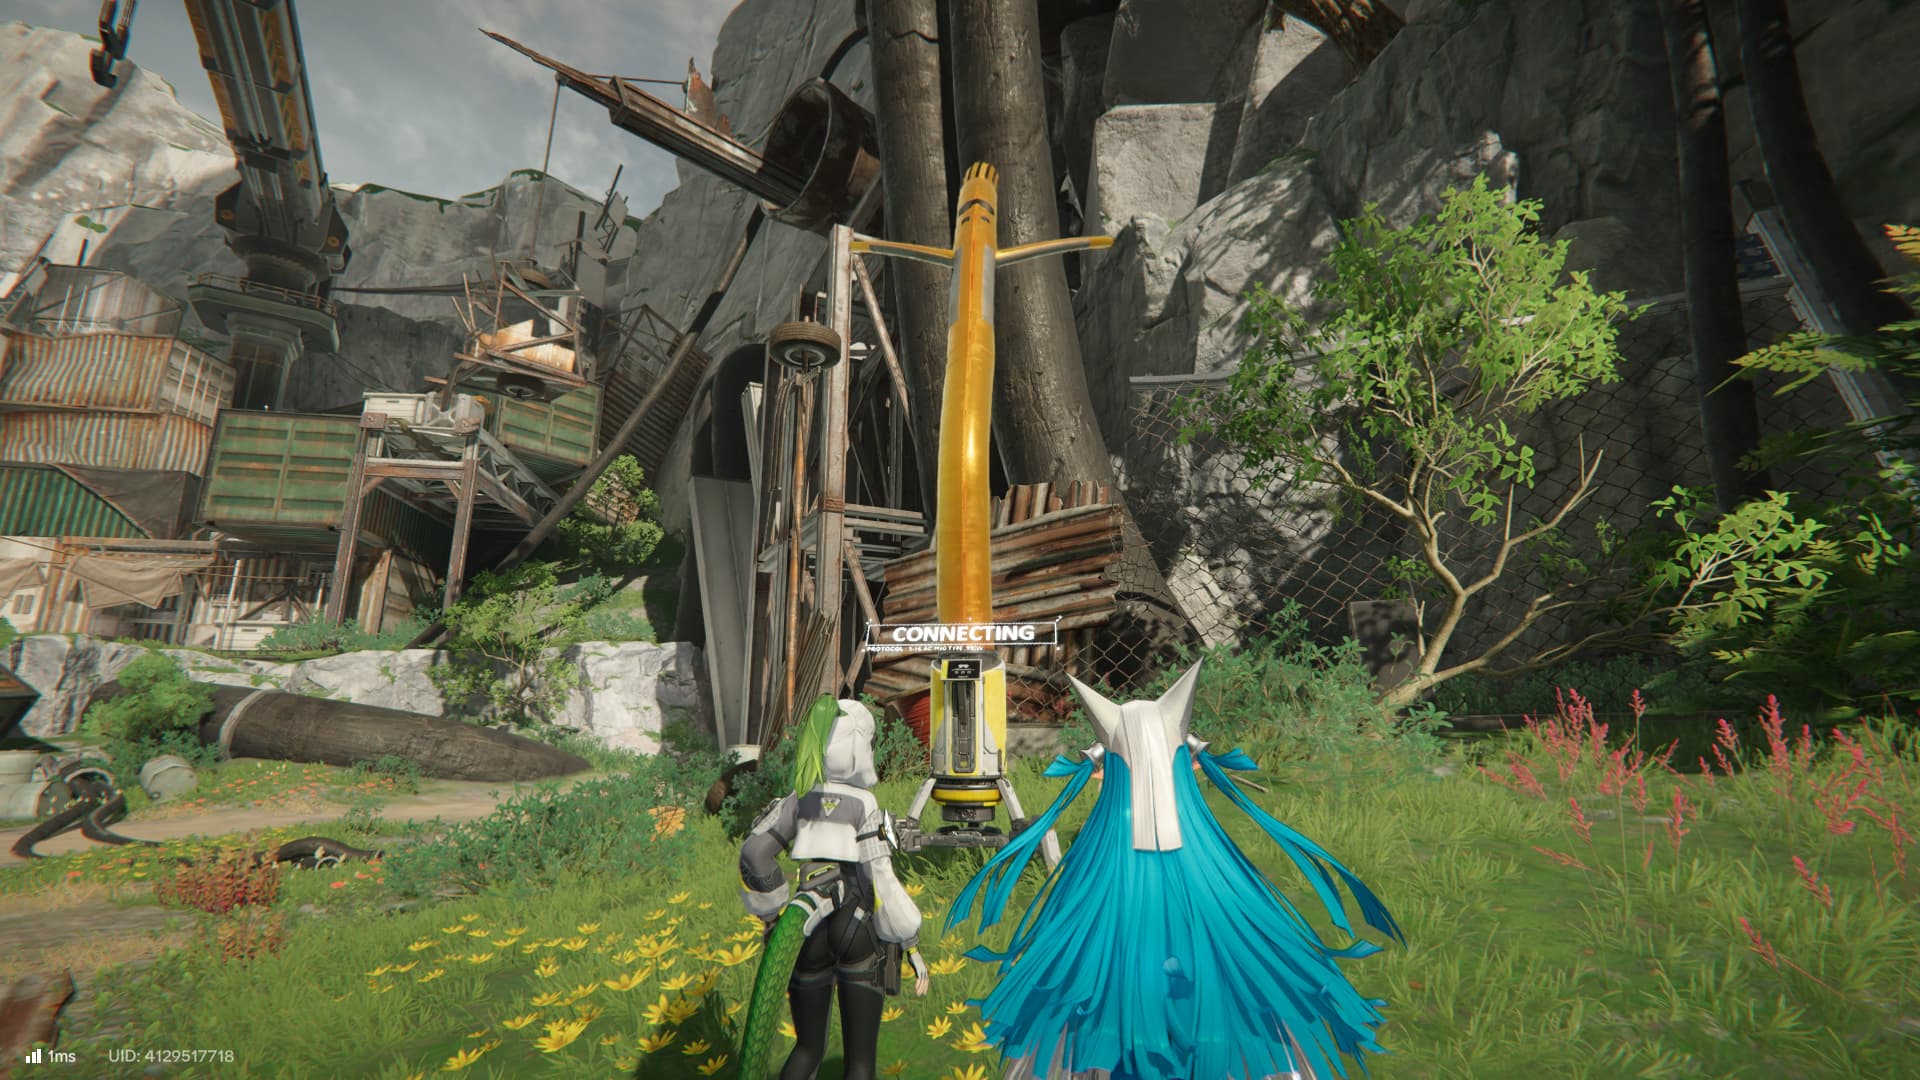
Amethyst Ore Bottleneck
If you're following along this guide, you may notice that the facilities pump out more Amethyst Ore than you can automatically mine. At this point, you also need to explore more of the overworld in order to increase your mining production.
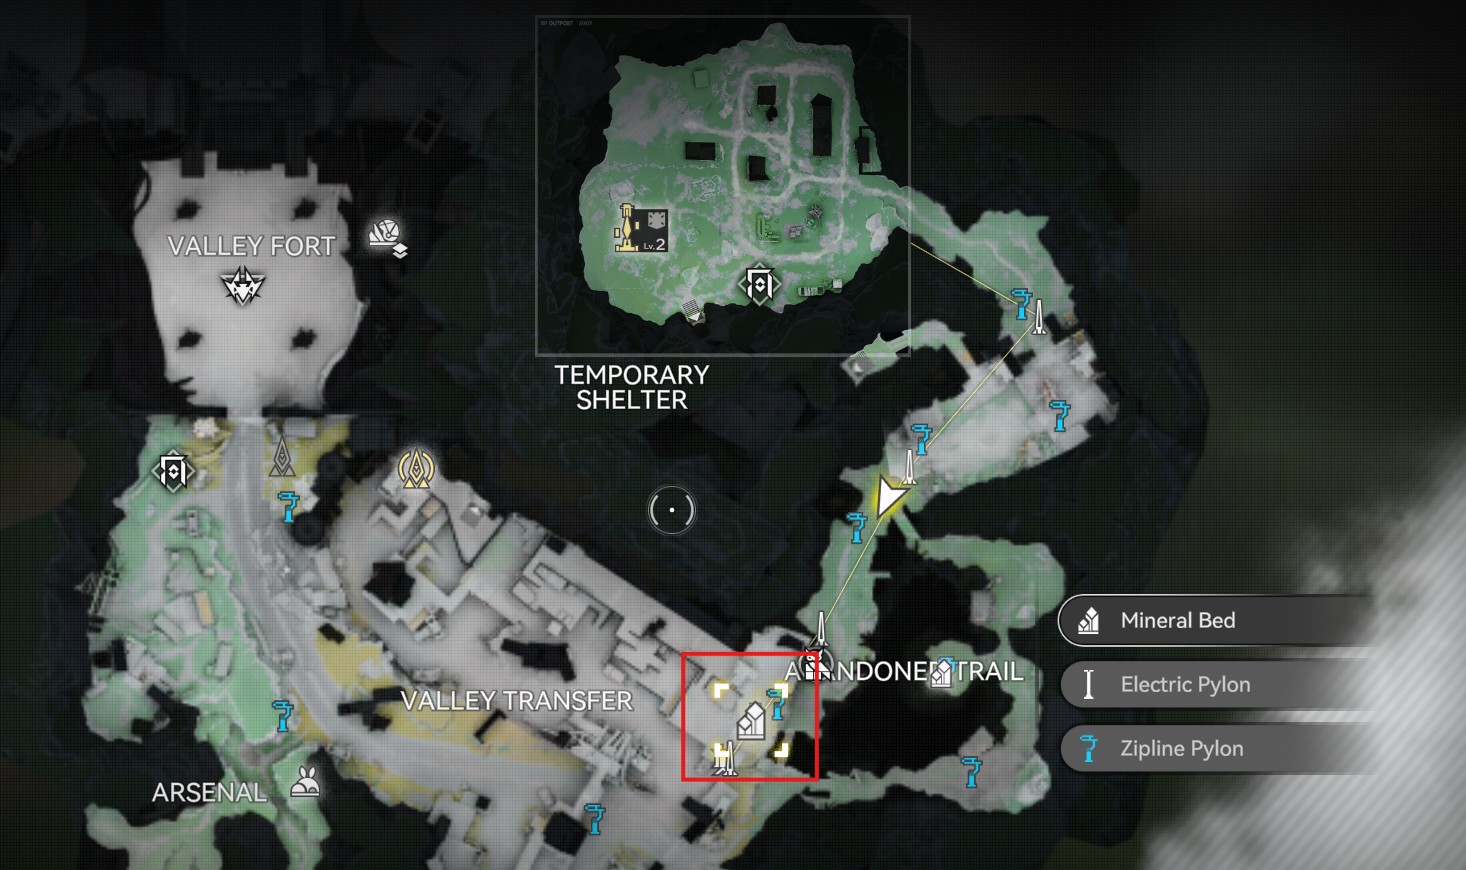
Here's a screenshot of a Mining Bed for Amethyst. You can connect Relay Towers from the Refugee camp. It might be a little tricky to get there the first time, but we don't want to explain everything about the game.
Hints:
- You can't start a transmission through a Zipline
- You can start a transmission and then fall down
- Find an Electric Nexus and power it up
Blueprint System
As mentioned before, you can copy production lines by using Blueprints. This helps you duplicate your production lines whenever needed, as you can save your layout for future use, but you can also use other players' Blueprints to help you set up your production lines as soon as possible and start producing items. For this, you’ll need a Blueprint code to import them to your game.
The game also gives you some basic blueprint when doing Simulations (Factory Tutorials) and they are really helpful for beginners. It allows you to easily set up new production lines based on your needs and they include icons to tell you exactly what you need to “feed” in each lane.
Final Tips
- Make sure to do the in-game tutorials (Simulations), they offer a detailed explanation of the facilities and how to use them.
- Use the in-game database to check the complete production chain of items you want to craft.
- If something feels too complex, break it down in small bits. Focus on one line at a time so you can slowly build the required materials for the final product.
- When starting to interact with your factory, make sure to set up production lines for Buck Capsules, Industrial Explosives and Batteries. These are the most important for outpost development, world exploration and scaling up your Core AIC.
- Be Creative! There’s no objective answer when it comes to setting up your production lines, feel free to test and find something that you like as that’s the best way to learn more about the AIC Factory system.
Video
Author: Muzzy
This incredible article is written by okMuzzy
Table of Contents
1. Base Guide Overview2. What are Stock Bills3. The AIC Buck Capsule (C) Formula4. The Tech Tree Dataloggers Tech Tree Progression5. Plant Farm6. Buck Capsule (C) Automation7. Optimizing Automation8. Expanding your Core AIC Depot Bus9. LC Valley Battery Amethyst Ore Bottleneck10. Blueprint System11. Final Tips