This Mobalytics Guide will aim to provide a seamless progression through the AIC / Base / Factory with Blueprints.
Endfield Arknights: Endfield Blueprints & Codes - Progression Guide
Endfield Base Beginner Guide
Learn about the basics of base-building and how the factory works
Overview
Welcome to our Endfield Factory Blueprints Progression Guide. This guide will aim to give you the Blueprints needed to seamlessly progress through the story.
If you want to learn more about the system as a whole, check out our Basic Factory Guide for more info.
Lastly, not every Blueprint is provided in this guide. If you need to basic crafting materials, that can simply be done by placing down a facility and resource, powering it with an Electric Pylon, and manually grabbing items.
This guide is intended to showcase Blueprints that are intended to use for longer periods of time.
Disclaimer
We do not claim to have the best Blueprints or the most optimized/min-maxed. We strive to provide a simple and effective progression through the Base system.
Early Game
Buck Capsule (C) Blueprint
NA/EU: EFO01U4Ai59iUoOa7Oa8
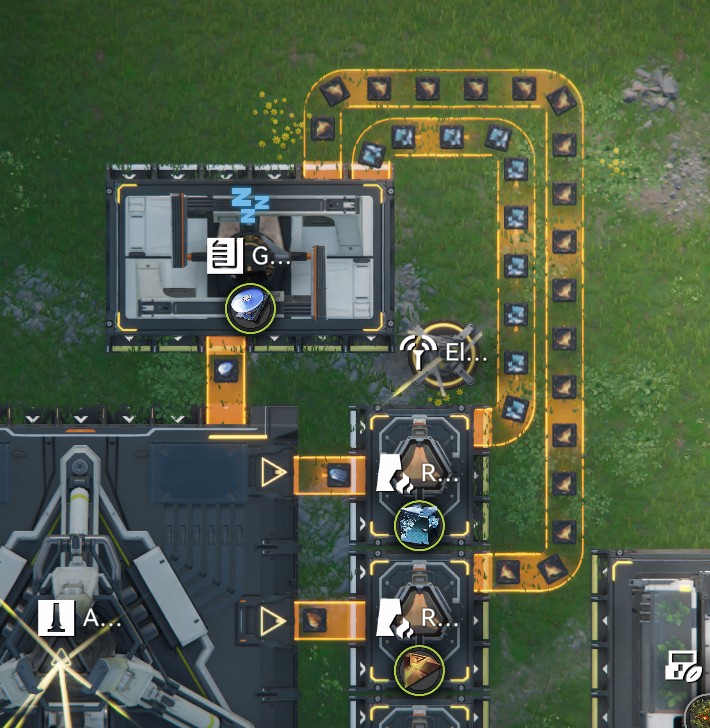
Used for obtaining Stock Bills from the Refugee Camp / Regional Development menu. Set up is not optimized, as you will quickly move on from this production line.
Place Buckflower in the Seed Picking Unit and Amethyst as the output from the AIC.
LC Valley Battery Blueprints (Green Battery)
Basic Starter Setup
NA/EU: EFO01u1Ioa2oue0a6AoOU
Setup uses one Thermal Bank for some additional grid power. Rest goes into the Depot. You can remove the Thermal Bank for more production, although this setup is bottlenecked.
Set up is not efficient, depending on your output space, you can double the Originite to make this efficient.
Efficient Production Setup
NA/EU: EFO01893u6Ou8A126UI73
The Infra Station's (another Outpost base) first region level is increased using LC Batteries. You can use this setup, to produce straight to the depot in a rush. The first starter setup with enough time should produce more than enough. Just make sure to unlock the Outpost to begin raising the levels.
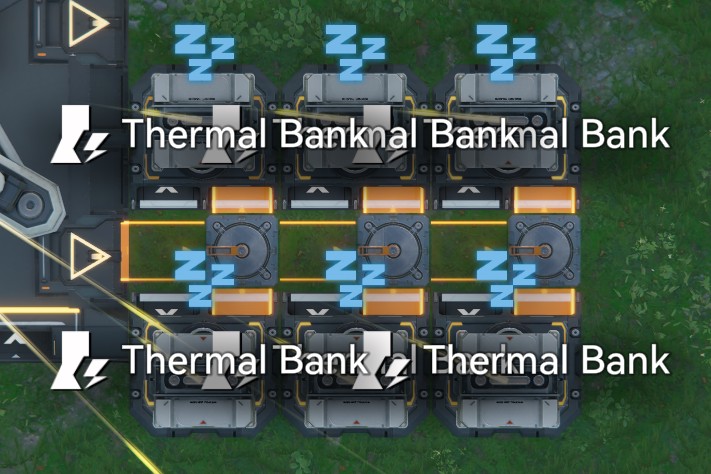
LC Battery + 4 Thermal Banks (Optional)

NA/EU: EFO01O3E2ue2O6I3E9oe4
Efficient setup for grid power using LC Battery. Use this if you want to explore and setup more Mining Rigs around the overworld. This amount of power will be plenty to progress and play around with random setups.
If Power is excess, can reroute some belts to the AIC or change a Thermal Bank for a Protocol Stash.
Keep in mind that you can set this up in your Refugee Camp / Outpost Bases as well.
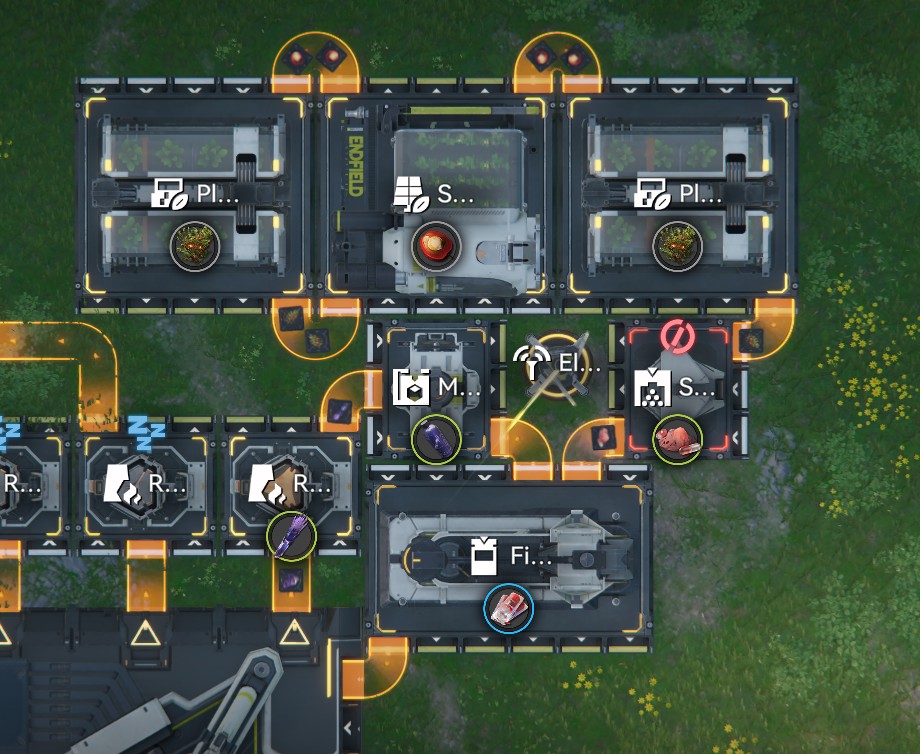
Industrial Explosive Blueprint (Bombs)
NA/EU: EFO01893u6Ou8A122UI73
Temporary setup (use for maybe one day) to produce bombs for overworld exploration and progression. Keep a couple stacks of bombs in your backpack for overworld use.
You can Stash this setup once you have a good stock of bombs in your Depot. (Just make like 500-1000)
Once you're done you can repurpose the Seed Picker/Planters for Buckflower. (If you're not capped out in the Depot already)
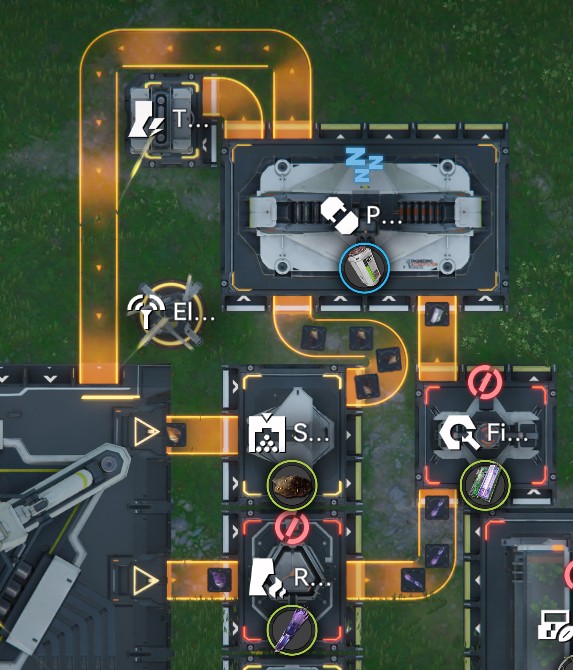
Ferrium Component Blueprint (Blue Gear)
NA/EU: EFO0172UA40A7I558O0Ai
Temporary setup used to craft Blue Gear. Can let this run until your main squad has a full set of Blue Gear.
Usually, we would recommend just skipping this, but part of the Operation Manual (Beginner Missions) requires an Operator to equip 3 pieces of Blue Gear. Since you're already making it, might as well suit up your squad.
Full Early Game Blueprint
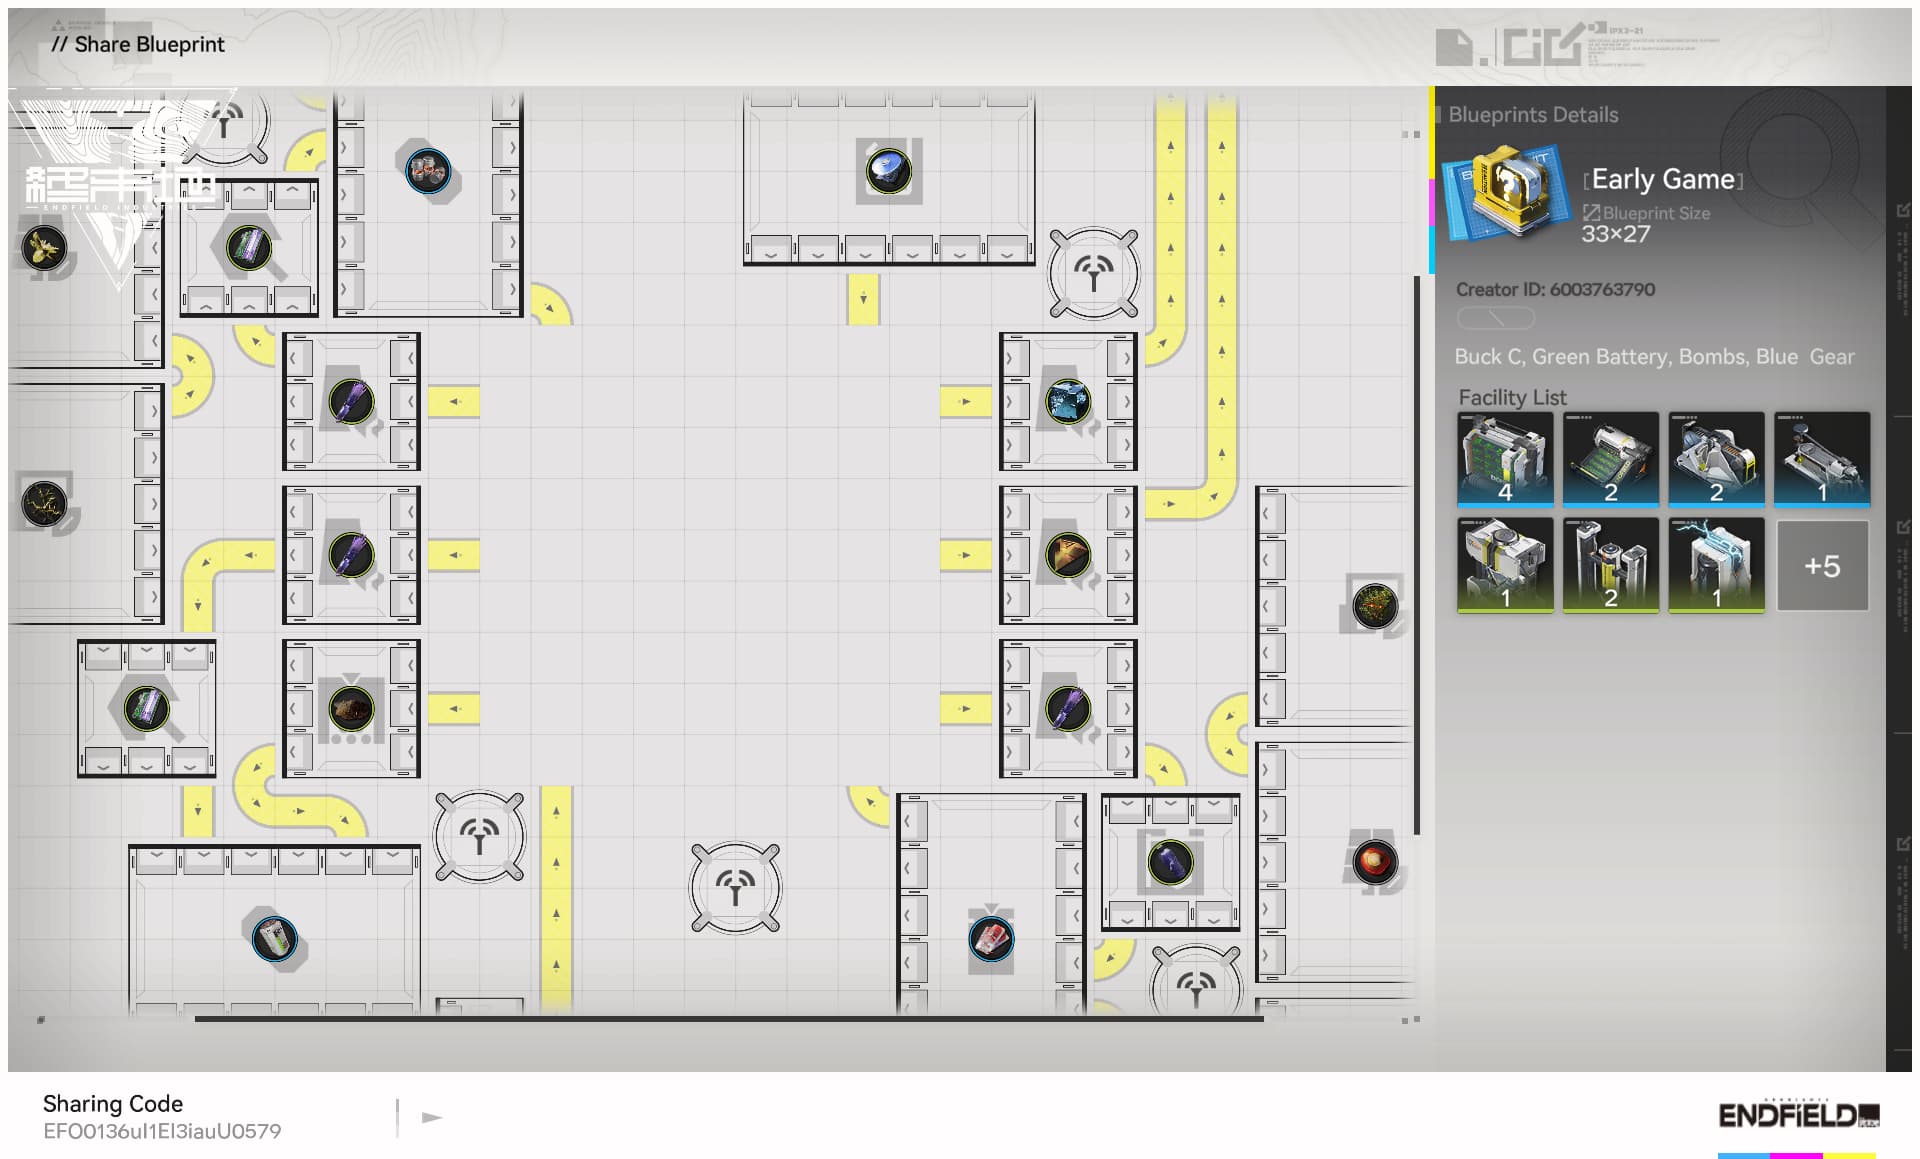
NA/EU: EFO0136uI1EI3iauU0579
All Blueprints used in the early game are designed to fit around the AIC without issue. Seed Loops can be placed on the edges of the Base to produce whatever you may need. (Aketine for bombs, Buckflower for medicine, etc)
Mid Game
Seed Loop Blueprint
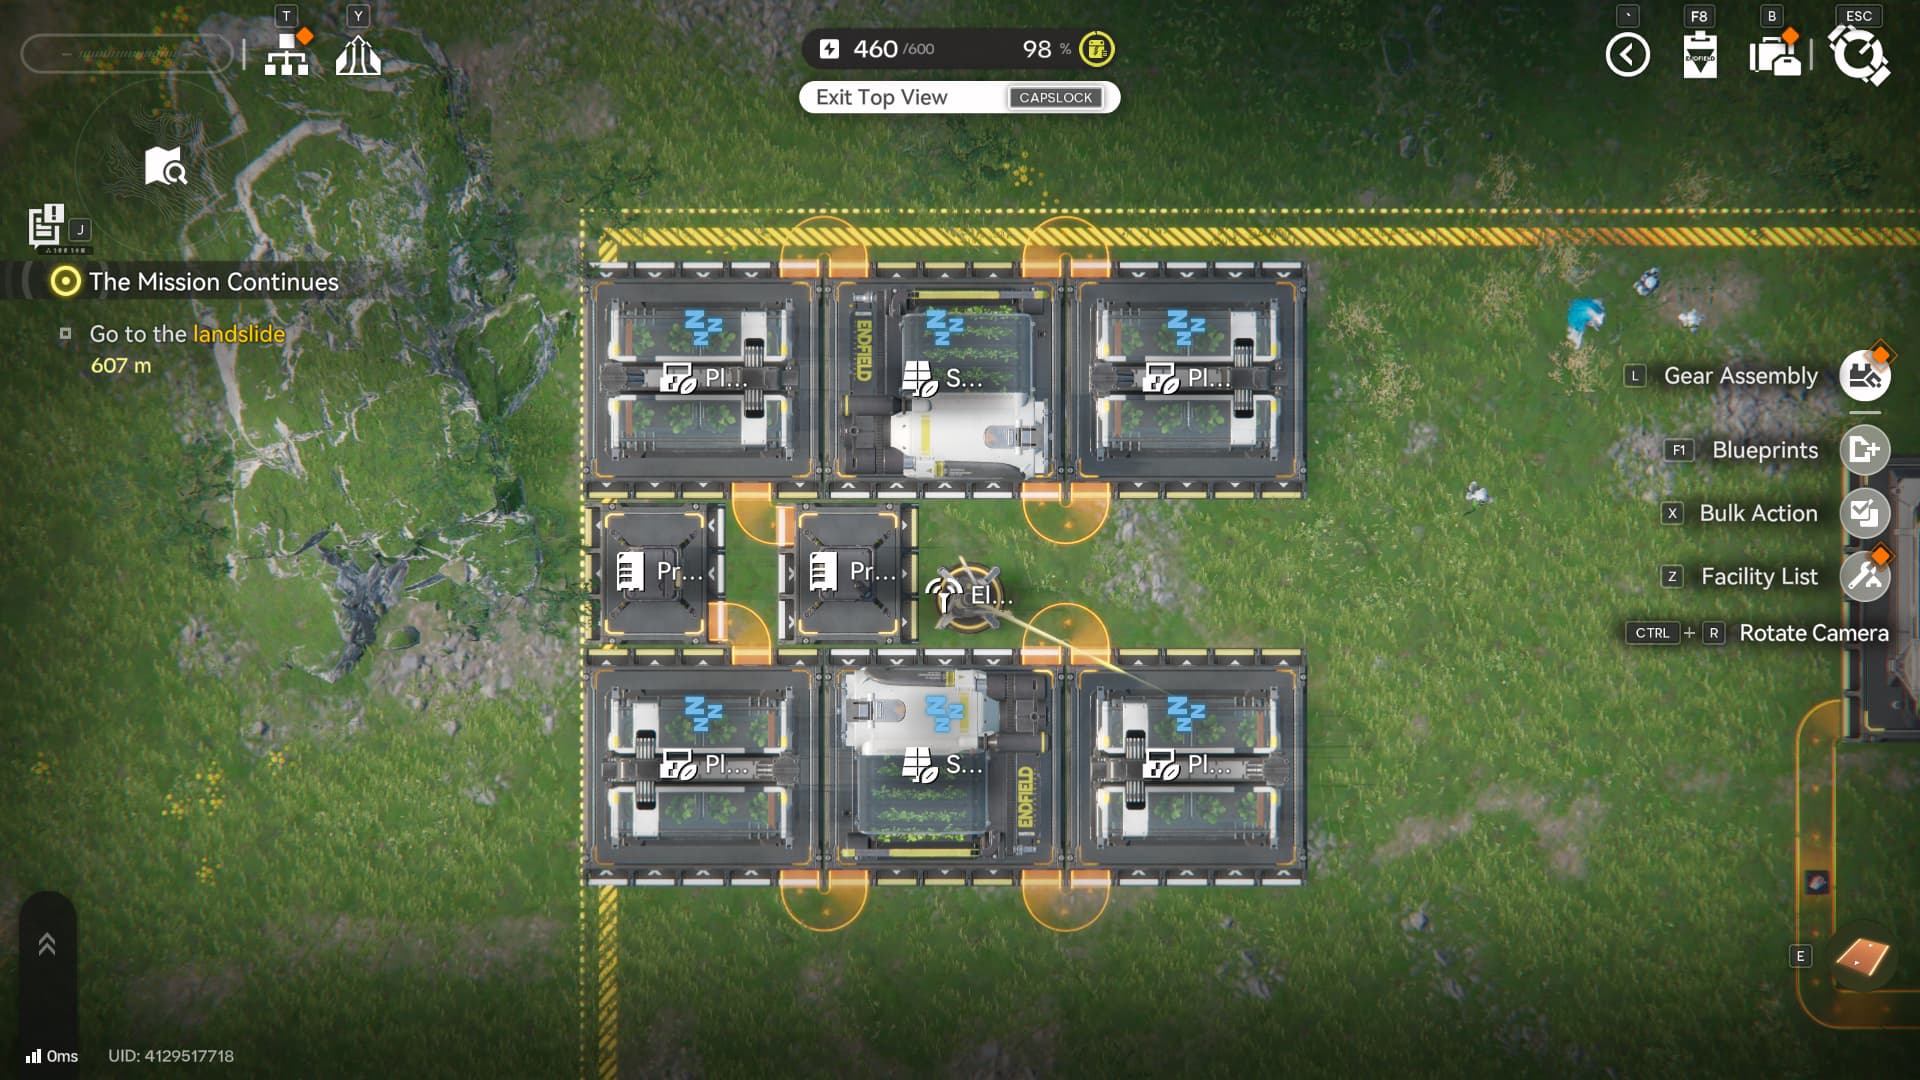
NA/EU: EFO0172UA40A7I55O0Ai
Self-sufficient loop that farms up to two different types of plants. Simply place about 5-10 plants in the Seed Picking Unit (middle), and watch the magic unfold.
Start by producing Buckflower. Once you find Sandleaf at the end of Valley 4 Main Story, start producing that as well.
We begin to use separate Seed Loops to make our Depot space easier to work with. You can continue to make the rest of the Blueprints with Seeds integrated in, but our Blueprints will be separate starting here.
Note: You can set this up in the Early Game to produce your Buckflower and Aketine, but the Blueprints above are designed with their seed usage integrated in.
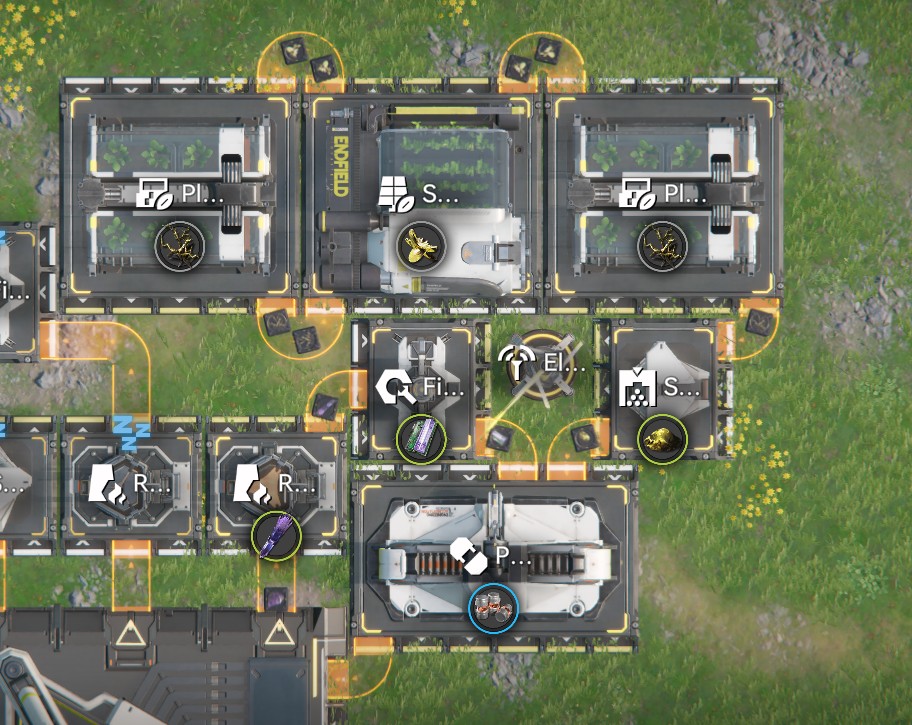
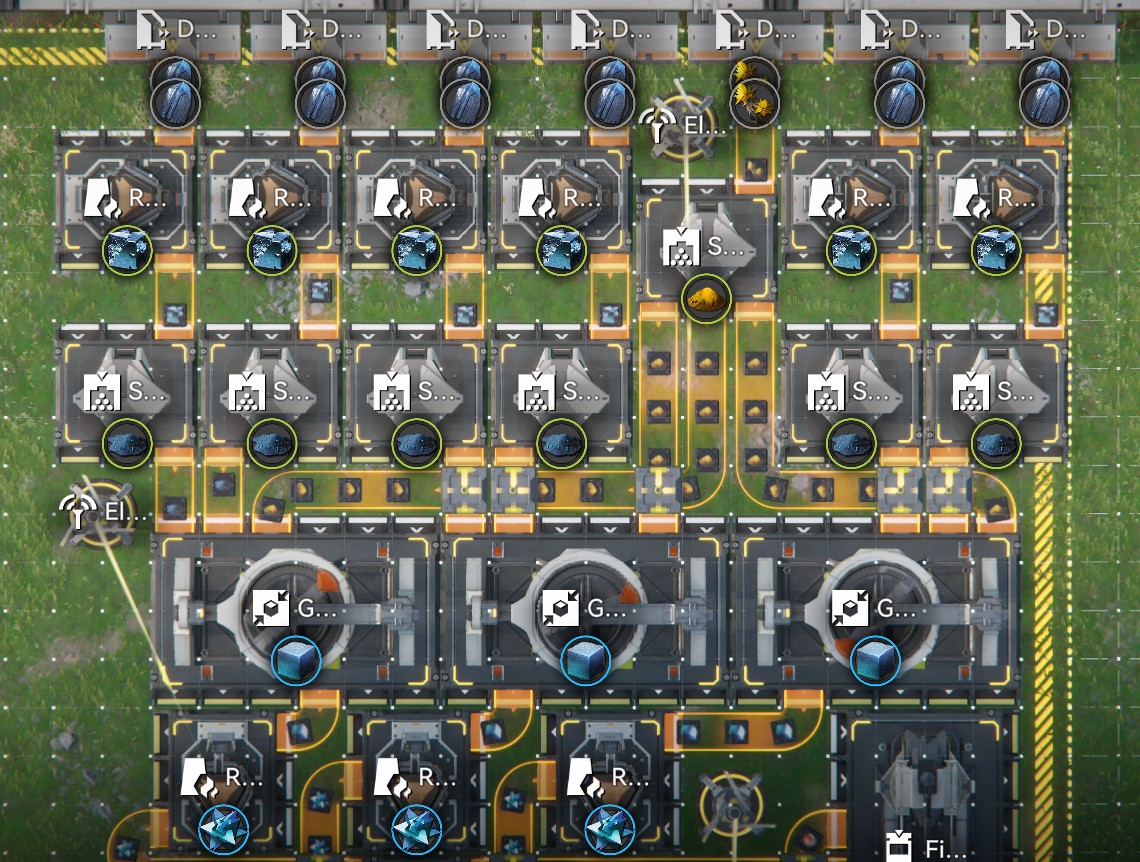
Buck Capsule (B) Blueprint
NA/EU: EFO01Iao8048I79725o08
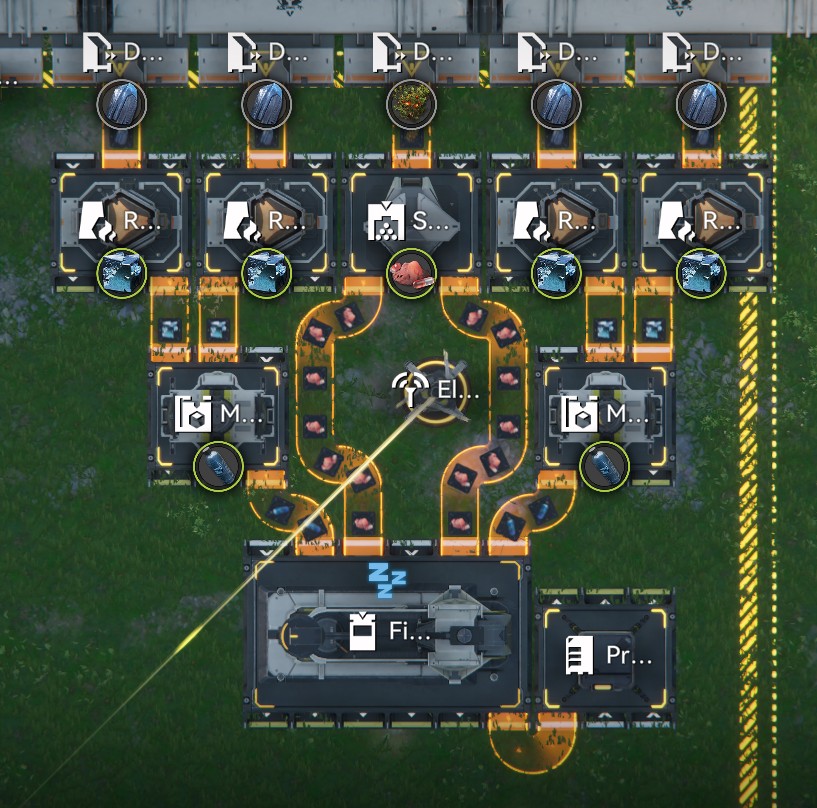
Next Buck Capsule becomes available upon mining Ferrium Ore. This is an efficient setup using 5 Depot Unloaders. If you have the space / Ferrium Ore yield, set up two of these to make more Stock Bills.
Note that if you're rushing through the story, you don't need to invest too much into this step and can wait for Buck Capsule (A)
Make sure you're setting up Mining Rigs to all the Ferrium that you see. It will be important for future setups. Continue Mining Originite as well.
Currently Amethyst is the least required Ore in the endgame, but things may change. Might as well setup Mining Rigs to every Mineral Bed you find.
SC Valley Battery Blueprint (Blue Batt)

NA/EU: EFO0136uI1EI3iauI0579
Efficient production line for Blue Batteries. The Blueprint puts them all into Thermal Banks, but you can adjust and swap some to Protocol Stash depending on your Power needs. (Since you can trade extra for Stock Bills to the Refugee Camp)
You honestly should be able to explore/progress through 95% of Valley 4 with the 4 Green Battery setup. But if you setup every Mining Rig, power will become a little scarce. Be prepared to set this up and swap your Green Battery setup out.
Thermal Bank Standalone Blueprint (Optional)
NA/EU: EFO019A61i3195eA85uI2
Similar to Plant Loops. you can make your Thermal Banks separate from your production lines. An output will send out a battery every 2 seconds, and each Thermal Bank consumes 1 every 40 seconds. You could use this setup with 20 Thermal Banks to power your base if you wanted to. Simply switch your battery production lines to have Protocol Stashes instead.
Mid to Late Game
This point in the game is when you're just about finishing up the Main Story in Valley 4 and get access to Sandleaf. This will open up a few new recipes, and these Blueprints act as a mid point between the mid and late game.
From here, you can decide for yourself how to want to optimize. You can start out small and produce new materials with basic setups, or thrust straight into more advanced setups.
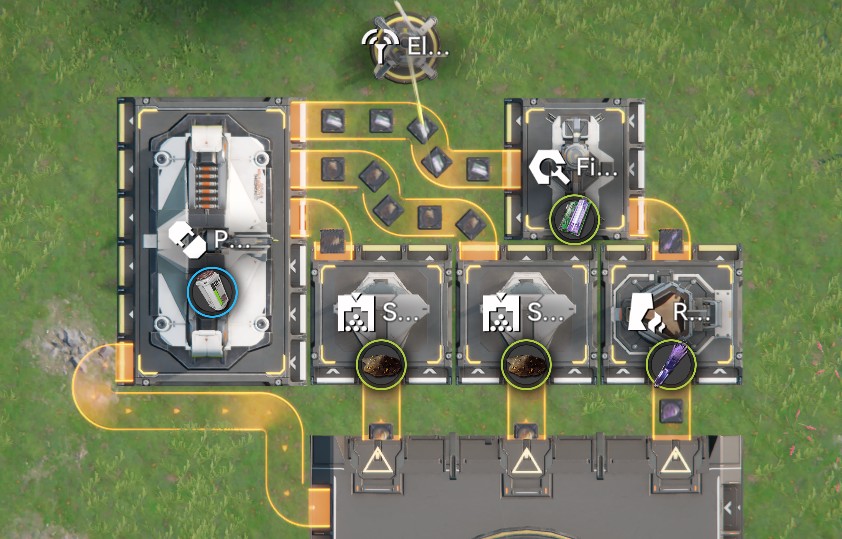
Cryston Component Blueprint (Purple Gear)
(Temporary / Skippable)

NA/EU: EFO01u1Ioa2oue0a0AoOU
This Blueprint also works with both the Depot and AIC due to using 3 output belts.
Not fully efficient, but Purple Gear is a temporary setup, so just use until you have enough Components for your team. You can also skip this step if you wish to rush through the story to reach endgame / Gold Gear.
Starter Blueprints
Starter Blueprints are intended to be simple production lines to start out. This can boost your Stock Bill production early on, allowing you to plan out more complex setups.
Buck Capsule A and HC Valley Battery will be the main production at the endgame of Valley 4.
Use these Blueprints below to start out, before moving onto more complex setups as you unlock more upgrades/outposts.
Buck Capsule A Blueprint (6/min)
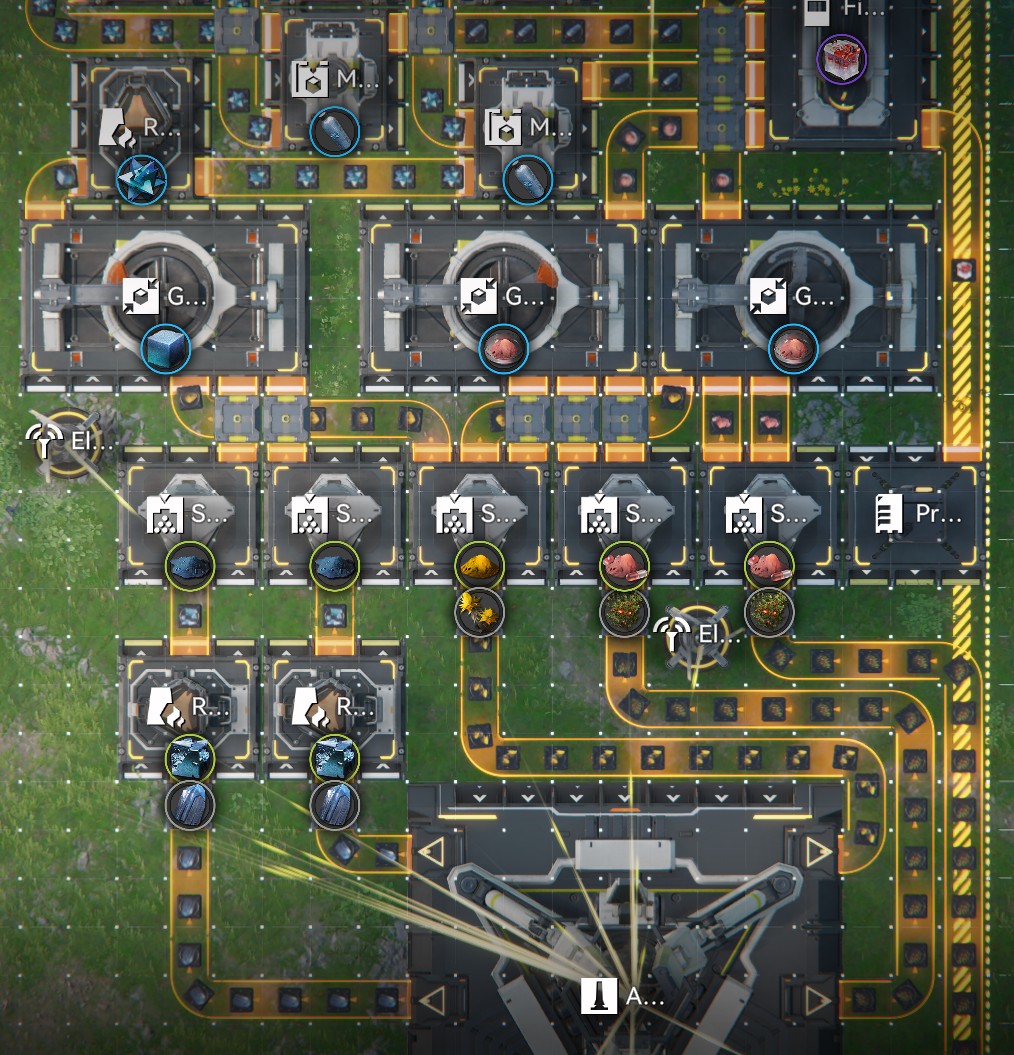
NA/EU: EFO01Iao8048I797o5o08
Note this Blueprint connects to the PAC (big base) for more depot outputs. Line up the top of the Blueprint with Depot Unloaders and the bottom with the PAC. This makes 6 Buck Capsule A per minute.
HC Valley Battery Blueprint (Purple Batt)
Coming Soon
Valley 4 Endgame
At the end of Valley 4, you will have access to the Main AIC Base and 3 Outposts. Depending on what you want to do, you can utilize these areas as you see fit. If you want examples of endgame setups, check out below.
Example Endgame Setup Valley 4 (CN Player)
A popular setup has been circulating in the community, being able to produce 18 Buck Capsule (A) and 18 HC Valley Battery per minute.
A redditor was able to recreate the build for NA/EU Blueprints. You can also reference the original bilibili video with this Blueprint.
Disclaimer: Optimizing Stock Bills is not necessarily the best strategy. Once you max your upgrades, clear out the Redistribution Shop, etc, Stock Bills become unecessary to farm heavily.
From there, you should reprioritize to building up your Wuling setup instead. There is a lack of Ferrium in Wuling, meaning you can transfer some over from Valley 4 to increase production.
Even still, this setup is still nice to see how people optimize their production.
Core AIC
- Top Left - EFO01iOe7u5E0O2472U4
- Bottom Left - EFO01Iao8U10Oa905o08
- Mid Top - EFO01a7094eU37A7oe5e
- Mid Bottom - EFO01893ui06291oUi73
- Top Right - EFO010U9657AuUiiE179
- Bottom Right - EFO011ea02i78eU134O7
Sub-PAC
- Outpost x3 - EFO019A61OUiIAeI5uI2
This build assumes you have connected all Mineral Beds, have unlocked all upgrades for the Core AIC, 4 Depot Busses for the Outposts, and are at the endgame (Region Level 11)
Video Covering the Base Setup
Wuling Progression
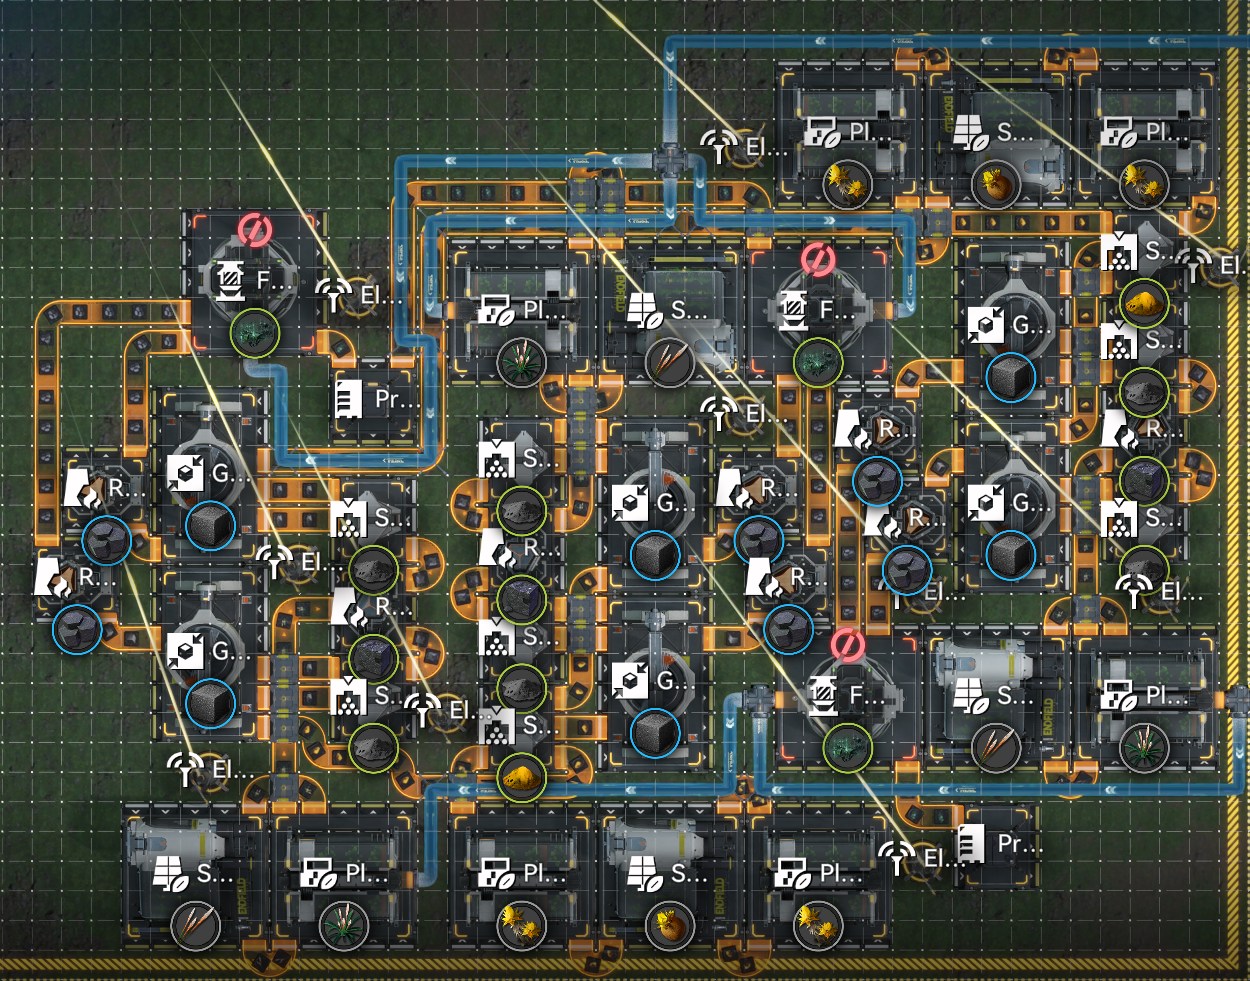
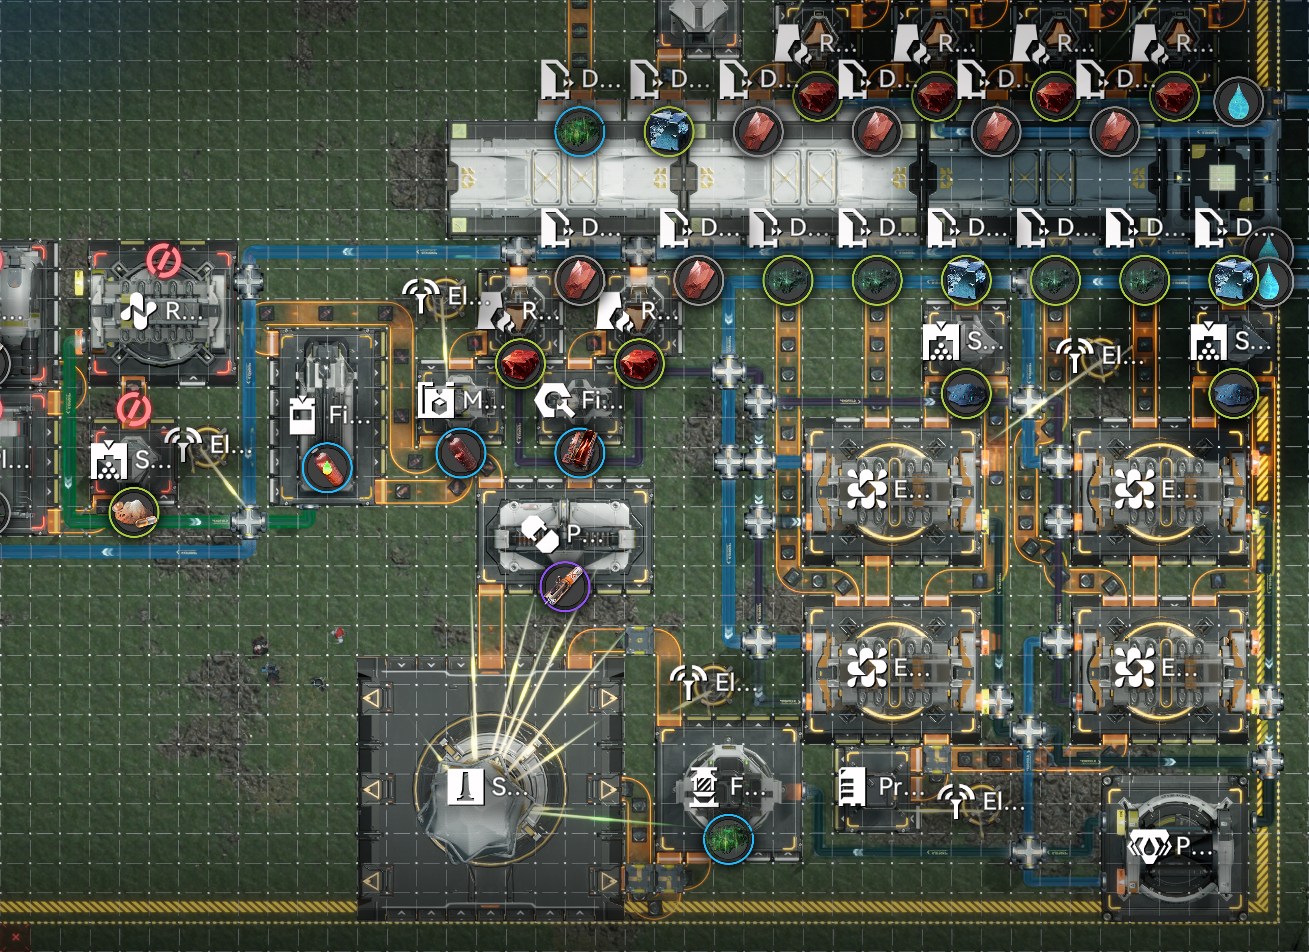
Xiranite Factory
The most important resource to produce in Wuling is Xiranite. The production has a hard limit since you can only place 2 Forges, the only Facility that can produce Xiranite (up to 4 in version 1.1)
The above setup includes all the required facilities for 2 Forges of the Sky. It's important to note you still need to feed water to the pipes and add Jincao to the Seed Picking Units. You will also need enough Planting Machines to produce Sandleaf in Wuling.
Pick the best one for your needs/available resources:
For NA/EU:
2 Forge Setup: EFO01u1I699e210OAoOU
4 Forge Setup: EFO01o08a11U506aIieO
Note: The 4 Forge Setup only includes 2 Forges, so you can use it before unlocking the ability to place 4 forges without an issue.
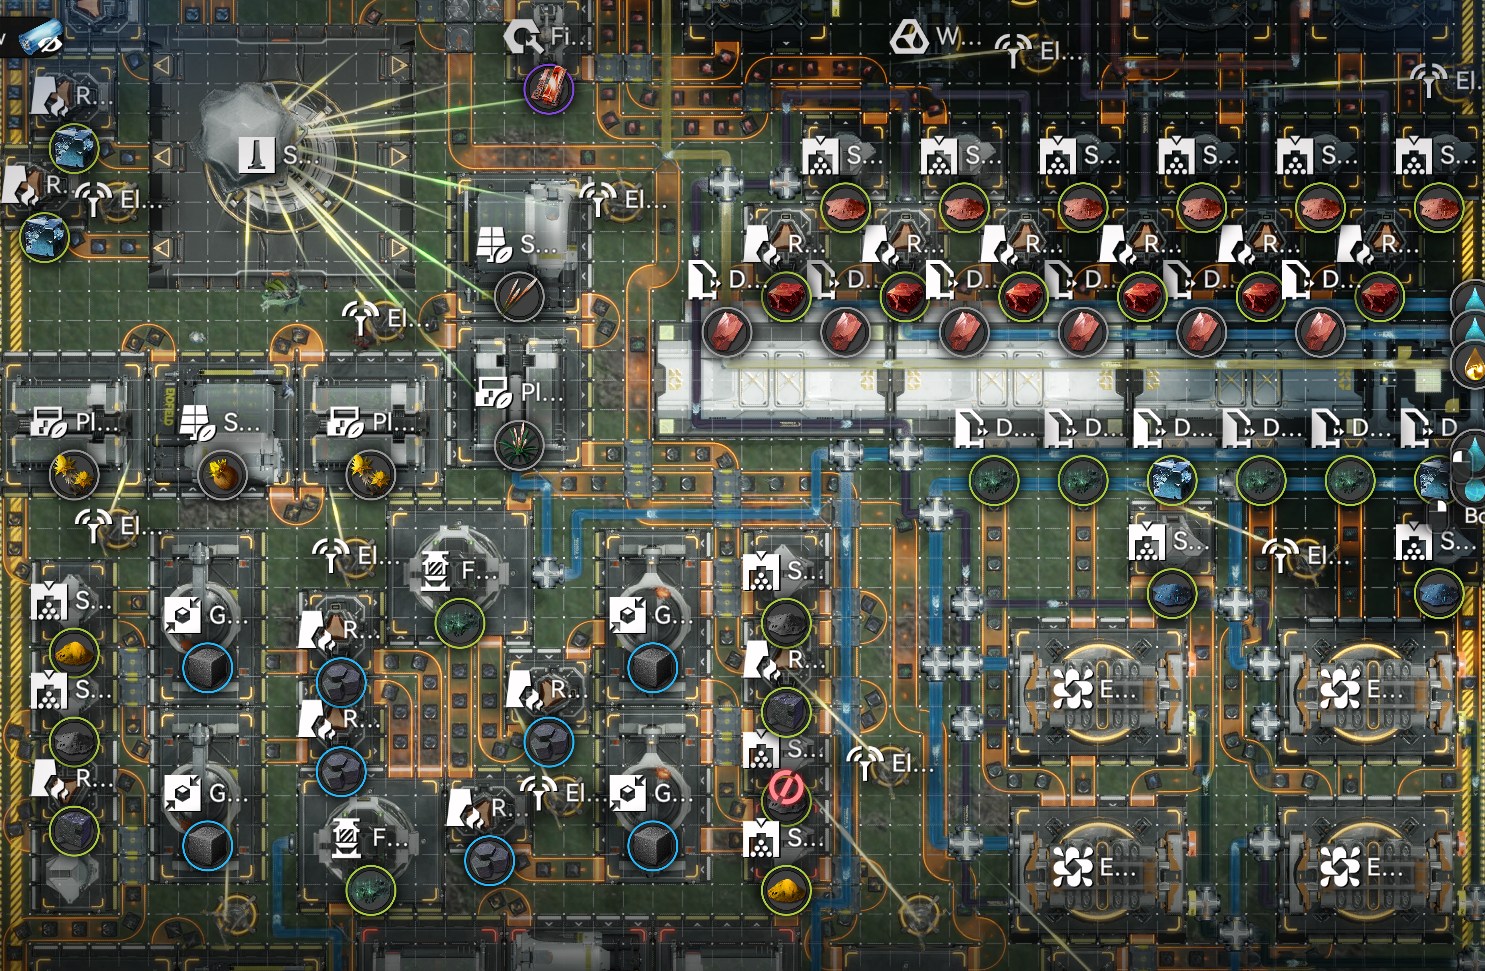
3-Forge Setup
In the version 1.2, the forge limit is increased to 8 (12 after the Test Area is unlocked), but we also need to use forges to produce Heavy Xiranite. If needed, this 3-Forge setup maximizes your Xiranite production and leaves one forge for the production of Heavy Xiranite.
Just remember to feed the appropriate Seed/Plants to the respective Seed-Picking/Planting Machine!
For NA/EU: EFO01o08a11U506E9IieO
1.1 Cuprium Hub
Requirements:
- Xiranite Production (at least 1 forge)
- Qingbo Stockade unlocked
- Wuling Tech Tree Tier 2
- Enough AIC Index to buy: Hydro Mining, Liquid Refining, Water Treatment Unit and Conduits.

The 1.1 update added a new mineral and new recipes that further expands the use of fluids in your AIC, both for resource gathering but also processing. The above hub focus on producing a bit of every new resource added in the version 1.1:
- Refined Cuprium (and its respective Parts, Bottles and Components)
- Jincao Tea (can switch to Yazhen Syringe)
- SC Wuling Battery
For NA/EU:
Top: EFO01A5i422865EO9ieO
Bottom: EFO014o5Iuu0Ao3uE71A
Video explaining the hub setup:
1.1 Mega Base (12 Battery & 6 Syringe/min)
Once you have enough Components and Parts, there's no need to stock Xiranite or any resource. When that happens, you can use the following blueprint to transform all your Cuprium and Xiranite into products (and sell for Stock Bills).
Requirements:
- Wuling Regional Development Level 7 (for Cuprium Purity)
- Mine every Cuprium Node
- Area Upgrades for Wuling's Core AIC Area
- 120 Xiranite/min (4 Forges working at 100% Efficiency)
- ~90 Sandleaf/min (3 Belts)
- 1.6k extra power for the blueprint facilities
- 8 Water Pumps (4 pipes full of water)
- Some Yazhen (to feed the Seed-Picking Units)
For NA/EU:
Liquid Xiranite/Yazhen Solution (Top Right): EFO01Iao16674a97O5o08
Cuprium and Sewage Refinery (Top Left): EFO01Eu238817uo5I3uIa
12 Battery Setup (Bottom Right): EFO01U4A2EEo94OE27Oa8
12 Battery Setup (Bottom Left): EFO01u1I699e210a3AoOU
Video explaining the blueprint setup:
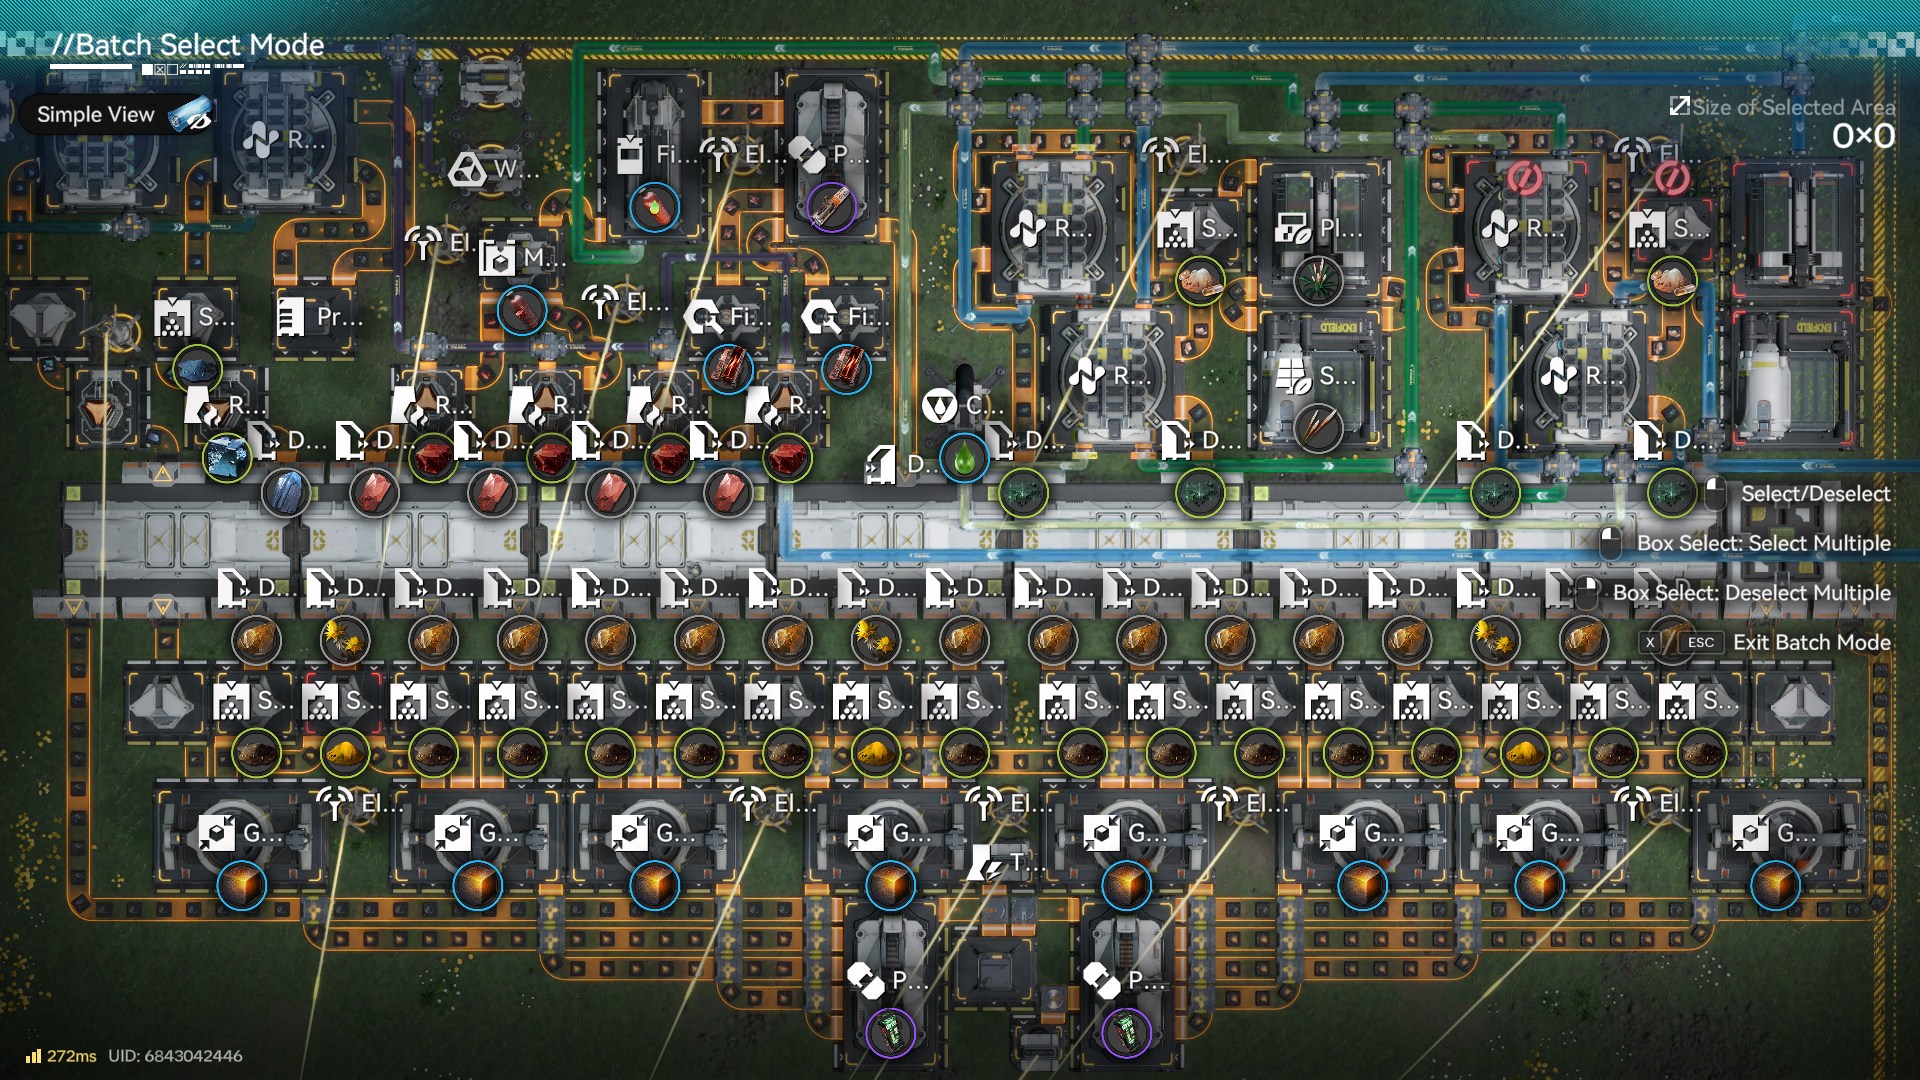
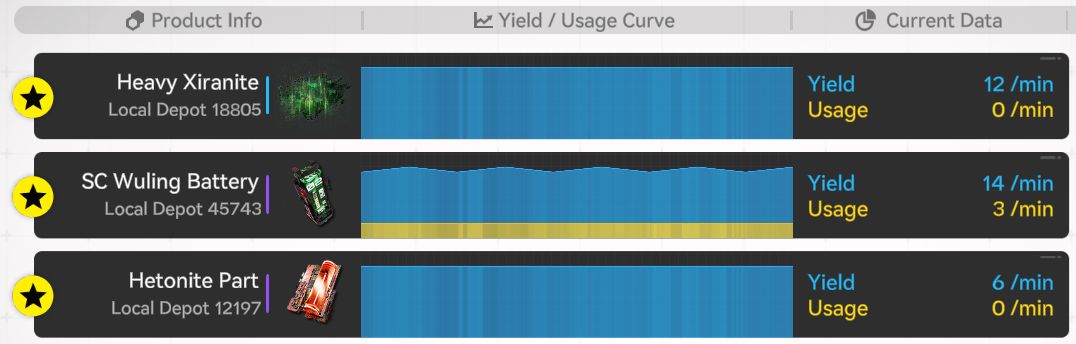
1.2 New Outpost (3 Hetonite Parts/min)
The version 1.2 added a new outpost, formulas and materials, which improves some of the previous setups. For this version, we're still focusing on 12 Batteries/min, not only because we need the power and stock bills, but because it uses all the Originium available in Wuling.
Requirements
- 1.2 Tech Tree Unlocked (Wuling AIC III)
- Area Expansion II (Cardiac Remediation Station)
- Basic Depot Bus (Cardiac Remediation Station)
You also need to set some productions elsewhere before using this blueprint!
- For Xiranite (you need 6~7 forges) check the Xiranite blueprints above!
- Use x3 Refining Unit to process Ferrium Ore into Ferrium and add to your depot or use the following blueprint in one of your Sub-PAC / Automation Core: (NA/EU only!) EFO01u1I699e210e4AoOU
Once you have everything unlocked/ready, start placing the Acid Blueprint, follow with the Xircon Blueprint and pick one of the 3 options to produce the sewage for your Xircon Crucibles.
For NA/EU:
Acid/Hetonite Production (Top Right): EFO01U4A2EEo94O2O7Oa8
Xircon Production (Bottom Right): EFO01u1I699e210e5AoOU
Yazhen Syringe [A] (Bottom Left): EFO018930aaAO91A7UI73
Cuprium Component + Part (Bottom Left): EFO0136u900iE6a990579
x2 Cuprium Part (Bottom Left): EFO01Iao16674a9a75o08
Use these at Wuling Core-AIC for 12x Batteries and 1x Forge
Part 1 (Left): EFO016i1AUUOui7U4O83e
Part 2 (Right): EFO01Iao16674a9a35o08
Video explaining the blueprint setup:
1.2 Maximum Hetonite Parts (4.5/min)
If you don't need any other Cuprium-related material, you can use all of the cuprium to maximize your Hetonite production. This gives you up to 2.25 Hetonite Components/min, which helps you artifice your gear more quickly.
This is a really compact blueprint that makes use of the new Expanded Crucible to fit all of the Hetonite and Xircon production in a single outpost! Keep in mind this will required the maximum area upgrade for the new outpost.
When setting up your blueprint, it's highly recommended to keep the Acid/Water pools in the right side of the screen. You should also avoid placing too many bridges when setting up your pumps, as this blueprint already uses a lot of pipelines and there's a limit of 96 Pipelines in the new map.
For NA/EU:
Outpost Part 1 - Forge + Ferrium (Left Side): EFO01o08a11U506E5IieO
Outpost Part 2 - Hetonite (Top Right): EFO01A5i422865EeA9ieO
Outpost Part 3 - Xircon (Bottom Left): EFO01eE7O55uaE4A2oAi8
Wuling AIC Area Part 1 - Sandleaf + Batteries (Left): EFO016i1AUUOui7U4O83e
Wuling AIC Area Part 2 - Forge + Batteries (Right): EFO01Iao16674a9a35o08
Video explaining the blueprint setup:
===================
1.2 Test Area Updated Blueprints
With the release of the Test Area, the maximum number of forges and the total available Cuprium/Originium also increased. For now you can get a total of 540 Originium/minute and 240 Cuprium, assuming you are at Regional Development Level 14 or above.
This is a big blueprint that requires the use of both outposts and the Core AIC at the maximum area size. The blueprint will also assume you are already at Development Level 14+ and unlocked the last forge upgrade. Make sure you are mining every single mineral node available in the map. You also need to request Ferrium from Valley 4 to maintain both Hetonite and Xircon productions
Part 1: Xiranite Production (Core AIC)
Due to size limits, this blueprint is divided in 4 parts. It doesn't requires any specific location, as long as they are placed next to each other. After placing the blueprint, place Sandleaf and Yazhen/Jincao in the Planting Units. Remember to use 2 pumps on every pipe (refer to the bottle icons)
For NA/EU:
- 10-Forge Setup (Top Right): EFO011eaiAAEIeUiI30O7
- 10-Forge Setup (Top Left): EFO01iOe54431O24a7aU4
- 10-Forge Setup (Bottom Right): EFO01A5i422865E2i91eO
- 10-Forge Setup (Bottom Left): EFO01eE7O55uaE4I7oui8
Part 2: Hetonite/Xircon (Marker Stone Outpost)
ONLY USE ONE OF THE TWO VARIATIONS, you can either use the water treatment unit or conduits to deal with sewage. If you decide to use conduits, you will need to bring the sewage all the way to the Test Area and dump it in the Purification Nodes. It is highly recommended to rotate the camera so the Acid and Water pools are in the right side of your screen. Avoid making bridges while setting up the water/acid pumps/conduits.
Remember to use 2 pumps on every pipe (refer to the bottle icons, manifold uses 4 pumps of water)
For NA/EU:
- 1. Xircon (Bottom Left): EFO019A6U7753AeOe5UI2
- 2.1 Hetonite Pipes (Water Treatment Unit): EFO01U4A2EEo94Oo671a8
- 2.2 Hetonite Pipes (Conduits): EFO01A5i422865E4591eO
- 3. Hetonite Reactors: EFO01eE7O55uaE406oui8
Part 3: Batteries Production (Jingyu Valley Outpost)
This one is the simplest one, as it doesn't require any liquid input. Just remember to place Sandleaf on the Planting Units on the left.
For NA/EU:
- 13.5 Batteries: EFO01u1I699e2105UAoOU
- Sandleaf Factory: EFO016i1AUUOui79EO83e
Video explaining the blueprint setup:
==================
1.3 Updated Blueprints
The 1.3 Updated increased the available Cuprium to 360/min and Ferrium to 120/min, allowing us to increase the production of Hetonite Parts while maintaining the Xircon Production.
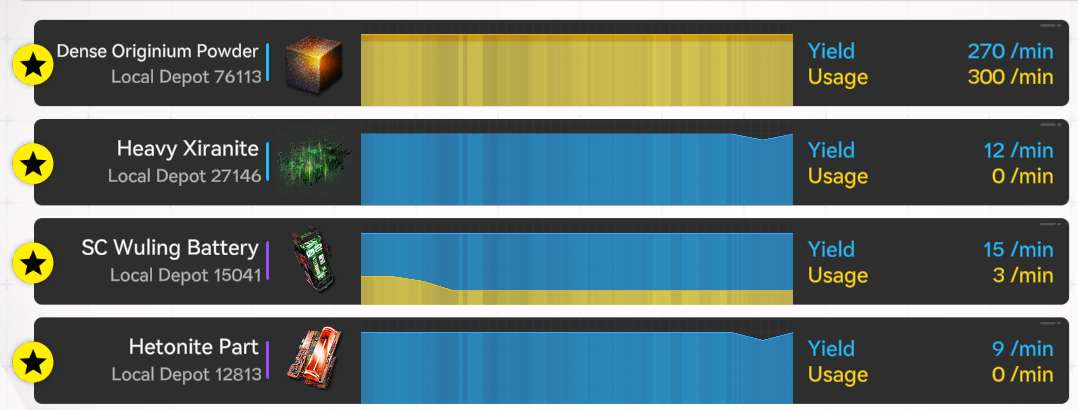
Sadly, due to the lack of Originium in Wuling, we're short on D.O.P. (Dense Originium Powder). Not even the Regional Transfer will be enough, since it only generates 25/min. From here, you have two options:
- Ignore the last 5 D.O.P./min. You'll have a minimal surplus of Xircon.
- Repurpose some of the Originium from Valley 4 to D.O.P. Manually transfer it every few weeks.
Once again, this is a huge Blueprint that uses all the outposts and assumes you are already at Regional Development Level 17. If you're below this, check one of the Blueprints above so you can match the available Yield!
Part 1: Xiranite Production + Xircon (Core AIC)
Due to size limits, this blueprint is divided in 4 parts. It doesn't requires any specific location, as long as they are placed next to each other, but I recommend placing it so the "river" (water source) is in the bottom of your screen. After placing the blueprint, place Sandleaf and Yazhen/Jincao in the Planting Units. You'll need to bring sewage from the Marker Stone Outpost to process Xircon here!
For NA/EU:
- 10-Forge Setup (Top Right): EFO011eaiAAEIeUaE30O7
- 10-Forge Setup (Top Left): EFO01A5i422865E439ieO
- 10-Forge Setup + Xircon (Bottom Right): EFO01Iao16674a9025o08
- 10-Forge Setup + Xircon (Bottom Left): EFO0136u900iE6aoo0579
Part 2: Hetonite (Marker Stone Outpost)
This time we're only producing Hetonite in the Marker Stone Outpost. This removes a lot of pipes, making it easier for you to set up pumps without hitting the pipe limit! Keep in mind this blueprint uses Conduits and you'll need to manually connect them.
For NA/EU:
- 6 Hetonite/min (Top): EFO01A5i422865E8I9ieO
- 3 Hetonite/min + Acid Dump (Bottom): EFO01a70eii2o7AI4oe5e
Part 3: Batteries Production (Jingyu Valley Outpost)
This one is simple, as it doesn't require any liquid input. Just remember to place Sandleaf on the Planting Units and set the AIC port to D.O.P.
For NA/EU:
- 9 Batteries/min (Top): EFO01u1I699e2109iAoOU
- 6 Batteries/min (Bottom): EFO01o08a11U50691IieO
Video explaining the blueprint setup:
Table of Contents
1. Overview2. Early Game Buck Capsule (C) Blueprint LC Valley Battery Blueprints (Green Battery) Industrial Explosive Blueprint (Bombs) Ferrium Component Blueprint (Blue Gear) Full Early Game Blueprint3. Mid Game Seed Loop Blueprint Buck Capsule (B) Blueprint SC Valley Battery Blueprint (Blue Batt) Thermal Bank Standalone Blueprint (Optional)4. Mid to Late Game Cryston Component Blueprint (Purple Gear) Starter Blueprints Buck Capsule A Blueprint (6/min) HC Valley Battery Blueprint (Purple Batt)5. Valley 4 Endgame Example Endgame Setup Valley 4 (CN Player)6. Wuling Progression Xiranite Factory 1.1 Cuprium Hub 1.1 Mega Base (12 Battery & 6 Syringe/min) 1.2 New Outpost (3 Hetonite Parts/min) 1.2 Maximum Hetonite Parts (4.5/min) 1.2 Test Area Updated Blueprints 1.3 Updated Blueprints