With Patch 15.5, TFT’s hardest game mode yet has arrived: Ao Shin’s Ascent. Similar to Tocker’s Trials, you’ll face off against creep rounds as well as powerful, unique bosses each with their own devastating abilities.
Boss Fights
Each stage includes two boss fights, one on 2-6 and a more challenging one on 3-6. As you climb the mountain, the bosses become increasingly difficult, so you’ll need to carefully choose which ones to face as every boss brings a different threat to your board. They’ll also have Modifiers in the higher zones that will drastically change how you play the rest of the game.
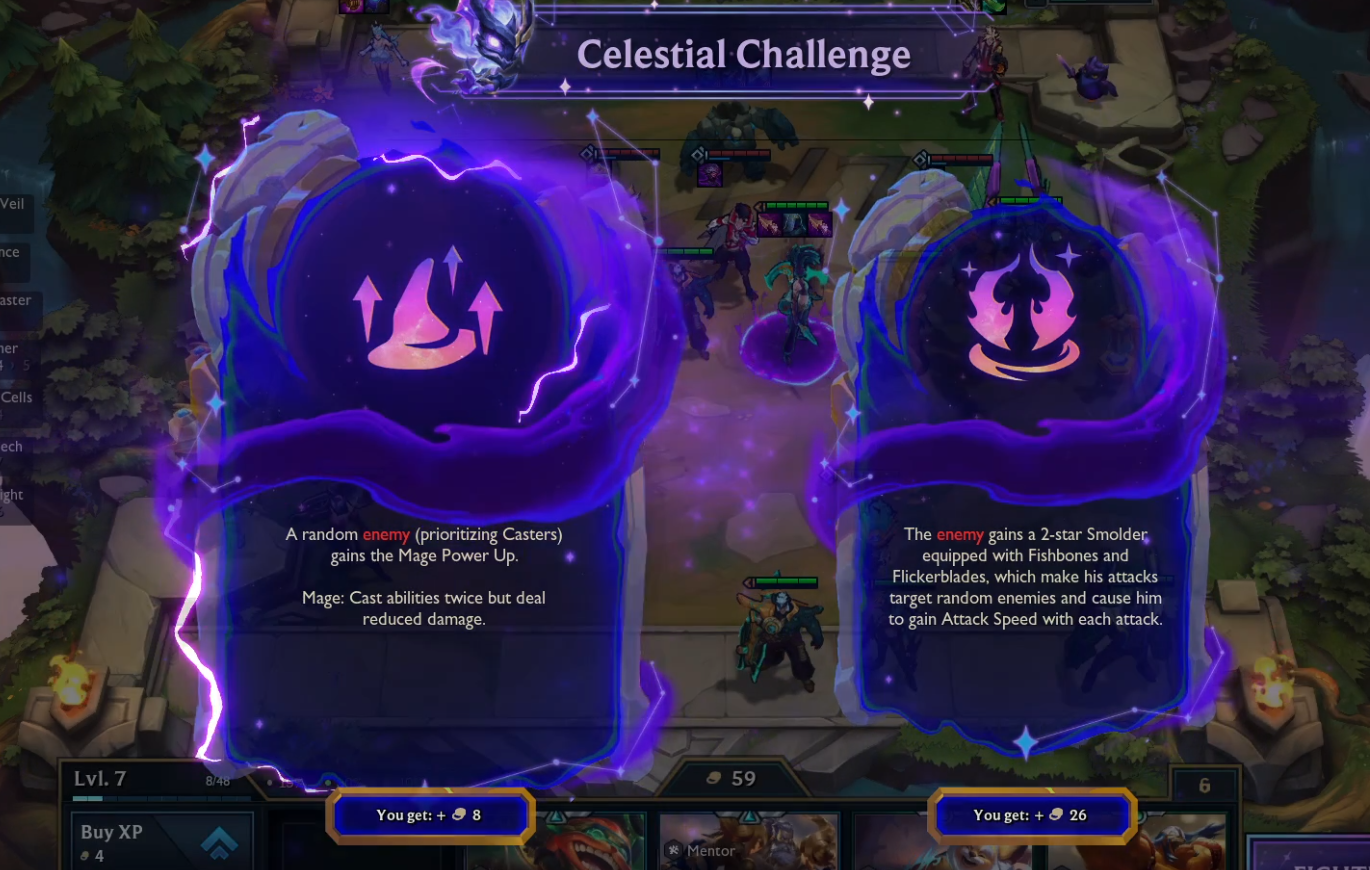
Celestial Challenges
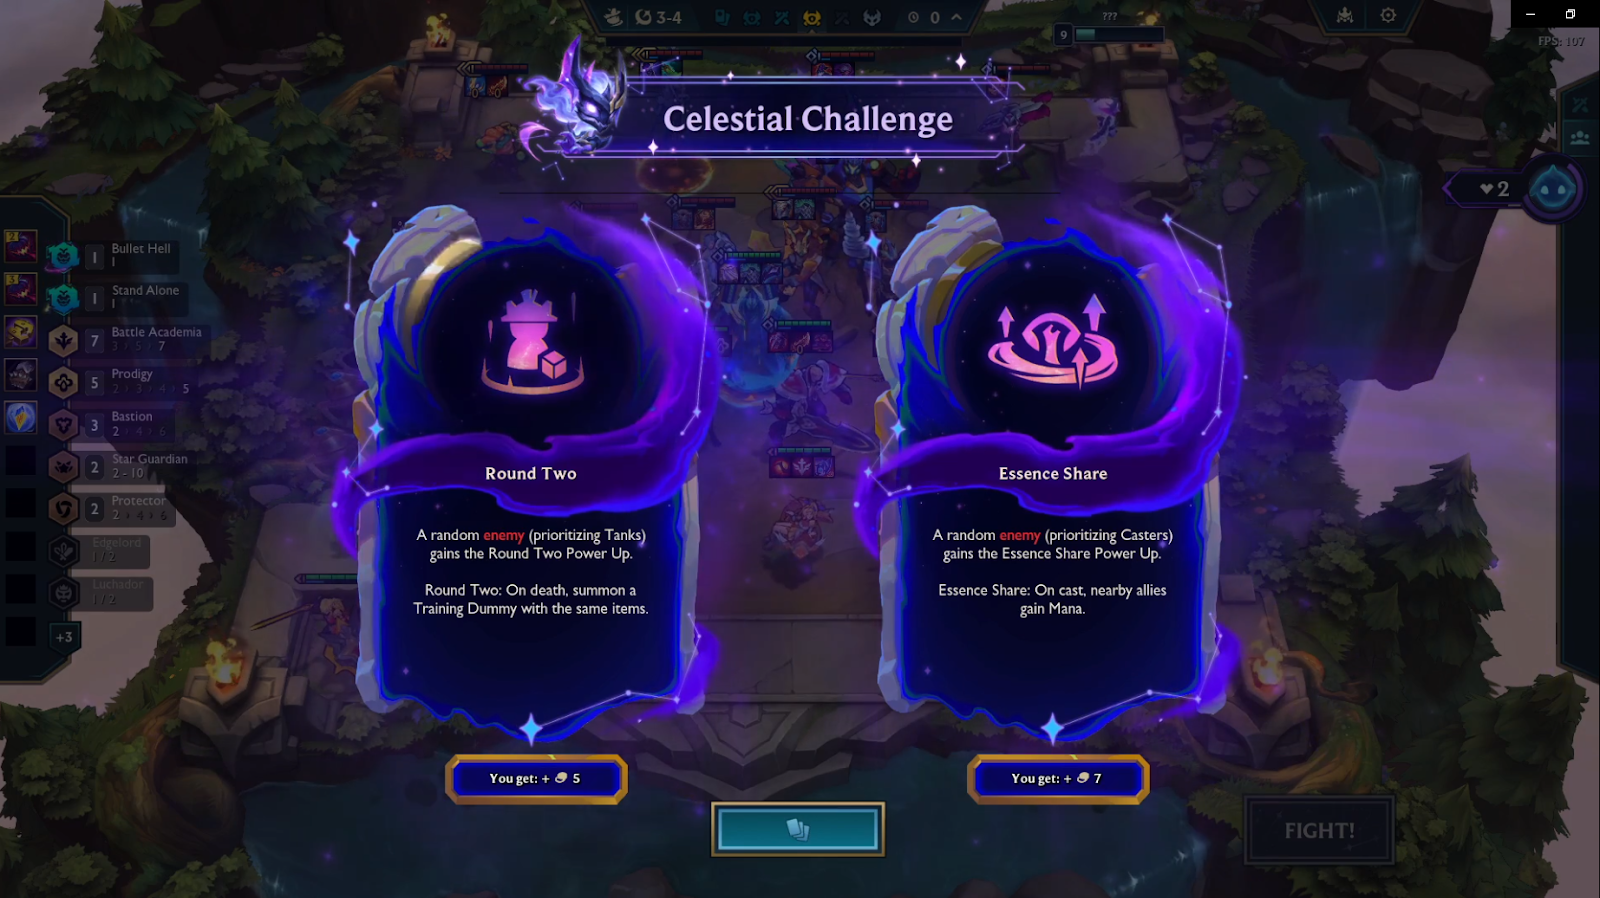
Then we have Celestial Challenges. Think of these as augments for the enemy board. You’ll get to choose between two, but choose wisely, one will be much harder to deal with than the other. But it’s not all bad! In return, you’ll receive a nice gold pay-out to help you build the perfect board to take down the boss and overcome these challenges.
The game mode isn’t timed, giving you plenty of breathing room to plan your moves and perfect your setup, because trust us, you’ll need to.
Ao Shin’s Ascent is ideal for players looking for a new challenge in TFT. If only you had a guide to help you along the way...
Well, now you do!
Guide Masters
Let’s meet the Guide masters who will assist you on your climb up that steep mountain.
Pantheon
First up, we have Pantheon. He falls from the sky, dealing massive damage to multiple enemies while also shielding your allies. You can position him defensively to maximize shielding across your team, or use him aggressively for pure burst damage. As you play, you’ll level up your Guide masters, upgrading their abilities. Pantheon’s Skyfall doubles in damage and also provides enhanced shields and bonus damage when upgraded
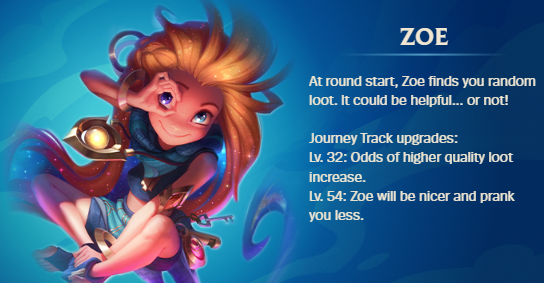
Zoe
Next is Zoe, your chaotic little helper. She brings you random loot that can be extremely valuable, but beware, sometimes she plays pranks and gives you nothing at all. When upgraded, Zoe becomes insanely powerful pulling emblems, full items, and even units, allowing you to build some of the most capped boards possible. Just don’t get dizzy when you see 20 items in your tab
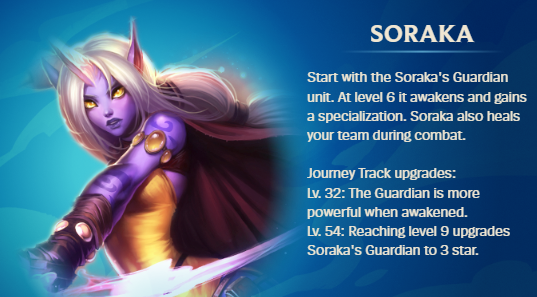
Soraka
Then there's Soraka, who heals your team during combat and spawns a Guardian unit. You can toggle the Guardian between being a front liner, a damage dealer, or something more unique. As Soraka ranks up, the Guardian becomes much stronger and at level 9, it can even reach 3-star power
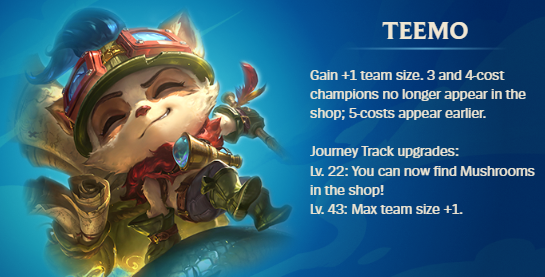
Teemo
Lastly, we have Teemo, the tiny terror. He gives you +1 team size, removes 3 and 4 cost champions from the shop, and causes 5 costs to appear earlier, perfect for reroll strategies. Upgrade Teemo, and it gets even better: mushrooms will start appearing in your shop, and he’ll grant you another +1 team size
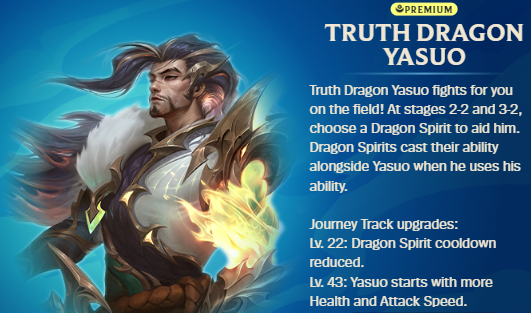
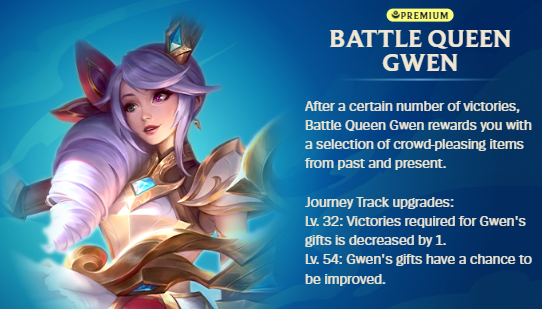
You can also have Yasuo and Gwen as your Guide Master but you'll have to purchase both of them through the riot store.
Now, To climb to the top of the mountain we have to start at the bottom.
How to Beat Ao-Shin's Ascent
Click the comp links to find the best power-ups, alternative items, augments, and tips for each comp we mention and play during Ao Shin's Ascent.
Stage 1 - APPROACH
Strategy TLDR
Recommended Guide Master - Any Guide Masters
Pick the easiest Celestial Challenge for your Comp
Be level 8 on 3-6 and roll for your 2 star Soul Fighter units
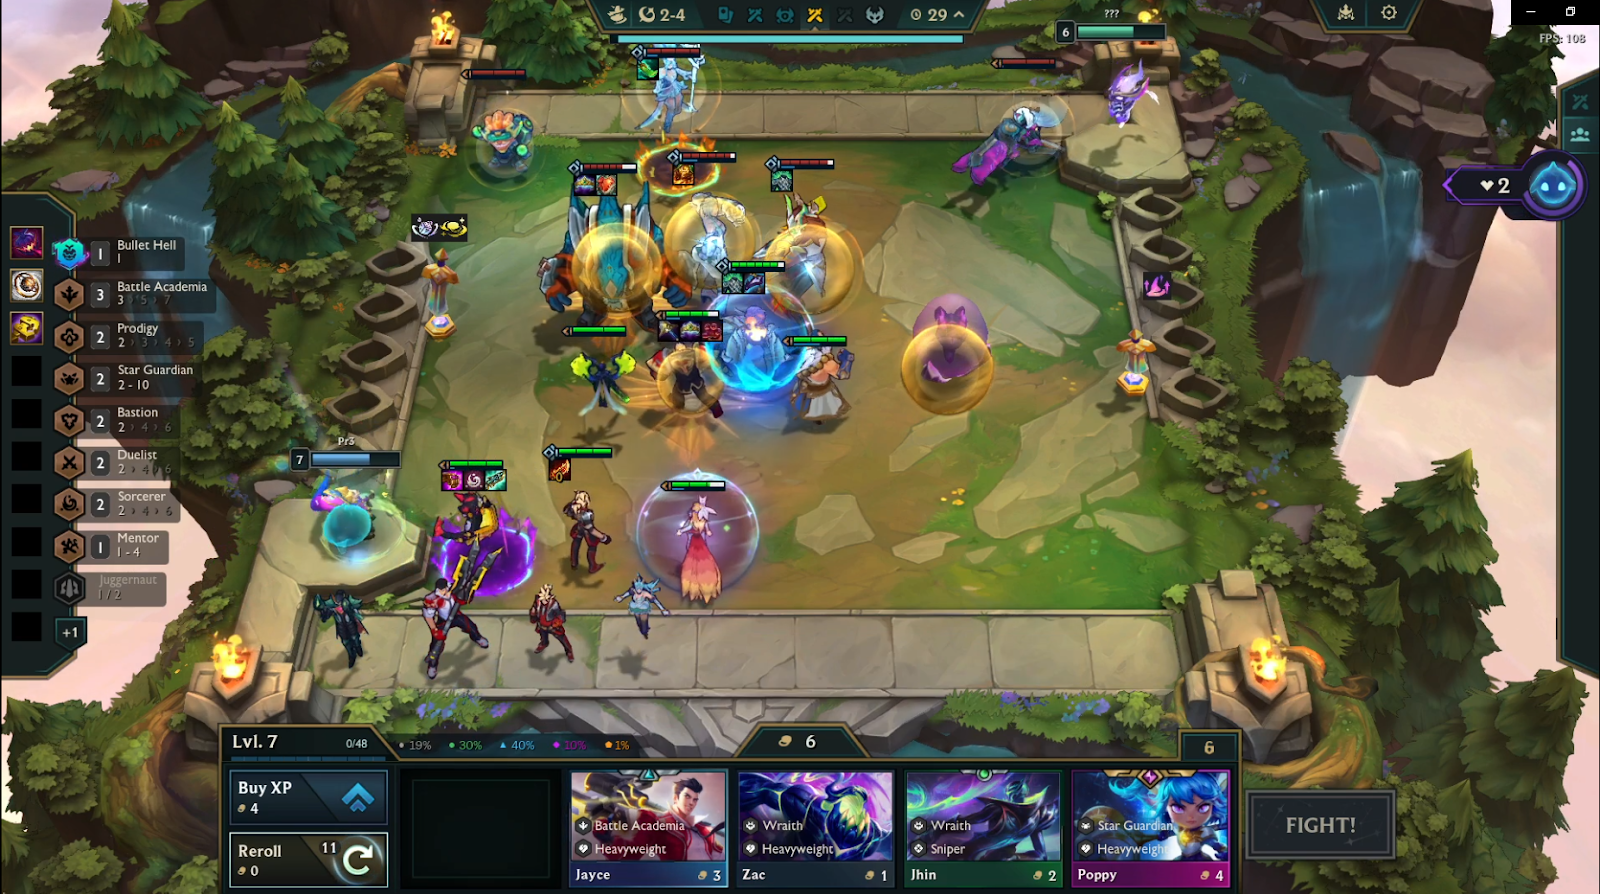
Approach is the first out of 5 parts that we need to complete to free the fellow tacticians and complete Ao Shins approach.
Approach is fairly easy so any Guide master can be used as theres no enemy Modifiers to play around and the Boss fights aren't as complex as the others.
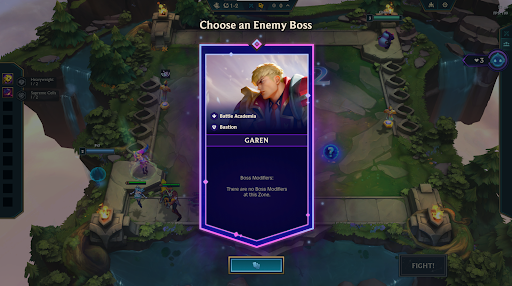
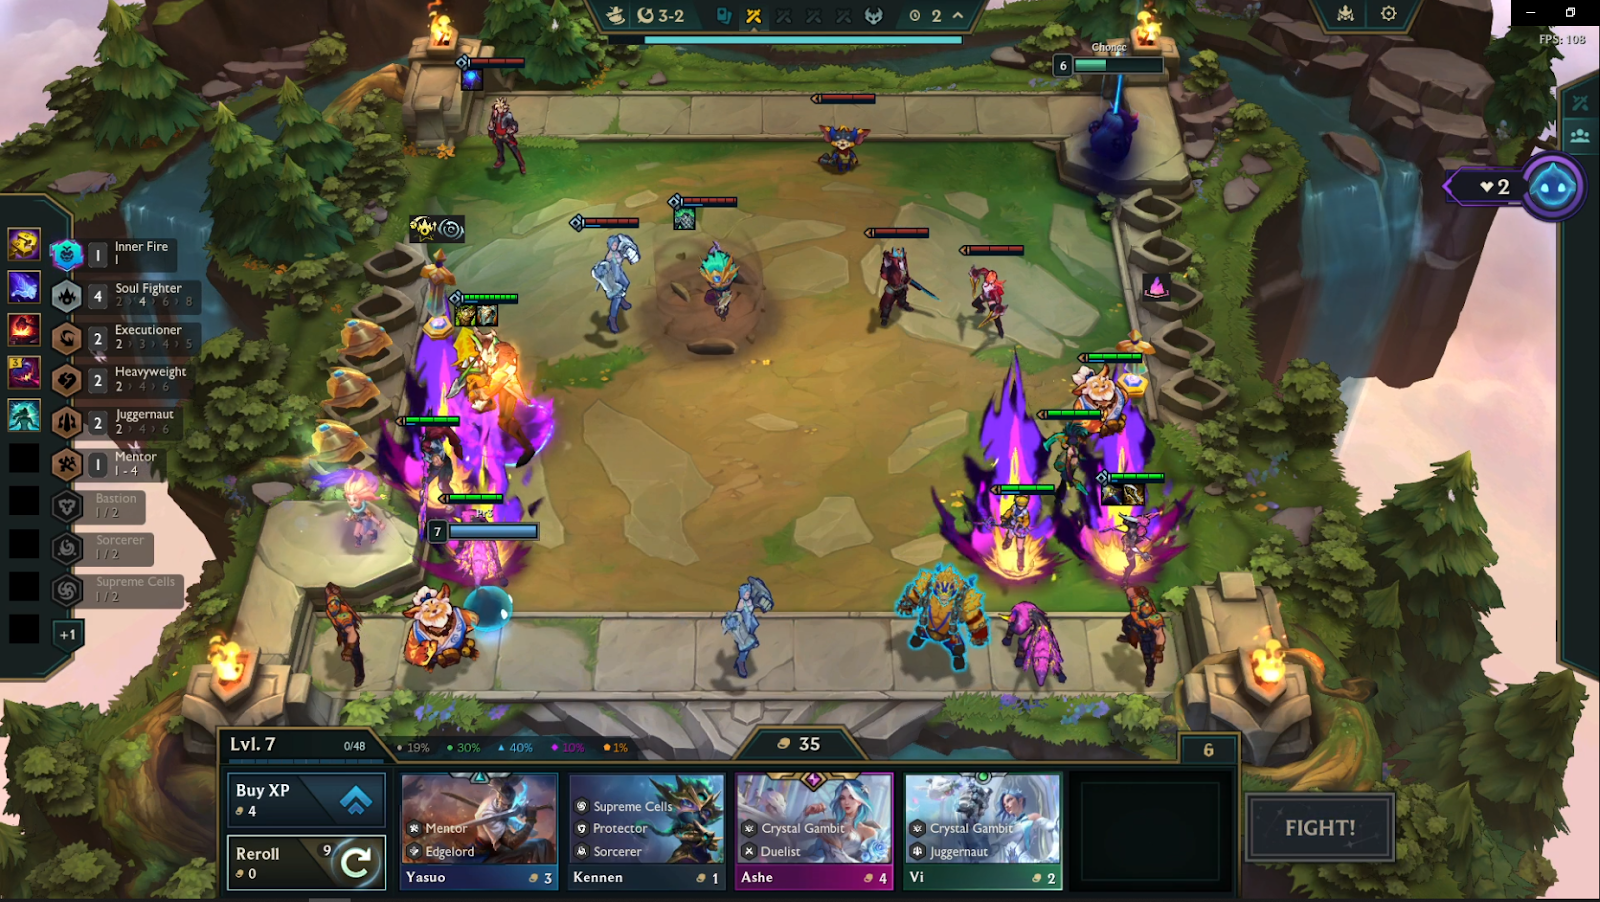
We're welcomed into the Approach by Garen, the first enemy boss we have to take down. Since it's early in the game, there are no modifiers to make this part harder. It's a nice introduction to the game mode and gives you a solid feel for what's to come.
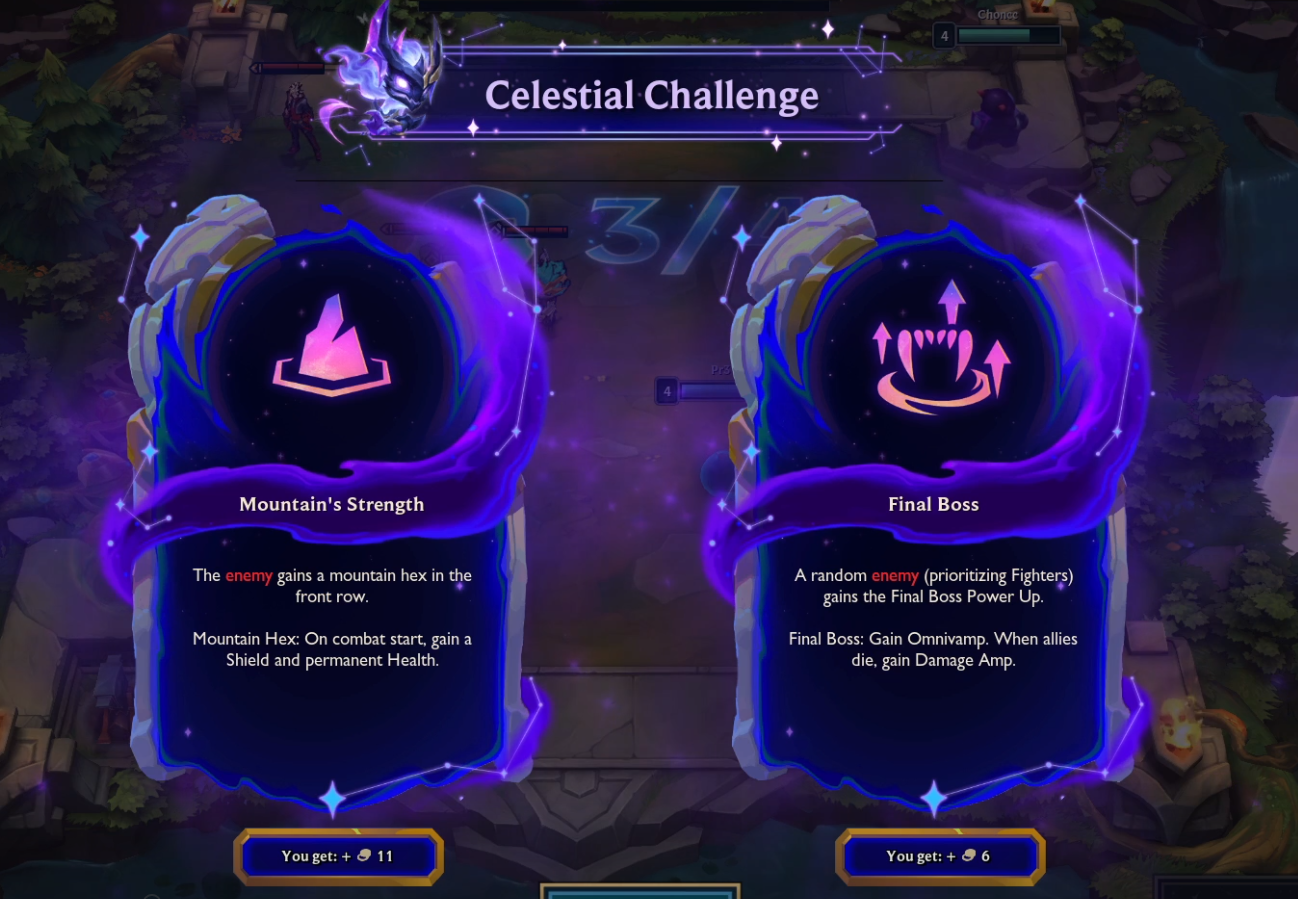
We do get introduced to the first Celestial Challenge here, and this is where you'll need to start paying close attention both to what the challenges do and to the type of comp you're playing. They can really change the way you approach the game. But we’ll get into that more later. For now, we opted for Mountain’s Strength, since it was only buffing a 2-star, 1-cost Kennen nothing we can't handle.
Before 3-6, you'll want to roll all your gold for the units you're playing, as this is the last round to do so before taking on the final boss in the Approach. The great thing is, like we discussed earlier, there's no time limit. You can position your carries away from threats like Katarina and really optimize your positioning as things will get more hectic on our climb up the mountain.
As you can see on the right, we have lives. If you do end up losing the round, you’ll get another shot and you'll also be given loot. This can include gold, items, champions, or even champion duplicators, so you can bounce back, avenge your defeat, and push on for that victory
With Approach Conquered and Choncc free its time to push on.
Stage 2 - SLOPE
Strategy TLDR
Recommended Guide Master - Pantheon
Choose any Celestial Challenges that won't effect your backline carry
Be level 5 or 6 on 2-6 and roll for any upgrades if needed, look to activate 4 Soul Fighter
On 3-6 be level 8 and Roll for Sett and Samira while activating 6 Soul Fighter, 8 If you find a Gwen
Now as we move up the mountain it's going to get harder and harder, It’s time to lock in and get this victory.
For the Slope, we’re going to use Pantheon as our Guide Master. He offers solid shielding for the frontline and deals tons of damage during his Skyfall ability. Soraka and Zoe are also playable Guide Masters on this stage. If you select Soraka, lean toward a frontline Guardian and look for combat augments along the way. For Zoe, keep an eye on the loot she drops each round, you’ll be able to decide which fast 8 comp to pursue based on the components or emblems she provides.
For this stage, you can lean toward any fast 8 board. Look for Star Guardians or Soul Fighters if you start with AD components, then decide which direction to commit to based on the units you naturally hit going into the 2-6 boss fight. If you get mostly AP components throughout Stage 2, consider playing Battle Academia or vertical Sorcerers.
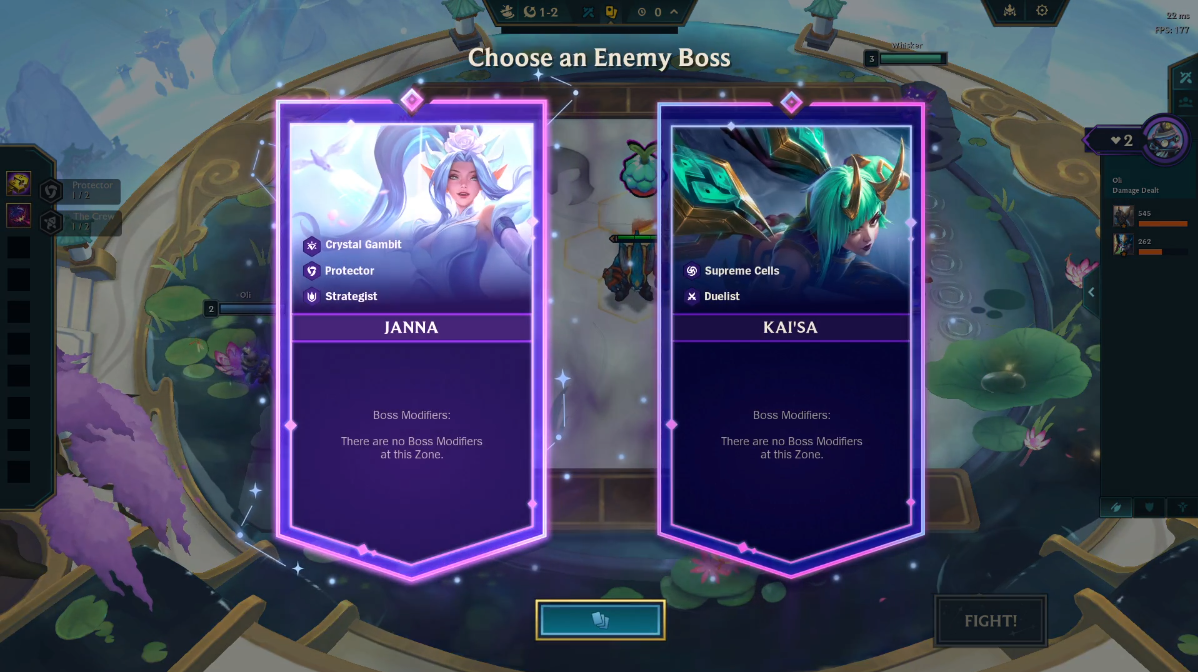
Straight away we’re offered which Enemy Boss we’d like to go against. We picked Kai'Sa here so we’ll end up against more of a Protector Supreme cell team.
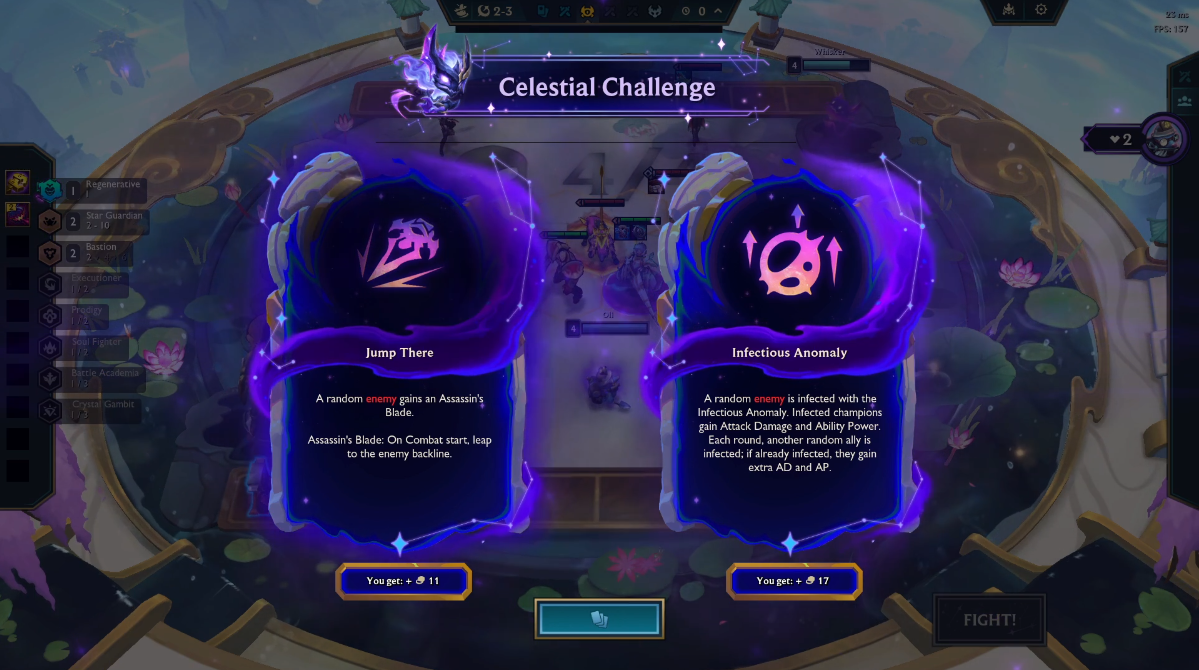
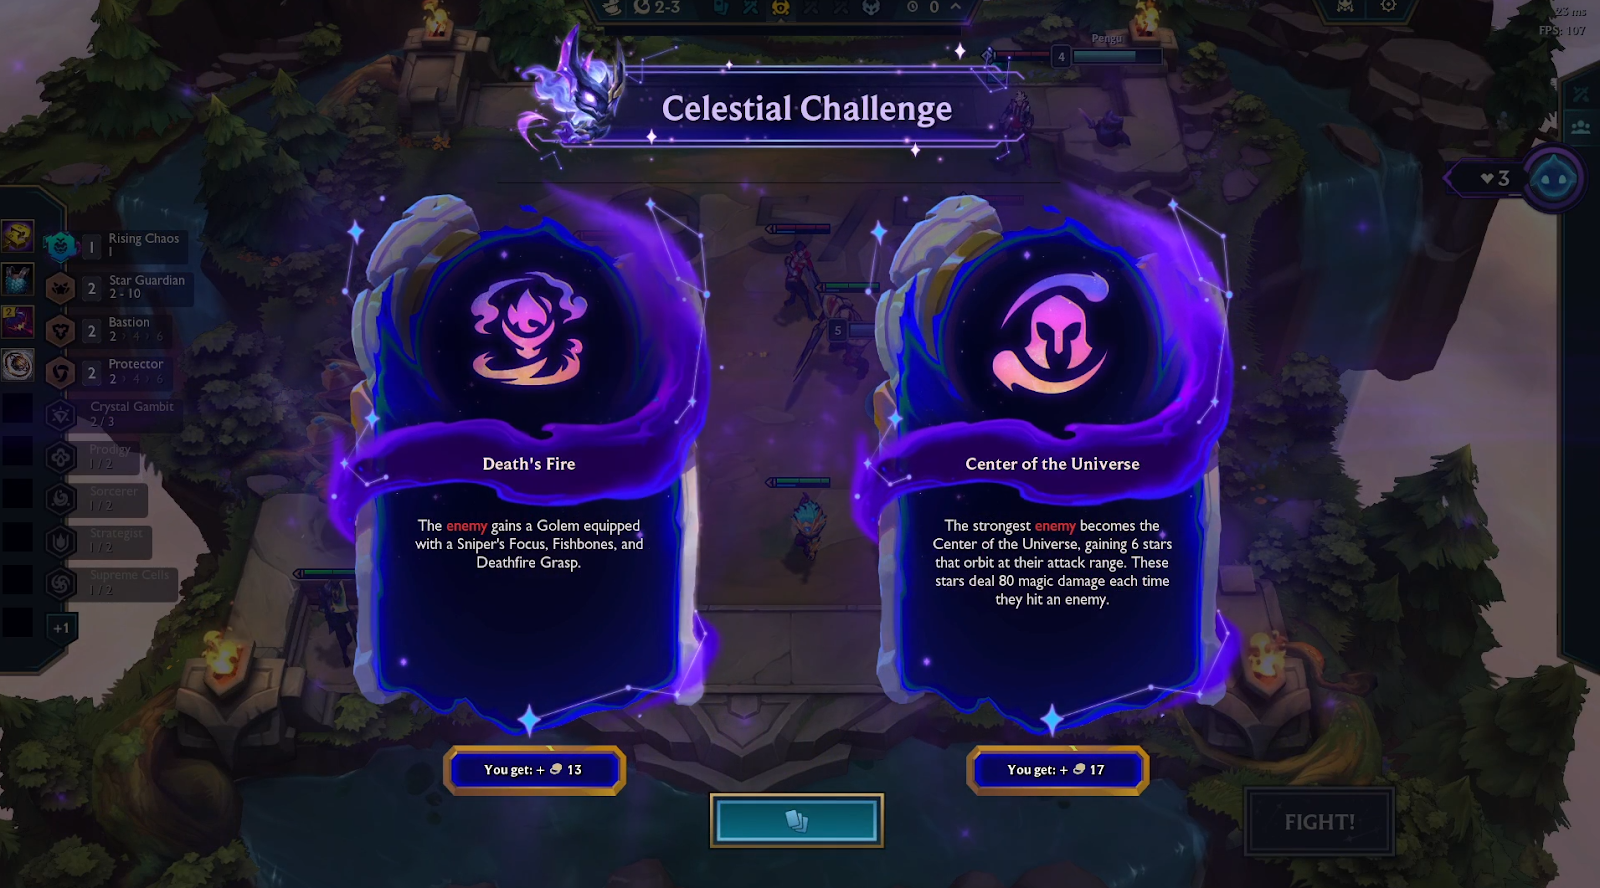
With the first Celestial Challenge being offered, one clearly impacts the game more than the other. Since we're playing around a Fast 8 comp with our main damage dealers in the backline, we don’t want to angle toward Jump In as it forces us to position some frontline units in the back, which weakens our frontline and exposes it unnecessarily. Infectious Anomaly on the other hand, provides more gold and is much easier to play around.
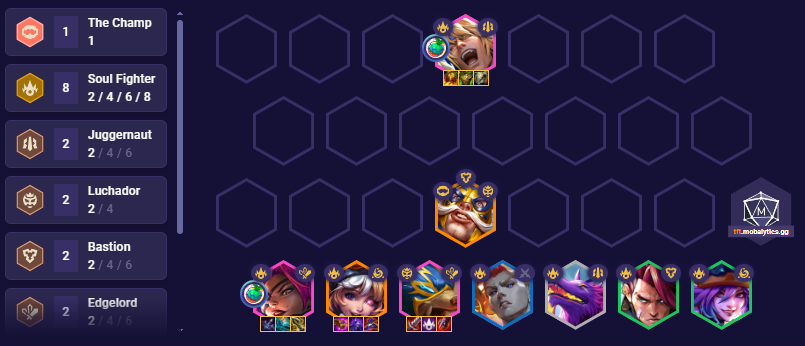
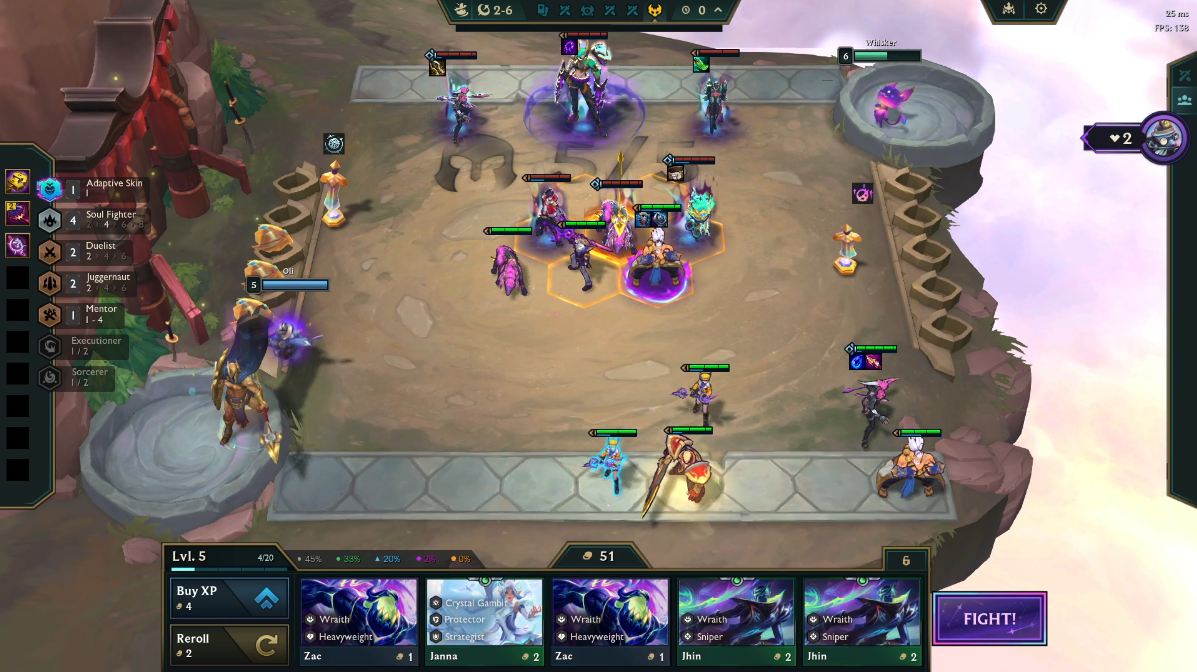
With the first boss fight approaching on 2-6, it’s not the toughest encounter, but it’s still important to secure a few upgrades beforehand. Ideally, you want to be level 5 or 6 with key items slammed on your core carries as this should allow you to breeze through the fight. Our board wasn’t the strongest, but we made sure most of our items were completed and that key traits like 4 Soul Fighter and Mentor were active across the board.
If you have pairs on your bench such as Naafiri or Kalista, It’s worth rolling down to 40 gold in hopes of hitting upgrades. Just make sure multiple units are within Pantheon’s shield radius to get maximum value, then click Fight when you’re ready.
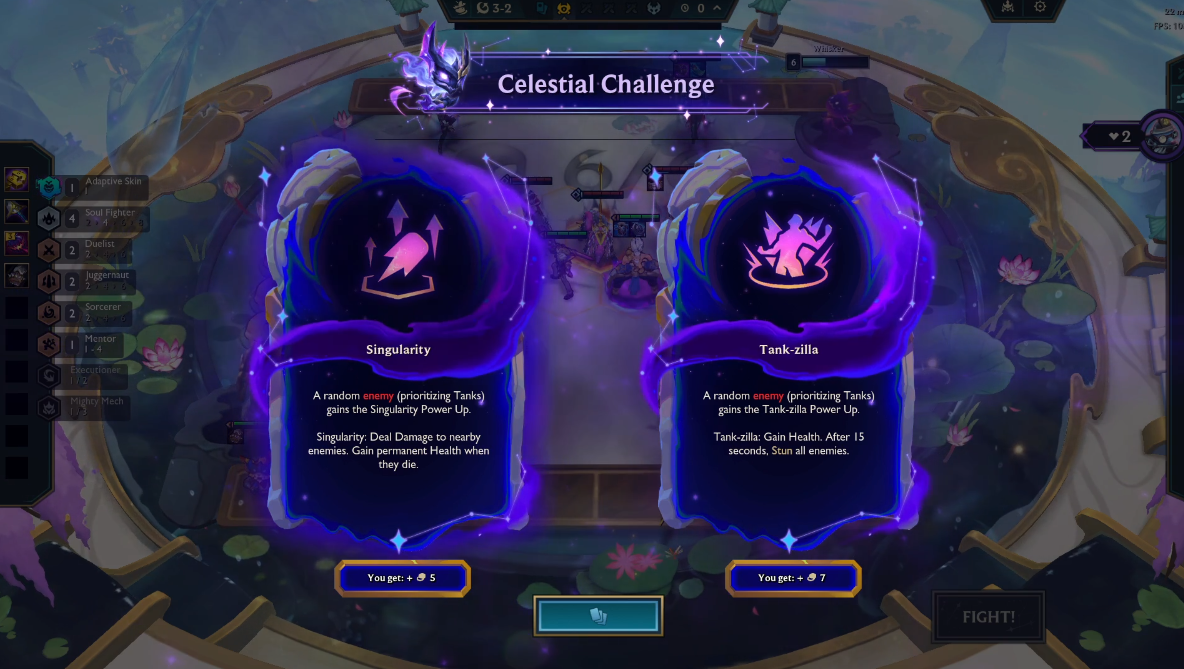
After completing the boss fight, you'll be offered the final Celestial Challenge of this stage on 3-2. Singularity is usually the better pick here. The permanent health option isn’t very impactful this late in the stage, and Tank-Zilla is just straight up a harder challenge to play against as the whole board getting stunned late into the team fight can really change the way the fight goes.
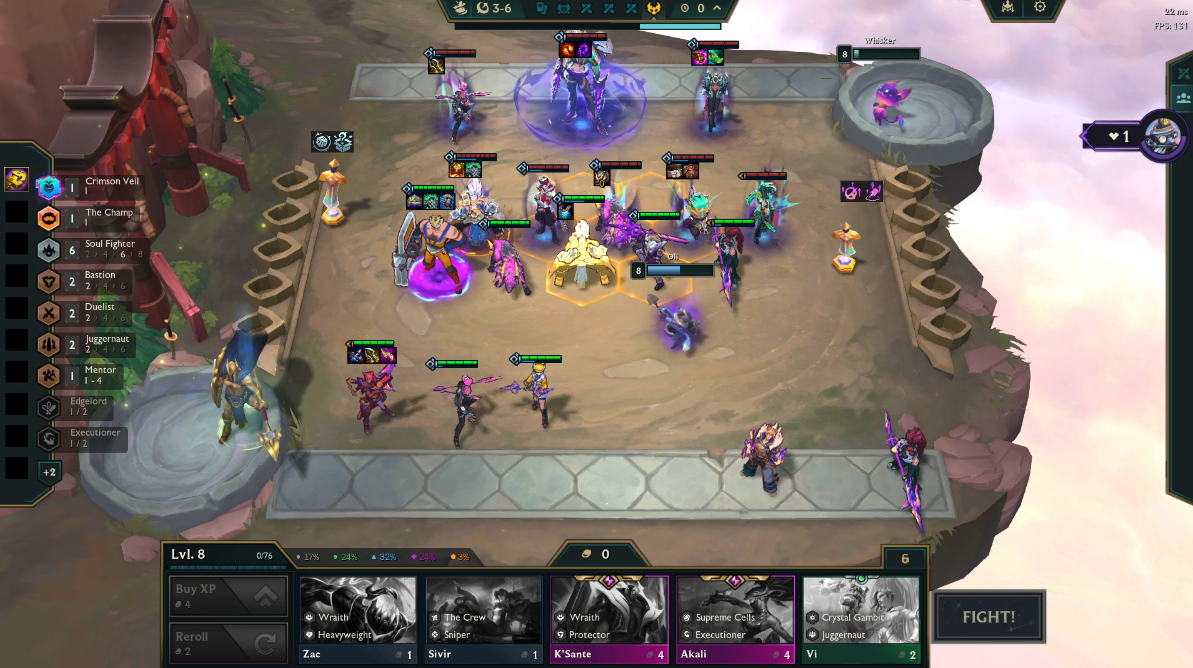
On 3-6, be ready for the final boss fight. There are a few key steps to take before you click fight. By this stage, you’ll want to be level 8 with 40+ gold to roll. Your goal here is to activate 6 Soul Fighter with Samira and Sett 2, if you find a Gwen on your level 8 rolldown you can look to play 8 Soul Fighter.
Make sure Samira and Sett are fully itemized, you can look to solo frontline Sett if you did upgrade him as he will be able to solo tank extremely well with 3 items but if he's 1 star then just frontline all your Melee units and keep Samira behind Sett.
You can position your damage carries to focus the Udyr with anti-heal first and avoid placing your main damage dealer the furthest away from the enemy Kalista.
When you're ready, press the fight button and free Whiskers from Ao Shin!
Stage 3 - CREST
Strategy TLDR
Recommended Guide Master - Soraka
Pick an Enemy Boss with a modifier that's easy to play around for Star guardians, but avoid ones that grant backline access, like Murk Wolf
Be level 6 on 2-6 and use your free reroll for atleast 2-3 upgraded units
3-6 aim to be level 8 and focus on upgrading Jinx, Poppy and K'Sante with 3 Items and power ups on Poppy and Jinx
Now it’s time to enter the Crest and free Power Monkey. Let's see what Ao Shin has in store.
Here, we’re playing around Soraka, she heals your team and provides a Guardian that can be transformed into different forms depending on what you need, kind of like the Golems from Set 14.
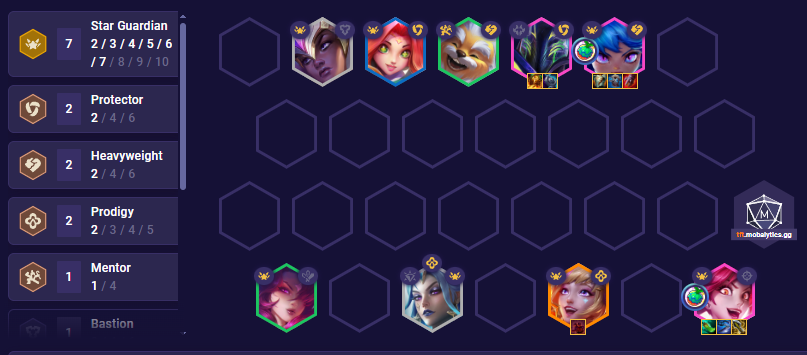
We recommend using Soraka in longer fights, or when you're lacking a strong frontline or backline. In this run, we’re looking to play around Star Guardians, so let’s see how the Crest treated us.
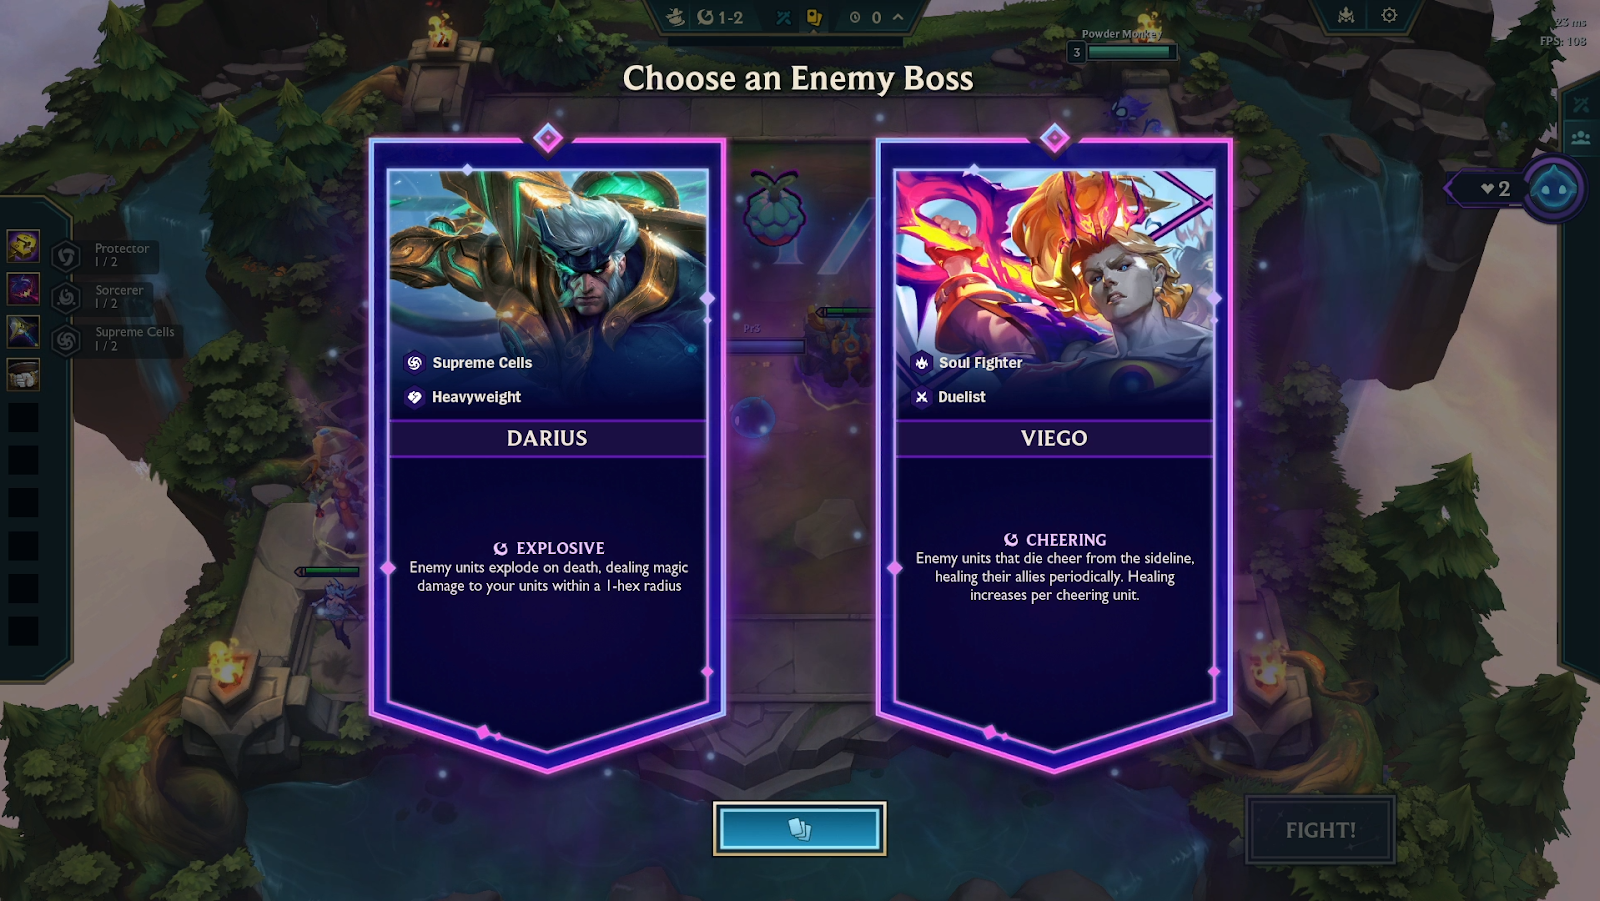
Now that we’re getting higher up the mountain, the boss modifiers are starting to come into play. Each one is unique, so once again, pick what’s best for your comp.
Here you’ll have to pay attention to the bosses modifier as each one has different effects, you’ll want to avoid Viego here as he has the cheering effect. This is bad for longer fights because when units are slain, they’ll start healing the remaining enemy team. Viego is a better pick if your comp has one-shot potential and can close out fights quickly.
Darius, on the other hand, causes units to explode on death, damaging everything within a 1-hex radius. If you’re running a backline carry comp, this isn’t much of a threat since the radius won’t reach your key units. You’ll just need to make sure your frontline is strong, or consider using Soraka’s Guardian as a frontline tank to absorb the explosive damage.
In this run, we leaned toward Viego.
First, here’s what the first boss fight vs. Viego looks like. Once you hit level 6, you'll get to choose which Guardian form you prefer. Since we’re opting for Star Guardians and want Jinx casting more often, we went for a frontline-focused Guardian. The damage that Jinx and Seraphine can put out together is insane, so also lean towards combat augments that work well with Starguardian and that buff up the frontline, we got Keepers which is great especially as we have Soraka's Guardian too. You’ll also get an Artifact for the Guardian which is a nice touch.
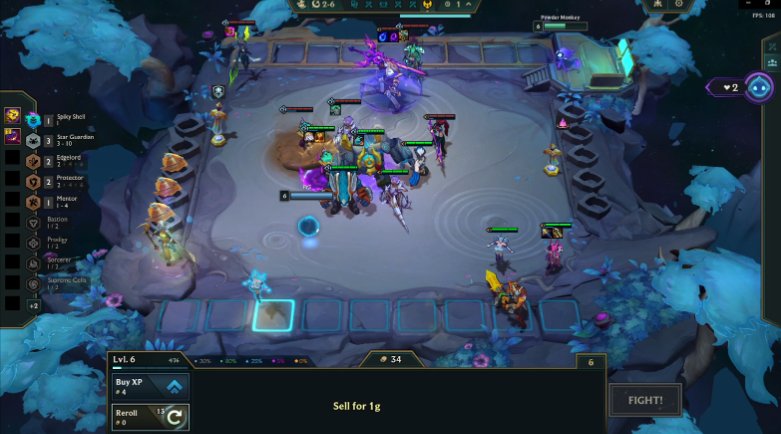
With the free reroll you get after each round, don’t be afraid to use it strategically. You should aim to stay above 40 gold while using your free reroll, this ensures that, even after buying your upgrades, you ideally won’t drop below 30 gold, helping maintain your economy and interest. After every round, make sure to scout your opponents, as you’ll notice their boards powering up. This is your cue to adapt with upgrades when needed. We like to use the free reroll especially if we have more than two pairs on the bench, particularly when they’re item holders, since completing those units can offer a significant mid game spike and allows us not to drop one of our limited lives. In our Star Guardian comp, where we’re playing around a tanky Soraka frontline using the Guardian unit, the frontline tends to be stable, so we prefer to focus more on the damage department. This is where scaling items become key. Archangel’s Staff works great on Seraphine later on, and a slammed Spear of Shojin helps with early casting especially getting the Gathering Force power up, especially on Jinx, since her scaling AD can become incredibly powerful late into team fights.
On 3-2 you’ll be offered a Celestial challenge, again we recommend you take in the challenge into account more than the gold given as we’re limited on lifes but if you think you can take the harder one, go for it. Here we take Mage as we have a solid frontline with guardians along with keepers and healing orbs, so we’re certain our frontline can handle the extra spell.
We ended up dying on 3-4 as our goal was going straight to 8 so we ideally didn’t roll on other levels as its a lower chance for us to get our upgraded 4 cost carries, Dying is fine in this game mode and it actually rewards you, We got dropped a ton of gold and a Champion duplicator which makes it even easier to hit Poppy 2 and Jinx 2 making us even stronger for the boss.
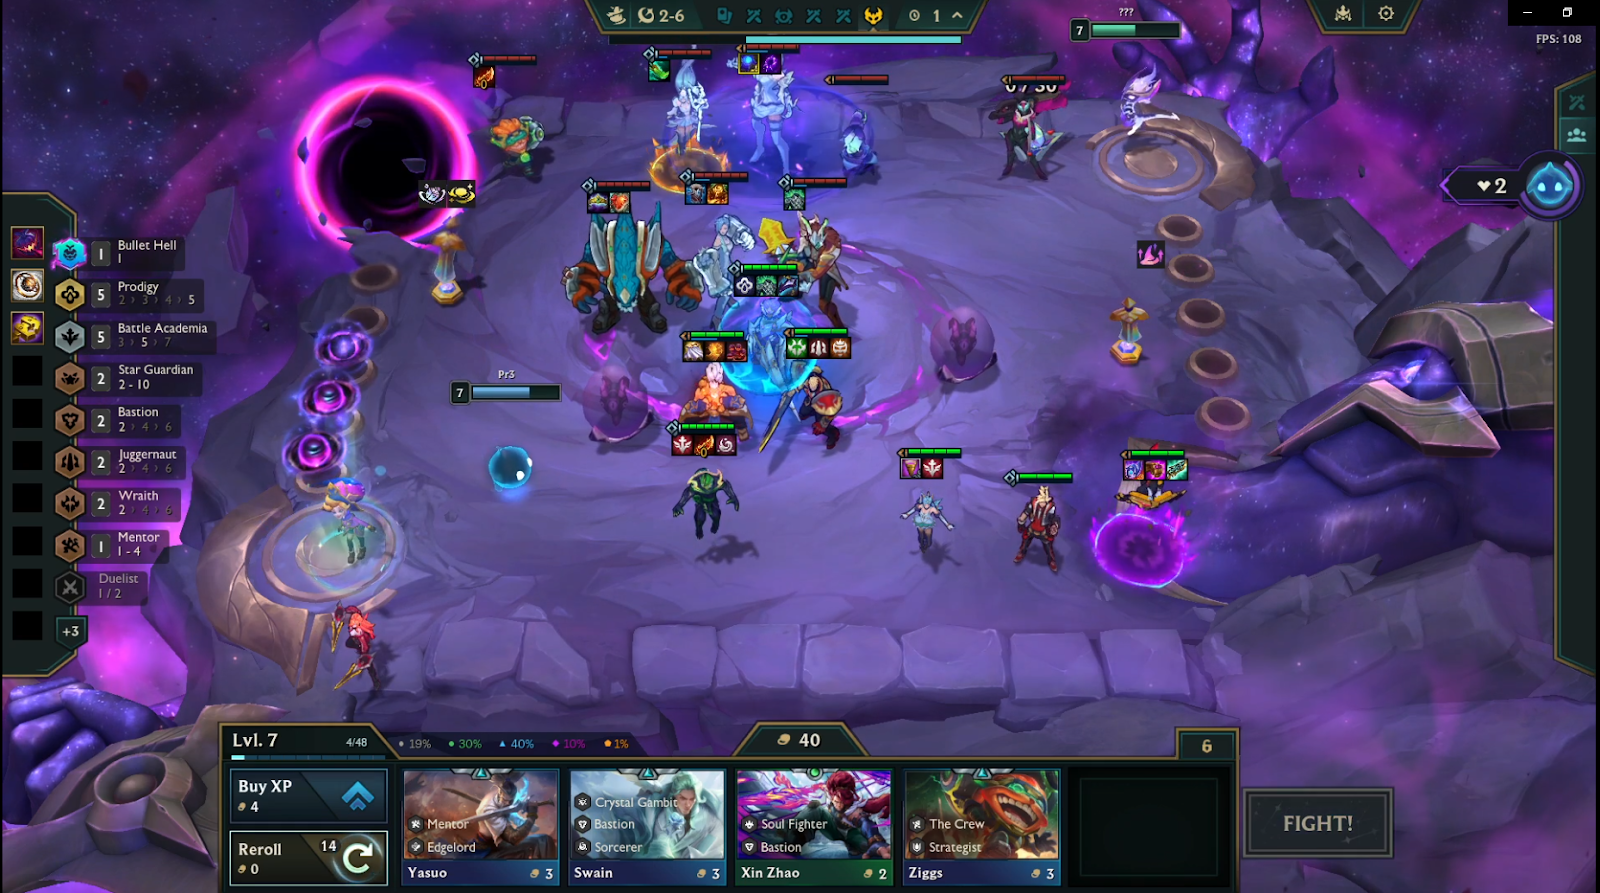
Stage 3-6 rolls around, and it’s time for the final boss in the Crest.
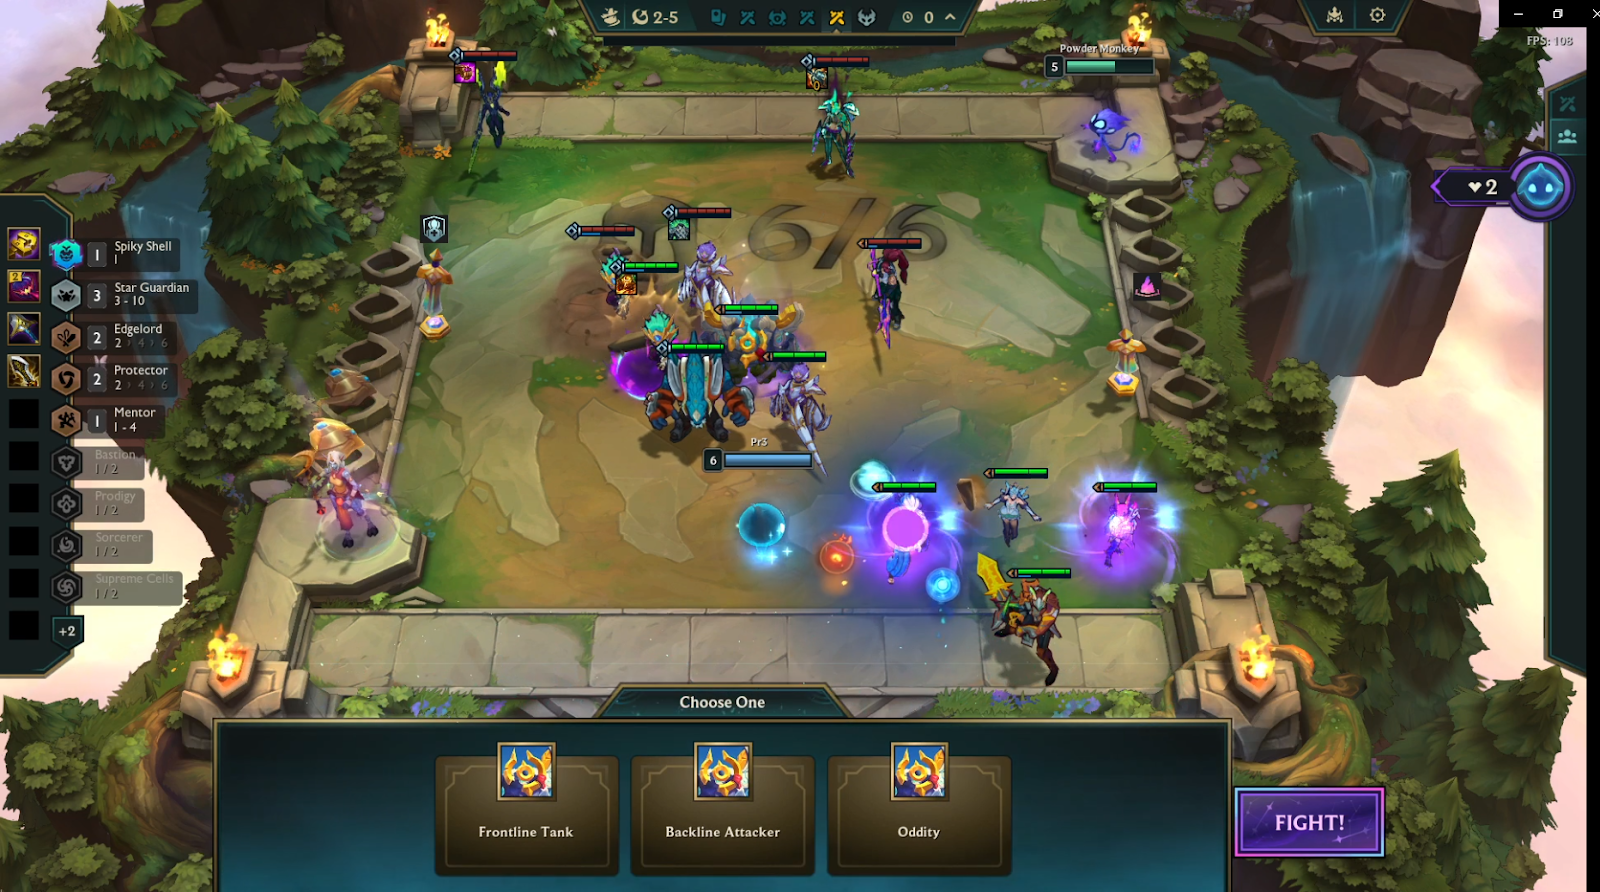
There isn’t too much positioning to worry about here, but you do want to make sure your carries are well protected and paired with your strongest tank. This is where one-shot, high damage builds really shine. The enemy team has a Kayle and Ashe ramping up, and Viego’s modifier provides healing, which can drag the fight out longer than usual. Fortunately, we have a Jinx 2, who deals insane damage, supported by a solid frontline to keep her alive.
For positioning, you'll want to focus down the anti heal first, in our case we had to position Jinx, Syndra and Xayah bottom right but it may be bottom left for you guys. This lets us focus down the anti-heal unit faster and also avoids the HP-stacking Kennen and the Rell with Gargoyles.
All that's left to do is click fight, watch the squad take down Viego and free Power Monkey before we advance to the next part in our adventure.
Stage 4 - CRUX
Strategy TLDR
Recommended Guide Master - Cyber Pop Zoe
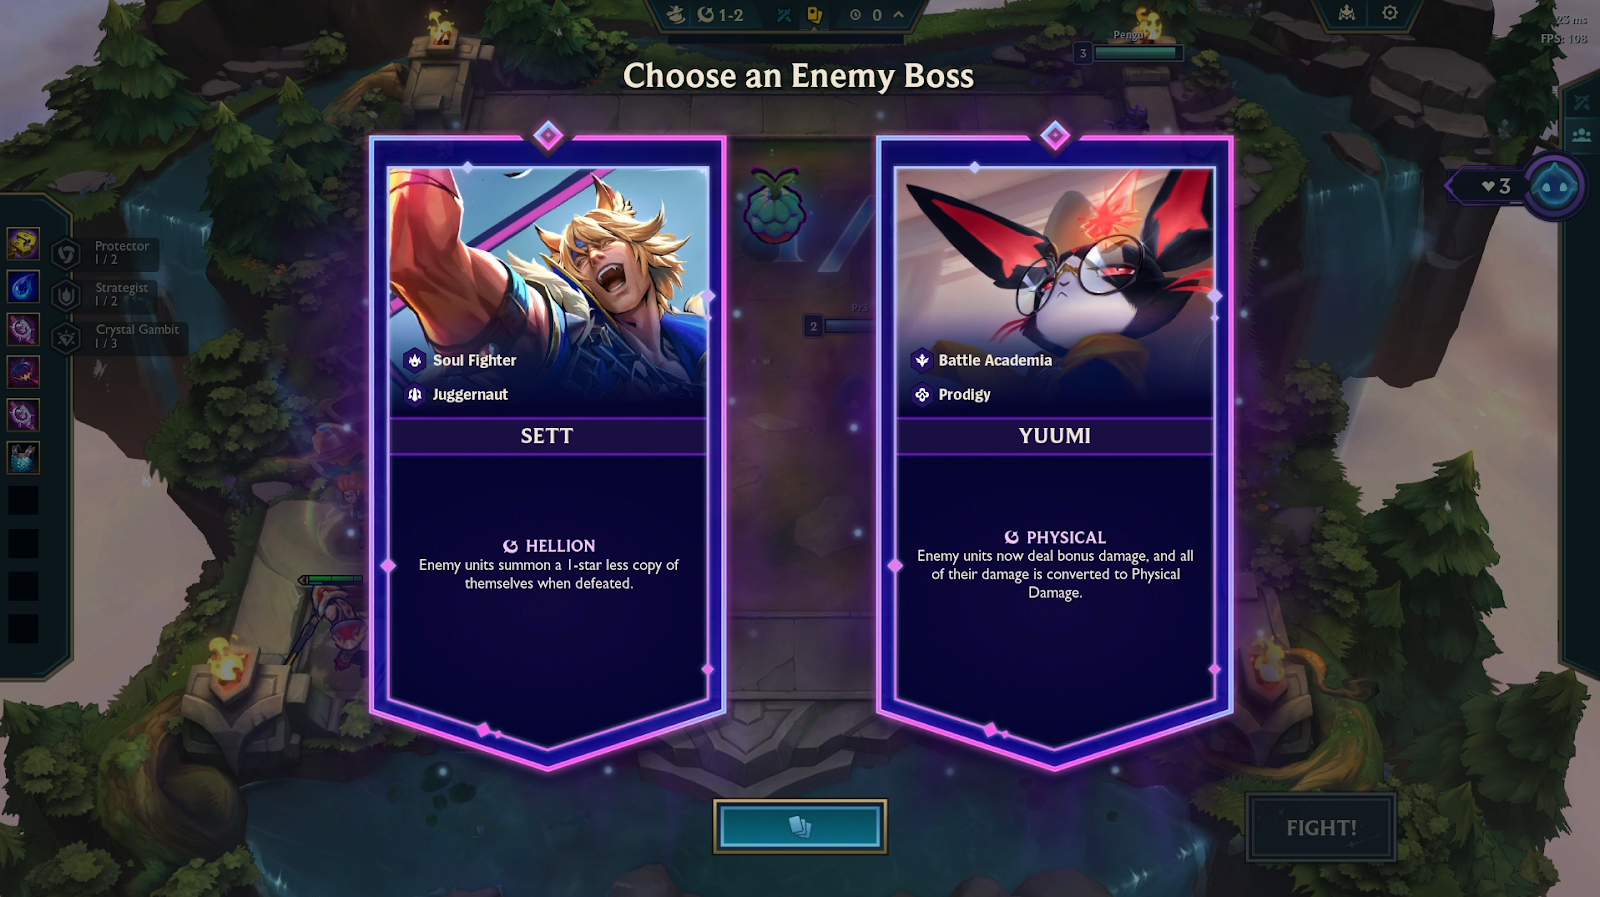
Pick to fight against Yuumi (Restart if she's not an option)
Choose Celestial challenges that wont effect Akali
On 2-6 use free rolls on level 7 For 1 Akali and Supreme Cell units
Make sure Akali is on either A3 or A5 Hex for backline corner access
Before the final fight, roll down on level 8 for K'Sante, Akali and Jarvan 2
For the Crux, we selected Zoe as our Guide Master. By this point, you probably have Zoe’s 2nd Guide Master upgrade, Cyber Pop Zoie. We recommend locking that in as it opens up the perfect strategy for this fight. Cyber Pop Zoe gives you Pandora’s Items as your first augment, which lets you consistently roll for best in slot gear. This makes it easy to force the same comp we used.
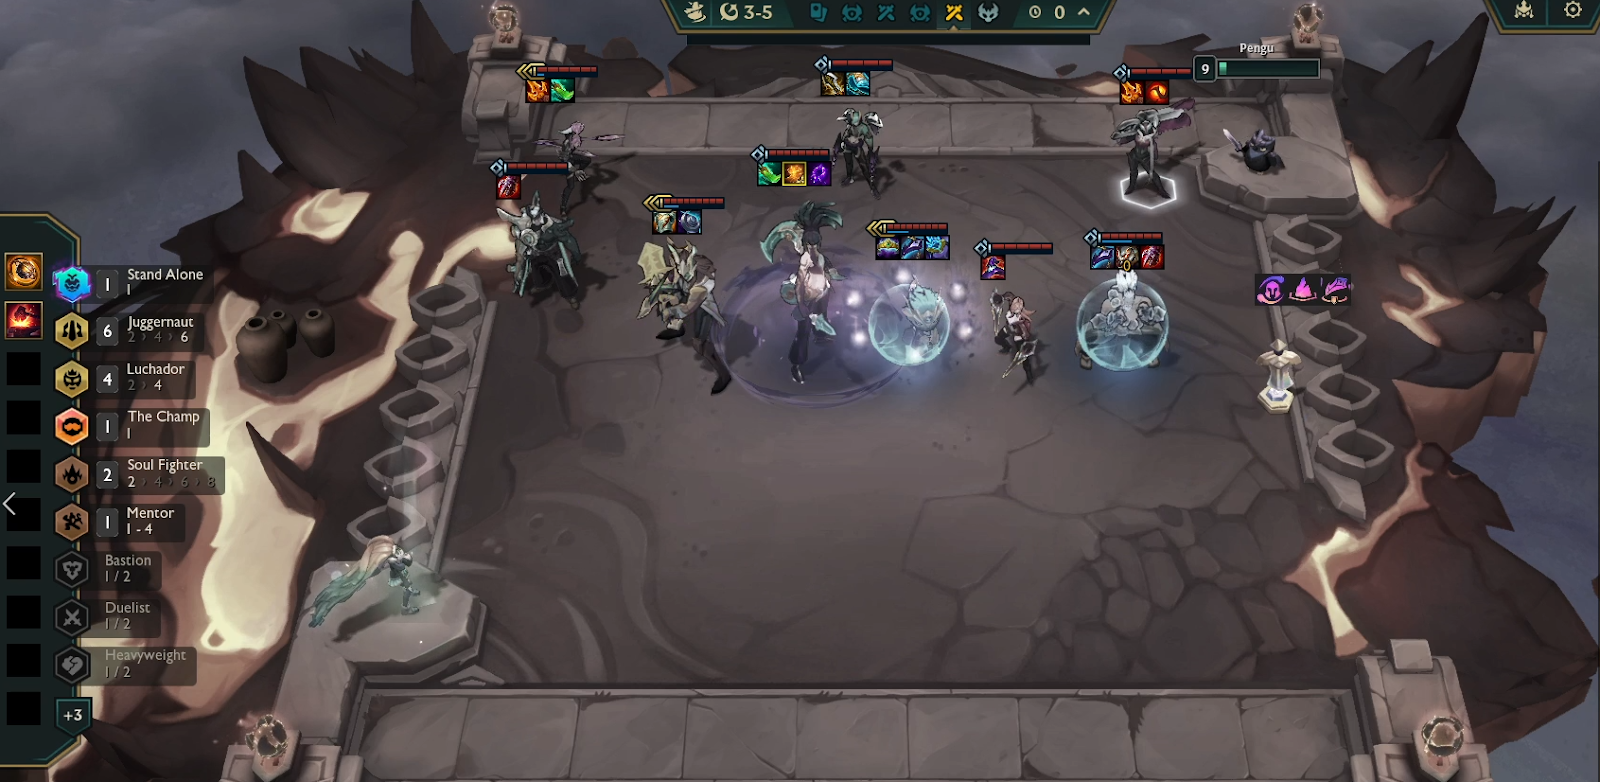
Starting in the Crux, this is where things really start to get challenging. There are six enemy bosses you can encounter here and some are seriously tough. We usually try to avoid Akali as the final boss fight, and from the picture, you can probably see why.
You're forced to deal with intense positioning pressure, which makes it really difficult to run simple backline comps. You're up against a Kalista with Spear of Shojin and Deathblade, a Senna lasering across the map, and an Akali equipped with Shojin and Hand of Justice, a brutal combo that's incredibly hard to take down.
There are definitely easier bosses at this stage, but if you're up for the challenge, give it a go.
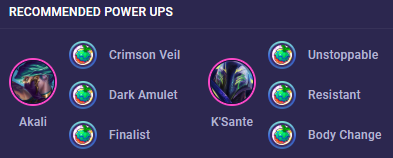
We lean towards the Yuumi boss fight as it features a wall of tanks that’s tough to break through with a standard front to back comp. Luckily for us we have the perfect team comp to counter this, Supreme Cell Akali. Akali has insane backline access and with Zoe’s Guide Master, you can craft BIS items for Akali, turning her into a 1v9 menace that cuts through the backline and carries the entire fight.
We opted for Spoils of war as the early rounds are quite easy so we’re able to farm a decent about of loot especially with Zoe as well so we’re able to snow ball and get to our final board ready for the boss fight.
Play around any opener you get but take into account Akali items, you can place them on most AP carries so if you get a Bastion Starguardian opener like we did, just put the Nashor’s set up on your back line unit.
The first Celestial challenge in the Crux was a no brainer for us, We’d rather play against a golem equipped with Sniper’s Focus, Fishbones and Deathfire Grasp as we’re playing Akali, it's just another backline unit for her to assassinate. If you are playing a standard comp like Battle academia, Starguardian anything with backline carries, It’s probably best to avoid that one because with a little RNG and your main carries gone.
On 2-6, with the first boss fight approaching, you’ll want to be around level 7. This is the perfect time to dig into those free rolls, because even one Akali at this point can auto win the fight. The enemy frontline is already starting to get thick, and with that Golem in play, you can’t risk keeping your 3 damage items on a 2-star Syndra, it’s just not enough. This is the board we had, with 30 gold left over, more than enough to hit level 9 before the next boss fight. You should be able to breeze past this boss fight and move confidently into Stage 3.
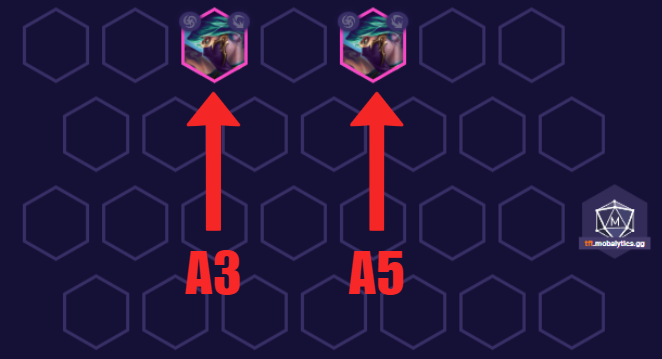
For positioning you'll want Akali in A3 or A5, you can see below in our Teambuilder. We place her on A5 because the enemy Ezreal is top right and she'll jump on him with her first ability. If the Ezreal is top left for you guys then position her A3.
For Power Up's and more information about this comp you can get them with our in-game overlay!
After defeating the first boss fight we get our second Celestial challenge, We go for the Left one as it’s a lot safer as you can tell by the gold offered. The second one isn’t bad for this comp as Akali can get onto it with ease and its a great option if you’re down on gold, don’t have Akali yet, it could be an option. But with the Zoe Guide Master and Spoils of war, we’re down for the safer route.
For the Stage 3 fights you’ll definitely want your Akali on the A5 hex as the 3 star Ezreal with Infinity Edge and Shojin could actually do insane amounts of damage if left alone, this positioning makes Akali jump on him ASAP so close out the threat.
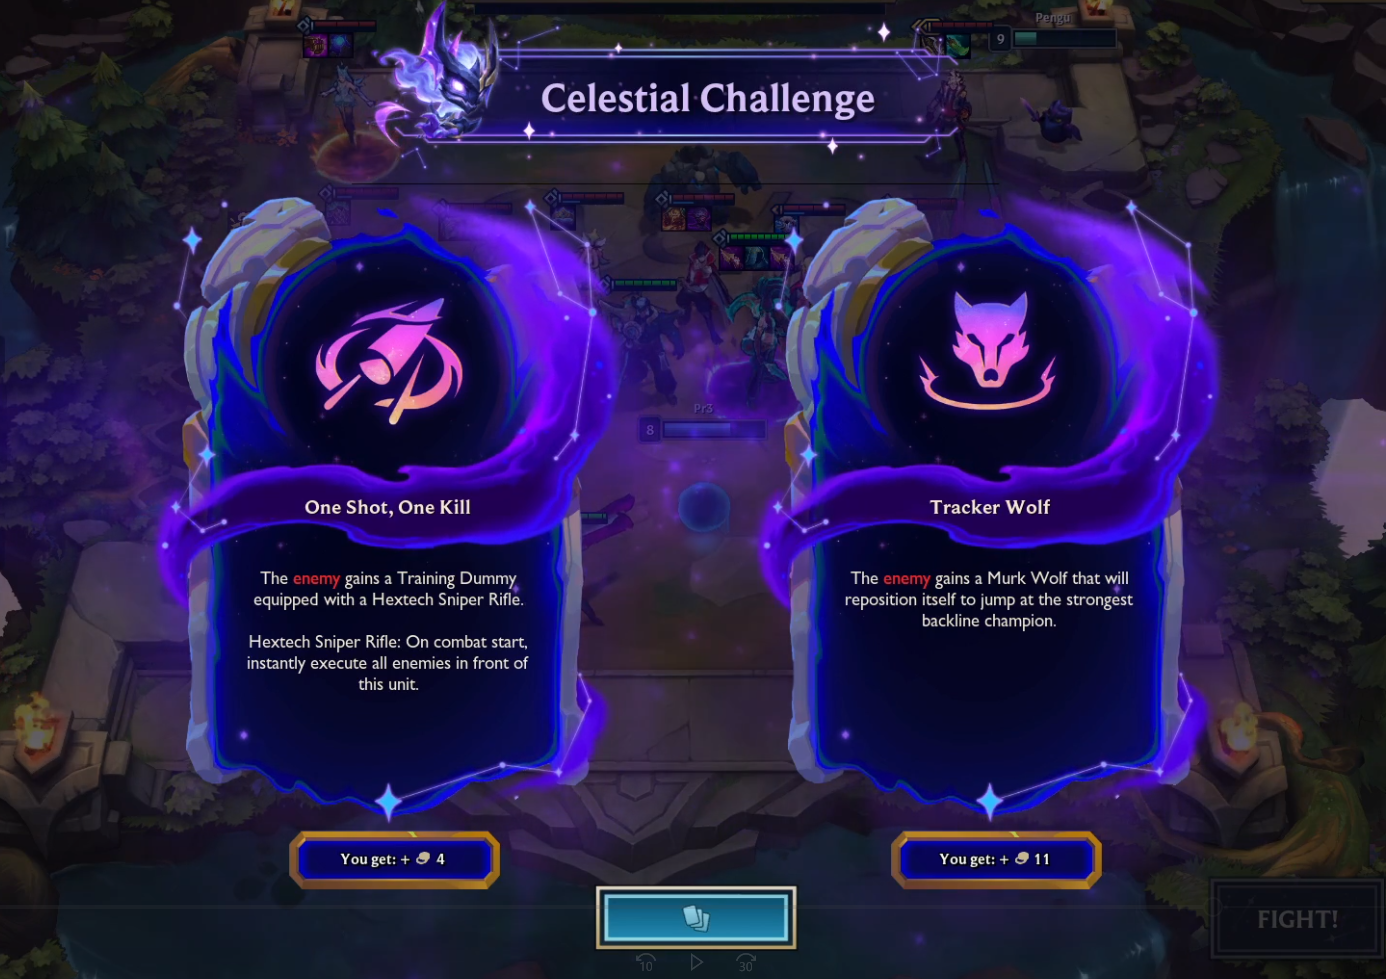
With the last Celestial challenge being offered we lean towards Tracker Wolf, it gives more gold and like discussed earlier, our main carry is a frontline unit so we’re not too fussed about a Murk Wolf jumping on our Senna or Ryze. It's best to avoid this if you are playing a high damage squishy backline unit as it really does become a pain.
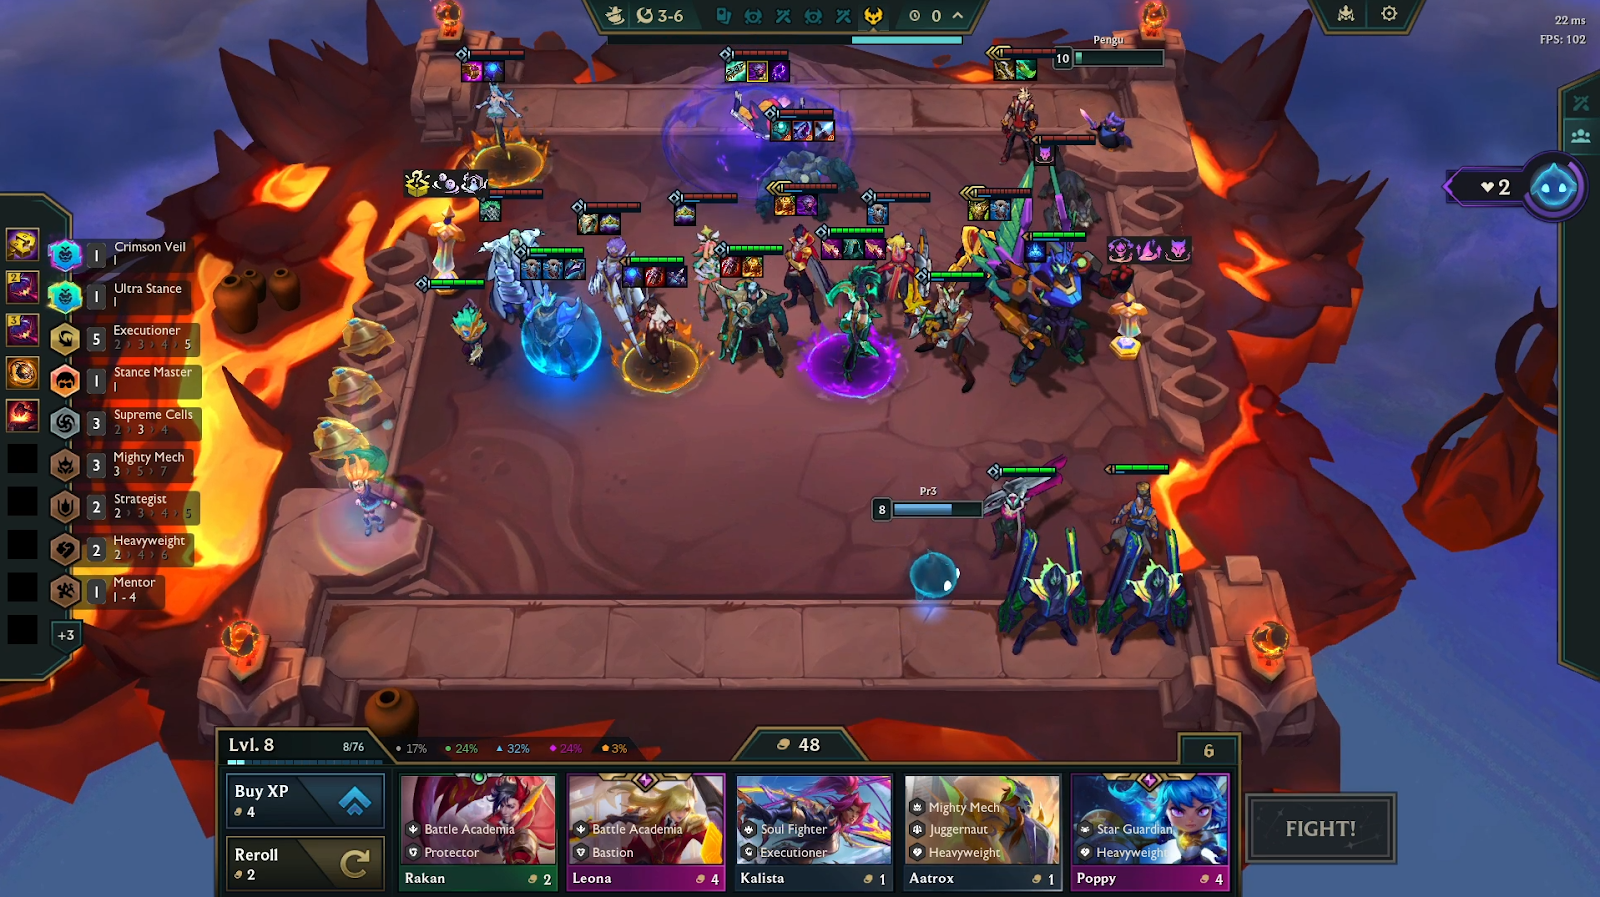
With 3-6 in sight, it's time for the final boss fight and as you can see, that frontline is no joke. You’ll want to keep Akali in A5 to target the Ezreal first, and she’ll eventually make her way to assassinate the Yuumi. By this point, make sure you have a 3-item tank on the board as well. We used Jarvan, positioned toward the left side, since Ezreal gets taken out early. Roll your gold for key upgrades, hit that Fight button, and give it a go.
This board cleared the boss fight cleanly. Our backup plan was to level up and bring in K’Sante if we lost, since we had 2 lives left and you get a ton of loot upon death but it wasn’t even needed. This Akali setup is insanely effective into the Yuumi boss. As you can tell from that frontline, trying to play a simple front to back comp here would’ve been a serious challenge.
Stage 5 - SUMMIT
Strategy TLDR
Recommended Guide Master - Arcanist Zoe
Look for Modifiers that don't take away shop/bench slots
Avoid Celestial Challenges that focus your backline units
Look to cash out trait tracker by 2-6 for board strength
Be level 7 on 2-6 and use free rerolls for Prodigy units and an upgraded frontline
Before the final fight focus on positioning and make sure you've used all your rolls on level 8 getting your 4 costs upgraded
For the final level, we highly recommend using the upgraded Guide masters, they significantly enhance your board by providing more resources or stronger abilities.
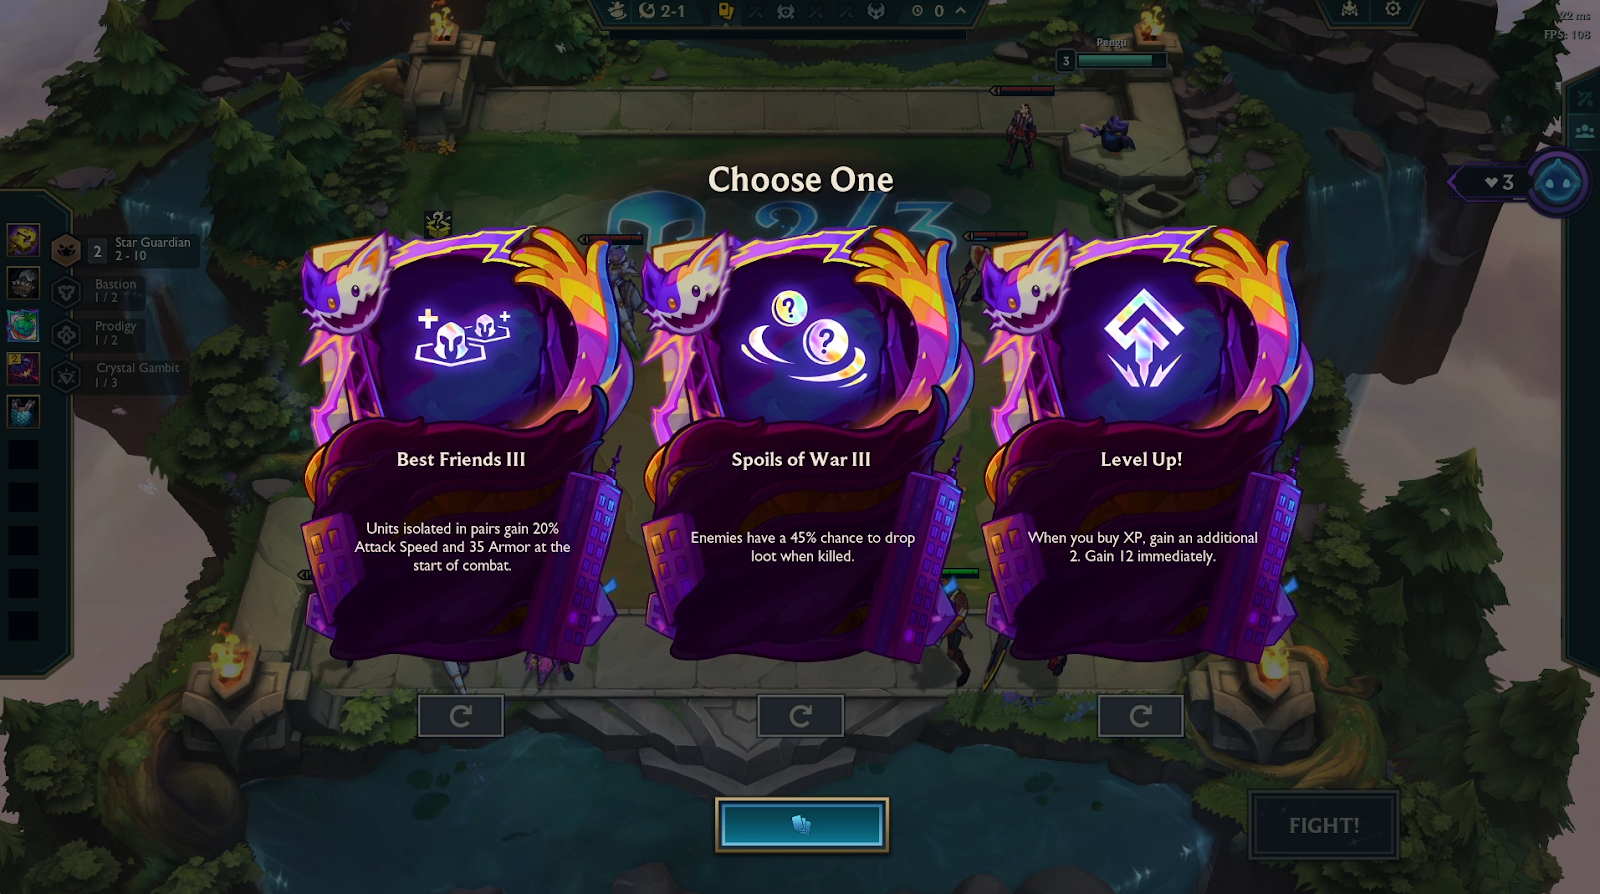
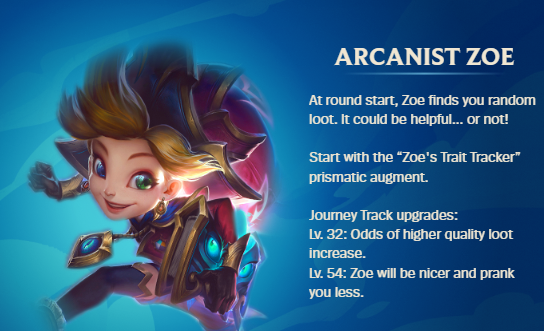
For the Summit, we especially love Arcanist Zoe. You need to be level 54 to unlock her and she'll gives you extra loot and has a lower chance of pranking you. Plus, you'll start the game with the Trait Tracker augment, which challenges you to field 7 active traits in exchange for a bunch of emblems to make the team even stronger, because trust us, you’ll need it.
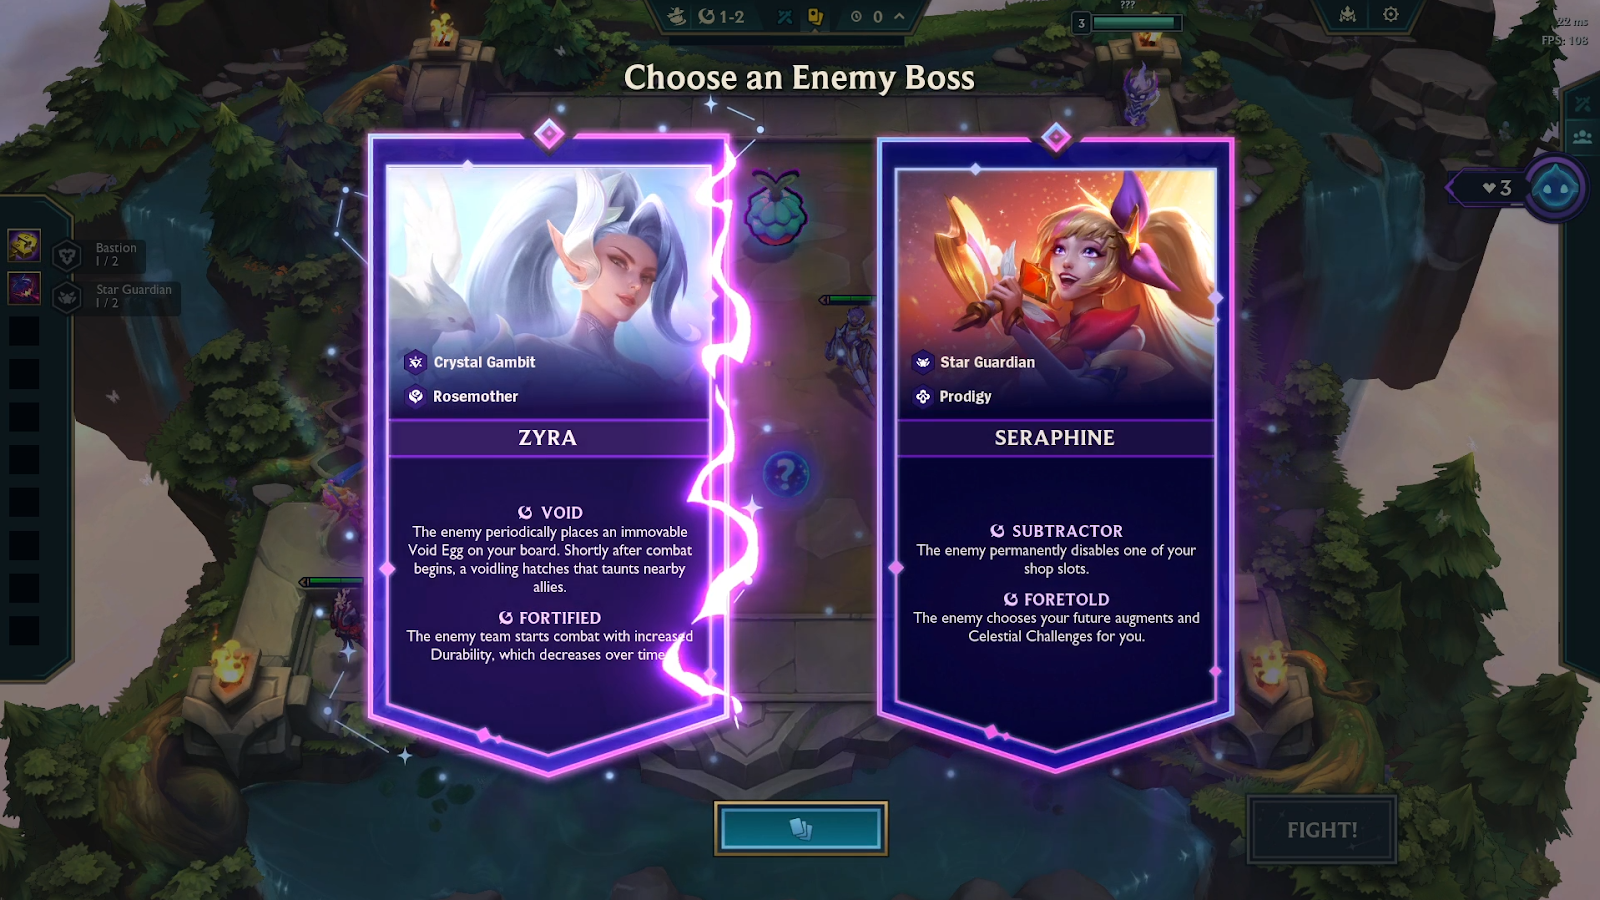
You’ll need to pay close attention, as enemy bosses will display two effects that make the game even harder. One key tip, try to avoid fighting Subtractor and Foretold whenever possible. Subtractor disables one of your shop slots, which can really make a difference when you’re rolling down for key units as it significantly lowers your chances of hitting upgrades. Foretold can also be a major nuisance, as it pre-selects not just future augments, but also upcoming Celestial challenges, which can end up disrupting your entire game plan.
In this run, Zyra comes with Void and Fortified. These can be tricky to deal with, as Void eggs can overwhelm you if your frontline isn’t strong enough, and Fortified gives the enemy team more durability early in the fight. To handle this, focus on building a solid frontline that can survive long enough for your backline to come online and carry.
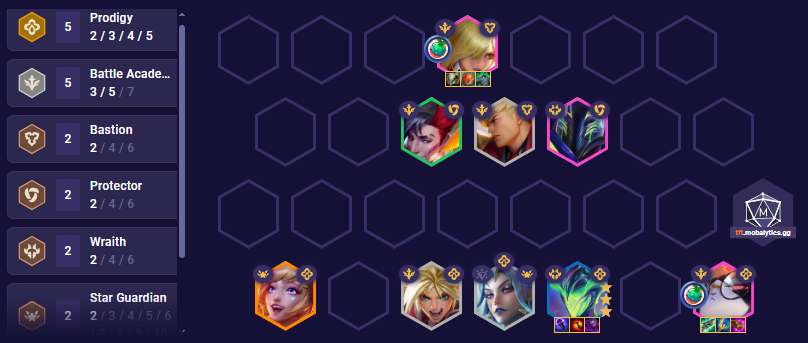
With Arcanist Zoe, you'll want to play around comps that benefit from stacking multiple traits. For example, it’s usually best to avoid comps like Edgelords, Duelists, and Crew, since they rely on fewer traits and don’t let you spike as hard with the Trait Tracker augment. Instead, look to build around comps like Star Guardians, Akali carry, or Battle Academia, as they offer a much wider range of traits to take advantage of. Whatever opener/augment you get you can lean towards one of these, we chose Battle academia as the frontline is solid with Leona and K’Sante plus the 5 Prodigy healing will give us time to deal with the Fortified effect and the void eggs in the later stages.
While playing against the void eggs you’ll always want to place your backline units away from the void eggs as they can end up doing a decent amount of damage, So early game if they’re in either of the front 2 rows then just place your backline units on the opposite side.
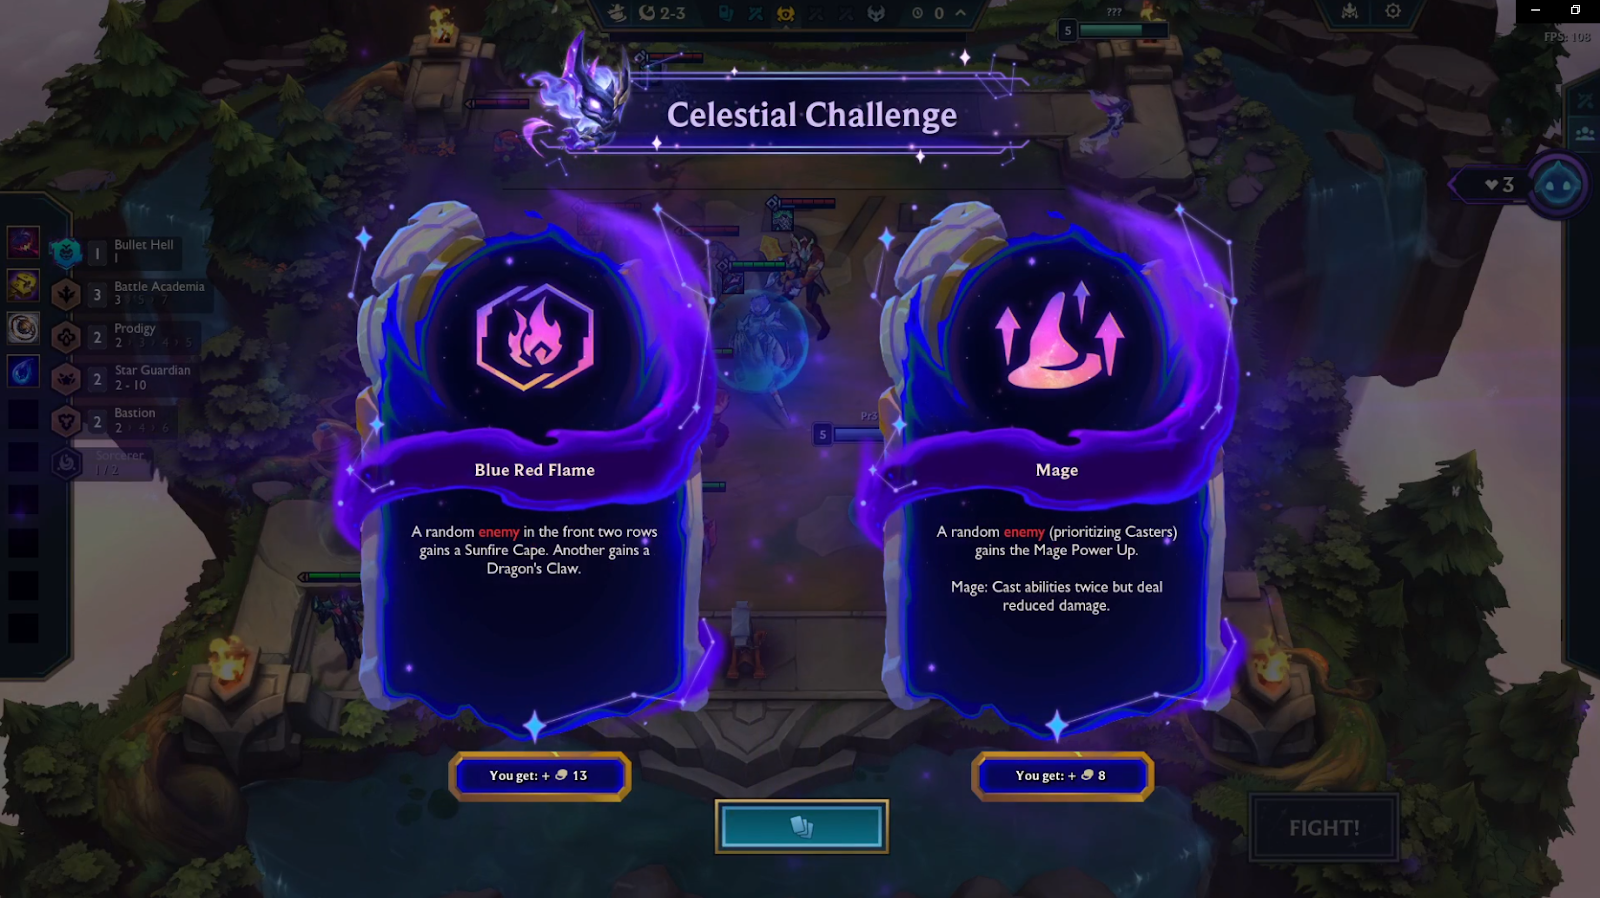
For the first Celestial challenge we have two options, We recommend you only pick Blue Red Flame if you’re either playing AD or a frontline carry such as Darius that doesn’t really care about the enemy getting extra Magic resistance from the Dragon’s Claw, as we’re playing a full AP prodigy board we benefit more from the enemy having the Mage effect rather than the added resistances.
As we’re playing trait tracker you’ll want to start holding units that can activate 7 traits at around level 6 or 7. The good thing about Arcanist Zoe is she can drop emblems also making it extremely easy to cash out trait tracker, by 2-3 we already had a Sorcerer emblem which means while playing Battle academia we can add in Ahri to activate Sorcerer and Star Guardian. A great tip is Mentor units are always good at activating traits, for example if you’re playing Battle academia you can field a Jayce and a Kobuko which will use Heavyweight and a mentor along with Battle Academia with 2 other units.
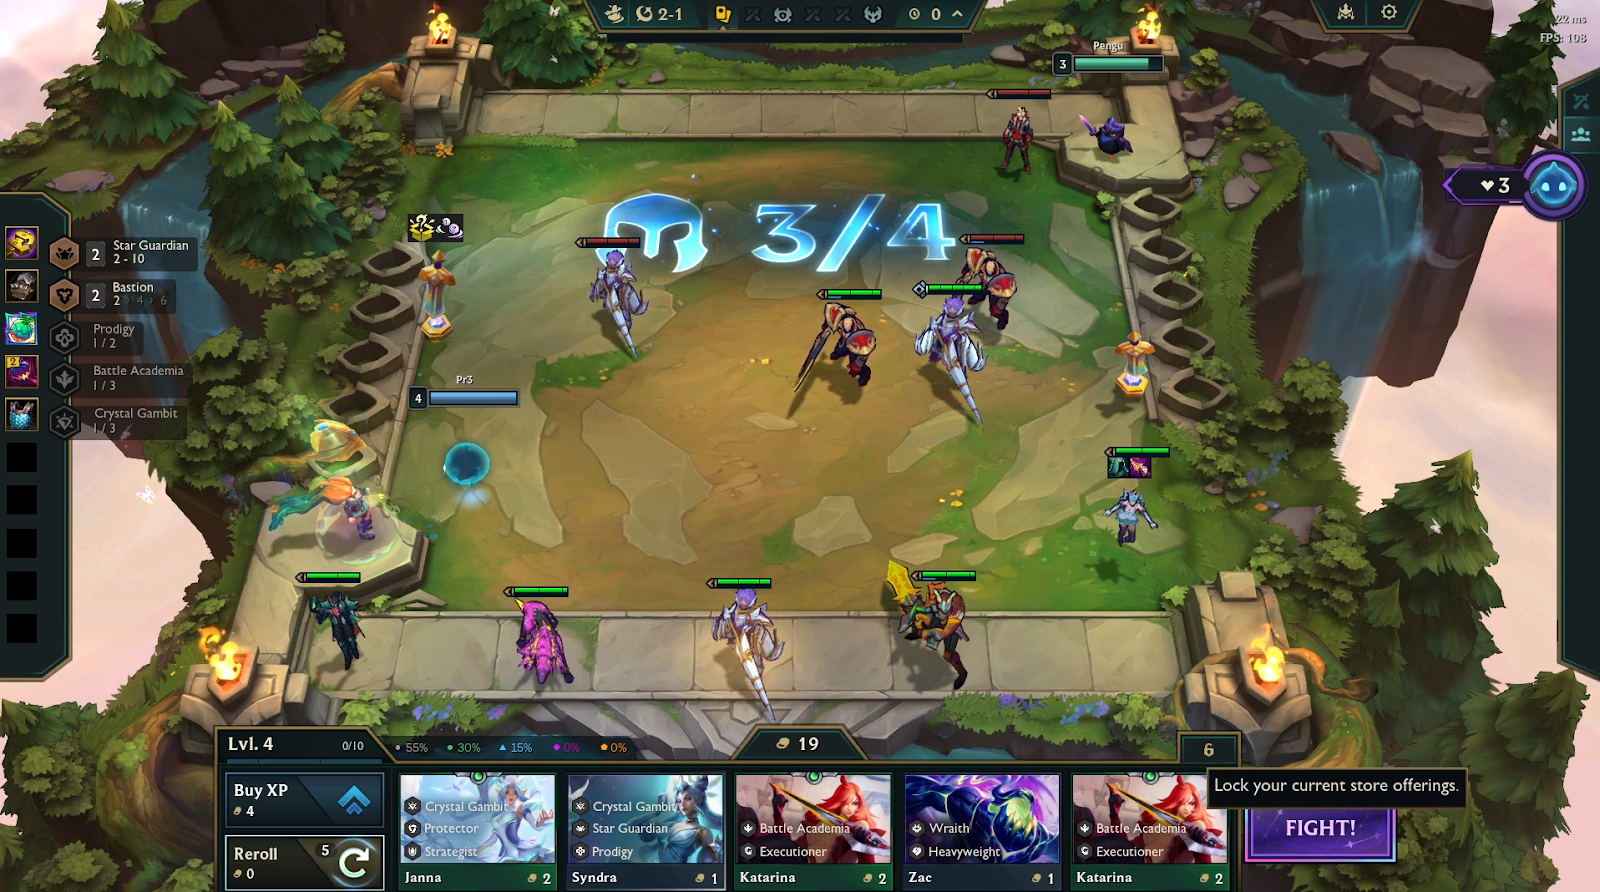
We ended up being able to activate trait tracker on just 2-4, aggressively levelling is fine especially with arcanist Zoe and having an Econ augment such as raining gold as we’ll instantly be able to get to 40+ gold within a couple rounds with the amount of loot we get and getting the extra emblems from trait tracker will just instantly spike us. Instead of the Jayce Kobuko set up we added Udyr and Kayle to activate Duelist and Mentor giving us 8 traits on level 7.
These are the emblems we got, really solid for our comp as Wraith and Prodigy is literally Malzahar so we can swap him out for Zyra for example and Garen can be swapped with Braum as we can put a Battle Academia emblem on him and still activate bastion for Leona while having Luchador for him . We can use all of them apart from Juggernaut but that’s okay as we’ll end up getting so many reforgers throughout the game.
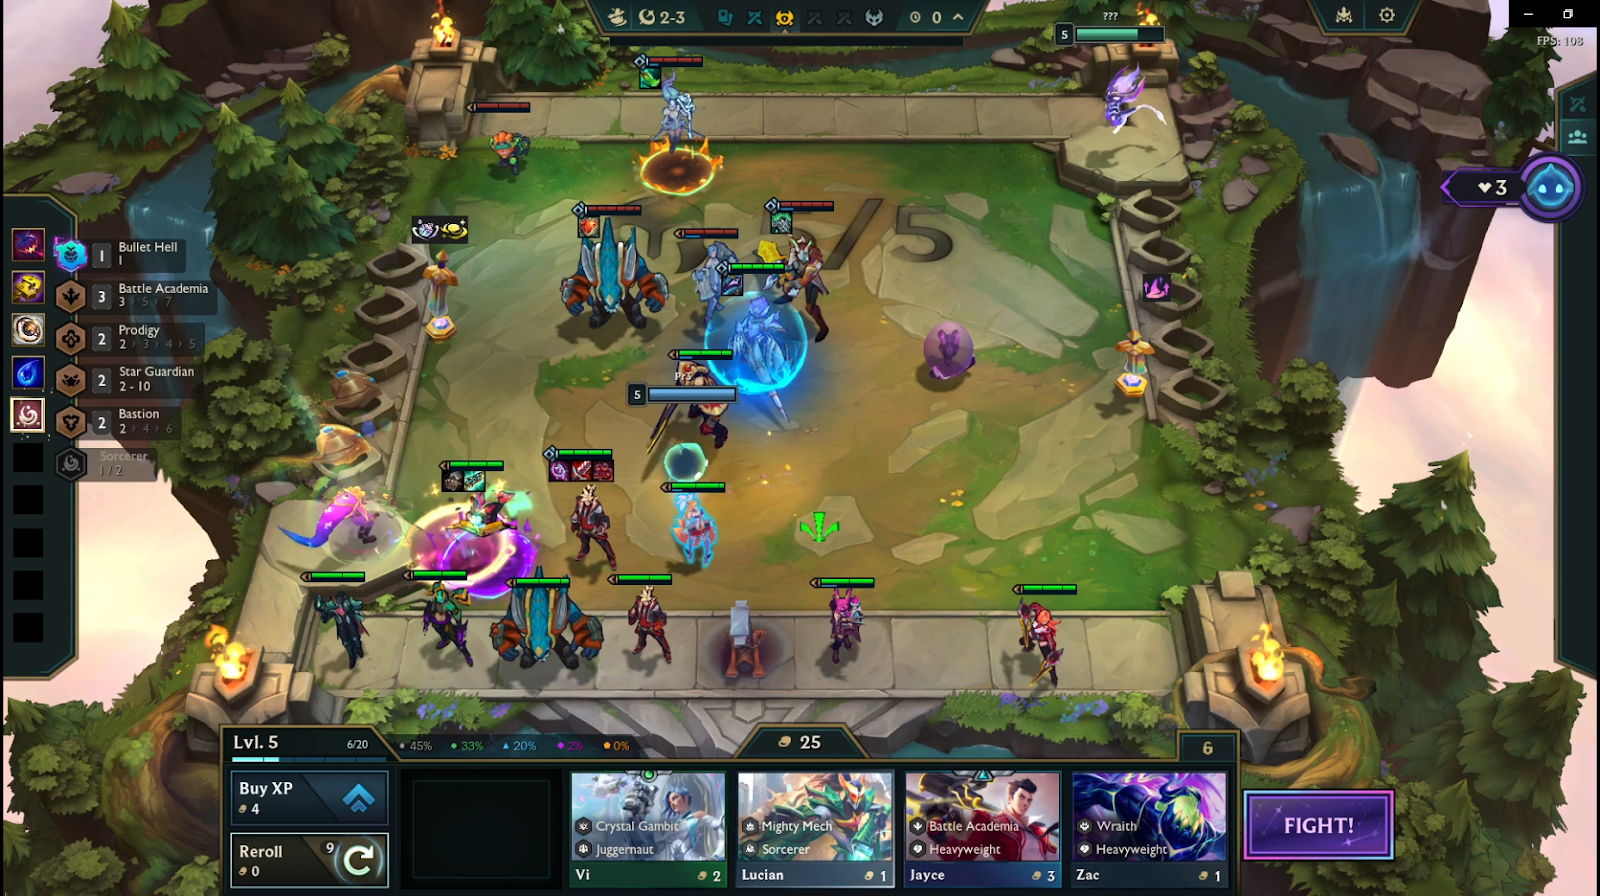
By 2-6 you should have your trait tracker cash out already done as we’ll need it as the first boss fight is no joke, by this stage you’ll want at least a 3 item upgraded tank and a 3 item backline unit. Bullet hell is a great power up for Yuumi also, especially with Gunblade as more projectiles will fly out which means more damage and more healing. Make sure you’re on the right side so your backline units aren't focusing the crown guarded Malphite first and that your frontline is close to both void eggs so they don’t end up reaching the backline. If you do have pairs on bench you can use some of your rerolls just to get some upgrades like even a Malzahar 2 and a 3 item Rell 2 will be solid for this boss fight.
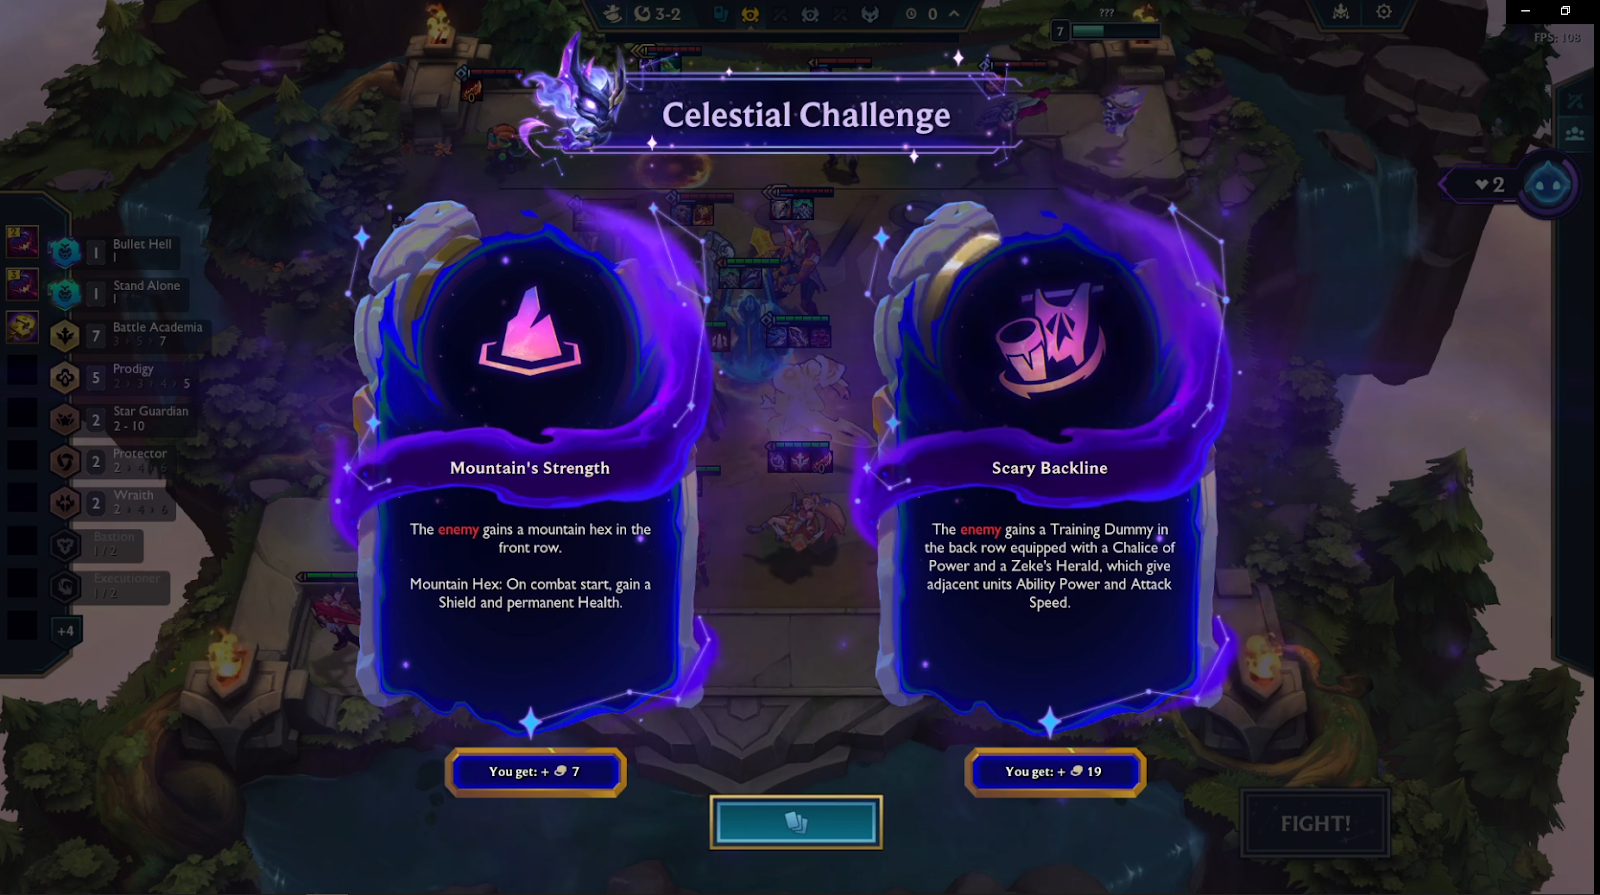
With the second Celestial Challenge offered on 3-2, it’s time to sit up and decide which option best suits your comp. Of the three builds we recommended for Arcanist Zoe, Mountain’s Strength is by far the easiest to play around and it’s clear why. The challenge only gives a small amount of gold, making it relatively low-impact and manageable.
On the other hand, Scary Backline can be a bit too punishing, especially if you’re running Battle Academia or Star Guardian. The 3-6 boss fight becomes much tougher, as the enemy backline gets a significant damage boost. That said, you can consider Scary Backline if you're low on gold and need the early econ boost, or if you're playing the Akali comp, with proper positioning, she can dive in and quickly eliminate those buffed backline threats before they become a problem.
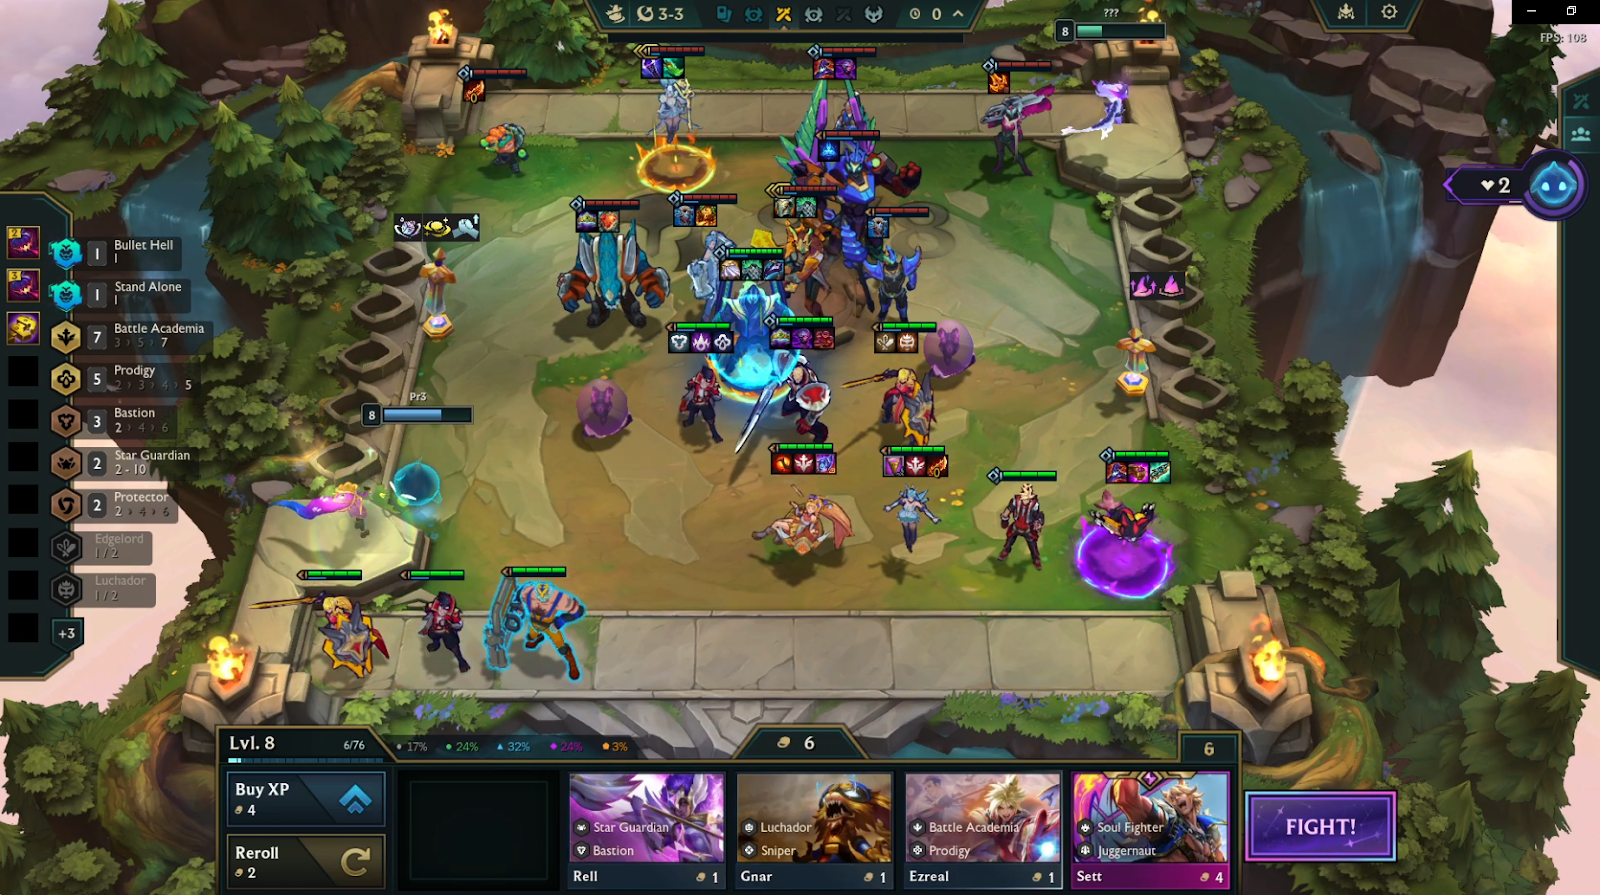
You can look to level to 8 whenever you have at least 30 gold and a few free rolls to work with. This timing helps you hit your 2-star 4-cost units before the difficulty ramps up in Stage 3. Ideally, you want to be level 8 somewhere between 3-1 and 3-4, and from there, aim to activate 5 Prodigy with both an upgraded frontline and backline.
Whichever unit you hit first, K’Sante 2 or Leona 2, you should 3-item them immediately and solo frontline them. At this point, look for power-ups like Stand Alone or Resistant to further boost their survivability. This is what your board should look like by the early part of Stage 3.
Stay on level 8 until you’ve upgraded your core units, Yuumi, K’Sante, and Leona to 2-star. This strategy applies to the other two comps we recommended as well. Make sure your 4-cost carries are upgraded and stabilized before you think about pushing to level 9.
You know it’s the final level when you're hit with another Celestial Challenge on 3-4, making things even tougher. Just like before, if you're playing front-to-back comps, you want to avoid giving the enemy any edge in damage. That’s why it’s best to stay away from Essence Share as a 5 Prodigy Yuumi with Archangel’s Staff and Gunblade will naturally outscale the enemy board over time. The key is just making sure your frontline survives long enough for her to carry. In this case, clicking Round Two is totally fine and it doesn’t buff the enemy damage and won’t interfere with your win condition.
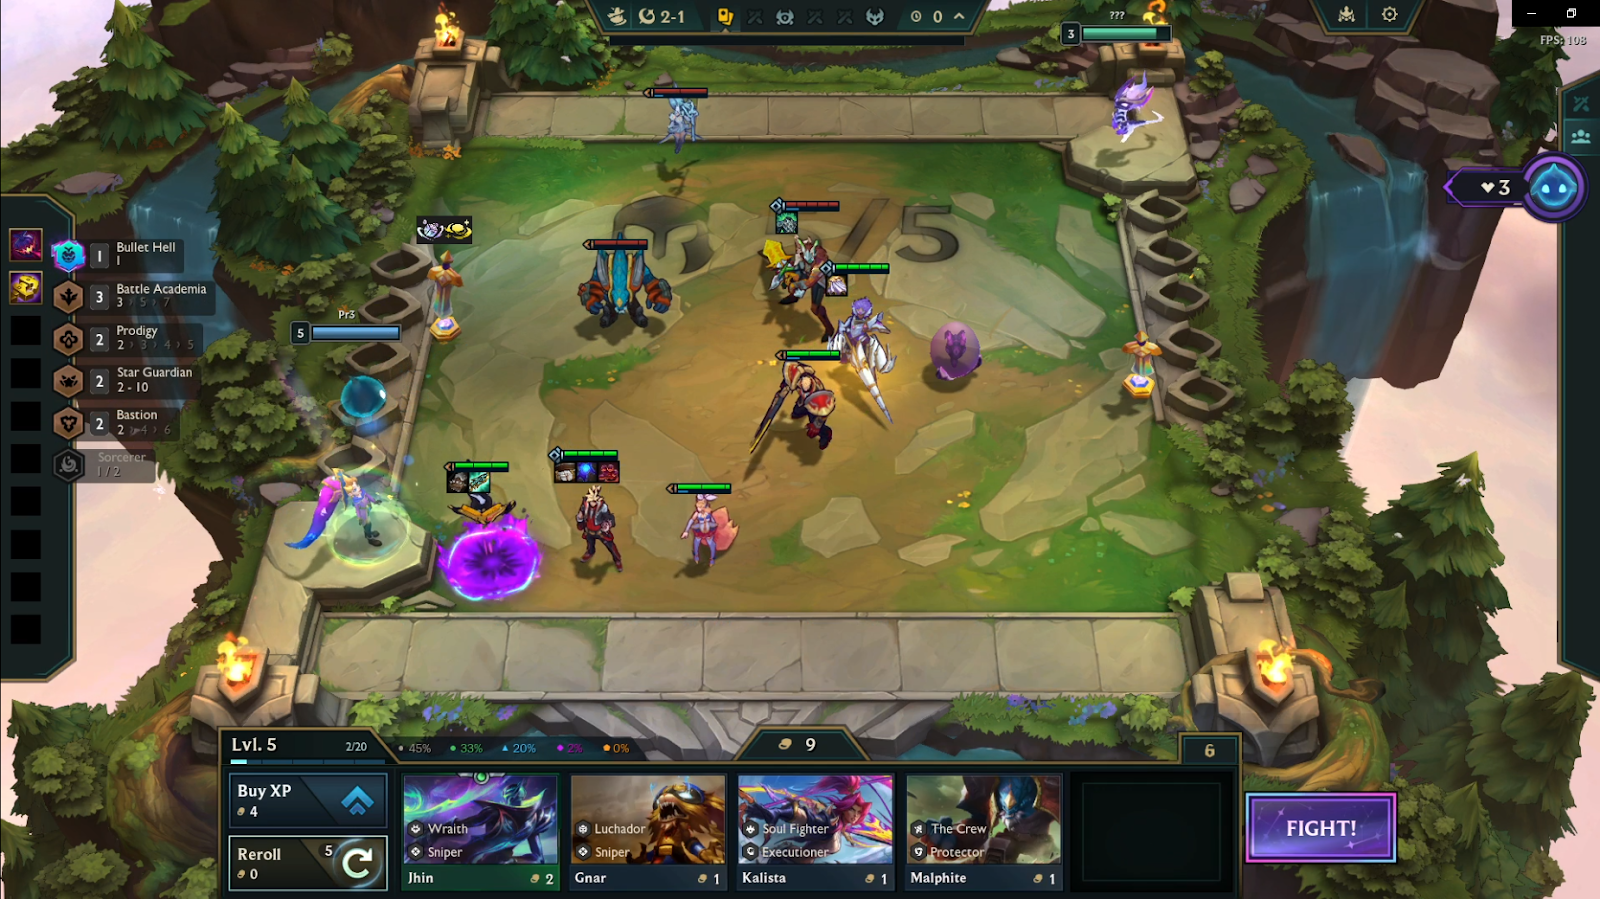
With the final Teamfight approaching, you should be at or near level 9, rolling down all your gold to hit the last key upgrades as this will be the hardest fight by far. By now, you’ll want 2-star Yuumi, Leona, and K’Sante, and with the number of Champion Duplicators you get throughout the run, you should also aim for a 2-star 5-cost that fits your traits. In our case, we had the Luchador Bastion, so upgrading Braum to 2-star made our frontline much stronger.
For positioning, you’ll want to place your carries in the back left. Yes, they’ll get hit by Senna’s laser, but that’s better than keeping them bottom right, where the whole team risks getting hit by Javan's ultimate which is worse. The goal is to ensure Yuumi stays alive and keeps casting, as her ability provides massive healing to your frontline. By this point, everyone on your board should be fully itemized and that’s the beauty of Arcanist Zoe. The amount of loot you get during Stages 2 and 3 gives you the tools to power up your entire comp, which makes all the difference in this incredibly tough final fight.
All that’s left now is to click “Fight” and watch your beast of a comp finally put an end to Ao Shin.
That’s how we conquered Ao Shin’s Ascent! We hope this guide has been helpful, and we encourage you to experiment with other comps and Guide Masters as there are plenty of ways to complete these stages, but this is what worked best for us. Be sure to visit our meta team comps page for the full guides on the comps we used and don’t forget to also download our in-game overlay to make your experience 10 times easier while you’re playing. Good luck, and have fun climbing the summit!
Tips and Tricks
Restart level if you don't get the right enemy boss
Make sure you focus on positioning every round
Restart If you get Modifiers that take away shop/bench slots
Focus more on combat augments rather than econ augments
Use free rerolls before 2-6 boss battles to upgrade key units
Cyber Pop Zoe will make your first augment "Pandora's Items" making you able to force most comps with best in slot items