Hi everyone, I'm Asmo and this is my comprehensive endgame guide for Path of Exile 2. You will learn exactly what you should do after the campaign. We will go over the best and quickest ways of unlocking your atlas, completing all of your endgame quests and unlocking your masters.
I completed my atlas progression multiple times in Trade League and in Solo Self Found - to get the experience necessary to give you good endgame progression advice that will be more than just telling you, that you can kill the end boss to get your atlas passive points.
This guide is very detailed, you will learn the best times and places for upgrading your character, how and when to progress up in map tiers, the atlas passives order that will maximize your map sustain and much more.
I'm going to help you understand the difficulty jumps and show you, how you can prepare for them, to never struggle, and have a smooth progression all the way to a fully completed atlas.
If you learn what's in this guide and follow the optimized order, you will complete your atlas progression much faster and easier.
PoE 2's endgame progression can be divided into three main parts:
The Precursor Fortress(Main Atlas Progression)
Individual League Mechanics(Target Farming)
Master Missions(Doryani, Hilda, Jado)
A lot of endgame content in PoE 2 is optional. You don't need to complete every quest to have a profitable mapping experience, but most players won't know what can be safely skipped. That's why I will show you the optimized order in which I recommend going through the endgame progression that first gets you the most important passive bonuses and optimizes the order of running the content in order to avoid backtracking and doing maps that don't move your progression forward.
You can follow the entire guide from start to finish or jump between the chapters to learn about any specific part that interests you.
The main part of the guide functions as a blueprint that can be followed from start to finish, but each part will be explained with a reason for doing it, so that you can understand when is the best time to do it and why you're doing it. That way you can change the order based on what you character needs and what your own personal goals are.
Disclaimer:
Path of Exile 2 currently doesn't allow for Atlas Tree respecialization. Some Atlas passives can be detrimental to pick up for certain strategies. This guide assumes you want to get all available points. If you want to run a specific strategy that calls for not allocating certain points, you will have to make that decision for yourself.
Guide
Phase 1 - First Steps
Let's start the moment you finish the campaign and arrive at the Ziggurat.
Open the Waygate (the Map Device in the Ziggurat).
Complete your first map, by rushing to the boss.
Talk to Doryani and Farrow in the Ziggurat to start your first quests.
Completing this first map unlocks the Map Device in your personal hideout, where you will enter maps from now on.
IMPORTANT TIP:
Unless you're farming a specific mechanic and have a clear goal in mind, you should always rush straight to the boss during your atlas progression. The reason for that is very simple. Farming regular rare monsters and all the different league mechanics is less rewarding when you don't have the atlas trees fully allocated yet, and more rewarding after you get all of the passives allocated. So we want to spend as little time as possible farming the less rewarding content and spend more time farming more rewarding content. There will be time and place to make currency and get experience, and I will highlight that at the appropriate step but unless you have a good reason, you should just rush straight to the boss and kill monsters on the way to the boss, ignoring extra content that takes additional time to complete.
First Objectives
Your first major objective is to reach the nearby Precursor Tower to reveal the Precursor Fortress.
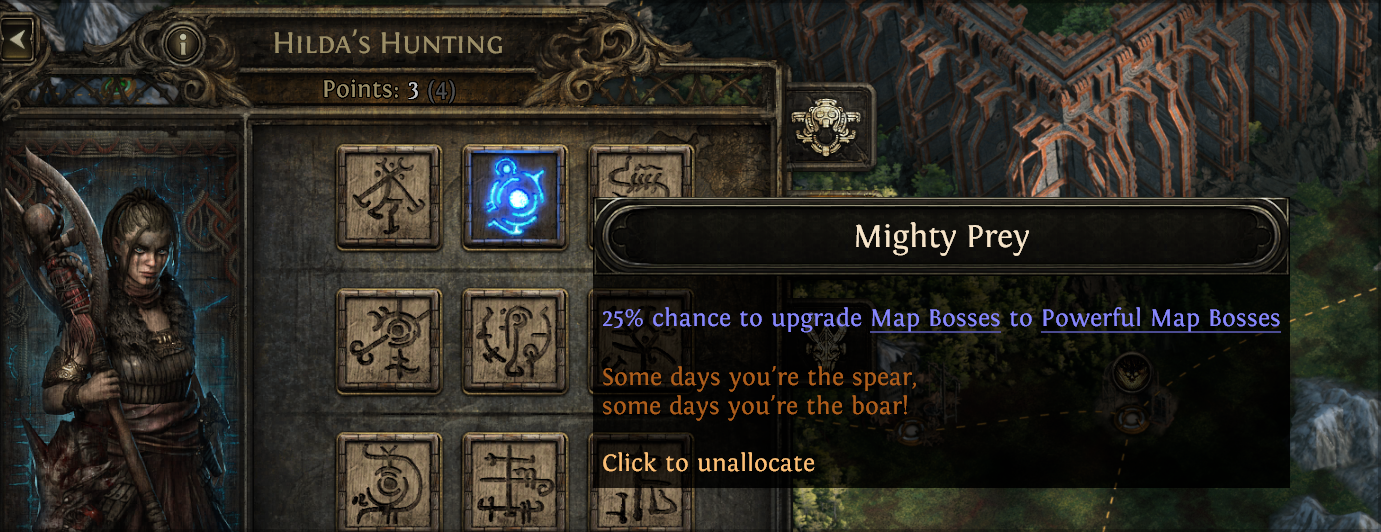
Before you progress any further, we need to make a short detour to Hilda's camp. I highly recommend doing just the first Beast Contract for Hilda, which will unlock a very useful passive giving you a chance to upgrade a Normal Map Boss to a Powerful Map Boss. Normally Map nodes have regular map bosses that drop waystones of the same tier as the waystone used to run the node, but maps with powerful map bosses - indicated by the powerful boss icon - drop waystones one tier higher.
By unlocking this Hilda's passive early you'll turn 25% of all your normal bosses into powerful bosses and you'll be able to go up in waystone tiers much faster. One point is all you'll need for now.
Sustaining Waystones Early
You want to always run the highest tier waystone you have. Eventually the quest progression content will start having requirements for a minimum tier of waystone that can be used to access it. These breakpoints are tier 6, tier 11 and tier 14.
It's a good idea to buy a few extra maps of these tiers when they become available from the vendor. The vendor - which is Doryani in your hideout - sells waystones one tier below your highest completed waystone - so as soon as you complete a tier 7 waystone, you want to buy a few tier 6 waystones and as soon as you complete tier 12 waystone, you want to buy a fiew tier 11 waystones. This will save you from having to go too far down in tiers in case you get unlucky and don't sustain your waystones somehow.
Your main objective should be to first acquire important atlas passives that will help with your waystone sustain. Without this, you might run out of waystones if you get unlucky, but if you prioritize the passives I'll show you, your waystone sustain should be perfect right from the start
You get your atlas passives by completing maps in the Precursor Fortress, but you don't want to run every map individually. Instead only path to your quest objectives using the shortest path possible, so the path that requires running the least maps, because once you get to the Pinnacle boss in the fortress tower, you'll be able to auto complete entire sections of the fortress - finishing about 40 maps at once, each time you kill the boss.
We don't want to run any maps that don't serve a specific purpose.
Early Fortress Progression
Get to the Ancient Gateway and then straight to the Burning Monolith. On the left and right side of the middle path towards the Burning Monolyth you will find map nodes with guaranteed trial keys for either the Trial of Chaos or Trial of the Sekhemas. I recommend grabbing the barya for trial of sekhemas if you don't already have it and getting your third ascendancy points when you reach level 70. It's a good idea to overlevel the trials a bit to make them quick and easy but still in time to give you the power boost you'll need. If you didn't get them while leveling - you can buy some relics with Honour Resistance to make your run easier. They make a big difference, so always pick up, identify and augment relics until you have a full set that gives you 75% honour resistance.
After getting to the Burning Monolith you'll get a quest to reach the Eastern and Western Gateways. Path to the East Gateway to kill the boss - Precursor Refiner and activate the beacon opening the gateway.
Then Path to the West Gateway to kill that boss - the Precursor Separator and activate the second beacon opening now both gateways.
Next, you have to path to the Enigma Chambers. They require Tier 10 waystones to access which you should be reaching by the time you path to both of them.
The Enigma Chambers contain smaller versions of the citadels where you find Crisis Fragments, needed to fight the Arbiter of Ash in the Burning Monolith. Normally to access that boss fight you'll need 3 crisis fragments found in citadels around the atlas, but for the initial quest, one of them is already in place. After killing both Enigma Chamber bosses, you can fight the Arbiter of Ash, you can kill him even with a weak character but that will require learning the fight and successfully dodging all of his deadly mechanics. I recommend learning that fight, but most players will feel like their character is a little bit too weak to tackle it at this point.
What to do if the content becomes too difficult?
No matter what, if at some point you hit a roadblock and the area level requirements become too high for your character to handle, you can pivot to completing one of the league mechanics to gear up. Do not waste time, progressing individual map nodes in the Fortress. After you get to the Enigma Chambers you should have enough points for good waystone sustain and that's all you need for now.
Phase 1 - Atlas Passives
Let's go over the atlas passives and my recommendation for the smoothest progression.
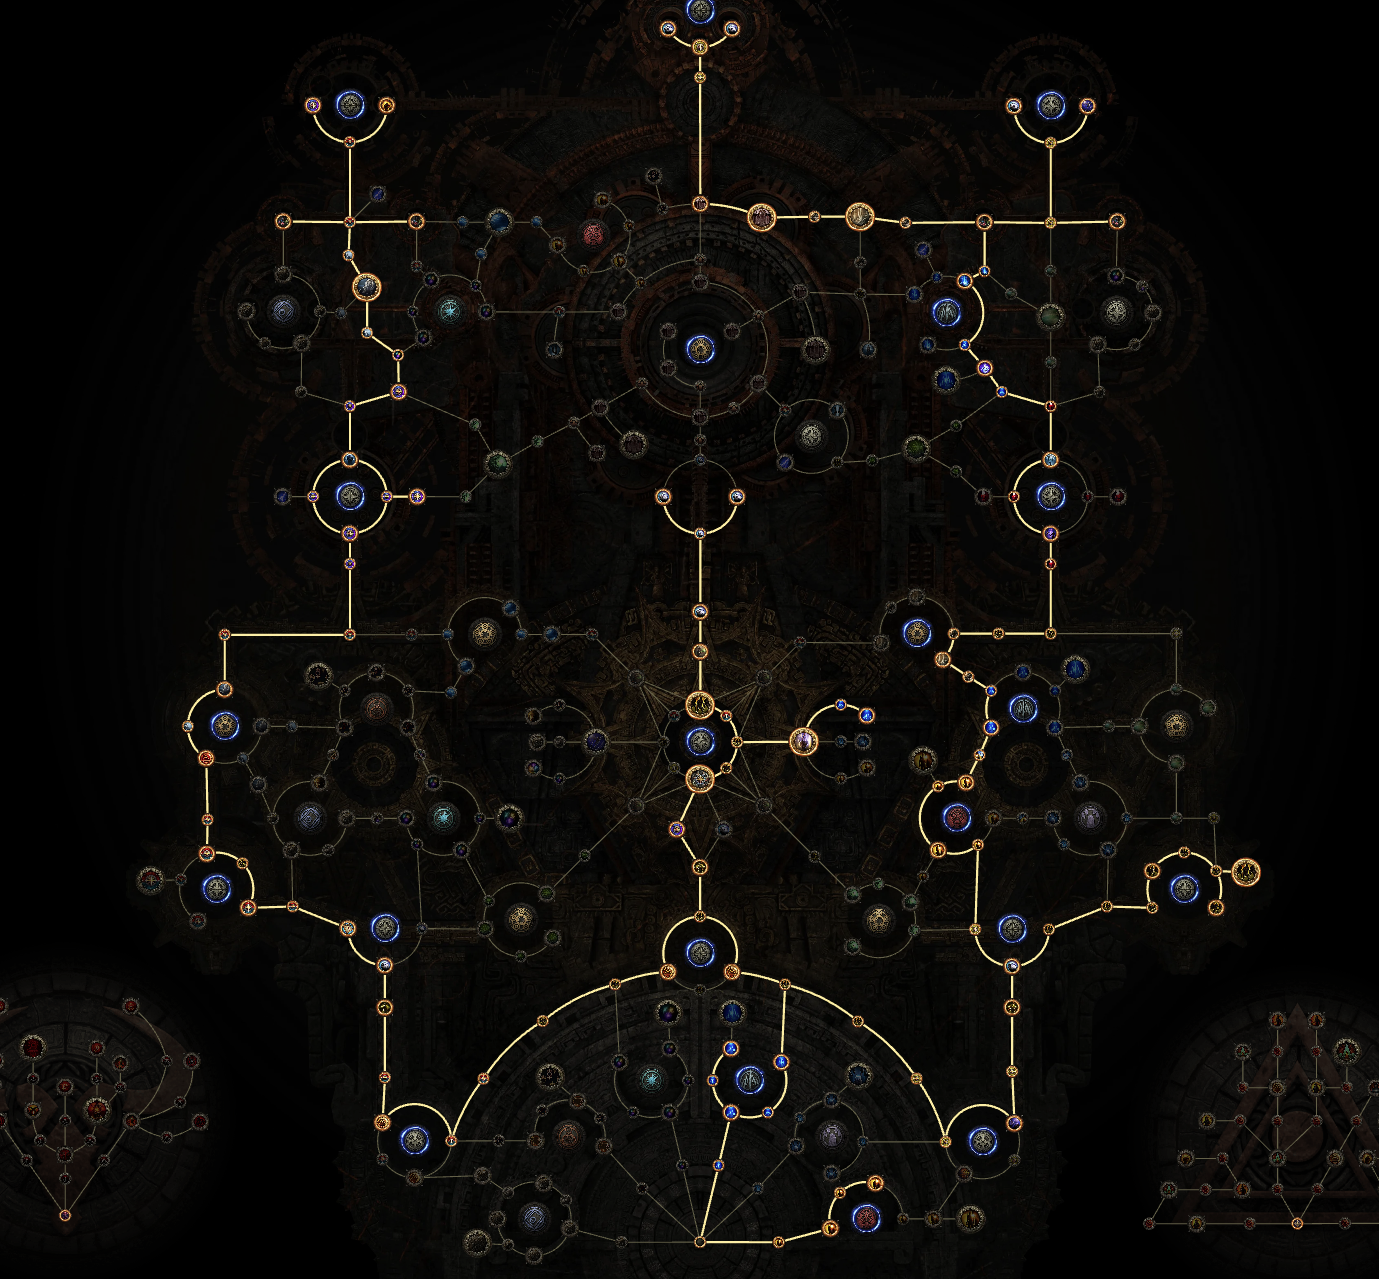
From the start - the most important passives to pick up will be waystone drop chance and unlocking tablets.
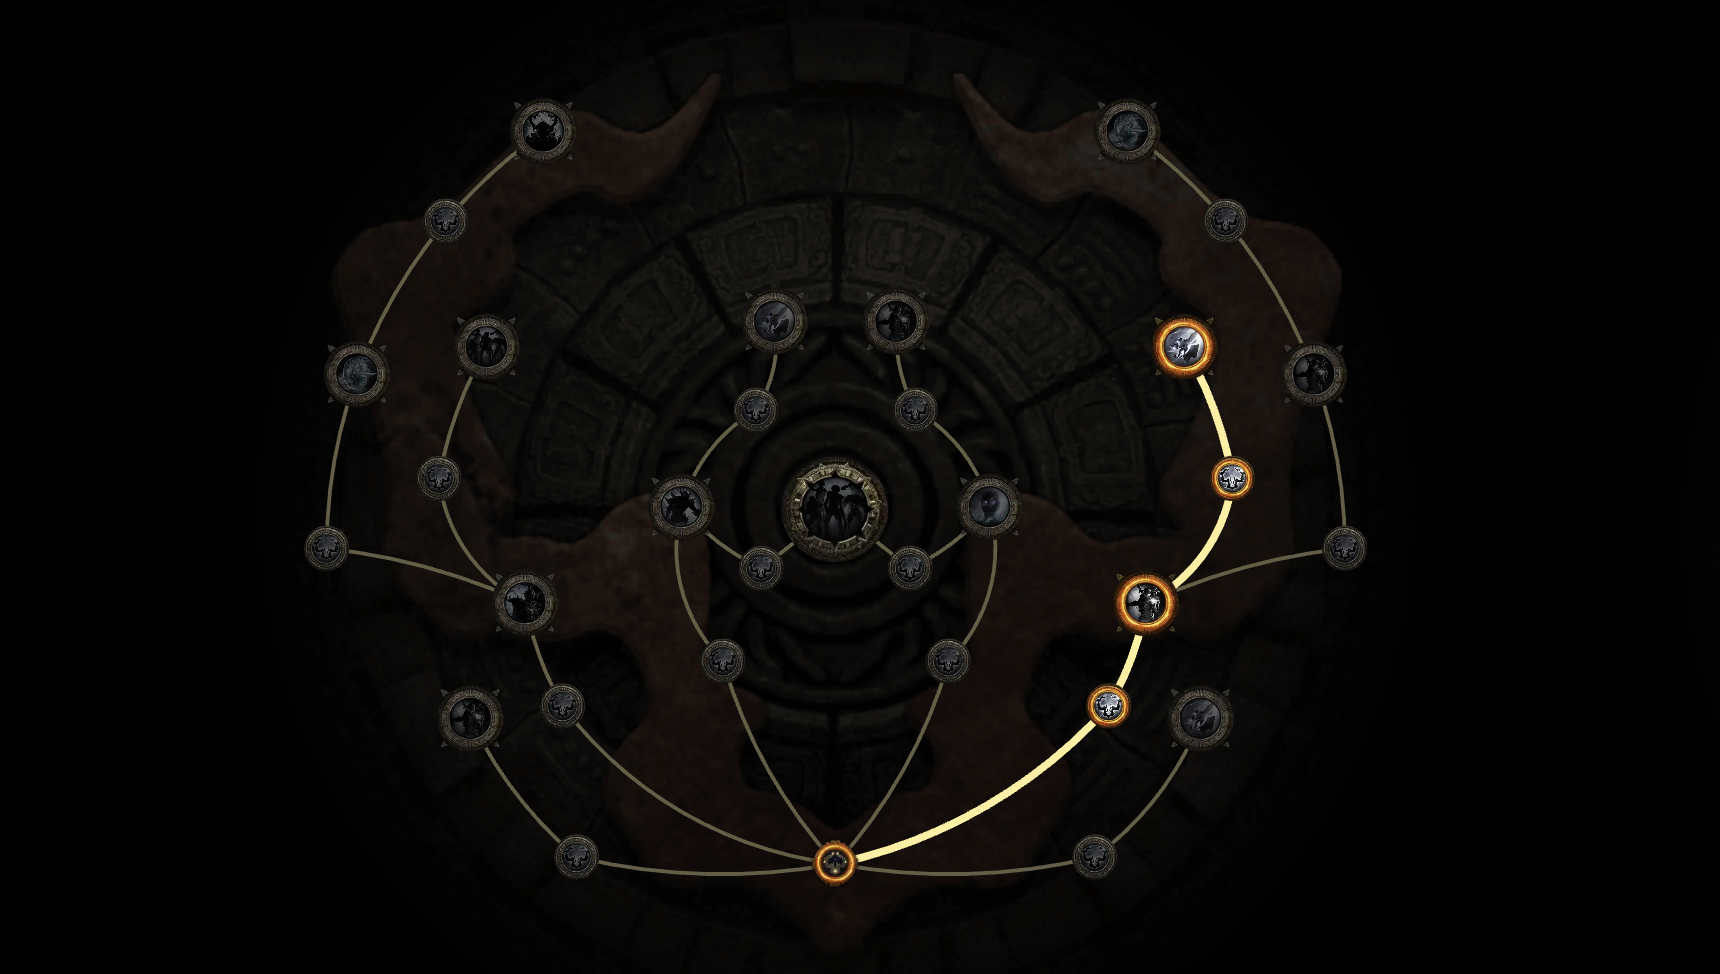
Path through the essence nodes - essences are the most useful early mechanic for gearing up, so we will prioritize it here - and pick up the Pathkeepers passive for waystone drop chance - then go straight for Eons of Domination
This will unlock Overseer Tablets. They're incredibly useful early on and as soon as you get one, you should use it map nodes that do not already have a powerful map boss, so that you can quickly go up in waystone tiers. Transmute and augment them for a chance to get additional waystone drop chance modifier.
Next path to the Valuable Paths notable for even more waystone drop chance,
In the The Chosen Path, select Essences and then go up, pick monster Effectiveness from the The Journey Ahead choice passive and Archaeological Interest for more waystone drops.
Monster Effectiveness makes monsters stronger but increases quantity of item drops, which applies to all nondeterministic drops. It increases your currency drops, item drops and waystone drops, so by default I always recommend picking up monster Effectiveness, unless you feel like your character is really weak and you can't handle the gradual difficulty increase.
The next passives in order, require pathing across the bottom arch to the left, going though Expanding Hordes and grabbing Atop the World passive. You will now unlock dropping generic Precursor Tablets and maximize your waystone drop chance. You can get all of these passives before progressing past the Burning Monolith.
If you have enough points, and can handle the extra effectiveness, I recommend grabbing the Nemesis Rising: Effectiveness for more generic drops.
Phase 2 - Increasing Your Character Power
The Biggest Mistake
At this point, if you can, kill the Arbiter of Ash and stay for a while in Tier 11 maps.
One of the biggest mistakes that most players make, is rushing to Tier 15 maps when their character is not strong enough, because they don't realize that they can get almost the same rewards in tier 11 maps.
Tier 11 waystones are area level 75, which means that all items drop at least item level 75.
which is enough for:
Tier 1 flat damage on rings and gloves
Tier 1 or tier 2 life rolls on gear depending on the item type
Tier 2 of all resistance and defense rolls
+3 rolls on amulets
Tier 2 physical damage on weapons
and level 18 gems
To get better rolls than that, you'd need to jump from item level 75 to item level 82 which most items found in T15 maps won't even reach, and even then these rolls are usually lower weight, so you can very comfortably gear up in tier 11 maps, without losing much. This is an important breakpoint that you should know about, because unless you're playing a strong build, have a lot of practice or love repeatedly dying in your maps, you'd be much better off spending a little bit of time in Tier 11 maps and getting your quests done quicker and easier.
In order to catch up in power, before finishing the fortress and killing the last pinnacle boss, It's a good idea to now progress the league mechanics that will benefit your build the most, get better gear and more levels.
Phase 2 - League Mechanics Overview
The first time you encounter each of the league mechanics, you will be given a quest and reveal an area where you can continue it. Let me give you a quick league mechanics overview so that you know which ones to prioritize for your specific build.
Abyss
Abyss is one of the best mechanics to prioritize early.
It gives:
Raw currency - such as: transmutations, augmentations, alchemy orbs, exalts and vaal orbs.
Desecrated Bones and Omens that can be used to craft on most gear, which are very universal and will help any build.
Expedition
Expedition - which starts in the ruins of Kingsmarch - currently has no passive tree - which means it can be farmed with high efficiency right away. It's a great mechanic if you need some early supplies and character power.
It gives:
Raw currency - good for basic crafting currency as well as raw income in the form of divines.
Good source of high level Uncut Skill gems and Spirit Skill gems early.
Expedition encounters have Map chests that drop multiple waystones, allowing you to replenish your waystone pool.
Breach
Breach is also good early on, particularly for build specific items and specialized currencies.
It gives:
Specialized Amulets, Belts and Rings for any build - especially good for early belts.
Currency items with ability to specialize and target farm specific items.
Powerful Minion specific items.
Caster specific items witch niche modifiers.
Catalysts for improving jewelry.
Ritual
Ritual allows you to hunt unique items and crafting omens. It's probably not going to help you improve your character directly early on, but it can help you make currency.
It gives:
Unique items.
Crafting Omens.
Delirium
Delirium can be used to increase the difficulty and rewards of maps, and rewards you with liquid emotions used to instill amulets.
it gives:
Ability to anoint amulets.
Increased item drops.
Liquid Emotions for anoints and jewel crafting.
Vaal Temple
Vaal temple gives Vaal currency - which usually lets you interact with corrupted items, or corrupt them with additional upsides and allows you to build a temple that can become very rewarding with a lot of time and planning.
It gives:
Vaal currency for corrupting items and interacting with corrupted items.
Alternative farming environment.
Phase 2 - Recommended Progression
Here is what I would do after killing the Arbiter of Ash and reaching Tier 11 waystones in the exact order.
One Doryani Master Point
First, path through nearby corrupted zone and clear the corrupted nexus to acquire a point for Doryani. This will let you spec into an additional revival, allowing you to safely run more difficult maps. You can run T11 maps, except for final parts of quests which may require Tier 14 or Tier 15 maps.
Delirium Anoint
Next make a quick detour to unlock amulet anoints from Delirium. You'll need to path to the Withered Willow and kill 5 bosses with delirium mirror fog active in your map. This will complete the first part of the quest, which allows anointing amulets.
I recommend doing this first part and clearing the first four passive point maps in the delirium area, so that you can allocate I know your childhood fears... for more liquid emotion drops. I wouldn't progress deli any further right now, but I would pass through deli mirrors in my maps while completing the other quests, until I have enough liquid emotions to get a decent passive anoint on my amulet.
Abyss
Then path straight to the abyss area and the Well of Souls. Following the quest, path toward the top bottom and right corners of the abyss, completing the quest objectives. Finally you can kill Kulemak - the final boss of the Abyss mechanic. Killing a boss in any of these quest will usually grant you about 6 passive skill points, this should bring you closer to fully unlocking the tree.
Can't Allocate Passive Points?
Keep in mind that as you're progressing and allocating passives, some of them will be impossible to click an allocate. This is because they require killing the boss first, so if you ever encounter this situation, you simply need to keep progressing until you kill the boss of that mechanic and then the passives will unlock and you'll be able to allocate them.
After Killing Kulemak, run the remaining nearby maps that grant Abyss tree skill points until you allocate them all.
Avoid These Tablets
As a general rule, when progressing the league mechanics, you want to avoid running tablets associated with that mechanic, so for example while doing your abyss quest and getting your abyss tree passives you DON'T want to run Abyss Tablets. Tablets usually add more of that league mechanic into the map and you want to complete the mechanic and kill the map boss as quickly as possible. The more of that mechanic you put into the map, the more time it will take to do. Keep that in mind while allocating the passives also. For example - From Below, will make the abysses larger, and Sprawling Rupture will make them spawn more monsters, both will make the abyss take more time to complete, so I would prioritize the middle part of the tree and picking up Balance of Power: Ulaman, for guaranteed currency chests.
Breach
After Abyss, I would recommend completing the Breach quest. Breach is great for early gearing - especially for the belt slot which early on is likely going to be your weakest item.
Path to the Monastery of the Keepers and follow the quest by completing breaches in nearby maps that grant Breach tree passive points - then do the Breach Hives and Breach Colony and kill Xesht for extra passive points - completing the quest. After Xesht you'll still need to run a few maps to get the last remaining points.
From the breach tree, I recommend getting Breeding Program: Banded Fruit as soon as you can, followed by Diverse Control. Other than that, get passives that increase the amount of monsters in your breach encounters to get more Hiveblood and fill in the entire tree. I recommend picking Sole Purpose: Destruction, for more Ailith abilities that spawn extra monsters in your encounters.
The Final Preparations
If you still need extra currency, experience or skill gems, do a few expeditions, by going to Kingsmarch and following the quest, but if you feel strong enough, and your character is at least level 85, do your last trial of Sekhemas to fully complete your ascendancy tree and head back to the Precursor Fortress to fully clear it by killing the end boss and finish the Main Atlas Tree.
The lowest level of Djin Baryas with 4 trials, are level 75 and by farming Tier 11 maps, you also guarantee that you'll get the lowest and therefore the easiest possible 4th ascendancy trial key. I recommend fully ascending before tackling the final pinnacle boss.
Phase 3 - The Origin Tower Pinnacle Boss
After getting enough character power to progress to Tier 15 maps and the final pinnacle boss, you want to head straight to the Matriarch and Patriarch Halls inside the central part of the Fortress. You don't need to enter the origin tower just yet.
The Matriarch will drop the Origin Cradle, and the Patriarch will drop the Origin Spark. You need both of these items to fight the Pinnacle Boss - Arbiter of Divinity. Bring the Origin Cradle and Spark to the Engine Room in the Origin Tower - turn them in for the Origin Core and take the core to the top of the tower.
After successfully defeating the Arbiter of Divinity, you can click on one of the cardinal devices located around the perimeters of the tower, to auto complete a region of the Fortress.
Each region should give you around 40 passive points on average, depending on how many maps you've already completed in it. I like starting with the bottom left segment. This is because auto completing a region, grants you access to the Precursor Towers located at the wall. You should now complete these towers to reveal the areas around them.
The towers in the bottom left segment of the fortress will speed up your path to the Ritual area. In the future leagues, the ritual mechanic at that location might be replaced by another mechanic, for example breach, but the general locations should stay the same. You want to use the towers to your advantage, so that you can move around the atlas faster, by pathing from these tower after you unlock them with the cardinal tower device, instead of having to path to these areas yourself.
Phase 3 - Atlas Passives
Killing the Matriarch, Patriarch and Arbiter of Divinity will give you a lot of passives points for your atlas tree, so let's get over the priorities and the best way to allocate them.
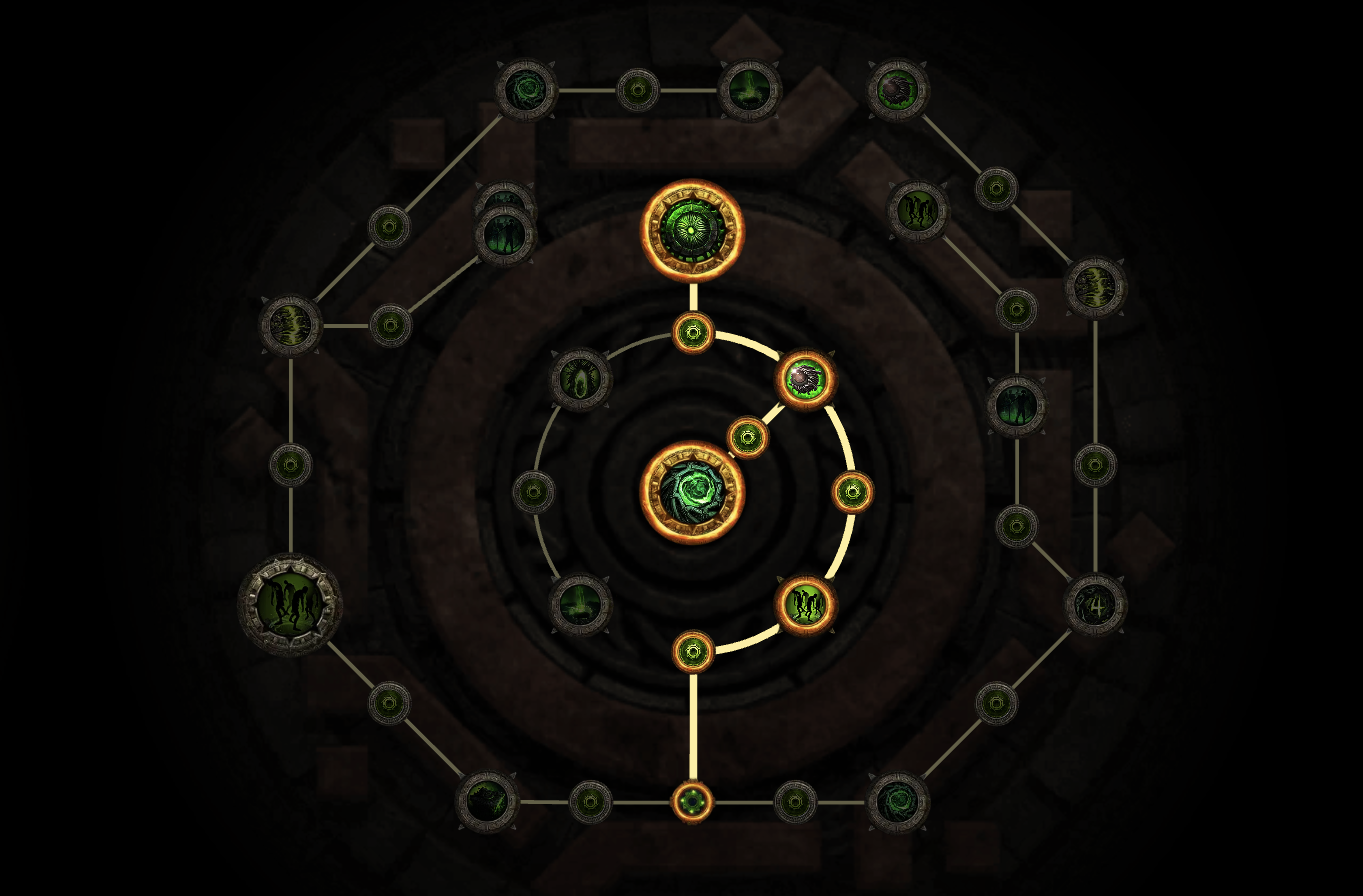
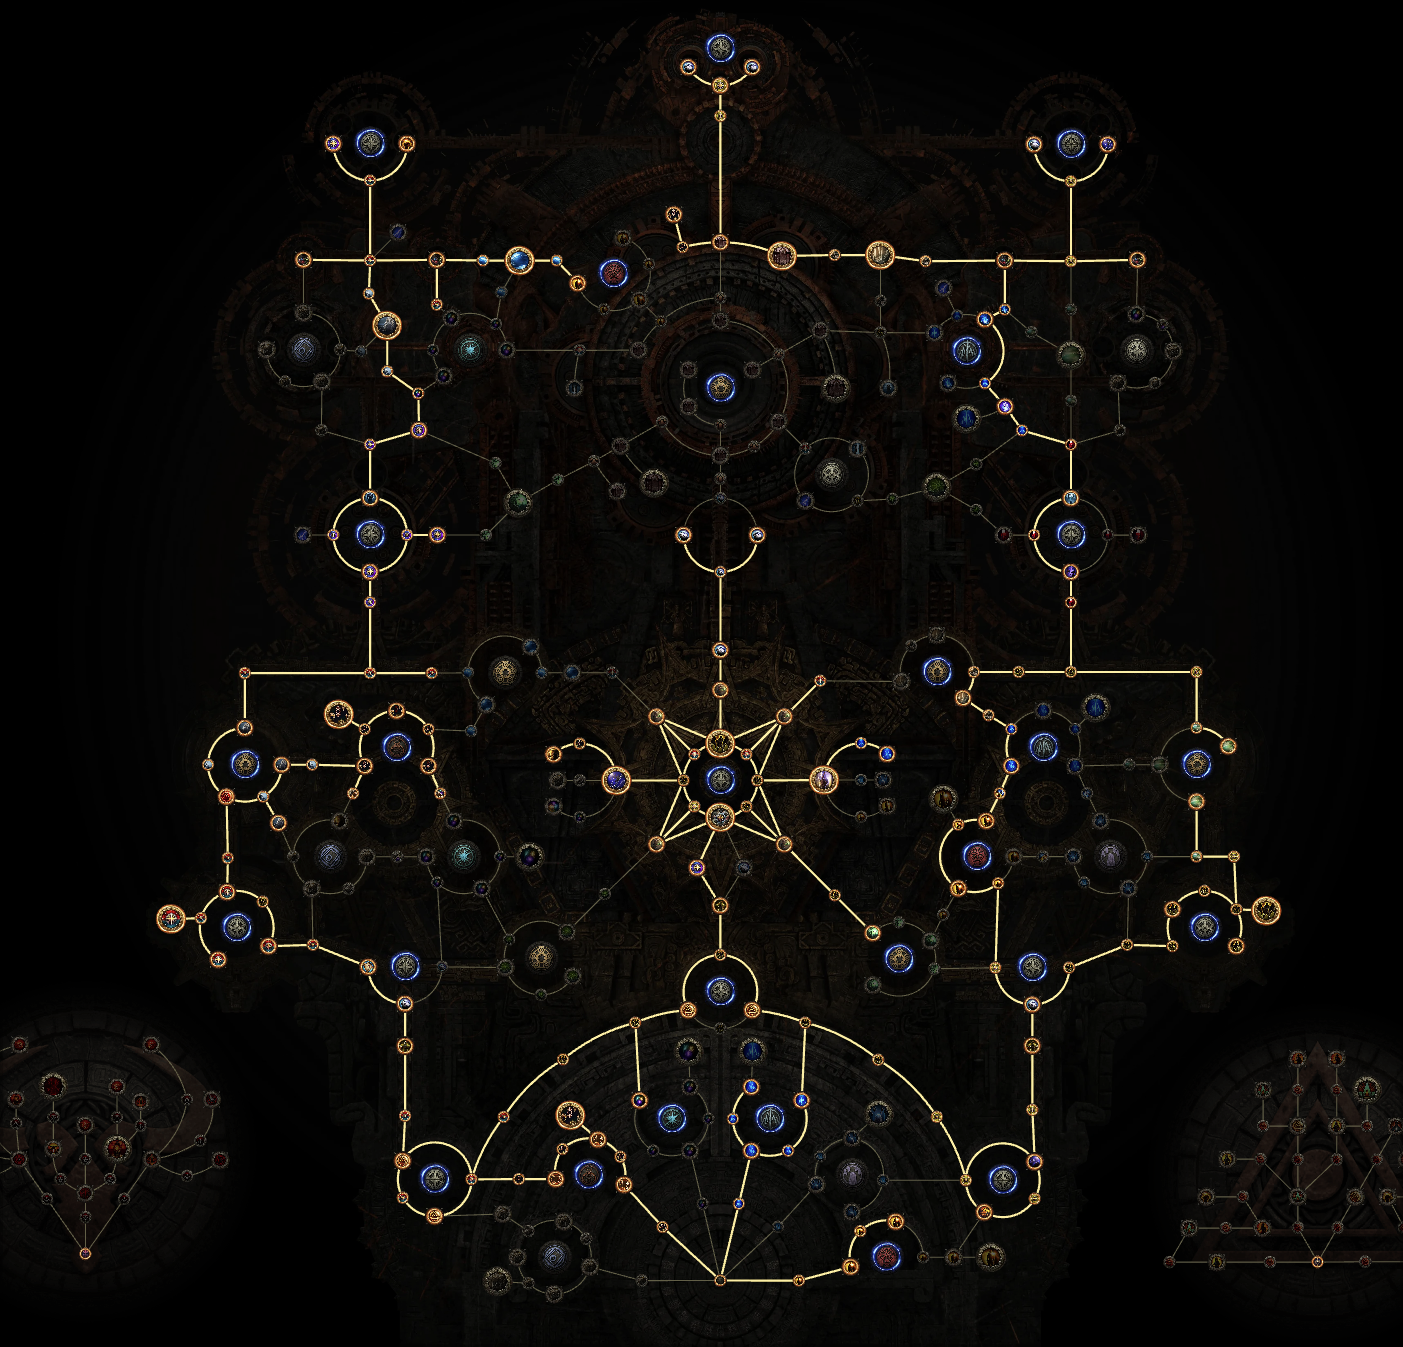
Start by picking up Reverse Transcription for an extra tablet modifier, allowing you to regal them.
Then path through rogue exiles and pick up Competing ExplorersCompetitive Archaeology. Rogue Exiles are one of the best sources of early jewelry drops. Without them, you'll hardly ever find rings and amulets, so it's useful to get them into your maps early in your progression.
Then path through the Essence nodes straight for the corrupted zone passives.
On the other side of the tree, path through the magic monster passives towards the cleansed area passives, and up to the Mountain Mastery: Tablets.
After killing the Arbiter of Divinity and using the Cardinal device, you should have enough points to pick up the top forks and memories.
Spec into the top left fork and the nearby memory nodes:
Risk and Reward
Enigmatic Intensification
Memories of the Vaal
Memories of the Maraketh
Then the top right fork, pathing through the essence nodes and picking up those two memory nodes:
Controlled Climates
Hard-Won Treasures
Memories of the Ezomytes
Memories of the Karui
and Finally path through Desert Mastery: Effectiveness - History of the Faridun: Vastiri Woes the Top Fork:
Curiously Durable Stone
Partial Translation
The passives at the top scale your waystone and tablet modifiers, allowing you to juice your maps for much more loot, and they're some of the most impactful passives you can pick up, that's why you want to path efficiently through the tree and get them as soon as possible, which is right after killing the Arbiter of Divinity.
You will also notice that we manage to pick up the Anomaly Map Lineage Support Drops passives, before doing a single Anomaly map. You can now complete your Jado Master missions with an increased chance to drop very expensive lineage support gems. It's a small optimization that could make the difference between getting an early expensive drop at league start or not getting it.
Overall this is a great starting tree template, that will significantly boost your loot in maps now.
Phase 4 - Fast and Efficient 100% Fortress Completion
Hunting the Halls
Now you want to complete the rest of the Fortress as quickly as possible. The best way to do that, is to go out into the infinite atlass, and look for Matriarch and Patriarch Halls. You can identify them by a smooth Orange Beam. They are usually next to each other, so if you find one of them, the other should be nearby.
The best way to find them, is to combine this search with progressing your Doryani Master quest in the following way:
First, if you don't see any Halls on your atlas, path in one direction straight away from the Fortress - for example to the West - pathing from the Precursor Tower in the fortress wall.
If you find a corrupted area - clear it by running the nexus and killing the boss, which will give you another master point for Doryani.
The Doryani's Science tree is the best for atlas exploration. I recommend taking Stitch the Flesh for the +1 Revival, Hidden Patterns, for faster traversal of the atlas, Remnants of the Greatness - for the extra atlas reveal which will happen whenever you use a Precursor Transformer that spawns when killing map bosses and either Map Irradiation or Volatile Connection for occasional cleansed maps.
Complete any precursor towers on the way to reveal more of the atlas, until you find Matriarch and Patriarch Halls.
You can save waystone drop chance tablets and high waystone drop chance waystones, because having higher waystone drop chance increases your chance at getting an additional Origin Spark or Origin Cradle from the Halls boss.
Once you get a complete set, head back to the Origin Tower in the Fortress and fight the Pinnacle Boss again. Then use the cardinal tower device to auto complete a region behind which you did not explore anything yet. Doing this will allow you to utilize the wall tower the reveal more of your atlas and quickly find more Matriarch and Patriarch Halls, as well as corrupted zones to finish Doryani's quest which wraps up after clearing the third corrupted nexus and killing a nearby guaranteed Immured Fury boss.
Get the next set of Origin Cradle and Spark - head back to the Origin Tower - kill the Arbiter of Divinity - autocomplete another Fortress section behind which you didn't explore your atlas yet and run the towers to explore a fresh atlas region. This strategy is the quickest way to find enough Matriarch and Patriarch Halls to kill the Arbiter of Divinity Five times in total, and fully unlock your main atlas tree.
You can also buy the Spark and Cradle from other players in trade league, but you'll need to explore your atlas anyway, so I recommend farming them for yourself and saving a lot of currency that way.
Atlas Passives Priority
We prioritized all of the important passives, so what you take next is mostly up to you, but I recommend first grabbing all generic passives. More Magic Monsters, more Rare Monsters, Item Rarity, Pack Size, all of those will generically help with most strategies and make your maps more rewarding.
Then you can pick up any specialized passives for the league mechanics you like - for example Shrines, to give you some extra power while mapping and the city passives for juicing city regions of the atlas.
Phase 5 - Completing Side Content
Now you can either go and farm whatever league mechanic you like or finish unlocking the remaining passive trees for each of the mechanics. If you want to fully unlock everything. I recommend starting with Ritual.
Ritual
Path to Caer Tarth and do rituals in maps that grant you passive points for the ritual mechanic. Instead of picking up low value items, just offer your tribute to the king, to get An Audience With The King invitation as quickly as possible. Once you get it, use it on the Crux of Nothingness - travel to it and kill the King in the Mists.
Take Aefe's body back to Caer Tarth and with the head of the king in your inventory, click on the Effigy to select 5 maps. Run them and collect the quest parts that drop at the end of last ritual in each map.
Remember to not run ritual tablets, or you'll have to complete more rituals in every map to progress, which will slow you down.
Putting all 5 parts into the effigy in Caer Tarth will let you fight Bodach the final boss of Ritual - defeat him for extra passive points and finish up your tree by quickly running the remaining maps located nearby which grant passive points for the ritual tree. Alternatively if you've found another crux of nothingness on your atlas, you can get another Audience with the King, run the 5 maps for the Rite of the Nameless again and kill Bodach for the last passive points, but most likely it will be faster to just complete maps near Caer Tarth.
While allocating the ritual passives, focus on things that give you more tribute, so for example Reborn in Shadow, From the MistsInvigorated Sacrifices: Attrition. Then fill the rest as you see fit, depending on the unique items you want to target farm.
Vaal Temple
After ritual, I recommend completing the Vaal Temple tree, because it's easier than Delirium.
Path to the Vaal City nearby and complete individual nodes that award Vaal Temple atlas passives, until you can no longer access the rest of the city. At this point You'll need to kill the Architect. Build a road highway straight the top of the temple and attach rooms higher up the road to protect it from destabilizing. You can use rooms and room chains to connect to the Architect and Atziri's Royal Chambers - you don't need to connect a road to them.
Killing the architect will unlock more of the Vaal city.
Your first passives should be Offerings to the Queen, Military ReinforcementsLoyal Gatekeepers. These are useful even if you're not going to run the Temple, because they give you extra loot and monsters in your map, around the Vaal Beacons.
After running the remaining accessible city nodes, you will need to kill Atziri. Make sure to connect to the Atziri's chambers at the end of the temple as well as the royal access chamber at the same time. Killing atziri will give you 6 extra passive points for the temple tree, which should bring you close to completely finishing it. Get the remaining few points by running the last few city maps with passive points guaranteed.
Delirium
The last atlas tree to complete is delirium - the delirium maps are significantly harder than completing other mechanics, because you will need to run over 100% delirious maps, which make the enemies much stronger.
If you've already completed a few deli maps and unlocked amulet anoints, then your next step in this quest is pathing to the Grand Mirror. When you get to the map boss, he will have a black mirror next to him, which will spawn a copy of the map boss. Kill them both and click the mirror. This will spread the fog to a group of maps and spawn a Simulacrum in at least one of them.
You'll need to then run maps covered in the delirium fog. Each map will escalate the level of delirium making the subsequent maps harder. Once you boost the delirium to 100%, you'll be able to enter the Simulacrum. It's a 7 stage fight, where you fight harder and harder waves of enemies. Completing it, grants you the boss key - the Ravens Reflection. Part of the broken mirror. You can bring it to the Withered Willow to activate the mirror and fight Tangmazu - the final boss of delirium. Beating him, will grant you a few points for your delirium tree, and to get the rest of them you'll need to complete remaining nearby maps. Try to first complete any regular delirium mirror maps with guaranteed passive points that aren't covered in fog, once you run out of them you'll have to finish up with the difficult delirium fog maps, that have their delirium level already raised above 100%. This is why we left this tree to unlock at the end.
Master Quests
After finishing delirium, you can follow up with Hilda and locate the Great Beasts she needs for her master passives. Kill the remaining three beasts and afterwards move on to complete Jado's master quest.
You'll need to find The Sealed Vault, which is usually located right at the front of the fortress. Jade Isles - which initially spawn next to Kingsmarch and then you'll need to find Derelict Mansion and Sacred Reservoir which are also going to be somewhere relatively close to your starting location. Jado is useful for some specific farming strategies, so it's good to have him fully unlocked. Most importantly for finding Exceptional Items and Lineage Supports.
Expedition Quests
With your Fortress complete - Atlas tree fully allocated - all league mechanics fully unlocked and all three masters ready to support you with all of their passives you can now finish with the grand expedition quest from Kingsmarch - if you haven't done it earlier for currency - you can head to Kingsmarch and follow the path charted by quest logbooks, killing expedition bosses and progressing the Kalguuran quest.
You'll have to kill Medved, Vorana, Uthred and Olroth - take the Triskellion Flame item from Olroth and sail to the crater. There is a lot to explore there, with lots of little secret rewards, but there is no atlas passive tree for this mechanic yet. Which means that your progression should be now complete.
Final Words
There is honestly a lot of content to go through, even if you're boss rushing in most of your maps. You don't need to do all of it, and you can focus on whatever content you like, but if you want to quickly and efficiently get all of your passives unlocked, so that you can be ready for any new currency strategy that drops or you simply like completing all available content, following this guide will speed you up a lot.
Simplified Checklist
Here is a simplified, step-by-step checklist of everything you need to do in correct order.
Phase 1: First Steps & Early Fortress
Finish the campaign and arrive at the Ziggurat.
Open the Waygate, complete your first map (rush straight to the boss), and talk to Doryani and Farrow.
Go to Hilda's Camp and complete your first Beast Contract. (Allocate the passive for a 25% chance to upgrade Normal Bosses to Powerful Bosses).
Begin progressing the Fortress by taking the shortest paths possible. Always rush to the boss.
Side Task: Whenever you pass Tier 6, Tier 11, and Tier 14 Waystones, buy a few backup maps of those tiers from Doryani.
Path to the Ancient Gateway and then straight to the Burning Monolith.
While pathing, find the guaranteed Barya, reach level ~70, and complete your 3rd Ascendancy Trial.
Path to the East Gateway (kill Precursor Refiner).
Path to the West Gateway (kill Precursor Separator) to open both gates.
Path to the Enigma Chambers (requires T10 Waystones). Kill both bosses to get Crisis Fragments.
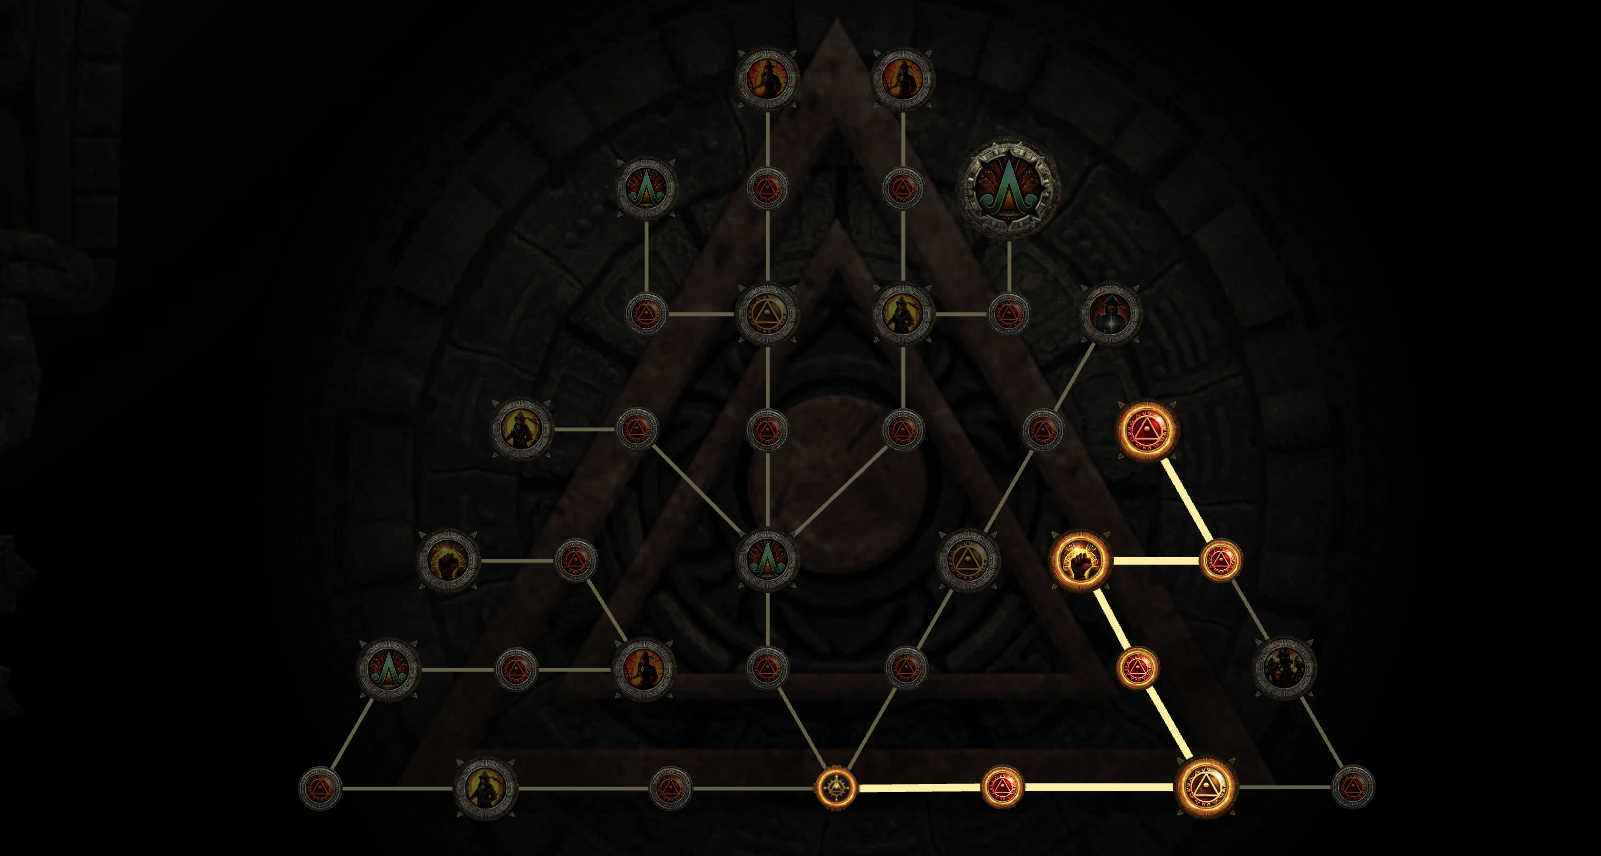
Allocate your Atlas Passives in this order: Trapped Subordinate -> Pathkeepers -> Eons of Domination -> Valuable Paths -> The Chosen Path: Essences -> The Journey Ahead: Effectiveness -> Archaeological Interest -> Expanding Hordes -> Atop the World.
Return to the Burning Monolith and defeat the Arbiter of Ash.
Phase 2: Character Power (Gearing Up in T11)
Stop pushing map tiers. Farm Tier 11 maps (iLvl 75) to gear up safely.
Path to a nearby Corrupted Zone, clear the nexus, and get 1 Doryani point (allocate the extra map revival).
Delirium (Part 1): Path to the Withered Willow. Kill 5 map bosses while Delirium fog is active to unlock amulet anoints. (Clear the first 4 passive point maps and allocate I know your childhood fears...).
Abyss: Path to the Well of Souls. Complete the quest objectives, closing the abysses and kill Kulemak. (Do not run Abyss tablets while doing this. Allocate Balance of Power: Ulaman, avoid size/monster-increasing nodes at first).
Breach: Path to the Monastery of the Keepers. Do the Hives and Colony, and kill Xesht. (Do not run Breach tablets. Allocate Breeding Program: Banded Fruit and Diverse Control).
Reach level 85+ and farm T11 maps for a low-level 4-Trial Barya to complete your 4th Ascendancy Trial.
Phase 3: The Pinnacle Boss
Push into Tier 15 maps.
Path to the Matriarch and Patriarch Halls in the central Fortress. Defeat them to get the Origin Cradle and Origin Spark.
Take the Cradle and Spark to the Engine Room in the Origin Tower to get the Origin Core.
Take the Core to the top of the tower and defeat the Arbiter of Divinity.
Click the bottom-left Cardinal Device to auto-complete that region of the Fortress.
Allocate Phase 3 Atlas Passives: Reverse Transcription -> Competing Explorers/ Competitive Archaeology -> Mountain Mastery: Tablets -> Top Left Fork (Risk and Reward, Enigmatic Intensification, Vaal/Maraketh memories) -> Top Right Fork (Controlled Climates, Hard-Won Treasures, Ezomyte/Karui memories) -> Top Fork (Curiously Durable Stone, Partial Translation).
Phase 4: 100% Fortress Completion
Spec Doryani's master tree for exploration (Stitch the Flesh, Hidden Patterns, Remnants of the Greatness).
Path outwards away from the Fortress using the newly unlocked wall towers.
Clear corrupted zones along the way to finish Doryani's quest (ends with killing the Immured Fury).
Look for smooth Orange Beams on the map to find more Matriarch and Patriarch Halls. (Use Waystone drop chance tablets to boost Origin Fragment drops).
Collect a Cradle and Spark, return to the Origin Tower, and kill the Arbiter of Divinity.
Autocomplete a new region, use the newly unlocked wall tower to reveal more of the map, and repeat this loop until you have killed the Arbiter 5 times total.
Spend your remaining main Atlas points on generic buffs (Magic/Rare monsters, Item Rarity, Pack Size).
Phase 5: Completing Side Content
Ritual: Path to Caer Tarth. Offer tribute to get "An Audience With The King". Use it on the Crux of Nothingness, kill the King in the Mists. Put his head in the Caer Tarth effigy, run 5 maps to get quest parts, and defeat Bodach. (No Ritual tablets during this.). Run guaranteed ritual passive maps until the tree is finished.
Vaal Temple: Path to Vaal City and run as many passive granting maps as you can. Kill the Architect. Build a straight road to the top of the temple, connect the Royal Chambers, and kill Atziri. Run guaranteed Temple passive maps until the tree is finished.
Delirium (Part 2): Path to the Grand Mirror. Complete maps covered in fog up to 100% delirious, enter and complete Simulacrum. Take the Raven's Reflection to the Withered Willow and kill Tangmazu. Run guaranteed Deli passive maps until the tree is finished.
Hilda Master Quest: Locate and kill the remaining 3 Great Beasts on the map.
Jado Master Quest: Find The Sealed Vault, Jade Isles, Derelict Mansion, and Sacred Reservoir on the map and complete them.
Expedition (Kingsmarch): Follow the logbook questlines. Defeat Medved, Vorana, Uthred, and Olroth. Take the Triskellion Flame to the crater.