menu
MobalyticsUse your favourite features in-game with our Desktop App
Gamebase Guide

Valheim 1.0 - Kall Fimbulbringer Boss Guide

Guides
Valheim
Updated on Sep 12, 2026
Sep 12, 2026

Intro

Kall Fimbulbringer

Kall Fimbulbringer is the final boss of Valheim and the last major encounter of the Deep North. Unlike the previous Forsaken, Kall is fought across three separate phases, each testing a different part of what you have learned throughout the game.

The fight has roughly 47,000 total health across all three phases, with the final phase alone accounting for 30,000. Kall also resists Pierce, Fire, Frost, and Lightning damage, while Spirit damage does nothing at all. Slash and Blunt therefore become the safest damage types to build around.

This guide focuses entirely on the fight itself, including the best preparation, recommended damage types, each phase of the encounter, and the rewards you receive for defeating him.

If you have not yet unlocked the Aesir Passage or collected the required Malicious Blood, refer to our Deep North Progression Guide first. That guide covers the full route from entering the biome to reaching Kall's arena.

Preparation and how to Summon Kall Fimbulbringer

How to Summon Kall Fimbulbringer

Kall Fimbulbringer is found inside the Aesir Passage in the Deep North. Unlike the earlier Forsaken, you do not summon him at a normal open-air altar.

To begin the fight, you need 3 Malicious Blood. These are obtained by completing the Jotun Invasions that become available during Deep North progression. Once you have all three, bring them to the Strange Bowl inside the Aesir Passage and make the offering.

If you have not yet unlocked the Aesir Passage or collected the Malicious Blood, refer back to our Deep North Progression Guide, where we cover the full progression chain involving Winding Tunnels, Mörkhalla, Intricate Keys, and the Jotun Invasions.

After making the offering, there is a short delay before Kall appears, giving you a brief moment to make sure your food, resistances, and other buffs are active.

How to Prepare for Kall Fimbulbringer

Kall is a long fight with 47,000 total health spread across three phases, so preparation matters more here than in almost any previous Valheim boss encounter.

Use Slash or Blunt Damage

Weapon choice is especially important against Kall.

He is resistant to:

  • Pierce
  • Fire
  • Frost
  • Lightning

He is also completely immune to Spirit damage.

By comparison, Slash and Blunt deal their normal damage, making those the safest damage types to build around.

This means Bows and Crossbows are still useful for utility and dealing with some targets during the fight, but they are not ideal as your main source of damage because most conventional ranged weapons rely heavily on Pierce.

Deep North Greatswords and Sledges are particularly strong options if your build supports them. You do not need one specific weapon to win, though. An upgraded Slash or Blunt weapon that you are comfortable using is more important than forcing yourself into an unfamiliar moveset.

Bring Fire and Frost Resistance

Even though Kall himself resists Fire and Frost damage, he can deal both types during the encounter.

This becomes especially relevant later in the fight, so having access to Fire and Frost resistance can significantly reduce the amount of damage you take.

Make sure any resistance effects you plan to rely on are active before starting the encounter rather than trying to reorganize your inventory in the middle of a phase.

Use Your Best Deep North Food

This is not the fight to save your best food for later.

Kall's encounter is long, and both Health and Stamina are important. Melee builds need enough Health to survive mistakes while still maintaining enough Stamina to dodge, reposition, and punish openings.

A setup combining two strong Health foods with one high-Stamina food is a reliable option for conventional melee builds.

Magic users should instead build around enough Eitr to comfortably use their Staffs while still keeping enough Health and Stamina to survive the fight.

Bring Healing and Stamina Mead

Because the encounter lasts through several distinct phases, bring a healthy supply of Healing Mead.

Stamina recovery is equally important. Kall has several attacks that require you to quickly create distance, and draining your entire Stamina bar during an offensive opening can leave you unable to escape the next attack.

If your build frequently runs low on Stamina, bring Stamina Mead as well.

Refresh the Rested Buff

Make sure you enter with as much Rested duration as possible.

The increased Health and Stamina regeneration is extremely valuable throughout such a long encounter. Starting the final boss with only a few minutes remaining on Rested is an unnecessary disadvantage.

Go home, refresh Comfort, repair your equipment, restock your food and consumables, then return through your Portal when you are ready.

Place a Portal Nearby

Build a Portal somewhere safe near the Aesir Passage before starting the fight.

Even with perfect preparation, dying during your first attempts is entirely possible. A nearby Portal turns that into a short corpse run instead of another expedition across the Deep North.

Keep some backup food and equipment at home as well, just in case your gear is left inside the arena.

Do Not Enter Overloaded

Clear unnecessary items from your inventory before entering.

You want easy access to your food, Meads, weapons, and any alternative equipment you plan to use. Carrying random Deep North materials into the final boss arena only makes inventory management more annoying.

Once your equipment is upgraded, your resistances are prepared, and you have enough supplies for a long encounter, you are ready to begin Phase 1.

Phase 1: Learn Kall's Chain Attacks

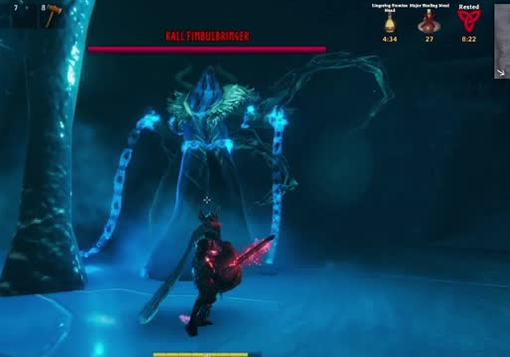
Phase 1 Khal Fimbulwinter

The first phase is the most straightforward part of the fight. Kall has 10,000 HP, and unlike the second phase, you can damage him normally throughout the entire phase.

This phase is mainly about learning how his chain attacks work. They have much more range than they initially appear to, so simply backing away from every swing is not always the safest response.

Chain Slam

Kall can bring one or both chains down in a heavy overhead attack.

The hit deals very high Blunt damage, but it is blockable if your shield and Stamina are strong enough. Otherwise, dodge to the side and use the recovery afterward to get a few attacks in.

Do not immediately commit to a full combo after avoiding the hit. Get your damage in, then make sure you still have enough Stamina left for the next attack.

Chain Sweep

The Chain Sweep is one of the attacks that can catch you surprisingly far away.

Kall swings the chain horizontally across a wide section of the arena. Moving straight backward can actually make this harder to avoid because of how far the chain reaches.

Instead, try to dodge through or toward the sweep when your timing is comfortable, then punish Kall once the chain has passed.

Chain Whirl

Kall can also spin both chains around himself.

This covers a large area around his body, so this is not a good moment to greed for another melee hit. Back away or time your dodge, then move back in once the animation has finished.

Chain Rush

The Chain Rush is one of the most dangerous attacks in this phase.

Kall quickly lunges toward you, dealing both Blunt and Pierce damage if he connects. It is also one of his hardest individual hits, so do not underestimate it just because you have some distance between you and the boss.

Dodging sideways is usually safer than trying to outrun it directly backward.

Do Not Underestimate His Range

The most important lesson in Phase 1 is that Kall's chains reach farther than they look.

If you constantly sit at what feels like medium range, you can still get clipped by sweeps or suddenly caught by the Chain Rush. Stay close enough that you can read his animations, but not so close that you are forced to react to every attack at the last possible moment.

Play Around Recovery Windows

The safest rhythm for Phase 1 is simple:

Watch the attack, avoid or block it, punish the recovery, then reset.

Do not try to continuously DPS Kall between attacks. This is a long three-phase fight, and losing a large amount of Health just to squeeze in one extra hit is rarely worth it.

This is also the best phase to conserve your Healing Mead. If you can learn the chain timings here, you will have far more resources available for the much harder final phase.

Phase 1 Tip: Pay attention to the chain itself rather than only watching Kall's body. The direction and movement of the chain gives you a much clearer indication of where the attack is actually going to land.

Phase 2: Defeat the Forsaken Aspects

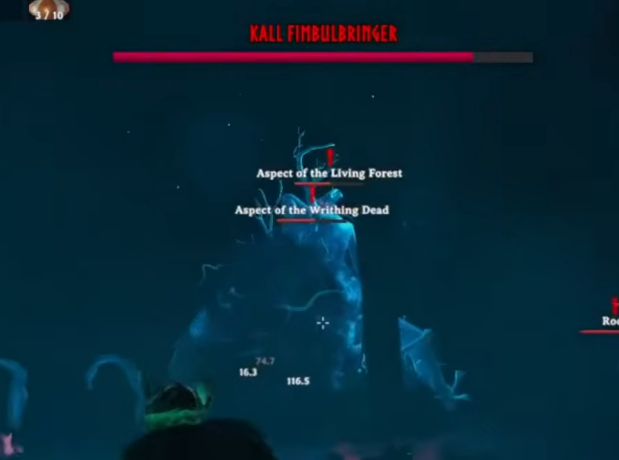
Phase 2 changes the fight completely. Kall has 7,000 HP in this phase, but becomes immune to every damage type, so trying to attack him is pointless. Instead, he summons seven aspects based on the previous Forsaken bosses you defeated throughout Valheim.

The real objective is to survive the phase and kill the summoned aspects.

Kall Becomes Completely Immune

Once Phase 2 begins, Kall throws out seven projectiles that become the boss aspects.

While they are active, Kall cannot be damaged by anything, including normal physical damage, elemental damage, Chop, or Pickaxe damage. Focus entirely on the summons instead.

The seven aspects are:

  • Aspect of the Lightning Stag
  • Aspect of the Living Forest
  • Aspect of the Writhing Dead
  • Aspect of the Dragon Mother
  • Aspect of the Twisted Soul
  • Aspect of the Crawling Matriarch
  • Aspect of the Emerald Flame

Together, they represent the seven bosses that came before Kall.

Do Not Fight Everything at Once

Aspects Khal Fimbulbringer

The biggest danger in this phase is losing control of the arena.

Each aspect brings back parts of its original boss moveset, so fighting several simultaneously can quickly become chaotic. Create space and focus on eliminating one target at a time instead of spreading your damage across everything.

If one aspect is already low, finish it before changing targets. Every kill reduces the amount of pressure in the arena.

Prioritize the Lightning Stag

The Aspect of the Lightning Stag is the toughest individual summon with 3,000 HP, making it significantly tankier than the other aspects. It also deals heavy Pierce and Lightning damage.

Unlike Kall, it does not resist your normal Blunt, Slash, or Pierce damage, so your main weapon remains effective against it.

Because it has the largest Health pool, this is a good target for strong cooldowns or burst damage if you have them available.

Exploit Familiar Weaknesses

The aspects retain many of the same weaknesses and resistances associated with their original bosses.

For example, the Aspect of the Living Forest is still extremely vulnerable to Fire while being immune to Poison and Spirit.

You do not need to completely rebuild your loadout for every summon, but if your secondary weapon or magic happens to exploit one of these weaknesses, use it.

This is one of the reasons Phase 2 feels like a callback to the entire game. Knowledge from the earlier boss fights becomes useful again.

Keep Moving

Several aspects can create additional hazards or attack from range, so standing still is dangerous.

Keep repositioning around the arena and avoid letting yourself get trapped between multiple summons. If several aspects group together, move away and force them to spread out before re-engaging.

The goal is not to clear the phase as quickly as possible. It is to steadily reduce the number of active enemies without taking unnecessary damage.

Save Resources for Phase 3

Phase 2 can consume a lot of Healing Mead if you panic and trade damage with the summons.

Take your time, recover whenever you create enough distance, and avoid using consumables simply because several enemies are on screen.

Once all seven aspects are defeated, Kall becomes vulnerable again, and the final phase begins.

Phase 2 Tip: Stop watching Kall. He is effectively irrelevant while the aspects are active. Keep your attention on positioning, the summons, and maintaining enough Stamina to escape when several attacks overlap.

Phase 3: Survive the Final Endurance Fight

Phase 3 is the real final test. Kall returns with 30,000 HP, which means this phase alone lasts longer than the first two combined. His basic chain attacks return, but several become more dangerous, and he gains new pressure tools that make staying close much riskier.

At this point, the fight is less about finding a way to burst him down and more about maintaining a clean rhythm for a long period of time.

Chain Attacks Gain Elemental Damage

Kall keeps the same general chain-based moveset from Phase 1, but his attacks now gain additional Fire and Frost damage.

For example, his Chain Whirl becomes much more dangerous in the final phase because it adds both Fire and Frost on top of the physical hit. This is where the resistance preparation from earlier starts paying off.

Do not assume an attack is safe simply because you learned how much damage it dealt in Phase 1. The timing may be familiar, but the punishment is much higher now.

Watch for Chain Flurry

Phase 3 introduces the Chain Flurry, a rapid sequence of repeated chain strikes.

This is one of the worst attacks to greed against. Once the flurry starts, back away or focus entirely on avoiding the sequence until it finishes. Trying to squeeze another melee hit into the middle of it can result in taking several hits in quick succession.

Once the full animation ends, you have a much safer opportunity to move back in and punish him.

Tendrils Create Arena Pressure

Kall can also summon Tendrils around the arena.

Each Tendril has relatively little Health, but their real purpose is to restrict your movement and punish you for standing too close. They eventually disappear on their own, so you do not need to stop attacking Kall every time one appears.

Destroy the Tendrils that are directly blocking your escape routes or making your current position unsafe. Otherwise, reposition and let them expire naturally.

Do Not Get Greedy

The biggest mistake in Phase 3 is treating Kall's massive Health bar as a reason to attack more aggressively.

You still want to follow the same basic rhythm as Phase 1:

Avoid the attack, punish the recovery, then reset.

The difference is that you now need to maintain that rhythm for much longer.

If you empty your entire Stamina bar every time Kall gives you an opening, you will eventually get caught by a Chain Rush, Flurry, or elemental attack with no way to escape.

Keep Enough Stamina to Reposition

Stamina is arguably more important than raw damage in this phase.

Kall's attacks cover a large amount of space, and the Tendrils can force you to suddenly change direction. Always keep enough Stamina available for at least one emergency dodge or sprint.

If your Stamina gets low, stop attacking and create some distance. Losing a few seconds of damage is much better than losing the attempt because you could not move.

Use Your Healing Items

If you saved Healing Mead during the earlier phases, this is where you should use it.

There is no reason to finish the final boss with a full inventory of consumables. Heal after taking a large hit when you have a safe opening, and keep your Health high enough that one mistake does not immediately end the fight.

The same applies to Stamina recovery if your build relies heavily on it.

Stay Patient Until the End

Thirty thousand Health can make Phase 3 feel slow, especially on your first kill.

Do not change your strategy simply because Kall is almost dead. The last 10% of his Health is not any safer than the first 10%.

Continue taking the same safe punish windows, avoid the Flurry, clear Tendrils only when necessary, and keep your resistances active until the fight is finished.

Phase 3 Tip: The final phase is an endurance test, not a damage race. If you have a choice between one extra attack and keeping enough Stamina to avoid the next chain combo, choose the Stamina.

Rewards for Defeating Kall Fimbulbringer

Defeating Kall Fimbulbringer marks the end of Valheim's main progression and rewards you with several unique items tied to the conclusion of the Deep North.

The two most important rewards are Sacrificial Blood and the Crown Jewel.

Sacrificial Blood

Sacrificial Blood is one of Kall's unique drops and is tied to the final progression rewards available after defeating him.

Unlike earlier boss drops, it is not used to unlock another biome. Kall is the end of the current progression chain, so his rewards are more focused on finishing the final stage of the game rather than opening another major area.

Crown Jewel

Kall also drops the Crown Jewel.

This is used as part of obtaining the Crown of Valheim, making it one of the most distinctive rewards tied to completing the final boss encounter.

The Crown is effectively an endgame trophy and a clear sign that you have completed Valheim's full boss progression.

Kall Does Not Give a Forsaken Power

One important difference from every earlier Forsaken is that Kall does not unlock a new Forsaken Power.

There is therefore no new boss ability to activate at the Sacrificial Stones after defeating him.

This fits with Kall being the final encounter rather than another progression gate leading into a new biome.

Final Thoughts

Kall Fimbulbringer is designed as a final test of everything Valheim has taught you.

Phase 1 tests whether you can read and punish his chain attacks; Phase 2 brings back elements from the bosses you have fought throughout the entire game, and Phase 3 turns the encounter into a long endurance fight where positioning and Stamina management become just as important as damage.

The most important thing is to stay patient. Use Slash or Blunt damage, keep your Fire and Frost resistances active, manage your Stamina carefully, and do not let the size of his final Health bar convince you to start taking unnecessary risks.

Once Kall falls, you have completed the final boss encounter of Valheim 1.0 and the full progression through the Deep North.

If you still need help reaching the fight, check our Deep North Progression Guide for the complete route through Winding Tunnels, Mörkhalla, Jotun Invasions, Malicious Blood, and the Aesir Passage.