Withered Knight is naturally durable, but this Solo build gives it enough damage and control to win fights without relying on teammates.
The build uses Withering Mark and Auto Execution to place a delayed explosion on the enemy. Once it activates, it deals heavy damage and staggers them, creating an opening for Radiant Retributionor another attack.
Unlike the Trios setup, this build keeps two skills on each weapon and takes Endless Flow (Weapon Specialization) for additional Skill Cooldown Speed. This gives you more ways to answer enemy pressure during extended one on one fights.
There are two Purple versions available: a cheaper setup that requires no wine and a stronger recommended version built around Wrath and Tenacious.
Made in collaboration with Tuezday. Check out his video for more information and demonstrations of this build!
Purple/Epic without Wine:5H68cF5MKQKKLIxe47X5LtwNxf2Ecded0EfLYTIC6l9hat
Recommended Purple/Epic with Wine:5H68aSwxqT5IciDnAs2MirF65uCZZDbZPCclQLkAdKNv
To import a build code:
Open the Prepare tab while in base.
Select Manage/Import at the bottom left.
Open Import Loadout and paste the code.
Affixes
Recommended Purple Loadout
Stoic 6 – Provides up to 6.6% Physical and Magic Resistance while your Health is below 50%. When your Health falls below 30%, it also restores 15% Health, giving you a powerful defensive reset during close Solo fights.
Aegis 5 – Greatly increases your Defense while also providing additional Physical Resistance. Level 5 is the important breakpoint for Aegis, with additional levels providing less overall value.
Valor 7 – Increases your Attack and provides Defense Penetration, ensuring the build still deals meaningful damage despite investing heavily in survivability.
Burst 5 – Increases the damage of Wither Execution. This pairs perfectly with Reprieve and Auto Execution, making the delayed Wither explosion much more threatening.
Tenacious 5 – Provides additional Health, making you harder to finish and giving Stoic more time to activate during extended fights.
Wrath 5 – Increases your damage while at low Health. Stoic helps keep you alive during this window, allowing you to take advantage of Wrath without becoming too vulnerable.
Victory Wine:
Stoic +2 Aegis +2 Tenacious +2 Wrath +2
Before drinking Victory Wine, the equipment provides Stoic 4 Aegis 3 Valor 7 Burst 5 Tenacious 3 and Wrath 3. The additional points bring Aegis, Tenacious and Wrath to Level 5 while raising Stoic to Level 6.
Purple Loadout Without Wine
If you want a cheaper Purple setup, use Valor 7 Burst 5 Aegis 5 Stoic 5 Tenacious 1 and Wrath 1.
This version does not require Victory Wine and still reaches the build’s essential Valor, Burst, Aegis and Stoic breakpoints. However, it sacrifices the additional Health and low Health damage provided by Tenacious 5 and Wrath 5.
Skills
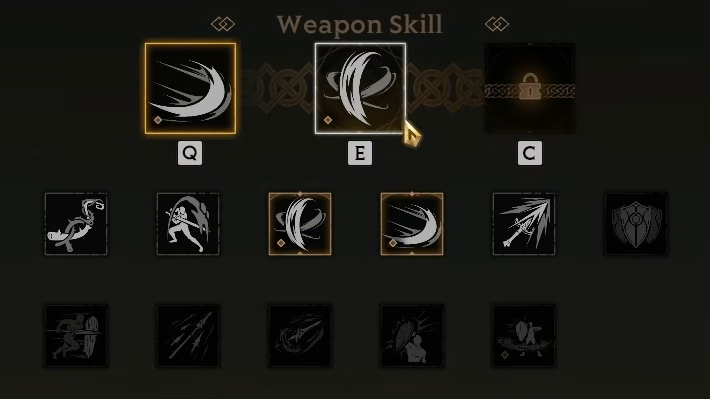
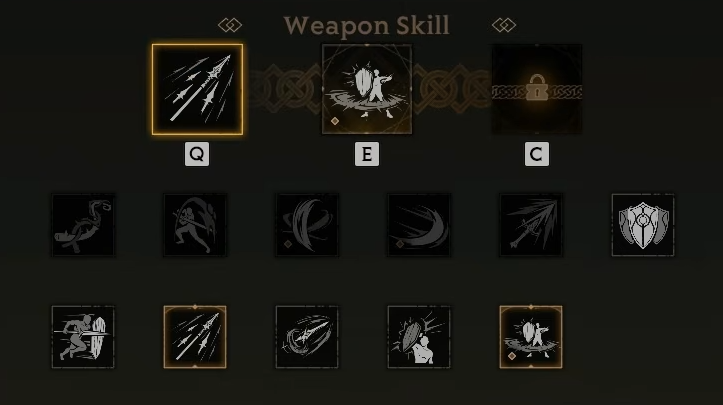
This build uses two Greatsword skills and two Polearm and Shield skills. Combined with Endless Flow (Weapon Specialization), this gives you shorter cooldowns and more options when fighting alone.
Greatsword
Withering Mark
Radiant Retribution
Withering Mark is a ranged attack that applies Wither to an unmarked enemy. With Auto Execution, that Wither will eventually detonate automatically, dealing increased damage and staggering the target.
Try to apply Withering Mark early. The explosion takes time to activate, so landing it at the beginning of a fight ensures the timer is already running while you trade attacks.
Radiant Retribution performs three fast advancing slashes. Each hit staggers, while the final strike has brief Super Armor. Long Range increases its movement distance, making it an excellent answer when an enemy attacks or tries to dodge away.
Polearm and Shield
Spear Barrage
Breaker Shield Bash
Spear Barrage gives you another offensive option while your Greatsword skills are unavailable. Its animation is relatively slow and can be interrupted, so it is best used after staggering an enemy rather than thrown out carelessly.
Breaker Shield Bash provides space, applies a Slow through Off-Balance and can interrupt an opponent’s pressure. Try to use it from a short distance, as its cone shaped attack can miss when an enemy is standing directly on top of you.
Three-Greatsword Alternative
If you prefer three Greatsword skills, replace Endless Flow (Weapon Specialization) with Greatsword Specialization. Remove Spear Barrage and equip Breakthrough Charge as your third Greatsword skill.
You can then replace Off-Balance with Dominance, granting Super Armor during Breakthrough Charge's sweeping follow-up. This version has more Greatsword pressure, but the standard setup provides more frequent cooldowns and defensive answers.
Talents
This build uses the following eight talents:
Reprieve – Wither no longer explodes immediately when executed. Instead, it creates a delayed area explosion with increased damage.
Collective Punishment – Allows the delayed Wither explosion to reapply Wither to affected enemies. Its area effect is less important in Solos, but it is required to reach Auto Execution.
Auto Execution – Causes Wither applied by the Greatsword to execute itself when its duration ends. The timer can no longer be refreshed, ensuring the delayed explosion actually activates.
Long Range – Increases Radiant Retribution's displacement distance, improving its chasing and repositioning potential.
Off-Balance – Causes Breaker Shield Bash to Slow enemies, making it easier to create space or prevent an opponent from escaping.
Endless Flow (Weapon Specialization) – Keeps two skills on each weapon while providing additional Skill Cooldown Speed. This is extremely valuable in Solos, where you have no teammates to relieve pressure.
Instant Wither – Withering Mark immediately executes an existing Wither. If the target is not already affected, it applies Wither instead.
Righteous Creed – Successfully executing Wither briefly increases your Physical Damage, giving you a stronger follow-up after the delayed explosion activates.
Reprieve's explosion flashes three times before activating. The detonation also staggers the target, even though this is not clearly stated in its description. Watch the flashes and prepare your next attack so it lands during the stagger.
Auto Execution is essential for this version of the build. Without it, repeatedly applying Judgment can refresh the Wither timer and prevent Reprieve's delayed explosion from activating.
Tips & Tricks
Apply Withering Mark as early as possible. The delayed execution needs time to activate, so starting its timer immediately gives you much more pressure.
Watch for the mark to flash three times. Its explosion staggers the enemy, creating a reliable opening for Radiant Retribution or a heavy attack.
Keep your Greatsword equipped while moving around the map. Radiant Retribution activates quickly and can stagger an enemy who suddenly attacks you.
Use Breaker Shield Bash from a small amount of distance rather than directly on top of the target. This makes its cone easier to connect and applies Off-Balance's Slow.
Don’t mindlessly chase opponents through their strongest cooldowns. Use terrain, force them to approach and punish them once their defensive or Super Armor ability has been wasted.


 Withered Knight is naturally durable, but this Solo build gives it enough damage and control to win fights without relying on teammates.
 Withering Mark and
  Auto Execution to place a delayed explosion on the enemy. Once it activates, it deals heavy damage and staggers them, creating an opening for
  Radiant Retributionor another attack.
 Endless Flow (Weapon Specialization) for additional Skill Cooldown Speed. This gives you more ways to answer enemy pressure during extended one on one fights.
 Wrath and
  Tenacious.