menu
MobalyticsUse your favourite features in-game with our Desktop App
Gamebase Guide

Trios Withered Knight Greatsword Build Guide (Rank 4 NA) - Mistfall Hunter

By Oli
Updated on Aug 14, 2026
Aug 14, 2026

Overview

Withered Knight is one of the strongest frontline classes in Mistfall Hunter. This Withered Knight (Greatsword) build combines excellent Defense with powerful melee attacks, allowing you to pressure enemies while still protecting your teammates.

Thorn Guide helps you catch priority targets, while Radiant Retribution and Breakthrough Charge provide damage, mobility and wide cleaving attacks. Intervene completes the build by shielding allies, staggering nearby enemies and reviving downed teammates.

This setup is primarily designed for trios and can be used with Rare, Exceptional or Epic gear.

Made in collaboration with Tuezday. Check out his video for more information and demonstrations of this build!

More Mistfall Hunter Builds

Browse builds for all the classes

Gear

There are three versions of this build depending on your available gear:

  • Green/Rare Loadout Code: 45jIgSbg4MMnl5LmXZ2Xhpsk55BNHhn4N9ezo
  • Blue/Exceptional Loadout Code: LmbLSYV4e8GWcW5T7swYa3UTEsTMfdyS6RyQSOiKRJbL4C
  • Purple/Epic Loadout Code: 4e5Ue251I1drOgi0SDy8wVGgsmqXwU8B5U4lLwaqw

These codes allow you to copy the items and gems needed for each version of the build. To import a code, simply do the following:

  • Open the Prepare tab in the character screen while in base.
  • Select Manage/Import at the bottom left.
  • Navigate to Import Loadout and paste the code.

Affixes

Purple Loadout

  • Stoic 7 – Provides up to 7.7% Physical and Magic Resistance while your Health is below 50%. When your Health falls below 30%, it also restores 15% Health, giving you an extremely powerful defensive reset during fights.


  • Aegis 7 – Greatly increases your Defense while also providing additional Physical Resistance. This is one of the main reasons Withered Knight can survive while fighting several enemies at once.


  • Valor 7 – Increases your Attack and provides Defense Penetration, ensuring you still deal meaningful damage despite investing heavily into defensive affixes.


  • Brotherhood 5 – Increases Defense while also providing additional Attack to you and your allies. It is especially powerful in trios because the bonuses affect your entire team.


  • Strife 5 – Increases your melee damage and provides another damage bonus while multiple enemies are nearby. Withered Knight regularly fights in the middle of enemy teams, making Strife extremely reliable.


  • Tenacious 1 – Provides a small amount of additional Health. This is a flexible final point and works well alongside Stoic's percentage based healing.

Victory Wine:

Aegis +1 Valor +2 Brotherhood +2 Strife +2 Tenacious +1

Before drinking Victory Wine, the equipment provides Stoic 7 Aegis 6 Valor 5 Brotherhood 3 and Strife 3. The additional points complete the important breakpoints and provide a strong balance of damage, survivability and team utility.

Blue Loadout

Aim for Valor 7 Strife 7 Aegis 5 Brotherhood 4 and Tenacious 1 after using Victory Wine.

Victory Wine:

Valor +2 Strife +2 Aegis +1 Brotherhood +2 Tenacious +1

Green Loadout

After using Victory Wine, the displayed setup reaches Valor 7 Aegis 5 Brotherhood 2 Strife 2 and Tenacious 1.

Victory Wine:

Valor +2 Aegis +1 Brotherhood +2 Strife +2 Tenacious +1

Skills

Withered Knight’s Greatsword provides damage, mobility and wide attacks, while the Polearm and Shield gives the build access to Intervene's team protection.

Greatsword

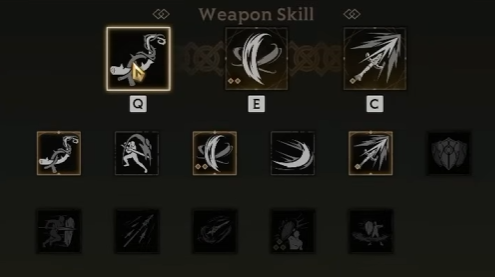
  • Thorn Guide
  • Radiant Retribution
  • Breakthrough Charge

Thorn Guide pulls an enemy towards you, making it excellent for catching fleeing targets, interrupting healing and peeling enemies away from your teammates. This build does not use either of Thorn Guide's talent upgrades.

Radiant Retribution performs three advancing slashes. It is a strong chasing tool, but you can also turn during the animation to strike several enemies when they surround you.

Breakthrough Charge is one of Withered Knight's most important skills. The initial dash closes distance, while its sweeping follow up deals wide damage and can be redirected towards enemies. It can also be used to create space before turning the second attack back into anyone chasing you.

Withering Mark can replace Thorn Guide depending on your preference. If you make this change, take Impalement so the mark can pass through enemies and hit multiple targets.

Polearm and Shield

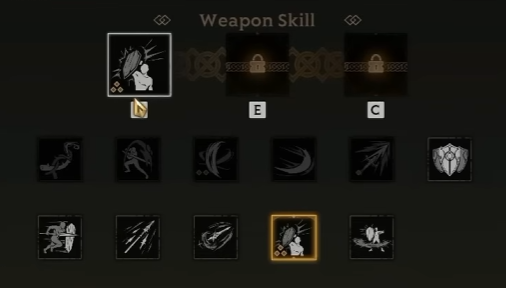
  • Intervene

Intervene allows you to dash forward or towards an ally, staggering nearby enemies and applying a shield. With all three of its talents selected, it also grants Movement Speed and can automatically revive a downed teammate.

Talents

These talents improve the Withered Knight (Greatsword) mobility and damage while unlocking Intervene's full defensive potential:

  • Greatsword Specialization – Provides a third Greatsword skill slot at the cost of one Polearm and Shield slot.
  • Long Range – Increases the displacement distance of Radiant Retribution, making it better for chasing and repositioning.
  • Whiplash – Allows the final hit of Radiant Retribution to execute enemies affected by Wither.
  • Dominance – Grants brief Super Armor during the sweeping follow up from Breakthrough Charge.
  • Sacred Body – Increases Magic Resistance. This is the most flexible point in the build, but provides reliable protection against magic heavy teams.
  • Guardian – Increases the radius in which Intervene applies its shield.
  • Swift Vanguard – Grants additional Movement Speed to allies affected by Intervene.
  • Succor – Targeting a downed ally with Intervene places a Redemption Mark on them. The mark prevents their execution and automatically revives them unless enemies deal enough impact to break it.

Tips & Tricks

  • Use Thorn Guide to interrupt enemies while they are healing.
  • Turn during Radiant Retribution so its three attacks can hit different enemies.
  • Use Breakthrough Charge to dash away, then turn the second swing back into anyone chasing you.
  • Don’t chase too far from your teammates, you need to remain close enough to protect them.
  • Save Intervene to shield allies and disrupt enemies attacking your backline.
  • Use Succor on downed teammates, then pressure anyone trying to break the Redemption Mark.
  • Intervene's shield can help a teammate survive multi-hit abilities such as Crow Storm.
  • Prioritize stronger defensive affixes when facing Epic and Legendary teams.

Video

Table of Contents

See More

Trios Withered Knight Greatsword Build Guide (Rank 4 NA) - Mistfall Hunter
Updated on Aug 14, 2026
Guildrun Guide: How to Beat Every Act Boss (Hydra, Demon, Dragon)
Updated on Aug 14, 2026
Guildrun Red Rift Tier List (All Heroes Ranked)
Updated on Aug 14, 2026
Tanky Hammer Mercenary (Solo + Trio) Build Guide - Mistfall Hunter
Updated on Aug 14, 2026
Mistfall Hunter Class Builds
Updated on Aug 14, 2026

Like our guides?

Add Mobalytics as a preferred source on Google!