League of Legends
 Teamfight Tactics
 Valorant
 Lost Ark
 Destiny 2
 Diablo 4
 Download APP
 Collapse
Introduction
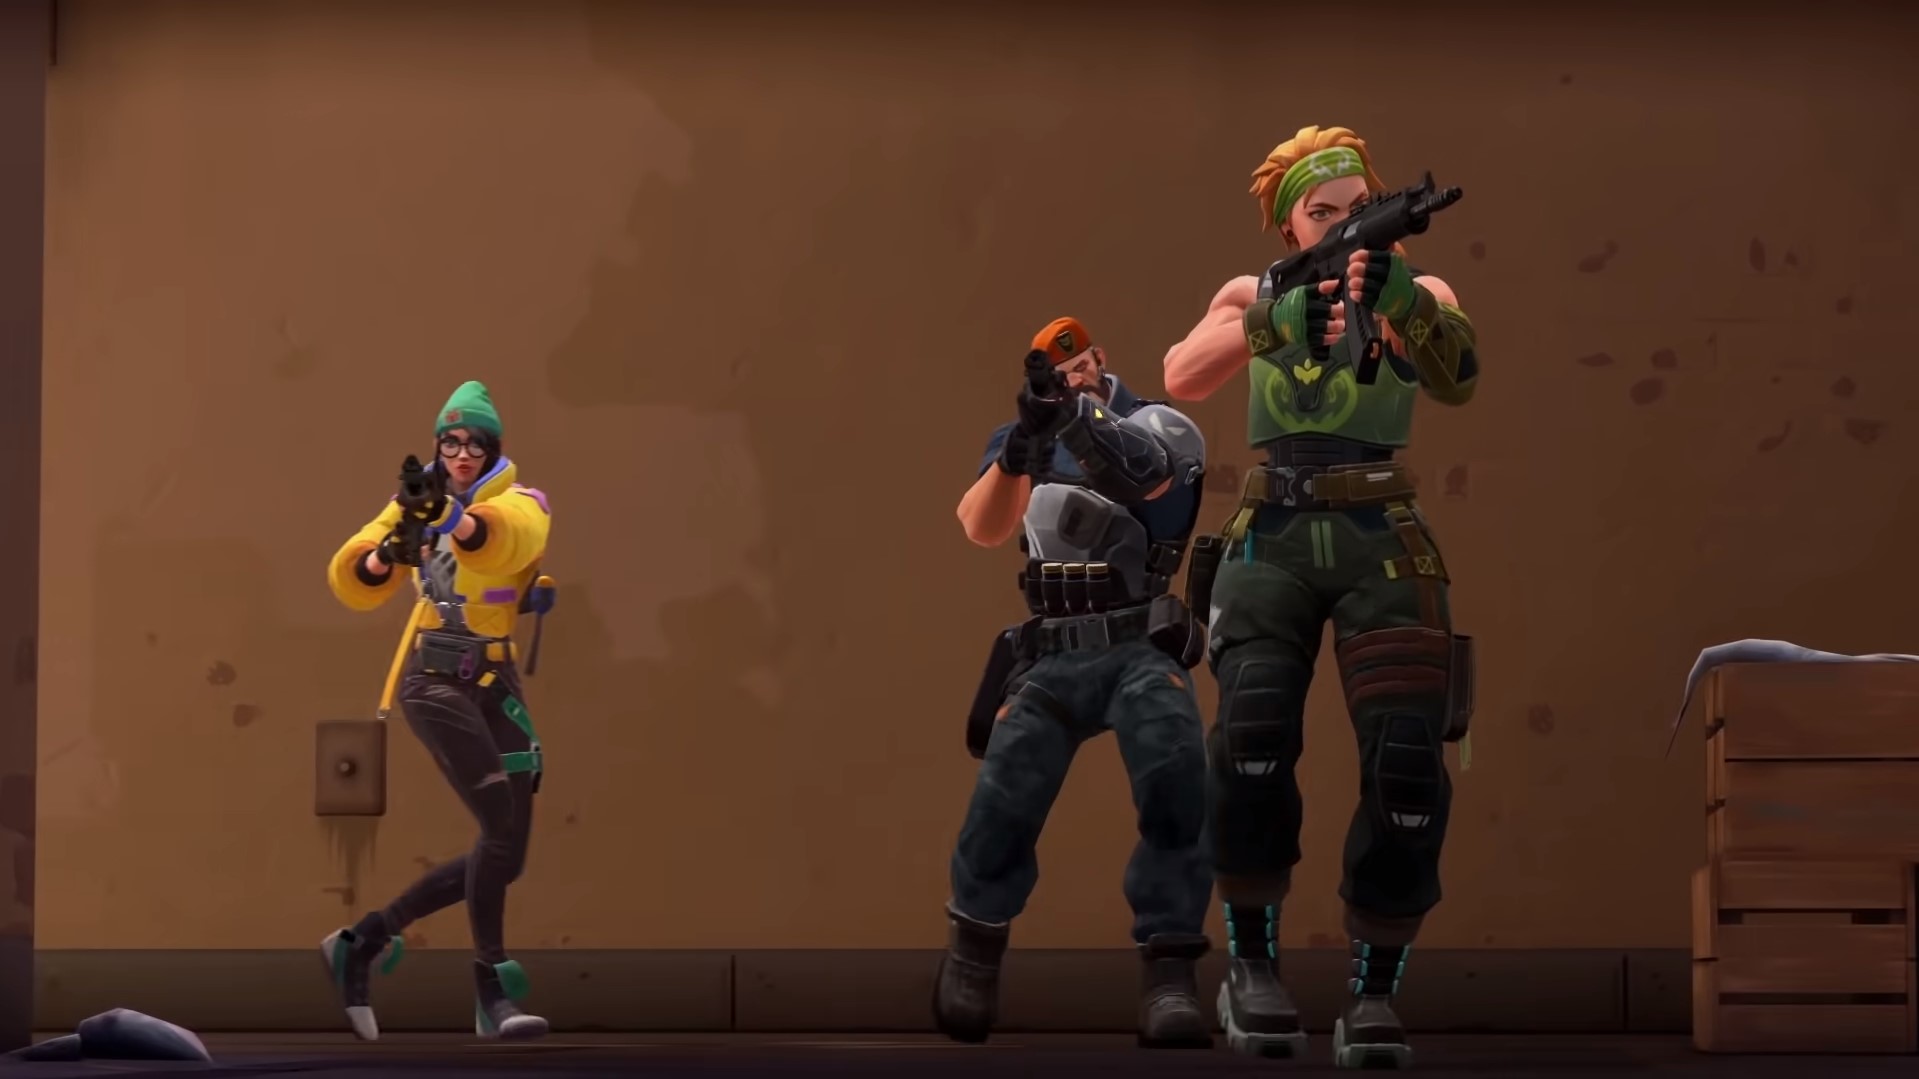
Starting with this post, Mobalytics is launching a new article series called “How to Valorant” for all players who are aiming to improve their skills and show off to their friends.
Within this series, you can learn all about the different existing kinds of mechanical and tactical gameplay mechanics that are crucial to the game.
As always, our primary goal is to help out everyone interested in becoming a better player and thus the focus of this particular series is on explaining the respective gameplay topics in great detail but still in an understandable and easy-to-learn way.
The topic of this first article, Episode 1, will be “Crossfires and Bait-and-Switch Setups”.
Holding a coordinated push or getting the upper hand in a situation in which your team is clearly outnumbered can be an impossible task to manage.
At these times, crossfires, which are discussed with your teammates in advance, can give you a better chance or even an advantage against such difficult attacks.
Not only the defender site can get great profit out of using the right crossfires in the right situations, but also the attackers can utilize this strategy to outplay their opponents in certain circumstances.

In addition to sheer crossfires, we also will be highlighting a specific subcategory of crossfires in this article: Bait-and-Switch Setups.
For these, you basically play with your food and are purposely drawing the attention of your opponent to specific things or in specific directions to get the better of them.
To explain and visualize these mechanics properly, we picked ourselves a few great examples from professional Valorant matchups and also go into detail on these situations by including expository illustrations for clarification.
What is a Crossfire in Valorant?
First and foremost, we have to agree on one common definition of a so-called crossfire.
On one hand, the term crossfire is pretty widespread and known by a large amount of the community, but on the other hand, not everyone has the same conception of a crossfire.
It can largely vary from person to person, regarding who you’re talking to.
In general, you can safely state the following without having people looking at you strangely:
A “crossfire” is a setup of at least two players who are both covering one specific area or entrance of the map but from two opposite directions.
The emphasis in this statement is very much on the three key phrases “two players”, “one area” and “two opposite directions”.
In this example, you can spot two defenders (green) who established a crossfire on Haven at the C Site and thus are holding one common line of sight (green dotted line) against the attackers push (red) coming from C Long.
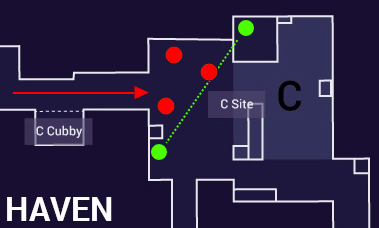
The overarching objective of this kind of setup is to simultaneously attack the opponent from at least two very different angles, so that even if one fight is lost the second member of the crossfire is able to easily equalize the numbers.
What is a Bait-and-Switch Setup?
A so-called Bait-and-Switch setup may be understood as a subcategory of a traditional crossfire.
The main difference between both Bait-and-Switch and crossfire is the timing in which the respective players join the fight by peeking the opponent.
First, one of the at least two members of a Bait-and-Switch setup has to draw the enemy’s attention to themself. That player is the only one fighting in the initial contact.
After the first player has drawn the necessary attention and did first damage, the other member or even members of the setup come out of their hiding spots and all engage in combat at the same time.
The element of surprise and finding your opponents looking in the wrong direction will play into your cards regarding the outcome of the encounter.
Another example: You and your teammate are trying to hold the B Site of Bind by trapping the enemy in a Bait-and-Switch setup.
Picture 1:
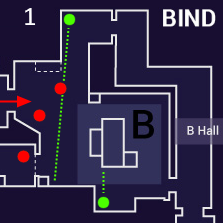
Firstly, one player is holding the cross to B Site from Elbow. Meanwhile the other one is hiding in Cubby and is waiting for his mate to have contact with the enemy.
Picture 2:
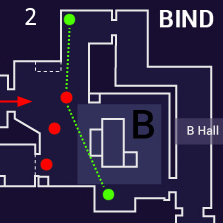
In the exact moment the baiting player in Elbow starts to fight the enemy, the second player, who previously hid in Cubby now peeks out of cover and kills the enemy from behind.
In summary, for a Bait-and-Switch setup to work you need a baiting player in one position and at least one more player hiding in a completely different position.
After the first player has drawn attention in the initial contact, the second player bursts out of cover and benefits from the distraction caused by the first one.
When to Use Crossfires / Bait-and-Switch?
The most common but nonetheless very effective use cases of crossfires are based on defending a certain area you already control.
Although, in principle this is independent of being on the defender or attacker side, you will notice there are a lot more situations where crossfires can be helpful as defenders. Trust me, I speak from experience.
For example, holding specific entrances to a Spike site, securing the dropped Spike, or defending a certain area the attackers want to take control of.
All these are classic examples where both basic crossfires and a little more advanced Bait-and-Switch setups are possible to be the opponent’s kryptonite.
But these setups are not exclusive to the defenders, attackers can also utilize them in appropriate situations. Afterplants, for example, are destined to be played out in solid crossfires and refrags through Bait-and-Switch setups.
As a memory aid, consider establishing a crossfire in your team’s composition if…
- …you are anticipating many opponents coming through a narrow entrance.
- …you want to trade kills and don’t want to lose a gained advantage by numbers.
- …you have to change up your approach in holding a specific area of the map.
Crossfires and Bait-and-Switch setups are definitely a strong force to be reckoned with but also hold the trait of committing your team onto one side of the map.
So, be absolutely sure if it’s worth it to gamble in such a manner before calling to your teammates.
Examples From Professional Matchups
In the following section, we got three scenes taken out of actual professional matches for you to further clarify the possible use cases and execution of both crossfires and Bait-and-Switch setups.
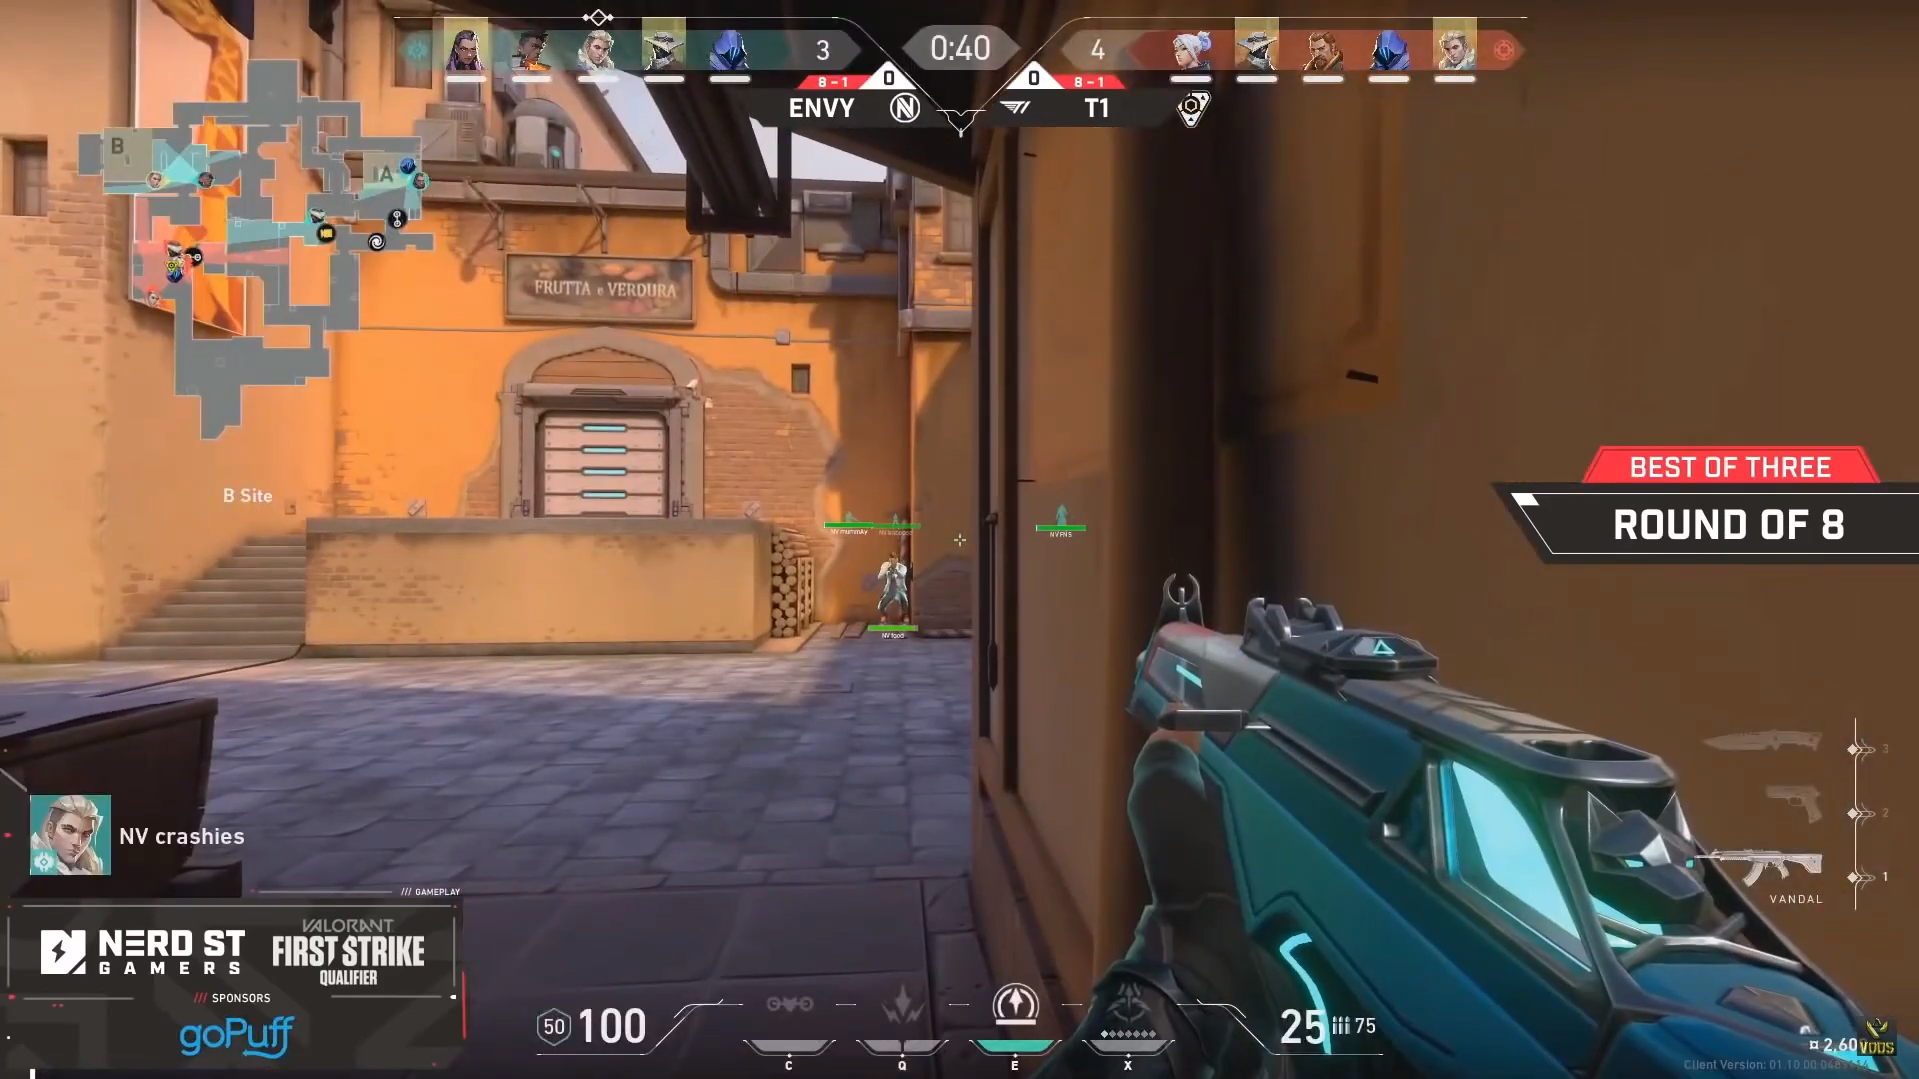
In the first scene, you can see a pretty much classic usage of a crossfire. The Envy players, food and crashies, have set themselves up for a potential B hit by positioning one player on Boathouse and the other one directly opposite in the Cubby.
Due to that perfect crossfire, they manage to kill four T1 players whilst trying to execute onto the B site and earn additional time to help their mate FNS to flank and come from behind.
The next clip focuses on a practical and often seen Bait-and-Switch setup inside Lamps on Bind that is used by T1 players Skadoodle and brax in this particular case.
Skadoodle is the first player, representing the bait who will have the first contact on entering enemies like “TenZ” from C9 Blue.
Brax, the second player in this setup is supposed to kill the distracted “TenZ” in case “Skadoodle” doesn’t already win the initial fight – which he managed to do in this scene.
Nonetheless, a very safe and consistent way to play out the round and utilize T1’s numbers advantage.
Our last selection’s purpose is to show you that you cannot always come out winning, even with a good understanding of the situation and solid decision making.
Here, T1’s players AZK and DaZed established a basic Bait-and-Switch setup after planting the Spike and waiting for the retake by C9 Blue’s last remaining player “mitch”.
After mitch faked the Spike defusal, it is on one of the living T1 players to either make sure to stop “mitch” from defusing or kill him doing it.
Unfortunately, due to a great clutch by “mitch”, the round ends up being won by C9 Blue and shows us that despite optimizing your situation as much as possible a round may still be lost nonetheless.
Conclusion
That was it for our first episode of “How to Valorant”.
We really hope that you not only could learn a few things you may add to your personal game but also are eager for the next episode in which we will thematize another helpful but nonetheless easy-to-learn Valorant skill.
By now, crossfires and Bait-and-Switch setups should be in the back of your head more often when coming across situations like those featured in this article.
Having an increased awareness for such important gameplay topics within Valorant is already half-the-rent to improve as a player and automatically climb the Ranked ladder.
So, stay tuned for our next episode on behalf of our new series “How to Valorant”!
To find the best positions to crossfire or bait-and-switch, check out our Valorant maps tool. We recommend coordinating with your 5-stack!