League of Legends
 Teamfight Tactics
 Valorant
 Lost Ark
 Destiny 2
 Diablo 4
 Download APP
 Collapse
The Best Agent Comps for Every VALORANT Map
Each map has its own unique characteristics, using certain agents lets you and your team leverage these characteristics to give advantages in the game.
Using the right agents opens up new possibilities for offense and locks down enemies on defense.
This guide will go over the best agents for each map, and how to use them based on professional and ranked win rate data (from rib.gg) as well as how an agent’s utility interacts with the map.
To see useful lineups for each character on every map, check out our Maps Tool.
Pearl
Ideal Team Composition
- Fade, Chamber, KAY/O, Neon, Astra
- Notable Pro Team: XSET
- With this composition XSET beat FPX twice and FNATIC during Champions.
- Champions Round Win Rate: 54.65%
- Notable Pro Team: XSET
Agent Breakdown
Fade
- Win Rate (Ascendant +): 50.72%
- Pick Rate (Ascendant +): 14.08%
- How To Play
- Fade is able to take advantage of the high rooftops on Pearl to get vision using her Haunt to get information and/or break crosshair placement to destroy the Haunt. Use the Prowlers to clear out the tight angles through mid as well as pockets on site to near sight enemies or lessen the number of angles that need to be cleared.
Chamber
- Win Rate (Ascendant +): 50.33%
- Pick Rate (Ascendant +): 19.44%
- How To Play
- On defense take aggressive fights for first bloods all throughout the map. Use Trademark in Art, Mid Doors, or the pillar B Main to allow teammates to stack other positions or to use damaging utility or Flashes once an enemy activates the Trademark.
KAY/O
- Win Rate (Ascendant +): 50.03%
- Pick Rate (Ascendant +): 3.93%
- How To Play
- KAY/O’s Zero/Point is good for getting early information on defense as well as clearing out tight portions of the map. His Flash/Drive is great for assisting enemies on the wide open B site when he is rotating through spawn as well as pop flashing through the tight choke points and smokes.
Neon
- Win Rate (Ascendant +): 51.38%
- Pick Rate (Ascendant +): 2.08%
- How To Play
- Neon’s Fast Lane is a great tool for getting on to site, especially B site which has very limited coverage for attackers to get deep into the site. High Gear allows Neon to rotate from site to site quickly as Pearl is a large map. Neon’s Relay Bolt is a great tool to stun enemies in one and done angles as well as attackers moving through choke points.
Astra
- Win Rate (Ascendant +): 50.52%
- Pick Rate (Ascendant +): 5.33%
- How To Play
- Pearl is one of the largest maps and Astra is the only controller that can utilize her abilities no matter where she is on the map. This makes her great for lurking. During site executes use her Gravity Well and Nova Pulse in common defender spots to give your entry teammates advantages in fights. Astra’s Gravity Well is still great for post plant and halting attackers when they push through choke points.
Synergies
- KAY/O Frag/Ment + Fade Seize, Astra Gravity Well, Chamber Trademark
- A damage synergy that can be used in choke points to stop attackers or to flush defenders out on executes A Dugout, Backsite A, B Screen, or B Hall.
- Fade Haunt + Neon Fast Lane
- During a site execute, utilize the Fast Lane to get Neon deep into site with cover, and the Fade Haunt allows the Neon to shoot highlighted enemies through the Fast Lane.
- KAY/O Flash/Drive + Chamber Trademark
- Using the Trademark for information, KAY/O can pop flash enemies who are stuck in the Trademark’s slow field.
Substitutions
- Raze for Neon
- Raze is more dependent on teammates’ utility for site executions than Neon, but Raze does have more lethal utility that can clear the tight corners of this map and halt attackers.
- Viper for Neon
- Viper is a solid option if Neon is not in the composition due to her Toxic Screen serving the same role as Neon’s Fast Lane on offense, and is a better tool for retakes on defense.
Example Defender Positions
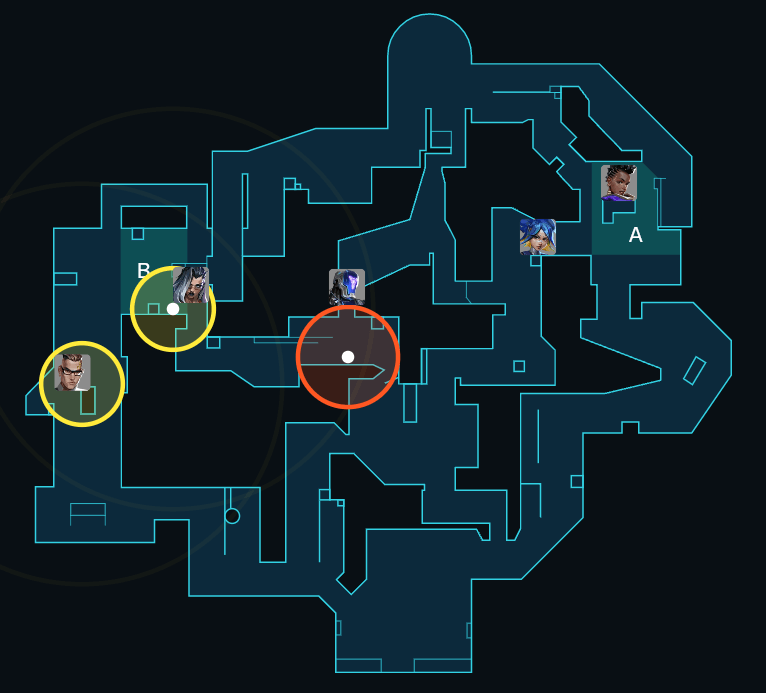
Image from Valoplant
Icebox
Ideal Team Composition
- Sova, Chamber, KAY/O, Sage, Viper
- Notable Pro Teams: LOUD, Leviatan
- LOUD and Leviatan went to overtime in a mirror matchup with this composition.
- Champions Round Win Rate: 50.00%
- Notable Pro Teams: LOUD, Leviatan
Agent Breakdown
Sova
- Win Rate (Ascendant +): 49.93%
- Pick Rate (Ascendant +): 13.33%
- How To Play
- Sova’s Owl Drone gets a ton of value on offense to clear out the many angles for defenders to hide in B Main and A Site. This is because there are so many positions for defenders to play at various elevations which the drone is better for clearing out. On defense Sova’s Recon Bolt is great for checking for early pushes to A Belt and mid.
Chamber
- Win Rate (Ascendant +): 49.44%
- Pick Rate (Ascendant +): 17.75%
- How To Play
- Chamber’s Rendezvous lets him take advantage of a lot of angles to Op from. Don’t be afraid to get aggressive and use elevated angles. Many players only Op on A rafters or behind B Yellow. Chamber can get in front of A pipes or under B Green to get quick kills from unexpected angles and get out. His Trademark is great for using in Kitchen and Orange to detect when enemies lurk through mid.
KAY/O
- Win Rate (Ascendant +): 49.48%
- Pick Rate (Ascendant +): 3.82%
- How To Play
- KAY/O’s Zero/Point is great for clearing out close angles, especially if a Chamber is playing there, forcing him to use Rendezvous. Learning basic Frag/Ment lineups to stall a plant is a great use because it will damage a planter through a Sage wall which is a very common way to plant on Icebox.
Sage
- Win Rate (Ascendant +): 51.60%
- Pick Rate (Ascendant +): 7.45%
- How To Play
- Sage’s Barrier Orb is almost a necessity to get down a spike plant. Taking ground to the back site on both A and B is very difficult to do, and her Barrier Orb allows you to plant front site with more protection. Barrier Orb is even fantastic for retakes on defense as teams will typically plant front site and play back in post-plant. Her Slow Orb is good for stalling pushes and throwing at common post-plant positions such as behind B Yellow.
Viper
- Win Rate (Ascendant +): 50.39%
- Pick Rate (Ascendant +): 15.02%
- How To Play
- Viper’s Poison Cloud is a fantastic way to lurk mid by throwing in mid to the right of where players can go under Tube. This allows players to lurk into Kitchen or Orange with a defensive player on Boiler not seeing them. Poison Cloud is great for setting up one ways on defense on 410 at A site or on the edge of Green Box B Main. Toxic Screen is a great way to gain ground on B site and to block Screens on A Site. Use Toxic Screen defensively by placing it across 410 from mid and through B Main to make clearing angles for offensive players more difficult.
Synergies
- Sage Slow Orb + Sova Hunter’s Fury
- If enemies are playing in predictable post plant positions or are executing on site. Sage can slow the area, and Sova uses his Ultimate to easily hit enemies that are unable to move quickly to dodge his ultimate.Sova can ult from Boiler to 410 and Snowman to B Yellow as these are good angles to hit enemies and easy places for Sage to safely throw Slow Orbs to.
- Viper Snakebite + Sova Shock Dart
- During post plant, both these characters have very strong utility. Viper’s Snakebite makes the diffuser vulnerable and Sova’s Shark Dart will then be able to deal double damage to kill an enemy. This can also be easily performed if playing defense and the other team is planting default A Site by throwing utility from the door at A rafters and banking it off the wall next to Generator onto default.
- KAY/O Frag/Ment + Viper Snakebite
- It’s important to know that if shot on one side of a Sage wall, both of these abilities will damage enemies on the other side of the wall. This allows both of these pieces of utility to be used simultaneously on the defensive side of a Sage wall to prevent a planter from sticking a plant behind a Sage wall.
Substitutions
- Raze for Kay/O
- Raze’s Blast Pack mobility lets her take advantage of elevated positions on this map. Her explosives are great for clearing out angles and forcing defenders back. Boom Bot is one of the few pieces of utility that allows teams to try to take control of back site when attacking.
- Fade for Sova
- Prowler is good for clearing the tight angles near 410 and B Main. Be careful of elevated positions as Prowler can track enemies up high, but the ability needs line of sight. Haunt works similar to Sova’s Recon Bolt, and Seize is great for stalling pushes as well as decaying enemies trying to defuse or plant the spike.
Example Defender Positions
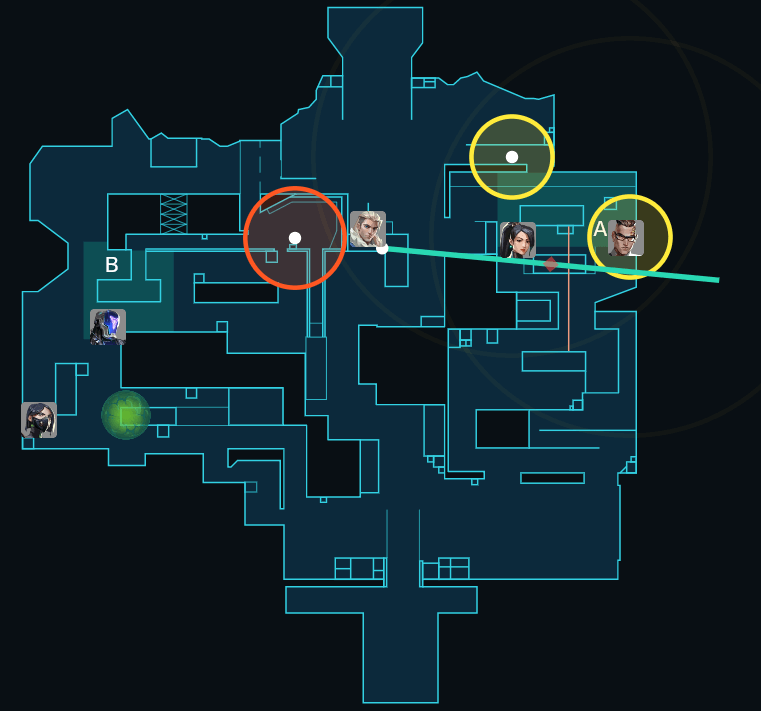
Image from Valoplant
Haven
Ideal Team Composition
- Fade, Chamber, Omen, Raze, Breach
- Notable Pro Teams: FNATIC, Team Liquid, XSET
- These teams all have a plethora of set plays utilizing the two Initiators and Raze with this composition.
- Champions Round Win Rate: 53.69%
- Notable Pro Teams: FNATIC, Team Liquid, XSET
Agent Breakdown
Fade
- Win Rate (Ascendant +): 49.54%
- Pick Rate (Ascendant +): 7.14%
- How To Play
- Just like on Pearl, Fade can use her Haunt on top of rooftops to break enemies’ crosshair placement and to see over cover. Prowler is a great tool to clear out Garage. Haven has tight choke points to sites and very few spots for defenders to play, so Seize works great in these commonly played defender locations and to halt a push.
Chamber
- Win Rate (Ascendant +): 49.36%
- Pick Rate (Ascendant +): 17.61%
- How To Play
- Be sure to rotate on defense when playing Chamber to not let the game pass you by. When holding A, make sure to get into A Sewer or down A Long so you have a view of A Lobby. This way you cut off all entries to A site and your 4 teammates can hold other positions. Trademark can be placed in Garage or B Site to allow teammates to stack other areas of the map.
Omen
- Win Rate (Ascendant +): 48.50%
- Pick Rate (Ascendant +): 11.83%
- How To Play
- Smokes are smokes, nothing new here. Omen offers unique value with his Shrouded Step and Paranoia. Shrouded Step allows Omen to play various defensive positions such as on top of any of the boxes on A, B, or C. He can also play behind the back platform on C or behind Brick Stack A Long because if he is spotted he can use Shrouded Step to get to safety. Paranoia can be used for teammates through walls. This is great for retakes on all sites and using when in C or A Link for teammates who are under pressure.
Raze
- Win Rate (Ascendant +): 50.70%
- Pick Rate (Ascendant +): 6.20%
- How To Play
- There are few defensive locations for players to use, so Raze’s Paint Shells are great for clearing them out. She can also use Blast Packs to quickly close on an enemy who is flashed and/or stunned from her teammates’ utility. Boom Bot is a good ability to clear some tight corners if no Fade Prowlers are available.
Breach
- Win Rate (Ascendant +): 49.54%
- Pick Rate (Ascendant +): 2.35%
- How To Play
- His pick rate is low in ranked, but he is definitely worth trying out. Every lane in Haven is conveniently the exact same width of his Fault Line which can be used through walls to assist teammates all over the map. The geometry on sites is rather uniform, making his Flashpoint consistently blind enemies, and his entire kit is fantastic for retakes. This last bit is very important because Haven has 3 sites, and retakes are very common on this map.
Synergies
- Fade Seize + Breach Fault Line + Raze Paint Shells
- Teams use this combo in A Lobby to trap players inside of a Raze Grenade. Breach can stun from A Long or B Link while Raze and Fade are on A Long.
- Breach Fault Line + Raze Blast Packs
- This is a great combination for taking a site. If an enemy’s location is known, Breach can stun the enemy as Raze Blast Packs towards the enemy to close the gap and get an easy kill.
- Fade Haunt + Omen Paranoia, Breach Flashpoint
- Flashes synergize very well with Fade’s Haunt because an enemy either is flashed they cannot see the Haunt to shoot it, or they have to turn the flash and they will get scanned. Professional teams will coordinate the timing of utilizing Fade Haunt and a flash exactly for this reason.
Substitutions
- Killjoy for Chamber
- Haven has more lanes which makes Killjoy intriguing. Because of this, Chamber can be easier to avoid by attackers and his lone Trademark doesn’t cover as much of the map. Meanwhile Killjoy can cover more area with her utility, her Lockdown is great for retakes and taking site, and her Nanoswarms are strong for post plant which you’ll find yourself in often on Haven.
- Jett for Raze
- Offensively Jett plays similar to Raze with her movement and being able to close in on enemies affected by utility. The other bonus to Jett is having a secondary Op. Haven is a large map and running two Operators is a viable strategy, and Jett gives you that flexibility if she is played alongside Chamber.
Example Defender Positions
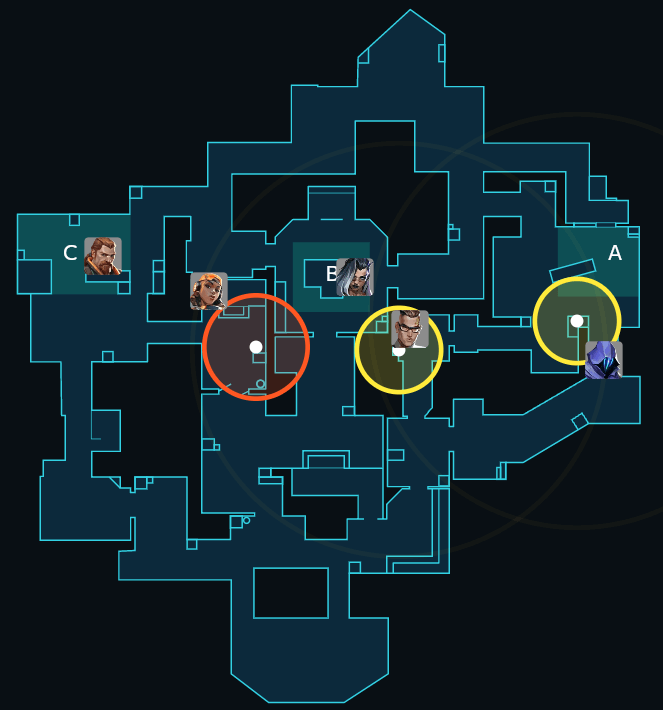
Image from Valoplant
Fracture
Ideal Team Composition
- Fade, Chamber, Brimstone, Neon, Breach
- Notable Pro Teams: DRX
- In Champions DRX went undefeated on Fracture with this team composition, beating OpTic, FNATIC, and 100 Thieves.
- Champions Round Win Rate: 60.00%
- Notable Pro Teams: DRX
Agent Breakdown
Fade
- Win Rate (Ascendant +): 50.82%
- Pick Rate (Ascendant +): 5.67%
- How To Play
- Haunt and Prowler are able to get early information on defense which is quite useful as there are multiple angles attackers can come from. Haunt is also great for marking enemies behind Fast Lane or Toxic Screen. Prowler clears out the sites on Fracture quite easily and is great to clear out Sands as it can open the door.
Chamber
- Win Rate (Ascendant +): 49.97%
- Pick Rate (Ascendant +): 18.38%
- How To Play
- Op aggressively, that’s how to play chamber no matter where you are. But when on Fracture take advantage of some unique angles such as on top of the double box on A site looking towards Dish or on top of B Generator looking towards B Arcade. These are two common Op spots used by bdog of Shopify Rebellion who had a 40 kill game against Cloud9 in the NA LCQ on Fracture. Trademark is a great tool to use for Chamber to watch one area aggressively and to make sure no enemies come from the other direction he has his back turned to.
Brimstone
- Win Rate (Ascendant +): 50.13%
- Pick Rate (Ascendant +): 10.84%
- How To Play
- Brimstones smokes are daunting for enemies to push through, and having 3 smokes is great for coverage on a fast execute. Between his Orbital Strike and Incendiary, Brimstone is fantastic for post plant as the common plant spots on this site are wedged into corners that are easy to shoot his Incendiary into and trap enemies with Orbital Strike. This map has 4 Ultimate Orbs, be sure to farm these on Offense as Brimstone to utilize his strong post plant Ultimate.
Neon
- Win Rate (Ascendant +): 48.65%
- Pick Rate (Ascendant +): 5.14%
- How To Play
- Neon’s kit lets her isolate angles on site, and stun those who are playing site. Her Relay Bolt can stun enemies playing on B site, meanwhile her Fast Lane lets her cut off defenders playing near B Generator and B Canteen to prevent these players from helping the site anchor on B. The same can be done on A site by cutting off Link and Sands. There are very few places to play defensively on A Site, and Relay Bolt can cover this entire area for easy entries. High Gear allows Neon to make space and quickly get to enemies who are affected by Breach’s utility.
Breach
- Win Rate (Ascendant +): 50.15%
- Pick Rate (Ascendant +): 12.93%
- How To Play
- Fracture is a map where using Breach’s utility through walls gives tremendous value. His Fault Line is great for clearing Operators off of B Main and A Main. It is important to know that his Fault Line hits enemies at multiple elevations, this is very strong on A Site where enemies are affected both high and low site. Breach’s Rolling Thunder works like this too, which makes him able to use his ultimate from underground in B Tunnel to B Site. His Aftershock is also great for post plant, and delaying plants when enemies are tucked in site, forcing them into open sight lines.
Synergies
- Brimstone Orbital Strike + Breach Rolling Thunder
- This combination can result in multi kills without even seeing an enemy. On defense with information from Fade, this is a great combination to use on enemies who are approaching A Hall or B Bench. This can also be used on both A and B Site as well as B Tower when attacking.
- Chamber Trademark + Neon Relay Bolt, Breach Fault Line
- With information from the Trademark, Neon can use her Relay Bolt and Swing enemies who are detected. This combination can also be done with a Breach Fault Line on its own or in tandem to cover more area.
- Fade Seize + Brimstone Incendiary
- If an enemy is in the back of A Site or the Trapezoid on B Site, these pieces of utility can be used to trap an enemy in a molly. This is also a solid combination to use when attacking by throwing it at a smoke in case an enemy is waiting in the smoke to get a backstab kill.
Substitutions
- KAY/O for Fade
- Flash/Point is a very effective ability on this map to pop flash on both offense and defense due to how common Brimstone is on this map, and all choke points being occupied by his smokes. His Zero/Point is good for getting information in the early rounds on defense to get a feel for where attackers are set up.
- Raze for Neon
- Paint shells are another great option for clearing out this map’s sites that enemies can get trapped in corners on. Boom Bot is a good piece of utility to clear out defenders in A Hall, B Main, and B Arcade in the early round. The mobility from her Blast Packs lets her make space for her team on executes by being able to get on top of A Site or to quickly capitalize on initiator’s utility.
Example Defender Positions
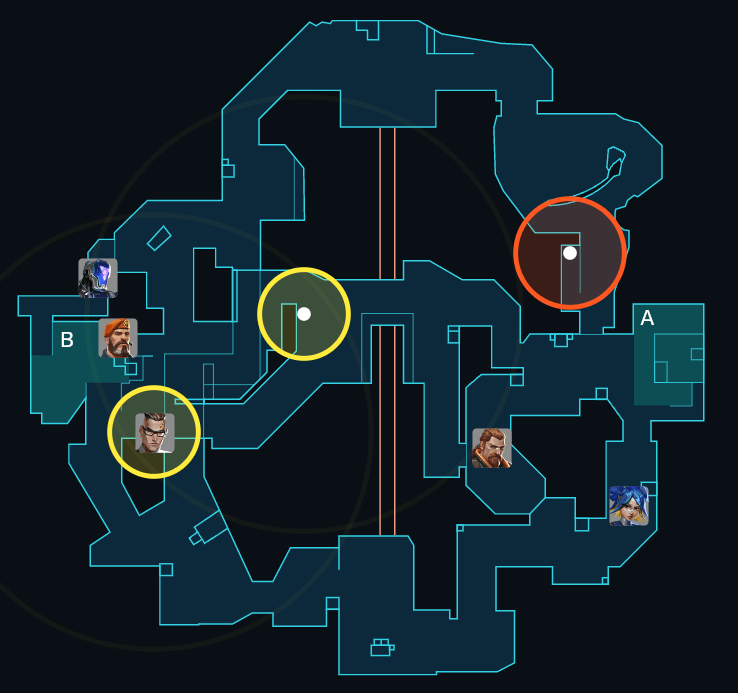
Image from Valoplant
Breeze
Ideal Team Composition
- Viper, Chamber, Sova, Jett, KAY/O
- Notable Pro Teams: OpTic, BOOM Esports
- These teams faced off against each other in a mirror match using this composition during Champions in which BOOM came out on top, 18-16.
- Champions Round Win Rate: 46.59%
- Notable Pro Teams: OpTic, BOOM Esports
Agent Breakdown
Viper
- Win Rate (Ascendant +): 50.28%
- Pick Rate (Ascendant +): 17.16%
- How To Play
- Viper is a must pick for this map because of her Toxic Screen. Offense is nearly unplayable without a Viper. Toxic Screens should be placed diagonally across A Site and along B Wall for B Site. Poison Cloud can be used defensively in A or B Main and offensively to block off Mid Nest or A Metal Doors at the end of Halls for a lurk. You’ll need to learn lineups for those two offensive Poison Clouds, but they are well worth it. With how open this map is post plant line ups using Snakebite are very effective.
Chamber
- Win Rate (Ascendant +): 50.35%
- Pick Rate (Ascendant +): 18.97%
- How To Play
- Breeze has a lot of long sight lines, so a Chamber Operator is great to have. Be sure to move around, and take advantage of some angles in mid that are not commonly cleared by utility such as B Tunnel to Mid Wood Doors, walk out Mid Wood Doors, or walk out Tunnel to B Elbow while a teammate in Mid Nest watches Mid. Trademark is commonly placed at the end of A Hall on defense and A Lobby or B Elbow on offense.
Sova
- Win Rate (Ascendant +): 50.32%
- Pick Rate (Ascendant +): 13.14%
- How To Play
- Breeze is a more open map making Sova better suited for it than Fade. Owl Drone is great to use next to Ultimate Orbs to get vision of site for Operators or players playing close angles. Recon Bolt can be shot along the back walls of A and B Site to reveal enemies through Viper’s Toxic Screen for easy kills. Be sure to shoot the arrow high so it can see over the Toxic Screen. When on defense Shock Darts can be banked to damage planters on default for both sites.
Jett
- Win Rate (Ascendant +): 50.09%
- Pick Rate (Ascendant +): 19.04%
- How To Play
- Jett is able to make space on offense using her Tailwind and a Cloudburst. On defense Jett can take early fights mid or even walking into A or B main by prepping Tailwind as she walks in. This requires a second teammate to watch down A Caves or B Window, or a feel of the timing to dash out by the time an enemy could be at one of those locations. If taking an aggressive fight like that, use Tailwind and/or Cloudburst to escape.
KAY/O
- Win Rate (Ascendant +): 49.26%
- Pick Rate (Ascendant +): 6.96%
- How To Play
- KAY/O’s Zero/Point counters both Sova and Viper, two agents with a very high pick rate on this map. Save this ability on defense once Sova is using his Owl Drone and/or Viper puts up her Toxic Screen for an execute. This will stall a push to allow for teammates to rotate and waste the enemy’s Owl Drone. Frag/Ment can be used A or B Main to stall pushes even further. Flash/Point is a fantastic flash to use to pop flash through a Toxic Sceen to get back site on offense or to counter flash enemies who are entering on site.
Synergies
- Viper Poison Cloud + KAY/O Frag/Ment
- On defense this combination stalls the attackers immensely. This combination can be used in tandem or alternating so the choke point is occupied to deter attackers from pushing through. Viper can add Snakebites into the mix here which can occupy a choke point for more than half the round.
- KAY/O Flash/Point + Jett Tailwind + Viper Toxic Screen
- This is a strong combination for scoring kills on enemies who are defending back site behind Toxic Screen. Once Toxic Screen is up, KAY/O can left click a flash that pops just on the other side of the Toxic Screen, and Jett can use Tailwind to get to these players quickly while they are still affected by the flash.
- Chamber Rendezvous + Sova Recon Bolt
- Chamber can set up a Rendezvous close B or A Main to try to grab a quick Op kill once the round starts by looking towards B Elbow or A Ultimate Orb in A Shop. The Recon Bolt can be shot down A Cave or B Window to make sure no enemies are pushing the areas that Chamber is exposed to and not looking at so he can tunnel vision on one sight line then Rendezvous after he shoots, the Recon Bolt expires, or the Recon Bolt is destroyed.
Substitutions
- Skye for Kay/O
- Guiding Light can pop flash through a Viper Toxic Screen and having an extra Owl Drone-like ability in Trailblazer is nice to have for finding Operators. Breeze is a massive map, so Seekers are great for information and many fights result in damage, but no kill. Because of this, Regrowth gets a lot of value.
- Cypher for Chamber
- Having two Trapwires and a Camera that can work at any range, Cypher offers much more coverage than Chamber, and isn’t restricted to a small area on a large map like Killjoy.
Example Defender Positions
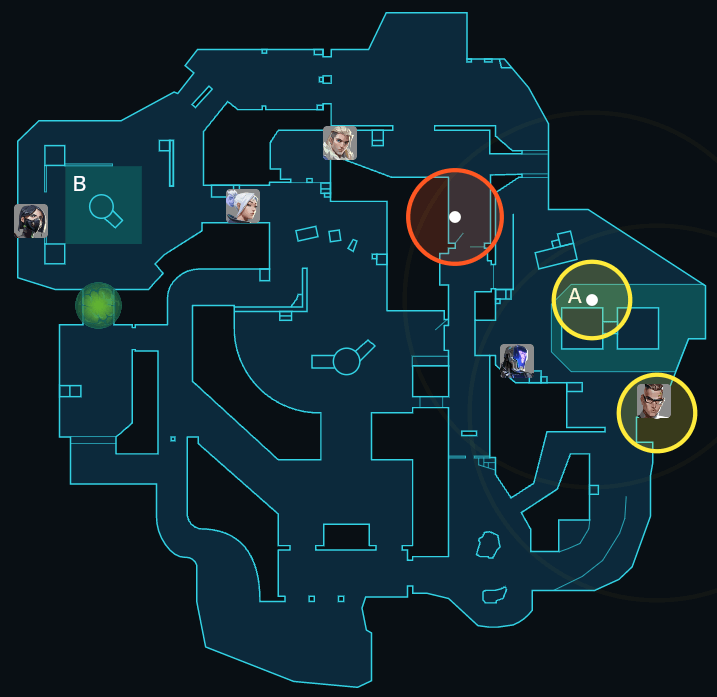
Image from Valoplant
Bind
Ideal Team Composition
- Viper, Brimstone, Raze, Skye, Fade
- Notable Pro Teams: LOUD, 100 Thieves, Leviatan
- In Champions this composition didn’t have the best round win rate, but Leviatan was able to take down Paper Rex who were regarded as the best Bind team with this composition. FNATIC and OpTic ran this composition with a Chamber instead of Fade due to having two of the best Chamber players in the world.
- Champions Round Win Rate: 44.53%
- Notable Pro Teams: LOUD, 100 Thieves, Leviatan
Agent Breakdown
Viper
- Win Rate (Ascendant +): 49.73%
- Pick Rate (Ascendant +): 1.28%
- How To Play
- Viper is commonly used to lurk in to A Lamps (U Hall). She does this by throwing a Poison Cloud into the entry of Lamps and a Toxic Screen to the right of A Short. When attacking B Site Viper can use a Snakebite on top of the Tube on B Site to clear a defender out of Tube because it will damage an enemy inside despite the Snakebite being above them. Defensively Toxic Screen can be set up across multiple lanes and Poison Cloud can be set up to block Hookah, A Short, or one way A Bath.
Brimstone
- Win Rate (Ascendant +): 50.50%
- Pick Rate (Ascendant +): 10.41%
- How To Play
- Brimstone’s 3 smokes and Stim Beacon are great for fast burst executes which are common on Bind. His smokes are not hollow, making them daunting for attackers to push through when using them defensively. Brimstone is very strong for post plant with both Orbital Strike and Incendiary. Using Orbital Strike to clear out B Site Tube, A Lamps, and Hookah in the early round helps supplement an offensive push to take ground.
Raze
- Win Rate (Ascendant +): 50.53%
- Pick Rate (Ascendant +): 15.11%
- How To Play
- Bind is Raze’s playground with a 100% pick rate at Champions. Offensively Raze can clear out many angles with her Boom Bot and Paint Shells as well as make space on site using her Blast Packs. On defense her Boom Bot gets early information and her Paint Shells can stall a push and force an attacker off a plant. All of her utility can go through the teleporters, using her Boom Bot and Paint Shells through the A Short teleporter into Hookah is a good way to crunch attackers B Short in Sands.
Skye
- Win Rate (Ascendant +): 49.97%
- Pick Rate (Ascendant +): 9.11%
- How To Play
- Trailblazer is a good ability to get information on both offense and defense. When on defense use Trailblazer through the teleporters to get information down B Long and then outside A Bath as well as A Short and then B Short. This same thing can be done with Guiding Light. Skye plays very well in B Garden on defense as she can quickly flash enemies who are coming down B Long.
Fade
- Win Rate (Ascendant +): 49.92%
- Pick Rate (Ascendant +): 9.01%
- How To Play
- Prowler is a great ability to clear out the close angles that bind has, especially shotguns in Hookah and A Lamps. Haunt can be thrown on top of the buildings to get a good view of site. Seize can be paired with other teammates’ damaging utility to get easy kills in defenders who are playing in one of the many one and done angles this map has. Nightfall is very strong on this map as it covers the entire area of both sites, letting your team quickly rush down a site.
Synergies
- Fade Seize + Brimstone Incendiary, Raze Paint Shells
- This combination is good on both sides. On defense it works best in A Short when enemies are in the cubby; it can also be used to counter a plant in front of Truck on A Site when a team uses a Sage wall to plant by throwing the Seize and then banking an Incendiary off the back wall or using right click with Paint Shells to lob it over the truck. On attack use it to clear out common pockets defenders play in.
- Brimstone Orbital Strike + Raze Showstopper
- This is a set play many teams use for fast executes on A Site. Brimstone uses his ultimate in A Lamps which either kills an enemy or forces them out the back door while Raze Blast Packs over the Truck with Showstopper to kill the enemy fleeing towards Pipes back site.
- Skye Guiding Light, Skye Trailblazer + Raze Blast Packs
- When Skye flashes or stuns enemies they’ll hide back site while they regain their site. Raze is able to Blast Pack on top of B Tube or A Truck to get a vantage point on these enemies while that would otherwise have been safe back site.
Substitutions
- Sage for Fade
- Barrier Orb can stifle an entire push and is great for safely planting on A Site in front of Truck. There are plenty of spots to stand on top of Barrier Orb to catch players off guard.
- Chamber for Fade
- This map has fewer lanes, which means the attackers are more likely to run into Chamber and there is less of a need for Sentinel utility. Chamber is great for taking control of one lane with his Operator and another lane with his Trademark.
Example Defender Positions
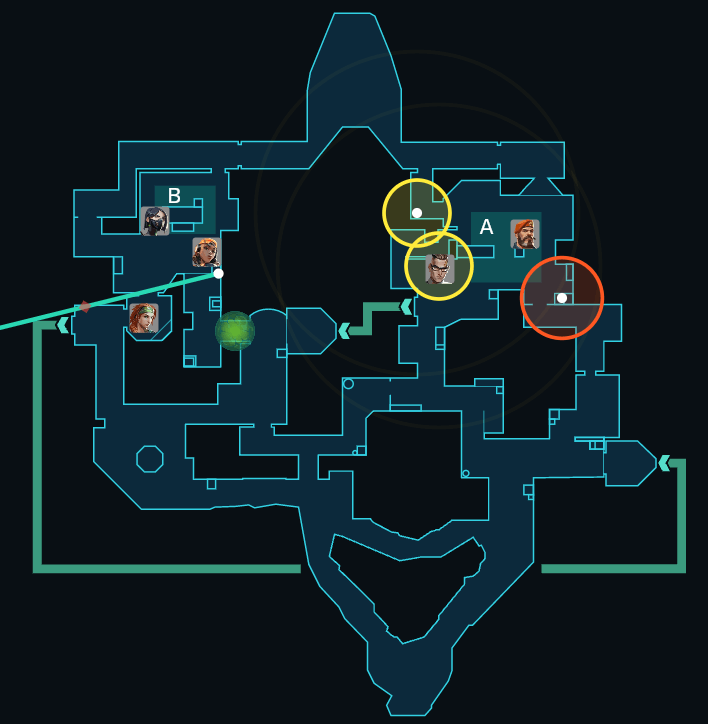
Image from Valoplant
Ascent
Ideal Team Composition
- Sova, Omen, Killjoy, Jett, KAY/O
- Notable Pro Teams: LOUD, XSET, OpTic
- LOUD went 4-0 on Ascent with this composition which was the cornerstone of their run. XSET was able to beat OpTic and nearly beat FPX. OpTic swapped to this composition in the middle of the tournament which made headlines as Yay moved from Chamber to Yay which coincided with Derke of FNATIC swapping from Chamber to Jett on Ascent.
- Champions Round Win Rate: 54.43%
- Notable Pro Teams: LOUD, XSET, OpTic
Agent Breakdown
Sova
- Win Rate (Ascendant +): 51.20%
- Pick Rate (Ascendant +): 9.14%
- How To Play
- Jett has once again become meta on this map, and Sova synergizes with Jett a little better than Fade does, which is why he is the pick here. Sova can get information using Recon Bolt on all parts of the map on defense. It can also be used to spam B Main with a high penetration gun. On offense support your Jett with Recon Bolt and get information using Owl Drone through A Main, B Main, and Tree. Shock Darts are great for destroying Killjoy setups that utilize an Alarm Bot and Nanoswarms in B Lane as well as a Killjoy Alarm Bot that is placed near Pizza to watch mid.
Omen
- Win Rate (Ascendant +): 50.14%
- Pick Rate (Ascendant +): 12.00%
- How To Play
- On defense Omen can set up one ways A and B Main. Shrouded Step allows him to play Mid Catwalk Cubby as he can teleport out if being spammed with utility. On offense Shrouded Step can be used to get from B Main to Logs or A Main to Front Generator to make some space for teammates. Paranoia is very strong on this map and is the main reason Omen is a great pick. Ascent has small sites and Paranoia’s width takes up a good portion of the site’s Area, most notably all of A Generator, a very common defensive spot.
Killjoy
- Win Rate (Ascendant +): 48.31%
- Pick Rate (Ascendant +): 3.34%
- How To Play
- Alarm Bot is great for allowing defenders to stack as it can cover mid when placed at Pizza or Tree. She can also hold down B Site with set ups in Lane and A Site with Nanoswarm Alarm Bot setups to kill a player who closes the door. Lockdown is great for taking sites and retaking. If using lockdown B Main, put it behind the box with the Ultimate Orb so it does not get spammed by a high penetration gun. If using Lockdown to retake B Site, place it next to the button to close the door as the platform the button is on blocks enemies on site from destroying the ult and it covers the entire site.
Jett
- Win Rate (Ascendant +): 50.92%
- Pick Rate (Ascendant +): 16.31%
- How To Play
- Jett can play the open mid portion of the map very aggressively by using her Tailwind and Cloudbursts to get out if needed. She can do this much better than Chamber who is tethered to his Rendezvous range. When attacking Jett can make space by dashing into a Cloudburst. When doing this on B Site, dash towards the button to close the door to Mid Market and on A Site she can dash towards Dice or on top of A Generator.
KAY/O
- Win Rate (Ascendant +): 49.30%
- Pick Rate (Ascendant +): 7.20%
- How To Play
- As mentioned earlier, Ascent has small sites. Zero/Point can cover a big area of a site for both information and suppress a sentinel, making an execute very easy. Flash/Point can be used with a left click through the window grates B Main or thrown straight upwards A Main to blind enemies on these sites without blinding teammates, or it can be pop flashed with a right click if there is a smoke blocking A or B Main. On Defense, Flash/Point is very strong mid to be used via a pop flash from Mid Market or into Tree if KAY/O is smoked off in Garden. Frag/Ment can be used to force defenders out of certain locations like Logs, Generator, or behind Dice.
Synergies
- Jett Tailwind + Omen Paranoia, KAY/O Flash/Point
- In pro play this is commonly used by the defensive team the moment a round starts. Omen can flash from B Lane through B Main, B Main to Tiles, or A Button to A Ultimate Orb. Jett can dash through B main, mid to tiles, or down A Main to capitalize on enemies blinded. And if no one is there, then your team gets a lot of ground and good information.
- Killjoy Lockdown + KAY/O Frag/Ment
- Killjoy’s Ultimate leaves small gaps in the area in which it detains; KAY/O’s Frag/Ment can be used in these gaps to force an enemy to die to the Frag/Ment or walk into the Lockdown.These can be done by throwing the Frag/Ment into wine with an A retake Lockdown, A Rafter with an A Main Lockdown, or B Back with a B Main Lockdown.If Frag/Ment is thrown on A Rafter it damages players under Rafters too.
- Jett Cloudburst + Sova Recon Bolt
- When Jett dashes into her Cloudburst, Sova can simultaneously shoot his Recon Bolt. If an enemy is pinged Jett can shoot the highlighted enemy while inside her smoke. This works best when Sova shoots his Recon Bolt behind A Generator and Jett is on top of Generator as she can see all of A Site from there.
Substitutions
- Fade for Sova
- She is used very similarly to Sova, and can even be used alongside Sova due to how strong highlighting enemies and getting information mid is on this map. Prowler can clear out close angles on site and is great for pushing defenders back who are playing aggressively.
- Astra for Omen
- Astra’s strength comes from being able to stall the A and B Main chokepoints with a Gravity Well. On offense she is able to use Gravity Well and Nova Pulse to clear out the few places defenders can play on Ascent’s sites.
Example Defender Positions
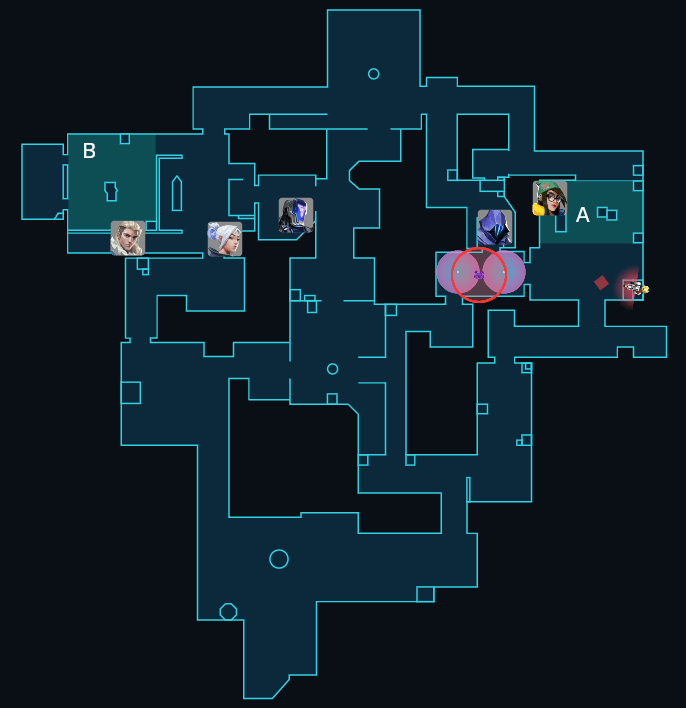
Image from Valoplant
Thanks for reading! Be sure to check back regularly for updated comps and remember to check out our VALORANT map tool for useful lineups for every agent.