League of Legends
 Teamfight Tactics
 Valorant
 Lost Ark
 Destiny 2
 Diablo 4
 Download APP
 Collapse
VALORANT Premier Beta Tips: 1 Tip for Every Agent
With the Premier Beta starting up, you may find yourself playing a different agent or two to round out a team composition or execute a few set plays.
We’re going to go through every agent and give 1 tip unique to their abilities that can be applied to many situations and can be used on most, if not any map.
You’ll definitely learn a thing or two about your main or a new agent that you can incorporate into your ranked or Premier mode games.
Click below to jump to any agent!
- Astra
- Breach
- Brimstone
- Chamber
- Cypher
- Fade
- Gekko
- Harbor
- Jett
- KAY/O
- Killjoy
- Neon
- Omen
- Phoenix
- Raze
- Reyna
- Sage
- Skye
- Sova
- Viper
- Yoru
Astra
Astra’s Gravity Well and Nova Pulse are applied to multiple heights that are stacked onto one another. This can be used to bait opponents into these abilities by setting the star on a level the opponent is not on so they cannot see the star placed.
You can also Gravity Well yourself or a teammate to counter an Astra Gravity well pulling a defusor off the spike.
Breach
Rolling Thunder and Fault Line have an 8 meter zone in front of you that the ability does not hit. Utilize this to perfectly space your utility by not hitting allies in front of you, and start the charge where enemies can be.
All of Breach’s abilities are shown on the mini map while they are equipped, allowing you to ensure their perfect placement to avoid having Aftershock leaving a gap or Flashpoint being sent on to a portion of the wall that won’t blind the enemies.
In the clip, the minimap will show the ultimate covering the door to halls, but not sand which allows a teammate to not be impacted while enemies in halls would. Meanwhile the flash portion of the clip shows the difference between sending a flash into sewer and arcade which can be seen from the mini map.
Brimstone
With Brimstone’s smoke menu being transparent, you can still see enemies while in the menu. This lets you hover a smoke or Ultimate while jump spotting and utilize that piece of utility when you see the enemy so its timing is perfect.
Chamber
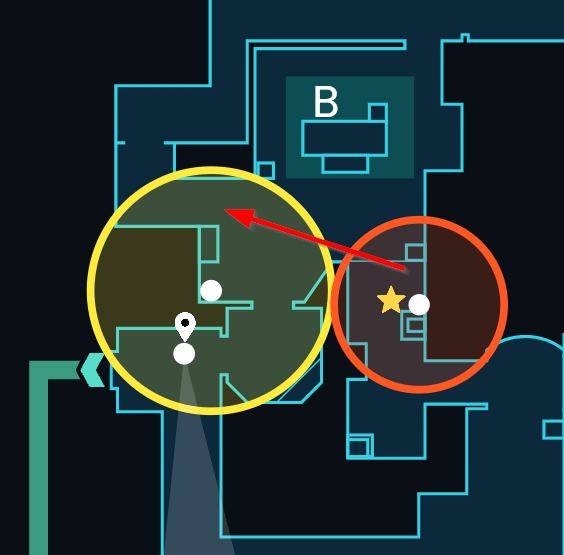
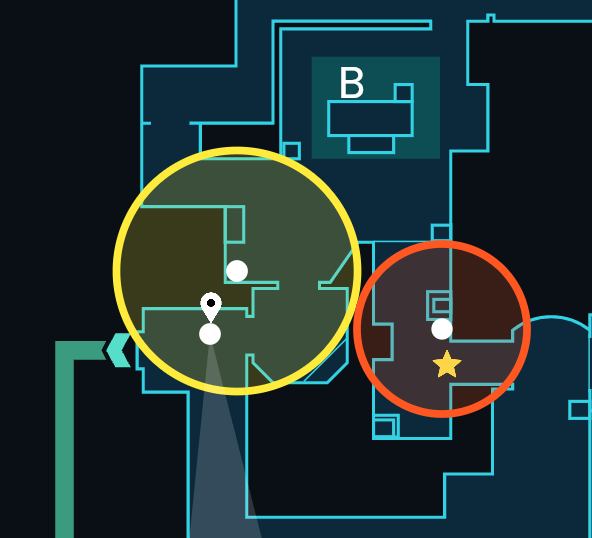
Chamber’s utility makes him a good agent to solo hold a site with an Operator as he can watch one lane with an Op and the other with his trip. This lets teammates stack another area of the map which gives enemies two options, hit into a stack or move into a Chamber Op who gets a kill then escapes to play a 4v5. When setting up for a solo hold, set up Rendezvous in one lane and Trademark in the other.
The important tip is to space out your Trademark and Rendezvous such that enemies activate the Trademark before they get a view of your Rendezvous point or escape route. In the example setups the yellow circle is the Rendezvous point, the red circle is Trademark, and the star is the furthest point an enemy will be when activating Trademark. All the setups have Chamber Op’ing down B Long and various Trademark locations around Hookah.
The first setup is not ideal because the Trademark outside of Hookah which results in an enemy being able to see both the Rendezvous and escape route elbow which lets enemies easily pinch you.
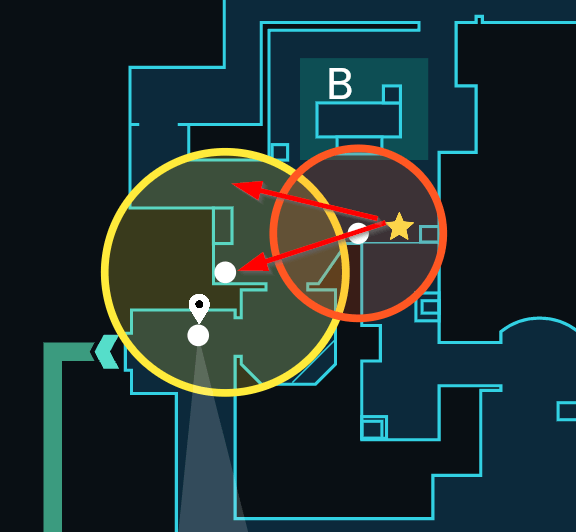
The second setup is not ideal as the Trademark is behind the box in Hookah and an enemy only has to take a few steps and they can see your escape route elbow, resulting in another pinch if you teleport away.
The third setup is best as the Trademark notifies of enemies in Hookah and gives you enough time to teleport and get to elbow to safety.
Cypher
When used at an elevated location Cyber Cage will go downwards to the level below. This can be used to get audio information if someone is beneath the cage and can be used to safely drop down from an elevated level with coverage during a retake which is normally a daunting task.
This clip shows using the cage to drop down from A Heaven to A Hell while being covered from A Site and A Main, and isolating a player on one side of A Hell.
Deadlock
Annihilation, Deadlock’s ultimate, has a spherical area at the very end range of it. Any enemy in this sphere is captured by the ultimate and it offers a much greater area that can capture an enemy as opposed to hitting an enemy with the beam which has a smaller area and can be dodged with strafing. The ult ends and produces the large spherical area at the end if the beam travels 40 meters or hits a second surface after ricocheting.
The first way of creating the sphere by being 40 meters away is risky and is not recommended, but the second way is easily controllable and can be used to guarantee landing the ultimate more often. After the ultimate bounces off of one surface and hits a second surface it creates the sphere. This is best utilized when an opponent is standing next to a wall or structure.
The ultimate can be first bounced off the ground and then when it hits the wall or structure next to the enemy it’ll have a wider capture area with the sphere.
In the clip below the first attempt that is aimed wide does not hit because it relies on the beam’s width, then the second attempt lands because the ult is banked and ends in the sphere shape along the back wall that has a greater area.
Fade
Utilize the pathing of Fade’s Prowlers to spam enemies through walls or smokes. When an enemy has a trail on them from being revealed by Haunt, grabbed by Seize, or hit by Nightfall, a Prowler sent on to their trail will automatically track to the enemy’s position.
The Prowler’s outline can be seen through walls and smokes, and it will perform a leaping animation when near the tracked enemy. Follow the Prowler with your crosshair and use the leaping animation as an indication of the enemy’s location.
Gekko
Gekko’s strength comes from being able to pick his utility back up and using it after a 10 second cooldown. When scouting with Dizzy, you can throw it straight up in the air to scout over walls, have it land back at your feet, and immediately pick it back up. Thrash, Gekko’s ultimate, can be used a second time if it is picked back up.
When utilizing Trash for the first time you can utilize the last 20-25% of the ultimate to steer it back towards a location where it can be picked up safely. This way it can be safely secured to guarantee a second use. Just be careful with jumping to cover ground with Trash as it can detain teammates.
Harbor
Harbor’s High Tide will travel at different speeds based on the height that the wall is thrown at.
The wall travels roughly 50% slower when aiming upwards, this makes it much easier to control the wall for precision with the curves in the wall. If trying to get the wall up as quickly as possible, throw it at head height.
Jett
While dashing into site, look to the sides at commonly held spots you are dashing past. If an enemy is there they will appear on radar even if they were spotted for a split second.
In the clip Killjoy’s face and then a question mark appears on the mini map which Jett or teammates can use to get an easy kill.
KAY/O
A left click flash blinds KAY/O’s enemies for a longer duration than a right click flash. Instead of pop flashing around a corner with a right click, use the left click flash from further back to flash for a teammate or bank the flash off of a wall to have it blind for longer.
When doing this be sure to have the flash explode just as it crosses the new sight line so enemies can’t easily turn it. Right click definitely has its uses, but if you are able to get a left click flash in the same spot, it’s worth doing.
In the clip is an example of converting a right click flash into a left click flash in the same area that pops in the same spot and will flash enemies for longer.
Killjoy
Pair the gaps left with Killjoy’s Lockdown with a Nanoswarm lineup. This will leave enemies with the option of getting detained or dying to a Nanoswarm. Be sure to activate the Nanoswarm the moment it lands and practice the timing of the throw so the Nanoswarm is activated roughly three seconds before Lockdown completes.
This is best used for retake scenarios where you can have set lineups and enemies will be unwilling to fall back too far. Here are a few examples on Haven and Ascent.
Look to line up the bottom right of Turret charge icon with upper left portion of the last window.
Line up crosshair by moving upwards from the vertical wooden beam to the height top of the last flag pole (there is leeway with this lineup).
Match your crosshair at the top of the curved portion of the window frame where the metal bar is and throw as you being to run forward (Be sure to have your weapon out when crossing B main and that CT and market are smoked).
Line up the barrel of the Turret icon with the top of a raised portion of the wall, jump and throw simultaneously.
Neon
Neon is the best agent for jiggling corners to check for operators. While in High Gear, Neon can jiggle peek corners a few ways.
You can do a standard jump peek, a 180 turn, strafe left and right, and you can even fake a 180 turn by pressing S and right click the moment you land to slide backwards and wide swing with a slide after you bait an Operator shot.
Omen
When using Omen’s From the Shadows ultimate, the ultimate can be canceled by pressing the ultimate button to return to his original position.
When canceling the ultimate, no noise will be made on the return position. Use this to catch enemies off guard, and if timed correctly can be used while inside Killjoy’s Lockdown to avoid getting detained.
Phoenix
As Phoenix’s Run it Back is ending, you can jump and turn your camera to the side to scout extra space because your momentum will continue during the ending animation.
The example ultimate was able to clear the back site with this trick.
Raze
Air strafe while using Raze’s Blast Packs to make yourself harder to hit and to navigate around corners and map geometry while in air.
To air strafe hold W and move the mouse in the direction of the directional key being held. To air strafe left hold W, A, and move your mouse to the left and to air strafe right hold W, D, and move your mouse to the right.
Reyna
When using Reyna’s Dismiss, you do not have to look at the orb. The only condition that needs to be met is that the soul orb has line of sight on you. Position yourself in a spot where the soul orb has line of sight on you.
Then you can hold an angle or wide swing a new area, and then dismiss if you miss your initial shots and utilize the previous soul orb similar to a Chamber Rendezvous to disengage from the fight.
Sage
When proactively using Sage’s wall, preset the wall at the angle it’ll be used at so it can be placed down as quickly as possible to avoid orienting the wall when closer to enemies. This is done by holding right click with the wall out and moving your mouse to the left and right to rotate the wall.
After setting the wall up at the correct angle, you can put it away and next time it is taken out it’ll be at the angle that was set up earlier. To quickly reset the wall, tap the keybind for the wall while it is out and it will go perfectly vertical, and tapping once more will result in it being horizontal.
Skye
Instead of quickly flashing around a corner, steer Skye’s Guiding Light into a wall or elongated pattern to flash enemies for a longer duration. Guiding Light blinds enemies for a longer duration if the bird is in flight longer.
A typical pop flash will only blind for 1 seconds, while a bird fully in flight blinds up to 2.25 seconds. Practice this technique to have the flash pop just as it rounds the corner so opponents are unable to turn the flash.
The first clip shows the use of a standard pop flash and its blind time, while the second clip shows an elongated flash that pops in the same spot with its longer flash duration.
Sova
When utilizing Sova’s Owl Drone, its maximum height is a fixed amount above the level in which it is flying over. Press the spacebar to raise the height of the drone. Fly over boxes, roofs, and higher locations to get Owl Drone higher and scout over higher walls, ledges, and roofs.
Using the box in the example clip allows Owl Drone to see over the roof into CT and Market.
Viper
There is a very easy way to create Viper’s Poison Orb lineups, and an indicator if the orb will be a one way smoke. When in a custom game, the Poison Orb will have an indicator of where it will land if thrown with left click. The smoke’s location is represented by a green circle on the mini map.
If the circle is yellow, this indicates it is on top of geometry on the map, and will be a one way smoke if you position yourself at the right spot where you can see the enemies’ feet, but they are unable to see you at all.
This lets you create easy lineups for one ways or long distance Poison Orb tosses to use in games. Take note of the color change on the mini map during the clip.
Yoru
When inside a smoke, throwing Yoru’s flash, Blindside, straight into the ground will result in the flash bouncing and popping just outside of the smoke.
This makes it nearly impossible for opponents to turn the flash. This can be used in any smoke to perfectly pop flash out of a smoke.
Thanks for reading! For more tips, check out our VALORANT agent hub.