 League of Legends
 Teamfight Tactics
 Legends of Runeterra
 Valorant
 Lost Ark
 Destiny 2
 Diablo 4
 Download APP
Ranking the Best Helldivers 2 Support Weapon Stratagems
Since you can only have one equipped at a time (like the Backpack slot), it’s important to know the best Support Weapon for your playstyle when trying to beat the highest difficulties of Helldivers 2.
This can be especially powerful if you coordinate with your squadmates to cover different roles like anti-tank, area of effect for hordes, short range vs long range, and so on.
Although there will always be a meta that forms based on the game’s state of balance, we always recommend going with your personal strengths and preferences first. As long as you get the job done for democracy.
In this tier list, we’ll cover the ranks for each Support weapon, their uses cases, and what makes them good or in need of improvement.
To explore our rankings for all stratagems, check out our best Helldivers 2 stratagems tier list.
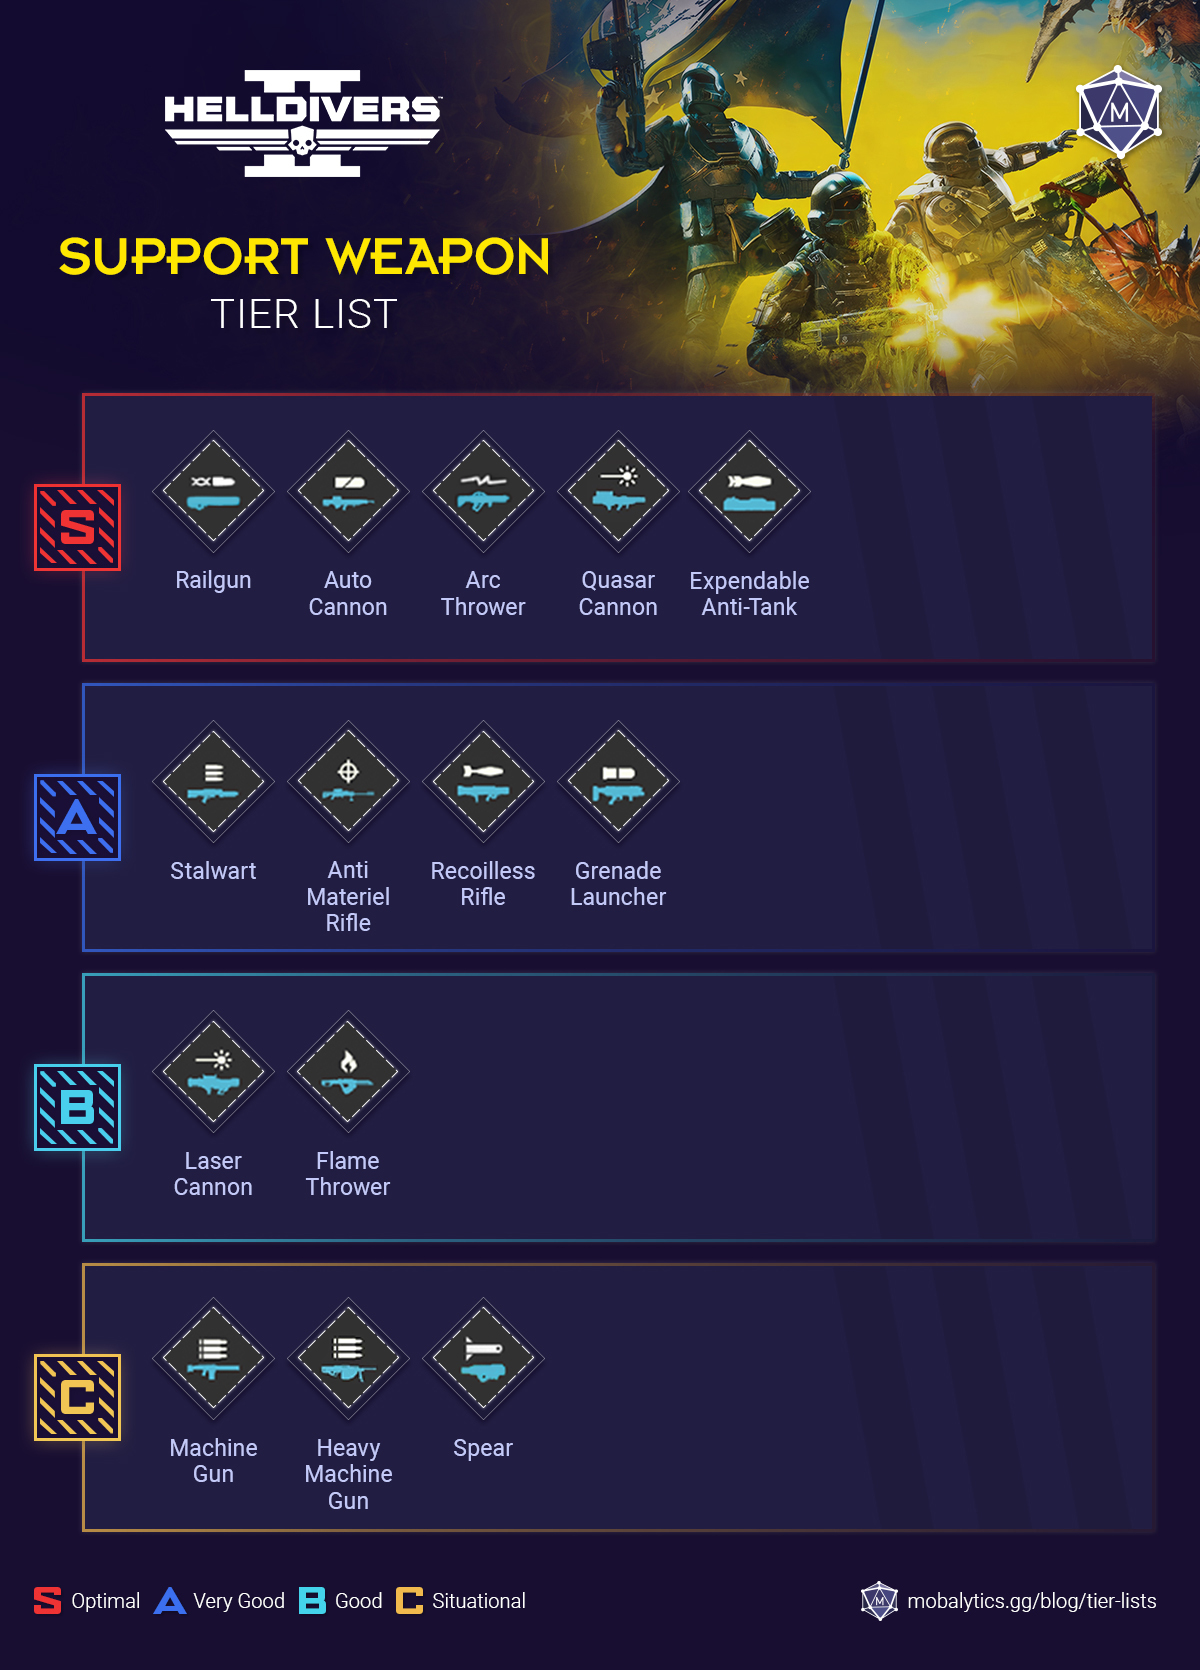
| Tier | Helldivers 2 Support Weapon Tier List |
|---|---|
| S | Railgun, Autocannon, Arc Thrower, Quasar Cannon, Expendable Anti-Tank |
| A | Stalwart, Anti Materiel Rifle, Recoilless Rifle, Grenade Launcher |
| B | Laser Cannon, Flame Thrower |
| C | Machine Gun, Heavy Machine Gun, Spear |
Support Weapon Ranking Commentary
S-tier (Optimal)
Railgun (10,000 cost) – Level 20
- Call-in Time: 3 sec
- Uses: Unlimited
- Cooldown Time: 480 sec
- Input: ⇩⇨⇩⇧⇦⇨ = Down, Right, Down, Up, Left, Right
On release, the Railgun was the closest thing that Helldivers 2 has seen for an S+ tier Support Weapon. It was a combination of other Support Weapons needing buffs, and the Railgun one of the most reliable anti-armor guns.
After its nerfs, it’s still does the job but requires more skill now due to requiring the Unsafe mode. However, due to its combination of being able to reload on the move, having a large magazine, and offering long-range anti-armor capabilities, the Railgun is still a welcomed choice for virtually any mission.
Autocannon (7,000 cost) – Level 10
- Call-in Time: 3 sec
- Uses: Unlimited
- Cooldown Time: 480 sec
- Input: ⇩⇦⇩⇧⇧⇨ = Down, Left, Down, Up, Up, Right
Being unlockable at just level 10, the Autocannon is the first S-tier Support Weapon you’ll get access to. It’s one of the most versatile weapons in the game, offering AoE, solid single-target damage against big threats (if you aim it correctly), and the ability to take out objectives like eggs, factories, and nests from afar.
Its main downside is that it requires a Backpack slot, but it can also be a big plus if you have a squadmate that can help you load it for insane firepower.
Something to keep in mind is that reloading will make you stationary, so be sure to reload when you have 1-2 shots left and never 0 shots left to take advantage of the faster reload speed.
Arc Thrower (7,000 cost) – Level 15)
- Call-in Time: 3 sec
- Uses: Unlimited
- Cooldown Time: 480 sec
- ⇩⇨⇩⇧⇦⇦ = Down, Right, Down, Up, Left, Left
The Arc Thrower started off with a reputation leaning more toward a meme weapon due to its likelihood to kill teammates (or its user), but as the playebase has improved, it has risen to be one of the best weapons.
It ignores armor, has AoE bounces, is long range, and is a great choice against both enemy factions. Another major upside is that it has unlimited ammo, giving you more uptime to complete missions faster and with more objectives done.
Two Arc Thrower tips – first off, aim slightly higher over your intended target to reduce your friendly-fire risk. Second, after you do a full charge, you can do half charges to increase your firing rate.
Quasar Cannon (7,500 cost) – Level 18
- Call-in Time: 3 sec
- Uses: Unlimited
- Cooldown Time: 480 sec
- ⇩⇩⇧⇦⇨ = Down, Down, Up, Left, Right
The Quasar Cannon is the best new Support weapon that has been added since launch. It’s comparable to the Expendable Anti-Tank in its role but has the upside of having unlimited ammo.
Its downside in comparison is that it has more wind up before firing and has a cooldown between shots, making it more susceptible to getting overwhelmed by large numbers of enemies.
However, if you have time and space, it is better than the E.A.T.
Expendable Anti-Tank (3,000 cost) – Level 3
- Call-in Time: 2 sec
- Uses: Unlimited
- Cooldown Time: 70 sec
- ⇩⇩⇦⇧⇨ = Down, Down, Left, Up, Right
The Expendable Anti-Tank (E.A.T.) provides one of the fastest Stratagem cooldowns and gives your team access to more anti-armored capabilities more often.
Its main downside is that it only comes with two rockets that can only be fired once each, but with its low cooldown, you’ll most likely have it when you need it.
If you’re in a position that you’ll know you’ll be holding for some time (while waiting for an objective to be completed etc) it’s a good idea to call them down preemptively in the area so your team can grab them and fire as needed.
A-tier (Very Good)
Stalwart (3,500 cost) – Level 2
- Call-in Time: 3 sec
- Uses: Unlimited
- Cooldown Time: 480 sec
- ⇩⇦⇩⇧⇧⇦ = Down, Left, Down, Up, Up, Left
Along with the Grenade Launcher, the Stalwart is another solid tool for thinning out waves and helping your team avoid getting overwhelmed.
For the people who hate Stalkers/Hunters, seriously give this a shot. You’ll need your team to take out the heavier enemies but you’ll melt the little swarmers with ease.
Although it is in theory comparable to the Machine Gun, we value the Stalwart a lot more since it can reload on the move – an upside that’s especially crucial when your job is to focus on the enemies that are most likely to overwhelm you with numbers.
Anti Materiel Rifle (5,000 cost) – Level 2
- Call-in Time: 3 sec
- Uses: Unlimited
- Cooldown Time: 480 sec
- Input: ⇩⇦⇨⇧⇩ = Down, Left, Right, Up, Down
The Anti Materiel Rifle is best used against automatons since they fight at long range and you can hit their weak spots easily, but you might as well use an Autocannon instead to do the same but with AoE and the ability to take out objectives.
It struggles against bugs because it doesn’t do much against Chargers and other big threats and can easily get overwhelmed by mass numbers of enemies.
There has been experimentation with stealth or scout builds that uses the Anti Materiel Rifle with stratagems like Jet Packs that might be viable in solo or with your team building around you.
Recoilless Rifle (6,000 cost) – Level 5
- Call-in Time: 3 sec
- Uses: Unlimited
- Cooldown Time: 480 sec
- ⇩⇦⇨⇨⇦ = Down, Left, Right, Right, Left
The Recoilless Rifle is usually compared against the E.A.T., but rather than having just two expendable rockets that drop, you’ll get a persistent weapon that you can repeatedly fire.
At first, this seems like a major upgrade, but it takes up a Backpack slot and is incredibly slow to reload while being stationary. Because of these downsides, we have to rank it lower.
However, it does have an additional upside since you can reload it with the help of a squadmates to really pump out rockets.
Grenade Launcher (6,000 cost) – Level 5
- Call-in Time: 3 sec
- Uses: Unlimited
- Cooldown Time: 480 sec
- ⇩⇦⇧⇦⇩ = Down, Left, Up, Left, Down)
While the E.A.T. offers a good supply of anti-tank weaponry to your team, the Grenade Launcher focuses more on clearing out large waves of small enemies to help you avoid being overwhelmed.
It has a large clip and can reload on the go, making it useful for kiting hordes from a distance. In addition, it’s a great choice for missions that involve taking out objectives like eggs, nests, and factories – it’s among the best for blitz missions for similar reasons.
B-tier (Good)
Laser Cannon (4,000 cost) – Level 5
- Call-in Time: 3 sec
- Uses: Unlimited
- Cooldown Time: 480 sec
- ⇩⇦⇩⇧⇦ = Down, Left, Down, Up, Left
On launch, the Laser Cannon was by far one of the worst Support Weapon choices as it did virtually no damage.
It was recently buffed and is honestly now in a good place, especially against automatons who primarily fight at a distance.
The Laser Cannon can have trouble against bugs since you can get overwhelmed, but it may have some additional value against the new flyer enemy since the Laser Cannon has insane range.
Flamethrower (6,000 cost) – Level 10
- Call-in Time: 3 sec
- Uses: Unlimited
- Cooldown Time: 480 sec
- ⇩⇦⇧⇩⇧ = Down, Left, Up, Down, Up
Similar to the Laser Cannon, the Flamethrower was lackluster on launch but has also been buffed.
While the Laser Cannon is good against bots because of its long range, the Flamethrower sort of offers the inverse as it’s better against bugs since most fights are in closer range.
The Flamethrower can melt Chargers in a few seconds while keeping large waves in check due to its AoE, just make sure to watch your positioning as you’re going to have to get up close and personal. One flank from a blindspot and you’ll be quickly overwhelmed.
C-tier (Situational)
Machine Gun (No cost) – Level 1
- Call-in Time: 3 sec
- Uses: Unlimited
- Cooldown Time: 480 sec
- ⇩⇦⇩⇧⇨ = Down, Left, Down, Up, Right
As we mentioned earlier, the Machine Gun is comparable to the Stalwart with some differences.
The Machine Gun provides more damage and armor pen but requires you to be stationary while moving. At higher levels of difficulty, being able to stay mobile is crucial to survival so it becomes less viable.
Fine as a starter weapon while you level up, but you’ll most likely want to replace it at some point.
Heavy Machine Gun (6,000 cost) – Level 12
Unlike the Quasar Cannon which was stellar on release, the Heavy Machine Gun has been incredibly lackluster.
It has the immobile disadvantage of the regular Machine Gun but runs out of ammo even faster.
In exchange, it is slightly better against more armored targets, but it’s less impactful than you’d think.
Spear (9,000 cost) – Level 20
- Call-in Time: 3 sec
- Uses: Unlimited
- Cooldown Time: 480 sec
- Input: ⇩⇩⇧⇩⇩ = Down, Down, Up, Down, Down
As a long-range anti-armor option that locks onto its target, the Spear seems awesome in theory but is unreliable in practice.
When it works it works, but it can have trouble locking onto targets from certain angles and is basically useless when it isn’t working properly.
We predict that this will get buffed (or bugfixed) soon, so keep it on your radar.