 League of Legends
 Teamfight Tactics
 Valorant
 Lost Ark
 Destiny 2
 Diablo 4
 Download APP
Lost Ark Kakul-Saydon Legion Raid Guide (Phase 2)
Now that you’ve beaten Phase 1, it’s time for Kakul-Saydon Phase 2!
We know that this Legion Raid is among the most frustrating so our goal is to help you clear it as smoothly as possible.
We’ll be covering rewards, key mechanics, attack patterns, and more with images and gifs.
If something isn’t clear please do ask questions in the comments!
If you need help with a different raid, check out our other Lost Ark raid guides.
Phase 2 Overview
- Required Gear Score (Normal Mode): 1475
- Required Gear Score (Rehearsal Mode): 1385
- Total HP for Phase 2: 1.891.172.695 (1.8b)
- Recommended Battle Items:
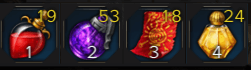
-
- Healing Potions
- Dark Bomb
- Sacred Charm
- Panacea
- Obtainable Rewards
- Normal loot comes at the end of each phase and you can acquire extra loot by buying the bonus loot box for some extra gold.
- When clearing Normal Mode, you will obtain both rewards for Normal and Rehearsal.
- Relic Type Accessories
- 2 Kakul-Saydon Trumpets
- 50 Badges of Madness
- 1000 gold
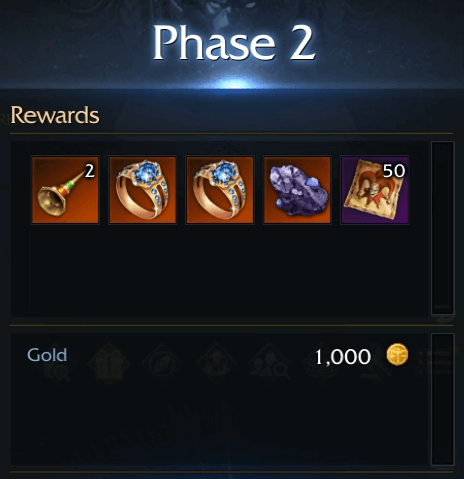
-
- Rehearsal Rewards
- 50 Badges of Madness (no gold or materials)
- Rehearsal Rewards
Key Mechanics
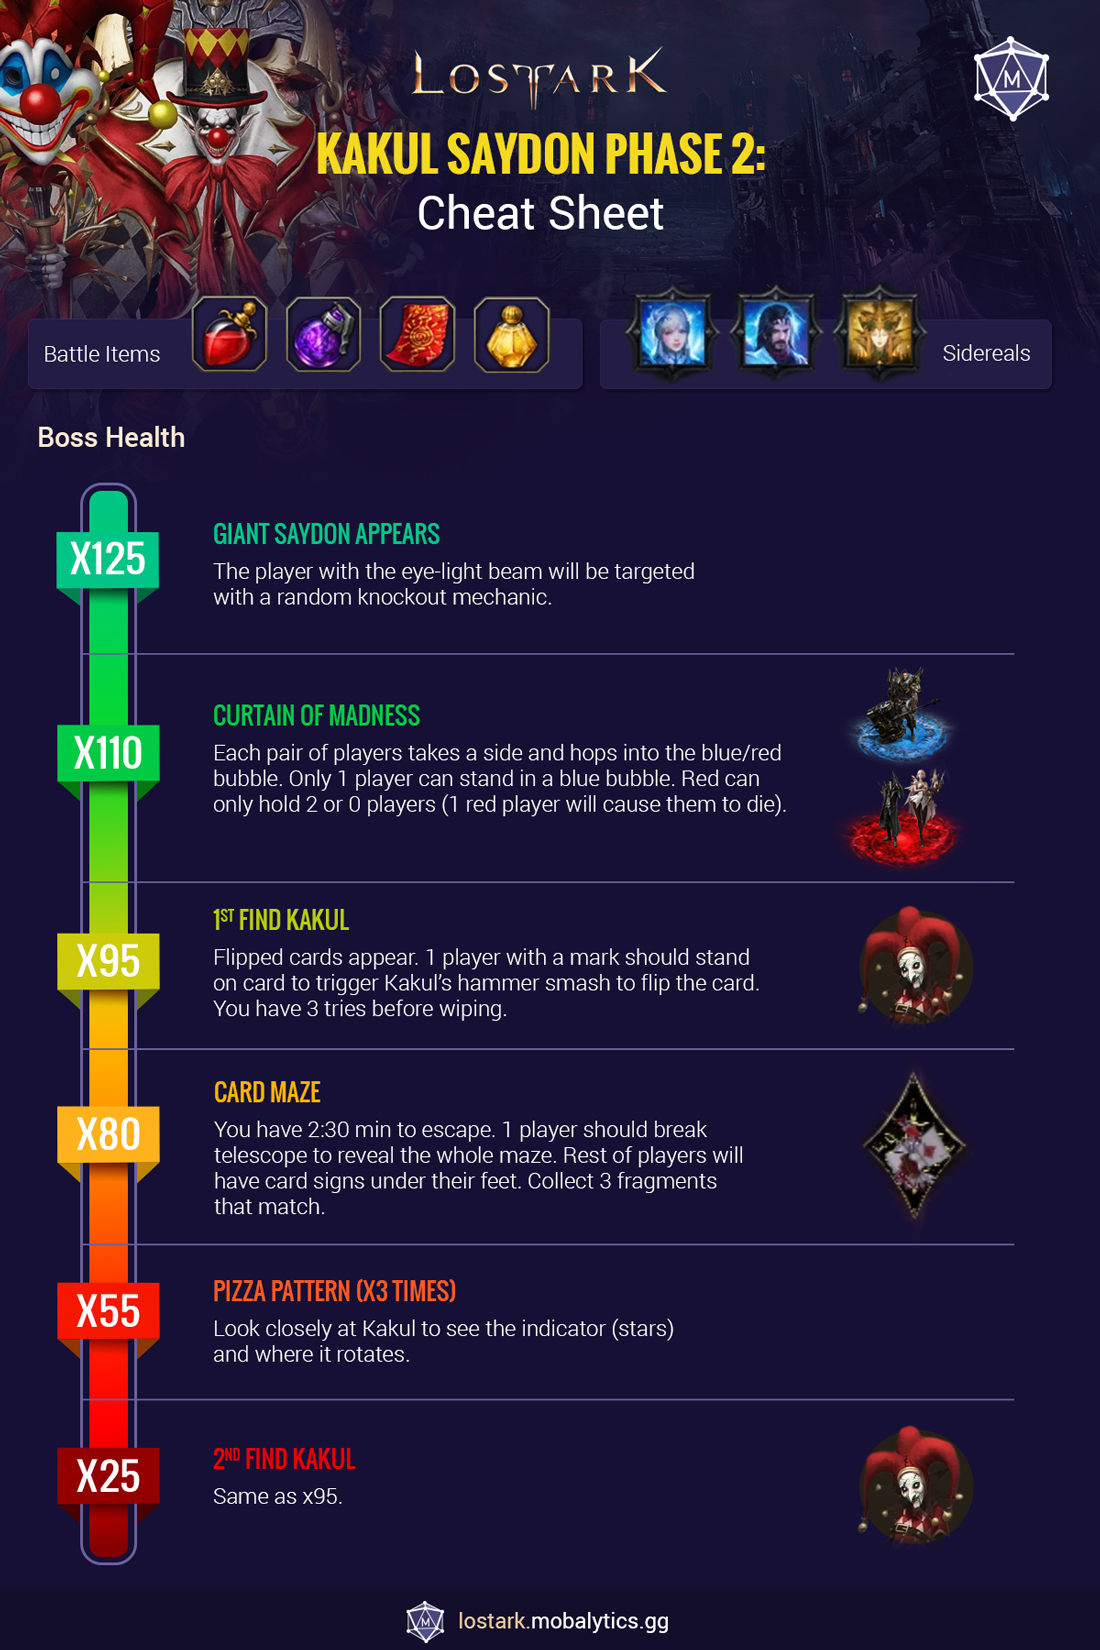
Giant Saydon Appears (X125)
Prepare yourself to face the wrath of a giant clown with a giant hammer. The regular sized Kakul will fly up and drop bombs everywhere. Make sure you dodge them because they do heavy damage, stagger, and increase Madness.
Meanwhile the giant clown will fix their gaze on a player and target them with a beam of light. It follows a player for a while and then stops. When it stops make sure you aren’t there as he will perform a knockout mechanic in that area.

Curtain of Madness (X110)
At the beginning of this mechanic, Saydon will do the “Evil-Eye” pattern. It puts the players who are facing Saydon into a fear state so make sure that your character is looking away from Saydon.
Note that pre-positioning is required before starting gate 2. Kakul will jump out of the area and 4 bubbles will appear (red or blue). Every 2 players should take a side (left and right) in regard to these rules:
- If your side has 2 blue bubbles
- Each player should stay in 1 blue bubble
- Blue bubbles can’t hold more than 1 player
- If your side has 1 or 2 red bubbles
- Both of you should stay in 1 red bubble
- if a red bubble has one player they will die. See image.
- You can completely ignore the blue bubble if there is 1 red bubble at your side.
Find Kakul (X95 and X25)
Kakul will disappear, and now you need to find him.
7 cards are placed on the floor, one of the 7 cards is the joker card. One out of four party members will have a mark, which will cause Saydon to swing his hammer at them.
While smashing a spot, he’ll flip 1 card and barely flip the 2 cards near it. This allows you to see if those 2 cards hold the joker card.
When Saydon locks onto a target and starts moving his hand to hammer the area, quickly dash out, otherwise you will instantly die.
You have 3 tries to find the joker card, if you failed, it’s a wipe.
Tips
When the 1st and 2nd hammer hits, start with the 2nd card from the left or right side. This allows you to flip 1 card and peek at the other 2 around it. If executed correctly, this will allow you to see 6 out of 7 cards.
If none of the 6 cards you checked has a joker card, this means that the card in the middle holds the joker card 100% – you’ll still have 1 hammer slam from Saydon to flip it.
Card Maze (X80)
Kakul summons a portal and blows his trumpet to summon all the players to his card maze.
You have a 2 minutes and 30 seconds to escape this area.
During this time, 1 player should break the telescope to be able to see the whole maze.
The rest of the players will have a card sign mark under their feet – each should collect 3 fragments that match their card suits to get out of this area.
To get those fragments you need to kill 3 card soldiers with matching card suits.
Once a player finished collecting 3 fragments, they will need to go to their green card suit spot to teleport to the center.
During that, the Oreha’s dungeon clown will be riding a ball and passing across the map. If he hits you, you will lose all your fragment stacks, and you will have to start over.
So, basically, the player who breaks the telescope must tell everyone where to go because they won’t be able to see the whole maze like they can.
The best solution for this mechanic:
It’s definitely a form of metagaming, but the player who will break the telescope can stream their PoV on Discord or any app for their teammates.
Pizza Pattern (X55)
This mechanic can be tricky and hard for some players since it’s not an ordinary pizza pattern like Velganus or Vykas gate 1.
This one is a triple spin pizza pattern and the indicator of how it will spin isn’t smoke/fog like we used to see – instead, you’ll have stars spinning in Kakul’s head.
So, when you hit the x55 HP bar, pay close attention to Kakul to identify the stars and see how it will work.
Like this:
During this pattern, a lot of stuff will be going on that increases your Madness gauge heavily. If you’re confident, you can follow the pattern and finish it.
If it will be hard, you can use Innana to tank some of the damage and reduce your Madness gauge and avoid turning to a clown.
Random Mechanics
Kakul Attacks
Aimed Laser
Kakul aims his gun towards a player and shoot them with lasers. This will deal some damage and push back the player (no fall during this mechanic).
The targeted player should stay away from their teammates during this.
Aimed Bomb
Kakul aims his gun towards a player and shoot them with fire bombs. This will deal damage and leaves a fire area on the ground that gives fire DoT stacks to anyone steps on it.
Once again, the targeted player should stay away from their teammates during this.
Yellow Strips
Kakul will perform his yellow strips attack, it increases a player’s madness gauge and deals some damage.
Excavation
Kakul jumps around while throwing bombs at everyone. The bombs deal heavy damage, fire DoT, and increases Madness gauge.
Jump Scare (counterable)
Kakul throws his trumpet back, flips his body, and weirdly moves towards a player. If the counter fails, it will cause fear and darkness to a player, followed by a jump scare face.
In-Out Ring
Kakul blows his trumpet to send waves of yellow attacks that increase the Madness gauge. If the yellow ring attack is small around Kakul, it will spread out.
If it’s a big yellow circle, it will shrink towards Kakul. The safe spot is always close to Kakul or very far from him.
Small ring:
Big ring:
Fire Bomb
Kakul throws a bomb that explodes after 2 seconds. It will knockup anyone standing within its range and leaves a fire DoT.
Sainty Spots
Kakul clones drop all over the place with a dark red/black circle that massively increases the Madness gauge. Only 1 clone will have a white sanity circle which will drop your Madness gauge.
If it’s hard to reach the sanity circle, you can stand on the very edge between 2 Madness circles so they won’t affect you. Be careful, Saydon will perform the “Evil-Eye” move every time this mechanic starts.
Kakul Spin (Counterable)
Kakul spins towards a targeted player. If the counter fails, Kakul will start spinning, pushing them back and dealing damage to them. The targeted player should stay away from their teammates.
4 Direction Trumpet
Kakul will blow his trumpet in 4 cardinal directions, dealing damage and increasing Madness gauge.
Saydon Attacks
Evil-Eye
Saydon will do a small/fast light show – if any player is positioned facing towards Saydon, they will be feared.
This mechanic is also performed every time before (blue/red bubble & sanity circle).
Remember that It’s just like Medusa from Vykas gate 3, you must look away!
Bonk!
Saydon will grab a targeted player, smashing him with his hammer for a few seconds and throw him on the floor.
Blow
Saydon will lock onto atarget and blow them out of the table. The indicator is a yellow telegraph – dash out of it or use a skill that is immune to knock up.
Paper Birds
Saydon takes off his hat and does a magic trick, sending out paper birds towards a targeted player. Be careful as it will come back from the same direction. If hit, they slam the player to the ground and deals some damage.
Out:
Back in:
Double/Triple Slam
Saydon locks onto a target and slams the area 2 or 3 times, knocking out the player to fall.
If he slams 2 times, he will do it in the same spot.
If 3 times, he will do it in 3 different spots.
Flame Breath
Saydon blows fire to half of the area – it deals damage, leaves fire DoT, and increases Madness gauge.
Thanks for reading! Keep an eye out for Kakul-Saydon Phase 3 or check out our other Lost Ark raid guides.