BUDGET BLEED BLOCK BLADESTORM is a build designed to be EXTREMELY cheap, while still providing full t1-t17 mapping capabilities in early league Grinding! We achieve this by utilising high block & INSANE Life REGEN thanks  Jack, the Axe and the Gladiator Ascendency, while also getting solid damage with Bleed/Impale Synergies!
Please note, the goal is to keep costs low, so gear will be minimal and high cost gems etc wont be included.
PoE Build Duelist
 Gladiator
Shin's BUDGET BLEED BLOCK BLADESTORM!
3.27 KotF
Starter
End Game
Speed Leveling
Creator
Path of Building Code
Build Overview
Strengths and Weaknesses
- 1MIL DPS With
 Bladestorm of Uncertainty storm stacking!
 - BLEED EXPLOSIONS!
- 70c-100c Max Investment
- 70% Block Chance
- 2000 Life Regen per sec
- Fast mapping
- Easy to gear
- Easy to scale further
- Great for Ritual, Heist & Harvest
- 1MIL DPS
- Not a pinnacle killer
Equipment


GEAR:
Gearing is very CHEAP and simple. We can get by with bad gear due to the KEY Gear we use. So all displayed gear above is just an example and shows even bad gear is enough for the builds purpose.
UNIQUES:
Get yourself a Haemophilia gloves as soon as you can. This will be our only source of Bleed EXPLOSIONS until we can get  Jagged Technique as our last ascendency. Jack, the Axe is my unique item i designed back in closed beta and is the KEY item for this build! We use its unique skill "Thirst for Blood" as our main sustain, as it allows for a massive 2000 Life regen per second while enemies around you are bleeding. Thirst for Blood also increases our damage with bleeding itself. A MUST have item for this build. Rumi's Concoction will be helpful while leveling until we cap out our block, then you can swap it out for any other flask. The Overflowing Chalice is a no brainer addition with its 40% increased damage, Consecrated Ground and increase to other flasks charge sustain.
Optional:  Azadi Crest is highly recommended for late maps and pinnacles.
RARE GEAR:
For all rare gear we want to focus the following:
Elemental Resistances to cap at 75%
Chaos Resistance to cap at 75%
Life & Amour
For Rings we NEED "Physical Attack Damage Leeched as Mana". So Try get it on both rings as well as your resistances.
Amulet can anoint  Discipline and Training but its not required and can blow out the budget.
FLASKS:
We want to get a life flask with "Instant recovery on low life" so we can pop it if we get hit by a rather nasty attack. Other then that, we have the two unique flasks mentioned above with the addition of a Quicksilver to decrease our travel time.
JEWELS:
The only jewel we use for this budget build is a "Corrupted Blood cannot be inflicted on you" jewel. Other rolls don't really matter as we only use it for Corrupted blood immunity.
LEAGUE ITEMS:
This league we have some sweeeeeeeeeet items that add to our builds!
We will be using the Impaling Uulgraft and Battering Uulgraft's to complement our build. Battering Uulgraft is a MONSTER of a damage dealer! Summoning 4 giant hands to slap the crap out of any rare or unique mobs on the screen. I've had moments were these hands would just 1 shot Rare's before i even get close to them. Great for supplementing out lesser single target capability's. Impaling Uulgraft on the other hand, add a chance to apply an additional Impale on enemies, which means more Bleed Multiplier from our Physical Mastery listed below.
Passive Tree
main:
123
123
ascendancy:
8
8
Keystones

Versatile Combatant
-10% to maximum Chance to Block Attack Damage
-10% to maximum Chance to Block Spell Damage
+2% Chance to Block Spell Damage for each 1% Overcapped Chance to Block Attack Damage

Resolute Technique
Your hits can't be Evaded
Never deal Critical Strikes
Masteries
Axe Mastery (2)
Bleeding you inflict deals Damage 15% faster
40% increased Effect of Onslaught on you
Physical Mastery (1)
+6% to Damage over Time Multiplier for Bleeding per Impale on Enemy
Armour Mastery (1)
100% increased Armour from Equipped Boots and Gloves
Block Mastery (1)
+2% to maximum Chance to Block Attack Damage
Mana Mastery (1)
10% reduced Mana Cost of Skills
Impale Mastery (1)
Impale Damage dealt to Enemies Impaled by you ignores Enemy Physical Damage Reduction
Life Mastery (1)
Skills Cost Life instead of 15% of Mana Cost
The Tree:
The tree is designed to get maximum defence while also utilising impale to increase bleed multiplier
Leveling tips:
Pick up the first Life and Mana Leech node below  Vitality Void to help with early mana sustain. Refund when you acquire a mana leech ring.
Obtaining  Hatchet Master early will speed up the campaign substantially due to the early onslaught access.
Suggested Passive Node Order:
In the first area, we want to grab  Art of the Gladiator,
  Bravery,
  Master of the Arena and then
  Defiance.
Pathing through  Golem's Blood, we want to get Hatchet Master then
  Savage Skewering for a big boost in speed and damage potential.
Returning back to the left we grab  Dirty Techniques,
  Testudo,
  Adamant,
  Versatile Combatant and our first Mastery (listed above) in the Adamant circle.
From here we will go back to the start and grab  Mana Flows to help further with mana issues. Then
  Bloodletting,
  Brinkmanship and
  Merciless Skewering followed by its Mastery (listed above).
Now we grab  Bastion Breaker,
  Bloodless and
  As The Mountain along with all their masteries (listed above).
Now we may be having accuracy issue by this point, If so, Grab  Resolute Technique. Otherwise, continue up and grab
  Aggressive Bastion,
  Cleaving,
  Slaughter and
  Cannibalistic Rite along with any masteries we have selected (listed above).
Now if you did not grab Resolute Technique before, grab it now then grab  Barbarism,
  Savage Wounds and the near by jewel slot.
Moving back down the tree, grab  Master of Wounds and
  Harvester of Foes along with its mastery (listed above).
Ascendency Order:
Block is the most important part of the ascendancy as we can do without the bleed arm until end game. So grab  Determined Survivor and
  More Than Skill as soon as possible. Then use the rest of the points to get
  Gratuitous Violence and Jagged Technique.
Skills
Eagle Guardian
Titan Plate

Bladestorm of Uncertainty

Rage

Faster Attacks

Melee Physical Damage

Brutality

Pulverise
Empyrean Aegis
Shagreen Tower Shield

Leap Slam

Fortify
Faster Attacks
Ghoul Track
Precursor Greaves

Blood and Sand

Flesh and Stone

Pride
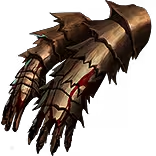
Haemophilia
Serpentscale Gauntlets

Vaal Molten Shell

Cast when Damage Taken

Blood Rage
Haemophilia
Serpentscale Gauntlets

Berserk
Jack, the Axe
Vaal Hatchet

Vulnerability
Skills:
Here I will go over each skill, their use and linked supports. Bladestorm of Uncertainty
Links:  Rage Support >
  Faster Attacks Support >
  Melee Physical Damage Support >
  Brutality Support >
  Pulverise Support
Our main attack skill, Bladestorm of Uncertainty is a great AOE skill that does decent damage and allows us to drop storms where we want while keeping up our positioning options. You can use Bladestorm instead but will lose a bit of DPS. We link Bladestorm of Uncertainty with the normal AOE Physical gems (Brutality, Melee Physical & Pulverise) But also add in Rage Support along with Faster Attacks Support to get more DPS.  Leap Slam
Links: Faster Attacks Support >  Fortify Support
Our travel skill and our source of Fortify. We use this to zoom through the map while dropping storms. The linked Fortify Support allows a almost 100% uptime of Fortify without prior investment.  Cast when Damage Taken Support
Links:  Blood Rage >
  Vaal Molten Shell
We run a CWDT setup that keeps Blood Rage active which allows for life leech and frenzy charge generation. This adds to the GOTTA GO FAST feel. Next we link Vaal Molten Shell to allow Molten Shell to pop on damage taken and allow us to pop Vaal Molten Shell manually when ever things get a lil hairy. Good Defensive and offensive setup.  Vulnerability
No Links
We cast this on anything that's a bit tanky, like Unique bosses.  Berserk
No Links
Same as Vulnerability, we pop when we need a little more DPS.  Blood and Sand,
  Flesh and Stone &
  Pride
Pride
No links
The trifecta of AOE Auras and stances. We have these active at all times and generally stay in blood stance for the extra damage it provides us.
How it Plays
We Leap Slam in to packs and drop a storm from Bladestorm of Uncertainty, then LAUGH MANICALLY as everything EXPLODES in a pile of gore.
Fast and effective at mapping with great defence.
Changelog
9/11/2025 - Release
Video Guide
Stats
Character
Attributes
250 /
135 /
62
Movement Speed
236%
Pantheon Major
TheBrineKing
Pantheon Minor
Tukohama
Charges
Endurance Charges
3
Frenzy Charges
3
Power Charges
3
Defensive
Life
4,253
Energy Shield
40
Mana
918
Armour
11,673
Evasion Rating
163
Block
70%
Resistances
76% /
75% /
75% /
75%
Simulated
Effective Health Pool
94K
Max Hit
12K /
33K /
31K /
31K /
31K
Skill DPS Estimation
 Bladestorm of Uncertainty
763K
Table of Contents
Featured Builds


Become a Creator
Want to earn rewards by sharing your builds with your community?