PoE 2 Build
[NOT UPDATED for 0.2.0] Lolcohol Grenadier Mercenary PoE 2
Build Overview
NOTE: This version of this build has NOT been updated after the massive, sweeping changes and nerfs that came with patch 0.2.0.
Early Game Version Build Video: https://youtu.be/vGwG6xG0p3I
Endgame Version Build Video: https://youtu.be/C4RBNYmQgTM
Fearless Dumbo's Version (if you want to take it even further): https://mobalytics.gg/poe-2/builds/frostferno-witch-hunter-fearless-dumbo
This build excels at single-target damage, making it an excellent setup for people who are looking to take down bosses during the campaign and in Waystones. The clear speed (how quickly it slays packs of monsters) is also solid and the build has great utility to control the flow of battle.
This version of the guide is focused on the Campaign and will be updated once I progress further into the endgame.
Note: This is an early version of the build and is subject to changes as it is further optimised, but this setup functions incredibly well.
Build Variants
Default
Endgame Level 82
Late Endgame (Tier 13+ Maps)
The basic build for the Campaign from Level 1-65


Note: You do not need the EXACT modifiers that I have shown in the Equipment section. Below are some guidelines on useful modifiers on each equipment slot.
Helmet: Armour/Evasion
- Life, Resistances, Attributes (Strength/Intelligence/Dexterity.
- Unique Helmets:
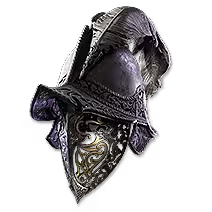 The Vile Knight (Bossing),
  Radiant Grief (Mapping)
Weapon: 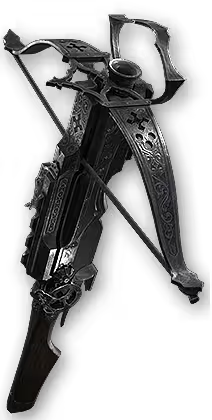 Bombard Crossbow
- Prefixes: Increased Physical Damage, or Elemental Damage (such as Adds 10-20 Fire Damage). Increased Elemental Damage with Attacks
- Suffixes: Attack Speed, Level of Projectile Gems. Attributes
Second Weapon Set: Don't worry about this for this version of the build.
Gloves: Armour/Evasion
- Prefixes: Life, Physical Damage Leeched as Life/Mana, Flat Damage to Attacks (eg. 5-10 Physical Damage to Attacks)
- Suffixes: Attack Speed, Resistances, Attributes. Life/Mana Gain on Hit/Kill (preferably On-Hit)
Belt:
Life, Resistances, Attributes
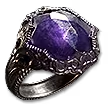
Rings: Resistance Bases or Iron Ring
Life, Resistances, Mana/Life Leech, Attributes
Amulet:
Life, Resistances, Attributes, Spirit, Whatever you need to top up your stats
Boots:
Most important mod of all: MOVEMENT SPEED! Make sure your boots have this.
Life, Resistances, Attributes, etc
Body Armour:
Life, Resistances, Attributes, Spirit
Flasks and Charms:
Flasks: Make sure you are using the highest level available Flasks that you can. For now, any two modifiers will be decent
Charms: Depending on the situation, swap between ones that provide immunity to the types of ailments that you see are being applied to you most often
Skill Gems
Default
Endgame Level 82
Late Endgame (Tier 13+ Maps)

1
Crossbow Shot
Item

2
Gas Grenade

3
Explosive Shot

4
Oil Grenade

5
Flash Grenade

6
Explosive Grenade

7
Glacial Bolt

8
Herald of Ash

9
Attrition
Gem Priority


+14
Leveling Gems:
Using the recommended Gems and Supports worked pretty well for me, but here's some extra tips that may help more
 Fragmentation Rounds and
  Permafrost Bolts work very nicely for the first few levels of this character. Freeze enemies with Permafrost Bolts and Shatter them with Fragmentation Rounds
Permafrost Bolts + Pierce
Fragmentation Rounds + Envenom
Level 5 Gems:
Bossing Setup:
Gas Grenade + Explosive Grenade Throw the Gas Grenade Down and explode them with your Explosive Grenades
Clear Setup:
 Galvanic Shards + Pierce + Lightning Infusion
Flash Grenade + Overpower to Stun enemies
Buffs:
Herald of Ash linked with Clarity and Vitality is nice early on.
Later, using Attrition with Herald of Ash wil help your clear and single target
Solving Mana Issues
- Don't over-level Skill Gems or use too many + Level of Projectile Skills on your Crossbow or Amulet
- Look out for modifiers such as +X to Mana and % increased Mana Regeneration Rate
 Artillery Ballista Setup: Font of Mana + Font of Rage and Ancestral Urgency can help for bossing
- Mana Flask: Gains x Charges per Second to help to get some Flask Charges while fighting bosses
- Inspiration Support can be linked to your Gas Grenade if you get desperate. If you are still struggling
- Mana Gain on Kill is an excellent modifier for mapping but will not assist you with bossing. Still, try to get this modifier somewhere on your gear (either your Crossbow or Rings)
Don't be afraid to experiment with Support Gems and other Skills. I have intentionally left some additional links out so that you can have some guidance without feeling like you have to follow an exact setup.
Also remember that your Crossbow Shot can be supported with Support Gems and is quite powerful early on!
Passive Tree
Default
Endgame Level 82
Late Endgame (Tier 13+ Maps)
main:
123
123
set 1:
20
20
set 2:
20
20
Passive Tree:
In order to explain how to go about leveling this, I'm going to tell you which Notables (the big Passive Tree Points) you should go for in which order.
1.  Remorseless
2. Ricochet
3.  Colossal Weapon and Overwhelm
4.  Instant Reload
5.  Cluster Bombs and Grenadier
6.  Stars Aligned and Finishing Blows
7.  Sand in the Eyes and Repeating Explosives
8.  Authority and
  Giantslayer
Attributes: Get as much Dexterity and Intelligence as you need and then put the rest into Strength
Remember: this is a guideline, if something intrigues you and you want to test it, give it a shot, but this setup has worked for me.
You can always respec points at The Hooded One, but this can be quite expensive so don't spend Points foolishly
From here: make your own decisions about where to go next. I haven't progressed further than this so I am hesitant to say exactly what to take until I test it. Once I have gone further, I will provide and update.
Ascendancy:
 Pitiless Killer was my first choice and I was very happy with how it performed.
 Zealous Inquisition was my second choice and I'm still uncertain if it's overkill as we already have so many explosions on the build.
 Judge, Jury, and Executioner is most likely my third Ascendancy Notable choice.
Other Options:
The only Ascendancy Point I would say to avoid for early game is  Weapon Master - this doesn't magically provide you an extra 20 Points to use on the tree, but instead you will need to Respec a huge amount of Passives and have two weapon setups to gain value from this.
 Obsessive Rituals feels a bit unnecessary early on, but could provide good defense later into the game
As for the rest, I plan to test them, especially  Witchbane, but my current choice has worked out very well
How it Plays
Campaign Version
Try to not run ahead of your Grenades and get yourself killed. There is a delay between deploying your Grenades and Detonating them, so play behind them, drawing enemies into your Grenades rather than having them run past them.
The playstyle of the Endgame variant is explained in previous sections
How it Works
The playstyle of the Endgame variant is explained in previous sections
Boss Setup (Campaign Version)
Oil Grenade + Explosive Shot + Gas Grenade
Open by shooting your Oil Grenade at the floor and then ignite it with Explosive Shot. This will produce Burning Ground and apply Fire Exposure to enemies, making them take increased Fire Damage. Now shoot your Gas Grenades under the boss and wait for them to explode.
This will provide huge clouds of Poison Gas, which you can then Detonate by shooting it with your Explosive Shot or Explosive Grenade
Remember to use your Flash Grenade setup to help Stun bosses
Clearing Setup (Campaign Version)
You can often clear packs with Explosive Grenade and Detonating it with your Explosive Shot . If you encounter a tanky Rare monster or Magic Pack, you can use the Boss Setup to clear them more quickly.
Staying Alive
Flash Grenade can be used when first engaging packs of enemies to stun them and allow you enough time to set up your Grenade/Explosive Shot Combo
Campaign Version
Glacial Bolt linked with Fortress is another excellent way to keep enemies at bay or trap them in with your Grenades, but do be careful as you can sometimes trap yourself and die because of it!
Changelog
15 Dec 2024: Added a Late Endgame variant of the build that is even more defensive and able to survive the highest tiers of maps
14 Dec 2024: Added an Endgame variant of the build that is Level 82 and comfortable in Tier 11 Maps
Video Guide
Table of Contents
Featured Builds


Become a Creator
Want to earn rewards by sharing your builds with your community?