


This Lightning Proxima build will have you zapping your way through NG+ with style and relative ease! It leverages all the items that can stack to enhance the throughput of Proxima's lightning skills and push her crit chance and damage as high as possible! It is truly electrifying! Let's get into it!
 Use your favourite features in-game with our Desktop App
Overview
Body Text
Best Proxima Lightning Build in Mortal Shell II – NG+ Build Guide
If you want to turn Proxima into a lightning-powered monster capable of stun-locking enemies and clearing entire groups in seconds, this is the build for you.
This Proxima Lightning build combines her strongest skill nodes with the Axatana, Voltaic Crown, Duality Stone, and Acolyte Stone to create an incredibly fast and aggressive setup. The result is huge burst damage, constant Shock applications, excellent survivability, and some seriously ridiculous AoE damage.
I’ve been using this 44-point, max-level Proxima build to clear NG+ content, and it is one of the most entertaining setups I’ve played so far.
In this guide, I’ll cover the Proxima skill tree, weapons, Tar Stones, ability stones, how the build works, and the changes I recommend for boss fights.
Note: This guide contains a late-game boss spoiler. Skip the boss section if you want to experience the encounter yourself.
Proxima Lightning Build Overview
The entire build revolves around one simple idea:
Generate as many Lightning stacks as possible, trigger Shock repeatedly, and use the Axatana to take advantage of the openings you create.
Proxima's Biosampler is the engine that keeps everything moving. Once you've invested heavily into Attunement and the relevant skill nodes, you can keep using it extremely frequently while simultaneously building Lightning stacks and controlling enemies with Stasis.
The core setup is:
- Proxima: Max-level, 44-point setup
- Weapon: Axatana +15
- Tar Stone: Duality Stone
- Tar Stone: Voltaic Crown
- Ability Stone: Acolyte Stone
- Additional crit support: Auspicious Stone and Headsman Stone
- Playstyle: Fast melee + Lightning + Shock + Stasis + burst damage
The build is particularly effective against groups because Shock and Lightning can spread huge amounts of damage through tightly packed enemies.
Proxima Skill Tree
This is the full 44-point version of the build that I use for NG+.
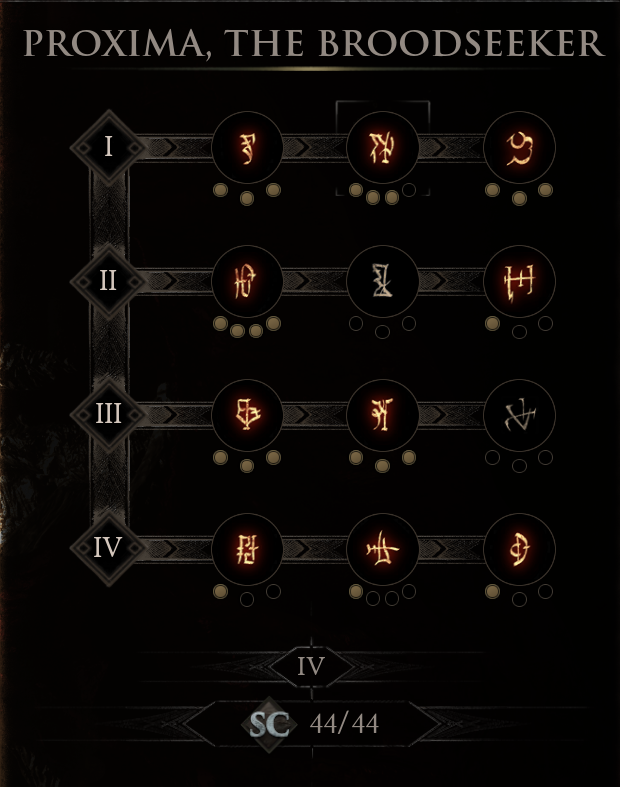
Attunement
Max out Attunement.
This is one of the most important investments in the entire build because it reduces the Resolve cost of the Biosampler by 50%.
The Biosampler is something you want to use constantly. Being able to keep it active without burning through your Resolve is fundamental to how this Proxima build works.
You're going to be using the Biosampler both while exploring and during boss fights, so this reduction pays off constantly.
Exo Shell – Level 3
Next, we're taking Level 3 Exo Shell.
This gives us:
- 30% mitigation chance after dodging
- 45% mitigation chance while aiming
- 100% mitigation chance while using the Biosampler
This is a huge part of Proxima's survivability.
The build is aggressive, meaning we're often going to be surrounded by enemies. Exo Shell gives us the defensive tools to stay in the fight rather than constantly backing away.
More importantly, it works beautifully with Grafted Armor and Shell Shock.
Shell Shock
Take the three points in Shell Shock.
Whenever Grafted Armor mitigates damage, you gain:
- 15 Resolve
- 10 Lightning stacks on the attacker
This is one of the key interactions in the entire build.
You're not simply using Grafted Armor as a defensive ability. Every time it mitigates damage, it also feeds the Lightning engine.
That means enemies attacking you can actually help you generate the resources and Lightning stacks required to trigger your Shock effects.
This is exactly what makes the build so satisfying.
Amperon
On the top row, we're also taking the Lightning Amperon nodes.
This gives us:
- 50% Lightning mitigation
- Lightning immunity
- Doubled Shock damage radius
The increased radius is particularly important.
Once your Lightning effects start triggering, the damage can spread through groups of enemies incredibly quickly. In tight spaces where you're surrounded by mobs, the AoE becomes absolutely ridiculous.
You can essentially turn an entire room into a lightning storm.
And because we're constantly generating Lightning stacks through the rest of the build, we're able to take advantage of this effect frequently.
Biohazard – 4 Points
We're also taking 4 points in Biohazard.
This gives the Biosampler:
- 180% more damage
- 5 additional Lightning stacks
The additional Lightning stacks are particularly valuable because the entire build is designed around triggering Shock as frequently as possible.
The Biosampler is already something we're using constantly, so getting extra Lightning stacks every time we use it means we're continually progressing towards our next Shock proc.
This becomes even more important once we add our weapon and Tar Stone setup.
Seizure – 3 Points
Next up is Seizure, with three points invested.
This applies 20 Stasis stacks whenever you slam into an enemy using the Biosampler.
This is why enemies can appear to slow down dramatically when you're playing this build.
You're essentially getting free crowd control every time you use one of your most important abilities.
The additional bonuses also give us:
- 80 Splash Damage
- 150 Stagger Damage
So the Biosampler isn't just helping us build Lightning stacks. It is simultaneously damaging, staggering and slowing enemies.
Because Attunement gives us so much additional efficiency with Resolve, you can keep using this ability constantly.
Discharge – The Star of the Build
Now we get to the real star of the show:
Discharge
I've only invested one point into Discharge.
I don't personally see the need to spend three points here. You only need the proc to happen once for the effect to become absolutely ridiculous.
When Discharge goes off while you're surrounded by enemies, the amount of Lightning damage and Shock procs happening simultaneously is incredible.
This is where the entire build comes together.
You've got:
Grafted Armor → Lightning stacks → Shock → Discharge → AoE damage → more openings to attack.
When you're fighting multiple enemies, the screen can become absolute chaos.
And that's exactly what we want.
Fortress
I've put one point into Fortress.
This is simply there to provide a little extra damage mitigation.
It isn't the defining part of the build, but the additional survivability is particularly useful during boss encounters, where mistakes can be much more expensive.
Grafted Armor
Finally, we've got one point in Grafted Armor.
This gives us an important recovery option if we get knocked out of our Proxima shell.
You can quickly use your burst attacks and Acolyte Stone to build the percentage charge back up and return to your shell.
It's another small piece of the build that helps keep the whole setup functioning smoothly.
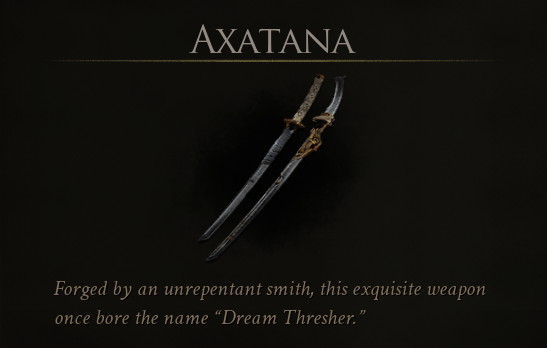
Best Weapon: Axatana
For the weapon, we're using the Axatana.
I've got mine at Level 15.
I deliberately haven't pushed it any higher because I wanted to demonstrate how achievable this build is even in NG+ without needing a completely maxed-out weapon.
The Axatana is fantastic here because of its incredibly fast moveset.
And that speed becomes even more ridiculous when combined with the Duality Stone.
Duality Stone
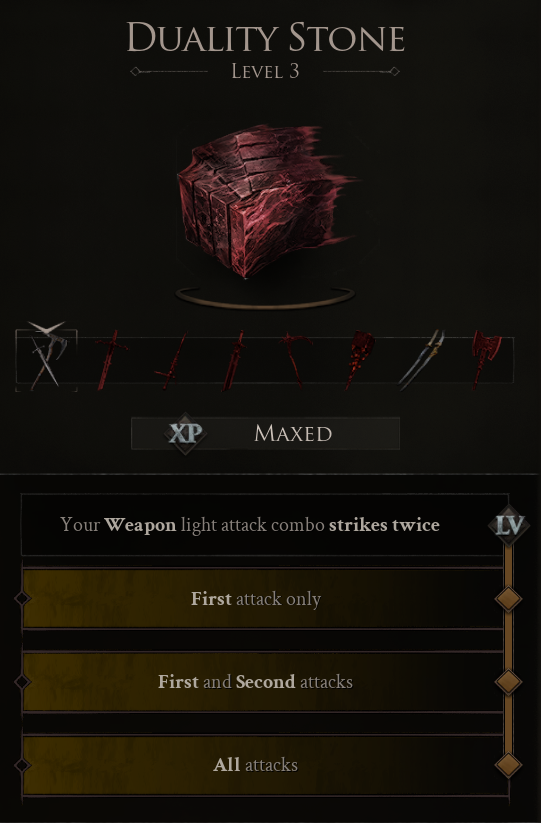
The Duality Stone is one of the most important pieces of equipment for this setup.
It's been a mainstay in my fast-swinging builds, and for good reason.
The Axatana already attacks extremely quickly, but the Duality Stone takes that speed to another level.
Take it off and the difference is immediately noticeable.
The weapon suddenly feels slower, less fluid and considerably less satisfying.
With Duality Stone equipped, the Axatana feels like it was made for this build.
The faster attacks also mean more opportunities to take advantage of the Shock staggers you're constantly generating.
Voltaic Crown
The other essential piece is the Voltaic Crown.
I've upgraded this to Permanent Infusion, and I strongly recommend doing the same.
This is what really makes the Lightning engine tick.
Once the Voltaic Crown is permanently active, you can watch the Lightning stacks climb extremely quickly.
Those Lightning stacks then lead into Shock, and the Shock staggers give you opportunities to keep attacking with the Axatana.
So the basic combat loop becomes:
Build Lightning stacks → trigger Shock → stagger enemy → attack rapidly with Axatana → build more Lightning → repeat.
Against groups, this can become completely absurd.
Acolyte Stone
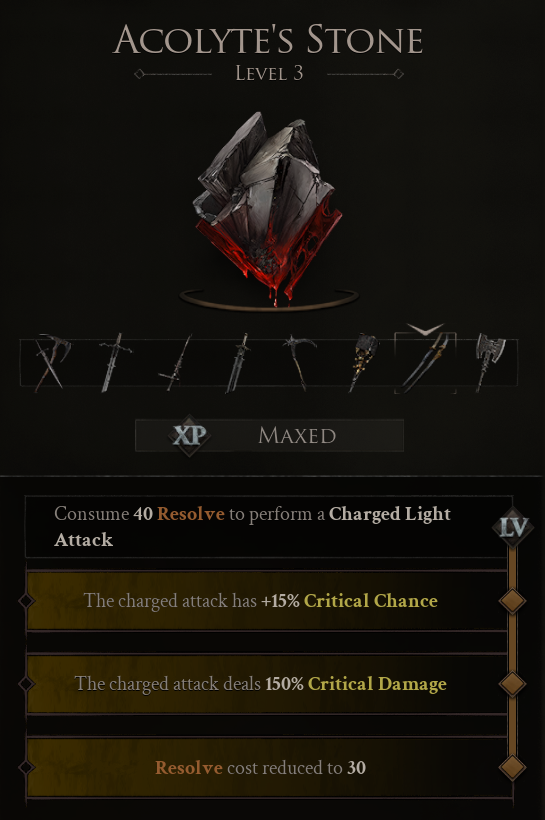
The Acolyte Stone is one of my favourite ability stones in the game, and it fits this build perfectly.
At Level 3, it provides:
- 150% increased critical hit damage
- 50% critical hit chance
- Only 30 Resolve cost
That combination is extremely powerful.
And remember, this is an NG+ endgame setup.
The damage numbers you can produce with Acolyte Stone are enormous.
I've seen individual critical hits in the 500–600+ range, and because of the rest of the build's critical-hit bonuses, you can produce some seriously chunky burst windows.
Critical Hit Setup
We're also using the Auspicious Stone and Headsman Stone to push our critical damage even further.
These provide:
- +100% critical hit damage
- +18% critical hit chance
When you combine those bonuses with the Acolyte Stone, the result is an extremely strong burst-damage package.
This is especially useful against bosses.
Once you create an opening with Shock or Grafted Armor, you can move in and unleash your critical attacks while the boss is vulnerable.
How the Proxima Lightning Build Works
The easiest way to understand this build is to think of it as a loop.
1. Use Biosampler constantly
Your Attunement investment makes Biosampler much cheaper, allowing you to use it repeatedly.
Biosampler also:
- Deals significantly increased damage
- Applies additional Lightning stacks
- Applies Stasis
- Adds Splash Damage
- Adds Stagger Damage
2. Build Lightning stacks
Your Biosampler, Shell Shock and Voltaic Crown all contribute towards building Lightning stacks.
You're effectively charging the engine while fighting.
3. Trigger Shock
Once enough Lightning stacks have been applied, you begin triggering Shock.
The increased Shock radius from Lightning Amperon makes this particularly devastating against groups.
4. Take advantage of the stagger
Shock gives you the opening you need.
This is where the Axatana comes into its own.
Start attacking rapidly and take advantage of the enemy being unable to respond.
5. Let Discharge cause chaos
When Discharge procs, the AoE damage can spread through groups of enemies.
This is particularly effective in enclosed areas where enemies are packed together.
6. Use Grafted Armor defensively
Don't think of Grafted Armor purely as a panic button.
Whenever it mitigates damage, it also gives you Resolve and applies Lightning stacks.
So enemies hitting you can actually help fuel your next rotation.
Boss Variant: Swap Seizure for Bio Hunter
There is one small change I recommend when you're specifically fighting bosses.
Take one point out of Seizure and put it into Bio Hunter instead.
The reason is simple.
Proxima gains a 0.88% permanent damage increase per sample, up to 20%.
Against normal enemies, you aren't necessarily fighting them long enough to make the most of this.
Bosses are different.
A boss fight lasts long enough for you to repeatedly use the Biosampler and build your samples, allowing you to reach the damage bonus much more reliably.
So for general exploration:
Seizure > Bio Hunter
For bosses:
Bio Hunter > Seizure
It's a very easy adjustment that gives you more sustained damage during longer encounters.
How to Play Proxima Against Bosses
The basic strategy doesn't really change.
You're looking to rotate between Grafted Armor, Biosampler and your melee attacks.
Use Grafted Armor to mitigate incoming attacks and generate Resolve and Lightning stacks.
When you get an opening, move in with the Biosampler to apply Stasis and continue building your Lightning stacks.
Once the boss becomes vulnerable, bring out the Axatana and use your critical-hit abilities to take huge chunks out of the health bar.
The combination of Shock, critical hits and the Axatana's attack speed can absolutely melt boss health bars.
Just remember that Proxima's defensive tools are there to be used.
Don't get greedy.
If you start taking unnecessary hits, reset the situation with your shell abilities and then go back into the rotation.
Where to Get the Voltaic Crown
The Voltaic Crown can be found in the northern section of the map.
It is associated with the Stone Bled Gate Beacon / northern gate progression.
The exact route is tied to progressing through these areas, so make sure you're exploring around the northern gate as you advance.
Where to Get the Axatana
The Axatana is located in the Forgotten Tower, in the southeast portion of the map.
This is one of the most important items to pick up if you're planning on running this Proxima setup.
The Axatana's fast moveset is absolutely perfect for exploiting the openings created by Shock.
Final Proxima Lightning Build
If you want to recreate the build, here's the core setup at a glance:
Slot | Item |
|---|---|
Shell | Proxima |
Skill Points | 44-point max-level setup |
Weapon | Axatana +15 |
Tar Stone | Duality Stone |
Tar Stone | Voltaic Crown – Permanent Infusion |
Ability Stone | Acolyte Stone |
Crit Support | Auspicious Stone |
Crit Support | Headsman Stone |
Core Skill Investments
- Max Attunement
- Exo Shell – Level 3
- Lightning Amperon
- Biohazard – 4 points
- Seizure – 3 points
- Shell Shock – 3 points
- Discharge – 1 point
- Fortress – 1 point
- Grafted Armor – 1 point
For boss fights, move one point from Seizure into Bio Hunter.
Final Thoughts
This Proxima Lightning build is one of those setups where all the individual pieces make sense on their own, but become ridiculous when you put them together.
Biosampler keeps your enemies slowed and staggered while generating Lightning stacks. Grafted Armor provides mitigation while simultaneously generating Resolve and more Lightning. Voltaic Crown keeps the Lightning engine running, while Lightning Amperon turns your Shock effects into enormous AoE attacks.
Then the Axatana comes in to clean everything up.
The end result is a Proxima build that can stun-lock enemies, clear groups incredibly quickly, and still produce huge burst damage against bosses.
If you enjoy fast melee combat, Lightning effects and watching entire groups of enemies disappear in a storm of Shock procs, this is definitely a build worth trying in NG+.
I'll be covering plenty more Mortal Shell II builds, tips and tricks, so keep an eye out for the next guide.
Video
Table of Contents
1. Overview2. Body Text Best Proxima Lightning Build in Mortal Shell II – NG+ Build Guide Proxima Skill Tree Shell Shock Amperon Biohazard – 4 Points Seizure – 3 Points Discharge – The Star of the Build Fortress Grafted Armor Best Weapon: Axatana Duality Stone Voltaic Crown Acolyte Stone Critical Hit Setup How the Proxima Lightning Build Works 1. Use Biosampler constantly 2. Build Lightning stacks 3. Trigger Shock 4. Take advantage of the stagger 5. Let Discharge cause chaos 6. Use Grafted Armor defensively Boss Variant: Swap Seizure for Bio Hunter How to Play Proxima Against Bosses Where to Get the Voltaic Crown Where to Get the Axatana Final Proxima Lightning Build Core Skill Investments Final Thoughts
See More





Like our guides?
Add Mobalytics as a preferred source on Google!