 League of Legends
 Teamfight Tactics
 Legends of Runeterra
 Valorant
 Lost Ark
 Destiny 2
 Diablo 4
 Download APP
Ranking The Best Helldivers 2 Sentry Stratagems
Welcome to our list of the best Helldivers 2 sentry stratagems!
When used in the right situations, they can do a ton of work for you passively, whether it’s whittling down enemy numbers from afar or drawing attention from you so you can make an escape.
Although we do have rankings based on the game’s current balance, we want to stress that you should always play the way you want!
Your personal strengths and playstyle should always come first, but referencing the meta can be helpful if you start having trouble at higher difficulties.
If you’re looking for stratagems in general, head to our best Helldivers 2 stratagems tier list instead.
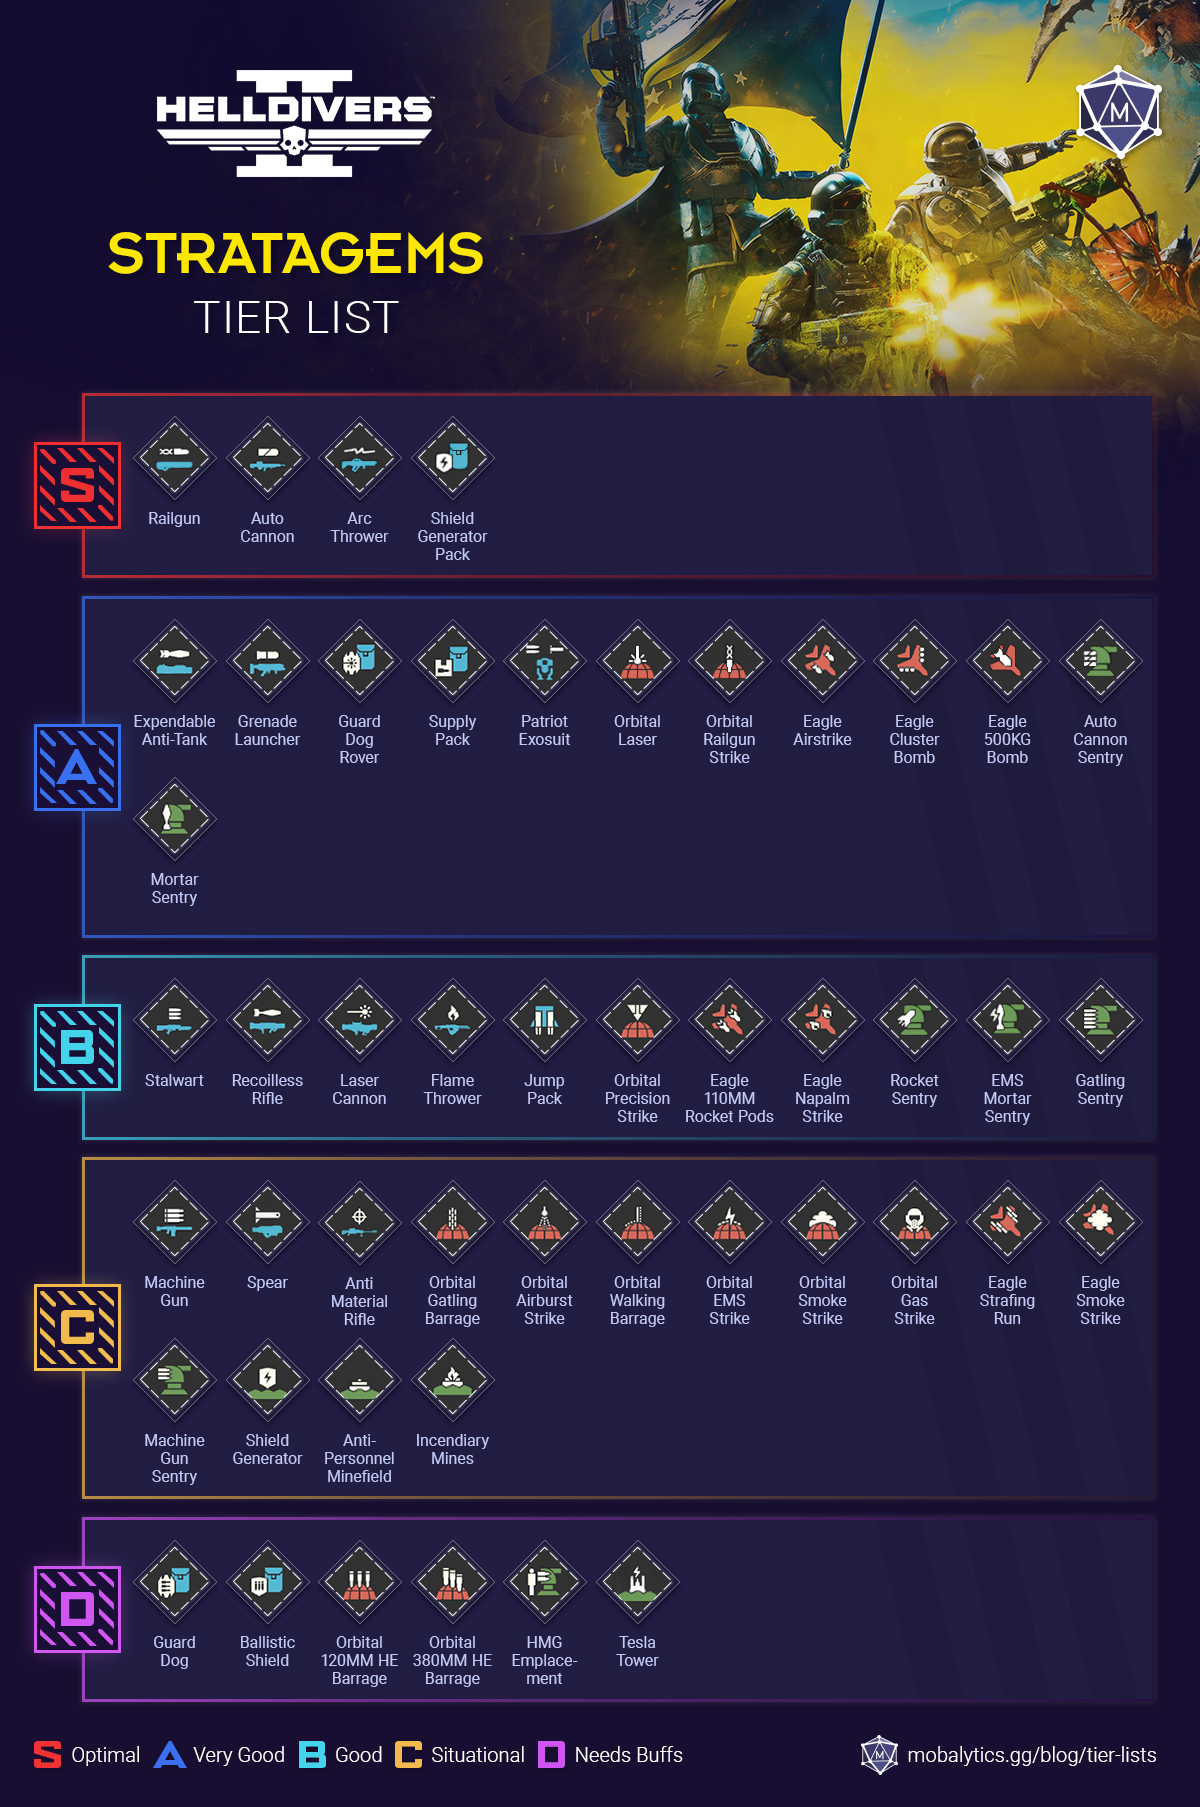
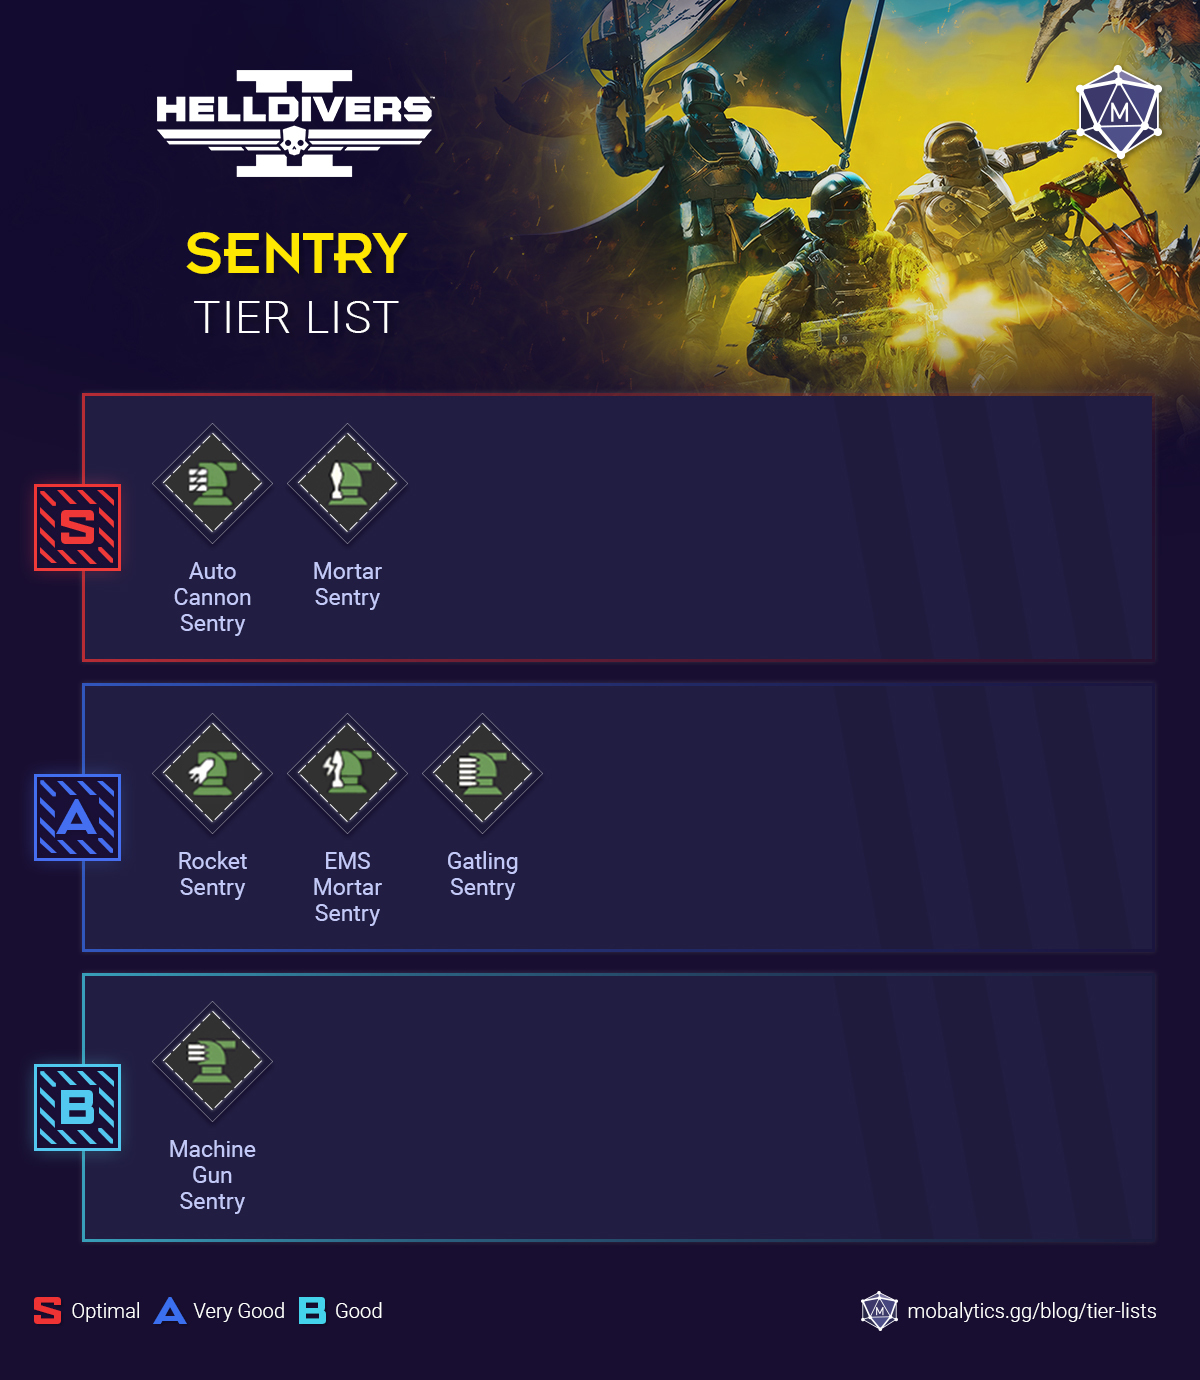
Since there are no sentry stratagems that are in S-tier in our main list, we’ll be adjusting our scale for the Helldivers 2 Sentry Tier List accordingly since you’re likely just focused on sentries:
| Tier | Helldivers 2 Backpack Tier List |
|---|---|
| S | Autocannon Sentry, Mortar Sentry |
| A | Gatling Sentry, Rocket Sentry, EMS Mortar Sentry |
| B | Machine Gun Sentry |
Sentry Ranking Commentary
S-tier Sentries
Autocannon (6,000 cost) – Level 13
- Call-in Time: 3 sec
- Uses: Unlimited
- Cooldown Time: 480 sec
- Input: ⇩⇦⇩⇧⇧⇨ = Down, Left, Down, Up, Up, Right
In terms of versatility, consistency, and upside, it’s tough to beat the Autocannon Sentry when comparing it to the others.
It will have a considerable impact on every map type and against both enemy factions, giving you great value if you’re trying to save up your Requisition Slips.
Compared to the other sentries that can be more specialized, the Autocannon Sentry is useful whether you need help with thinning out waves with AoE or focusing down bigger threats.
The normal Autocannon Support Weapon is S-tier on our general tier list, so it makes sense that this is among the best sentry stratagems.
Mortar Sentry (7,000 cost) – Level 8
- Call-in Time: 3 sec
- Uses: Unlimited
- Cooldown Time: 180 sec
- Input: ⇩⇧⇨⇨⇩ = Down, Up, Right, Right, Down
The Mortar Sentry has the potential to have more upside than the Autocannon Sentry, but also be a double-edged sword more so than other choices.
On the positive side, if you’re able to set it up in a protected place, you can sit back and let it clear out a ton of enemies from afar due to its high ammo capacity. It not needing line of sight on enemies is especially nice to have.
On the negative side, it’s the sentry strategem that likely gets the most teamkills – your team must always be aware of their proximity to enemies and it can be risky to place it when you’re already being overwhelmed by numbers.
This makes it a safer bet against automatons since the faction won’t rush you down as much as the terminids.
Overall though, there’s a reason why this is one of the most popular sentry stratagems alongside the Autocannon Sentry, they’re both just super solid, especially if you have competent squadmates.
A-tier
Gatling Sentry (4,000 cost) – Level 5
- Call-in Time: 3 sec
- Uses: Unlimited
- Cooldown Time: 180 sec
- Input: ⇩⇧⇨⇦ = Down, Up, Right, Left
After the two S-tier choices, the Gatling Sentry is the third best generalist sentry stratagem, being impactful in most situations.
It can be especially useful for relieving pressure when you’re getting overwhelmed by many enemies as it has a very high rate of fire.
However, this can also make it prone to running out of ammo quickly.
Another upside that makes it useful in a pinch is that it only needs four directional inputs rather than the five or six that other sentries require.
Rocket Sentry (7,500 cost) – Level 15
- Call-in Time: 3 sec
- Uses: Unlimited
- Cooldown Time: 180 sec
- Input: ⇩⇧⇨⇨⇦ = Down, Up, Right, Right, Left
In theory, the Rocket Sentry sounds great, but in practice, it can often feel inconsistent.
It doesn’t always target armored enemies like it’s supposed to and can sometimes have trouble killing them when it does lock onto them.
When it targets waves of weaker enemies, it also lacks the AoE punch of other sentries, allowing it to get overwhelmed.
So although it’s on the border of falling to B-tier, we’re leaving it in A-tier for now since it does have anti-armor niche.
EMS Mortar (8,000 cost) – Level 20
- Call-in Time: 3 sec
- Uses: Unlimited
- Cooldown Time: 180 sec
- Input: ⇩⇧⇨⇩⇨ = Down, Up, Right, Down, Right
As the game ages and the player base improves, we think that the EMS Mortar will only rise in favor and impact.
However, right now it needs your team to have the awareness and coordination to follow up when it crowd controls enemies.
It does also have the added upside of not killing your allies, but if there are enough enemies around, getting hit by it can still be a death sentence as the ones that weren’t hit will inevitably catch up.
Overall, it’s an underrated choice that deserves more experimentation but it’s a bit difficult for most squads to use right now.
UPDATE:
With the recent addition of the new Termicide mission type, the EMS Mortar has risen in stock. It’s a great option for the mission because it doesn’t friendly-fire the silos, and it’s easy for teammates to follow-up on its crowd control since everyone should be nearby.
B-tier (Good)
Machine Gun Sentry (1,500 cost) – Level 2
- Call-in Time: 3 sec
- Uses: Unlimited
- Cooldown Time: 180 sec
- Input: ⇩⇧⇨⇨⇧ = (Down, Up, Right, Right, Up)
Besides being the starter sentry you can unlock first, there aren’t too many reasons to take the Machine Gun Sentry beyond the early-mid game border when you haven’t unlocked everything.
It fulfills virtually all the same things that the Gatling Sentry does but worse, and there’s only a three level gap between unlocking the two.
A cool buff we’d like to see would be being able to place it sideways or upside down on any surface to give it additional placement flexibility.
General Helldivers 2 Sentry Tips
#1 Pay attention to the mission type and its objectives
Due to their stationary nature, the effectiveness and upside of sentry stratagems can really depend on a mission’s outlook.
If you’re playing a stationary mission on a small map, sentries become more appealing and impactful.
However, for a blitz where you want to stay on the move, you might want to consider other options instead.
#2 Place sentries on high ground when possible
With many maps having hills, buildings, and other vertical locations, get used to placing your sentries as high as possible.
This will not only give them a vantage point to hit more enemies but will also protect them from getting overwhelmed.
#3 Don’t skip out on ship modules
This one might be obvious to many players reading this, but upgrading your ship modules makes a big difference.
If you aren’t keen on taking sentries often, it might be better to prioritize other options, but if you do like taking sentries for many mission types, they’re worth the investment.
The particularly good ones are Synthetic Supplementation (reduces cooldown) and Shock Absorption (increases ammo).
#4 Communicate with your allies
Similar to the previous tip, this is another one that you should be doing anyway.
However, it’s particularly necessary when using the Mortars. For the Mortar Sentry, tell your allies when you’re placing it and to keep their distance as best they can.
For the EMS Mortar Sentry, tell them to be ready to follow up with airstrikes and other stratagems to make the most impact while enemies are CC’d.
#5 Synergize your sentries
Many sentry combinations have synergies with each other that you can try to maximize.
For example, the two Mortars can allow the EMS to stun a wave that can then be decimated by the Mortar Sentry.
Another example is putting an AoE sentry alongside a sentry with a strong single target sentry so the strong single target sentry can focus down the juicy one faster.
There will be times when you’ll want to stagger the placements, so be sure to keep that in mind as well.