 League of Legends
 Teamfight Tactics
 Valorant
 Lost Ark
 Destiny 2
 Diablo 4
 Download APP
 Collapse
Everything New in TFT Set 9: Runeterra Reforged
Keep in mind that the information for new champions are constantly being updated on the PBE. Our website will continually be updated, so make sure to check out the Champions Page to stay updated on any changes.
To see ALL the new changes, head to our all-in-one TFT page for Set 9.
When Does Set 9: Runeterra Reforged go live?
Looking at TFT’s patch schedule, we can see that Set 9 will be set to release on June 14th with Patch 13.12.
With this, we can see that Set 9 PBE will be available around May 31st.
TFT Set 9 Mechanics Update
TFT Set 9 will be shaking up the game with a few new mechanics. But before we get into the new mechanics, let’s talk a bit about a returning mechanic, Augments.
TFT Set 9 Augments
The Augment system will be returning to TFT, but with some spice. We’ve been playing with similar Augments like Knife’s Edge or Celestial Blessing for 3 sets now. With Set 9, TFT will be introducing almost entirely new Augments. Some old favorites will be returning, such as Golden Egg or Built Different, but overall, the Augment system will be very fresh.
New Augment Refresh System
Furthermore, Set 9 will be changing how the Augment refresh system works. Previously, you were given one reroll to refresh your entire selection of Augments. In Set 9, you will now be able to refresh Augments individually, once, for every Augment. This means you can have a lot more freedom with how you choose Augments.
Let’s say you get a selection of Augments. You like Augment A, but B and C are bad for your comp. You can now reroll only Augments B and C, and see if they reroll into something better than Augment A. With this new system, it should be less likely that you feel “augment diff.”
TFT Set 9 New Mechanic: Region Portals
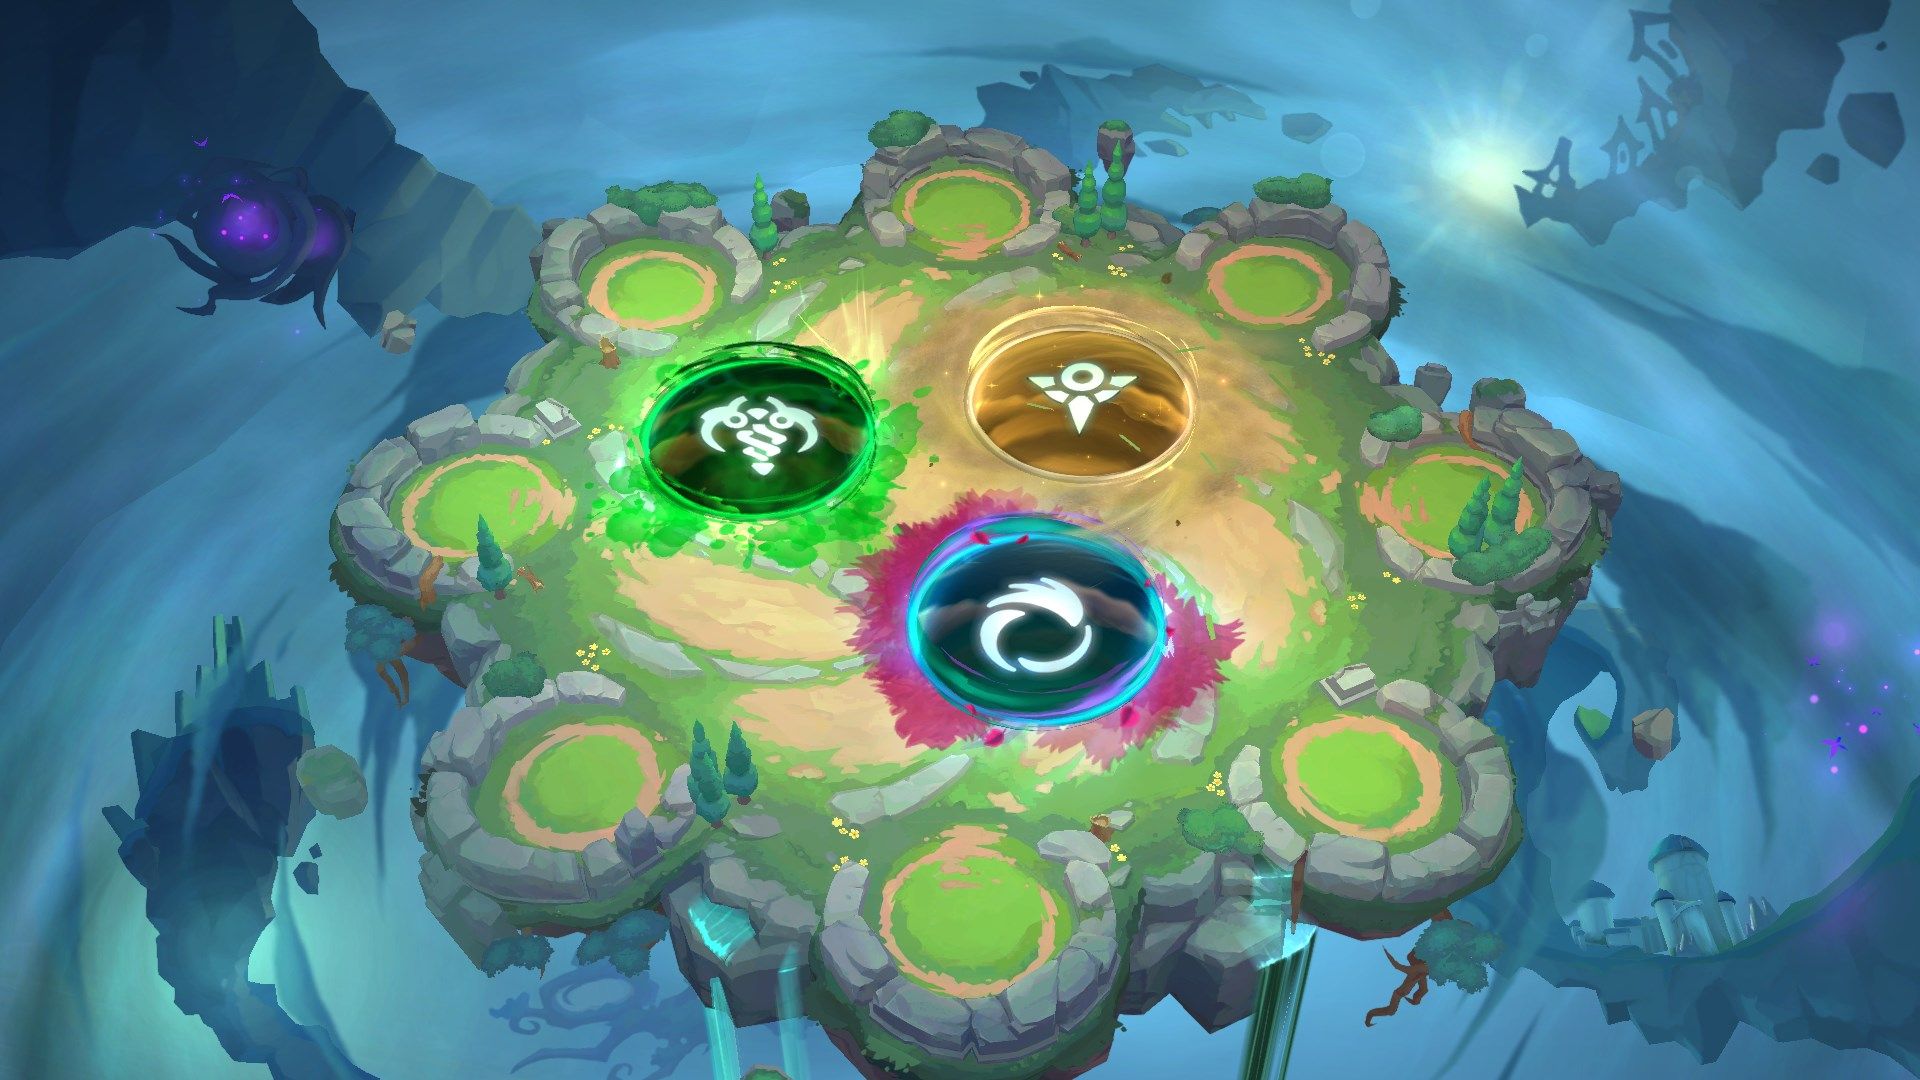
TFT Set 9: Runeterra Reforged is all about exploring the lore of the game through the different regions such as Demacia, Noxus, Ionia, and more. Region Portals are a new mechanic that adds a new rule to the game, similar to how Set 3 Galaxies did.
At the start of the game, there will no longer be an opening item carousel. (Finally, we don’t have to all compete for one item)
Instead, three Region Portals will be present on the floor. Everyone will move their Little Legend to a portal in order to “vote” for which Region they want to play in. The game will then randomly pick one Little Legend, and the game will add the new Region Portal “rule” to the game. Here are a few examples of some of the new Region Portals.
- Noxus – Noxkraya: Each time you take an augment, a random arena hex appears. Units on an arena hex gain an item that they can use.
- Void – The Lavender Sea: Starting on 2-1, after every carousel and PvE round, a void symbiote infects a new board hex. The hex grants 20% damage reduction if it’s in the first two rows or 20% increased damage if it’s in the back two rows.
- Demacia – House Lightshield: Gain a powerful Crown of Demacia on 2-1. If the wearer dies, you instantly lose the fight.
Each Region has a multitude of different Portals, and these effects can drastically change your gameplan. For a deeper look on this mechanic, you can check out the full list of them in our Region Portal Guide.
TFT Set 9 New Mechanic: Legends
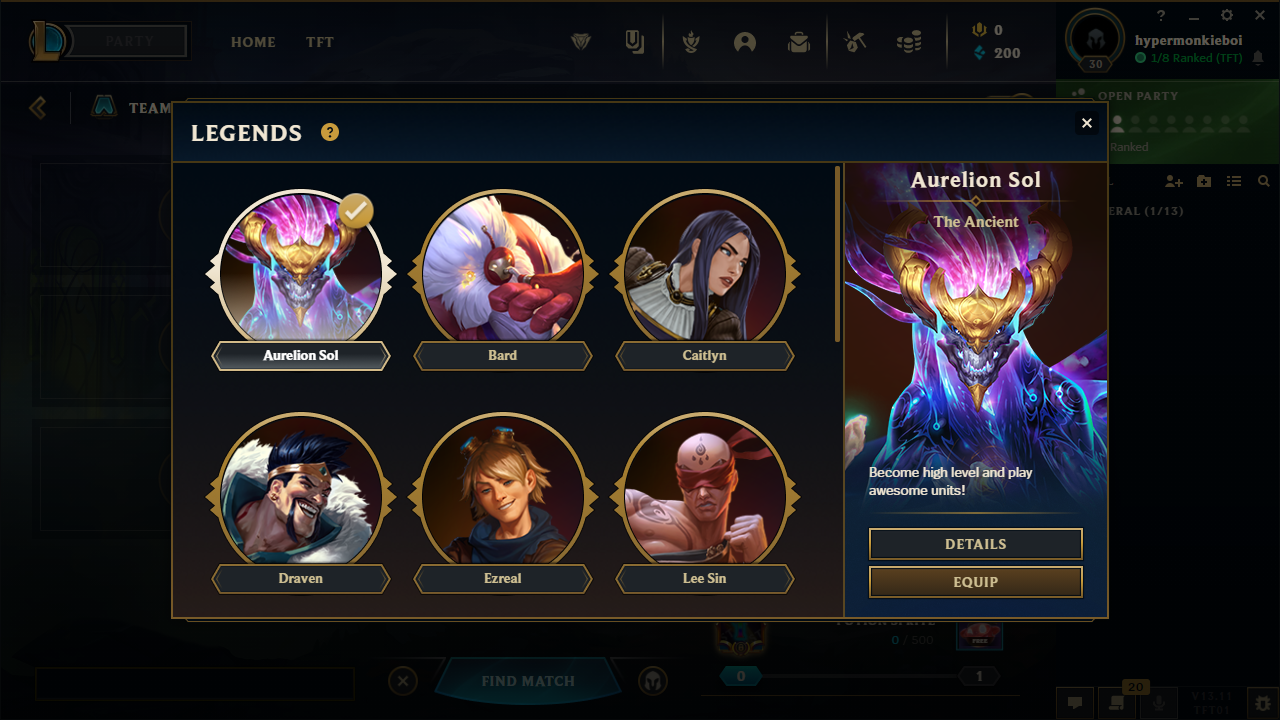
Have you ever been tilted because all of your Augment choices were garbage? Not only do you get to reroll Augments individually, but TFT is introducing a new Legends system. The new Legend mechanic will be a way to ensure you always get one Augment of your choosing every game.
Before every game, you will be able to select or equip 1 out of 15 Legends. These Legends, will guarantee that one of your Augments on 2-1 will be predetermined. For example, let’s take a look at Aurelion Sol’s Legend Augments.
Legend: Aurelion Sol
2-1
- Silver – Cutting Corners: Leveling up costs 2 XP less
- Gold – Patient Study II: After player combat, gain 2 XP if you won or 4 XP if you lost. You can now reach Level 10.
- Prismatic – Level Up!: When you buy experience points, gain an additional 11. You can reach level 10.
When you play a game of TFT with ASol selected as your Legend, one of your Augments in the game will be guaranteed to be from this list. There may be Legends that affect different augment selections like the one at 3-2 or 4-2, but this is the simple rundown of how they work.
With the new Legends system, TFT is giving you more control and freedom to select what Augment you want to see, and what playstyle you want to play.
Once again, if you want to see more details about this mechanic, check out our full Legends Guide.
TFT Set 9 New Traits
All of the new Origins in Set 9 correspond to a region in the world of Runeterra. Here’s a rundown of the new Origins.
Darkin
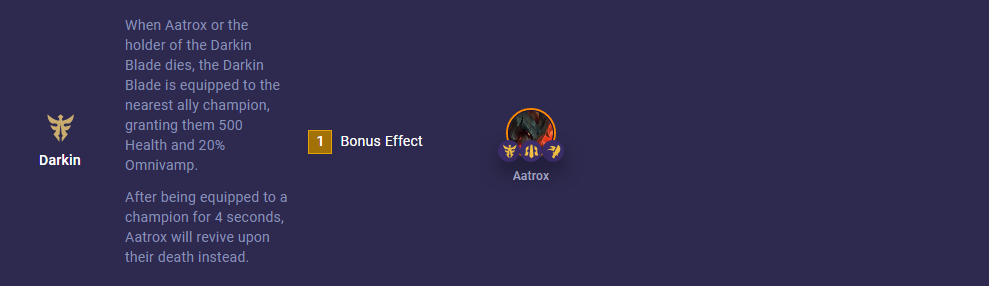
Bonus: When Aatrox or the holder of the Darkin Blade dies, the Darkin Blade is equipped to the nearest ally champion, granting them 500 Health and 20% Omnivamp. After being equipped to a champion for 4 seconds, Aatrox will revive upon their death instead.
Champions: Aatrox (5)
Demacia
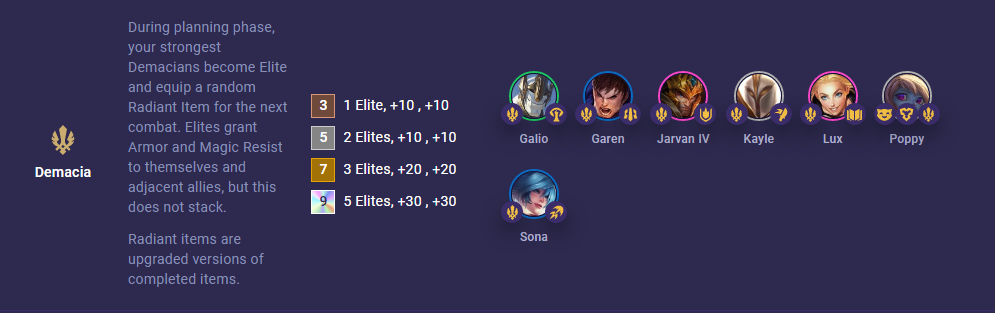
Bonus: During planning phase, your strongest Demacian(s) become Elite and equip a random Radiant Item for the next combat. Elites grant Armor and Magic Resist to themselves and adjacent allies, but this does not stack. Radiant items are upgraded versions of completed items.
- (3) 1 Elite, +10 , +10
- (5) 2 Elites, +10 , +10
- (7) 3 Elites, +20 , +20
- (9) 5 Elites, +30 , +30
Champions: Kayle (1), Lux (4), Poppy (1), Galio (2), Garen (3), Sona (3), Jarvan IV (4)
Freljord
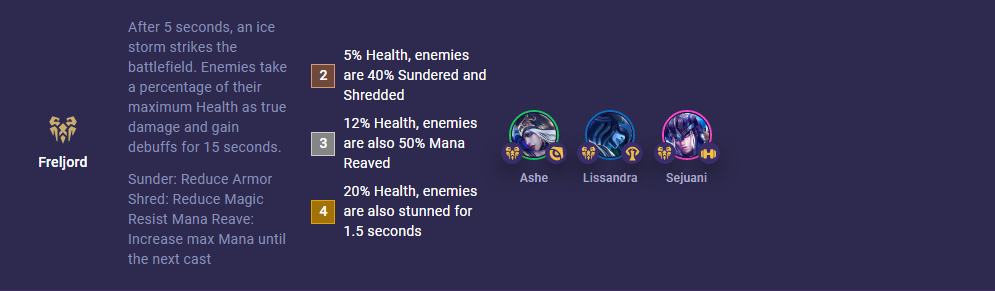
Bonus: After 5 seconds, an ice storm strikes the battlefield. Enemies take a percentage of their maximum Health as true damage and gain debuffs for 15 seconds.
- (2) 5% Health, enemies are 40% Sundered and Shredded
- (3) 12% Health, enemies are also 50% Mana Reaved
- (4) 20% Health, enemies are also stunned for 1.5 seconds
Sunder: Reduce Armor
Shred: Reduce Magic Resist
Mana Reave: Increase max Mana until the next cast
Champions: Ashe (2), Lissandra (3), Sejuani (4)
Ionia
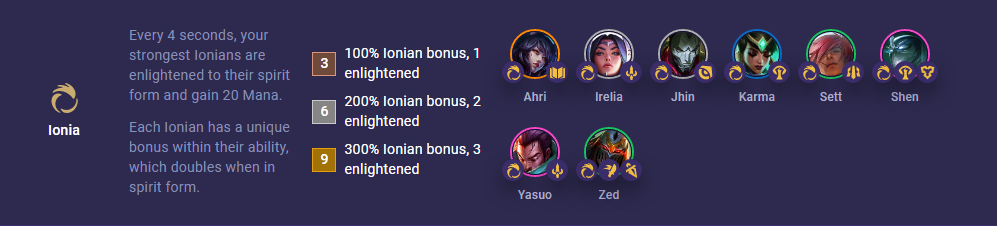
Bonus: Every 4 seconds, your strongest Ionians are enlightened to their spirit form and gain 20 Mana. Each Ionian has a unique bonus within their ability, which doubles when in spirit form.
- (3) 100% Ionian bonus, 1 enlightened
- (6) 200% Ionian bonus, 2 enlightened
- (9) 300% Ionian bonus, 3 enlightened
Champions: Irelia (1), Jhin (1), Sett (2), Zed (2), Karma (3), Shen (4), Yasuo (4)
Noxus
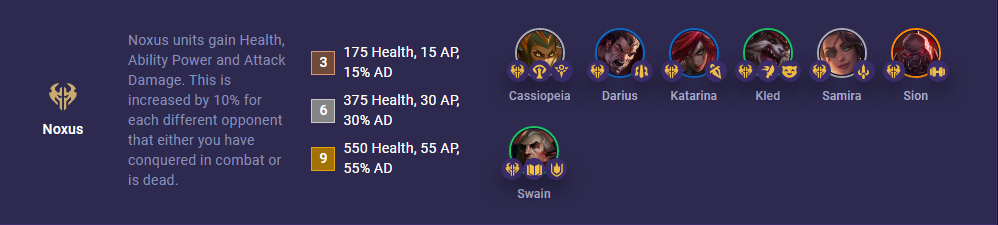
Bonus: Noxus units gain Health, Ability Power and Attack Damage. This is increased by 10% for each different opponent that either you have conquered in combat or is dead.
- (3) 175 , 15 , 15%
- (6) 375 , 30 , 30%
- (9) 550 , 55 , 55%
Champions: Cassiopeia (1), Samira (1), Kled (2), Swain (2), Darius (3), Katarina (3), Sion (5)
Piltover
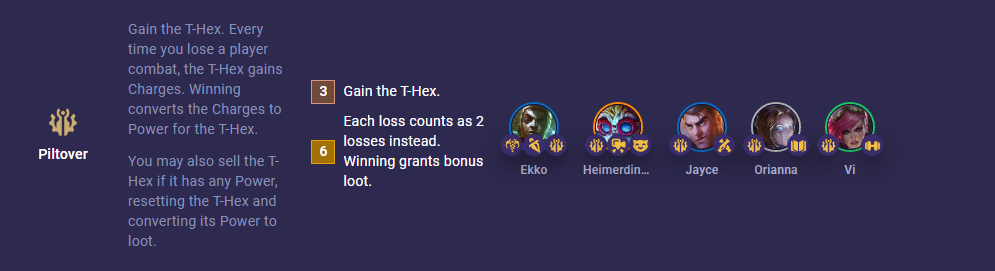
Bonus: Gain the T-Hex. Every time you lose a player combat, the T-Hex gains Charges. Winning converts the Charges to Power for the T-Hex. You may also sell the T-Hex if it has any Power, resetting the T-Hex and converting its Power to loot.
- (3) Gain the T-Hex.
- (6) Each loss counts as 2 losses instead. Winning grants bonus loot.
Champions: Orianna (1), Piltover (2), Ekko (3), Jayce (3), Heimerdinger (5)
Shadow Isles

Bonus: After dealing or receiving damage 8 times, Shadow Isles units gain a Shield for 8 seconds and become Spectral for the rest of combat. Spectral units gain Mana every second.
- (2) 40% Shield, 10 Mana
- (4) 70% Shield, 15 Mana
- (6) 100% Shield, 20 Mana
Champions: Maokai (1), Viego (1), Kalista (3), Gwen (4), Senna (5)
Shurima
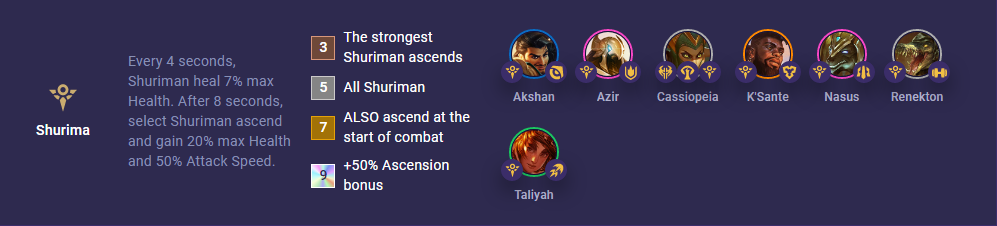
Bonus: Every 4 seconds, Shuriman heal 7% max Health. After 8 seconds, select Shuriman ascend and gain 20% max Health and 50% Attack Speed.
- (3) The strongest Shuriman ascends
- (5) All Shuriman
- (7) ALSO ascend at the start of combat
- (9) +50% Ascension bonus
Champions: Cassiopeia (1), Renekton (1), Taliyah (2), Akshan (3), Azir (4), Nasus (4), K’Santa (5)
Targon

Bonus: Your healing and shielding is increased.
- (2) 18% increased healing and shielding
- (3) 25% increased healing and shielding
- (4) 34% increased healing and shielding
Champions: Soraka (2), Taric (3), Aphelios (4)
Void
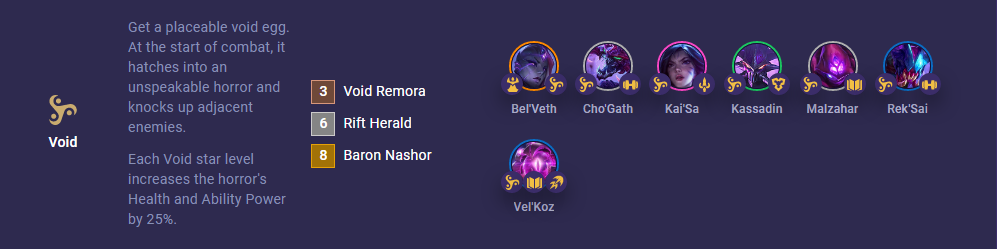
Bonus: Get a placeable void egg. At the start of combat, it hatches into an unspeakable horror and knocks up adjacent enemies. Each Void star level increases the horror’s Health and Ability Power by 25%.
- (3) Void Remora
- (6) Rift Herald
- (8) Baron Nashor
Champions: Cho’Gath (1), Malzahar (1), Kassadin (2), Rek’Sai (3), Vel’Koz (3), Kai’Sa (4), Bel’Veth (5)
Yordle

Bonus: Allies gain 10% Attack Speed per star level. Yordles can become 4 star, gaining a wacky spell upgrade! Ties in items are broken by the Yordle fielded most recently.
- (3) If you have three 3-star champions, your strongest 3-star Yordle champion becomes 4-star
- (5) Two 3-star Yordle champions can now become 4-star
Champions: Poppy (1), Tristana (1), Kled (2), Teemo (2), Heimerdinger (5)
Zaun

Bonus: Zaun champions create random chem-mods that only they can use. Champions can be modded once, and mods can only be removed by selling the champion.
- (2) Gain 1 chem-mod
- (4) Gain 2 chem-mods
- (6) Gain 3 chem-mods and Overcharge mods
Champions: Jinx (2), Warwick (2), Ekko (3), Urgot (4), Zeri (4)
Wanderer
Bonus: Wanderers’ spells change depending on the Region Portal players voted for at the start of the game.
Champions: Ryze (5)
TFT Set 9 New Classes
Let’s quickly cover the new Classes as well. Some of these are returning classes, while others are “new.” Overall, though, classes do tend to be slight reskins of things we’ve seen already.
Bastion

Bonus: Bastion champions gain Armor and Magic Resist. This is increased by 100% for the first 10 seconds of combat.
- (2) +20 Defenses
- (4) +45 Defenses
- (6) +90 Defenses
- (8) +180 Defenses
Champions: Maokai (1), Poppy (1), Kassadin (2), Taric (3), Shen (4), K’Sante (5)
Bruiser

Bonus: Your units gain 100 Health. Bruisers get even more.
(2) +15%
(4) +40%
(6) +85%
Champions: Cho’Gath (1), Renekton (1), Vi (2), Rek’Sai (3), Sejuani (4), Sion (5)
Challenger

Bonus: Challengers gain bonus Attack Speed. When their target dies, Challengers dash to a new target and increase their Attack Speed bonus by 50% for 2.5 seconds.
(2) 30%
(4) 55%
(6) 80%
(8) 110%
Champions: Irelia (1), Samira (1), Warwick (2), Kalista (3), Kai’Sa (4), Yasuo (4)
Deadeye

Bonus: Innate: +Range. Every 3 seconds, Deadeyes attack the enemy with the highest percent Health and deal bonus damage.
(2) +20% damage
(4) +44% damage
(6) +100% damage
Champions: Jhin (1), Ashe (2), Akshan (3), Aphelios (4), Urgot (4)
Empress

Bonus: When Bel’Veth kills an enemy, they leave behind Void Coral that she will consume. The first Coral increases her max Health by 50%, while further Coral heals her 20% max Health. When a Void Coral is consumed, she deals 10% max Health as magic damage to enemies within 2 hexes.
Champions: Bel’Veth (5)
Gunner

Bonus: When Gunner champions attack, they gain bonus Attack Damage, up to 8 stacks.
(2) 5% Attack Damage per stack
(4) 10% Attack Damage per stack
(6) 16% Attack Damage per stack
Champions: Tristana (1), Jinx (2), Jayce (3), Zeri (4), Senna (5)
Invoker
Bonus: Allies restore Mana every 3 seconds.
(2) 5 Mana for all allies
(4) And 10 additional Mana for Invokers
(6) 10 Mana for all allies and 15 additional Mana for Invokers
Champions: Cassiopeia (1), Galio (2), Soraka (2), Karma (3), Lissandra (3), Shen (4)
Juggernaut

Bonus: Juggernaut champions take less damage as their Health decreases.
(2) 10% to 20% damage reduction
(4) 20% to 34% damage reduction
(6) 30% to 50% damage reduction
Champions: Sett (2), Warwick (2), Darius (3), Garen (3), Nasus (4), Aatrox (5)
Multicaster

Bonus: Multicasters cast their Ability multiple times. Bonus casts have 50% reduced effectiveness.
(2) 1 extra cast
(4) 2 extra casts
Champions:
Redeemer

Bonus: Whenever an ally gains a Shield, grant them 7% stacking Attack Speed for the rest of combat.
Champions: Taliyah (2), Teemo (2), Sona (3), Vel’Koz (3)
Rogue
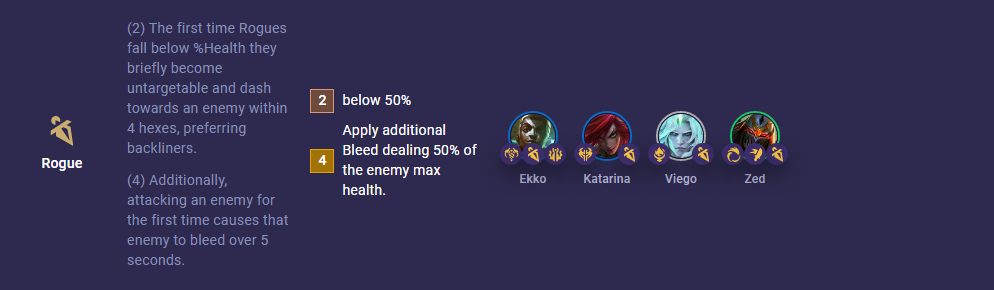
Bonus:
(2) The first time Rogues fall below 50% Health they briefly become untargetable and dash towards an enemy within 4 hexes, preferring backliners.
(4) Additionally, attacking an enemy for the first time causes that enemy to bleed, dealing 50% of their max Health as magic damage over 5 seconds.
Champions: Viego (1), Zed (2), Ekko (3), Katarina (3)
Slayer

Bonus: Slayers gain 15% omnivamp. Additionally, Slayers deal bonus damage, doubled against units below 60% health.
(2) +5% bonus damage
(3) +10% bonus damage
(4) +25% bonus damage
(5) +35% bonus damage
(6) +50% bonus damage
Champions: Kayle (1), Kled (2), Zed (2), Gwen (4), Aatrox (5)
Sorcerer
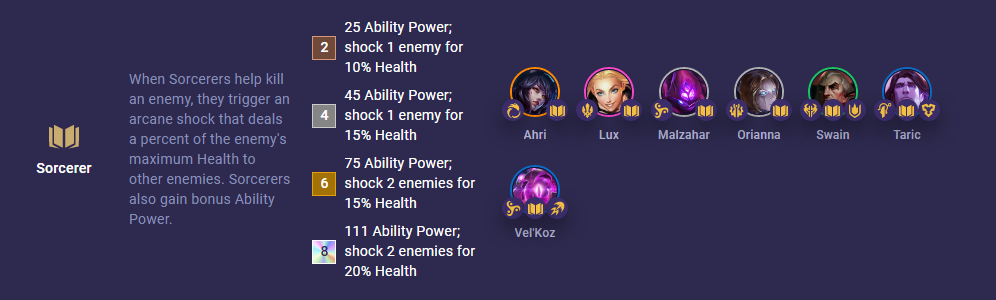
Bonus: When Sorcerers help kill an enemy, they trigger an arcane shock that deals a percent of the enemy’s maximum Health to other enemies. Sorcerers also gain bonus Ability Power.
(2) 25 Ability Power; shock 1 enemy for 10% Health
(4) 45 Ability Power; shock 1 enemy for 15% Health
(6) 75 Ability Power; shock 2 enemies for 15% Health
(8) 111 Ability Power; shock 2 enemies for 20% Health
Champions: Malzahar (1), Orianna (1), Swain (2), Taric (3), Vel’Koz (3), Lux (4), Ahri (5)
Strategist
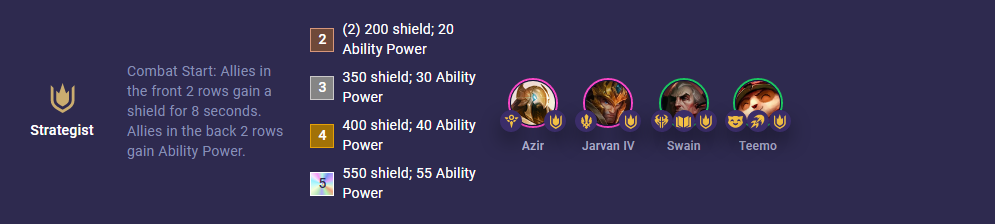
Bonus: Combat Start: Allies in the front 2 rows gain a shield for 8 seconds. Allies in the back 2 rows gain Ability Power.
(2) 200 shield; 20 Ability Power
(3) 350 shield; 30 Ability Power
(4) 400 shield; 40 Ability Power
(5) 550 shield; 55 Ability Power
Champions: Swain (2), Teemo (2), Azir (4), Jarvan IV (4)
Technogenius

Bonus: Gain a placeable Apex Turret with 3 upgrade slots. Upgrades to the Apex Turret will show up in your shop for 6 gold. You may only have 1 Apex Turret.
Champions: Heimerdinger (5)
First Impressions:
Set 9 New Champions: Tips, First Impressions, and Positioning
Positioning Key
We’ll be giving basic positioning suggestions for every champion to get the ball rolling for you, but remember that positioning is incredibly contextual in TFT and to always adapt to the situation at hand.
The terminology we’ll be using in this article will be frontline, midline, and backline.
1-Cost Champions
Cassiopeia – Noxus, Shurima, Invoker
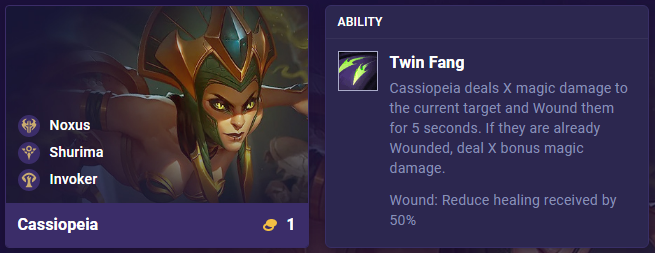
Ability: Twin Fang
Deal magic damage to the current target and Wound them for 5 seconds. If they are already Wounded, deal bonus magic damage. Wound: Reduce healing received by 50%.
First Impressions:
Cassiopeia looks to be a simple magic damage backline unit to carry items. It’s difficult to assess what 1-cost units are viable as slow roll carries, but having 3 traits makes her a very flexible early game pickup. There aren’t really any 3 or 4-cost Noxus AP carry units, but Shurima and Invoker both have AP based units to transition to later in the game.
Positioning: Backline
Cho’Gath – Void, Bruiser
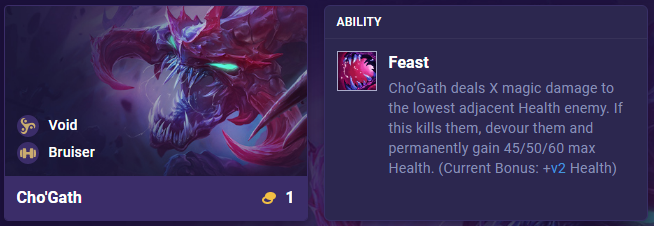
Ability: Feast Deal
Magic damage to the lowest adjacent Health enemy. If this kills them, devour them and permanently gain 45/50/60 max Health.
First Impressions:
Void and Bruiser go hand in hand and they’re back once again. Cho’Gath’s ability also makes him scale throughout the game, which is quite helpful for a 1-cost unit. While Cho’Gath might not always kill with his ability, having that is still a nice bonus.
Positioning: Frontline
Irelia – Ionia, Challenger
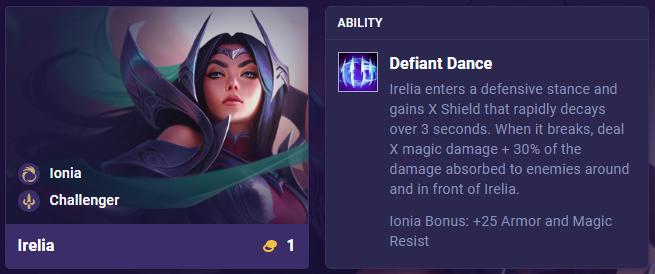
Ability: Defiant Dance
Enter a defensive stance and gain a Shield that rapidly decays over 3 seconds. When it breaks, deal magic damage +30% of the damage absorbed to enemies around and in front of Irelia. Ionia Bonus: +25 Armor and Magic Resist.
First Impressions:
The Challenger trait is basically Duelist, meaning the trait consists of mostly melee units that aren’t necessarily tanks. Irelia’s ability helps her be more tanky, making her an important frontline early and mid game for Challenger teams or even transitioning into Ionia teams.
Positioning: Frontline
Jhin – Ionia, Deadeye
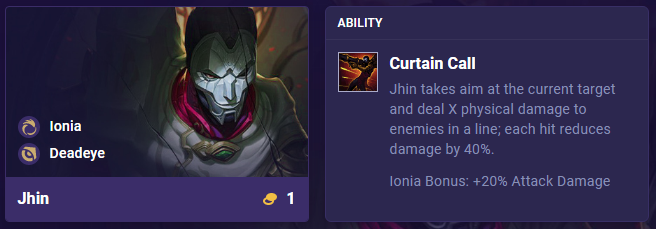
Ability: Curtain Call
Take aim at the current target and deal physical damage to enemies in a line; each hit reduces damage by 40%. Ionia Bonus: +20% Attack Damage.
First Impressions:
Jhin is a simple AD backline DPS, with an ability that pierces through enemies. This means that you want to ideally place him in the opposite corner of enemy backlines.
Positioning: Backline
Kayle – Demacia, Slayer
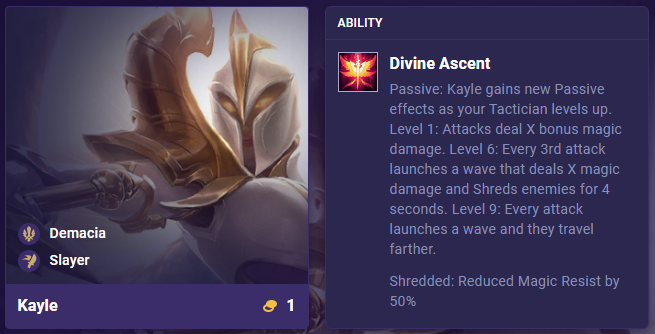
Ability: Divine Ascent
Passive: Kayle gains new Passive effects as your Tactician levels up.
Level 1: Attacks deal bonus magic damage.
Level 6: Every 3rd attack launches a wave that deals magic damage and Shreds enemies for 4 seconds.
Level 9: Every attack launches a wave and they travel farther.
First Impressions:
Kayle is another backline DPS, but her ability makes her scale better with Ability Power and Attack Speed rather than Attack Damage. Her kit also makes her a target to slow roll carry as she scales with tactician level. However, reaching level 9 while also slow rolling is quite difficult, so it’ll be interesting to see if Kayle is strong enough to get there.
Positioning: Backline
Malzahar – Void, Sorcerer
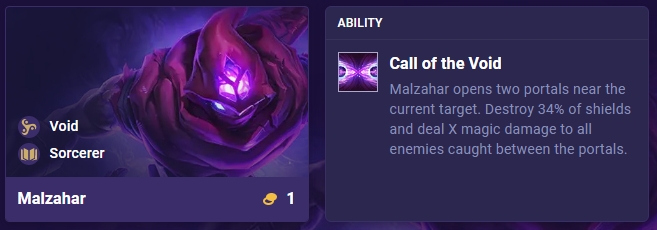
Ability: Call of the Void
Open two portals near the current target. Destroy 34% of shields and deal magic damage to all enemies caught between the portals.
First Impressions:
Malzahar is a backline AP DPS that also has the added benefit of being a good shield breaker. While this may not be a defining reason to play him, it’s still something to keep in mind. Void is also a powerful trait to assemble early as it gets you another unit on the board when you reach Void 3. Malzahar, Cho’Gath, and Kassadin will likely be a strong early game board as it’s easy to assemble and provides a Voidling for the board.
Positioning: Backline
Maokai – Shadow Isles, Bastion
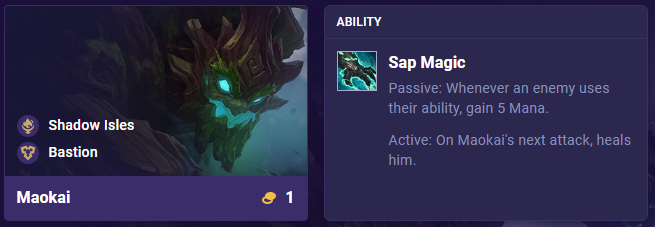
Ability: Sap Magic
Passive: Whenever an enemy uses their ability, gain 5 Mana. Active: On Maoki’s next attack, heal.
First Impressions:
Maokai is a tank that is better against enemies with low mana pools that cast frequently. This means he will be able to heal more, and both of his traits help him be a more effective tank. Maokai can definitely help you win some early game rounds against the right board, but he will likely fall off in the late game.
Positioning: Frontline
Orianna – Piltover, Sorcerer
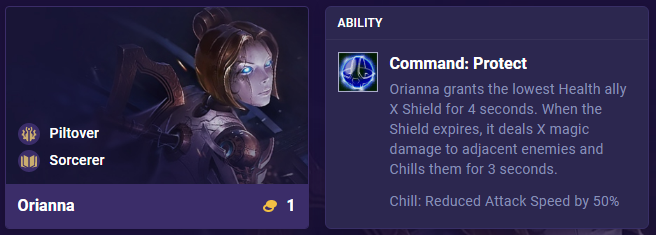
Ability: Command: Protect
Grant the lowest Health ally a Shield for 4 seconds. When the Shield expires, it deals magic damage to adjacent enemies and Chills them for 3 seconds. Chill: Reduced Attack Speed by 50%
First Impressions:
Orianna’s ability will likely target one of your frontline units as they will likely have lower Health when she casts. Chilling enemy frontline units is mainly important when fighting against melee heavy teams like Challenger or Juggernaut, and less important against teams with backline DPS units.
Positioning: Backline
Poppy – Yordle, Demacia, Bastion
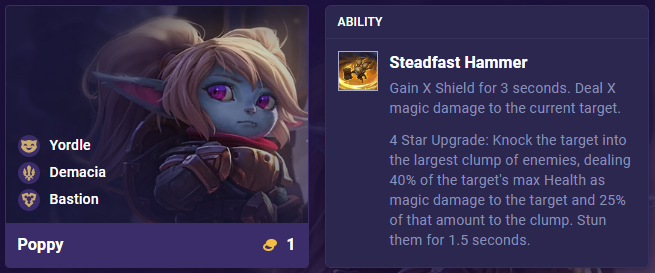
Ability: Steadfast Hammer
Gain a Shield for 3 seconds. Deal magic damage to the current target. 4 Star Upgrade: Knock the target into the largest clump of enemies, dealing 40% of the target’s max Health as magic damage to the target and 25% of that amount to the clump. Stun them for 1.5 seconds.
First Impressions:
Poppy is back with another simple ability. She deals some damage and gains a shield. Having 3 traits definitely makes her a solid early pick up. Yordles can be a slow roll comp, Demacia is another team you can build into, and Bastion is a flexible frontline you can use on any board in the early game.
Positioning: Frontline
Renekton – Shurima, Bruiser
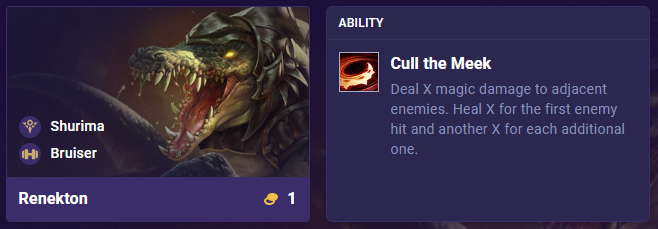
Ability: Cull the Meek
Deal magic damage to adjacent enemies. Heal for the first enemy hit and more for each additional one.
First Impressions:
Renekton will likely be a great early game unit as the Bruiser trait is a very effective frontline early on. Being able to heal is very effective when most early game boards can’t simply burst him down. Shurima is also a nice trait to build into, but that won’t be noticeable until the mid game when you can pick up Taliyah (2) and Akshan (3).
Positioning: Frontline
Samira – Noxus, Challenger
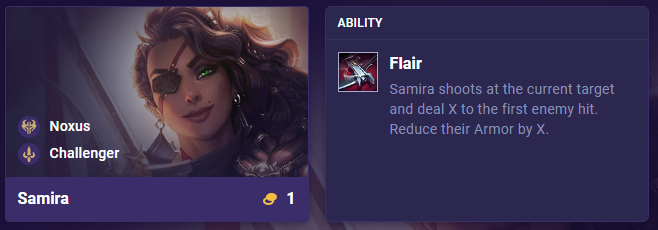
Ability: Flair
Shoot at the current target and deal damage to the first enemy hit. Reduces their Armor.
First Impressions:
Samira is a backline Challenger, which is important for the early game when you don’t have upgraded Challenger units to build a semi frontline. Having Armor reduction on her ability also makes her valuable for scaling the teams damage, giving her utility past the early game.
Positioning: Backline
Tristana – Yordle, Gunner

Ability: Rapid Fire
Gain Attack Speed for 4 seconds. For the duration, attacks explode on impact and deal physical damage to enemies within 1 hex. 4 Star Upgrade: Every 8th attack deals bonus physical damage and ricochets to the largest clump of enemies, dealing physical damage to enemies within 1 hex.
First Impressions:
Tristana is another backline AD DPS, but while Jhin transitions to the Deadeye trait, Tristana has the Gunner trait. Tristana is also a slow roll carry target due to her Yordle trait allowing her to reach 4 stars. Her ability naturally splashes damage, so she can focus on building purely damage items.
Positioning: Backline
Viego – Shadow Isles, Rogue
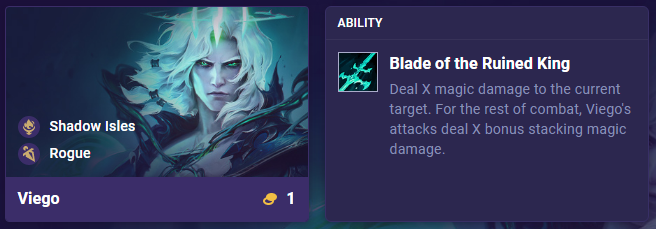
Ability: Blade of the Ruined King
Deal magic damage to the current target. For the rest of combat, Viego’s attacks deal bonus stacking magic damage.
First Impressions:
Viego is the first Rogue unit you’ll encounter, and Rogue is basically this set’s version of Assassin or Hacker. His viability will largely depend on his base stats, but he’ll be an important pick up for any Rogue comp.
Positioning: Midline
2-Cost Champions
Ashe – Freljord, Deadeye
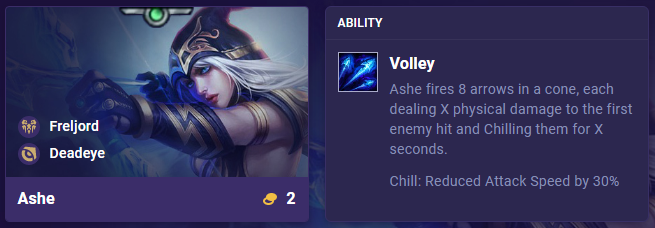
Ability: Volley
Fire 8 arrows in a cone, each dealing physical damage to the first enemy hit and Chilling them. Chill: Reduced Attack Speed by 30%.
First Impressions:
Ashe is the first Freljord unit, and Freljord is an amazing trait to splash in if your comp can fit it. The flexibility isn’t amazing, since there’s only 3 Freljord units to choose from, but being able to Shred and Sunder the entire enemy board is amazing. Her ability is something we’ve seen before, and will be nice to counter melee carry units with her Chill.
Positioning: Backline
Galio – Demacia, Invoker
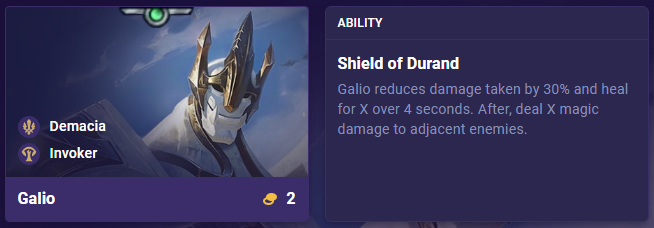
Ability: Shield of Durand
Reduce damage taken by 30% and heal over 4 seconds. After, deal magic damage to adjacent enemies.
First Impressions:
Galio is another simple tank, but he notably has the Invoker trait. This makes him nice to utilize as a tank in AP comps that use carries like Lux, another Demacia unit.
Positioning: Frontline
Jinx – Zaun, Gunner
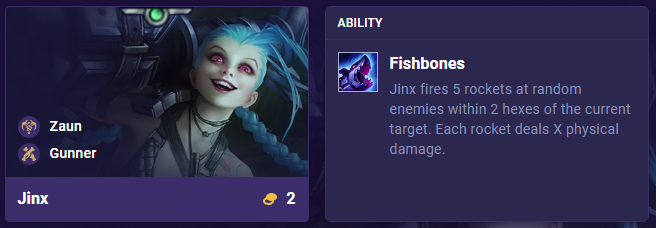
Ability: Fishbones!
Fire 5 rockets at random enemies within 2 hexes of the current target. Each rocket deals physical damage.
First Impressions:
Jinx is the next Gunner unit we see, and her ability fires 5 rockets very quickly. Her Zaun ability also pairs very well with Zeri, another unit that is both Zaun and Gunner. This makes them a natural pair of backline DPS units.
Positioning: Backline
Kassadin – Void, Bastion
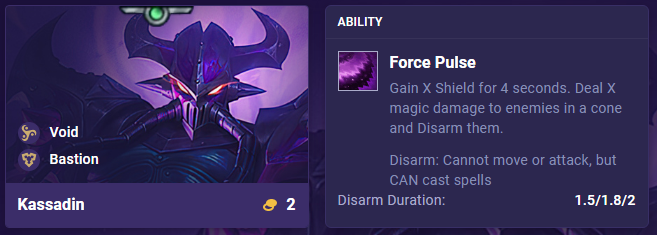
Ability: Force Pulse
Gain a Shield for 4 seconds. Deal magic damage to enemies in a cone and Disarm them for 1.5/1.8/2 seconds. Disarm: Cannot move or attack, but CAN cast spells.
First Impressions:
Disarm is an underrated mechanic, and if Challenger comps ever get out of hand, Kassadin can definitely win fights with his ability. However, in most other comps, Disarm is less impactful. Kassadin pairs nicely with the other Void units, but Bastion isn’t easy to fit into Void comps that like want to build into Brawler.
Kassadin will still likely be a solid early pick up for a simple frontline, and you can transition into other units as the game goes on.
Positioning: Frontline
Kled – Noxus, Yordle, Slayer
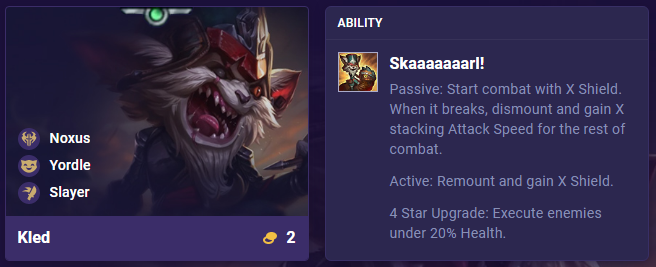
Ability: Skaaaaaaarl!
Passive: Start combat with a Shield. When it breaks, dismount and gain stacking Attack Speed for the rest of combat. Active: Remount and gain a Shield. 4 Star Upgrade: Execute enemies under 20% Health.
First Impressions:
Kled is another unit with 3 traits, making him somewhat likely to be a contested unit. However, his three traits don’t particularly have great overlap, so that is something to keep in mind.
Positioning: Frontline
Sett – Ionia, Juggernaut
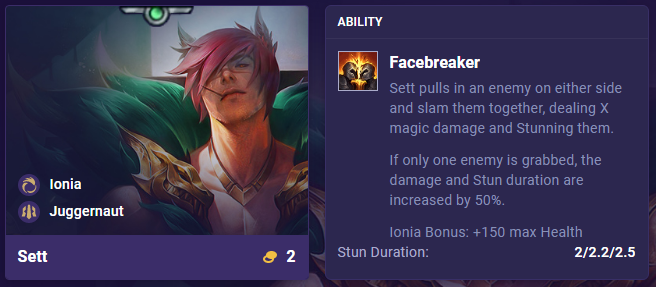
Ability: Facebreaker
Pull in an enemy on either side and slam them together, dealing magic damage and Stunning them for 2/2.2/2.5 seconds. If only one enemy is grabbed, the damage and Stun duration are increased by 50%. Ionia Bonus: +150 max Health.
First Impressions:
Juggernauts are another frontline trait, and are less about being full tanks, and more about being a mix of damage and tank. Sett’s stun ability can be crucial if you can land it on an enemy frontliner with a strong ability. Keep this in mind when positioning against specific opponents.
Positioning: Frontline
Soraka – Targon, Invoker
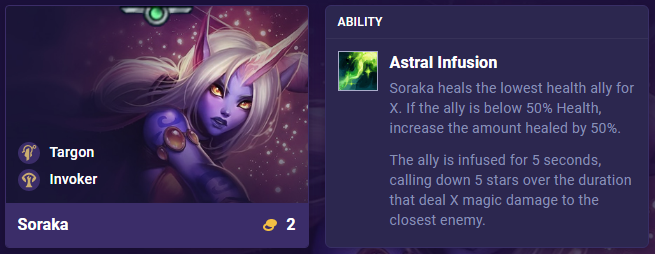
Ability: Astral Infusion
Heal the lowest health ally. If the ally is below 50% Health, increase the amount healed by 50%. The ally is infused for 5 seconds, calling down 5 stars over the duration that deal magic damage to the closest enemy.
First Impressions:
Soraka is mostly a utility unit providing healing for your team, but her ability does also deal some damage as well. She can flex AP comps with her Invoker trait, while the Targon trait provides more utility by buffing healing and shielding for your team.
Positioning: Backline
Swain – Noxus, Strategist, Sorcerer
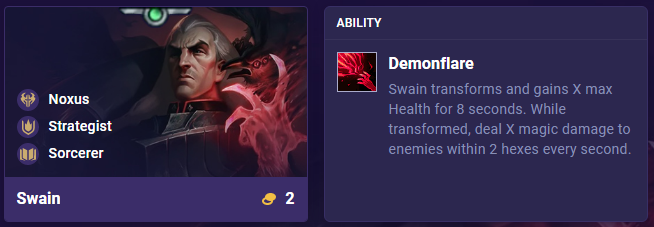
Ability: Demonflare
Transform and gain max Health for 8 seconds. While transformed, deal magic damage to enemies within 2 hexes every second.
First Impressions:
Swain is returning with a similar ability as we’ve seen before. Swain is a mix between a tank and a close range AoE damage dealer. Swain can definitely be a strong tank in the early game with some tank items as his healing can help him sustain. As the game progresses, Swain will likely fall off unless you invest into him heavily. Even so, any unit with 3 traits will be very flexible to use as more comps get discovered.
Positioning: Midline
Taliyah – Shurima, Multicaster
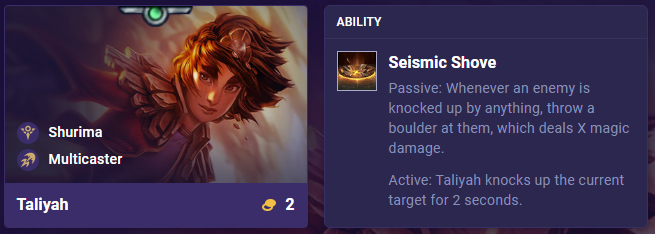
Ability: Seismic Shove
Passive: Whenever an enemy is knocked up by anything, throw a boulder at them, which deals magic damage. Active: Knock up the current target for 2 seconds.
First Impressions:
Taliyah is another AP backline DPS that synergizes with other units that knock up units. There are only a few other abilities that knock up units, including K’Sante (5), Ryze (5) with Shurima ability, and Taliyah herself. Taliyah will also see play in AP builds that focus on Multicaster instead of Sorcerer.
Positioning: Backline
Teemo – Yordle, Strategist, Multicaster
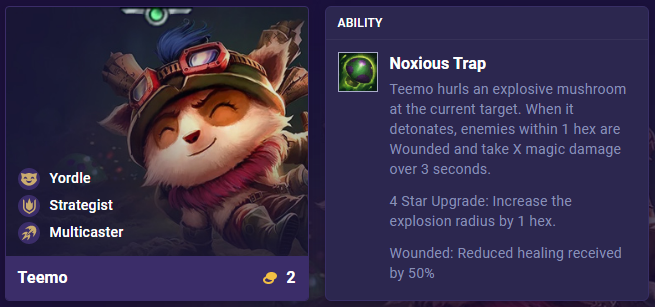
Ability: Noxious Trap
Hurl an explosive mushroom at the current target. When it detonates, enemies within 1 hex are Wounded and take magic damage over 3 seconds. 4 Star Upgrade: Increase the explosion radius by 1 hex. Wounded: Reduced healing received by 50%.
First Impressions:
Teemo is another Yordle that looks to be another slow roll carry target as his ability is largely damage based. The Wounded tag also means that you won’t need things like Sunfire Cape or Morellonomicon if you have Teemo on your team.
Positioning: Backline
Vi – Piltover, Bruiser
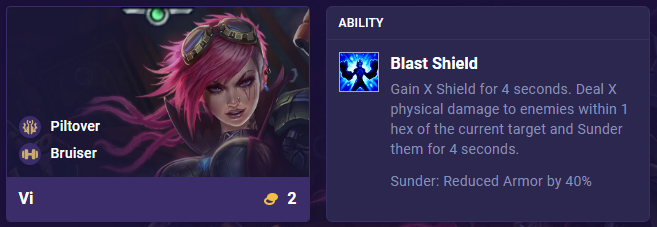
Ability: Blast Shield
Gain a Shield for 4 seconds. Deal physical damage to enemies within 1 hex of the current target and Sunder them for 4 seconds. Sunder: Reduced Armor by 40%.
First Impressions:
Vi is back with the Bruiser tag, and is also a Piltover. Getting Piltover 3 early is nice if you want to play around the T-Hex, but it will be hard to get consistently as you need to find a 1, 2, and 3 cost unit as early as possible. Keep in mind that Vi Sunders enemies with her ability, making Last Whisper less important if you have a well positioned Vi.
Positioning: Frontline
Warwick – Zaun, Juggernaut, Challenger
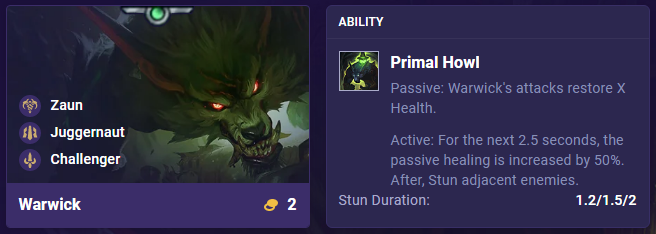
Ability: Primal Howl
Passive: Warwick’s attacks restore Health. Active: For the next 2.5 seconds, the passive healing is increased by 50%. After, Stun adjacent enemies for 1.2/1.5/2 seconds.
First Impressions:
Warwick is another 2-cost unit with 3 traits, making him a higher priority pick up for players that want to flex multiple comps. His ability also has natural sustain, giving him more space for offensive or tank items. His Zaun trait also gives the potential to give an extra “item,” making him a very potent carry.
Positioning: Frontline
Zed – Ionia, Rogue, Slayer
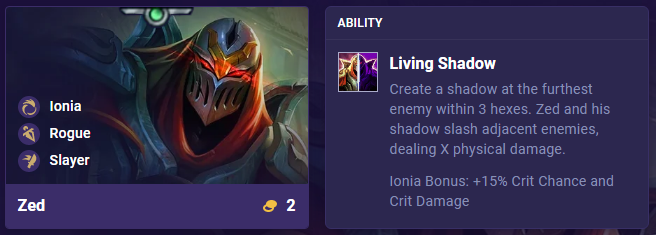
Ability: Living Shadow
Create a shadow at the furthest enemy within 3 hexes. Zed and his shadow slash adjacent enemies, dealing physical damage. Ionia Bonus: +15% Crit Chance and Crit Damage.
First Impressions:
Zed is a Rogue with 3 traits, and will likely be a strong build around carry for Rogue builds. Rogues already dash around the board naturally, but his ability allows him to target backline carries while being somewhat safe.
Positioning: Midline
3-Cost Champions
Akshan – Shurima, Deadeye
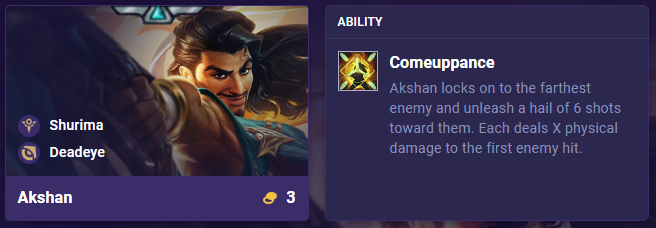
Ability: Comeuppance
Lock on to the farthest enemy and unleash a hail of 6 shots toward them. Each deals physical damage to the first enemy hit.
First Impressions:
Akshan has a non-piercing ability, meaning his positioning is very important. If the enemy board has a large frontline, it will be hard to target the enemy backline with Akshan’s ability.
Positioning: Backline
Darius – Noxus, Juggernaut
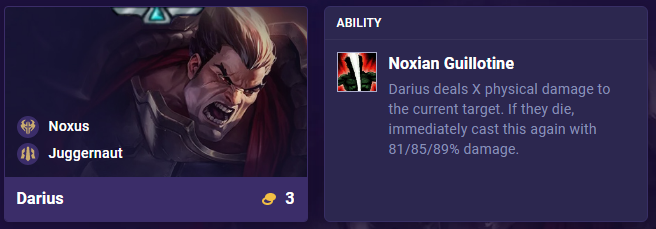
Ability: Noxian Guillotine
Deal physical damage to the current target. If they die, immediately cast this again with 81/85/89% damage.
First Impressions:
Darius is back in the game with his signature dunk ability. Any ability that resets has potential to carry as against squishy targets, Darius can basically 1v9. If the enemy does not invest enough into their frontline, Darius will breeze through and dunk on everyone.
Positioning: Frontline
Ekko – Zaun, Piltover, Rogue
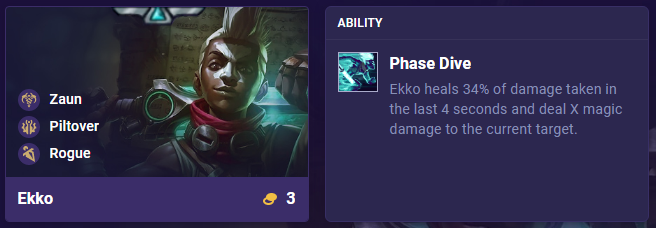
Ability: Phase Dive
Heal 34% of damage taken in the last 4 seconds and deal magic damage to the current target.
First Impressions:
Ekko, like Zed, is another Rogue with 3 traits. Ekko is also the 3rd Piltover you’re likely to find to hopefully get the T-Hex early. The healing on his ability makes him a potential frontline for Rogue teams as he can heal back up.
Positioning: Frontline / Midline
Garen – Demacia, Juggernaut
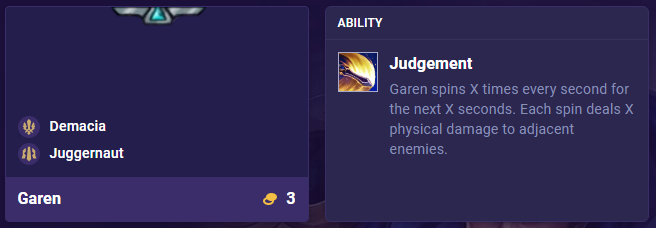
Ability: Judgement
Spin x times every second for the next few seconds. Each spin deals physical damage to adjacent enemies.
First Impressions:
Garen and Darius are both 3-cost Juggernauts, but in my opinion, Darius has better carry potential than Garen. Garen’s ability is AoE, but he will struggle to reach enemy backlines. Garen can still get a lot of damage off if enemies surround him, but overall, unless his numbers are very strong, he may be a bit lacking as a potential carry.
Positioning: Frontline
Jayce – Piltover, Gunner
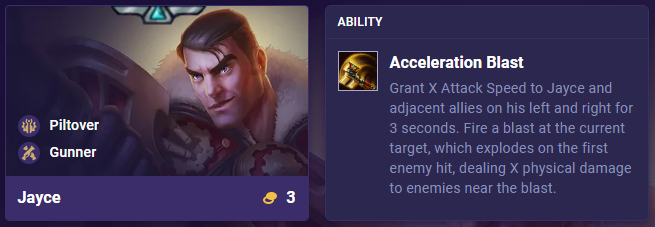
Ability: Acceleration Blast
Grant Attack Speed to Jayce and adjacent allies on his left and right for 3 seconds. Fire a blast at the current target, which explodes on the first enemy hit, dealing physical damage to enemies near the blast.
First Impressions:
Even though Jayce is a 3-cost unit, in terms of the Gunner units, he’s probably the least likely to be a carry. His ability provides additional Attack Speed to adjacent allies, making him a good utility unit for your other Gunners.
Positioning: Backline
Kalista – Shadow Isles, Challenger
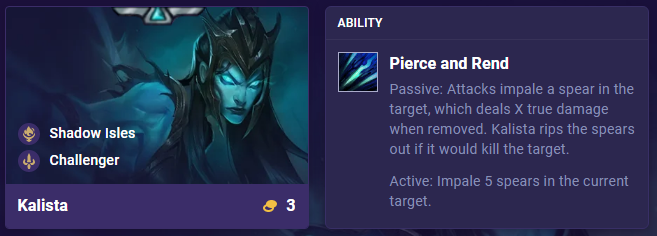
Ability: Pierce and Rend
Passive: Attacks impale a spear in the target, which deals true damage when removed. Kalista rips the spears out if it would kill the target. Active: Impale 5 spears in the current target.
First Impressions:
We’ve seen this Kalista ability before, and it can be quite good at taking down tanky enemies as her spears “deal” true damage. Stacking Attack Speed on Kalista will be ideal for taking down tanky units, but she doesn’t particularly excel at dealing damage against squishy targets.
Positioning: Backline
Karma – Ionia, Invoker
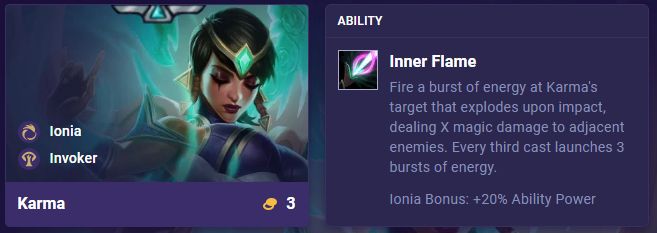
Ability: Inner Flame
Fire a burst of energy at Karma’s target that explodes upon impact, dealing magic damage to adjacent enemies. Every third cast launches 3 bursts of energy. Ionia Bonus: +20% Ability Power.
First Impressions:
Karms is an AP unit with a damage based ability, but her traits lean her more toward being a utility unit with Invoker. She pairs really nicely with Shen (4), to provide Invoker and Ionia, which will likely see play in Sorcerer comps that want to build into Ahri (5).
Positioning: Backline
Katarina – Noxus, Rogue
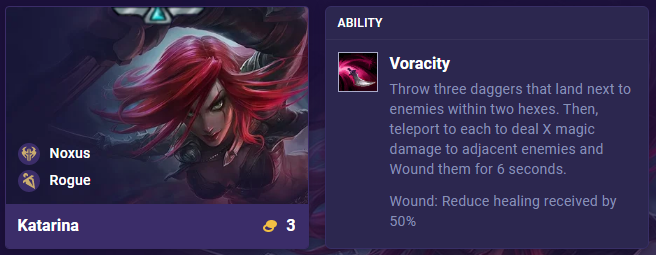
Ability: Voracity
Throw three daggers that land next to enemies within two hexes. Then, teleport to each to deal magic damage to adjacent enemies and Wound them for 6 seconds. Wound: Reduce healing received by 50%.
First Impressions:
Any champion with a teleport type ability can really get out of hand if they can cast their ability over and over. We don’t know Katarina’s mana pool at the moment, but I can definitely see her being a Blue Buff and Hextech Gunblade user.
Positioning: Midline
Lissandra – Freljord, Invoker
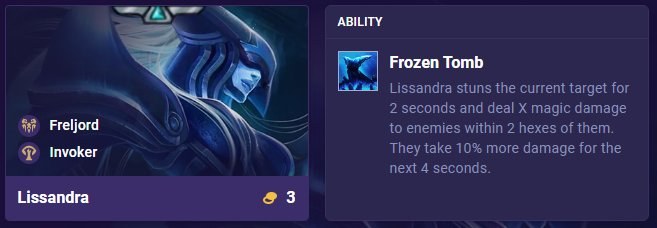
Ability: Frozen Tomb
Stun the current target for 2 seconds and deal magic damage to enemies within 2 hexes of them. They take 10% more damage for the next 4 seconds.
First Impressions:
Lissandra is the next Freljord unit, and her ability is mostly for utility. Freljord is a great trait to splash into team comps, and her Invoker trait makes her an ideal unit for AP comps that can fit Freljord in.
Positioning: Backline
Rek’Sai – Void, Bruiser
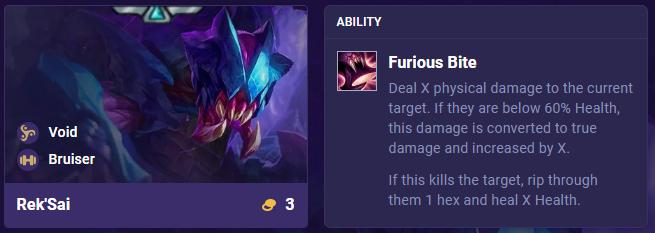
Ability: Furious Bite
Deal physical damage to the current target. If they are below 60% Health, this damage is converted to true damage and increased. If this kills the target, rip through them 1 hex and heal.
First Impressions:
Rek’Sai is a Void Bruiser, who pairs perfectly with Cho’Gath, another Void Bruiser. This makes it so the Void trait is heavily incentivized to build into Bruisers for their frontline. Her ability is a simple damage ability with some potential healing, but her main role will be to tank, and any damage is a bonus.
Positioning: Frontline
Sona – Demacia, Multicaster
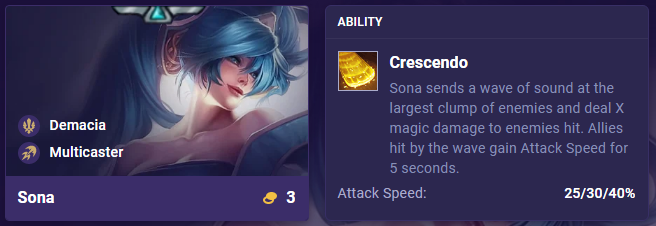
Ability: Crescendo
Send a wave of sound at the largest clump of enemies and deal magic damage to enemies hit. Allies hit by the wave gain 25/30/40% Attack Speed for 5 seconds.
First Impressions:
Sona is another Multicaster to pair alongside units like Teemo (2), Taliyah (2), or Vel’Koz. Unfortunately, these units don’t have much overlap in terms of their other traits.
This likely means that you’ll splash 2 Multicasters into a team where your main carry is a Multicaster. There is potential to build into a 4 Multicaster team, but the investment is quite high when the other traits don’t overlap well.
Positioning: Backline
Taric – Targon, Bastion, Sorcerer
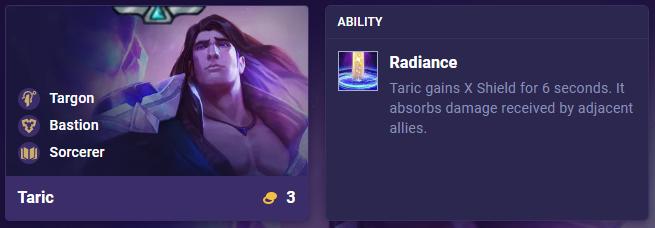
Ability: Radiance
Gain a Shield for 6 seconds. It absorbs damage received by adjacent allies.
First Impressions:
Taric is mainly a utility frontline, but he also has the Sorcerer trait. We talked about Karma and Shen being a good pair for Invoker, and Taric fits right along Shen to provide Bastion and Sorcerer for an AP comp frontline.
Positioning: Frontline
Vel’Koz – Void, Multicaster, Sorcerer
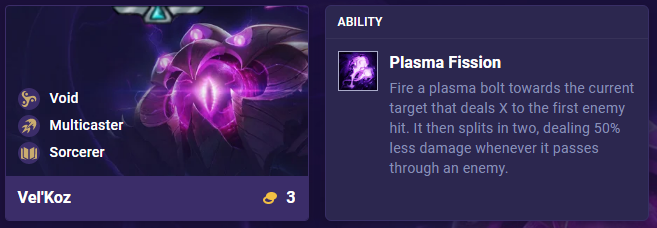
Ability: Plasma Fission
Fire a plasma bolt towards the current target that deals magic damage to the first enemy hit. It then splits in two, dealing 50% less damage whenever it passes through an enemy.
First Impressions:
Vel’Koz instantly stands out as a carry unit as he has two offensive classes, Multicaster and Sorcerer. Malzahar (1), is another Void Sorcerer unit, so it’s very likely that Void team comps will lean into Bruiser and Sorcerer for their team comp.
Positioning: Backline
4-Cost Champions
Aphelios – Targon, Deadeye

Ability: Moonlight Vigil
Fire a moon blast at the largest group of enemies that deals physical damage to enemies within 2 hexes. Equip 4 Chakram, plus 1 more for each enemy hit by the moon blast. For 7 seconds, attacks deal bonus physical damage for each Chakram equipped. Damage dealt by Chakrams heals Aphelios.
First Impressions:
Aphelios is our first look at a 4-cost AD ranged carry, a staple in TFT. His ability is quite layered, but basically it just provides more damage and a little bit of healing. The important thing to keep in mind is that when playing against Aphelios, you want to spread out your team more so his ability doesn’t hit everyone on your team, granting him a ton of Chakrams.
Positioning: Backline
Azir – Shurima, Strategist
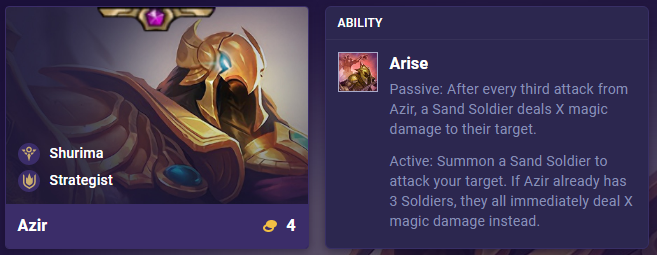
Ability: Arise!
Passive: After every third attack from Azir, a Sand Soldier deals magic damage to their target. Active: Summon a Sand Soldier to attack your target. If Azir already has 3 Soldiers, they all immediately deal magic damage instead.
First Impressions:
Azir is another unit this set that scales with both Attack Speed and Ability Power. Strategist also gives a mix of offense and defense, and Jarvan will likely pair very well with Azir as they are both 4-cost Strategists.
Positioning: Backline
Gwen – Shadow Isles, Slayer
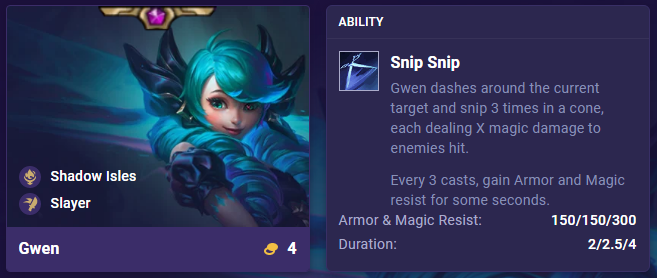
Ability: Snip Snip!
Dash around the current target and snip 3 times in a cone, each dealing magic damage to enemies hit. Every 3 casts, gain 150/150/300 Armor and Magic resist for 2/2.5/4 seconds.
First Impressions:
Gwen is a somewhat unique unit, as she is a melee carry that focuses more on AP than AD. There aren’t too many AP carries that are melee, so Gwen is a bit of fresh air there.
Positioning: Midline
Jarvan IV – Demacia, Strategist

Ability: Cataclysm
Mightily leap on a nearby enemy. Deal magic damage to enemies within 2 hexes and Stun them for 2/2.5/8 seconds.
First Impressions:
As mentioned previously, Jarvan will likely pair with Azir well for Strategist, but they don’t have much overlap outside of that. You can lean more into Demacia for other carries like Lux (4), or more into Shurima and Azir.
Positioning: Frontline
Kai’Sa – Void, Challenger
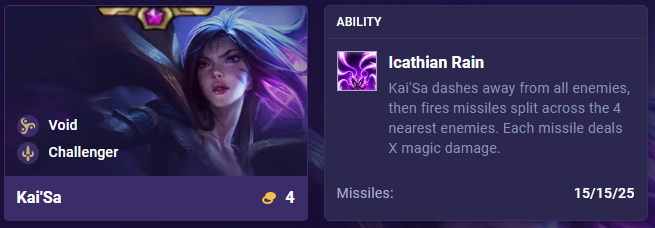
Ability: Icathian Rain
Dash away from all enemies, then fire 15/15/25 missiles split across the 4 nearest enemies. Each missile deals magic damage.
First Impressions:
Kai’Sa is another carry type unit for the Void trait, and she is also another unit that scales with Attack Speed and Ability Power. She somewhat doesn’t fit super well in the Void trait since the other units point the team into Bruisers and Sorcerers rather than Challengers. Even still, Kai’Sa may see play as a carry unit in more Challenger teams than Void teams.
Positioning: Backline
Lux – Demacia, Sorcerer
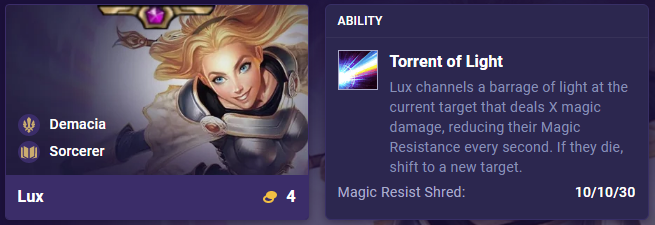
Ability: Torrent of Light
Channel a barrage of light at the current target that deals magic damage over 3/3/6 seconds, reducing their Magic Resistance by 10/10/30 every second. If they die, shift to a new target.
First Impressions:
Lux is the 4-cost carry for the Sorcerer trait, but her ability is single target. Usually, AP carries tend to have AoE abilities, so having a single target AP carry is quite interesting. She will help melt through tanky enemies, but won’t be able to blow up backlines like other AP carries we’ve seen before.
Positioning: Backline
Nasus – Shurima, Juggernaut
Ability: Soul Eater
Steal 5/5/15% max Health, 10% Attack Damage, and 5/5/15 Defenses from the nearest 4/5/9 enemies for 8 seconds. While empowered, every third attack deals physical damage.
First Impressions:
Nasus is a very beefy unit, and his ability just makes him even beefier. The main thing to keep in mind is that for a 4-cost unit, he doesn’t provide much CC. His value will come from stealing stats from enemy frontlines, making it easier to take them down. You can somewhat think of it as a mini Shred or Sunder on enemy frontlines.
Positioning: Frontline
Sejuani – Freljord, Bruiser
Ability: Fury of the North
Passive: Whenever an ally attacks a Chilled enemy, they deal bonus true damage. Active: Gain a Shield for 4 seconds. Deal magic damage to nearby enemies and Chill them for 4 seconds. Chill: Reduced Attack Speed by 30%.
First Impressions:
Sejuani is the last of the Freljord units, and her Bruiser trait makes her a flexible frontline unit. Freljord is definitely a consideration for Deadeye teams, as Ashe slots right in. For most other teams, you’ll be looking at Lissandra and Sejuani as a pair for the utility.
Positioning: Frontline
Shen – Ionia, Bastion, Invoker
Ability: Ki Barrier
Gain a Shield and grant a Shield to the 2 lowest Health allies for 4 seconds. After shielding his allies, Shen’s shield refreshes with a burst, dealing magic damage to adjacent enemies. Ionia Bonus: +10% Damage Reduction.
First Impressions:
Shen is the only 4-cost unit with 3 traits, and he’ll likely see a decent amount of play due to that factor. Bastion makes him a flexible frontline, and Invoker makes him valuable to any team (more so for AP teams). Of course, Shen will also be valuable for teams that want to go deep into the Ionia trait.
Positioning: Frontline
Urgot – Zaun, Deadeye
Ability: Disdain
Passive: Whenever an enemy enters attack range, fire a blast from the leg facing that direction, dealing physical damage to them. Each of Urgot’s 6 legs has a 4/4/1 second cooldown. Active: Gain a Shield for 5 seconds and dash behind the current target. Reset all leg cooldowns.
First Impressions:
Urgot’s ability is quite unique, but it will be interesting to see how practical it is. Deadeye gives him longer range, making his ability more effective. His ability also allows him to reposition and shoot more enemies with his legs. The Deadeye trait is a ranged class, but Urgot spins it in a way that makes him more like a melee carry.
Positioning: Midline
Yasuo – Ionia, Challenger
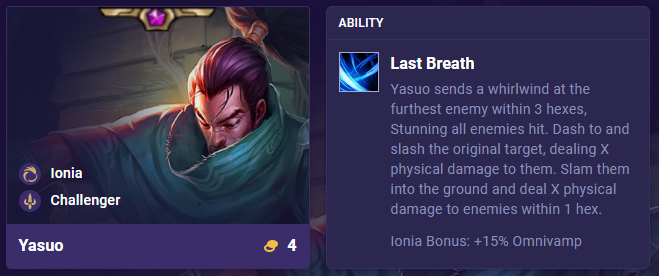
Ability: Last Breath
Send a whirlwind at the furthest enemy within 3 hexes, Stunning all enemies hit. Dash to and slash the original target, dealing physical damage to them. Slam them into the ground and deal physical damage to enemies within 1 hex. Ionia Bonus: +15% Omnivamp.
First Impressions:
Yasuo’s ability has CC, damage, and splash all in one. He really is the full package in terms of damage. Yasuo will excel at dealing damage to clumped teams, and you will want to position him well so his whirlwind hits as many enemies as possible.
Positioning: Midline
Zeri – Zaun, Gunner
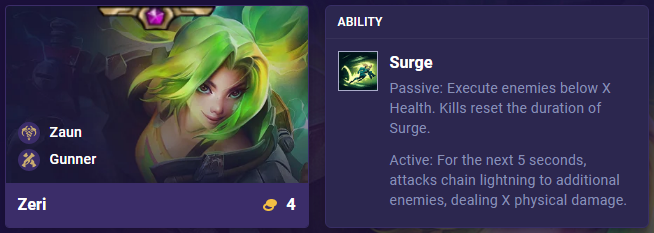
Ability: Surge
Passive: Execute enemies below x Health. Kills reset the duration of Surge. Active: For the next 5 seconds, attacks chain lightning to 3/3/5 additional enemies, dealing physical damage.
First Impressions:
Zeri’s Gunner ability gives her splash damage, which is very effective when her ability also executes enemies below a certain Health. Zeri will likely be a very strong backline AD carry assuming her base stats are decent enough.
Positioning: Backline
5-Cost Champions
Aatrox – Darkin, Slayer, Juggernaut
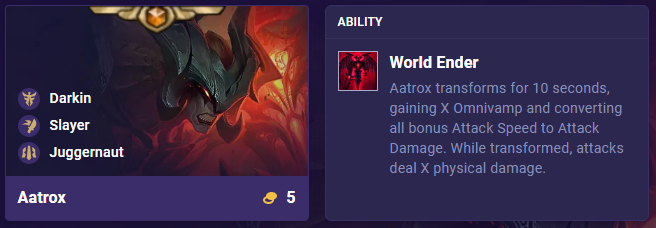
Ability: World Ender
Transform for 10 seconds, gaining Omnivamp and converting all bonus Attack Speed to Attack Damage. While transformed, attacks deal bonus physical damage.
First Impressions:
Aatrox can fit into many teams, but this is mainly due to his unique Darkin trait. The Darkin Blade will pass along to allies, giving them a buff which can give a lot of value to your team. He will fit in more with melee carry teams with the Slayer and Juggernaut trait, but I can see him being splashed in level 9 comps for his Darkin trait as well.
Positioning: Frontline
Ahri – Ionia, Sorcerer
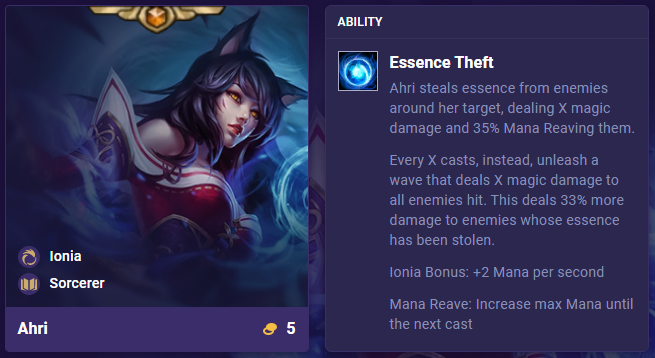
Ability: Essence Theft
Steal essence from enemies around her target, dealing magic damage and 35% Mana Reaving them. Every x casts, instead, unleash a wave that deals magic damage to all enemies hit. This deals 33% more damage to enemies whose essence has been stolen. Ionia Bonus: +2 Mana per second. Mana Reave: Increase max Mana until the next cast.
First Impressions:
Ahri is a 5-cost AP carry that helps raise the ceiling of Sorcerer comps. Multicaster comps likely won’t look to use Ahri, but vertical Sorcerer comps will definitely want Ahri in the end game.
Positioning: Backline
Bel’Veth – Empress, Void
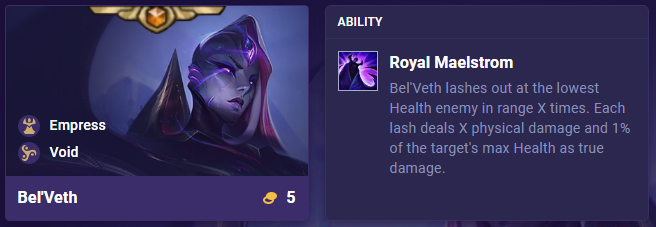
Ability: Royal Maelstrom
Lash out at the lowest Health enemy in range x times. Each lash deals physical damage and 1% of the target’s max Health as true damage.
First Impressions:
Bel’Veth is a flexible late game carry. She fits into Void comps as a carry because she can utilize extra Attack Damage and Attack Speed items while other units like Vel’Koz can carry AP items. Or, if you go for a Fast 9 comp, she can likely just be a strong carry for a flex board.
Positioning: Midline
Heimerdinger – Piltover, Yordle, Technogenius
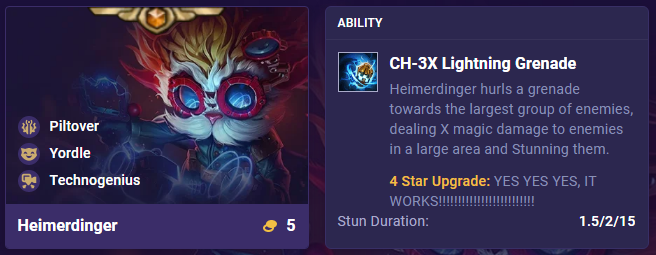
Ability: CH-3X Lightning Grenade
Hurl a grenade towards the largest group of enemies, dealing magic damage to enemies in a large area and Stunning them for 1.5/2/15 seconds. 4 Star Upgrade: YES YES YES, IT WORKS!!!!!!!!!!!!!!!!!!!!!!!!!
First Impressions:
Heimerdinger is the ideal late game unit for Piltover comps that utilize the T-Hex. You can pour a lot of gold into the Turret and gain a lot of board strength with only one unit slot. Once again, as with many 5-costs, Heimerdinger can simply be used to strengthen any board at level 9, or as a late game carry for specific Yordle or Piltover comps.
Positioning: Backline
K’Sante – Shurima, Bastion
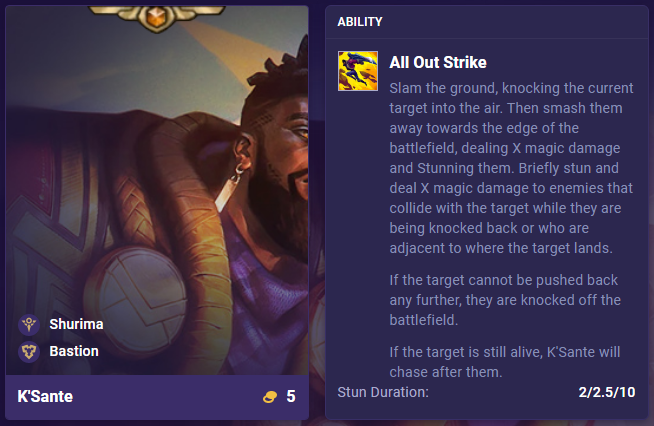
Ability: All Out Strike
Slam the ground, knocking the current target into the air. Then smash them away towards the edge of the battlefield, dealing magic damage and Stunning them for 2/2.5/10 seconds. Briefly stun and deal magic damage to enemies that collide with the target while they are being knocked back or who are adjacent to where the target lands. If the target cannot be pushed back any further, they are knocked off the battlefield. If the target is still alive, K’Sante will chase after them.
First Impressions:
We’ve seen a similar ability as this before with Lee Sin. This ability is extremely effective at dealing with very tanky enemies as you can just knock them off the board.
Positioning: Frontline
Senna – Shadow Isles, Gunner, Redeemer

Ability: Dawning Shadow
Fire a massive beam at the furthest enemy, dealing physical damage to all enemies hit. Any allies hit gain a Shield for 4 seconds.
First Impressions:
Senna is a 5-cost unit that is more utility than damage. Even still, in Gunner comps, she will help buff up your main carry.
Positioning: Backline (Corner)
Sion – Noxus, Bruiser
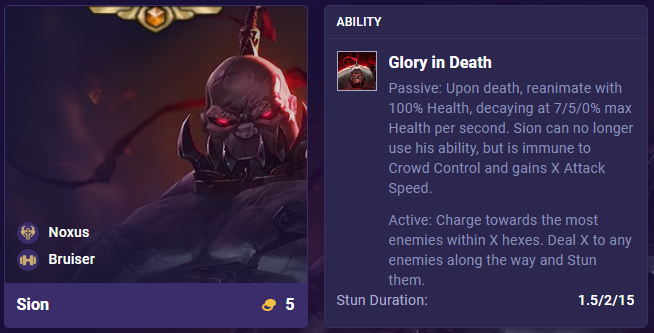
Ability:
Passive: Upon death, reanimate with 100% Health, decaying at 7/5/0% max Health per second. Sion can no longer use his ability, but is immune to Crowd Control and gains Attack Speed. Active: Charge towards the most enemies within a few hexes. Deal damage to any enemies along the way and Stun them for 1.5/2/15 seconds.
First Impressions:
Sion is another flexible 5-cost addition to any team. He is a lot like Fiddlesticks, where his primary use is to CC enemies early in the fight after “dying.” Sion will likely be added to many end game boards for a strong CC ability.
Positioning: Frontline
Ryze – Wanderer
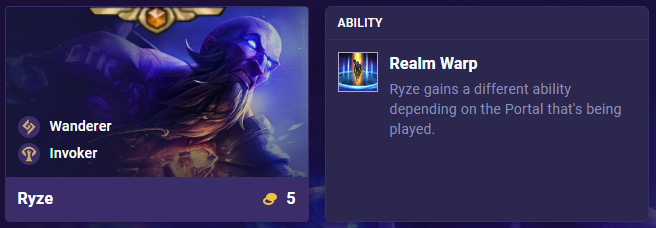
First Impressions:
Ryze is definitely the most complicated unit of the 5-costs. He has 10 different abilities that change depending on the Region Portal of the game. Each of these abilities will vary in their usefulness, and as such, it’ll take time to see how Ryze fits into the meta.
Positioning: Backline
Abilities:
Ryze has 10 different abilities corresponding to 10 different regions of Runeterraa. This ability is decided based on the Region Portal of the game, chosen at the beginning of the game. If the Region is the Void, Ryze will instead have a random ability, rather than a Void specific ability.
Realm Warp: Bandle City
Ryze creates a portal to Bandle City underneath a random unit on your bench. After a brief delay, they arrive on the battlefield with bonus mana and are…slightly smaller?
Realm Warp: Demacia
Ryze creates a portal to Demacia underneath a cluster of injured allies, granting a Shield for x seconds. If an ally leaves the safety of the portal, they are healed. When the portal expires, enemies within are dealt magic damage.
Realm Warp: Freljord
Ryze creates a portal to the Freljord underneath a random group of enemies for x seconds. The freezing winds deal magic damage to enemies within two hexes over the duration and apply Permafrost, a permanent Attack Speed Slow. If enemies are already affected by Permafrost, they are instead Frozen for the duration.
Realm Warp: Ionia
Ryze creates a portal to Ionia, summoning forth a Spirit Tree that affects the closest x units. Allies are invigorated, gaining Attack Speed for x seconds and restoring Health over the duration. Enemies are pacified, causing them to dance for x seconds.
Realm Warp: Noxus
Ryze creates a portal to Noxus’ armory that spews out a torrent of weapons and armor, granting completed items to random allies with open slots, and throwing Axes towards random enemies that deal magic damage each. If any ally would recieve an item while all slots are full, they instead gain a stacking damage increase for the rest of combat.
Realm Warp: Piltover
Ryze summons a portal to Piltover that launches out an enforcer grenade towards his target, dealing magic damage to enemies within two hexes and creating a containment area for x seconds. Enemies are unable to leave the area, and a % of the damage dealt to them is also dealt to all other enemies within.
Realm Warp: Shadow Isles
Ryze creates a portal to the Shadow Isles, reclaiming lost ally’s souls. They return to the battlefield, with a % of their maximum Health. If no allies have died yet, the portal remains open, waiting for an ally to die. Ryze cannot resurrect himself.
Realm Warp: Shurima
Ryze creates a portal to Shurima, summoning a gigantic sand tornado that travels across the battlefield, dealing magic damage to enemies hit and knocking them up briefly. The tornado has chance to unearthed burried treasures and gold as it travels.
Realm Warp: Targon
Ryze creates a portal to the skies above Mount Targon that beckons his target. After a few seconds, they descend from the heavens as a meteor towards the largest cluster of enemies, dealing a % of the the initial target’s maximum Health as magic damage and knocking up enemies in the epicenter.
Realm Warp: Zaun
Open portals to Zuan, causing hired guns to fire a torrent of munitions at a nearby enemy that deal magic damage. The more gold you have, the more powerful the portals become:
- Portals fire a bolt that applies 50% Wound
- Portals throw an axe, applying 40% Shred and Sunder
- Portals fire a rocket that deals half damage in a one-hex radius.
- Summon an additional portal, and more depending on additional gold.
Closing Words
That covers just about everything coming in Set 9: Runeterra Reforged. The game is continuing to evolve, and we see this through all of the new mechanics like Region Portals and Legends. The Augment system we all know and love is also getting an overhaul.
Overall, Set 9 is looking to be a very refreshing set, and we’re all looking forward to playing it once it comes to PBE and eventually fully releases.
Thanks for reading, this was quite the hefty article, but hopefully this helps you prepare for the new set! Good luck in your future games with the new set, and be sure to check back for more guides, news, and all things TFT.
To learn about the new TFT Set, head to our all-in-one Teamfight Tactics Set 9 reveal page that covers all champions, traits, and more!
Subscribe to our newsletter:
Don’t miss out on all of the latest TFT content!