King’s Fall: Warpriest Guide
The first boss fight of King’s Fall is Warpriest.
This encounter is a strict damage check, and you only have 4 chances at damage.
Loadouts and strategy will revolve around dealing as much damage as possible.
In Destiny 2’s newest update, The Final Shape, the new Prismatic Subclass changes the meta. Check out Prismatic builds for Hunters, Warlocks, and Titans to keep you ahead of the curve.
The Mechanics

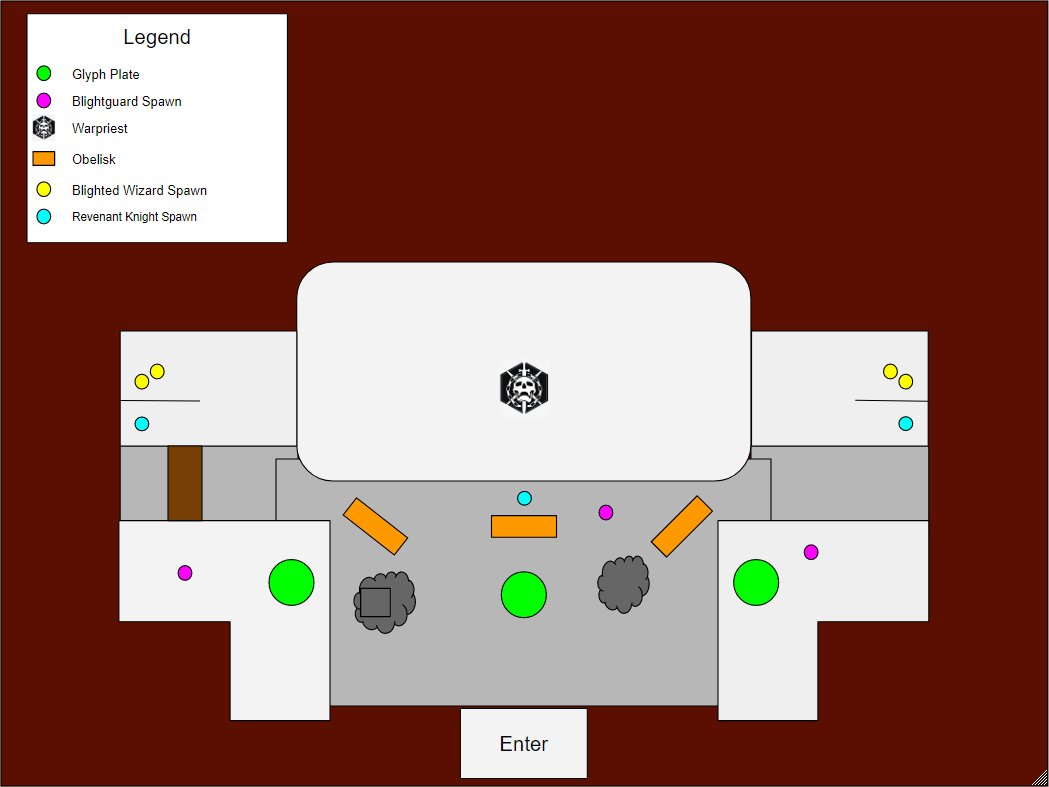
This room is divided into 3 sections, so your team will split up into 3 groups of 2 that will be on the left, center, and right respectively. Within the group of 2, one player will be in control of the plate and Blightguard and the other will be clearing enemies and dealing damage for the entire damage phase.
To start the encounter, have a player stand on each of the 3 Glyph Plates. Once the encounter starts, ads will spawn on all 3 areas of the room. Towards the end 2 Blighted Wizards will spawn on the left and right, and a Revenant Knight will spawn in each portion of the room (left, center, and right).
The Wizards do not have to be killed to advance the encounter, but it is recommended you do, as they can interfere with later portions. Once all 3 Revenant Knights are killed the encounter advances to the Glyph Reading Phase.

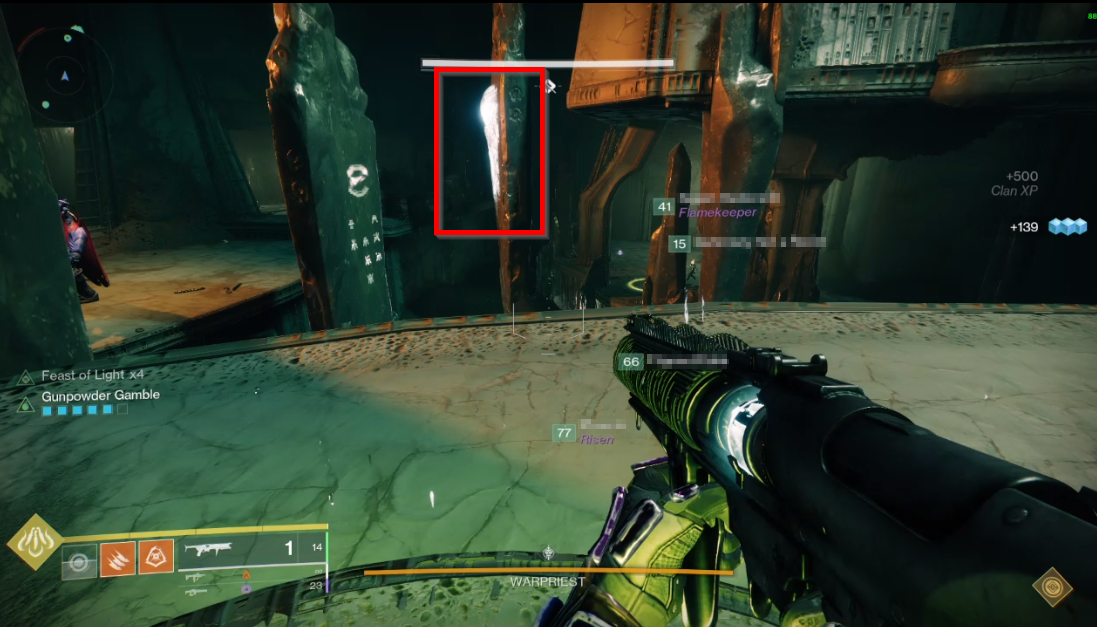
To initiate Glyph Reading the plate player in the center will stand on their Glyph Plate. This player will look at the left and right Obelisks to see if either are lit up in the back. The center plate player will then get off their Glyph Plate before the next person gets on.
If the left Obelisk is lit up, then the left plate player will stand on the left Glyph Plate. If the right Obelisk is lit up, then the left plate player will stand on the left Glyph Plate. If neither the left or right are lit up, the center plate player will get off their plate, and then step on the center Glyph Plate once again.
From here one of the 2 other Glyph Plates will be the next in the sequence. To know which plate is next the same lighting indicator will dictate the order. If a side plate is unoccupied and it is lit up, then that is the next plate.
If the center plate is unoccupied and no Obelisks are lit up, the center plate is next. And finally, the last unoccupied plate will be stood on so all 3 Glyph Plates are stood on simultaneously.
Once the 3 Glyph Plates are stood on in the correct order, the damage phase will begin as the Warpriest is no longer immune. The player who stood on the final of the 3 Glyph Plates will have the Brand.
The Brand moves with the player who is holding it, and in order to deal damage a player must be standing within the red area of the Brand.
The Brand lasts for 15 seconds, but it can be taken by another player and extended another 15 seconds. This can be done twice for 3, 15 second timers of damage.
To take the Brand, the mechanic works exactly the same as the Basilica Encounter, a player must kill the Blightguard to be able to pick up the Brand Claimer, and with the Brand Claimer this player can take the Brand by standing in the red aura and holding the interact key/button.
2 Blightguards will spawn per damage phase and they will spawn sequentially (not at the same time) on the two areas other than where the final Glyph Plate in the sequence was.
For example, if the final Glyph Plate in the sequence was on the left, the left plate player will start with the Brand and the Blightguards will spawn in the center and right.
Meanwhile, players will be able to damage the Warpriest in the Brand’s Aura. Once the Brand’s timer is about to run out, the player with a Brand Claimer will take the Brand to extend the timer.
After the final Brand’s timer runs out the Warpriest launches an AoE attack that will automatically kill a player unless they are behind an Obelisk.
It is recommended to perform damage where the final Glyph Plate of the sequence is, and stand behind that Obelisk once the damage phase is over, and if that Obelisk was disintegrated, perform damage in that location, and then move to a different Obelisk as the timer is ending.
The Plate Players who did not receive the initial Brand should wait for their respective Blightguard to spawn, defeat it, pick up the Brand Claimer, and then take the Brand as the timer is about to run out. Once the Obelisk is disintegrated by the Warpriest, the entire encounter will repeat.
There are 3 Obelisks in total, giving your team 4 available damage phases (1 for each Obelisk and a final damage phase which results in the Warpriest being defeated or the fireteam being wiped due to no coverage of an Obelisk).
To summarize, the order of actions the team will perform are:
- Stand on the 3 Glyph Plates to start the encounter
- Clear the enemies which spawn and ultimately the 3 Revenant Knights to initiate the Glyph Reading Sequence.
- Center Plate Player stand on the center Glyph Plate to see the first plate of the sequence.
- If the left Obelisk is lit up in the back, the left Glyph Plate is first.
- If the right Obelisk is lit up in the back, the right Glyph Plate is first.
- If the left nor right Obelisks are not lit up in the back, the center Glyph Plate is first.
- The center Plate Player gets off the center Glyph Plate.
- The first Glyph Plate of the sequence is stood on by the associated Plate Player, and they remain on the plate.
- The Plate Player on the first plate will look to see if another Obelisk is lit up in the back.
- If an Obelisk is lit up in the back, that is the next plate in the sequence.
- If no Obelisk is lit up, the center plate is next in the sequence.
- The second Plate Player stands on the second Glyph Plate in the sequence, and they remain on the plate.
- The Final Plate Player stands on the third Glyph Plate and receives the Brand.
- The 3 non-plate players run towards the player with the Brand to deal damage.
- The 2 other Plate Players wait on their Blightguard to spawn, kill the Blightguard, pick up the Brand Claimer, then take the Brand Aura as the timer is about to expire.
- Once the final Brand timer expires, the entire fireteam stands behind the closest Obelisk.
- Repeat
Tips and Tricks
- Divinity is very strong in this encounter for boss damage. The player using Divinity should not be standing on the Glyph Plates nor killing the Blightguard to maximize the uptime of Divinity.
- Use Kinetic or Harmonic Siphon mods to spawn orbs for the team to collect Super energy to use during the damage phase.
- Before the final Glyph Plate is stood upon, have the non-plate players congregate together at the plate to maximize uptime for the damage phase.
- Utilize the columns to jump from the center to the left side of the room.
- If having difficulty with ammo, utilize the Aeon exotics to use a finisher on the Blighted Wizards to spawn Heavy Ammo.
Loadouts
Here is a list of recommended options:
- Primary:
- Izinagi’s Burden – To use in tandem during DPS.
- Witherhoard – For ad clear and to use in tandem during DPS.
- Secondary
- One player uses Divinity.
- Any primary ammo weapon.
- Power
- Linear Fusion Rifle for primary damage dealing if doing so at range.
- Sword – can be used if the team deals damage right next to the Warpriest then all stand behind the same Obelisk.
Challenge Mode
The challenge of this encounter involves taking the Brand within roughly 5 seconds after the Brand Claimer is picked up. Here are some tips for completing this challenge for double loot from the encounter:
- If the final Glyph Plate of the sequence is on the left, perform damage between the left and right Glyph Plates, as both players can get from the Brand Claimer to the Aura in time.
- If the final plate in the sequence is the center or right, deal damage in the center, and move with the Aura based on where the next spawn is.
- The two Blightguards spawn in one after the other. Communicate which Blightguard spawns first. Then the player with the Brand Aura can move towards this side to lessen the distance for the player with the Brand Claimer.
- If the Brand Claimer is on the left, have the player with the Brand Aura jump on the column in the central area so the player with the Brand Claimer can take the Brand while mid-air.
- Use Thundercrash Titans as the Plate Players as they can super to quickly get to the Aura if needed. If there is only one Titan, have this player be the left Plate Player.
- Do not worry about maximizing the damage time, it is most important to ensure a quick transfer so the challenge is not failed.
Loot Table
- Smite of Merain
- Kinetic Pulse Rifle
- Defiance of Yasmin
- Kinetic Sniper Rifle
- Gauntlets Armor
- Chest Armor

Thanks for reading! Check out our other Destiny 2 raid and dungeon guides.
 Download APP
 Collapse