King’s Fall: Oryx
The final encounter of King’s Fall is Oryx.
This encounter is a more intensive version of the Daughters of Oryx.
Many of the base mechanics are the same, so you’ll have a head start on how this encounter works.
Dive into our Prismatic Hunter guides, Prismatic Warlock guides, and Prismatic Titan guides for the newly released expansion, The Final Shape.
The Mechanics

This encounter starts the same as the Daughters of Oryx with the Brand collection phase in which 3 pieces of the Brand must be collected, and the 3rd piece completes the brand to steal a shield from the Vessel of Oryx. To start the encounter go to the far side of the room where a light is floating a few feet in the air.
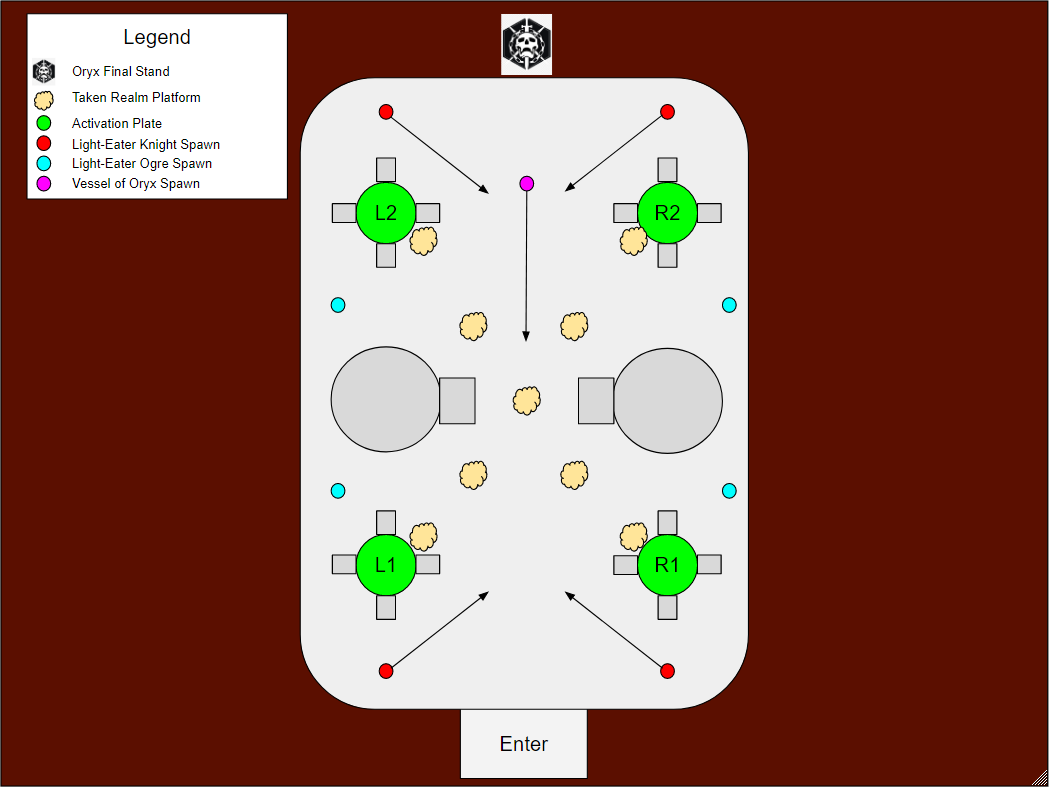
Players will split up by having 4 players assigned to their own plate, and 2 floaters. One floater for L1 and R1, and the other floater for L2 and R2.
Once again another player will be selected at random to become taken, and this player will need to collect the Brand by jumping across the Taken Realm Platforms.
Oryx will move around the sides of the arena and slam an Activation Plate which will become lit up in green. This will be the first plate in the sequence. The next plate of the first pairing will be seen by any player who steps on the first plate of the sequence, and the next plate will be designated by the Brand floating above it.
The taken player and the player assigned to the first Activation Plate that Oryx slammed will jump onto the plate and call out the next plate the Brand is floating over. The player assigned to the plate with the Brand above it will jump on that plate, and the platforms will form.
The Taken player will jump across the plates, collecting the Brand piece while the other 2 players remain on the plates to keep the platforms active.
While all of this is going Light-Eater Ogres and Light-Eater Knights will spawn in. First, the 4 Light-Eater Ogres will spawn in. The ogres spawn in a counterclockwise rotation with the first Ogre spawning next to the plate counterclockwise of the first Activation Plate.
So if Oryx slams L2, the first Ogre will spawn near L1. These Ogres need to be killed immediately, and once they die they will spawn a black orb on the ground with a ring around it. For the meantime do not stand in the ring near the orb.
After the Ogres are defeated, 4 Light-Eater Knights will spawn in the same order. These Knights will travel along the path designated by the arrows on the map toward one of the black orbs dropped from the Ogres. Do not let this happen, as the Knights will steal the black orbs if they reach them.
The Brand process happens two more times in which the first Activation Plate is randomly dictated. The Ogres and Knights only spawn in during the first piece of the Brand being collected. As the third piece is collected, a Knight, the Vessel of Oryx spawns in and runs towards the middle of the arena.
The Vessel is surrounded by a shield which is stolen by the player who now holds the fully built Brand. This shield will follow the player who stole it and grants the team invincibility.
While the shield is being stolen, the players assigned to the plates will need to interact with the black orbs the Ogres dropped. These orbs are bombs that need to be detonated all at the same time to stun Oryx.
To detonate the orb, stand within the ring for a few seconds. The timing in which the orbs should be detonated is when in the kill feed there is a message that says “Oryx Calls upon the Darkness”.
The 4 players assigned to the orbs would stand just outside their orb’s ring. Once this message appears they all go into their orb’s ring and wait for it to be detonated.
The message “Player Name has detonated a Corrupted Light” will appear, indicating the orb was activated. While the players are detonating the orbs, the player holding the shield will stand in the middle of the arena. The players who detonated the orbs will immediately run towards the shield in the middle after they see they detonated the corrupted light orb.
The orbs will explode, killing any player, not in the shield and stunning Oryx. This will open up a crit spot in Oryx’s chest for the team to damage him. It is important to know that floaters will need to detonate a plate payer’s assigned orb if they are handling the shield.
Once the damage phase is over 1 of 2 things will happen. Either 4 Knights will spawn on each Activation Plate and Oryx will throw area-of-effect attacks all over the arena or the Shade of Oryx will spawn. If the former happens, kill the 4 Knights on the plates and avoid the attacks from Oryx.
Then that portion is over. If the Shade of Oryx spawns in, there will be a taken orb between L2 and R2 with the Shade of Oryx in it. One by one, members of the team will be transported into this taken orb and will need to shoot the Shade of Oryx. Once enough damage is dealt to this enemy, this phase is over.
From here the encounter will repeat itself until Oryx is at roughly 25% of his health for the final stand. During the final stand Oryx will go to the very far end of the arena and two Light-Eater Ogres will spawn in the L2 and R2 positions that the whole team will need to kill.
Oryx will open up his chest and 5 players will deal damage while the last player of the team is responsible for detonating the corrupted light orbs the Ogres drop. The same rules of detonating the orbs will apply for that last player of the group.
Oryx will “call upon the darkness” as the second Ogre is killed and the solo player will stand in the orb to detonate it and return to the shield to survive the blast, extending the time to damage Oryx.
If Oryx is still alive, he will call upon the darkness once again, and the solo player can detonate the other orb extending the damage even further.
If Oryx is not killed after this, he will wipe the team.
To summarize, the order of actions the team will perform are:
- A player gets Taken at random.
- Oryx will slam an Activation Plate which is the first plate in the sequence.
- The Taken player and the player assigned to the lit up plate go to stand on the lit up plate.
- Whichever player gets to the plate first looks for the floating Brand piece, and calls which plate it is floating over.
- The player assigned to the plate under the Brand piece stands on their Activation Plate.
- The Taken player will jump across the Taken Realm Platforms to collect the Brand piece.
- Repeat steps 3 through 6, two more times to collect 3 Brand pieces in total.
- While players are collecting the Brand, the other players kill the 4 Light-Eater Ogres and the 4 Light-Eater Knights.
- The player who collects the third Brand steals the shield from the Vessel of Oryx and then stays in the middle of the arena.
- The 4 players assigned to the orbs detonate their bombs once “Oryx Calls upon the Darkness”.
- The whole team groups in the middle in the shield to deal damage to Oryx once his crit spot opens.
- If the bomb phase will begin, if so kill the 4 knights on the plates. If the Shade of Oryx spawns in, deal enough damage to the shade to advance the encounter.
- Repeat until the final stand.
- Once Oryx activates his final stand at 25% health, kill the Light-Eater Ogres that spawn L2 and R2.
- 5 players deal damage to Oryx.
- One player activates the 2 orbs once Oryx calls upon the darkness to extend the damage phase.
- Kill Oryx… or wipe
Tips and Tricks
- Touch of Malice is a great option for damage due to not being able to take damage in the shield.
- Kill the Light-Eater Ogres where they spawn to prevent any plate players from getting killed as these enemies deal a lot of damage. The Ogres spawn counter clockwise, so they can be teamshot quickly.
- After damage return to your plates in case the bomb phase occurs. This will allow each player to quickly kill the knight on their plate for faster runs and not risk any deaths.
Loadouts
Here is a list of recommended options:
- Primary:
- Touch of Malice
- Any primary
- Secondary
- Izinagi’s Burden
- Damage dealing sniper
- Shotgun if having difficulty with killing the Ogres and Knights
- Power
- Linear Fusion Rifle
- Subclasses
- Well of Radiance
- Use during the damage phase for the damage buff.
- Thundercrash
- This super technically can hit Oryx, but is a bit risky. It’s great to quickly kill the Knight or Ogre if needed as well as relocate to the shield from a bomb if needed.
- Blade Barrage
- Use Star Eater Scales with this super for a burst damage super.
- Well of Radiance
Challenge Mode
The challenge for Oryx revolves around the Light-Eater Knights and Light-Eater Ogres. A player cannot kill the same Ogre nor Knight during the encounter. Here are some tips to complete the challenge:
- Designate within the group a corresponding Knight and Ogre. For example if a player is L1 they will kill the Ogre next to L1 and the Knight that runs towards the L1 orb.
- Do not damage other teammate’s Ogres nor Knights due to the risk of accidentally getting the final blow.
- After each phase, rotate which plate, Knight, and Ogre each player is getting.
- If your team can confidently 2 phase Oryx, the players on L1 and R1 can swap with the players on L2 and R2 and teamshot the knights as normally.
Loot Table
- Any weapon or armor piece can drop from this encounter.
- Touch of Malice, the exotic scout rifle can only drop in this encounter.
- 20 Spoils of Conquest can be used to purchase one red border weapon per week.
Thanks for reading! Check out our other Destiny 2 raid and dungeon guides.
 Download APP
 Collapse
