 League of Legends
 Teamfight Tactics
 Valorant
 Lost Ark
 Destiny 2
 Diablo 4
 Download APP
Circle of the Moon Druid Build and Guide
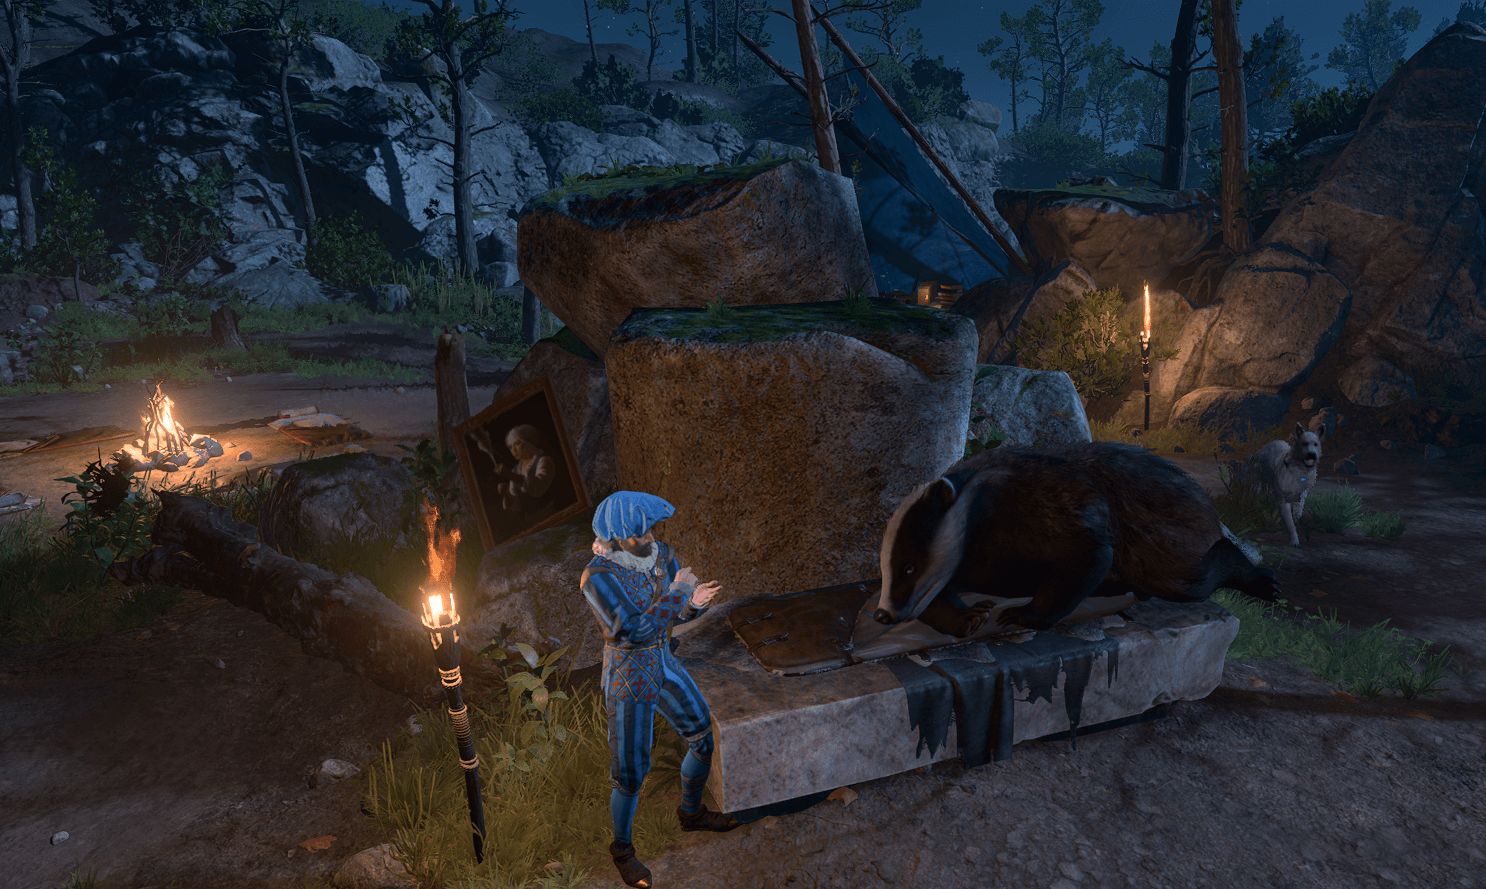
Welcome to our Circle of the Moon Druid build guide for Baldur’s Gate 3.
Druids are known as avatars of nature, which allows them access to a wide variety of different spells to aid their party.
They’re able to heal their allies, ensnare foes, and unlock both defensive and offensive skill sets with their different Wild Shape forms.
As a Druid, you’re able to choose what Druidic Circle you come from, determining your character’s playstyle.
Their adaptability is showcased in the different ways they can approach both battle and roleplay.
Find out where the Druid ranks in our Baldur’s Gate 3 class tier list.
Pros and Cons
Pros
- Able to fill the roles of support, spellcaster, and melee combat
- Access to Spells that manipulate terrain
- More Wild Forms available than any other Druid subclass
Cons
- Less spells then Circle of Land Druids
- Spells can be difficult to position effectively
- Many of their spells require Concentration
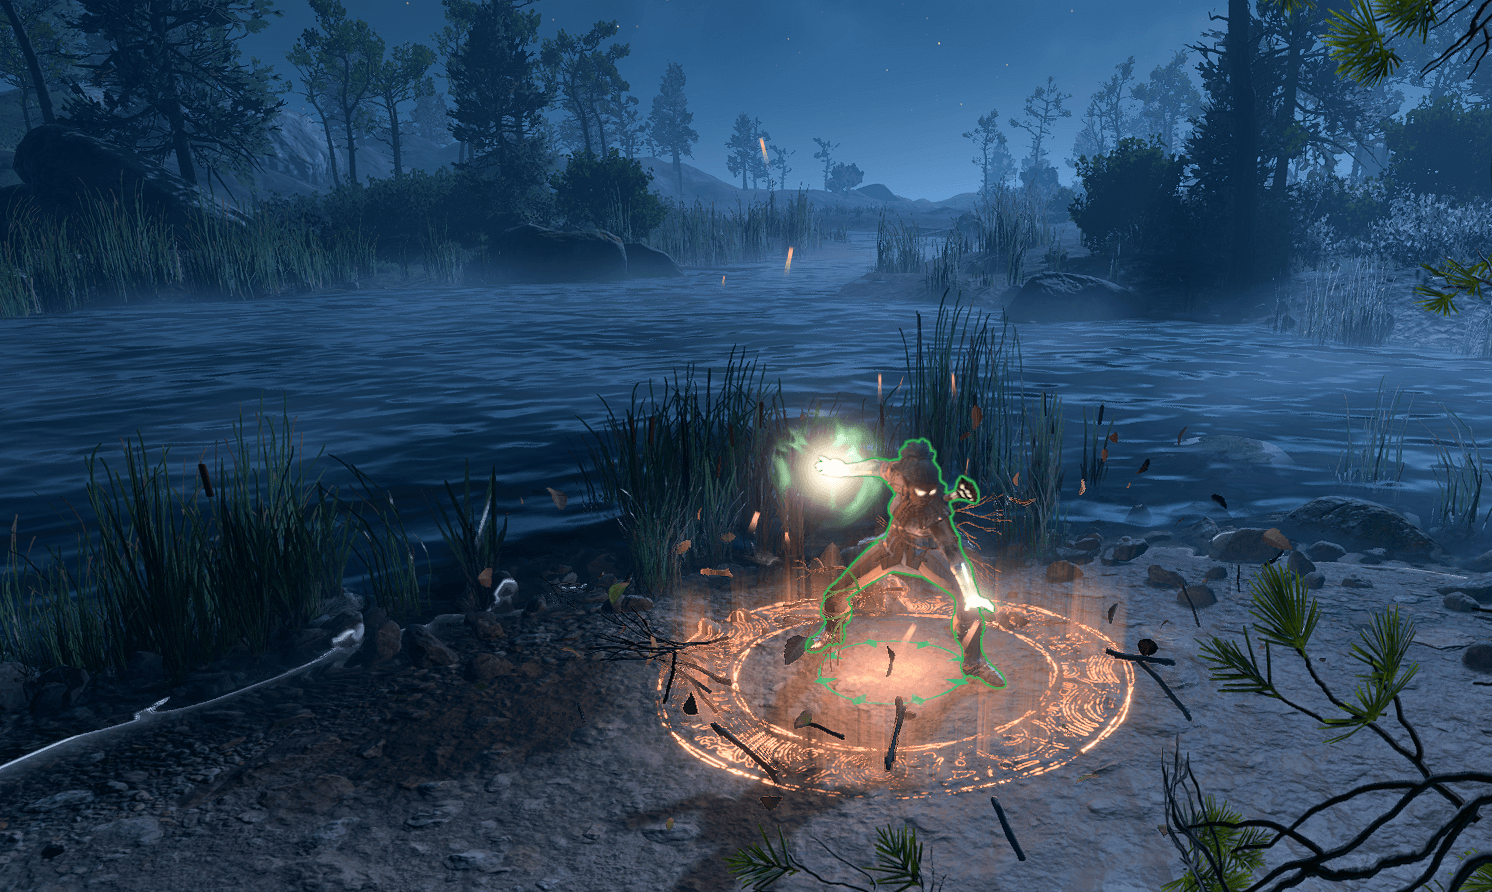
Circle of Moon Druids known for using different Wild Shape forms for different scenarios. This is because their Class Feature allows them to use Wild Shape as a Bonus Action, letting them turn into an animal and use an action after they’ve shifted.
They also gain access to Wild Forms other Circles can’t learn. You can shapeshift twice per short rest, meaning that you can use WIld Shape up to six times per long rest. Lastly, you gain access to Lunar Mend, which lets you spend a spell slot to recover HP.
The biggest problem with Circle of Moon Druids is how dependent they are on Wild Shaping. You don’t gain access to as many spells or spell slots as Circle of Land. As a Circle of Moon Druid, you’ll mostly be in your Wild Shape during every combat encounter and not much else since dialogue cannot be performed while in Wild Shape.
Additionally, each Wild Shape form has a separate health bar, meaning that if your health reaches 0 while shifting, you will not be downed and can either continue combat in your base form or shift into a different animal.
Races
The best races for Druids are any that give extra durability or Dexterity. While you’re in Wild Shape, your Strength, Dexterity, and Constitution modifiers will be replaced by the stats of whatever animal you’re shifted as.
Whenever you’re not in Wild Shape, however, you should have high Constitution and Dexterity to increase your survivability.
Recommended races & their traits
- Gold Dwarf: Dwarven Toughness, Darkvision, and Dwarven Resilience
- Wood Elf: Darkvision and Fey Ancestry
I highly recommend picking Gold Dwarf as your Moon Druid’s race. Their sub-race trait, Dwarven Toughness, gives you an additional 1 HP everytime you level up. Dwarven Resilience gives them an advantage on saving throws against Poison, and you have resistance against Poison damage.
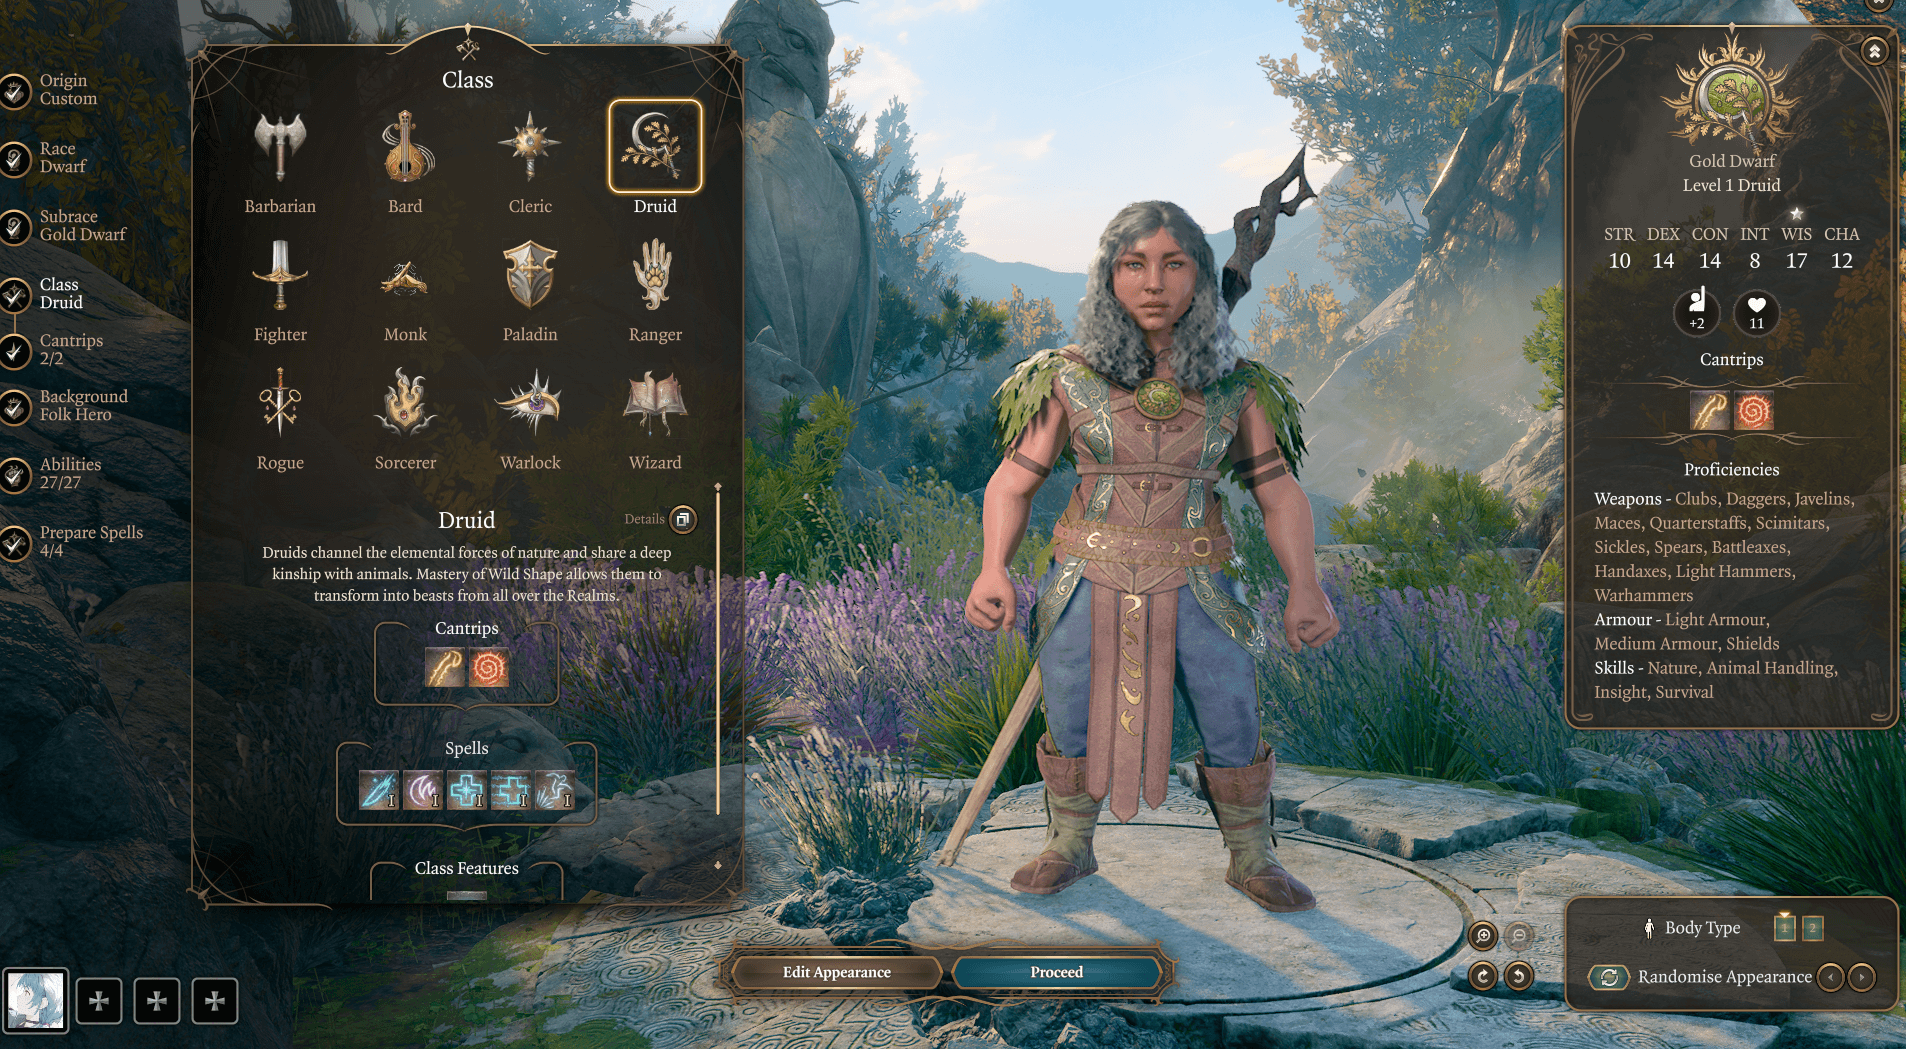
These traits will only increase your durability as you already gain the Weapon and Armor Proficiencies (Clubs, Shields, and Medium Armor) you need in order to effectively frontline.
Stats, Backgrounds, and Proficiencies
A Druid’s highest ability score should be Wisdom, since it’s your ability modifier. Your second highest ability scores should be Constitution and Dexterity. However, these ability scores won’t matter when you’re in Wild Shape. When you’re wearing Medium Armor, you can only have +2 Dexterity.
Because of this, both of these Ability Scores should be between 16-14. The rest of your ability points can be allocated as you wish, but remember that in order to wear Medium Armor you must have at least 10 Strength. Your ability scores should look something like this:
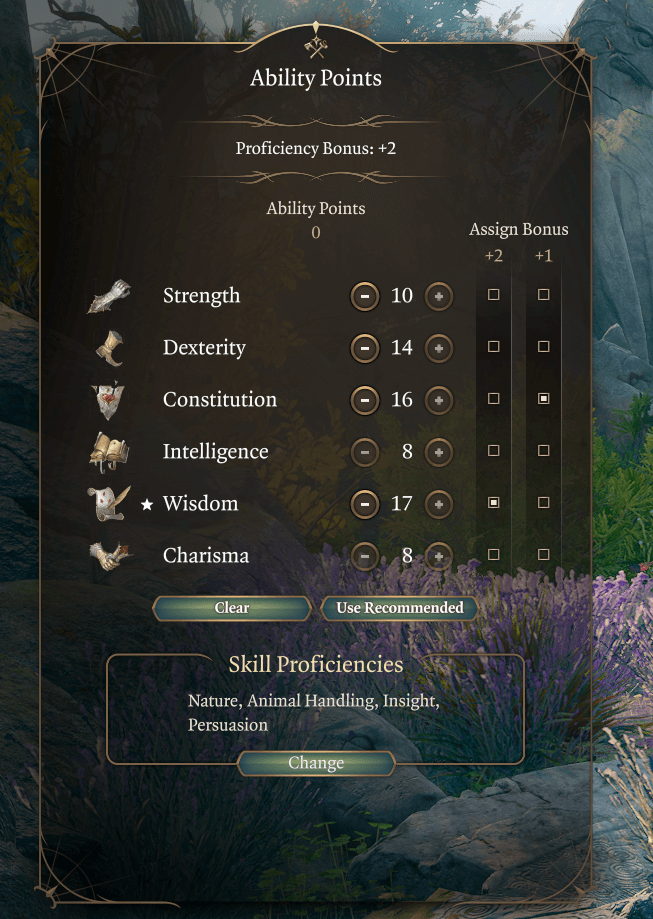
The best Druid backgrounds provide Wisdom skills for your character.
- Recommended backgrounds
- Folk Hero: Animal Handling and Survival
- Acolyte: Insight and Religion
- Outlander: Athletics and Survival
When choosing your skills, selecting anything with Wisdom or Dexterity will be optimal. I recommend choosing Perception, Survival, and Animal Handling. This will give your Druid a lot of bonuses when interacting with different animals and creatures during your journey.
Recommended Spells and Abilities
While Circle of Moon Druids don’t have access to as many spells as Circle of Land, they can still pick from a decent amount.
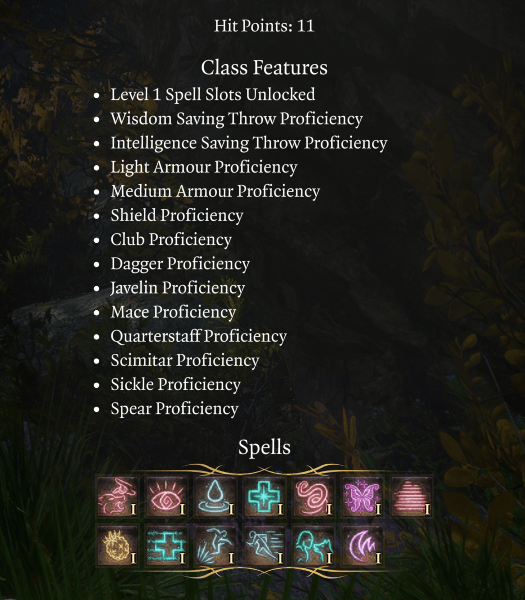
Level 1
At Level 1, I suggest picking the Cantrips Thorn Whip and Shillelagh.
Thorn Whip is an ability that pulls creatures towards you and deals 1d6 piercing damage.
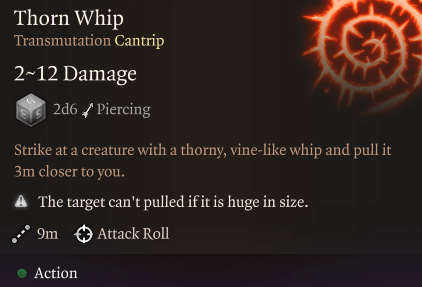
This is a great cantrip when you’re fighting enemies who are higher than you, as you can pull them down to you and your allies and remove their advantage.
Shillelagh buffs your staff/club with magic, dealing 1d8+2 Bludgeoning damage, and uses Wisdom for Attack Rolls.
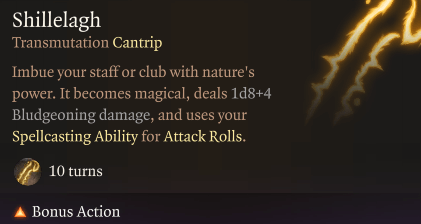
This cantrip is a Bonus Action, so whenever your Druid is forced into melee combat it’s always a good idea to use it.
You can choose four Level 1 Spells in the character creator. I recommend the following load-out:
- Entangle
- Entangle creates a large area of vines that root any targets that fail a Strength Check while walking through them. This spell is incredibly useful for protecting your party’s flank or preventing enemies from getting too close.
- Faerie Fire
- Faerie Fire creates light in an AoE that causes anyone inside to turn visible. Any Attack Rolls against them will have an Advantage. Using this spell can really turn the tides of battle if you’re able to hit it on a large group of enemies. It’s important to know that allied units can be hit with this ability as well, so keep that in mind if your party’s rogue is attempting to flank enemy units as they will lose their advantage.
- Healing Word
- Healing Word heals any ally you can see within an 18m radius. You can revive and heal allies with this spell from a distance, and it’s a Bonus Action so you can still attack in the same turn.
- Longstrider
- Longstider lets you touch any ally to increase their Movement Speed by 3m. This spell is really good for immobile classes, such as Fighters or Paladins, so they can use their Action on damage and not gap closing.
Level 2
Once you reach Level 2, you’re able to pick Circle of Moon as your subclass. This allows you to Wild Shape as a Bonus Action in combat, letting you transform and attack in the same turn. They also gain access to special Wild Forms, such as Polar Bear, Dire Raven, and Deep Rothé.
You also gain access to another Level 1 spell. I recommend choosing Thunderwave. Thunderwave is an AoE ability that pushes enemies away from you which is useful for creating space. Additionally, Thunderwave allows the wielder to take advantage of terrain by either pushing enemies into vines created by Entangle or off of cliffs!
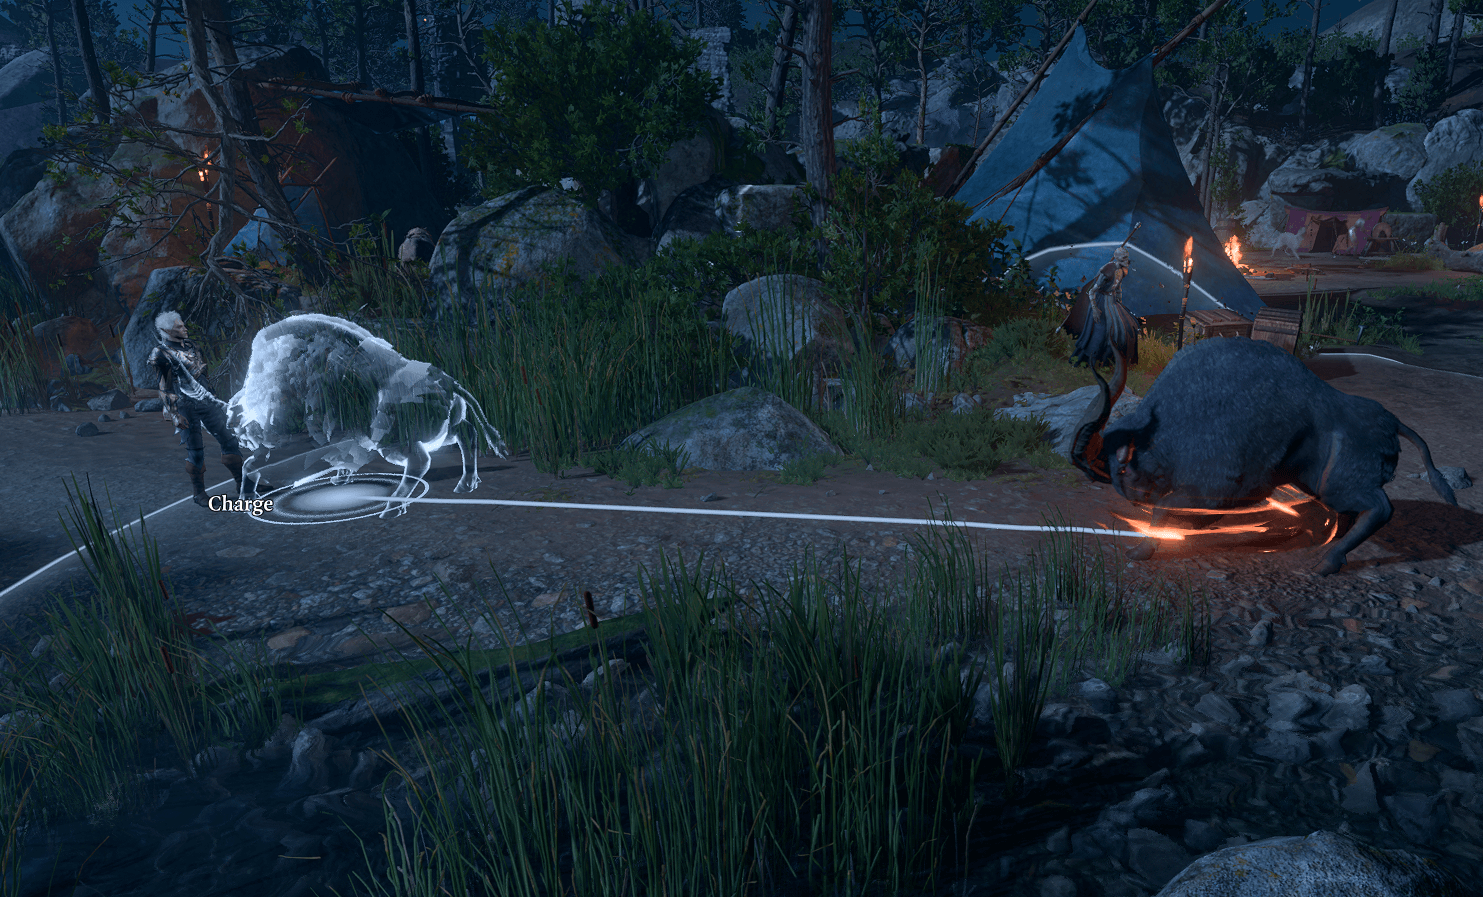
A Circle of Moon Druid’s main goal during combat is making full use of their Wild Shape forms. You’re able to turn into a Polar Bear, which has 30 HP, and tank hits for your allies.
You can also Goad enemies into attacking you, which will help take the heat off of your more fragile allies. You also have Lunar Mend, which allows you to heal while in Wild Shape, allowing you to stay shifted longer. There are also many other creatures to Wild Shape into.
You can turn into Deep Rothé and knock enemies prone, or increase your allies’ movement speed as a Wolf. You’re rewarded for thinking outside the box and trying new things, so don’t be scared to try out different Wild Shapes in combat.
Level 3
Once you reach Level 3, you’ll gain access to two Level 2 spells and spell slots. I highly recommend Moonbeam and Spike Growth. Moonbeam is an AoE Spell that damages any creature that enters the beam for 2d10 Radiant Damage for 10 turns.
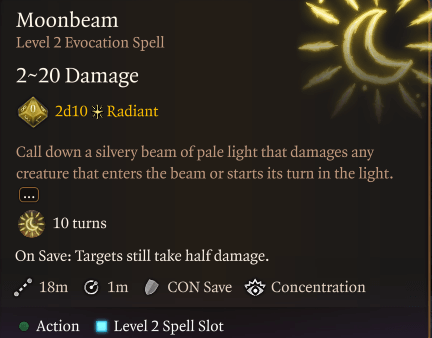
It can also be moved to a new position in subsequent turns by recasting. This spell isn’t as useful for zoning as a lot of the other spells due to its small size; however, its high damage output makes it one of the best damage dealing spells in the game.
Additionally, it can be used with any crowd control abilities to maximize the amount of damage being dealt. Spike Growth shapes the ground into spikes, and any creature walking on them takes 2d4 Piercing damage. This counts as difficult terrain, so it also halves movement speed.
This is a great spell to keep enemies away from your allies, and can also do massive damage over a large area. However, it’s important to note that enemies will likely choose to try and jump out of the spikes or walk around them, so proper positioning is important if you don’t want to waste any spell slots.
Level 4
When choosing a feat at Level 4, you should choose Ability Improvement. This lets you place 2 points into Wisdom so you can reach 18. Because Wisdom is your modifier, this will make all your abilities stronger. You also gain access to another Level 2 spell and a cantrip.
I recommend choosing Heat Metal as your spell and Guidance as your cantrip.
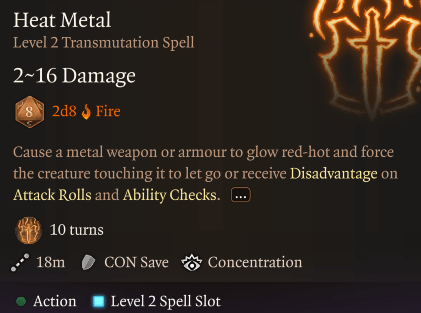
Heat Metal causes metal weapons or armor to become hot and cause the creature touching them to drop their weapon or receive a Disadvantage on Attack Rolls and ability checks. This spell can be re-casted as a Bonus Action (if the target is still touching the metal item) to deal 2d8 Fire Damage and re-apply the Disadvantage.
This is a great single-target ability, and can easily weaken powerful enemies. Guidance gives a 1d4 bonus to ability checks, and is just a generally good Cantrip to have in order to buff your party.
Level 5
Lastly, when you gain access to level 5 spells, you should take Call Lightning and Sleet Storm. Call Lightning is a spell that deals 3d10 Lightning Damage. If you maintain Concentration, you can call down lightning again without expending a spell slot.
Sleet Storm calls forth a storm that douses fires, creates an ice surface (halving the movement speed of anyone walking through it), and disrupts the concentration of spellcasters. This ability slows down creatures, can knock them prone, and stops the concentration of abilities. It’s a very strong CC ability and can easily help you establish zone control.
Levels 6 and 7
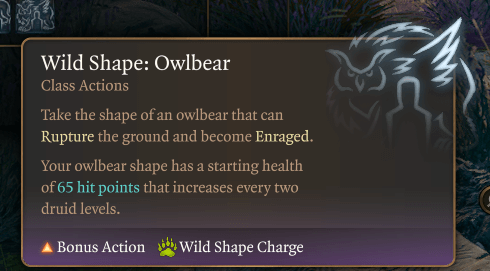
At Levels 6 and 7, you gain new Wild Shape forms, Primal Strike, and Level 3 and 4 Spell Slots. You’ll gain access to two new Wild Shape forms, a Panther and an Owlbear.
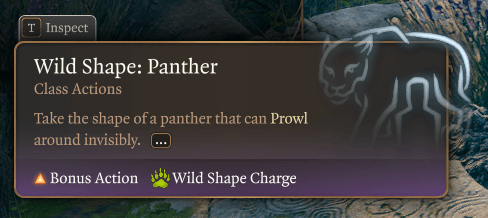
Both forms are very good, as you’re able to turn invisible as a Panther and Rupture the ground as an Owlbear.
Primal Strike is a Sub-Class passive that turns your attacks into magic damage for the purpose of overcoming Resistance and Immunity to non-magical damage while in Wild Shape.
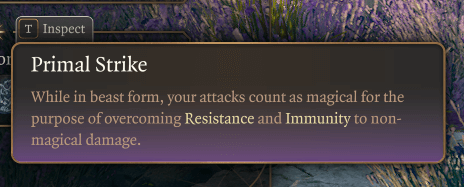
For example, if an enemy has Resistance to Slashing Damage, then your Owlbear attacks will turn into Magic damage instead of Slash Damage. Lastly, you’ll also gain Level 3 and 4 Spell Slots. I recommend choosing Plant Growth and Conjure Woodland Being.
Plant Growth is a great CC ability, as it’s able to reduce Movement Speed by a quarter. This can help slow down large groups of enemies and make it harder for them to attack you. Conjure Woodland Being summons a dryad that can Entangle enemies and disables terrain effects for your allies.
Level 8
At Level 8 you’ll be able to choose a Feat, another Spell Slot, and gain the new Wild Shape: Sabre-Toothed Tiger. For your Feat, I recommend picking Ability Improvement so you can raise your Wisdom to 20, and increase your Constitution.
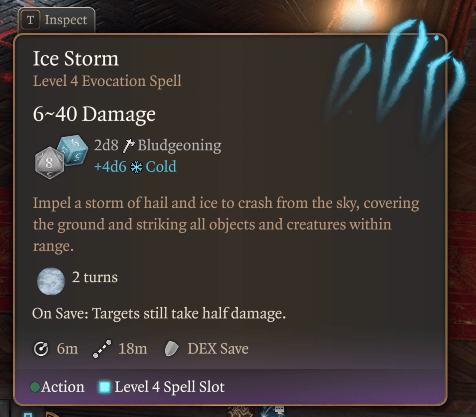
The Sabre-Toothed Tiger is able to Shred Armor and heal back HP. This is one of the best Wild Forms in the game, as it can take down tanky enemies. I’d recommend picking Ice Storm as your new Spell, as it’s able to damage large groups of enemies and also potentially knock enemies Prone.
Level 9
When you reach Level 9, you’ll be able to choose Level 5 Spells. I’d recommend getting rid of Conjure Woodland Being and switching it out for Conjure Elemental.
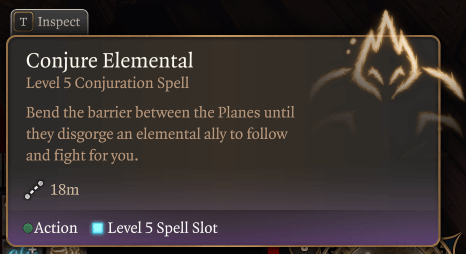
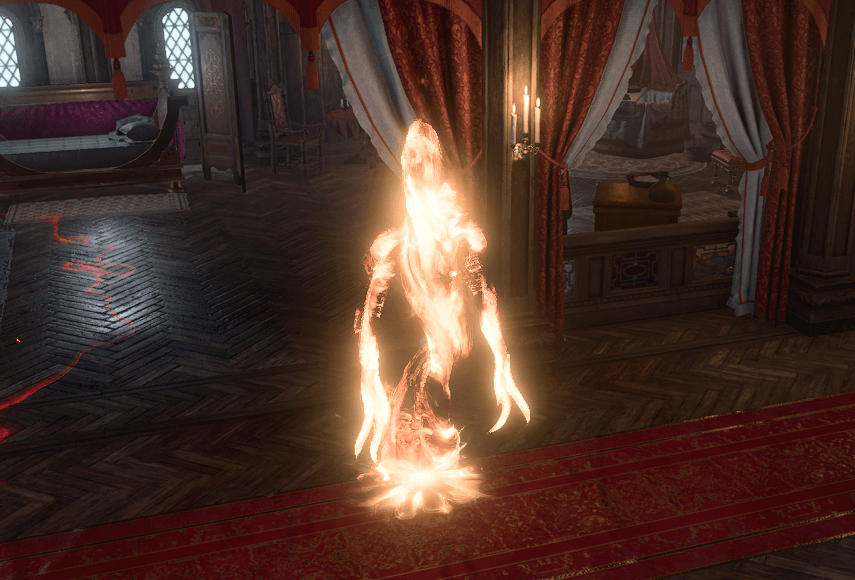
This lets you summon an Elemental that will fight with you. Depending on which element you choose, the Elemental you summon will have different abilities.
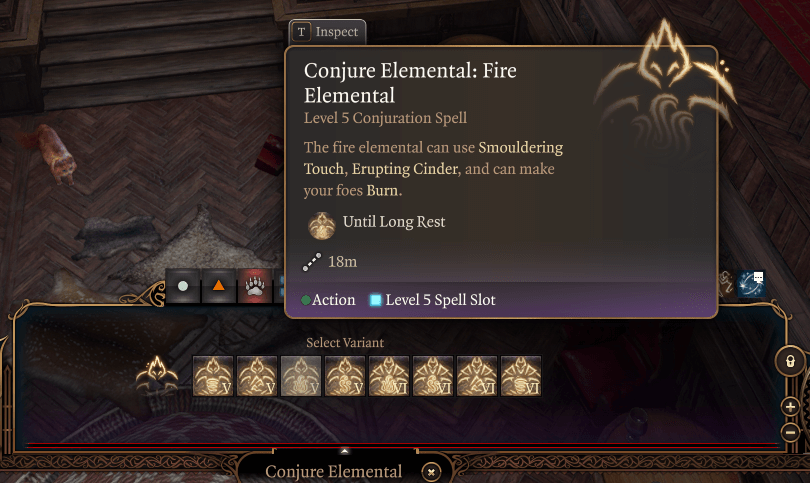
For example, the Earth Elemental will Stun enemies or the Fire Elemental can Burn enemies. I’d also recommend picking up Insect Plague. This Spell causes locusts to attack everyone within a certain range and make the area Difficult Terrain. This is a great spell for zoning and keeping enemies away from your allies.
Level 10
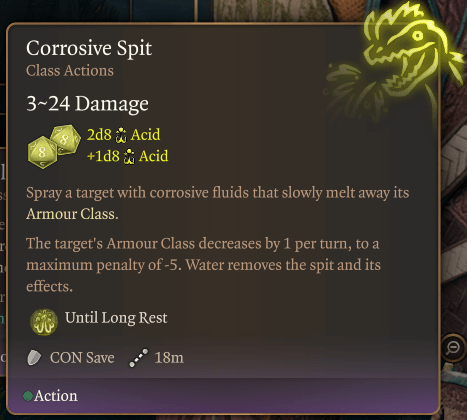
Once you reach Level 10, you’ll gain new Wild Shapes, Improved Wild Strike, a new Cantrip, and another Level 5 Spell Slot. Your newly acquired Wild Shapes are the following: Dilophosaurus, Air Myrmidon, Earth Myrmidon, Fire Myrmidon, and Water Myrmidon.
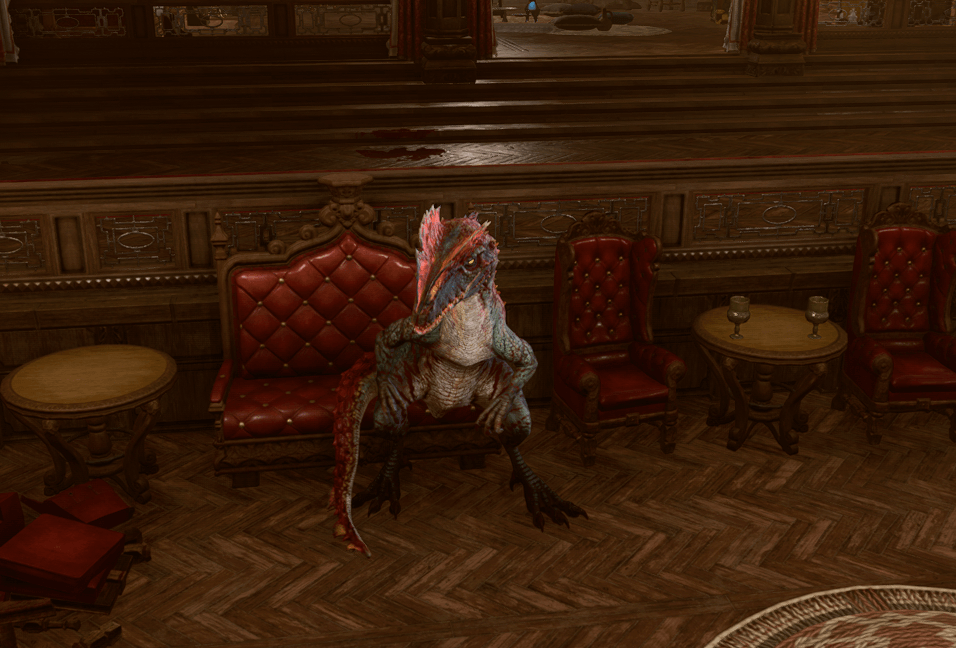
Turning into a Dilophosarus allows you to melt away enemies’ AC with your Corrosive Spit.
Improved Wild Strike lets you make 2 additional attacks after making an unarmed strike while in Wild Shape. This lets you make up to 3 strikes in one turn.
For your new Cantrip, I’d recommend picking either Produce Flame or Resistance (depending on team comp). For your new Level 5 Spell, you should choose Mass Cure Wounds. You can heal up to 6 allies for 3d8+5 in a very large range.
Levels 11-12
At Levels 11 and 12, you gain Level 6 Spell Slots and choose your last Feat. When choosing your Level 6 Spells, I recommend switching out Insect Plague for Heroes’ Feast. This Spell produces a feast around you that cures diseases, immunizes to poison, and increases HP by 2d10 for 24 hours. You also spawn a box full of Camp Supplies.
Your next Level 6 Spells should be Heal and Wall of Thorns. Heal is the best single-target healing Spell, as it heals for 70 HP. I also like Wall of Thorns, since it creates a 60-ft-long, 10-ft-high, 5-ft-thick wall of brush that slows movement and can inflict 7d8 piercing damage.
I recommend picking the War Master Feat, as it’ll give you Advantage on Saving Throws to maintain Concentration for Spells. I recommend picking this since your Wisdom is already 20.
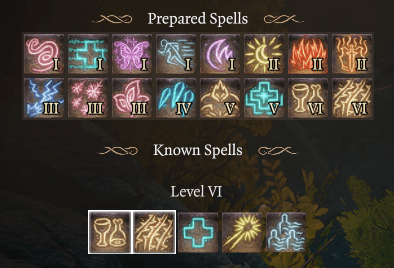
As you play, feel free to change out your Spells since you can always edit your Spellbook or talk to Withers. At this point, your Spells can look something like this at Level 11:
Equipment
While equipment isn’t extremely important (since you’ll be in your Wild Shape most of the time), it can still be helpful when casting spells. I recommend equipping a Club and Shield.
You can buff your Club with Shillelagh and have it do extra damage if you’re ever forced into a melee fight. You should also equip a Light Crossbow since your Dexterity isn’t bad.
The best armor for Circle of Moon Druids is Medium Armor. While it won’t matter when you’re in your Wild Shape, you’ll gain some survivability when you’re not.
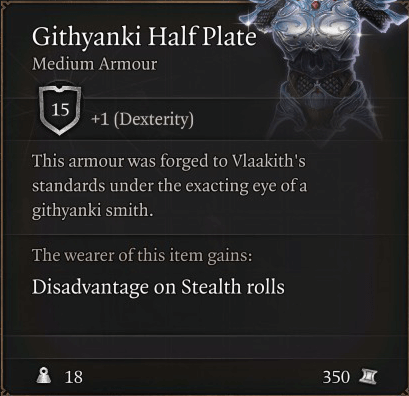
I recommend Scale Mail, or if you have klepto tendencies, then you could take Lae’zel’s Githyanki Half Plate. You can also kill the Githyanki Patrol.
Once you reach Acts 2 & 3, you’ll find a lot of new Equipment. Here are some I’ve found while playing:
- Armor of Landfall: Bought from a merchant in Moonrise Towers
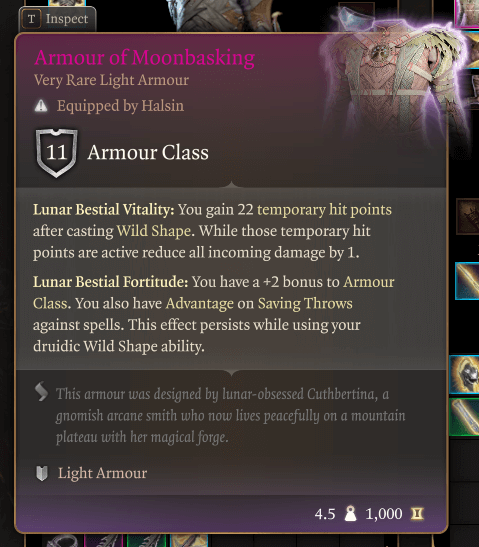
- Armor of Moonbasking: Bought from Voiceless Penitent Bareki in Lower City Sewers
- Browbeaten Circlet: Found in Moonrise Prison.
- Shapeshifter Hat: Bought from a merchant in the Devil’s Fee Shop in the Lower City.
- Gloves of Dexterity: Bought from a merchant in Crèche Y’llek.
- Adamantine Shield: Found in the Grymforge, during The Adamantine Forge Quest.
- Shield of Devotion: Bought from Quartermaster Talli in Last Light Inn.
- Kethric’s Shield: Obtained by killing Kethric Thorm.
- Club of Hill Giant Strength: Obtained by breaking the Stool of Hill Giant Strength in the Arcane Tower after sitting on it.
The Armor of Landfall grants you Green Bed Regeneration, which regains you 1d4 HP whenever you start your turn on a Plant Growth or Vine Surface. You also gain a +1 bonus to Spell Save DC and Advantage on Constitution Saving Throws.
This is a pretty good armor piece and is what you should be wearing until you get the Armor of Moonbasking in Act 3.
Armour of Moonbasking
Browbeaten Circlet
Browbeaten Circlet gives the wearer a +1 bonus to spell save DC while Threatened. This is a really useful buff as you’ll be near enemies for most of the combat, and it’s a good option if you haven’t gotten the Shapeshifter Hat. The Shapeshifter Hat gives you a +1 in Nature and increases your Wild Shape Charges by 1.
Gloves of Dexterity
The Gloves of Dexterity increases your Dexterity to 18 and gives you Attack +1. Dexterity is always a good Ability Score to have, especially since most of your points will be allocated to your Wisdom and Dexterity.
Shield Options
Good Shield options are the Adamantine Shield, Shield of Devotion, and Kethric’s Shield.
Adamantine Shield
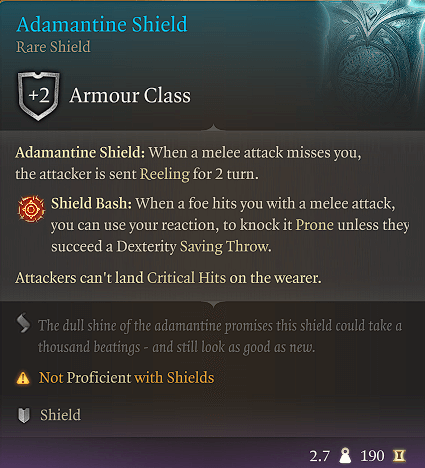
The Adamantine Shield gives you the abilities Shield Bash and inflicts Reeling when melee attacks miss you.
Shield Bash gives you the following passive: when a foe hits you with a melee attack, you can use your reaction to knock it Prone unless they succeed a Dexterity Saving Throw.
Shield of Devotion gives the wearer Shield Bash and an additional Level 1 Spell Slot.
Ketheric’s Shield
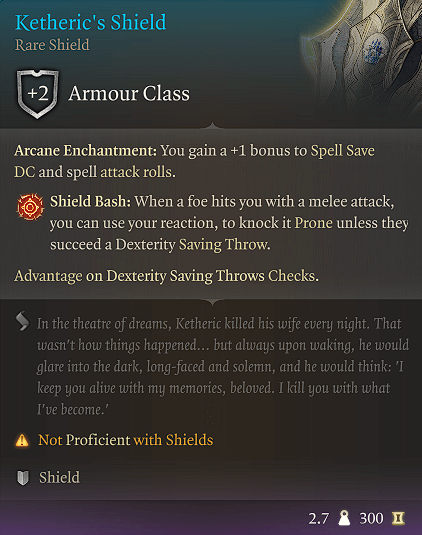
If you have Kethric’s Shield equipped, you gain Shield Bash and Arcane Enchantment. Arcane Enchantment grants you a +1 bonus to Spell Save DC and spell attack rolls.
Club of Hill Giant Strength
The Club of Hill Giant Strength is a great club choice for Moon Druids, as it also gives you the passive Splinters of Giant’s Might. Splinters of a Giant’s Might increases your Strength score to 15. This can help you when melee attacking and shoving during combat.
Conclusion
Circle of Moon Druids really lean into the main selling point of being a Druid by making reliance on Wild Shape the player’s main focus. While they don’t excel in any particular playstyle, they have exceptional capabilities as frontline, stealth and spellcaster.