 League of Legends
 Teamfight Tactics
 Valorant
 Lost Ark
 Destiny 2
 Diablo 4
 Download APP
Table of contents
List of the Best Baldur’s Gate 3 Equipment in Act 1
Looking for the best Baldur’s Gate 3 items of Act 1? You’ve come to the right place.
In this guide, we’ve listed all item types from Amulets to War Picks with their locations and notes about them.
We covered items that have unique names and weren’t just generic +1 items.
Note that since there are a TON of items in BG3, we may have missed some so please let us know and we’ll add it.
Click our table of contents to the right to jump to a specific item slot!
Amulets
Absolute’s Talisman

- Where to find it
- Loot from Priestess Gut (in the Goblin Temple)
- Commentary
- This is a useful Amulet to use out of combat to keep your health up between battles. However, its Advantage on Death Saving Throws is a nice bonus in theory but is a bit too situational to be practical.
Amulet of Elemental Torment
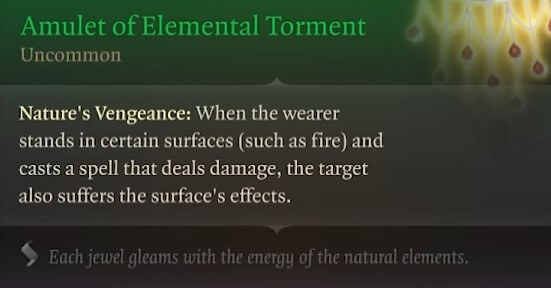
- How to get it (reported locations)
- Option 1 – Sold at the Druid Grove by Arron
- Option 2 – Sold at the Goblin Camp by Grat the Trader
- Option 3 – Sold at the Zhenatrim Hideout by Brem
- Commentary
- There might be a cool build out there that makes some good use of this in combination with elemental resistances. However, the amount of coordination this needs is a bit too much for the result.
Amulet of Misty Step
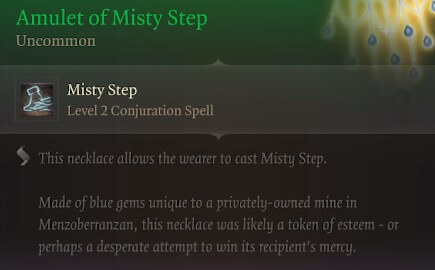
- How to get it
- Located in a chest near Polma (female ogre) in the Goblin temple
- Commentary
- Misty Step is one of the best Level 2 spells, both in and out of combat for its mobility. It allows you to escape in a pinch, get to high ground, teleport to the enemy backline, and so on. Having it attached to an Amulet lets you keep it in your back pocket or prep it for a particular battle.
Amulet of Restoration
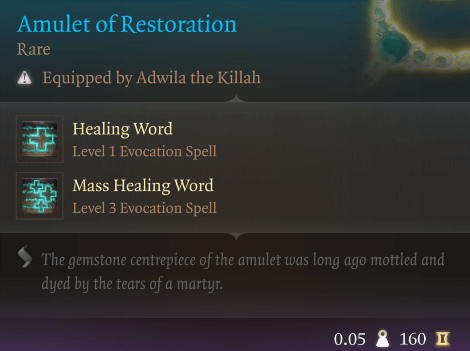
- How to get it
- Sold at the Myconid Colony in the Underdark by Derryth Bonecloak
- Commentary
- Whether you want to use it in or out of battle, this is one of the best Amulets for healers in Act 1. Just keep in mind that each spell can only be used once per Long Rest.
Amulet of Selune’s Chosen
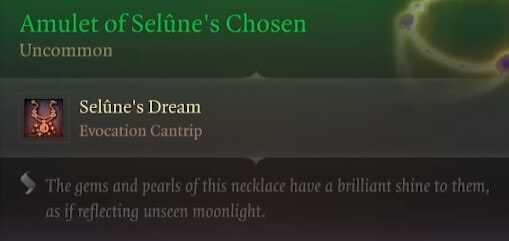
- How to get it
- Behind Dror Ragzlin’s throne (in the Goblin temple) is a locked Iron Gate, you’ll find it there in his treasure stash.
- Commentary
- Selune’s Dream is a bit too risky to be used in battle outside of an extreme emergency. It’s better served as a supplement between battles.
Amulet of the Unworthy
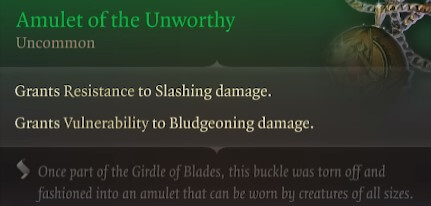
- Where to find it
- Dropped by one of the Minotaurs at the East end of the Underdark.
- Commentary
- This amulet can be situationally decent but in many fights, you’ll be facing a variety of damage sources so it may be harder to get value with than you’d think.
Beastmaster’s Chain
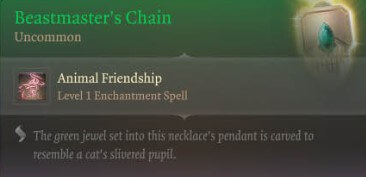
- Where to find it
- At the Worg Pens (Goblin Temple) in a chest
- Commentary
- This amulet is very situational for battles that include Animals, so it’s better off as something you keep in your back pocket rather than always equipped.
Broodmother’s Revenge
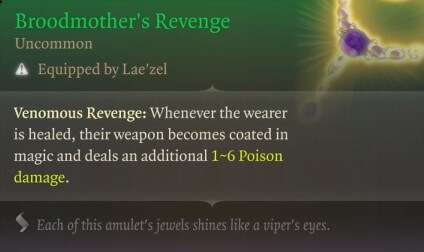
- Where to find it
- Loot from Kagha
- Commentary
- Broodmother’s Revenge shines in longer fights as your healer is likely to proc it for multiple party members. It does work with AoE heals so keep that in mind and maximize the three turns of Poison coating. Keep in mind that it only coats weapons, so you can skip this if you’re going a spellcasting party.
Envoy’s Amulet
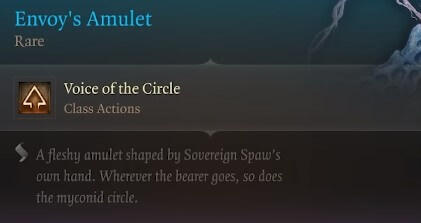
- Where to find it
- Granted as a reward by the Sovereign Spaw for delivering Nere’s Head.
- Commentary
- In a game where Persuasion can be used to literally convince your enemies to kill themselves, +2 is incredibly valuable for social situations.
- Note that if you turn in Nere’s Head to Glut, you’ll get Champions Chain which instead provides +2 to Intimidation.
Komira’s Locket
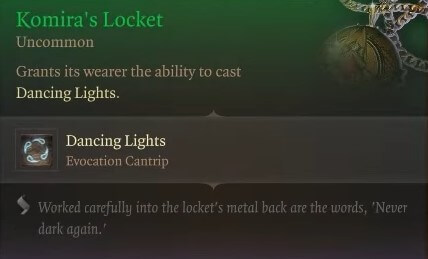
- Where to find it
- Reward given by Arabella’s parents if you save her from Arabella.
- Commentary
- Komira’s Locket is another situational choice and is rarely needed with the wide range of other light sources and ways to get Darkvision.
Pearl of Power Amulet
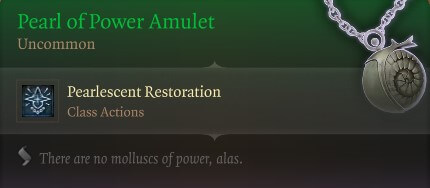
- Where to find it
- Sold at the Myconid Colony by Omeluum (the Mindflayer) after completing his Arcane Tower quest.
- Commentary
- This is one of the best Amulets for a caster in general – being able to refill any spell slot levels 1-3 between battles is incredibly useful. For example, you can use your Level 3 spell slot to cast Animate Dead and then immediately refill it your resource.
Sentient Amulet
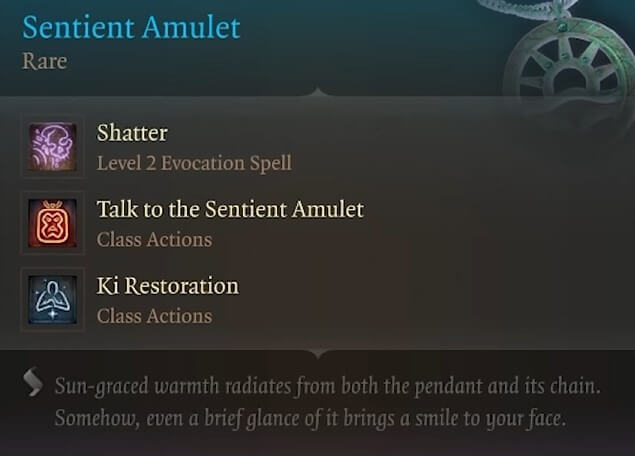
- Where to find it
- Within the Adamantine Chest in the small structure in the lava near the Grymforge. You’ll see a Lava Elemental in the area.
- Commentary
- This Amulet is quite the find. For all classes, it’s pretty solid having an extra AoE spell and it opens up a new quest line.
- If you’re a Monk, it is an AMAZING find as you’ll be able to use your Ki abilities more often. Do NOT miss it.
Silver Pendant
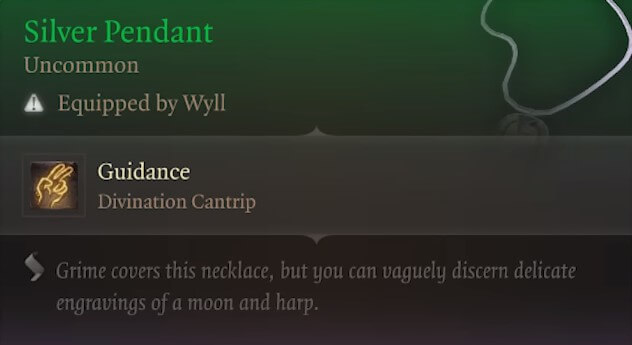
- Where to find it
- Southwest of the Druid Grove gates, you’ll find a cliff that you can access by climbing a ladder. Loot the skeleton to find the pendant.
- Commentary
- If you don’t have a Cleric or other class that can easily grant Guidance, Silver Pendant is a solid keep to swap in when needed to help you with social interactions, locking picking, and other situations.
The Amulet of Lost Voices
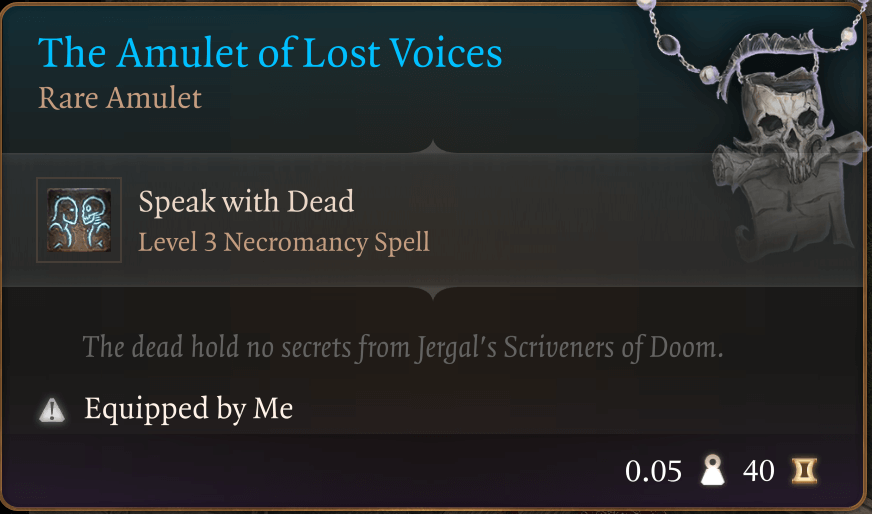
- Where to find it
- Inside a heavy chest within the room where you find Witherrs (Dank Crypt).
- Commentary
- Like Speak with Animals, Speak with Dead can really widen your possibilities in BG3. Although there are other methods the ability, this Amulet is easy to get and can open up a spot on your spell list for something better.
The Blast Pendant
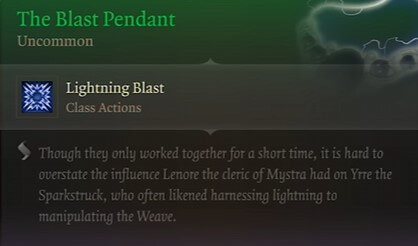
- Where to find it
- Looted from a petrified Drow in the Spectator fight area (Underdark)
- Commentary
- If you’re going the full Lightning Charge build (used by assembling other pieces on this list), this is a nice fit. Not so much out of the context though.
The Ever-Seeing Eye
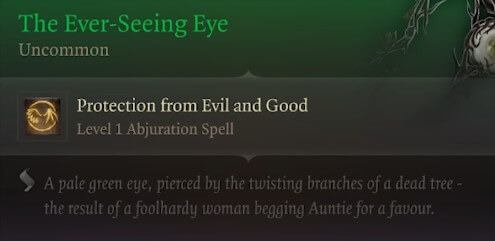
- Where to find it
- In the Hag’s treasure room (adjacent to where Mayrina is held captive)
- Commentary
- The Ever-Seeing Eye is definitely situational but (without spoilers), there will be many opportunities to get value from this. Definitely not a must-have, especially since it requires Concentration, but you can never discount making enemies have Disadvantage against you.
The Spectator Eyes
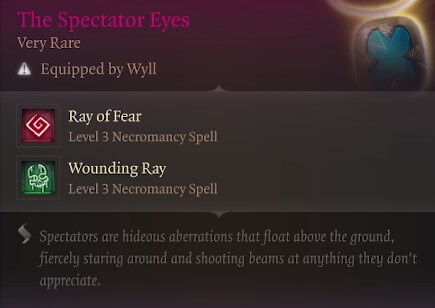
- Where to find it
- Dropped by the Spectator in the Underdark
- Commentary
- Having two Level 3 spells for free is an absolute luxury in Act 1, they can turn the tide of a fight, especially when you’re low on resources.
Uncovered Mysteries
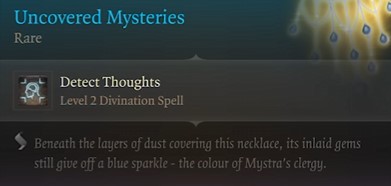
- Where to find it
- On the 1st floor of the Arcane Tower within a chest
- Commentary
- If you have the luxury of being able to plan social interactions ahead of time, this is a nice one to keep ready in your Inventory to open up your options.
Boots
Boots of Aid and Comfort
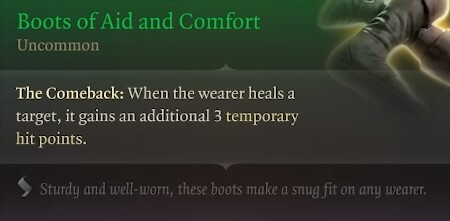
- Where to find it
- Sold at the Goblin Camp by Grat the Trader
- Commentary
- Boots of Aid and Comfort is a solid early game choice for healers, 3 doesn’t seem like much but you have to remember that health pools are much smaller at lower levels.
Boots of Genial Striding
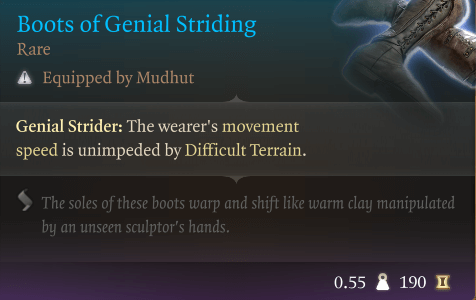
- Where to find it
- Sold at the Myconid Colony by Blurg
- Commentary
- Difficult Terrain will be a factor in many fights, whether it’s from the environment, created by enemies, or created by your abilities. Whether you want to build around it or want to ignore it, this can be a good choice for your melee party members.
Boots of Speed
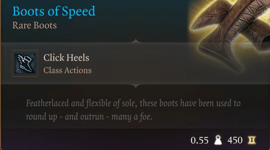
- Where to find it
- Rewarded for completing the Cure the Poisoned Gnome quest OR you can take it from Thulla’s body instead of giving the boots to the Duergar
- Commentary
- Boots of Speed is a great choice for virtually any class due to its versatility. It allows offensive characters to engage or chase more reliably and it allows your vulnerable characters to stay out of trouble. Best of all, it just requires a Bonus Action, no rests needed in between.
Boots of Stormy Clamour
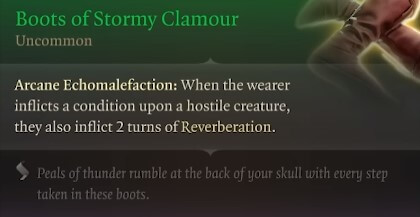
- Where to find it
- Sold at the Myconid Colony by Omeluum (the Mindflayer) after completing his Arcane Tower quest.
- Commentary
- If you have a character (like a Bard) that can continually apply debuffs, this can be a nice supplement to really disable their target(s).
Boots of Striding

- Where to find it
- Loot dropped by Minthara
- Commentary
- Boots of Striding includes a lot of perks that offer mobility and defensive upgrades for your Concentration casters. Don’t forget the Athletics boost if you need some extra oomph to reach places out of combat.
Disintegrating Night Walkers
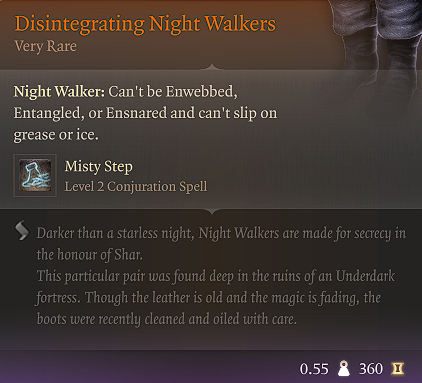
- Where to find it
- Dropped by Nere in the Underdark
- Commentary
- These boots are a suped-up version of the Amulet of Misty Step, offering not only a free Misty Step spell per Short Rest, but also the ability to ignore a ton of crowd-control effects.
- You can equip these to any class but they will likely shine most on your frontliners since they will face the most crowd control effects.
Linebreaker Boots
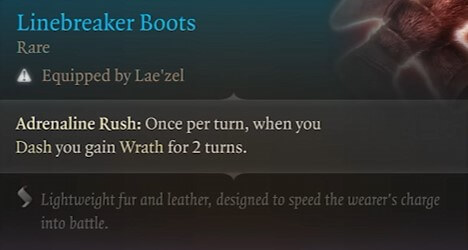
- Where to find it
- Loot dropped by Beastmaster Zurk in the Worg Pens (Goblin temple)
- Commentary
- Linebreaker Boots can work on any class but particularly shine on classes like the Monk or Rogues who have improved Dash abilities.
Mystra’s Grace
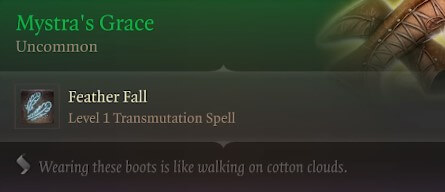
- Where to find it
- Within the Chest of the Mundane at the Arcane Tower’s 3rd floor. Use the Sussur Bloom’s antimagic field to see its loot.
- Commentary
- Having Mystra’s Grace in your inventory can open up a Prepared Spell slot in your spell’s list, just make sure to swap it out for something better before entering combat.
Spiderstep Boots
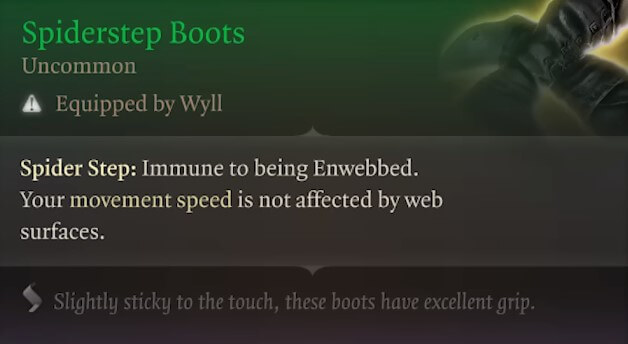
- Where to find it
- In a chest within the Aracnomancer’s laboratory in the Whispering Depths (the Spider boss’s lair underneath the Blighted Village).
- Commentary
- You’ll face some spiders during Act 1, but Spiderstep Boots can be a potential option if you like playing with Web abilities whether it’s from spells or spider pets. Outside of those situations, it won’t be too useful.
Springstep Boots
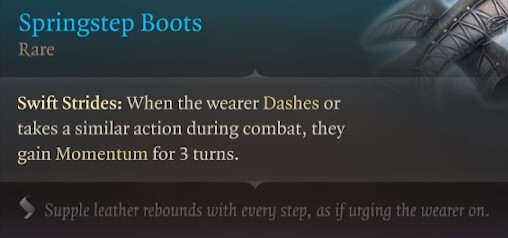
- Where to find it
- Behind Dror Ragzlin’s throne (in the Goblin temple) is a locked Iron Gate, you’ll find it there in his treasure stash.
- Commentary
- This makes your mobile classes even more mobile! It’s particularly useful on Monks and Rogues since they have improved Dash actions.
Swiresy Shoes
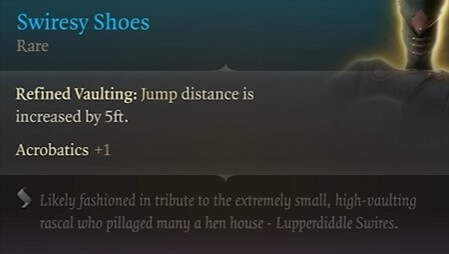
- Where to find it
- Sold at the Goblin Camp by Grat the Trader
- Commentary
- Swiresy Shoes is better out of combat for helping your party reach hard-to-reach places (you’ll likely have better choices for fighting). Remember that you can swap it between characters easily.
The Speedy Lightfeet
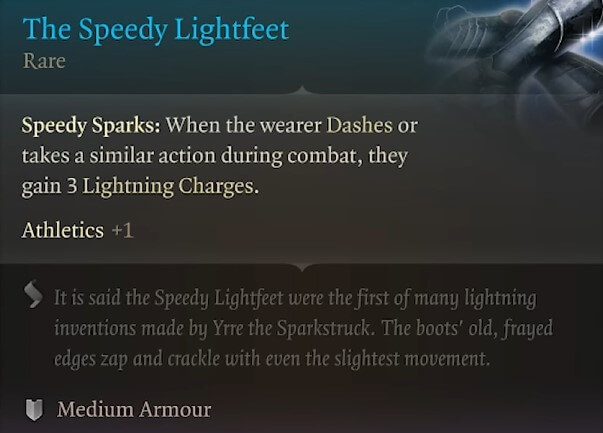
- Where to find it
- In a chest in the cellar of the windmill (where the Gnome is tied up near the Blighted Village)
- Commentary
- At first glance, you might think this is a good choice for a Monk or Rogue going for the Lightning Charge build set due to their Dash synergies. However, the Medium Armor requirement makes it a bit clunky, so it may be more for a Fighter or melee Ranger.
Winter’s Clutches
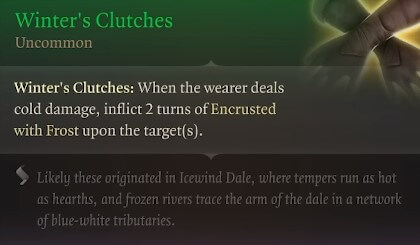
- Where to find it
- Option 1 – Reward given by Glut after you kill Sovereign Spaw.
- Option 2 – Sold by Lady Esther along the Rosymorn Monastary Trail (lady who wants the Githyanki egg)
- Commentary
- If you happen to be going an Ice/Cold build, this is a great option for obvious reasons. Pretty straightforward!
Wondrous Gloves
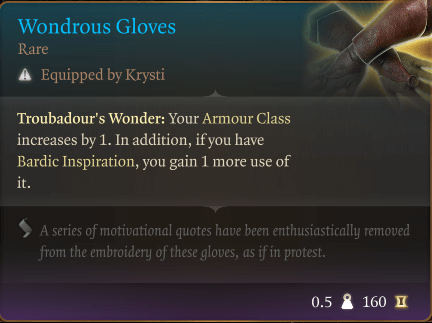
- Where to find it
- Dropped by the Mimics at Gyrmforge
- Commentary
- Having +1 AC is always incredibly valuable but this becomes amazing if you have a Bard in your party.
Clothing (Chest)
Armour of Uninhibited Kushigo
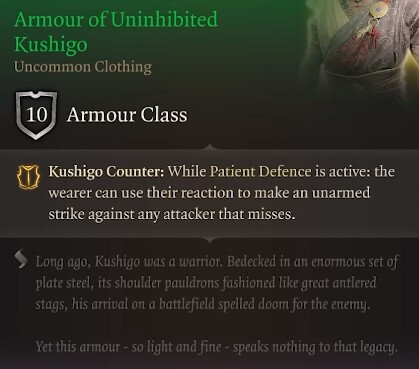
- Where to find it
- One of the reward choices given by Sergeant Thrinn of the Grymforge if you give her the Boots of Speed.
- Commentary
- This is powerful on Monks but useless on every other class.
Bloodguzzler Garb
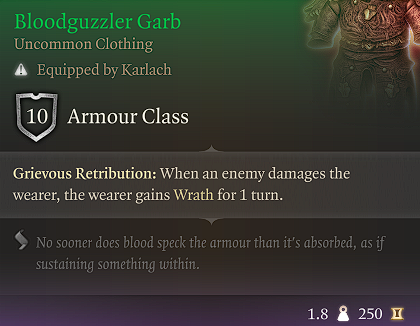
- Where to find it
- Loot dropped by the Bulette in the Underdark
- Commentary
- Wrath grants +1 damage to melee weapons, so this Garb is a solid choice for Barbarians and Monks.
Poisoner’s Robe
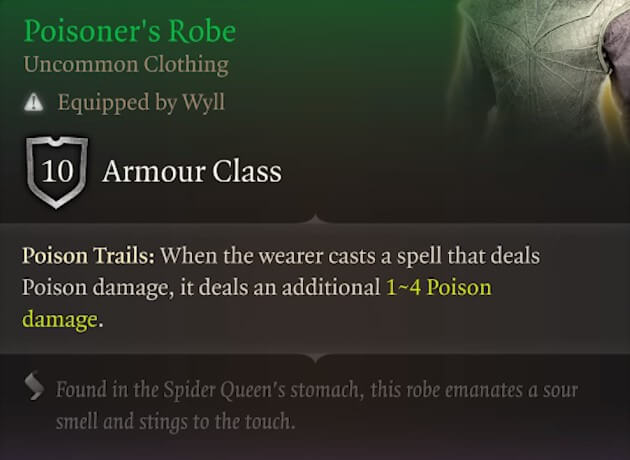
- Where to find it
- Loot dropped by the Spider Matriarch within the Whispering Depths (the Spider boss’s lair underneath the Blighted Village).
- Commentary
- If you happen to be going a poison caster build, or even just have access to Poison Spray, this can be a decent pickup but will likely be replaced quickly.
Robe of Summer
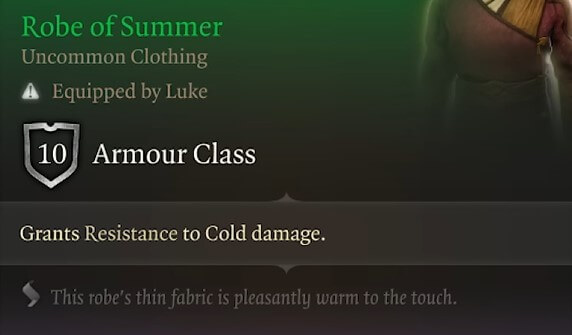
- Where to find it
- Found within the Druids’ Hidden vault (Druid Grove).
- Commentary
- There isn’t much Cold damage in the early game so it’s hard to justify using this.
The Protecty Sparkswall
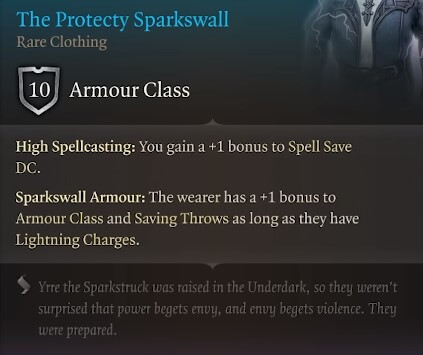
- Where to find it
- In the chest behind the Iron Gate on the Grymforge bride with the traps.
- Commentary
- Having a +1 bonus to your Spell Save DC can be helpful for any Cloth armor wearer but it can be difficult to proc the Sparkswall Armour unless you’re going for the Lightning Charge build. There will likely be better options if you aren’t building around it.
Clubs
Club of Hill Giant Strength
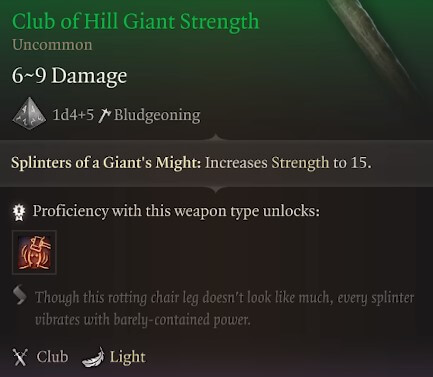
- Where to find it
- At the top floor of the Arcane Tower, you’ll see a stool named “Stoll of Hill Giant Strength”. Throw the stool so it breaks to discover the club.
- Commentary
- By the time you get this Club, you’ll likely have better weapons for your Fighter or Barbarian. However, being able to increase your Strength to 15 instantly can be helpful out of combat since STR improves Athletics checks.
Daggers
Assassin’s Touch
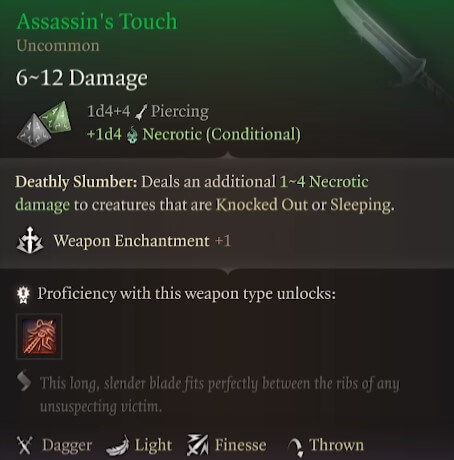
- Where to find it
- Reward given after successfully escorting Sazza to the Goblin Camp.
- Commentary
- If you have a Rogue along with access to the Sleep spell from your party, this can be an attractive early option until you find something better.
Hunter’s Dagger

- Where to find it
- Sold at the Goblin temple by Roah Moonglow.
- Commentary
- Rupture causes its target to take 1d4 damage each time it moves. Overall this is a solid early game dagger that you can proc often.
Ritual Dagger
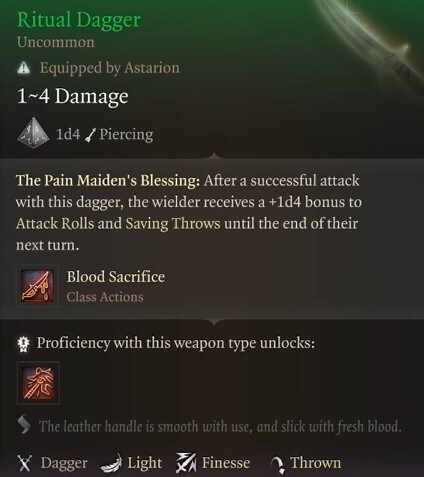
- Where to find it
- Found within the torture chamber in the Goblin Temple (where Abdirak is located)
- Commentary
- Even if you’re Dual-wielding, this Dagger will likely be outshined by other choices since you can typically avoid Saving Throw dangers by positioning properly as a Rogue.
Sussur Dagger
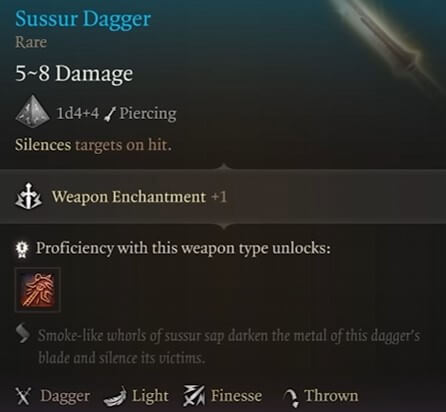
- Where to find it
- Reward given for completing the Finish the Masterwork Weapon that combines the Sussur Tree Bark with a Dagger.
- Commentary
- If your wielder can wreak havoc on key casters, you can really flip an otherwise difficult fight into your favor. Consider pairing it as a dual-wield option.
Worgfang
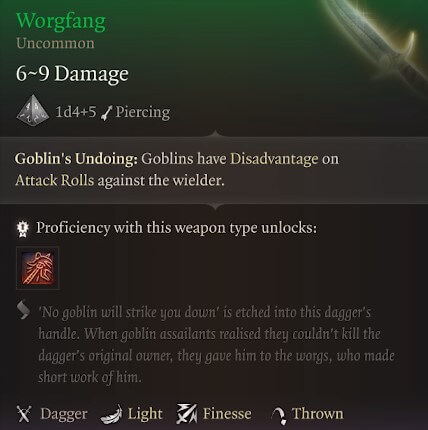
- Where to find it
- Found in a pile of bones within the Worg Pens cells at the Goblin temple.
- Commentary
Glaives
Monster Slayer Glaive

- Where to find it
- Sold at the Goblin temple by Roah Moonglow.
- Commentary
Sorrow
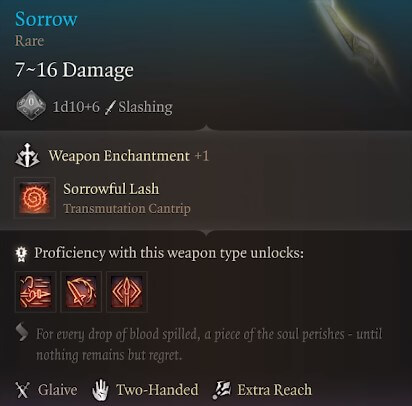
- Where to find it
- Found within the Druids’ Hidden vault (Druid Grove).
- Commentary
Gloves
Abyss Beckoners
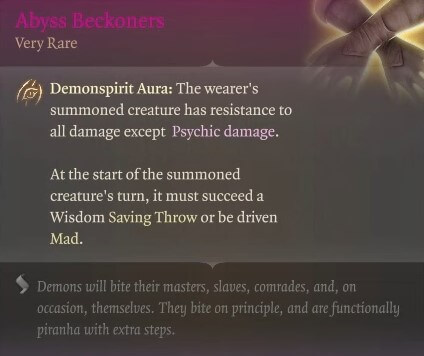
- Where to find it
- Found within a chest in the jail sails at the back of the Zhenatrim base (The Risen Road).
- Commentary
Bracers of Defense
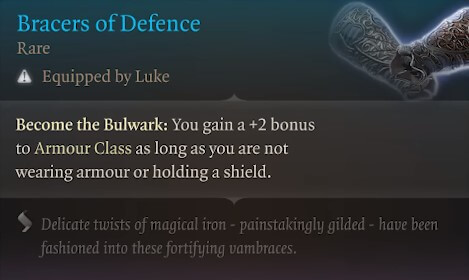
- Where to find it
- In the Apothecary’s Cellar underneath the Blighted Village.
- Commentary
- Bracers of Defence are definitely worth getting to make your Barbarian, Monk, or casters more tanky. +2 AC is a pretty big powerspike!
Fleetfingers

- Where to find it
- In the Forest, southeast of the Blighted Village (shovel mound)
- Commentary
- This item is best on class’s like the Monk or Rogue who have synergies with Dash, but it could be mobility overkill in most situations so be sure to compare your other options.
Gloves of Archery
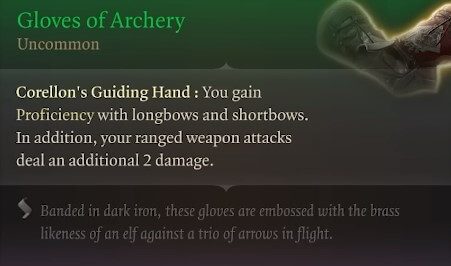
- Where to find it
- Sold at the Goblin Camp by Grat the Trader.
- Commentary
- This is a solid early game choice for your Rangers or range-specializing Fighters/Rogues until you find something better. In most cases you’ll use it for the +2 additional damage rather than the proficiency outside of specific situations.
Gloves of Hail of Thorns
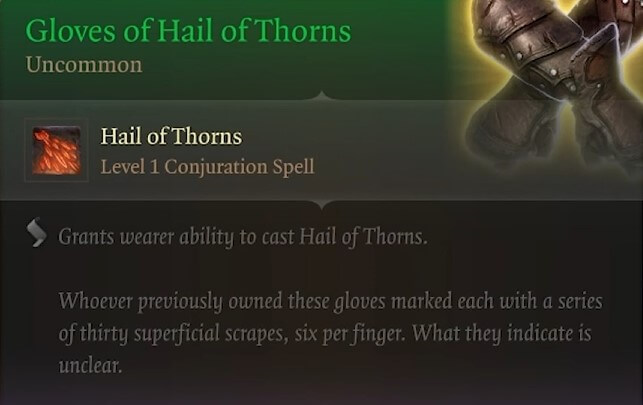
- Where to find it
- Option 1 – Sold at the Zhentarim Hideout by Brem if you complete the Find the Missing Shipment quest
- Option 2 – Sold at the Myconid colony by Derryth Bonecloak
- Commentary
- This pair of gloves can be a useful choice if your party comp lacks AoE since it allows you to cast Hail of Thorns every Short Rest. Hail of Thorns launches a volley of thorns that deals 1d10 to a radius.
Gloves of Heroism

- Where to find it
- Found in the hidden cellar of the Toll House (where Karlach’s “Paladins” are)
- Commentary
- Heroism prevents your character from being Frightened and grants 5 temporary HP per turn. This is one of the best options for early game Paladins and should be avoided by all other classes.
Gloves of Missile Snaring
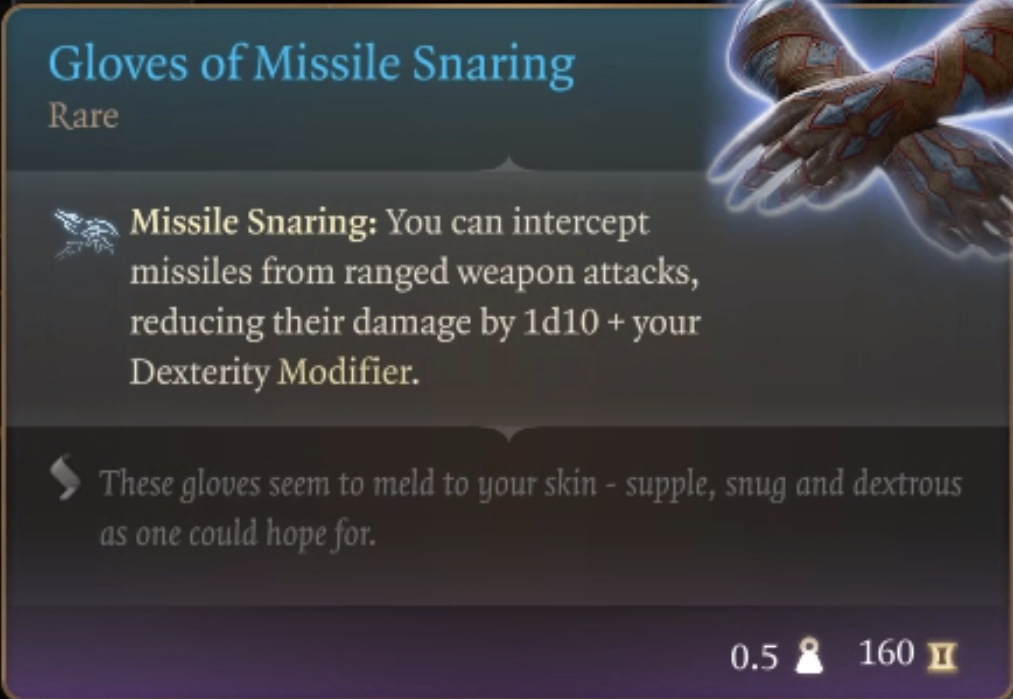
- Where to find it
- Sold at the Druid Grove by Arron.
- Commentary
- In the early game, you’ll face a good amount of bow-wielding enemies, so this is a decent equip for all classes (except Monk since it doesn’t stack with their ability) if you need survivability.
Gloves of Power
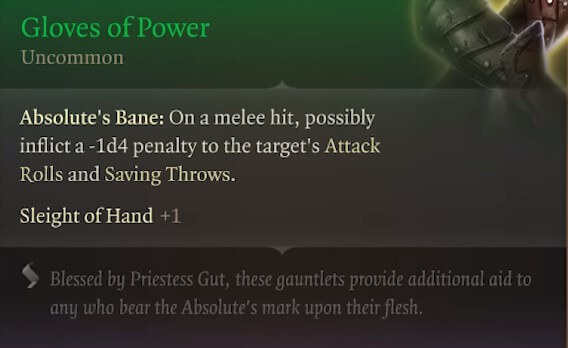
- Where to find it
- Loot dropped by Goblin Boss Za’Krug (during the opening ight when you first reach the Druid Grove.
- Commentary
- Gloves of Power can work on any melee damage dealer but is particularly appropriate on Rogues or Rangers who are the designated DEX lock pickers. For the latter, if you have a better in-combat choice, feel free to keep this in your back pocket for when you need it out of combat.
Gloves of Thievery
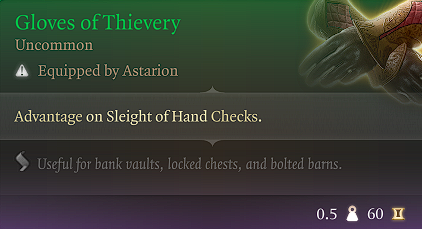
- Where to find it
- Sold at the Zhentarim Hideout by Brem if you complete the Find the Missing Shipment quest
- Commentary
- If you don’t have the Gloves of Power from above, Gloves of Thievery are the superior option for keeping in your inventory for out of combat use.
Gloves of Uninhibited Kushigo
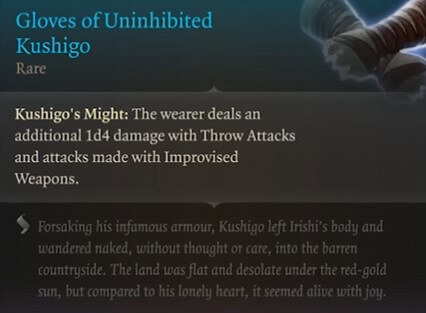
- Where to find it
- Reward given by Derryth Bonecloak after completing Find the Mushroom Picker quest.
- Commentary
- This pair of gloves is a niche choice, even for its intended classes of Barbarian or Monk. You’ll likely have better options unless you’re going for a super specific build.
Hellrider’s Pride

- Where to find it
- Option 1 – Can be purchased or stolen from Zevlor, or taken from his body after killing him.
- Option 2 – Given as a reward for completing the quest, Investigate Kagha.
- Commentary
- Whether it’s single target or AoE, being able to simultaneously heal and grant Blade Ward is incredibly impactful. Honestly it could be a while before you find something better for your healer.
Herbalist’s Gloves

- Where to find it
- Sold at the Myconid Colony by Derryth Bonecloack
- Commentary
- Poison isn’t the worst thing in the world but if you’re bothered by it, consider keeping this in your inventory to swap to when you need it.
Reason’s Grasp

- Where to find it
- Found in a locked chest near the caravan that was attacked by gnolls (The Risen Road)
- Commentary
- If you have a party that lacks healing, this can be clutch for a Barbarian as long as you time it correctly for maximum value.
The Sparkle Hands
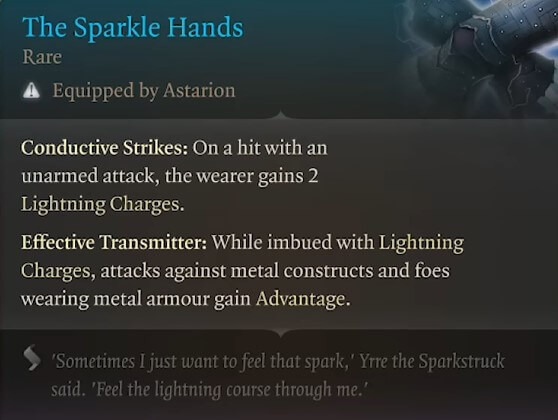
- Where to find it
- Found in a chest near the Wood Woad fight location in the Hag’s swamp (Sunlit Wetlands).
- Commentary
- Even if you aren’t going the full Lightning Charges build, these gloves are a solid choice for a Monk since you can proc its Effective Transmitter effect with just the item itself.
The Watersparkers
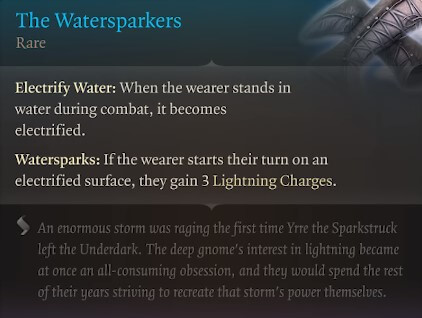
- Where to find it
- In a chest in the section of the Goblin temple (Shattered Sanctum) where you meet Mithara.
- Commentary
- If you’re going the Lightning Charge build, this is one of the easier ones to build charges with as there are many sources of water. Note that you will take damage going this route unless you equip something like The Sparkswall ring which grants protection against electrocution.
Greataxes
Blooded Greataxe
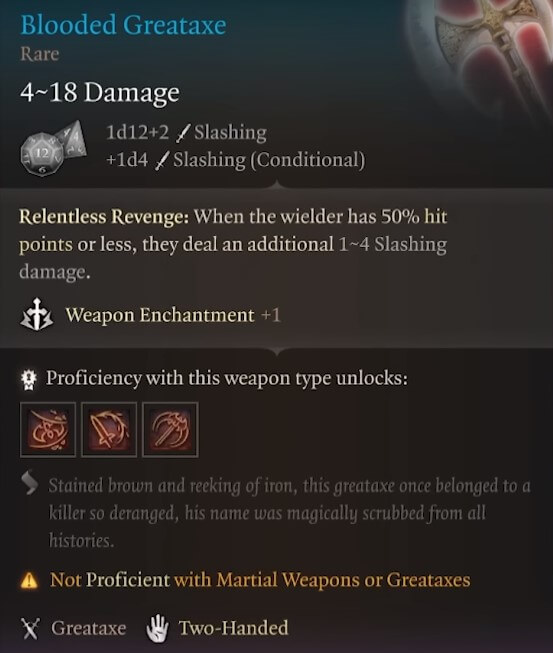
- Where to find it
- Option 1 – Sold at the Goblin Camp by Grat the Trader
- Option 2 – Sold at the Goblin temple (Shattered Sanctum) by Roah Moonglow
- Commentary
- This item is best on a Barbarian since you get additional resistances while Raging so you’ll be safer under 50% health but fine on a Fighter that you can keep from dying.
Exterminator’s Axe
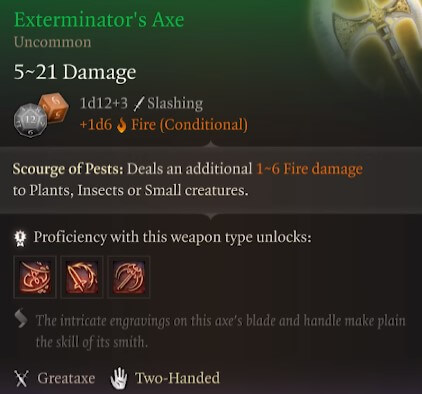
- Where to find it
- Loot dropped by Gekh Goal, one of the duegars in the Underdark near the docks that lead to Grymforge
- Commentary
- This is useful if you plan on taking on the Myconids, Goblins, Halfings, and Gnomes.
Very Heavy Greataxe

- Where to find it
- Loot dropped by Fezzerk, the goblin with the emo haircut in front of the Blighted Village’s windmilll
- Commentary
- This is one of the first upgraded Greataxes you’ll encounter but is quickly outclassed by the Blooded Greataxe.
Greatswords
Everburn Blade
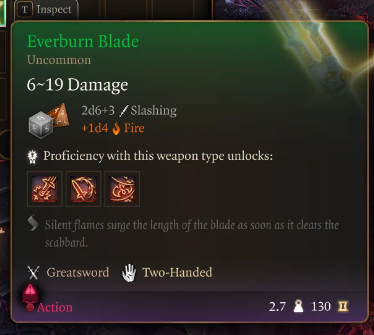
- Where to find it
- Loot dropped by Commander Zhalk at the last scene of the Nautiloid intro when you’re escaping
- Commentary
- The easiest way to get this item is to use the Command spell to make Zhalk drop it instead of killing him. It’s definitely solid early on but not a must-have if you don’t want to deal with obtaining it.
Jorgoral’s Greatsword
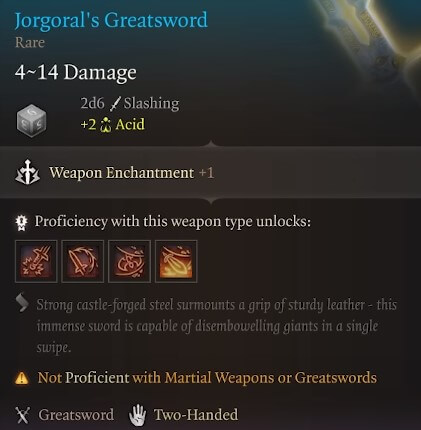
- Where to find it
- Sold by Corsair Greymon at Grymforge near Nere’s door (or dropped as loot).
- Commentary
- Jorgoral’s Greatsword is a sweet option if you need more AoE as the Colossal Onslaught ability provides another option on top of your Cleave.
Sword of Justice
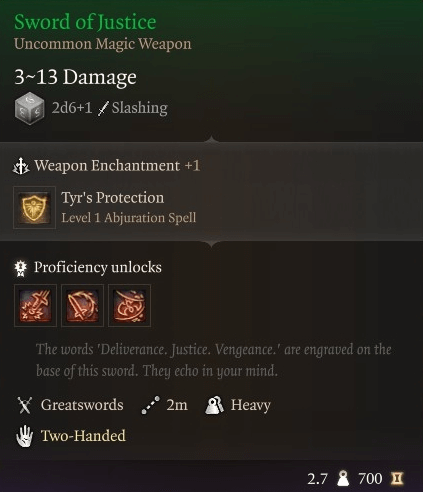
- Where to find it
- Option 1 – Loot dropped by Anders at the Risen Road Toll House
- Option 2 – Reward given for killing Karlach.
- Commentary
- Being able to grant +2 AC to an party member is super helpful but it can be difficult to keep up since it requires Concentration and melees get hit the most.
Sussur Greatsword
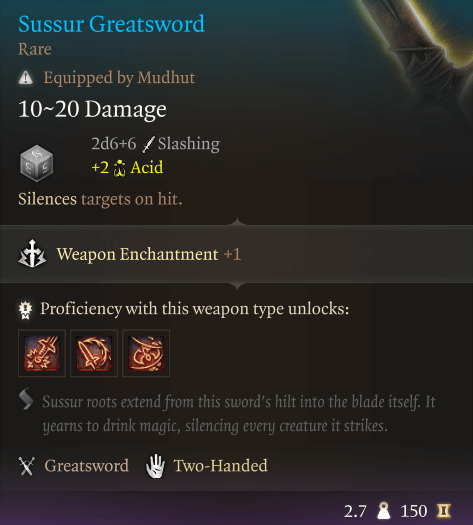
- Where to find it
- Reward given for completing the Finish the Masterwork Weapon that combines the Sussur Tree Bark with a Greatsword.
- Commentary
- If your wielder is able to reach casters reliably, this can be a great choice. However, keep in mind that some fights have more casters than others.
Halberds
Light of Creation
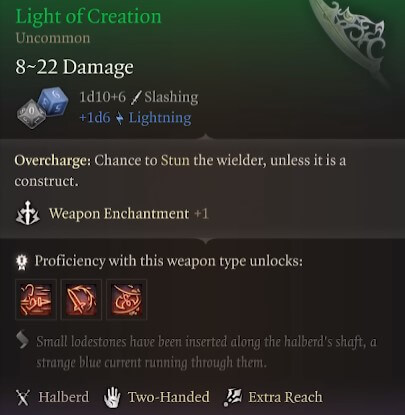
- Where to find it
- Loot dropped by Bernard at the top of the Arcane Tower
- Commentary
- This item seems really good on paper but the DC 10 CON save for the stun isn’t the most reliable. However, when it does land, it will be significantly impactful as you’ll be able to get Advantaged attacks in.
Merregon Halberd
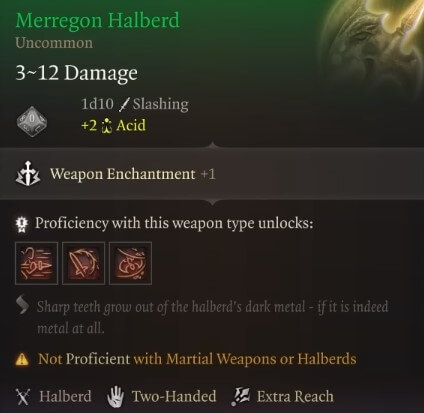
- Where to find it
- Loot dropped by a Merregon Legionnaire or found near the lava (all in Grymforge)
- Commentary
- There aren’t many Halberd choices in the early game, so pick this up until you get the Light of Creation.
Handaxes
Dragon’s Grasp
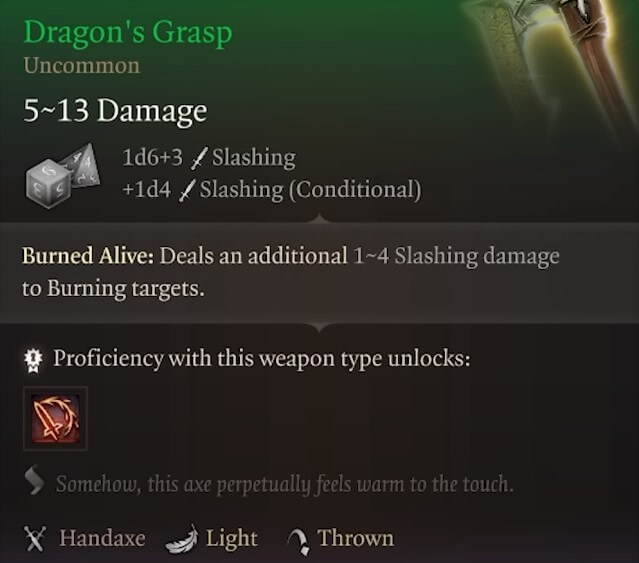
- Where to find it
- Sold at the Druid Grove by Arron
- Commentary
- Burning is pretty easy to activate in the early game, such as with Grease, Alchemist’s Fire, and so on. However, it can be a pain to play around since you may also be putting your melee wielder in danger so keep that in mind.
Ritual Axe
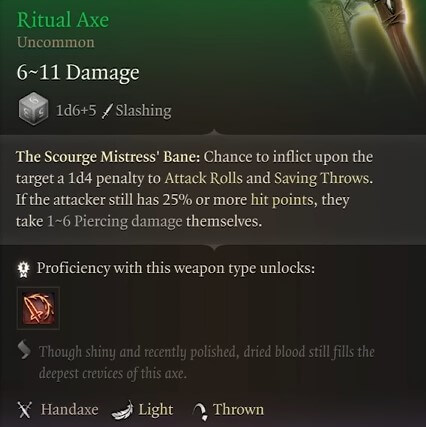
- Where to find it
- Found within the torture chamber in the Goblin Temple (where Abdirak is located)
- Commentary
- The penalty of hurting yourself, especially until your 25%, just isn’t worth it. This is a skip in most cases.
Heavy Armor (Chest)
Adamantine Splint Armour
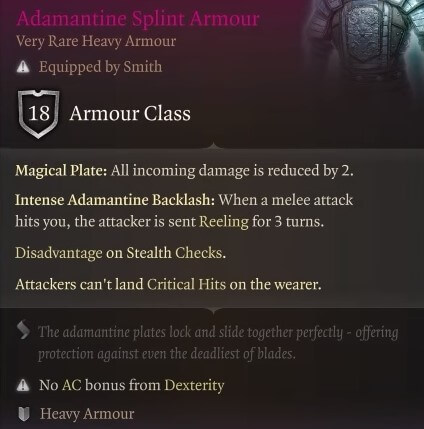
- Where to find it
- Created by combining the Mythril Ore and the Splint Mould using the Grymforge
- Commentary
- If you’re a Heavy Armor wearer, this is definitely best in slot. However, since you only get two Mythril ores, be sure to weigh your options properly between the other Adamantine choices.
Helmets
Cap of Curing
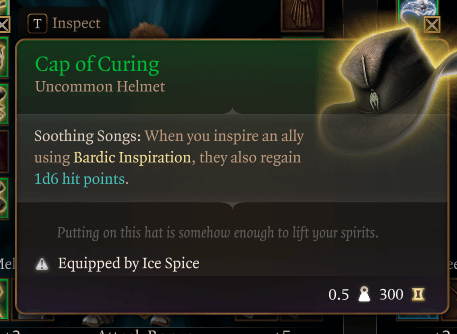
- Where to find it
- In a chest behind where Alfira is singing at the Druid Grove.
- Commentary
- This is one of the best early game Helmets for a Bard as you can simultaneously buff and heal your allies.
Cap of Wrath
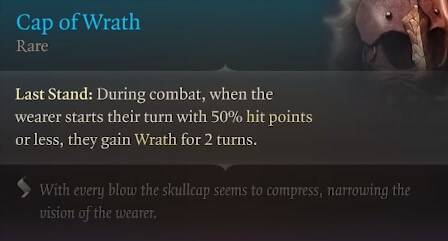
- Where to find it
- Loot dropped by Thudd in Grymforge near Nere’s door
- Commentary
- Cap of Wrath is particularly good on Barbarians since they get resistances from raging but it is also solid on Fighters or Monks.
Circlet of Blasting
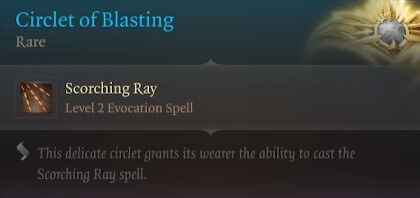
- Where to find it
- Sold at the Myconid Colony by Blurg
- Commentary
- Getting a free level 2 spell is never anything to ignore, and Scorching Ray itself is especially versatile. You can use it to focus down one big threat, try to finish multiple low targets at once, and it can be generically fine to wear on any class.
Dark Justiciar Helm
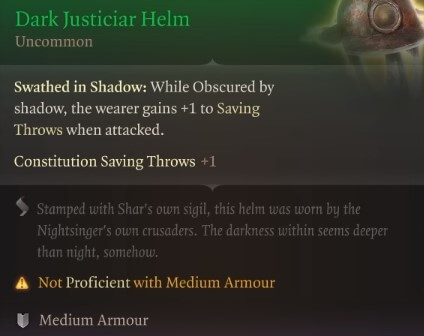
- Where to find it
- Found on the Dark Justiciar skeleton in Grymforge on the way to the Rothes breaking the wall.
- Commentary
- You’ll likely have better options, but this works best on Rogues, Rangers, and Shadow Monks due to their synergies with stealth.
Dark Justiciar Mask
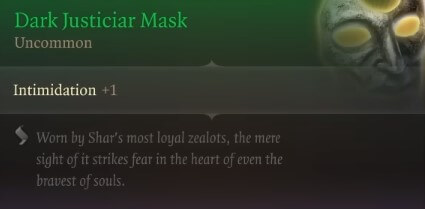
- Where to find it
- Found on a skeleton near the Ancient Forge waypoint.
- Commentary
- Only real use is to keep in your inventory when you know Intimidation checks are coming up.
Key of the Ancients
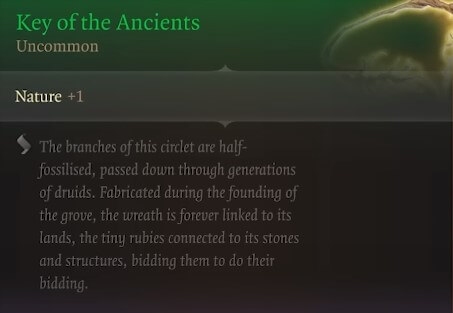
- Where to find it
- Option 1 – Dropped by Findal in the Druid Grove’s underground passage (where you can sneak out Sazza)
- Option 2 – Dropped by Nettie
- Commentary
- You’ll probably already have a character with decent Nature checks, whether through class or background, but if you don’t, this isn’t the worst thing to wear while wandering the wilderness out of combat.
Haste Helm
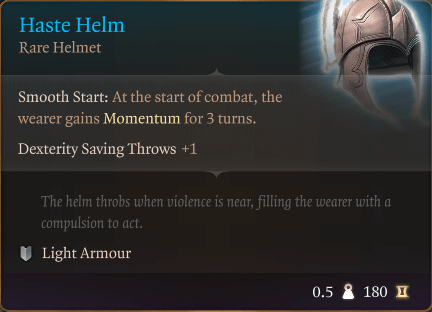
- Where to find it
- Inside a locked chest near the Ancient Sigil Circle waypoint within the Blighted Village
- Commentary
- Haste Helm can be a benefit for any class but it particularly shines on your melee damage dealers that want to engage onto key enemies.
Helmet of Autonomy
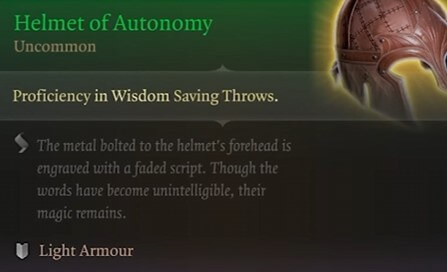
- Where to find it
- Looted from a skeleton near the entrace to the BOOOAL Kuo-toa encounter.
- Commentary
- This is too one-dimensional to be used in combat and out of combat Wisdom saves are very rare. The small amount of gold you’ll get from this is probably better.
Helmet of Smiting
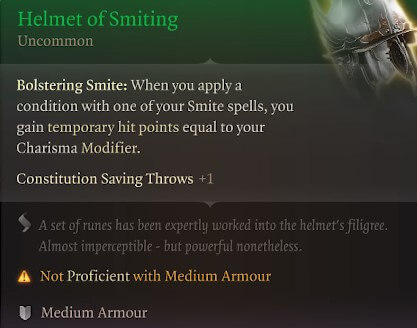
- Where to find it
- In a locked chest in the Selunite Outpost that leads to the Underdark.
- Commentary
- Helmet of Smiting is another Paladin-specific item that makes you tankier. There may be some other options you’ll consider but this should definitely be a contender.
Shadow of Menzoberranzan
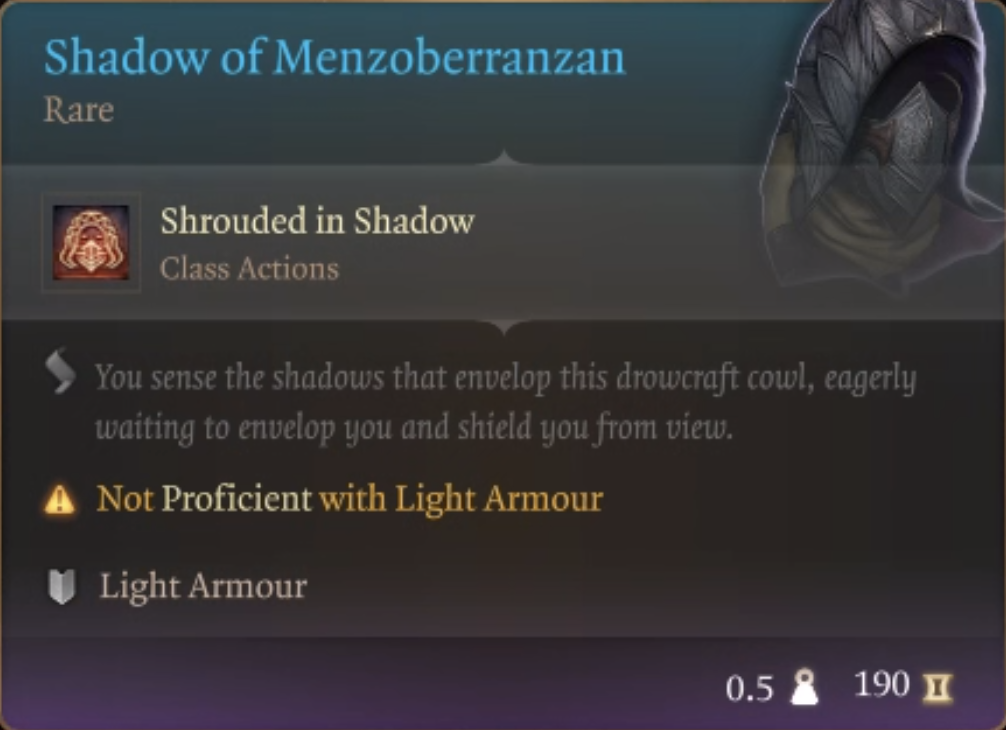
- Where to find it
- In the Myconid Colony vault (unlocked after completing the Defeat Duergar Intruders quest).
- Commentary
- Shrouded in Shadow allows you to become Invisible for two turns every Short Rest. This can be used on any class but is particularly great on stealth-based classes (to help them stay out of sight) or casters (as a get-out-of-jail-free escape if you get focused by enemies.
The Shadespell Circlet
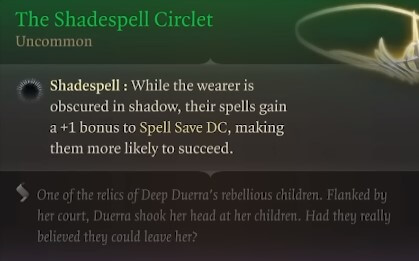
- Where to find it
- Sold at the Myconid Colony by Omeluum (the Mindflayer) after completing his Arcane Tower quest.
- Commentary
- This is an interesting one, as it rewards stealthy spellcasting. You can give it a shot with the likes of the Arcane Trickster, Ranger, or Circle of the Land Druid of the Swamp Biome.
Wapira’s Crown
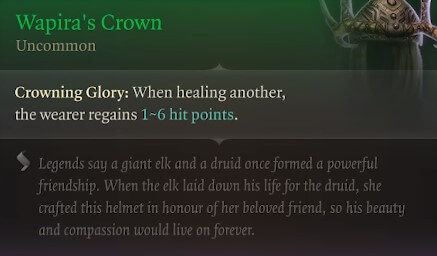
- Where to find it
- Reward given by Zevlor after killing the Goblin Camp
- Commentary
- If you’re a non-Bard healer, this is an attractive choice. If you’re a Bard though, you’ll likely prefer the Cap of Curing.
Warped Headband of Intellect
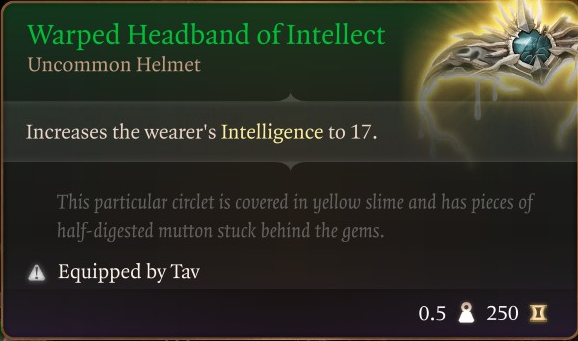
- Where to find it
- Loot dropped by the ogre, Lump the Enlightened, in the Blighted Village.
- Commentary
- When Wizards are the only INT-based class in the game, having the stat for checks can be difficult if you aren’t running a Wiz. As a result, this can be an attractive item to keep in your inventory and equip as needed for INT checks.
- However, the downside is you won’t be able to summon Lump and his friends. So consider this before you slay the ogres.
Heavy Crossbows
Gandrel’s Aspiration
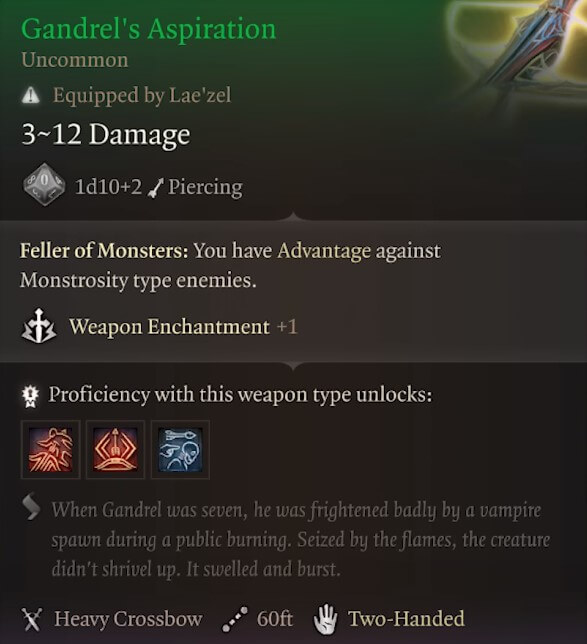
- Where to find it
- Loot dropped by Gandrel, who is found in the Hag’s Swamp and hunting Astarion
- Commentary
- This Heavy Crossbow is a pretty strong early choice but will soon be replaced by the other blue ones below this. Keep that in mind when navigating the social situation that arises when interacting with Gandrel.
Giantbreaker
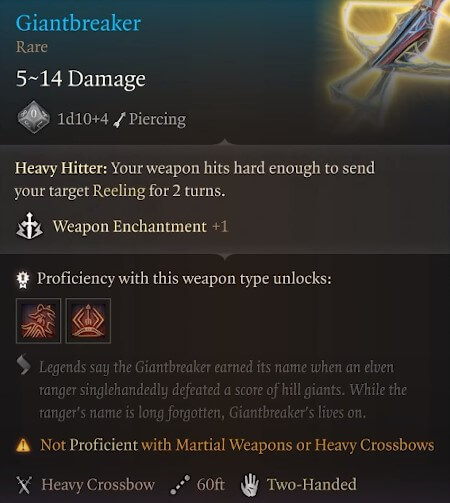
- Where to find it
- Sold at the Zhentarim Hideout by Brem if you complete the Find the Missing Shipment quest.
- Commentary
- Reeling causes its target to have a -1 penalty to Attack Rolls, making Giantbreaker particularly strong since it hits hard and debuffs enemies. Between this and Harold below, you can’t go wrong. Keep in mind that Giantbreaker is more consistent while Harold has higher upside.
Harold
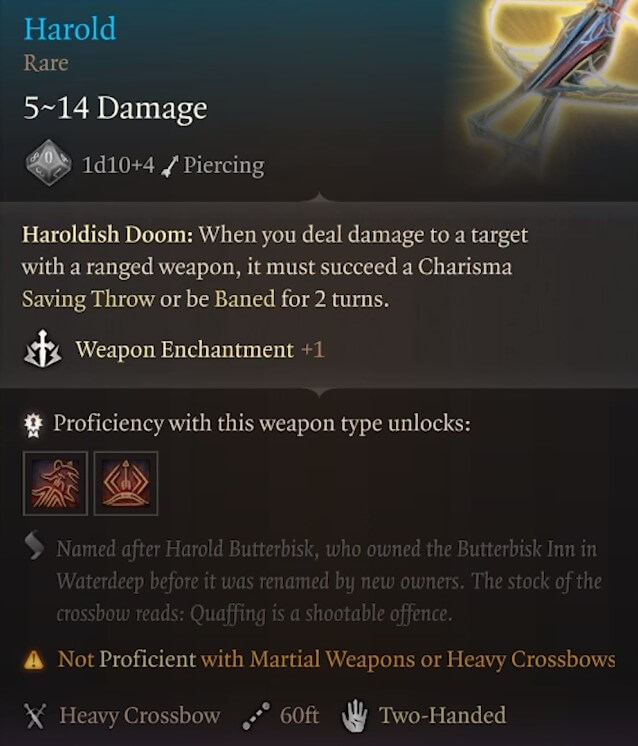
- Where to find it
- Reward given for delivering the chest to Zarys in the Zhentarim Hideout.
- Commentary
- As we mentioned above for Giantbreaker, you can’t go wrong with either choice. Harold requires a CHR save but can cause your target to be Baned (1d4 penalty to Attack Rolls and Saving Throws) while Giantbreaker doesn’t need a save but only debuffs -1 to Attack Rolls.
Light Armor (Chest)
Blazer of Benevolence
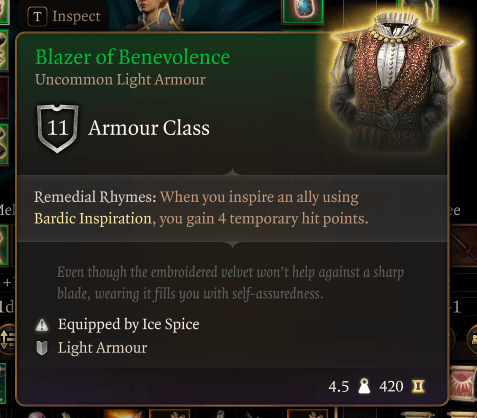
- Where to find it
- Reward given for rescuing Volo from the Goblin Camp.
- Commentary
- Bard’s are already one of the best BG3 classes and they seem to have a good amount of equipment made just for them. This is another good one that rewards you for Bardic Inspirations.
Drow Studded Leather Armor
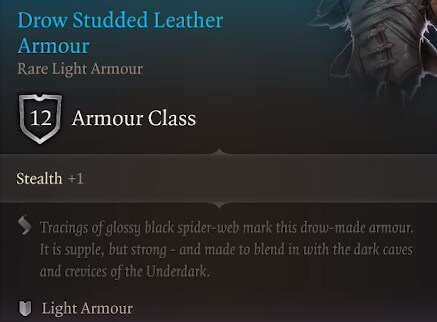
- Where to find it
- In the locked chest behind the spiderwebs in the Underdark (on the way to the Spectator fight).
- Commentary
- This is pretty boring for a Blue rarity and just worse compared to the Spidersilk you can get from Minthara.
Spidersilk Armor
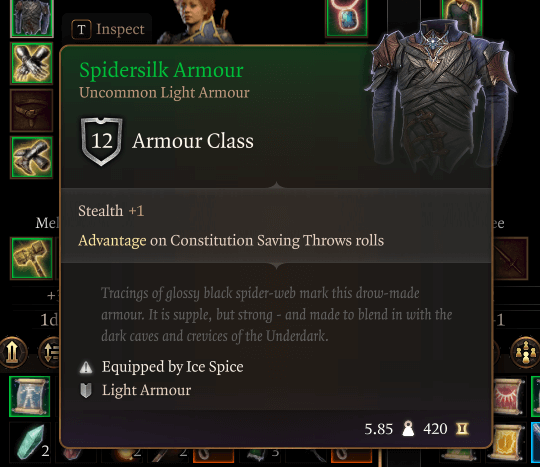
- Where to find it
- Loot dropped by Minthara
- Commentary
- This armor can last a while on your Rogue or other stealth-based party members. Even if Minthara joins your party you can simply take it from her.
Light Crossbows
Sharran Crossbow
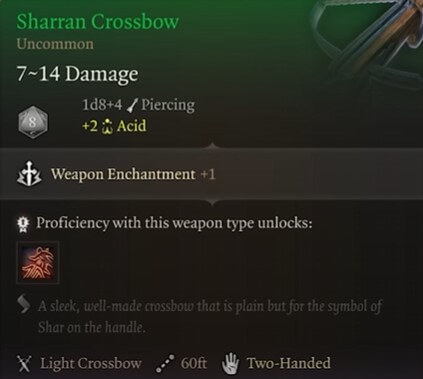
- Where to find it
- In a chest near the Underdark Grymforge, note that it will be identified upon picking it up.
- Commentary
- This basically the same as the Light Crossbow +1 with some Sharran flavor.
Light Hammers
Shining Staver-of-Skulls
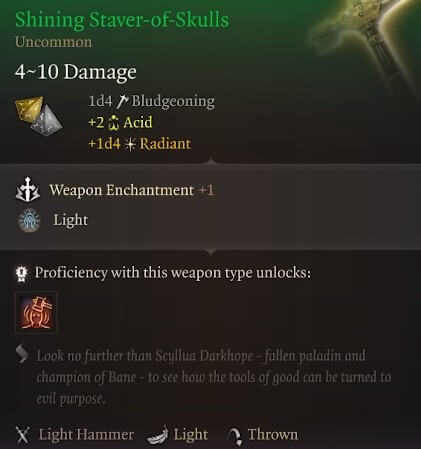
- Where to find it
- Sold by Corsair Greymon at Grymforge near Nere’s door (or dropped as loot).
- Commentary
- Pardon the screenshot above, this Light Hammer does not come with Acid or Light, but it does come with Radiant damage. Without spoiling Radiant damage will come in handy in Act 2.
Skybreaker
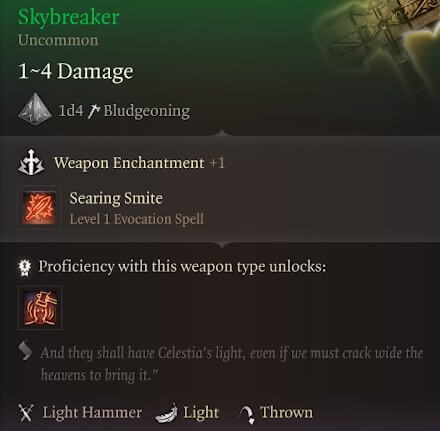
- Where to find it
- In a locked chest near the entrance of the Arcane Tower by the graves.
- Commentary
- Skybreaker allows you to caste Searing Smite once very Long Rest. In theory this can allow you to use some other equipment that are usually just for Paladins, but you won’t be able to benefit from it often enough to make it worth it.
Longbows
Spellthief
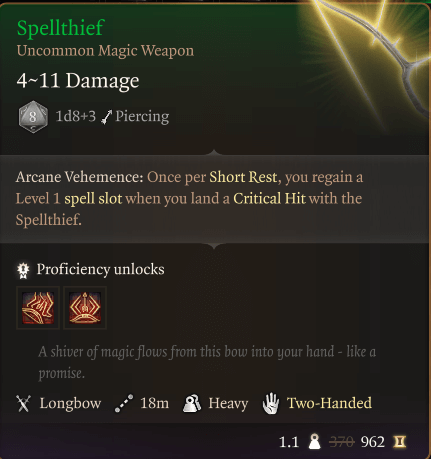
- Where to find it
- Sold at the Druid Grove by Arron
- Commentary
- If you have a Ranger or Arcane Trickster, this Longbow won’t be replaced for a long while since you can get it very early on and being able to refill a Level 1 spell is significant while your characters don’t have many slots.
The Joltshooter
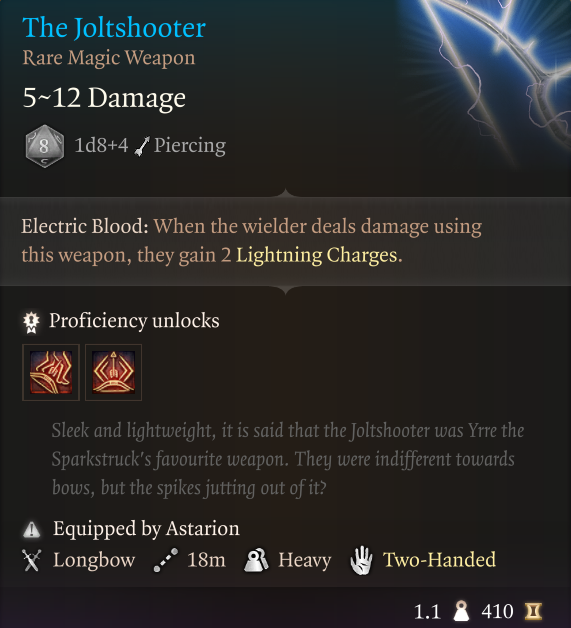
- Where to find it
- One of the reward choices after rescuing Counsellor Florrick from the burning buildings near the Zhentarim hideout (Waukeen’s Rest).
- Commentary
- This is the go-to if you’re a ranged damage dealer that wants to go the Lightning Charge build, but it’s fine to use even if you aren’t since it’ll accrue extra Lightning damage on its own.
Titanstring Bow
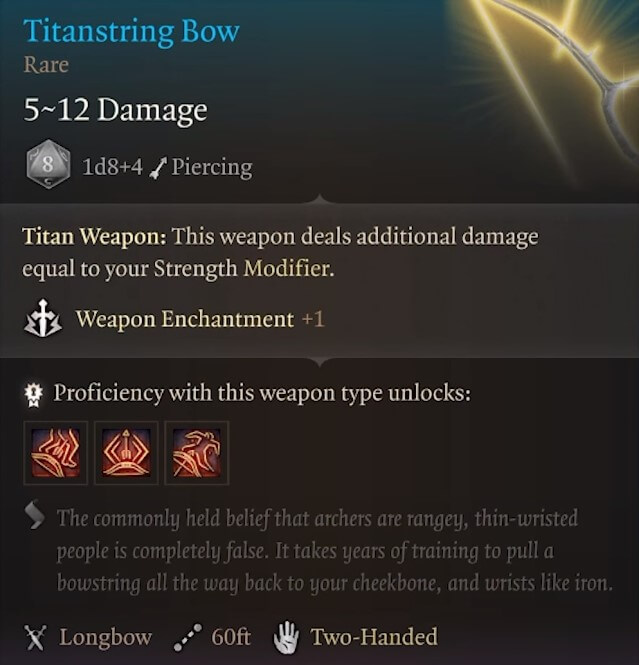
- Where to find it
- Sold at the Zhentarim Hideout by Brem if you complete the Find the Missing Shipment quest.
- Can be found in Act 2 (no spoilers)
- Commentary
- If your STR Fighters, Barbarians, or Monks have Longbow proficiency, this should be your go-to choice.
Longswords
Adamantine Longsword
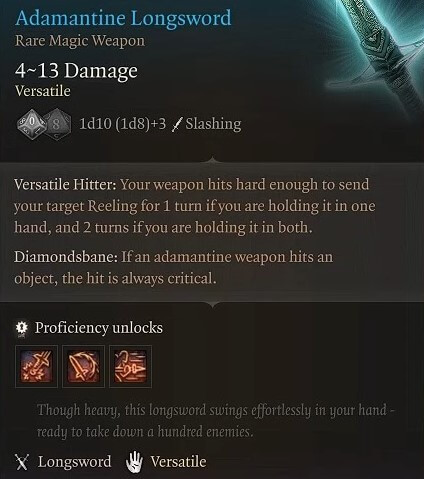
- Where to find it
- Created by combining the Mythril Ore and the Longsword Mould using the Grymforge
- Commentary
- The Adamantine Longsword is a solid choice on its own but make sure to weigh it against all the other Adamantine choices since you only have access to two Mythril ores. I’d rate it lower than the armor or shield choices.
Phalar Aluve
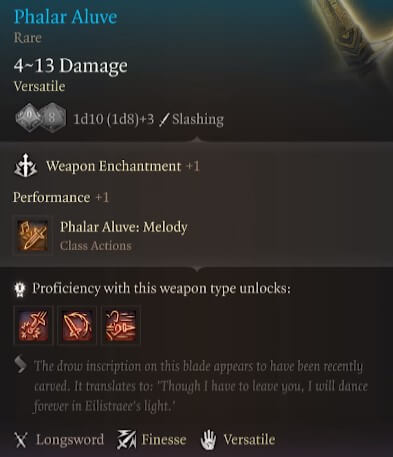
- Where to find it
- A sword in stone found in the Underdark (easily found if you take the route from the Selunite Outpost). You’ll need to pass either a STR or Religion check.
- Commentary
- The Phalar Aluve allows you to use its Melody to either buff allies or debuff enemies every Short Rest
- Sing
- Provides all allies within 6m range to have 1d4 bonus to Attack rolls and INT/WIS/CHR Saving Throws
- Shriek
- Debuffs all enemies in range with a 1d4 penalty to INT/WIS/CHR Saving Throws and also receive an extra 1d4 Thunder damage.
- Sing
- This is incredibly strong for any Longsword wielding class, and keep in mind that Longswords can be dual-wielded if you take the Feat. It has a strong case for being the best Act 1 Longsword.
- The Phalar Aluve allows you to use its Melody to either buff allies or debuff enemies every Short Rest
Maces
Adamantine Mace
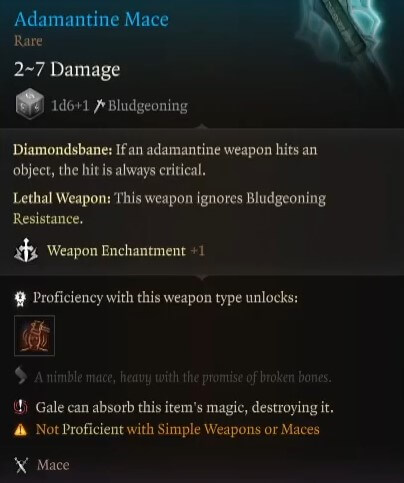
- Where to find it
- Created by combining the Mythril Ore and the Mace Mould using the Grymforge
- Commentary
- Just like all the other Adamantine choices, you’ll need to weigh all your options among your party members since you only get two Mythril ores to work with. Like the Longsword, it’s slightly worse than the armor or shield.
Loviatar’s Scourge
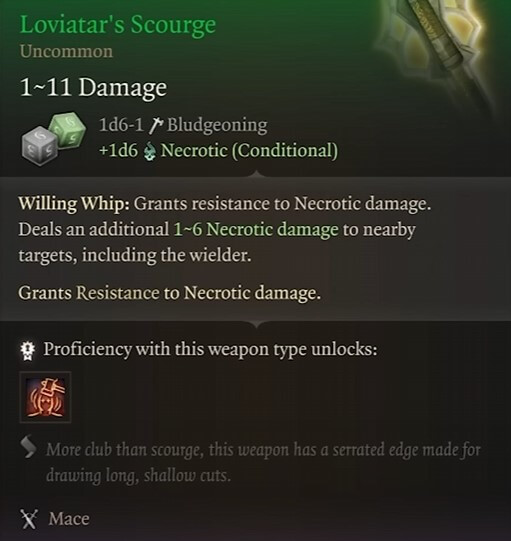
- Where to find it
- Loot dropped by Abdirak in the Goblin temple (Shattered Sanctum).
- Commentary
- Compared to other weapons that hurt yourself, this one isn’t too bad since it has built-in resistance to it. There are other Mace choices but this is fine if you need some extra AoE punch.
Shattered Flail
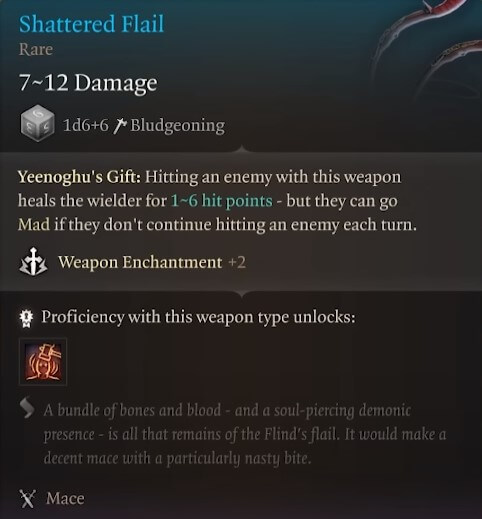
- Where to find it
- Loot dropped by Flind, the gnoll leader outside of the cave that has the Zhentarim chest (along the Risen Road)
- Commentary
- Shattered Flail has a higher skill cap than the other Maces since you need to plan around its Madness mechanic but the upside is that your healer can focus on other targets while your flail user self-sustains.
Xyanyde

- Where to find it
- Loot dropped by Minthara.
- Commentary
- If you end up slaying Minthara, Xyanyde will likely be your go-to Mace for a long while since Faerie Fire not only provides Advantage but will also stop enemies who turn Invisible. This is particularly good of course against the Hag.
Mauls
Doom Hammer
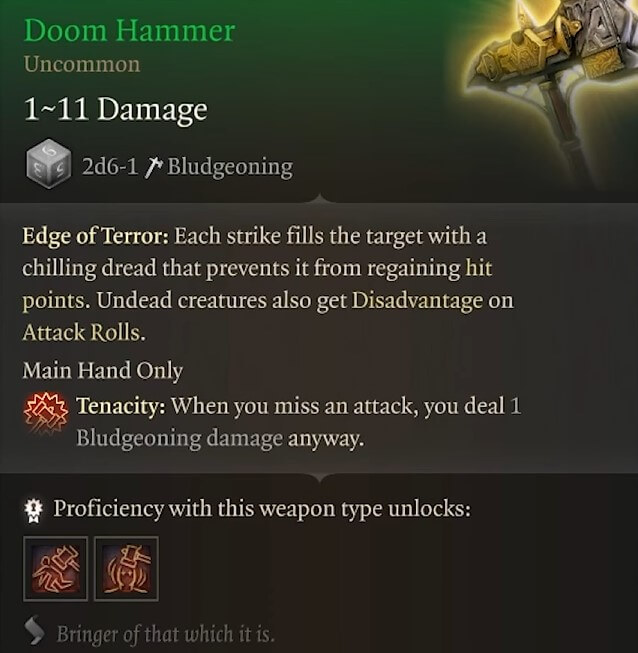
- Where to find it
- Sold at the Goblin Campb by Grat the Trader
- Commentary
- Against enemies with access to healing, Edge of Terror is an incredible passive to have. There are also many undead in both Acts 1 and 2, so be sure to weigh the damage tradeoffs as you run into other options.
Hamarhraft
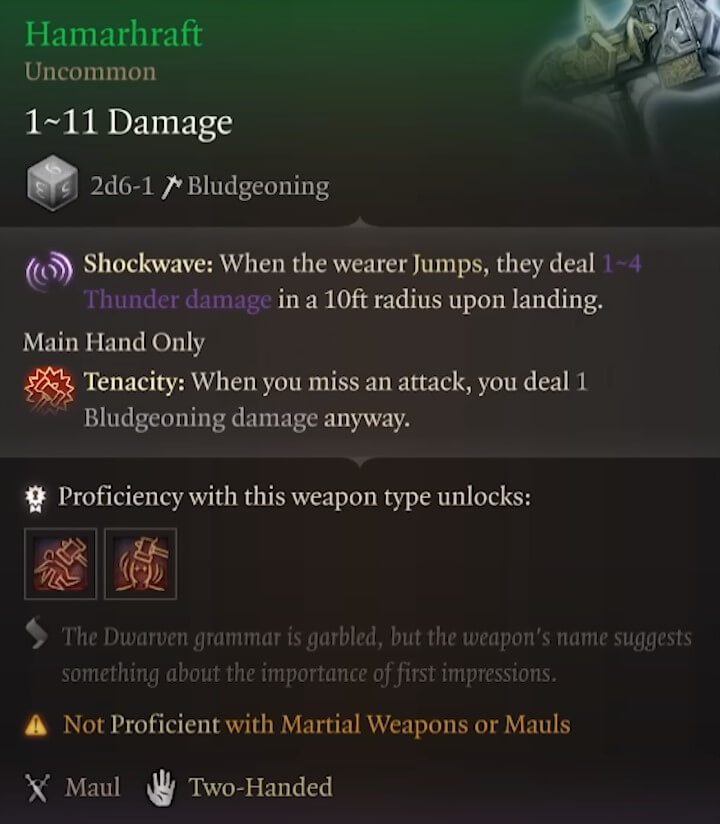
- Where to find it
- In a chest of the 2nd floor of one the burning building where you rescue Benryn (Waukeen’s Rest)
- Commentary
- If you aren’t against undead or enemies that heal, Hamarhraft is better than the Doom Hammer since it’s useful in more situation and gives you more AoE damage.
Medium Armor (Chest)
Adamantine Scale Mail
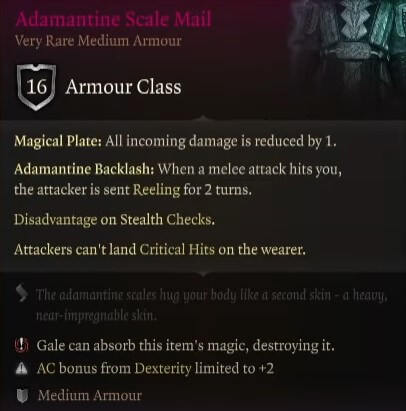
- Where to find it
- Created by combining the Mythril Ore and the Scale Mail Mould using the Grymforge
- Commentary
- Like all the other Adamantine choices, make sure to weigh your options carefully since you only get two Mythril ores. However, we rate the armors and shield higher than the weapons.
Dark Justiciar Mail
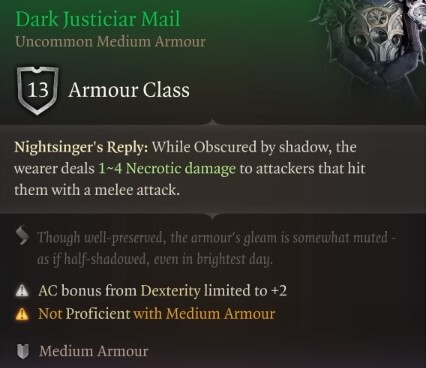
- Where to find it
- You can find it twice on skeletons, one near the Underdark – Grymforge waypoint and another near the Ancient Forge waypoint.
- Commentary
- This provides a nice damage boost to stealth classes, but keep in mind that it only works for melee attacks.
Hedge Wanderer Armour
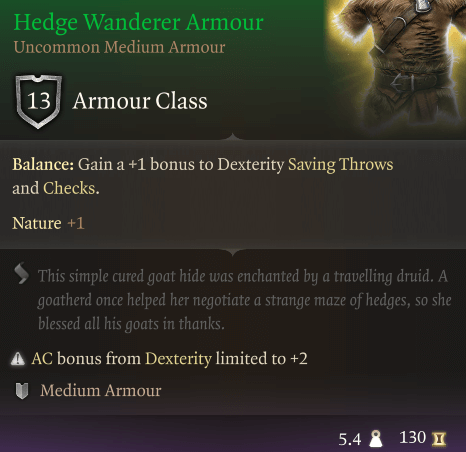
- Where to find it
- Sold at the Druid Grove by Arron.
- Commentary
- This is the first unique Medium Armor you can get in the super early game, so consider getting it when you get to the Druid Grove.
Slippery Chain Shirt
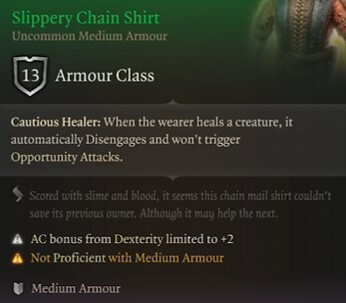
- Where to find it
- Inside a chest on a cliff within The Festering Cove (area where the BOOOAL encounter occurs)
- Commentary
- This armor has a pretty cool ability if you have a Medium Armor wearing Cleric or Paladin but you’ll likely want them to have Heavy Armor instead.
The Jolty Vest
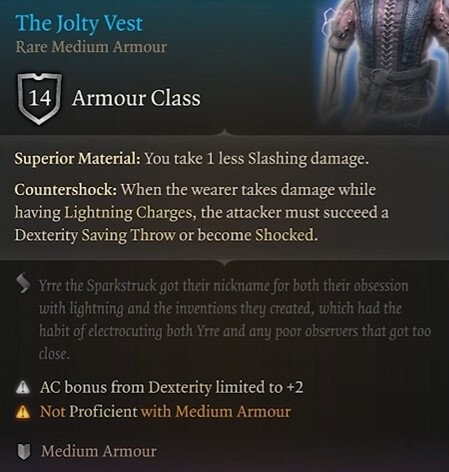
- Where to find it
- Sold at the Zhentarim Hideout by Brem if you complete the Find the Missing Shipment quest.
- Commentary
- At 14 AC, this is an attractive Medium Armor choice even if you aren’t going the Lightning Charge build. The 1 less Slashing damage is a nice bonus as well that isn’t related to the Lightning build.
The Oakfather’s Embrace
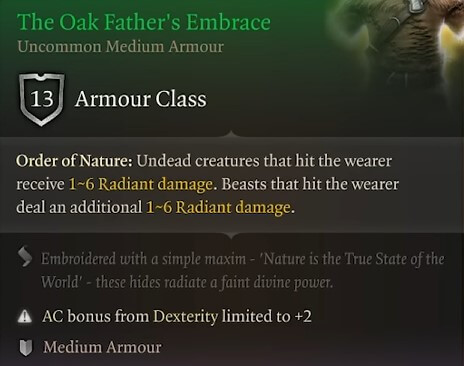
- Where to find it
- Looted from a skeleton in the Owlbear Nest access through the Forest.
- Commentary
- You can get this Medium Armor pretty early so it’s worth grabbing but you’ll need to remember to swap it accordingly.
Pikes
Returning Pike
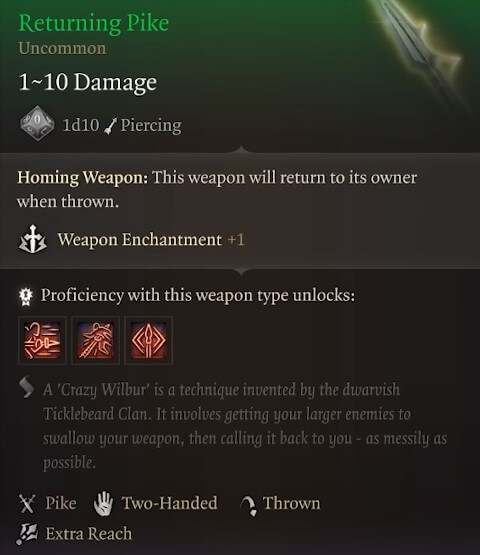
- Where to find it
- Sold at the Goblin Camp by Grat the Trader
- Commentary
- This is kind of gimmicky but you can’t deny that it feels cool! In most cases, you’ll have a better ranged option but there are some throw-centric builds out there.
Quarterstaffs
Corellon’s Grace
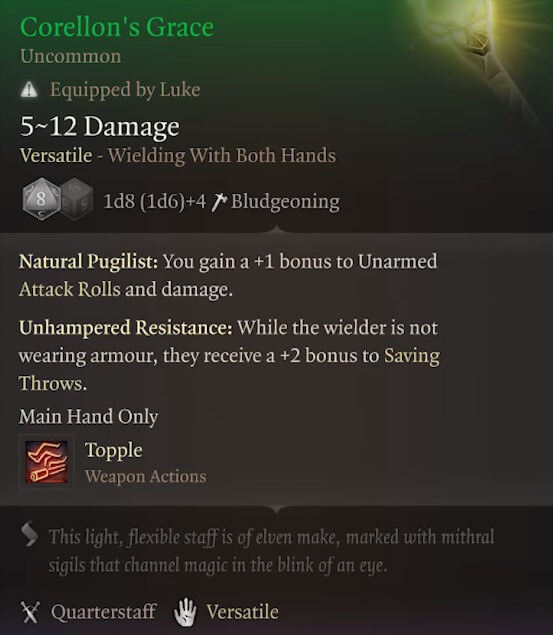
- Where to find it
- Sold at the Druid Grove by Auntie Ethel (or can be looted from her).
- Commentary
- Correlon’s Grace is absolutely tailor-made for Monks and you can get it super early. Make sure to grab it!
Creation’s Echo
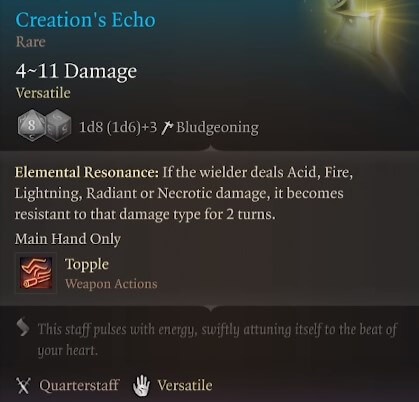
- Where to find it
- Sold at the Myconid Colony by Omeluum (the Mindflayer) after completing his Arcane Tower quest.
- Commentary
- This Quarterstaff is definitely interesting but it can be clunky to get real value out of it since you likely won’t be dealing a type of elemental damage to an enemy that can also deal it to you.
- For example, would you cast Fireball against a lava monster that would deal fire damage to you? Probably not.
- But can work if you’re facing a lava monster and you have other enemies that you can Fireball instead. Just feels like the stars need to align a bit too much though.
- For example, would you cast Fireball against a lava monster that would deal fire damage to you? Probably not.
- This Quarterstaff is definitely interesting but it can be clunky to get real value out of it since you likely won’t be dealing a type of elemental damage to an enemy that can also deal it to you.
Gold Wyrmling Staff

- Where to find it
- Sold at the Goblin temple (Shattered Sanctum) by Roah Moonglow.
- Commentary
- Having an extra Cantrip for your caster is always nice but there’s a chance that you may have taken Fire Bolt already. If not, it’s a decent pickup.
Mourning Frost
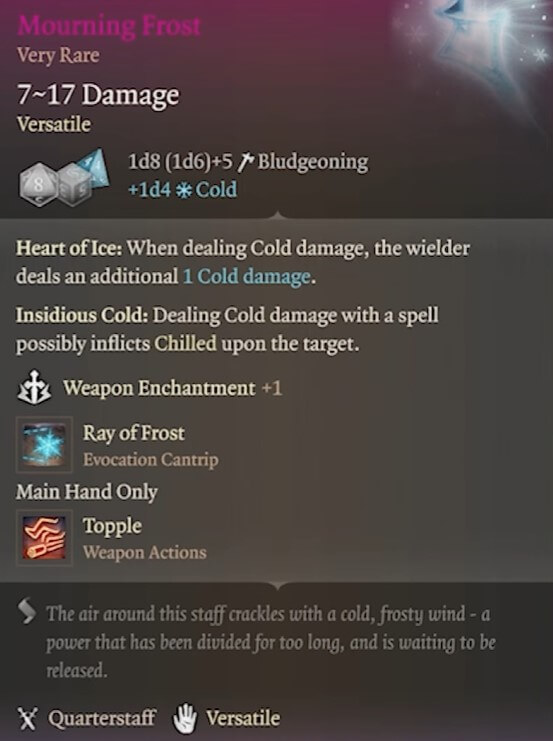
- Where to find it
- Can be assembled using three parts:
- Icy Helve
- Looted from Dhourn, one of the petrified Drow in the Underdark (near the Spectator fight)
- Ic Metal
- Looted from the Myconid Colony vault after finishing the Defeat the Duergar Intruders quest
- Icy Crystal
- Looted from Filro the Forgotten, the Wizard near the Sussur Tree
- Icy Helve
- Can be assembled using three parts:
- Commentary
- This item takes a decent amount of work to assemble but it’s strong even if you aren’t going an Ice/Cold build since the built-in Ray of Frost can proc its benefits.
Nature’s Snare
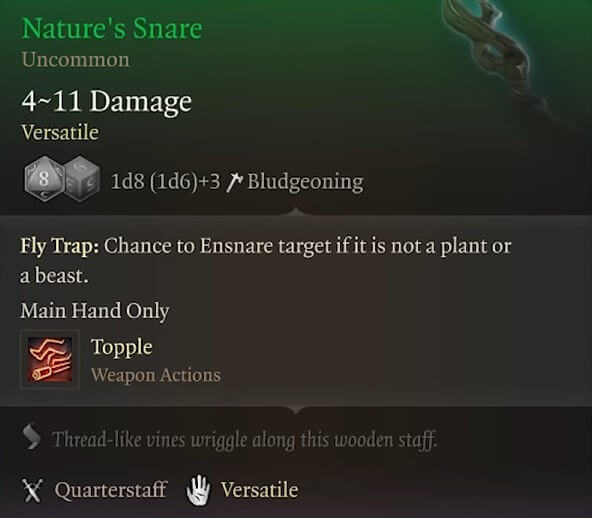
- Where to find it
- In a locked chest in the Underground Passage under the Druid Grove (where you can sneak Sazza out).
- Commentary
- If you aren’t a Monk, Nature’s Snare is a solid early choice to help your casters defend themselves with some self-peel. Basically they can snare an enemy attacking them to create space between them and reposition.
Rain Dancer
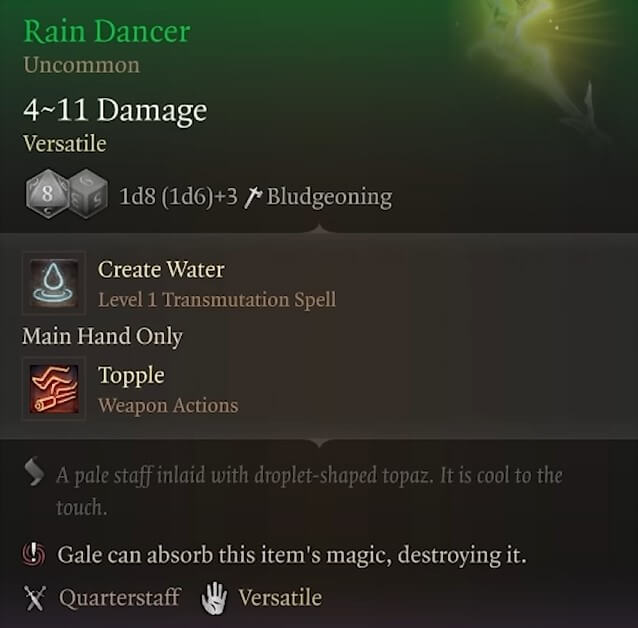
- Where to find it
- Sold at the Druid Grove by Arron.
- Commentary
- It’s fine to use if you don’t have anything better but it will likely get replaced quickly. Might be fine to keep for out-of-combat uses to Create Water as needed.
Staff of Arcane Blessing

- Where to find it
- In the basement of the Arcane Tower.
- Commentary
- If you’re going more of a supportive build with your caster, this is an attractive option since you get an upgraded version of Bless in Mystra’s Blessing.
Staff of Crones
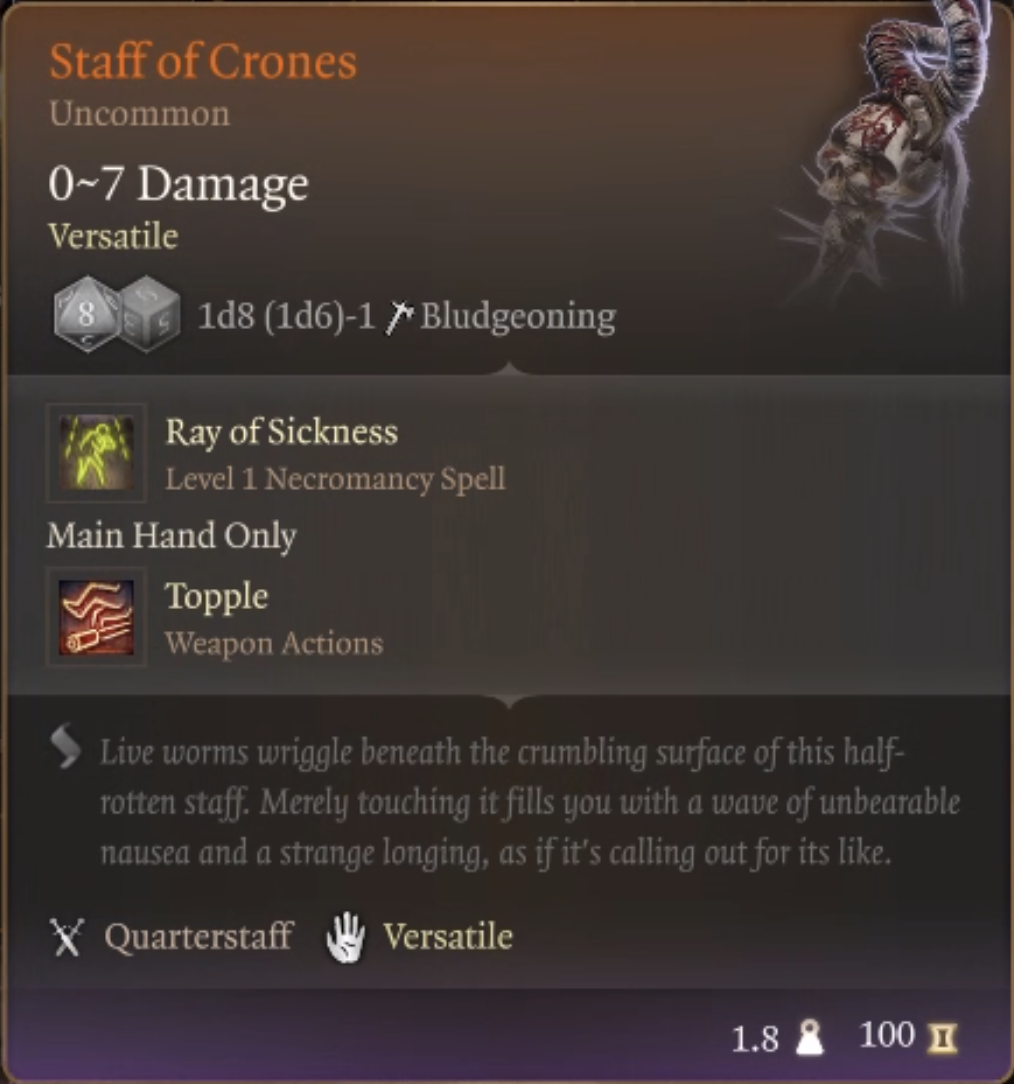
- Where to find it
- In the Hag’s treasure room (adjacent to where Mayrina is held captive).
- Commentary
- Having a Level 1 spell every Short Rest is pretty nice but Ray of Sickness itself isn’t super powerful. We found ourselves swapping to other options in our runs.
The Spellsparkler
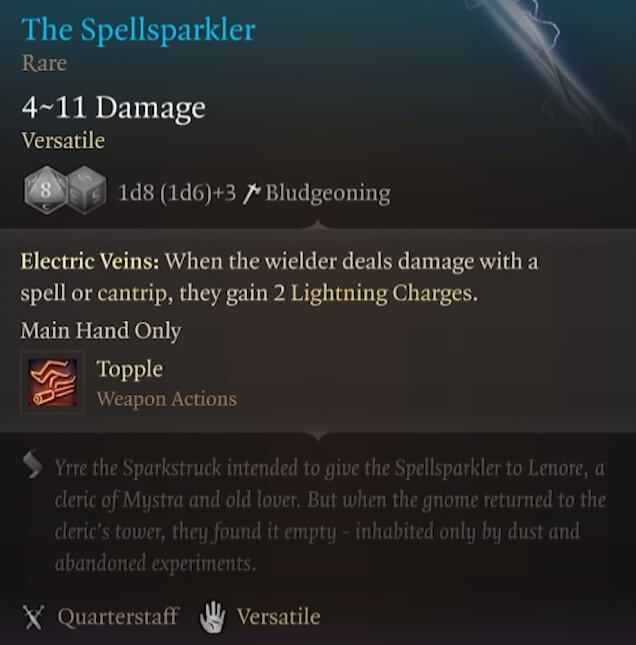
- Where to find it
- One of the reward choices after rescuing Counsellor Florrick from the burning buildings near the Zhentarim hideout (Waukeen’s Rest).
- Commentary
- This is the go-to choice for casters if you’re trying to go the Lightning Charge build.
Rapiers
Rupturing Blade
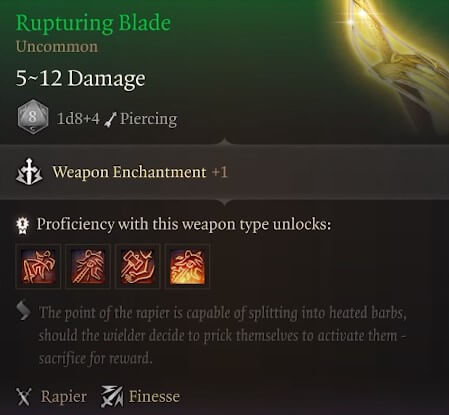
- Where to find it
- Sold at the Zhentarim Hideout by Brem if you complete the Find the Missing Shipment quest.
- Commentary
- If you’re really set on using Rapiers, this option is fine, just keep in mind that its Searing Blood ability will cause self-damage.
Rings
Bracing Band
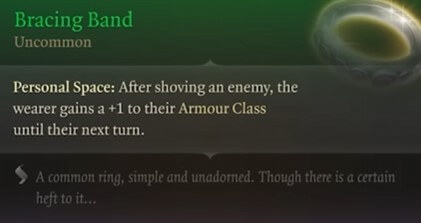
- Where to find it
- One of the reward choices given by Sergeant Thrinn of the Grymforge if you give her the Boots of Speed.
- Commentary
- If you have a STR-based character, this can be an okay supplement if you don’t have any other options. Otherwise, it’s near useless.
Caustic Band
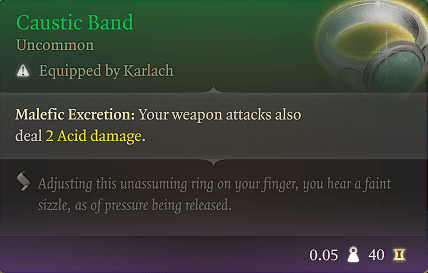
- Where to find it
- Sold at the Myconid Colony by Derryth Bonecloak
- Commentary
- This is a decent filler ring for non-casters since you can proc it pretty often. 2 damage doesn’t seem like a lot but it can definitely add up over time, especially with multi-hits.
Crusher’s Ring
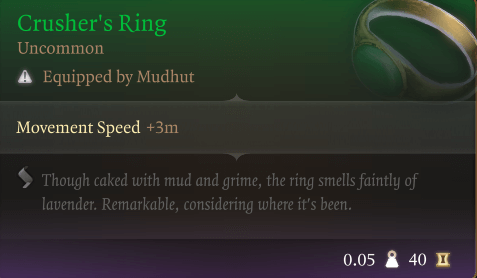
- Where to find it
- Loot dropped by Crusher at the Goblin Camp.
- Commentary
- Movement Speed is always useful on any class, it’s definitely worth the pick-up early on.
Explorer’s Ring
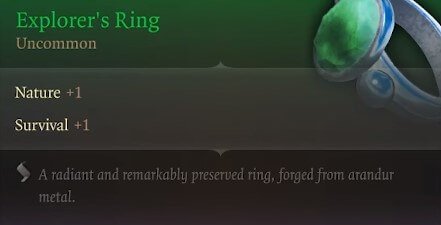
- Where to find it
- Looted from a skeleton above the green Biggerbang plants in the Underdark (location of the Find the Mushroom Picker quest)
- Commentary
- Equip this ring for exploration purposes to help you find hidden secrets, but make sure to unequip it as it’s near useless in combat.
Fetish of Callarduran Smoothhands
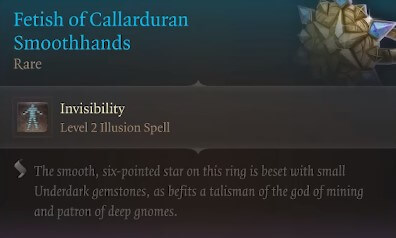
- Where to find it
- In the Grymforge, near where your boat enters, you’ll see duegar throwing dead deep gnomes into the lake. Talk to them then pass a Perception check to loot the ring.
- Commentary
- Invisibility is another one of those spells that can be useful in many situations for every class. Not only can it be used to stealth and steal, but if can also help your vulnerable members escape, or help your killers easily reach the enemy’s key threats.
Guiding Light
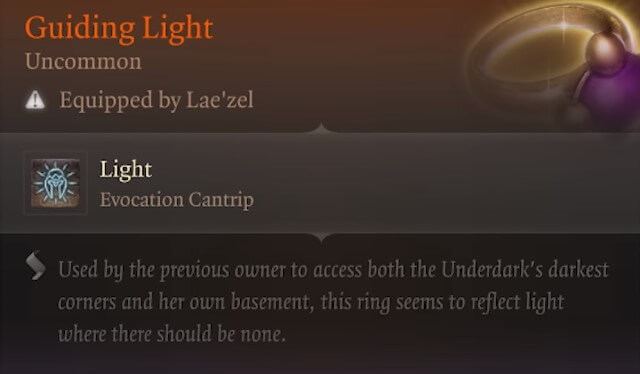
- Where to find it
- Can be obtained from Bernard at the Arcane Tower, whether through social interaction or by looting it from their body.
- Commentary
- This is kind of boring as an orange ring but Light is particularly valuable if your party lacks Darkvision. You can cast it on one target at a time.
Ring of Absolute Force
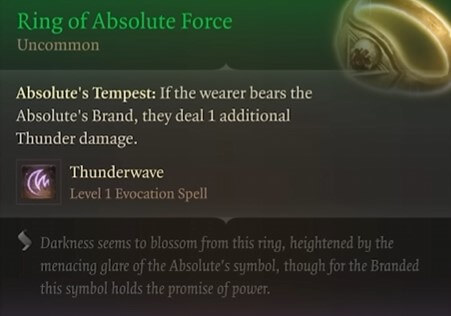
- Where to find it
- Loot dropped from Sergeant Thrinn in Grymforge near Nere’s door.
- Commentary
- Even if you don’t have the Absolute’s Brand, AoE options can be rare for some classes so having a spare Thunderwave can definitely come in handy.
Ring of Color Spray
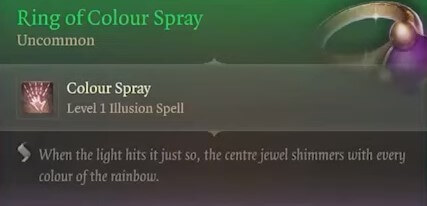
- Where to find it
- Looted from the Harpies nest found at the beach cliffs near the Druid Grove.
- Commentary
- Colour Spray allows you to blind enemies up to 33 combined HP, which is pretty strong in the early game when enemies have lower health. Definitely worth grabbing after the Harpy fight.
Ring of Flinging
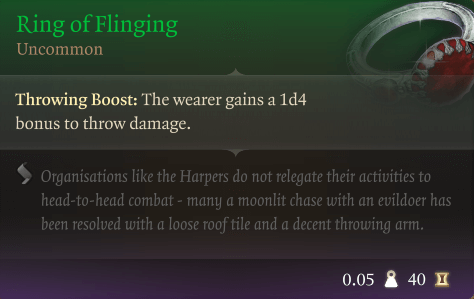
- Where to find it
- Sold at the Druid Grove by Arron.
- Commentary
- Unless you’re planning to go a Throwing build, this isn’t worth grabbing.
Ring of Jumping

- Where to find it
- Sold at the Myconid Colony by Derryth Bonecloak.
- Commentary
- In BG3, you’re nearly always rewarded for exploring. Having Jump to help you navigate vertical spaces will always be handy, and it will even last 10 turns if activated in battle.
Ring of Mind-Shielding
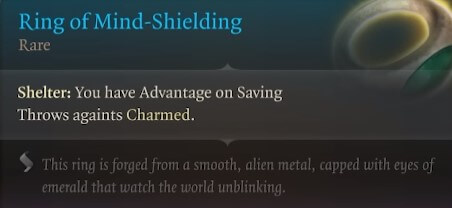
- Where to find it
- Can be purchased or exchanged for after completing the Help Omeluum Investigate the Parasite quest.
- Commentary
- This ring only really comes in handy when you’re facing Mind Flayers since they can Charm you after you attack them.
Ring of Poison Resistance
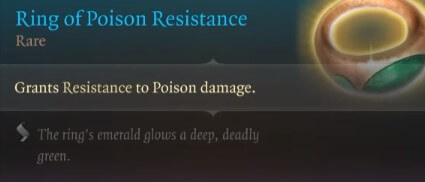
- Where to find it
- Found in the Goblin temple’s (Shattered Sanctum) Worg Pens in a skeleton.
- Commentary
- Poison usually isn’t significantly impactful in general but it is present a decent amount in Act 1 if you want to keep the ring in your back pocket.
Ring of Protection

- Where to find it
- Reward given by Mol after finishing the Steal the Sacred Idol quest.
- Commentary
- Completing this quest can be a headache but the ring itself is one of the best of Act 1, providing a good defensive boost for any class.
Ring of Salving
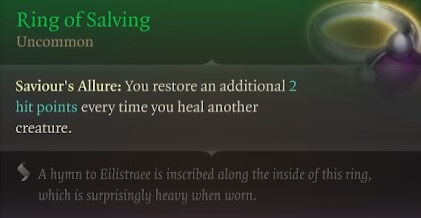
- Where to find it
- Sold at the Myconid Colony by Omeluum (the Mindflayer) after completing his Arcane Tower quest.
- Commentary
- 2 HP doesn’t seem like it a lot but every bit can count to help you preserve potions, rests, and other resources. Keep this on your healer until you find something better.
Smuggler’s Ring
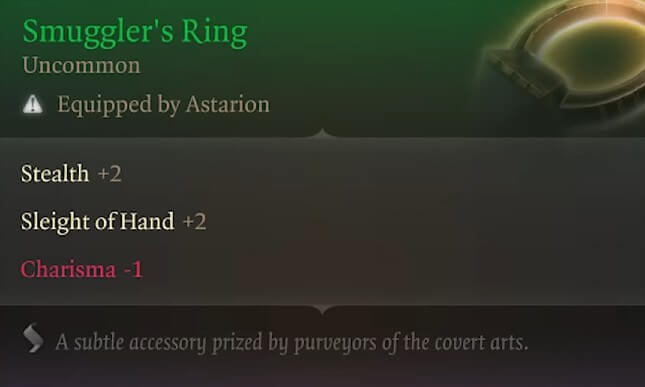
- Where to find it
- Near the broken bridge at The Risen Road on a skeleton hidden in a bush.
- Commentary
- If you plan on pickpocketing or stealing, this is an ideal choice to have ready.
Spurred Band
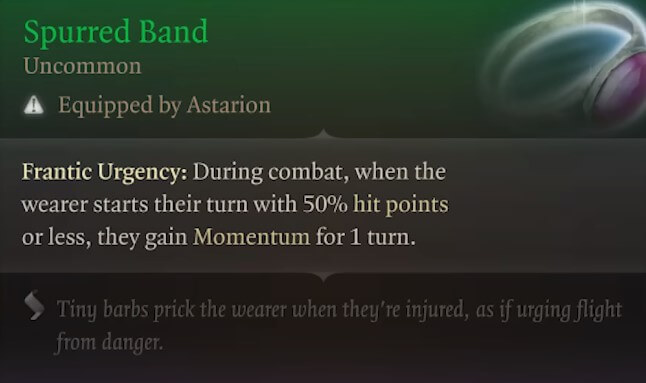
- Where to find it
- In the Whispering Depths (the Spider boss’s lair underneath the Blighted Village) from a skeleton.
- Commentary
- Like other items that synergize with 50% health or less, it’s best on Barbarians but can work with Fighters or Monks.
The Sparkswall
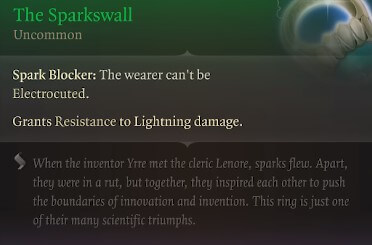
- Where to find it
- In a chest at the Arcane Tower’s basement.
- Commentary
- This ring is basically made for the Lightning Charge set, Lightning/Electrocution is rare in Act 1 outside of that use.
The Whispering Promise
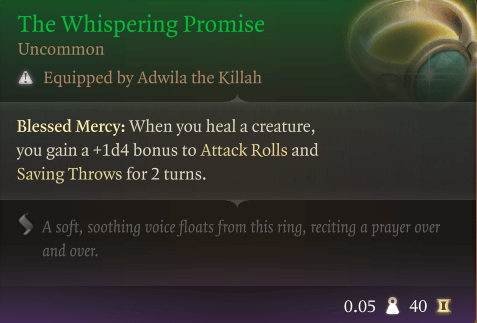
- Where to find it
- Option 1 – Sold at the Druid Grove by Volo
- Option 2 – Sold at the Goblin Camp by Grat the Trader
- Option 3 – Available in Act 2 (no spoilers)
- Commentary
- Along with Ring of Salving, this is going to be an attractive choice for your healers throughout Act 1, especially on a Paladin, but keep in mind that many Cantrips also use Attack Rolls.
Scimitars
Adamantine Scimitar
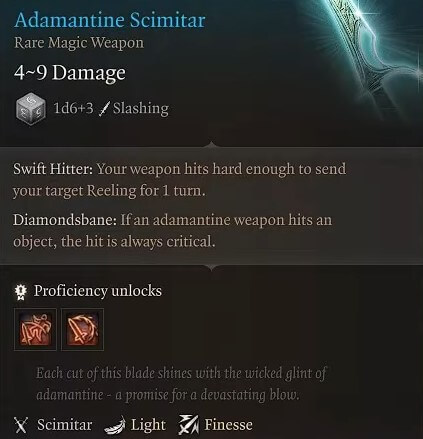
- Where to find it
- Created by combining the Mythril Ore and the Scimitar Mould using the Grymforge
- Commentary
- With all the Adamantine equipment choices, remember that you only get access to two Mythril ores. In general all choices are good, but we prefer taking the armor pieces or shield over the weapons if you need a tiebreaker.
Speedy Reply
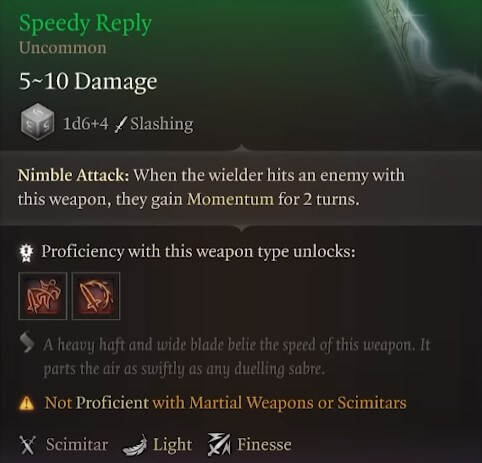
- Where to find it
- Found on a corpse near the entrance to the cave where gnollls attack (The Risen Road).
- Commentary
- By using its Momentum property (which grants bonus movement speed), Speedy Reply allows its wielder to better stick to its targets and weave around the battlefield more nimbly.
Shields
Absolute’s Warboard
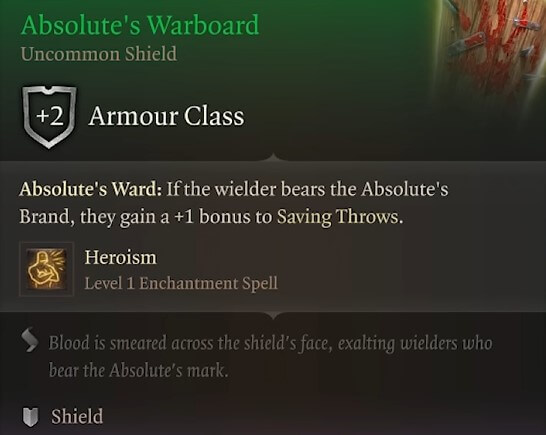
- Where to find it
- Loot dropped by Priestess Glut in the Goblin temple (Shattered Sanctum).
- Commentary
- Even if you don’t have the Absolute’s Brand, having access to a free Heroism is definitely nice to have as it prevents a target from being Frightened and grants 5 temporary health each turn while active.
Adamantine Shield
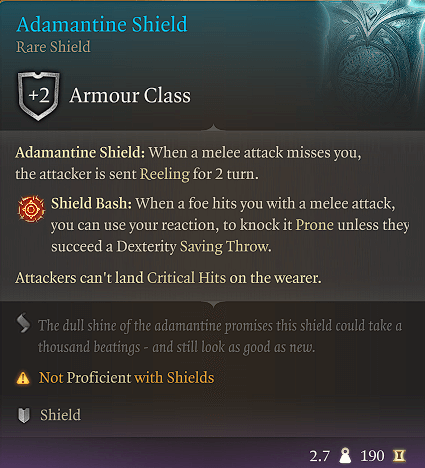
- Where to find it
- Created by combining the Mythril Ore and the Shield Mould using the Grymforge.
- Commentary
- Along with the two Adamantine armors, the Adamantine shield is one of the best uses for your Mythril since it’s basically the only Shield Bash of Act 1.
Glowing Shield
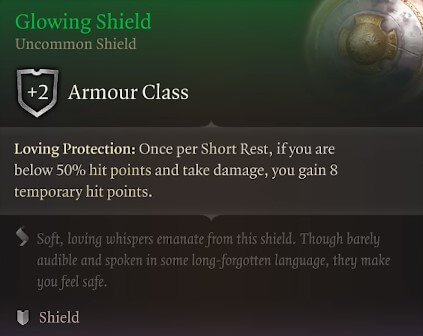
- Where to find it
- Climb the ladder from the camp’s walls and explore the cliffs above/behind the Goblin Camp. You’ll find a locked chest there that contains the Glowing Shield.
- Commentary
- This shield isn’t the best but it isn’t the worst. It’ll help your frontliner up longer but it only being every Short Rest is pretty limiting.
Safeguard Shield
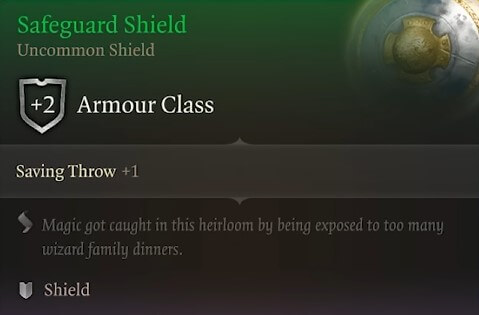
- Where to find it
- Sold at the Druid Grove by Dammon.
- Commentary
- If you don’t have access to any other +2 shields this is fine to have, but should be replaced quickly.
The Real Sparky Sparkswall
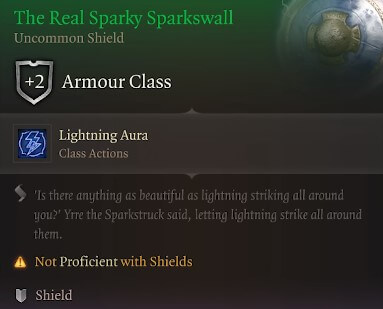
- Where to find it
- Found in a chest hidden in the cliffs north west of the Underdark – Grymforge waypoint.
- Commentary
- Lightning Aura only really works if you’re going the Lightning Charges build, so skip it in all other cases.
Wood Woad Shield
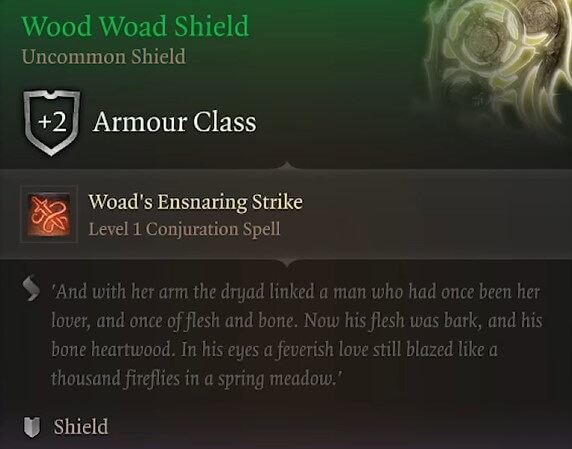
- Where to find it
- Looted from the Wood Woad fight at the beaches of the Hag’s swamp.
- Commentary
- Having crowd control on your tank is definitely useful in a pinch, and you can get this pretty early on.
Shortbows
Bow of Awareness
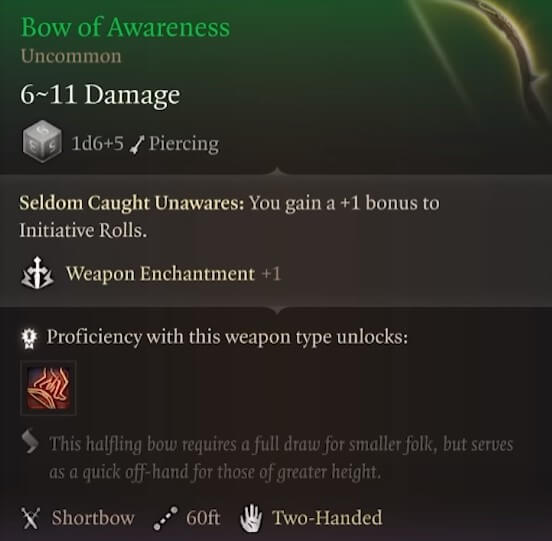
- Where to find it
- Sold at the Goblin temple (Shattered Sanctum) by Roah Moonglow.
- Commentary
- This one is simple but effective – stick it on your Ranger, Rogue, or Fighter to get an early edge in your fights.
Bow of the Banshee

- Where to find it
- Sold by Corsair Greymon at Grymforge near Nere’s door (or dropped as loot).
- Commentary
- Being able to inflict CC with your auto-attacks can be very impactful (for a DC 12 WIS save) and it even grants you more upside if your Fright lands.
Hunting Shortbow
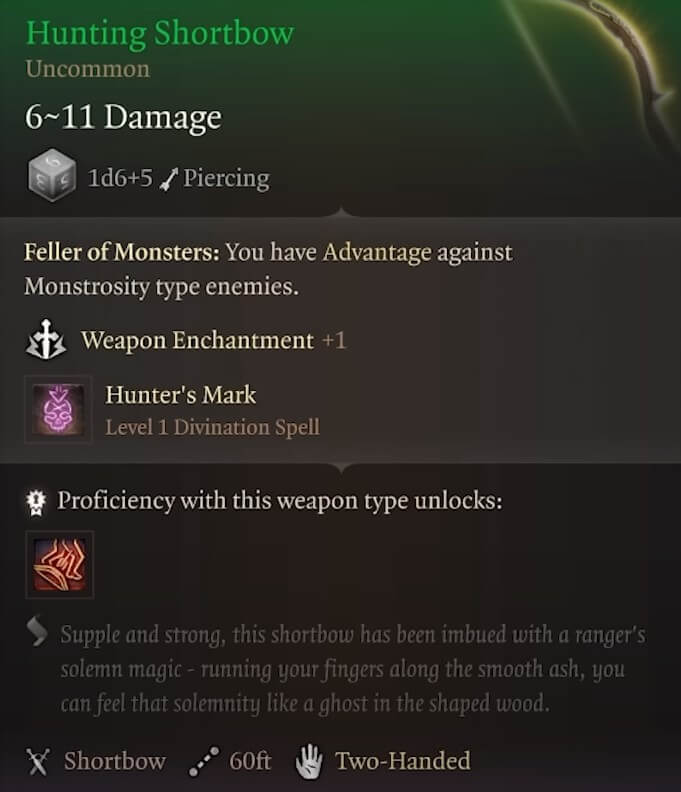
- Where to find it
- Sold at the Druid Grove by Dammon.
- Commentary
- Hunter’s Mark is a classic spell that every party should have access to, so this can be a good way to slot it in if you don’t have a Ranger.
Shortswords
Shortsword of First Blood

- Where to find it
- Looted from a dead Deep Gnome near the Decrepit Village (where you encounter the Duergar in the Underdark).
- Commentary
- This weapon is built for Rogues who draw first blood but even if you set it up, 1d8 isn’t that massive of an advantage.
Steelforged Sword
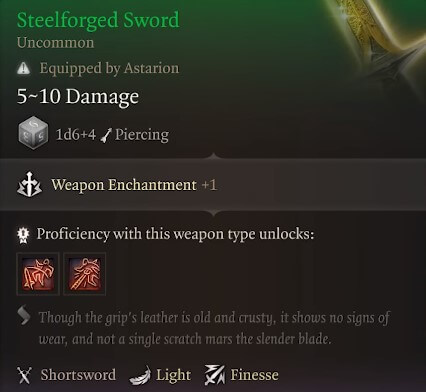
- Where to find it
- In a chest in the workshop within the Blighted Village.
- Commentary
- This is a pretty generic item, but we decided to include it since it is a unique still.
The Baneful
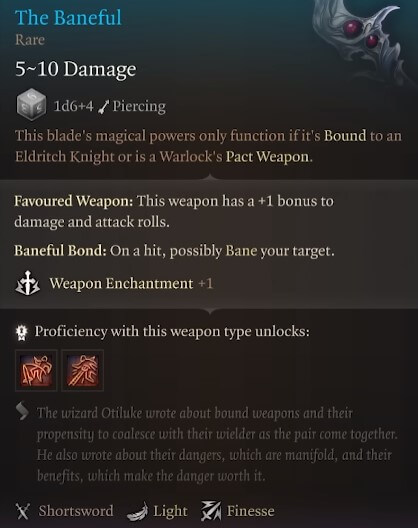
- Where to find it
- Sold at the Myconid Colony by Blurg.
- Commentary
- This blade is great if you have an Eldritch Knight or Pact of the Blade Warlock as being able to crowd control with auto-attacks is an incredible perk to have.
Sickles
Sickle of BOOOAL
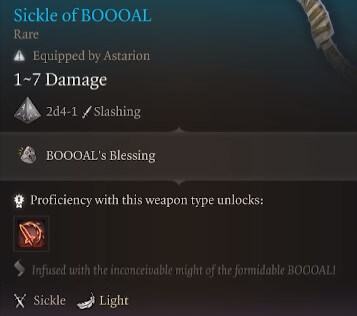
- Where to find it
- Can be obtained through various means from Pooldripp the Zealous from the Festering Cove (under the Underdark). If you want the blessing effect, there must be Kuo-toa that worship BOOOAL.
- Commentary
- Bleed is sort of clunky to build around, but this does provide an option if you want to.
Sussur Sickle
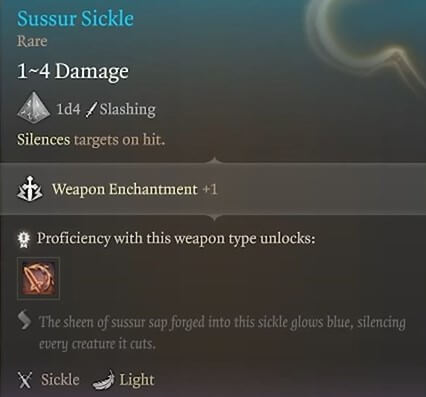
- Where to find it
- Reward given for completing the Finish the Masterwork Weapon that combines the Sussur Tree Bark with a Sickle.
- Commentary
- Like the Sussur Dagger or Greatsword, being able to Silence key targets can really swing a fight into your favor by removing key threats. Definitely take one of the three if you have the quest.
Spears
Jagged Spear
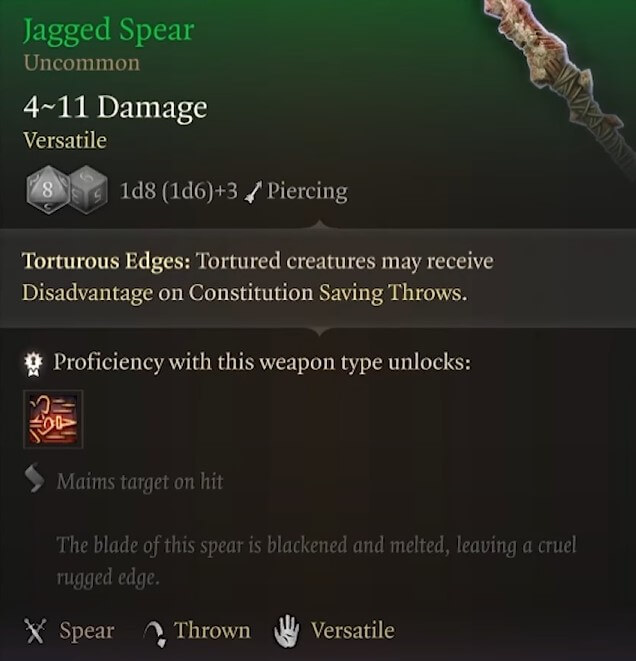
- Where to find it
- Near the torture chamber in the Goblin temple (Shattered Sanctum).
- Commentary
- If you have abilities like Heat Metal this can help enable it, but by the time you unlock more CON save abilities, this Spear will likely be underpowered.
The Watcher’s Guide
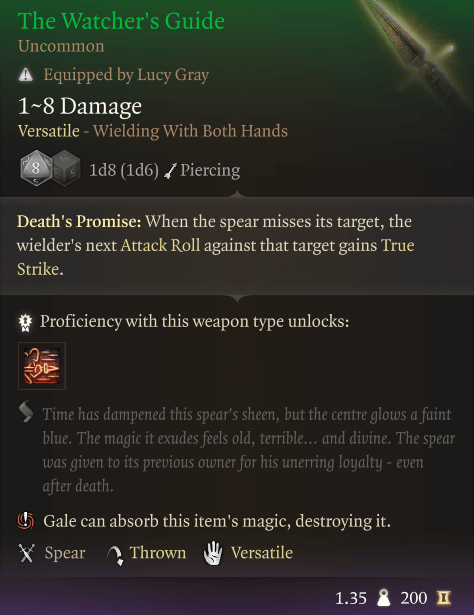
- Where to find it
- Found on a corpse in the Dank Crypt.
- Commentary
- Having more consistency is always nice and there will be enemies that are usually hard to hit so this can definitely come in handy until you find something better.
Vision of the Absolute
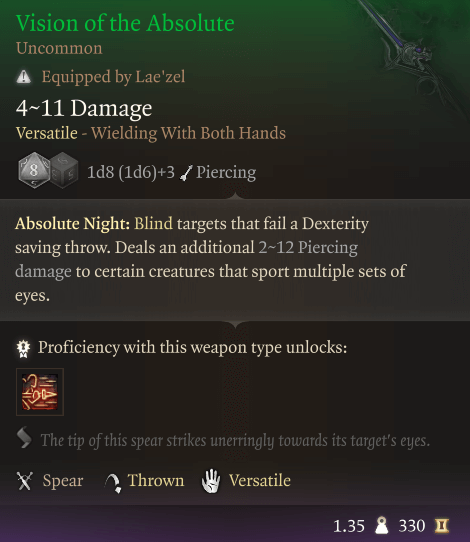
- Where to find it
- Assembled with the following components:
- Shaft of a Broken Spear – Obtained from Edowin’s body in the Forest (not too far from the Owlbear cave)
- Head of a Broken Spear – Obtained from the Owlbear in above mentioned cave.
- Assembled with the following components:
- Commentary
- Having a CC effect attached to auto-attacks is always useful and it provides an additional bonus for things like Spiders and Beholders.
Tridents
The Sparky Points
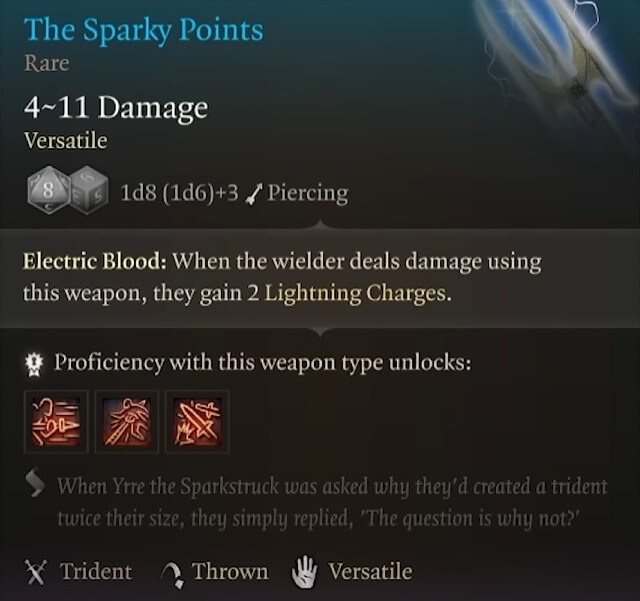
- Where to find it
- One of the reward choices after rescuing Counsellor Florrick from the burning buildings near the Zhentarim hideout (Waukeen’s Rest).
- Commentary
- The Sparky Points fits in well if you’re going for the Lightning Charge build but it can also be fine as a standalone for some additional damage output.
Warhammers
Faithbreaker
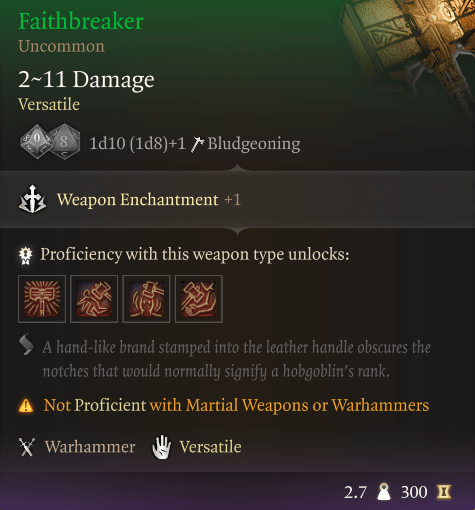
- Where to find it
- Loot dropped by Dror Ragzlin in the Goblim temple (Shattered Sanctum).
- Commentary
- Faithbreaker has access to Absolute Power which allows you to knockback enemies. This gives your Warhammer four different crowd control between knockback, proning, Dazing, and Weak Grip!
Intransient Warhammer

- Where to find it
- Found in a chest on the Duergar boat when you’re attacked on the way to Grymforge.
- Commentary
- Intransigent Warhammer has a higher skillcap than other weapons since you need to plan executions but if you can make it work, you have a ton of CC potential in fights against many enemies.
War Picks
Deep Delver
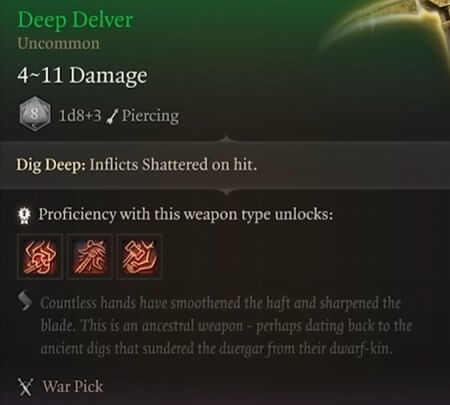
- Where to find it
- Loot dropped by Elder Brithvar, one of the Duergar near Nere’s door.
- Commentary
- After Shattering a target, a Shattered target takes an additional 1d4 piercing damage when hit. So overall this provides a small boost in damage while Shattered is active. It’s okay, but there are likely better options out there.
Thanks for reading our list of the best Baldur’s Gate 3 items of Act 1! Keep your eye out for Acts 2 and 3.
Table of contents
- Amulets
- Boots
- Clothing (Chest)
- Clubs
- Daggers
- Glaives
- Gloves
- Greataxes
- Greatswords
- Halberds
- Handaxes
- Heavy Armor (Chest)
- Helmets
- Heavy Crossbows
- Light Armor (Chest)
- Light Crossbows
- Light Hammers
- Longbows
- Longswords
- Maces
- Mauls
- Medium Armor (Chest)
- Pikes
- Quarterstaffs
- Rapiers
- Rings
- Scimitars
- Shields
- Shortbows
- Shortswords
- Sickles
- Spears
- Tridents
- Warhammers
- Warpicks