menu
MobalyticsUse your favourite features in-game with our Desktop App
WoW Forever Class

1-60 Protection Warrior Leveling Guide (Weapons, Talents, Rotation, Macros)

presentationWarrior
presentationProtection
Leveling
By Kargoz
Updated on Oct 14, 2026
Oct 14, 2026

Overview

Hey guys, Kargoz here! Thanks for checking out my WoW Forever Protection Warrior Leveling Guide.

My goal with this guide is to give you everything you need to level this sword and board monster from 1-60 as efficiently as possible. I've spent a ton of time breaking down talent builds, coefficients and leveling rotations to figure out what actually performs best.

This isn't your grandad's 2004 Prot Warrior. In WoW Forever Protection is a legit leveling spec. Between the buffs to Revenge, improved Rage generation, stronger mitigation, and eventually Shield Slam, you can deal respectable damage while being EXTREMELY difficult to kill.

The biggest advantage isn't necessarily your damage against a single target. It's your ability to pull multiple enemies, take significantly less damage, and keep fighting with very little downtime.

Unlike Vanilla, where Protection sacrifices most of its damage for survivability, Forever gives you several ways to turn defensive stats and mechanics into offensive power.

The biggest improvements include:

  • Improved Revenge: Increases Revenge damage by up to 50%, making it one of your most efficient attacks.
  • Bastion: Increases all damage dealt by 10% while using a shield.
  • Shield Specialization: Generates 5 Rage whenever you block an attack.
  • Master of Defense: Generates 5 Rage whenever you dodge or parry an attack while wearing a shield.
  • Thunder Clap: Now scales with Attack Power and can be used directly in Defensive Stance.
  • Victory Rush: Provides free damage and heals 10% of your maximum health after qualifying kills.
  • Shield Slam: Gives Protection a powerful offensive ability that also scales with Block Value.

All of this creates a gameplay loop where blocking, dodging, and parrying help fuel your damage.

Protection shines when you're fighting multiple mobs, taking advantage of its mitigation, Rage generation, and sustained damage. You also have exceptional survivability against elite enemies and can comfortably tank dungeons while leveling.

Talents

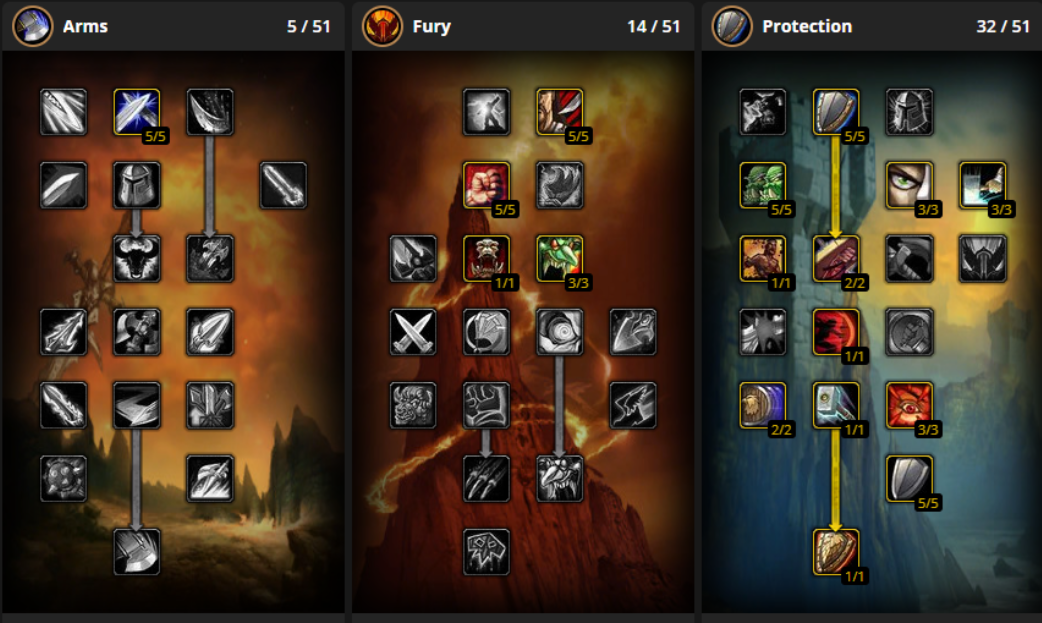
Points Invested 51 / 51
5/6/40
Arms
5(47)
Improved Heroic Strike
0/3
Deflection
5/5
Improved Rend
0/3
Improved Charge
0/2
Improved Tactical Mastery
0/5
Improved Overpower
0/2
Anger Management
0/1
Deep Wounds
0/3
Spearing Strike
0/1
Two-Handed Weapon Specialization
0/3
Impale
0/2
Bloodthrill
0/5
Sweeping Strikes
0/1
Weaponmaster
0/5
Improved Slam
0/2
Improved Hamstring
0/3
Mortal Strike
0/1
Fury
6(53)
Booming Voice
0/5
Cruelty
5/5
Lingering Rage
1/5
Unbridled Wrath
0/5
Furious Precision
0/3
Piercing Howl
0/1
Blood Craze
0/3
Dual Wield Specialization
0/5
Raging Blows
0/1
Enrage
0/5
Improved Execute
0/2
Improved Berserker Rage
0/2
Death Wish
0/1
Improved Intercept
0/2
Flurry
0/5
Gore Drinker
0/2
Bloodthirst
0/1
Protection
40(50)
Improved Bloodrage
2/2
Shield Specialization
5/5
Iron Will
0/5
Anticipation
5/5
Improved Revenge
3/3
Improved Thunder Clap
3/3
Last Stand
1/1
Master of Defense
2/2
Improved Disarm
0/3
Defiance
3/3
Improved Sunder Armor
3/3
Vanguard
1/1
Improved Shield Bash
0/2
Improved Shield Wall
2/2
Concussion Blow
1/1
Focused Rage
3/3
Bastion
5/5
Shield Slam
1/1

Your primary objective is to establish a strong Rage economy early before transitioning into sustained mitigation and offensive scaling.

Early Levels: 10–22

Prioritize the talents that make your defensive abilities generate damage and Rage.

  • Shield Specialization 5/5: Generates 5 Rage whenever you block.
  • Improved Revenge 3/3: Increases the damage of your most efficient counterattack.
  • Improved Thunder Clap: Reduces its Rage cost and improves your ability to handle multiple enemies.
  • Master of Defense: Provides additional Rage from successful dodges and parries.

This setup becomes considerably stronger once you unlock Revenge at level 14 and Shield Block at level 16.

Midgame: 22–40

Continue developing your Protection talents, prioritizing improvements to mitigation, Rage efficiency, and offensive consistency.

Some particularly valuable talents include:

  • Anticipation: Additional Defense improves your defensive reliability.
  • Vanguard: Increases Agility while using Defensive Stance.
  • Focused Rage: Reduces the Rage cost of offensive abilities.
  • Last Stand: Provides a defensive emergency cooldown.
  • Bastion: Increases damage while using a shield.

Level 40–60

Shield Slam is your major offensive milestone.

Once unlocked, you gain a powerful attack that scales with Block Value, giving your shield direct offensive value.

Finish developing your Protection talents and invest remaining points into complementary offensive talents.

Your presentation also includes an alternative build with additional Fu

Gameplay & Rotation

Protection doesn't use a completely fixed rotation. Your priority changes depending on enemy count, available Rage, and whether Revenge is active.

Levels 1–10

Focus on efficient Rage usage and keeping downtime low.

  1. Open with Charge once available.
  2. Apply Rend when the target will survive long enough.
  3. Use Thunder Clap when fighting multiple enemies or when its mitigation is valuable.
  4. Spend excess Rage on Heroic Strike.
  5. Carry leftover Rage into your next fight whenever possible.

Avoid repeatedly using Heroic Strike on enemies that are already about to die.

Levels 10–20

Once you acquire Defensive Stance and Revenge, your core Protection gameplay starts coming online.

Priority:

  1. Charge to initiate combat.
  2. Maintain Battle Shout.
  3. Apply Rend to enemies that will survive long enough.
  4. Use Revenge whenever available.
  5. Activate Shield Block to increase blocking and create Revenge opportunities.
  6. Apply Thunder Clap and Demoralizing Shout for multi-target mitigation.
  7. Use Sunder Armor against enemies that will survive several additional attacks.

Your level 16 Shield Block is particularly important because it's off the Global Cooldown.

Levels 20–40

Victory Rush becomes a major part of your leveling efficiency.

Priority:

  1. Charge into combat.
  2. Use Victory Rush after a qualifying kill when available.
  3. Maintain Rend on longer-lived enemies.
  4. Prioritize Revenge.
  5. Use Shield Block to improve survivability and create offensive opportunities.
  6. Use Thunder Clap against multiple targets.
  7. Spend extra Rage on Cleave or Heroic Strike.

Try to chain kills to benefit from Victory Rush's free damage and healing.

Levels 40–60

Once you unlock Shield Slam, your priority changes significantly.

Single-Target Priority:

  1. Shield Slam
  2. Revenge when available
  3. Victory Rush when available
  4. Rend if the target will live long enough
  5. Sunder Armor against durable enemies
  6. Heroic Strike with excess Rage

Multi-Target Priority:

  1. Thunder Clap
  2. Shield Slam on your priority target
  3. Revenge when available
  4. Demoralizing Shout for mitigation
  5. Cleave when you have spare Rage

Continue using Shield Block proactively when the incoming attacks and Rage economy justify its cost.

Race Selection

Alliance

Human

  • Sword Specialization: Gives 2% Critical Strike Chance while using swords. Extremely strong since it benefits your entire offensive toolkit, not just weapon swings. Critical auto attacks also generate additional Rage in Forever.
  • Will to Survive: Removes Stuns. Great for PvP and occasionally useful against dungeon mobs and elites.
  • Perception: Improved stealth detection is valuable against Rogues and other stealth enemies, especially on PvP servers.
  • The Human Spirit: 5% increased Spirit provides additional passive health regeneration, helping reduce downtime.

Dwarf

  • Stoneform: Removes Bleeds, Poisons, and Diseases while providing 10% Physical Damage Reduction for 8 seconds. An excellent defensive cooldown for dangerous pulls, elites, and dungeon tanking.
  • Big Game Hunter: 5% increased damage against Beasts. Surprisingly strong while leveling because so many grinding locations feature Beasts.
  • Mace Specialization: 1% increased Crit Chance while using maces, providing additional offensive value and Rage generation through critical auto attacks.
  • Find Treasure: Useful for finding chests while questing, providing additional gold, consumables, and potential gear upgrades.

Gnome

  • Eureka!: Your next three non-periodic damaging abilities deal 10% additional damage and cost 10% less Rage. Excellent for high threat openers in dungeons, especially when combined with Shield Slam and Thunder Clap.
  • Escape Artist: Removes movement impairing effects and provides 3 seconds of immunity. INSANELY useful for a class with limited mobility, especially in PvP.
  • Expansive Mind: Increases maximum Rage by 5%, allowing you to pool slightly more resources before important pulls.
  • Engineering Specialization: Reduces Engineering device failures and backfires by 20%. Excellent synergy with a profession that's already incredibly useful for Warriors.

Night Elf

  • Elune's Light: Provides 10% increased Critical Strike Chance for 15 seconds. One of the strongest offensive racials in Forever. Excellent for burst damage, generating additional Rage through critical auto attacks, and establishing high threat on dungeon bosses.
  • Quickness: 1% Dodge and 2% increased movement speed. Both are fantastic for Protection, especially once Master of Defense converts dodges into additional Rage.
  • Shadowmeld: Can now be used in combat to reduce enemy aggression. Useful for escaping dangerous situations, although dropping threat is generally undesirable while actively tanking.
  • Wisp Spirit: Increased movement speed while dead. Primarily a convenience bonus when recovering from deaths.

Horde

Orc

  • Blood Fury: Increases Attack Power by 10% for 15 seconds without the old healing penalty. Great for burst damage and high threat openers, especially with Protection's improved Attack Power scaling.
  • Shatter Curse: Removes and prevents Curses and Banes while reducing Magical Damage Taken by 15% for 8 seconds. Extremely useful against casters, which are naturally more dangerous for Protection.
  • Axe Specialization: Provides 1% Critical Strike Chance while using axes, improving damage and Rage generation through critical auto attacks.
  • Hardiness: Reduces Stun durations by 20%. Strong in PvP and useful against enemies with frequent stuns.

Tauren

  • Endurance: Provides 5% increased maximum Health AND 1% Hit Chance. Both are exceptional for Protection. Extra health improves survivability and increases the healing from Victory Rush, while Hit improves damage and threat consistency.
  • War Stomp: Two second AoE stun affecting up to five enemies. Excellent for interrupting casts, controlling large pulls, and creating breathing room during dangerous encounters.
  • Plainsrunning: Gradually increases movement speed while continuously moving, up to 30%. Potentially HUGE for open world leveling and reducing travel time before obtaining a mount.
  • Cultivation: Allows you to duplicate and gather herbs without Herbalism. Mostly an economic bonus, but useful for gathering extra resources while leveling.

Troll

  • Berserking: Provides 10% Attack Speed, improving auto attack throughput and Rage generation. A solid offensive cooldown, particularly during extended fights.
  • Rapid Regeneration: Restores 50% of maximum Health over 6 seconds, provided you aren't interrupted by movement, actions, or damage. Absolutely incredible for recovering between pulls and reducing Warrior downtime.
  • Regeneration: Improves Health Regeneration by 10% and allows a portion of it to continue during combat. Provides additional sustain, especially when combined with Spirit.
  • Beast Slaying: 5% increased damage against Beasts. Extremely valuable for grinding and open world leveling because of how frequently you'll encounter Beasts.

Undead

  • Will of the Forsaken: Removes Fear, Charm, and Sleep effects. Exceptional in PvP and useful against specific dungeon encounters.
  • Cannibalize: Restores 35% maximum Health over 10 seconds when consuming Humanoid or Undead corpses. Fantastic for reducing downtime while grinding these enemy types.
  • Touch of the Grave: Attacks have a 5% chance to drain health from enemies, providing additional damage and passive sustain.
  • Underwater Breathing: Increases underwater breath duration by 300%. Situationally useful for underwater questing and exploration.

Skyborne

High Order Skyborne (Alliance)

  • Wind Blessed: 1% Haste improves auto attack throughput and Rage generation.
  • Elemental Insight: 5% increased damage against Elementals.
  • Read Ley Line: Increases Health regeneration by 100%, with significantly longer duration when used near a ley line. Potentially useful for reducing downtime.
  • Walk on Air: Allows controlled gliding, providing additional mobility and opportunities for shortcuts while leveling.

Windshaper Skyborne (Horde)

  • Wind Blessed: 1% Haste improves sustained offensive throughput and Rage generation.
  • Elemental Insight: 5% increased damage against Elementals.
  • Skysight: Provides 10% increased movement and mounted speed. Particularly strong for open world travel when you can maintain its longer duration near elemental convergences.
  • Walk on Air: Provides gliding utility and additional options for navigating difficult terrain.

My Recommendations

Alliance: Gnome and Night Elf are exceptionally strong choices. Gnome offers incredible utility, improved burst threat, and better Rage flexibility, while Night Elf provides outstanding offensive potential, passive movement speed, and Dodge synergy. Human is also excellent if you plan to use swords consistently.

Horde: Orc is a fantastic all around choice, combining offensive burst with excellent PvP and anti-caster utility. Tauren is arguably the most well rounded defensive option, with Health, Hit, AoE crowd control, and powerful travel speed bonuses. Troll deserves serious consideration for solo leveling thanks to Rapid Regeneration and its additional sustain.

Ultimately, all of these races are viable, but the best choice depends heavily on whether you're prioritizing solo grinding, dungeon tanking, or world PvP.

Alternate Talents


Mitigating Damage

Protection has access to an excellent collection of defensive tools that allow you to survive situations other Warrior builds would struggle with.

Shield Block: Your most frequently used defensive ability. It increases your chance to block by 75% for 7 seconds, with a limit of two blocked attacks.

Demoralizing Shout: Reduces enemy melee Attack Power. It's especially valuable when several enemies are attacking you.

Thunder Clap: Slows enemy attacks, significantly reducing sustained incoming physical damage.

Shield Wall: Your emergency defensive cooldown, providing 60% damage reduction for 12 seconds.

Last Stand: Provides additional maximum health when you're in danger of dying.

Disarm: Exceptionally strong against dangerous weapon wielding enemies.

Victory Rush: Restores 10% of your maximum health after qualifying kills while providing a free damaging attack.

The biggest optimization is using these tools BEFORE the situation becomes dangerous.

Don't wait until you're almost dead to start mitigating incoming damage.

Stat Priority

Protection benefits from both offensive and defensive stats.

Unlike other Warrior builds, you can extract considerable offensive value from your shield and defensive mechanics.

Strength / Attack Power > Stamina > Agility > Defense / Block Value

This is a practical leveling priority rather than a fixed mathematical ranking. Your ideal balance depends on whether you're grinding regular mobs, fighting elites, or tanking dungeons.

Strength and Attack Power: Improve your general offensive output, including abilities that now benefit from Attack Power scaling.

Stamina: Increases your health pool, giving you considerably more flexibility during large pulls and difficult encounters.

Agility: Provides critical strike chance and avoidance, making it valuable both offensively and defensively.

Defense: Improves your defensive consistency and synergizes with Protection's mitigation focused gameplay.

Block Value: Becomes particularly attractive once you've unlocked Shield Slam.

What Gear Should You Look For?

Prioritize strong one handed weapons, regularly upgrade your shield, and equip armor with useful combinations of Strength, Stamina, and Agility.

An important distinction from traditional Arms leveling is that Protection doesn't rely as heavily on having the slowest possible weapon.

Your most powerful abilities increasingly derive their value from base damage, Attack Power, and defensive scaling rather than simply your weapon's top end damage.

Consumables

Essential Consumables

  • Cooked Stat Food: +5% XP from kills, plus stat bonuses
  • Sharpening Stones / Weightstones: Increased weapon damage
  • Healing Potions: Emergency healing
  • Bandages: Health recovery between pulls
  • Rage Potions: Instant Rage generation
  • Swiftness Potions: +50% movement speed for 15 seconds

Offensive Consumables

  • Level 4: Rage Potion, 20–40 Rage
  • Level 20: Elixir of Ogre's Strength, +8 Strength
  • Level 25: Great Rage Potion, 30–60 Rage
  • Level 27: Elixir of Agility, +15 Agility
  • Level 55: Elixir of the Grizzly, +25 Strength and +2% Crit

Sharpening Stones / Weightstones

  • Level 1: Rough, +2 Weapon Damage
  • Level 5: Coarse, +3 Weapon Damage
  • Level 15: Heavy, +4 Weapon Damage
  • Level 25: Solid, +6 Weapon Damage
  • Level 35: Dense, +8 Weapon Damage

Defensive Consumables

  • Level 2: Elixir of Minor Fortitude, +27 HP
  • Level 16: Elixir of Lesser Defense, +150 Armor
  • Level 20: Free Action Potion, prevents stuns and slows for 30 seconds
  • Level 25: Elixir of Lesser Fortitude, +120 HP
  • Level 26: Troll's Blood Elixir, +12 HP per 5 seconds
  • Level 29: Elixir of Defense, +250 Armor
  • Level 43: Elixir of Greater Defense, +450 Armor
  • Level 55: Elixir of the Phalanx, +400 HP and +500 Armor

Healing Potion Progression

  • Level 3: Lesser Healing Potion, 140–180 HP
  • Level 12: Healing Potion, 280–360 HP
  • Level 21: Greater Healing Potion, 455–585 HP
  • Level 35: Superior Healing Potion, 700–900 HP
  • Level 45: Major Healing Potion, 1,050–1,750 HP

WoW Forever XP Bonuses

  • Cooked Stat Food: +5% XP from kills
  • Cozy Sleeping Bag: Up to +3% XP bonus
  • Camp Tent: Restores a limited amount of rested XP

Professions

  • Blacksmithing + Enchanting: GIGA tryhard combination with HUGE gold making potential, especially for dedicated dungeon tanks.
  • Blacksmithing: Craft weapons, armor, shield spikes, sharpening stones, and valuable new WoW Forever recipes.
  • Enchanting: Excellent for dungeon tanks. Disenchant unwanted dungeon loot for materials and sell high demand enchants.
  • Rare Recipes: As the tank and group leader, you can negotiate reservations on valuable Blacksmithing Plans and Enchanting Formulas before dungeon runs.
  • Mining + Blacksmithing: More economical while leveling. Gather your own materials and swap Mining for Enchanting later.
  • Engineering: Strong alternative for PvP focused Warriors, offering bombs, gadgets, and additional utility.

My Recommendation: If you plan to main tank and spam dungeons, Blacksmithing + Enchanting has MASSIVE long term potential. Expensive to level, but access to rare recipes, enchanting materials, and crafting services can make it extremely lucrative.

Weapon Progression

Levels 1–12: Starter Weapons

Vendor Options:

  • Gladius / Tomahawk / Cudgel: Cheap early weapons available from vendors.
  • Cutlass: Solid vendor upgrade at Level 10.

Alliance Quest Weapons:

  • Craftsman's Dagger: A Pilot's Revenge in Dun Morogh.
  • Haggard's Sword / Umbral Sword / Elunite Sword: Level 10 Warrior class quest rewards, depending on your starting area.

Horde Quest Weapons:

  • Jagged Dagger: Skull Rock quest in Durotar.
  • Compact Fighting Knife: Supervisor Fizsprocket quest in Mulgore.
  • Thun'grim's Sword / Heirloom Sword: Level 10 Warrior class quest rewards.

Your Level 10 class weapon is one of your first major upgrades. Make sure you complete this quest while unlocking Defensive Stance.

Levels 12–20: Early Dungeon and Quest Upgrades

Alliance:

  • Daryl's Shortsword: A Hunter's Challenge in Loch Modan.
  • Fist of the People's Militia: A People's Militia quest chain in Westfall.
  • Cruel Barb: Dropped by Edwin VanCleef in Deadmines. Excellent early sword if you're running the dungeon.

Horde:

  • Engineer's Hammer: Samophlange quest in the Barrens. Keep in mind this competes with Welding Shield as a quest reward.
  • Hammer of Orgrimmar: Hidden Enemies quest chain involving Ragefire Chasm.
  • Wingblade: Leaders of the Fang quest in Wailing Caverns. One of your strongest early guaranteed upgrades.

Additional Options:

  • Scimitar / Poniard: Vendor fallbacks if your weapon is outdated.
  • Butcher's Cleaver: Dropped by Razorclaw the Butcher in Shadowfang Keep.

Levels 20–30: Major Weapon Upgrades

This is an excellent bracket for powerful dungeon weapons and several VERY strong quest rewards.

Alliance:

  • Subdued Dragon's Fang: Stopping the Cycle quest in the Wetlands. A new Forever weapon with excellent damage for this level range.
  • Cruel Barb: Still a useful fallback if you haven't replaced it.

Horde:

  • Slatemetal Cutlass: Torek's Assault quest in Ashenvale.
  • Outlaw Sabre: Baron Aquanis quest in Blackfathom Deeps.
  • Serrated Raptor Claw: Changing Tastes quest in the new Wetlands dungeon.

Dungeon Drops:

  • Meteor Shard: Archmage Arugal in Shadowfang Keep. Strong damage with an additional Fire damage proc.
  • Bite of Serra'kis: Old Serra'kis in Blackfathom Deeps. Fast dagger with a poison effect.
  • Swinetusk Shank: Agathelos the Raging in Razorfen Kraul.

Don't feel obligated to farm every dungeon weapon. The guaranteed quest rewards can carry you through this bracket without excessive detours.

Levels 30–40: Scarlet Monastery and Gnomeregan

Alliance:

  • Sword of Serenity: In the Name of the Light quest in Scarlet Monastery. One of your best guaranteed upgrades during this bracket.

Horde:

  • Sword of Omen: Into the Scarlet Monastery quest. Excellent guaranteed sword.
  • Windstorm Hammer: Test of Lore quest chain.

Both Factions:

  • Electrocutioner Leg: Electrocutioner 6000 in Gnomeregan. Excellent weapon damage with an additional Nature damage proc.
  • Ironspline's Fist: Razorfen Downs dungeon drop with a large Strength bonus.
  • Vanquisher's Sword: Bring the Light / Bring the End quests in Razorfen Downs. Another excellent guaranteed weapon upgrade.

If you're primarily dungeon leveling, Scarlet Monastery and Razorfen Downs provide some of your most important weapon progression opportunities.

Levels 40–50: Powerful Quest Weapons

This is where you can start acquiring weapons that will last for a significant portion of your remaining leveling journey.

Priority Upgrades:

  • Force of the Hippogryph: Horde quest reward from Weapons of Spirit in Feralas. Strong weapon damage and Agility, although the quest chain is substantial.
  • Thrash Blade: Corruption of Earth and Seed quest in Maraudon. One of the BEST weapons to target while leveling thanks to its extra attack proc.
  • Jang'thraze the Protector / Sang'thraze the Deflector: Zul'Farrak dungeon drops with useful defensive and offensive effects.

Optional Upgrades:

  • Flurry Axe: Rare BoE weapon with an extra attack proc. Extremely powerful but potentially expensive.
  • Falchion: Reliable vendor fallback if you've fallen behind on upgrades.

Levels 50–60: Finishing Your Weapon Progression

By this point, you're looking for weapons that can comfortably carry you into Level 60 dungeons and your initial gearing progression.

Recommended Targets:

  • Lord General's Sword: Dropped by General Angerforge in Blackrock Depths. Excellent damage with an Attack Power proc.
  • Mirah's Song: Reward from the Scholomance quest chain involving Kirtonos the Herald. Strong Strength and Agility bonuses alongside solid weapon DPS.
  • Blazing Rapier: Crafted weapon with a damage over time proc.
  • Mass of McGowan: Powerful BoE mace with Strength and Stamina.
  • Sword of Zeal: High damage BoE sword with an offensive proc.

My recommendation is to prioritize Thrash Blade, then work toward Lord General's Sword or Mirah's Song as you approach Level 60.

Shield Progression

Keeping your shield updated is REALLY important for Protection. More Armor and Block Value improve your survivability, while blocking also creates Revenge opportunities and generates additional Rage through .

Alliance Shield Progression

Levels 1–20

  • Militia Buckler: Reward from Riverpaw Gnoll Bounty in Elwynn Forest. An easy early shield for Humans. Other starting zones have comparable quest rewards.
  • Buckler of the Seas: Reward from The Coastal Menace in Westfall. A convenient upgrade while questing.
  • Gold-plated Buckler: Dropped by Miner Johnson in Deadmines. Nice upgrade if you're already running the dungeon.
  • Furen's Favor: Level 20 Warrior class quest reward from The Shieldsmith, following The Rethban Gauntlet in Redridge Mountains. A guaranteed shield worth collecting if you're doing your class quests.

Levels 20–30

  • Arctic Buckler: Reward from Blackfathom Villainy in Blackfathom Deeps. Excellent early dungeon quest shield with 642 Armor and 8 Stamina.
  • Crest of Darkshire: Reward from Bride of the Embalmer in Duskwood. Strong Stamina and a natural upgrade if you're completing the quest chain.
  • Marbled Buckler: Reward from The Crone of the Kraul in Razorfen Kraul, available from Level 29. Excellent stats with 776 Armor, 17 Block, and 5 each of Strength, Agility, Stamina, and Spirit.

Levels 30–40

  • Captain Rackmore's Wheel: Guaranteed reward from Claim Rackmore's Treasure! in Desolace. Collect the two keys and open Rackmore's chest. A solid fallback if you've missed earlier upgrades.
  • Gold Lion Shield: Reward from A Grim Task in Wetlands. A reasonable alternative if you're already completing the quest.
  • Aegis of the Scarlet Commander: Dropped by Scarlet Commander Mograine in Scarlet Monastery Cathedral. This is your BIG upgrade at Level 39. It has 1548 Armor, 23 Block, Strength, Stamina, and deals Holy damage whenever you block. Absolutely incredible synergy with Protection.

Levels 40–50

  • Optomatic Deflector: Reward from Rescue OOX-17/TN! in Tanaris. Provides 1578 Armor, 25 Block, 5 Strength, and 2% additional Block Chance. Excellent for Protection's Rage generation.
  • Shizzle's Drizzle Blocker: Reward from Shizzle's Flyer in Un'Goro Crater, available from Level 49. Provides 1691 Armor, 29 Block, and 13 Strength. A fantastic guaranteed offensive option.
  • Stoneshell Guard: Dropped by Lord Roccor in Blackrock Depths. A strong dungeon upgrade featuring 1803 Armor, 31 Block, Strength, Stamina, and bonus Armor.

Levels 50–60

  • Crest of Supremacy: Dropped by Shade of Eranikus in the Sunken Temple. Excellent shield with 1930 Armor, 35 Block, Strength, Agility, and Stamina.
  • Rock Golem Bulwark: Dropped by Panzor the Invincible in Blackrock Depths. Solid alternative with 1994 Armor and 36 Block, although Panzor is a rare spawn.
  • Draconian Deflector: Dropped by General Drakkisath in Upper Blackrock Spire. One of your best pre-raid targets, providing 2153 Armor, 40 Block, 10 Defense, and Fire Resistance.

Horde Shield Progression

Levels 1–20

  • Charging Buckler / Tribal Warrior's Shield / Bone Buckler: Early quest shields available through Durotar, Mulgore, and Tirisfal Glades respectively.
  • Welding Shield: Reward from Samophlange in the Barrens. Extremely convenient for Horde leveling. Remember that it competes with Engineer's Hammer as the quest reward.
  • Kresh's Back: Dropped by Kresh in Wailing Caverns. Provides Defense and is worth grabbing if you're already running the dungeon.
  • Ruga's Bulwark: Level 20 Warrior class quest reward from Trial at the Field of Giants in the Barrens. Guaranteed upgrade with Strength.

Levels 20–30

  • Driftmire Shield: Reward from Je'neu of the Earthen Ring in Ashenvale. Great quest upgrade with Strength, Stamina, and Intellect.
  • Arctic Buckler: Reward from Blackfathom Villainy in Blackfathom Deeps. Excellent defensive upgrade with 642 Armor and 8 Stamina.
  • Commander's Crest: Dropped by Commander Springvale in Shadowfang Keep. Good offensive stats and passive health regeneration.
  • Marbled Buckler: Reward from A Vengeful Fate in Razorfen Kraul, available from Level 29. One of your best guaranteed upgrades before Scarlet Monastery.

Levels 30–40

  • Captain Rackmore's Wheel: Guaranteed Desolace quest reward. Particularly useful if you haven't completed Razorfen Kraul.
  • Grom'gol Buckler: Reward from The Defense of Grom'gol in Stranglethorn Vale. An accessible questing alternative.
  • Vile Protector: Reward from Compendium of the Fallen in Scarlet Monastery for eligible Horde races. Solid offensive shield with a chance to deal Shadow damage when struck.
  • Aegis of the Scarlet Commander: Dropped by Scarlet Commander Mograine in Scarlet Monastery Cathedral. Your primary target at Level 39. The on-block Holy damage is especially valuable for Protection.

Levels 40–50

  • Aegis of Battle: Reward from Venom to the Undercity, part of the Hinterlands quest chain involving the elite spider Shadra. Provides 1691 Armor, 29 Block, 6 Agility, and 10 Stamina. This is arguably your strongest guaranteed midgame shield, but you'll want help completing the elite encounter.
  • Optomatic Deflector: Reward from the Tanaris chicken escort. A great alternative if you want additional Block Chance.
  • Shizzle's Drizzle Blocker: Un'Goro Crater quest reward with 13 Strength. Excellent if you're prioritizing offensive throughput.

Levels 50–60

  • Stoneshell Guard: Lord Roccor in Blackrock Depths. Great defensive upgrade if you missed the stronger quest shields.
  • Crest of Supremacy: Shade of Eranikus in the Sunken Temple. Excellent offensive and defensive stats.
  • Rock Golem Bulwark: Panzor the Invincible in Blackrock Depths. Useful alternative if you happen to encounter the rare boss.
  • Draconian Deflector: General Drakkisath in Upper Blackrock Spire. Outstanding pre-raid shield and an excellent target heading into Level 60.

Changelog

Guide Created 10/14/2026

Video

Table of Contents

Trending Guides

Rogue Leveling - Everything You Need to Know
By DonTheCrown ∙Updated on Oct 22, 2026
Assassination
Combat
Subtlety
0/21/0
Feral Druid Guide - Talents, Rotations, Races & More
By FF ∙Updated on Oct 21, 2026
Balance
Feral Combat
Restoration
0/37/14
Shaman Leveling Guide (Level 1-30) - Talents, Rotations, Races & More
By NickTew ∙Updated on Oct 21, 2026
Elemental
Enhancement
Restoration
0/11/0
presentationShaman
presentationEnhancement
Leveling
presentationShaman
presentationEnhancement
Leveling
Warlock Leveling Guide (Level 1-30) - Talents, Rotations, Races & More
By Crix ∙Updated on Oct 21, 2026
Affliction
Demonology
Destruction
26/0/0
presentationWarlock
presentationAffliction
Leveling
presentationWarlock
presentationAffliction
Leveling
Affliction Warlock Guide - Talents, Rotations, Races & More
By Crix ∙Updated on Oct 19, 2026
Affliction
Demonology
Destruction
26/0/0
presentationWarlock
presentationAffliction
General
presentationWarlock
presentationAffliction
General