menu
MobalyticsUse your favourite features in-game with our Desktop App
WoW Forever Dungeon

Blackfathom Deeps Dungeon Guide - Bosses, Loot & Quests

Beginner
Mechanics
Updated on Oct 6, 2026
Oct 6, 2026

Blackfathom Deeps Map and Recommended Route

Blackfathom Deeps Overview

Blackfathom Deeps is a dungeon in WoW Forever. Located in Northwestern Ashenvale this once glorious night elf temple was dedicated to worship of the moon-goddess Elune. It is now inhabited by Naga, Satyrs and the Twilight Hammer Cult all whom protect Aku'mai the hydra.

This dungeon is designed for levels 24 - 32 and, whilst it can be completed towards the lower end of that range, having a party around level 27 makes the dungeon considerably more manageable.

Blackfathom Deeps Loot

Quest Loot

Quest

Loot

Knowledge in The Deeps

  • Sustaining Ring

Blackfathom Villainy

  • Gravestone Scepter
  • Arctic Buckler
  • Dark Ritual Leggings
  • Cultist's Armguards

Researching The Corruption

  • Beetle Clasps
  • Prelacy Cape
  • Staghide Armguards

Twilight Falls

  • Nimbus Boots
  • Heartwood Girdle
  • Silvered Gauntlets

Allegiance To The Old Gods

  • Band of the Fist
  • Chestnut Mantle

Baron Aquanis

  • Outlaw Sabre
  • Witch's Finger

Boss Loot

Boss

Loot

Ghamoo-ra

  • Tortoise Armor
  • Ghamoo-ra's Bind
  • Spiked Shell Band

Lady Sarevess

  • Naga Battle Gloves
  • Naga Heartpiercer
  • Darkwater Talwar
  • Pattern: Brawler's Leather Hood

Gelihast

  • Algae Fists
  • Reef Axe
  • Murloc Skin Bag

Lorgus Jet

  • Fallenroot Longbow

Twilight Lord Kelris

  • Rod of the Sleepwalker
  • Gaze Dreamer Pants
  • Twilight Lord Girdle

Old Serra'kis

  • Glowing Thresher Cape
  • Bite of Serra'kis
  • Bands of Serra'kis

Aku'mai

  • Moss Cinch
  • Leech Pants
  • Strike of the Hydra

Notable Trash Mob Loot

  • Staff of the Blessed Seer
  • Staff of the Friar
  • Ring of Precision
  • Crested Scepter
  • Grimclaw

Blackfathom Deeps Quests

Knowledge in The Deeps (Alliance Only)

Quest Giver: Gerrig Bonegrip
Coordinates/Location: Ironforge, The Forlorn Cavern (50.5, 5.5)
Required Level: 10
Reward: Loot, XP & Silver

Blackfathom Villainy

Quest Giver: Argent Guard Thaelrid
Coordinates/Location: Blackfathom Deeps, alcove southwest of Ghamoo-ra
Required Level: 18
Reward: Loot, XP & Silver

Researching The Corruption (Alliance Only)

Quest Giver: Gershala Nightwhisper
Coordinates/Location: Darkshore, Auberdine (38.4, 43.0)
Required Level: 18
Reward: Loot, XP & Silver

Twilight Falls (Alliance Only)

Quest Giver: Argent Guard Manados
Coordinates/Location: Darnassus, Craftsmen's Terrace (55.0, 24.0)
Required Level: 20
Reward: Loot, XP & Silver

Allegiance To The Old Gods (Horde Only)

Quest Giver: Je'neu Sancrea
Coordinates/Location: Ashenvale, Zoram'gar Outpost (11.6, 34.2)
Required Level: 17
Reward: Loot, XP & Silver

The Essence of Aku'mai (Horde Only)

Quest Giver: Je'neu Sancrea
Coordinates/Location: Ashenvale, Zoram'gar Outpost (11.6, 34.2)
Required Level: 17
Reward: Loot, XP & Silver

Amongst The Ruins (Horde Only)

Quest Giver: Je'neu Sancrea
Coordinates/Location: Ashenvale, Zoram'gar Outpost (11.6, 34.2)
Required Level: 21
Reward: Loot, XP & Silver

Baron Aquanis (Horde Only)

Quest Giver: Item drop after boss kill, hand in at Je'neu Sancrea
Coordinates/Location: Ashenvale, Zoram'gar Outpost (11.6, 34.2)
Required Level: 21
Reward: Loot, XP & Silver

Ghamoo-ra

Mechanics

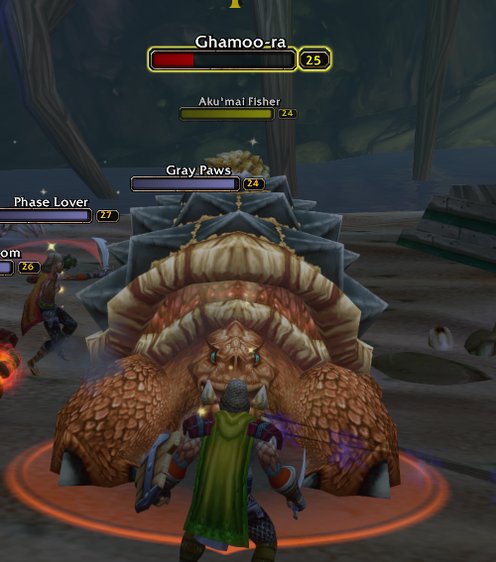
Ghamoo-ra is the first boss you will come across in Blackfathom Deeps. He is a large turtle that can take a surprising amount of punishment due to his high armor. The tank should keep Ghamoo-ra facing away from the party while melee dps should stay behind him and avoid standing in front of the boss.

The main thing to be mindful of is positioning. There is no reason for the group to take unnecessary damage during this encounter, so the tank should keep the boss controlled and the healer should focus on keeping the tank topped up.

  • Trample: Can deal a decent amount of damage to players caught in it, so avoid taking unnecessary damage.
  • High Armor: Ghamoo-ra has very high armor, so physical dps will deal reduced damage to him.
  • Positioning: The tank should keep the boss facing away from the group and melee dps should remain behind him.

Lady Sarevess

Mechanics

Lady Sarevess is accompanied by two naga guards. The adds are the main thing that can make this encounter a real pain.The tank should pick up Sarevess while the group deals with the additional naga one at a time.

It is recommended that you clear the surrounding area before engaging the boss as there is not a huge amount of room to work with. Polymorph, Sap or Freezing Trap can be used to keep one of the adds out of the fight.

  • Forked Lightning: This can hit multiple players; avoid stacking up.
  • Frost Nova: Roots players in place. This is particularly annoying for melee players.
  • Naga Guards: These should be dealt with carefully rather than allowing both to attack the group at the same time.

Gelihast

Mechanics

Gelihast is surrounded by a large number of murlocs. This means that the area around the boss can present more danger than the boss himself. He casts Net which can root a player in place so make sure you clear the murlocs to avoid becoming overwhelmed

Once the surrounding murlocs have been dealt with the boss is relatively straightforward. Blessing of Freedom can be used to remove movement impairing effects.

  • Net: Roots a player in place, so be careful if there are still mobs nearby.
  • Murlocs: Clear the surrounding mobs before engaging Gelihast.
  • Positioning: Keep the boss under control and avoid pulling additional murlocs during the fight.
  • Altar: Once Gelihast is dead, make sure to interact with the altar behind him to obtain the available buff.

Lorgus Jett

Mechanics

Lorgus Jett is an optional boss and primarily relevant to the Horde quest 'Allegiance to the Old Gods'. This is a simple encounter. The only thing to be mindful of is when his Lightning Shield is active. Melee DPS should be particularly careful about attacking him while the shield is active.

The tank should keep Lorgus Jett under control while the group burns him down. Purge and Dispel Magic can be used to remove buffs from the boss.

  • Lightning Shield: Be careful about attacking the boss while this is active as it can cause additional damage.

Baron Aquanis

Mechanics

Baron Aquanis is an optional boss. It is an underwater fight. Water Breathing can be particularly useful if your group has access to it.

Twilight Lord Kelris

Mechanics

Twilight Lord Kelris is one of the more dangerous bosses in Blackfathom Deeps and is found inside the main temple. He is a caster that can deal significant damage if his abilities are not managed correctly. His most problematic ability is Sleep, which can take a player out of the fight and can be particularly dangerous if it affects the healer.

The tank should keep Kelris facing away from the group while the dps focus on burning him down. Kick, Pummel, Shield Bash and other interrupts should be used when possible. Off-healers should be ready to assist if the healer is put to sleep.

  • Sleep: Can take a player out of the fight, so be prepared to cover for the healer if they are affected.
  • Mind Blast: Can deal significant damage to its target, so keep the group topped up.
  • Healer: Make sure the tank is healthy before dangerous casts and be ready to use defensive abilities if required.

Old Serra'kis

Mechanics

Old Serra'kis is an optional underwater boss that you can come across after Baron Aquanis. This is a simple fight with nothing to consider other than your breath limit!


Aku'mai

Mechanics

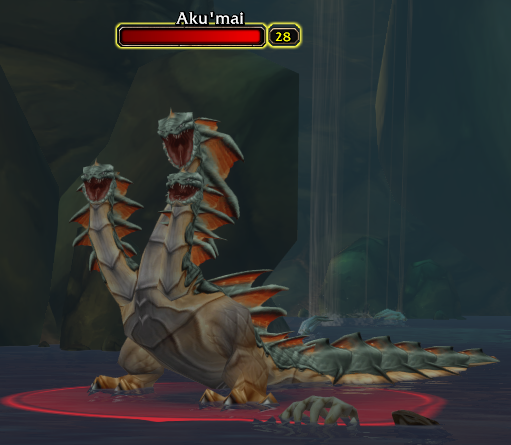
Aku'mai is the final boss and by far the most dangerous encounter in the dungeon. He is a large hydra that can hit the tank extremely hard and becomes considerably more dangerous when Frenzied Rage is active. The tank should keep Aku'mai facing away from the party while melee DPSs stay behind the boss and the healer focuses on keeping the tank alive.

The main thing to be mindful of is Poison Cloud. This can cause significant damage to anyone standing in it. Melee DPS positioning is paramount here. The tank should move Aku'mai away from the poison. Cleanse and Purify can be used to remove poison effects.

  • Poison Cloud: Do not stand in the poison and move away from it as soon as possible.
  • Frenzied Rage: Aku'mai becomes considerably more dangerous during this ability. Tanks beware! Use defensive cooldowns here.
  • Tank Damage: Aku'mai can hit extremely hard. Healers be ready to counter this!
  • Melee DPS: Be particularly careful about standing in Poison Cloud and move out as soon as it appears.

Table of Contents

See More Dungeons

Wailing Caverns - Bosses, Quests & Loot
By Ruse_Cruize ∙Updated on Oct 6, 2026
Mechanics
Beginner
Mechanics
Beginner
The Hall Of Thanes Dungeon Guide - Bosses, Loot & Quests
By PhaseShifter ∙Updated on Oct 6, 2026
Beginner
Mechanics
Beginner
Mechanics
The Deadmines Guide - Bosses, Loot & Quests
By PhaseShifter ∙Updated on Oct 6, 2026
Beginner
Mechanics
Beginner
Mechanics
Shadowfang Keep Dungeon Guide - Bosses, Loot & Quests
By PhaseShifter ∙Updated on Oct 6, 2026
Beginner
Mechanics
Beginner
Mechanics