Dooley has a package of Small items called Rays that activate when the Core or another Ray is used.
This particular archetype is tricky to pull off and rarely see but we've got you covered if you want to learn it!
In this run, Kripparrian turns an Ignition Core opener into a winning build that used the Omega Ray and Beta Ray.
Kripparrian's Video Guide
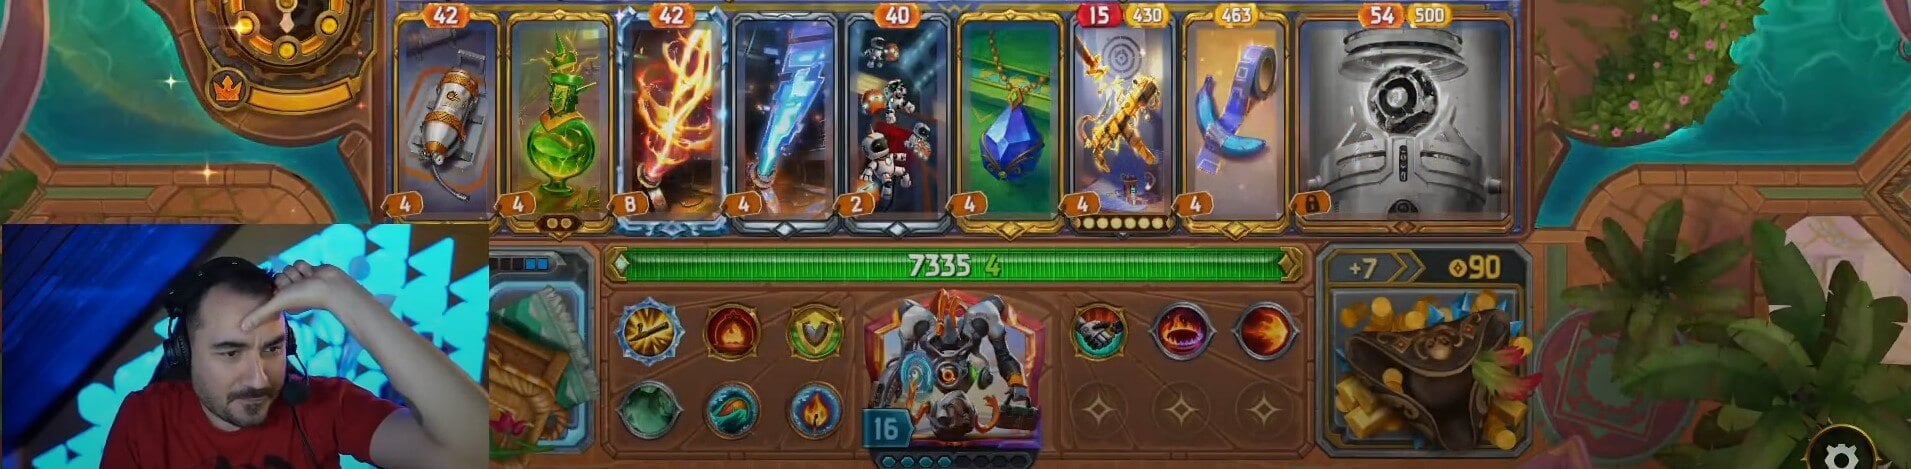
Example 10 Win Board
Core Combos and Synergies
Ignition Core Opener
The Ignition Core is one of the few openers that allows Dooley to play aggressively from the start.
Early on, focus on getting Small fast-casting items to Charge up your Ignition Core.
Most early game matchups you face won't have the defenses to outrace your Burn, especially if you can find a Burn skill.
Ignition Core
Rays
On Day 3, Kripp found an Omega Ray from the Furnace (Gives a small Burn item). This opened up the pathway toward a Ray build.
What's cool about about the pairing with the Ignition Core is that the Omega Ray takes care of your scaling so you don't need to worry about leveling up your Core as much.
This lets place all your items to the left of Ignition Core to make it cast ASAP while still having your Burn items scale (normally you'd have to place them to the right of the Ignition Core).
Omega Ray
With any Burn build in The Bazaar, you'll want to find crowd control to give your comp more time to ramp up, especially as you enter the mid to late game.
On its own, the Beta Ray is already a great choice for this, but Kripp was able to find one Enchanted with Heavy from Serafina (sells Enchanted items).
With additional Haste from the Omega Ray and the Ignition Core, the Heavy Beta Ray did a ton of work Slowing and Freezing Kripp's enemies.
Heavy Beta Ray
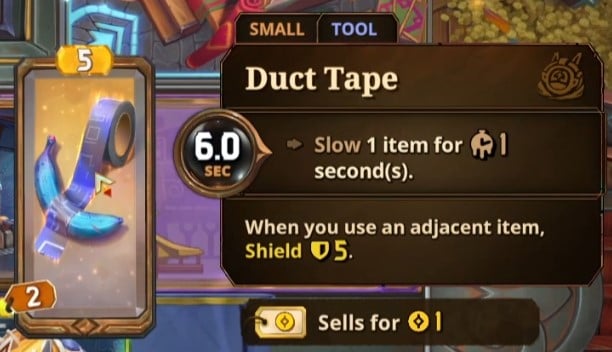
Duct Tape + Uzi
In Dooley builds that want to Charge the Core to make it cast ASAP and often, the Duct Tape + Uzi combo is a classic synergy.
This is because the Uzi casts incredibly fast at 2.0 seconds to Charge up your Core and activate the Duct Tape's adjacent Shielding effect.
You can then place your Charged Core on the other side of the Duct Tape to give you even more burst defensive utility.
Note: Kripp was able to get a Shielded Uzi which is great but isn't necessary for the build to succeed.
Shielded Uzi
Duct Tape
Supportive Items and Skills
PvE Item Drops
The Sapphire is an ideal pairing with the Beta Ray since it'll be casting often and helps give you a chance against strong meta comps like Pygmalien Bees.
Unfortunately, you'll need to rely on getting it at either the Frost Street Champion (level 12) or Death Knight Reaper (level 13) PvE encounters to find it.
Sapphire
Another major item hit from PvE encounters was the Energy Potion which grants a massive AoE Haste across your board.
Kripp found it at the Boilerroom Brawler (level 4) but you can also find it at Ferros Khan (level 10) and Hulking Experiment (level 10).
If you land it, try to increase its Ammo capacity at Curio or Loot drops.
Energy Potion
Small Burn Items
These slots are flexible but ideally, you'll want Small Burn items to maximize the Charge of your Ignition Core and the AoE Burn ramp from the Omega Ray.
The self-Burn from Nitro isn't a big penalty since the build has a lot of Shielding. Bomb Squad, although slow without a Friend, was still worth it to activate the Buddy System skill (listed below).
Nitro
Bomb Squad
Skills
Almost any Skills besides ones related to Damage or Healing would be useful for this build as it's pretty flexible.
Here are some of the major ones Kripp chose or found throughout his run.
Buddy System Skill (huge Core CD decrease activated by Bomb Squad)
Chilling Touch (triggered by Beta Ray)
Defensive Stance (Shield ramp triggered by fast Uzi procs)