In our other "Haste Poison Vanessa Build," we covered the basics of getting Poison to work well through Pufferfish. In this build, I'll be covering what I believe to be the strongest Poison build, which uses Catfish in the late game.
This build plays more like Pygmalien, looking to scale your Cove up to extremely high shield, and your Catfish to extremely high Poison.
While I believe this build to be "stronger," than Pufferfish, it's not necessarily better. Pufferfish will be better at trying to secure a quick win, while this build looks to guarantee a 10-win by scaling into the late game.
This build also requires a very specific setup that won't be available every game. Even still, you can keep an eye out for the pieces to see if you can pivot toward this build.
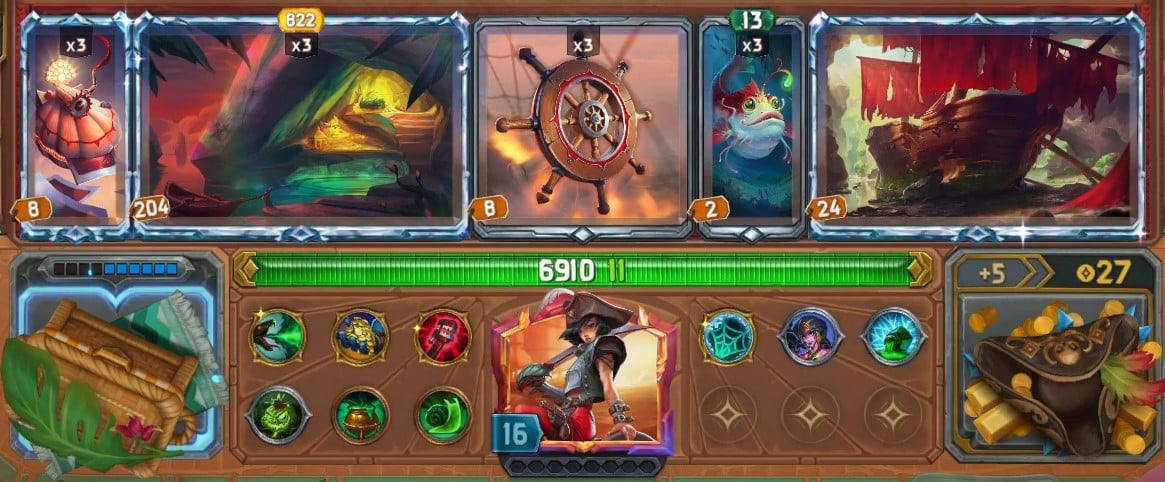
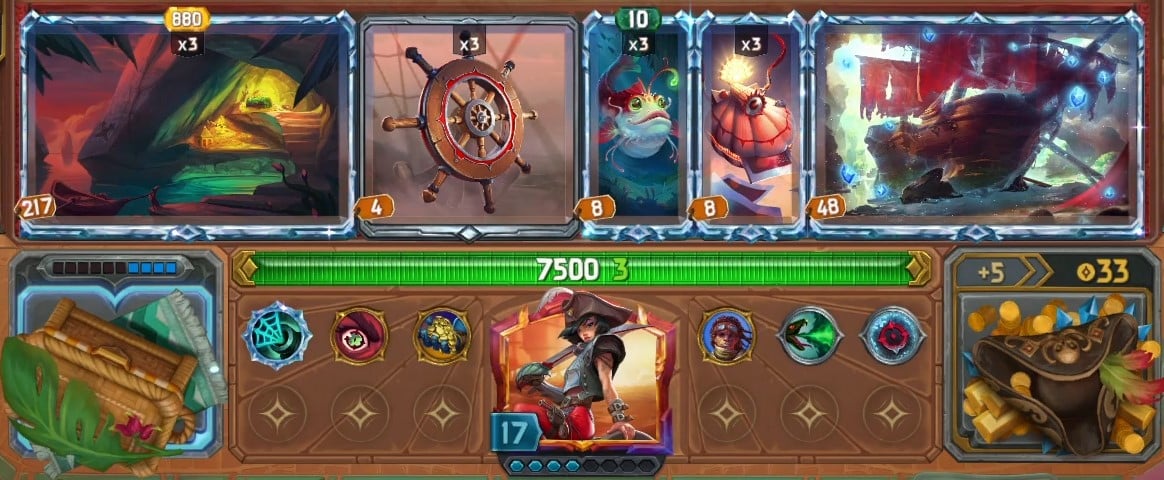
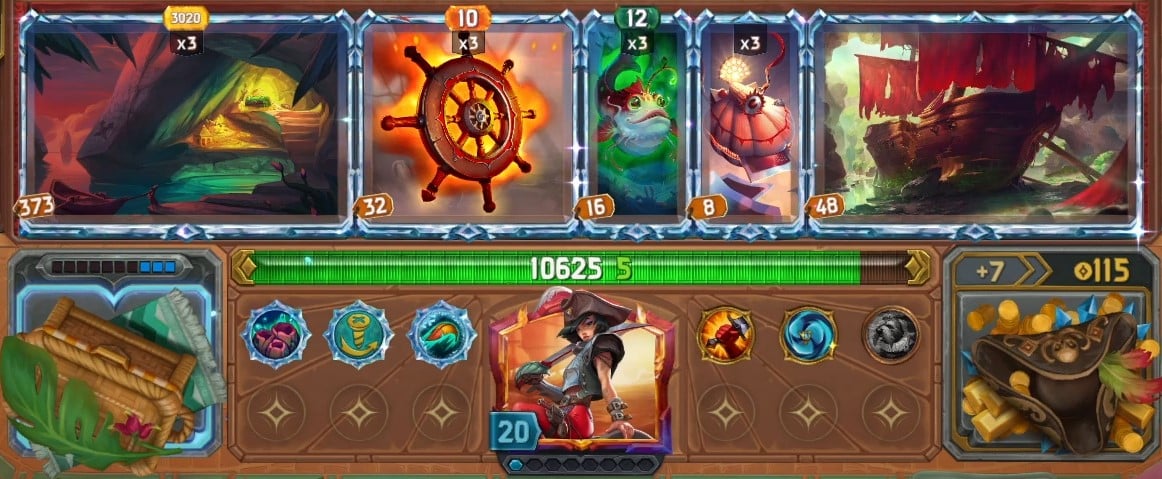
Example 10 Win Boards
Day 11 Win
Day 13 Win
Day 15 Win
Main Engine
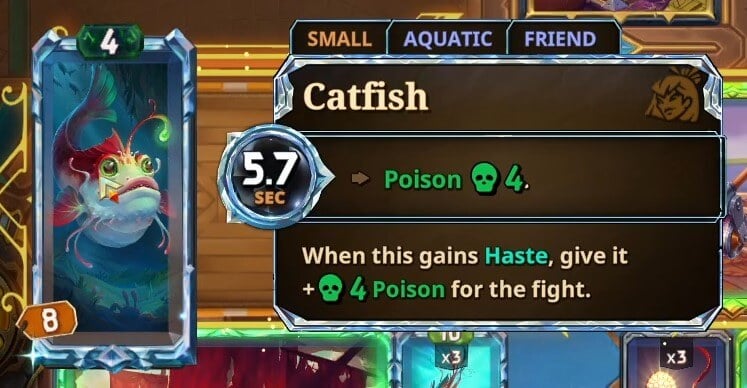
Catfish
As the name suggests, this build revolves around the scaling potential of Catfish. The whole idea is to Haste Catfish a bunch, and get it to extremely high Poison. This will melt just about any build in the game after enough time.
It's fairly obvious that Catfish scales better over time, but there's two more reasons Catfish can outperform Pufferfish.
Catfish can Crit. Many skills can give 100% Crit to your non-weapon items after some time, and Catfish is no exception. With Crit, Catfish will not only scale up its Poison, but it will Poison for double on Crit.
Poison Enchant: When you Poison Enchant a Pufferfish, you double your Poison. Going from 10 to 20 or 15 to 30 is good, but Catfish makes it even better. Poison Enchant always doubles the stat of a matching item, meaning Catfish will actually gain 8 Poison per Haste instead of 4. This makes Catfish scale insanely fast.
Overall, this build is extremely fun to play. While you may stumble sometimes, when things line up, the build feels unstoppable.
Shipwreck
Shipwreck is one of the best items for Vanessa, and it enables very powerful builds. For the cost of one Large space, you essentially triple the impact of all your Aquatic items.
This is only further compounded when you scale up other things like Catfish, Cove, Seaweed, etc.
Shipwreck is also very consistent to find. Past Day 6 or 7, it will start appearing Large Shops. Furthermore, if you find a "Vehicle Shop," Shipwreck will be guaranteed. Vanessa only has 4 Vehicles, so finding that Shop will guarantee Shipwreck either immediately or on reroll.
(Vehicle Shop doesn't show up every game though, so don't bank on it too much)
In general, from 6 onward, I will do everything in my power to find Shipwreck before I hit level 11. This will ensure I can upgrade the Shipwreck from my Level 11 upgrade.
If you already find it upgraded, that's great too. You can save your upgrade for a different item.
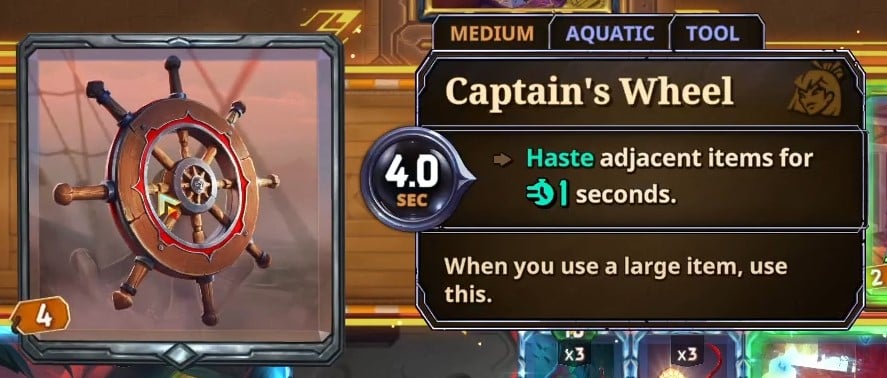
Captain's Wheel
Captain's Wheel is the next piece of the puzzle. In most cases, it's possible to Haste too much. If your item has 50 seconds of Haste and it keeps going up, that's a bit overkill.
However, there's no such thing as too much Haste for Catfish. With Shipwreck, Captain's Wheel will be the best way to apply the most Haste to Catfish.
It will trigger on it's own in 4s (which is already pretty good), but the Large item is what really enables Captain's Wheel.
The Cove and Submarine are both Large items with 3s cooldowns. When hasted, that goes down to 1.5s. This means you will activate Captain's Wheel every 1.5s AND 4s. Combine that with Shipwreck for Multicast and you have yourself an insane amount of Haste.
You can still use other Haste items like Beach Ball or Astrolabe, but Captain's Wheel will be ideal for getting your Catfish up as fast as possible.
Shipwreck also let's you leave Captain's Wheel at Silver. With the Multicast, your adjacent items will be permanently hasted after the first cast.
The one downside is that Captain's Wheel won't reach your last item and only Haste Cove/Catfish. With the full build, you're only missing out on 1 item, and that's ok.
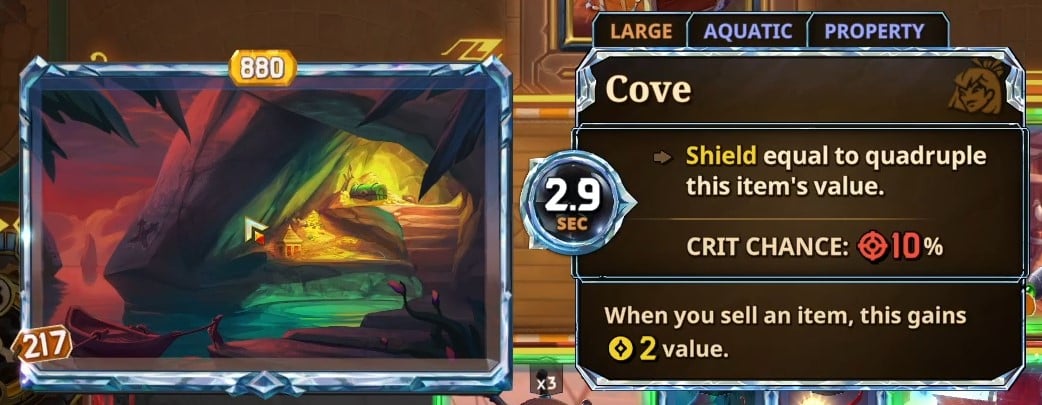
Cove
The Cove is my preferred large item to use in this build. Submarine also has the same cooldown, but Cove can have much higher Shield. Submarine will contribute some damage, but the build focuses on dealing Poison, so that damage is not necessary.
When it comes to the Cove, the bigger the better. You can find Cove very consistently early on in Large/Aquatic/Shield Shops, and you can have it sit in the chest scaling up until it's strong enough to go on board.
Keep in mind that at Bronze/Silver/Gold, Cove will only gain 1 value per item sold. This means you really want to upgrade it to Diamond as soon as possible to get more value from your sold items.
I find that if you have a lot of Shield items, you'll frequently get "Upgrade Leftmost Shield Item" on level up. This is a great way to get your Cove to Gold/Diamond early.
From there, you can buy things like Gumballs, Bronze Junk items, Chocolate Bars, etc. If you find Enchant item with Shield effects, be sure to put it on your Cove as it will double the total Shield. From 4x Value to 8x Value.
Lastly, even though you want to scale up the Cove, don't completely give up your early game to scale it up. You want to balance being strong in the early/mid game, while also building for the late game.
Supporting Items and Skills
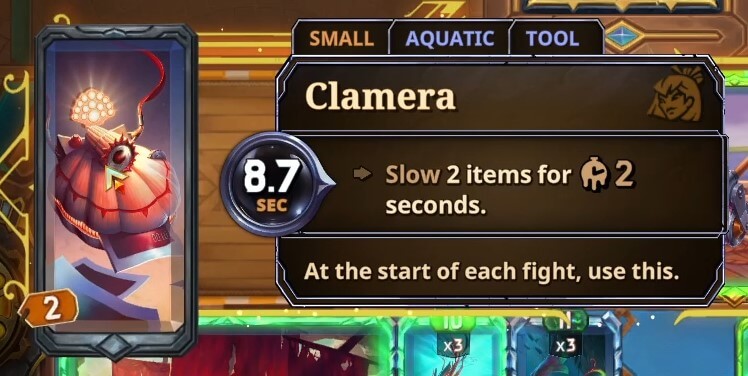
Clamera
Clamera is my go to 4th item for the build. It casts at the start of the fight, giving you that brief window of time to get your Cove and Haste going.
However, you can absolutely use other items as well. A Seaweed can be great for combatting the Poison mirror, and you may randomly find a good Small item like a Freeze Potion.
The last spot is flexible, but I'd aim to get a Clamera if possible. Having Clamera also gives you synergy with Slow skills, such as "Freeze the first time to slow."
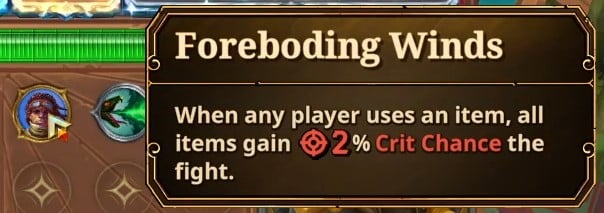
Crit Skills
There are a few skills that let you ramp up the Crit of your items over the fight. Foreboding Winds is a fairly common drop, and it's very powerful with this build.
While you are also benefitting your opponent, chances are they have Crit while you don't. Because of this, it's generally preferable to take this as it's usually more beneficial for you than for your opponent's board.
"Building Crescendo" will do the same thing but only for your board, so look out for that skill.
Other Skills
Outside of these main two categories of skills, most other Skills will be great for the build.
Haste Aquatic on start of fight is great to get the ball rolling before your opponent's board can act.
Freeze on first Poison/Slow/Haste are all great. (Crit/Burn also work if you have the ways to obtain these)
Aquatic Cooldown reduction
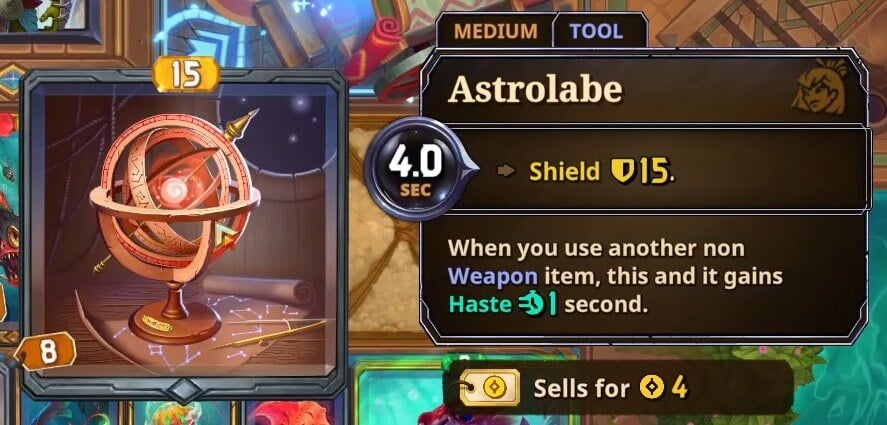
Astrolabe
Before you find the final build, Captain's Wheel won't be amazing. Your board will have more Aquatic items, so Hasting everything will be ideal. Astrolabe is a great pickup for hasting your Aquatic board, and you can play around Pufferfish to get the ball rolling.
Furthermore, Astrolabe is a great pickup because it enables a new shop option at the "Docks." You'll be able to get 6 Gold and 2 XP for free at the Docks, which is an insane amount of value.
If you find Astrolabe early, it will more than make up for it over time.
Additional Tips
To reiterate, this build is not something you build toward on Day 1. Look to build a strong board, and if the pieces slowly come, you can look to transition into this board. While you can technically get this build up and running very early (like Day 6/7), that won't be consistent.
I will often times start out my game playing a generic Haste Poison build with Astrolabe/Pufferfish. From there I can see if I can build toward this build, or if I should stick it out and power up my current board.
If you find yourself with a strong/decent board Day 3-5, try to start building your Gold to look for big items like Shipwreck.
Be sure to take advantage of items that generate value. These will get you extra Gold and/or more value on your Cove.
Ambergris (gains value when buying an Aquatic item)
Shovel (get a random Small item start of each day)
Fishing Rod (get a random Small Aquatic item start of each day)
Tropical Island (get a coconut or citrus at the start of every hour