Gogmazios brings several new mechanics to the table. Knowing about them is essential to ensure victory.
Tips in the Notification Bar
The notification bar at the right of the screen will display important tips according to the current state of the fight, allowing hunters to act accordingly:
- Gogmazios’ current state (solid / liquid / gaseous)
- Phase change
- How to use items in the field (slinger/weapons) or dodge attacks
Switching between states
Gogmazios starts the fight in the solid state, during which its oil attacks will not ignite the ground. Use Fire elemental weapons to soften its hide and cause it to switch to either the liquid state (in phases 1 and 2) or the gaseous state (in phase 3).
In either liquid or gaseous state, Gogmazios becomes weak to the Dragon element, and its oil will light up once it touches the ground, exploding after a few seconds, and Gogmazios’ laser attacks will cause explosions, as well.
Players must use Dragon elemental weapons while Gogmazios is in the gaseous state in phase 3 to weaken its power and be able to withstand its ultimate attack.
Compact Anti-Wyvern Gun
This new Slinger ammo drops from Gogmazios’ body while it is on the liquid and gaseous state. You can get it from the ground or by aiming at Gogmazios directly.
The shot can be charged by holding (R2), which makes it deal up to 500 Dragon Elemental damage. This is a powerful tool to keep up DPS during the fight if Gogmazios is out of reach.
Obtaining Weapon Fragments from Gogmazios
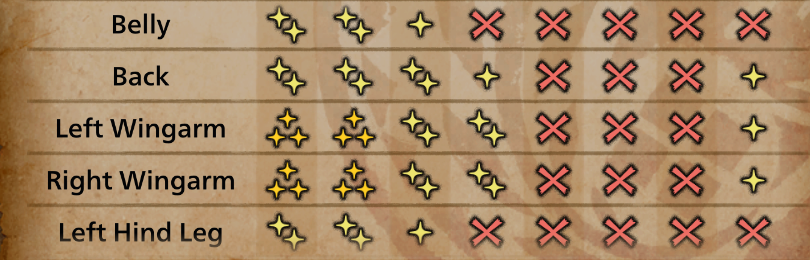
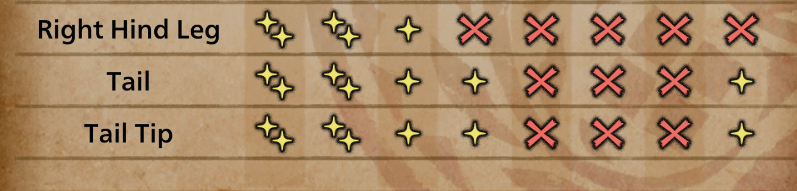
Gogmazios will have visible blue artifacts scattered across its body. Repeatedly attacking them will cause the weapon fragments to drop, rewarding extra Tarred Artifacts at the end of the hunt. These are used to craft Gogma Artian Weapons among other purposes.
Phase 1
During Phase 1, Gogmazios will switch between the solid and liquid states. In the solid states, Fire element works best, and its oil attacks will not ignite the ground. In the liquid state, Dragon element is far superior, and its oil attacks will ignite the ground after a brief delay, causing an explosion.
Forward slam
Gogmazios briefly stands up on two legs and slams the ground with its wingarms. This attack hits forward, but it can follow players around. The monster can cover a great distance forward, so it’s best to run beneath him or to the sides to avoid the attack.
Side slam
Gogmazios raises one of its wingarms in the air and slams it into the ground. This attack can hit even if you’re on Gogmazios’ side and just like its forward slam, it can cover great distance forward. Dodge toward Gogmazios’ rear or beneath him to avoid damage.
Tail sweep
Gogmazios sweeps its tail, leaving behind oil puddles that ignite while it’s on the liquid state. This attack can be avoided by dodging backward.
Forward laser
Gogmazios clenches its neck backward, opens its mouth, and fires up a laser beam forward after a delay. If you see it charging up, move sideways immediately to dodge the laser.
180-degree laser
Gogmazios retreats and positions itself sideways, preparing to fire a laser covering the whole area in front of it. When you notice the monster positioning sideways, run to the opposite side, as the laser does not reach too far. You can also run beneath Gogmazios to avoid the attack.
Body Sweep
Gogmazios does a side sweep with one of its arms, followed by a tail sweep. Both of them can cause oil explosions while it is in liquid or gaseous state. You can cover directly beneath Gogmazios, or dodge backward as the arm sweep does not cover a long distance.
Front Bite
Gogmazios clenches its body backward and then lunges forward covering a short distance. This attack deals more damage if Gogmazios hits you with its mouth, so it’s best to dodge sideways to avoid damage. It can immediately use other attacks after this, so watch out for follow ups.
Arm Sweep
Gogmazios drags one of its wingarms in a 180-degree angle directly beneath. You can dodge by rolling into Gogmazios or away from it, as this attack doesn’t cover much distance.
Phase 2
After dealing enough damage to Gogmazios, it will ignite the lower level of the arena with abyssal lava, which deals continuous damage. Climb over to the elevated area to continue the fight.
The elevated area has Giant Coal Humps, which you can throw to deal up to 500 damage. You will also find an Activation Lever that brings out the Great Forge on the right side of the arena. Make sure to lure Gogmazios to this side if you plan on using it. There is also a falling boulder at the center of the area, which you can drop on Gogmazios to stagger it.
During Phase 2, Gogmazios’ moveset will be limited, as it will be standing on the ledge. Your priority should be hitting its wingarms to make it trip, and then go all out on its back. Dealing enough damage to Gogmazios’ back will cause the Elderbreaker cannon to fall.
Then, players can connect the Nexus wires to the cannon to load it. Gogmazios will fire lasers at players who are carrying the wires, so the rest of the party should distract it. Firing the Elderbreaker cannon at Gogmazios can deal up to 65,000 damage in a single hit.
Arm slam and sweep
Gogmazios slams its arm forward and then sweeps it backward or sideways. It can follow up with another sweep with its other arm. This attack can cause oil explosions on the ground afterward. You can run to the back of the arena or stand directly under Gogmazios’ head to avoid the attack.
Side laser
Gogmazios fires a laser from side to side of the area. The laser can target the ground near it, the middle of the area, or the farther part of the area. It will usually fire the laser at the center part of the area, so you can stay near the ledge to keep attacking while avoiding it.
Oil splash
Gogmazios splashes oil puddles that explode on contact with the ground. These will usually target the farther part of the area, so run forward to avoid them.
Laser explosion
Gogmazios fires a laser at a set location, causing a big oil explosion afterward. It will usually target players who are carrying the Nexus. If this is the case, let go of the Nexus wire (◻) and roll away.
Phase 3
After following Gogmazios to the upper area of the Oilwell Basin, it will take flight. During Phase 3, players will need to fire Compact Anti-Wyvern Guns at it to knock it down, and then deal Dragon elemental damage to weaken its ultimate attack.
Remember to pick up Compact Anti-Wyvern Guns from the ground and from Gogmazios’ body. You can charge them by holding (R2) to increase their damage.
During this Phase, Gogmazios uses the same moves from Phase 1, as well as some new, powerful attacks.
Knocking down Gogmazios
While Gogmazios is in the air, fire Compact Anti-Wyvern Guns at it. Wait for the right timing, as you will need to focus on its wingarms, which is very difficult to do while it’s flying around. It will crash down and stagger occasionally, which will mark your opportunity to strike.
Wing dragging
Gogmazios drags one of its wings across the area. This attack covers a great distance forward, so roll sideways to avoid it. You can shoot slinger ammo afterward.
Crash down
Gogmazios targets a player, then crashes down on them. Players can roll backwards to avoid the attack. Afterward, there is an opening to fire slinger ammo.
Ultimate attack
Gogmazios heats up, creating an opening for attacks where its body is most vulnerable to damage. You will have a big opening to dish out as much damage as possible during this window. Then, it will fly into the air and release a laser that covers the entire area with magma.
This attack can only be avoided in two ways:
- Climbing on the elevated areas, which Gogmazios can destroy with its attacks.
- Covering behind Fabius or other guarding players
Players must weaken Gogmazios with Dragon elemental attacks (and Compact Anti-Wyvern Guns) to withstand the attack on the ground. Otherwise, it can one-shot players.