menu
MobalyticsUse your favourite features in-game with our Desktop App
Hades 2 Guide

Hades 2 - Introduction to Speedrunning

Beginner
Mechanics
Updated on Jan 10, 2026
Jan 10, 2026

Overview

How very spirited! You truly think you can stop Time. Well, then... I would like to see you try.”

~ Chronos


This guide is designed for anyone looking to get into speedrunning Hades II any fear. Hades II is an incredibly fun game to speedrun. Any fear runs are quite short, but require high levels of decision making and skill expression. A good run also requires a bit of luck! This guide is here to help you take your first steps, from basic routing to faster, cleaner clears for both Underworld and Surface runs, with any aspect.


Disclaimer: the advice in this guide is of a general nature. It is not comprehensive and not all information is categorically true in all circumstances. There are exceptions to many of these *rules* which you may find through experience. The meta is still evolving and it is encouraged that runners try new builds, techniques and ideas to enhance the corpus of knowledge.
Overall Goals & Mindset

  • Aim: clear rooms as fast as possible by:
    • Stacking high damage (attack/special/cast/boons/hammers).
    • Using rooms that pause or shorten the timer (shops, NPCs, skip rooms).
    • Avoiding unnecessary combat (bad side rooms, slow choices).
  • Your in-game time (top right) is what matters – some rooms pause it.

Arcana

Basic, non–Fate’s Whim

  • Good “standard” set if you don’t use Fate’s Whim:
    • Take cards that boost:
      • Attack/special/global damage
      • Max magick if you’re using omegas (Ω)
  • E.g.
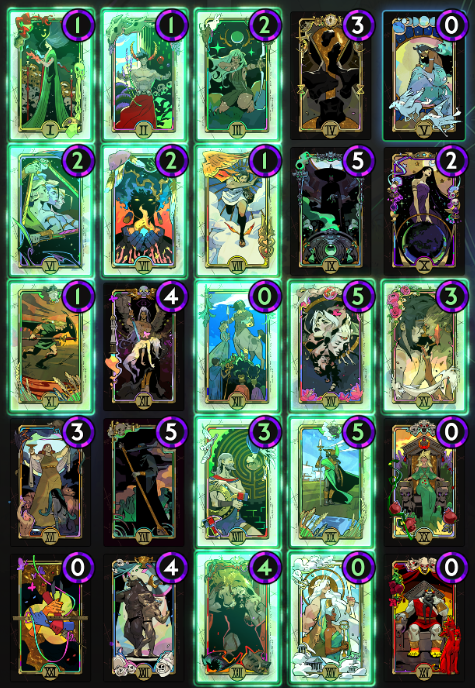
    • Basic setup

  • If you focus on Omega attacks only:
    • Drop The Huntress (III) (only buffs normal attack/special).
    • Take Persistence (VII) instead for more max magic.


Fate’s Whim

  • No rerolls:
    • Enables Fate’s Whim
    • Allows you to take Jeweled Pom (Jpom) Keepsake
    • God boon-giving Keepsakes (including Gorgon Amulet) disable Fate’s Whim
    • Higher RNG/variability but higher peak
    • Good for aspects that don’t require specific boons (e.g. Aspect of Thanatos)
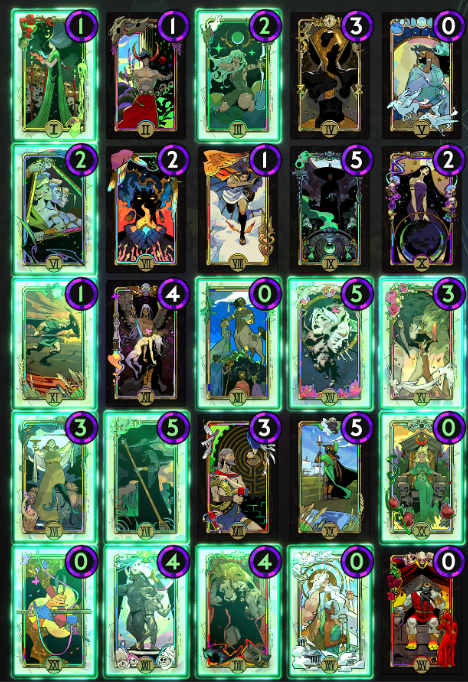
  • E.g.
    • Fate's Whim setup

  • Excellence (XIX) and The Boatman (XVII) are interchangeable depending on preference

Note: Jeweled Pom rewards a random Hades boon. Look for Gigaros Dash (applies Scorn →  more attack/special damage), Howling Soul (for cast builds), Unseen Ire and Life Tax (can play more aggressively as you have higher survivability).


Familiars

  • If not using many omegas/magick (e.g. Aspect of Medea):
    • Raki – extra crit chance → more damage → faster clears.
  • If you are using omegas (e.g. Aspect of Moros or Aspect of Charon):
    • Hecuba – more magick so you don’t run out mid-encounter.

Fear

  • Vow of Frenzy:
    • Best for speedruns.
    • Enemies:
      • Attack faster,
      • But also spawn faster (rooms end sooner if you can kill them).
  • Vow of Shadow:
    • Only used in Underworld runs because of the Shadow Spiller mini-boss:
      • Lets you skip killing adds around it → a few seconds saved.
  • Vow of Time:
    • Completely optional
      • Doesn’t change anything in terms of speedrunning

Top Builds

Medea

#1 - Aspect of Medea (Revaal)

    • Familiar: Raki
    • Start with Cloud Bangle:
      • Hunt for Heaven Flourish
    • Attack -> special repeated is the highest damage
    • Use special and dash to move quickly
    • Keep The Huntress (III) active
      • Channel Ω attack during enemy spawn animation to hit them as soon as they become targetable
      • Avoid boons that regenerate maximum magick, such as Lucid Gain 
        • The exception to this is if you take Possessed Array
    • Possessed Array + Born Gain for big AoE damage and magick sustain.

Charon

#2 - Aspect of Charon (Zorephet)

    • Familiar: Hecuba
    • Arcana: Persistence (VII) (for magick).
    • Start with Harmonic Photon:
      • Hunt for Apollo + Poseidon special and cast boons
      • Their magick generators are good too
      • Look for hammers that improve Ω special such as Giga Cleaver

Moros

#3 - Aspect of Moros (Ygnium)

    • Familiar: Hecuba
    • Swap The Huntress (III)Persistence (VII) in Arcana.
    • Start with Iridescent Fan:
      • Use Sworn Flourish
      • Look for Fine Line for consistently high AoE damage
      • Born Gain is an exceptional magick generator
      • Make sure your attack enables Origination (XIV)

Other

#4 - All Aspects are good

    • Play the aspects you have the most fun with
    • There is still undeveloped meta for many lesser-played aspects
    • Many aspects have great times: Aspect of Thanatos, Aspect of the Morrigan, Aspect of Melinoë, Aspect of Circe etc. 

Keepsake Rotation

Region 1 (Erebus)

  • If using Fate’s Whim: start Jeweled Pom (+lvl boons & Hades boon).
  • Otherwise: start your main god keepsake (e.g. Zeus / Apollo / Hera).

Region 2 (Oceanus)

  • Always: Fig Leaf (keepsake that can skip 1 room per region).
  • Across 3 regions, that’s up to 3 free skipped rooms.
  • Sometimes doesn’t give you a skip (affectionately named ‘fig scam’)

Region 3 (Fields)

  • Gorgon Amulet:
    • She drops in, finishes enemies early.
    • Pauses timer while she is present.
    • You can collect rewards / orientate yourself while time is paused.
  • Adamant Shard (or any other God’s keepsake):
    • Hephaestus → if you require armour for less risk of death against Chronos
    • If you need a particular boon to put a build together, take that god’s keepsake
  • If at Fate’s Whim you will lose the bonus by taking a god boon
  • Metallic Droplet, Calling Card, Experimental Hammer and other keepsakes can be used depending on what you need

Region 4 (Tartarus + Chronos)

  • White Antler:
    • Massive damage to Chronos → big time save on the final boss.
    • High risk, high reward → take armour at the final shop and/or Hephaestus boons if you need safety

The Underworld

Erebus

  • Early rooms (locations 1–4):
    • Kill enemies as fast as you can.
      • Keep Huntress active 
      • Use trees for terrain kills
      • Keep an eye out for Chaos Gates


  • Rooms from location 5 onward:
    • You can start seeing “skip rooms”:
      • Nemesis – pauses timer; offers reward (often gold).
        • Can only appear once per run
        • Can appear in any region
      • Artemis – pauses timer; gives crit boon. 
        • Can only appear in Erebus and Oceanus
        • Kill last enemy while Artemis is aiming at them 
          • Skips animation
      • Cocoon combat – very short combat; quick reward.
      • Fountain room – heals you; super fast, no enemies. 


  • General rules:
    • Prefer non-menu rewards (boon/pom/hammer are menu) to find most skip rooms.
    • Artemis can appear in pom rooms
    • Take Daedalus hammers:
      • They’re amazing for damage
      • Often build enabling
    • Selene’s hexes are generally not worth taking
      • There may be some exceptional situations where they are valuable with aspects such as Aspect of Selene
    • Don't fight Zagreus in the Underworld
      • He takes too long for too little benefit


  • Minor reward rooms (tassels) offer minor rewards that can be changed into major rewards with The Artificer (XVIII)
    • Change Bones and Ashes into major rewards
    • Sometimes better to take Nectar, as it adds +1 level to a boon
  • Major reward rooms (crescent moons) can be rerolled
    • Only on non-Fate’s Whim setups
    • Reroll gods/rewards you don’t want
    • Mostly used on mini-boss doors
      • As they can only roll boons, you can reroll for the god you want. 

Tassels

Crescent moon

Minor rewards

Major rewards

Do not reroll

Potential reroll

  • Chaos Gates in Erebus:
    • Taking a Chaos Gate:
      • Skips one full location.
      • Timer does not pause, but room is short (2–5 seconds).
      • Check Wells of Charon for Sparks of Ixion (one reroll is reasonable)
      • Advanced: talk to Nyx (if she is present) after taking a boon to pause the timer while the next rewards spawn
    • Don’t take Chaos if:
      • The door was a shop (shop pauses timer & gives boons – better than Chaos).
    • Take Chaos if:
      • You’re in earlier locations (e.g. 3–4),
      • And you’re not skipping a more valuable room (shop/skip room).


  • Skip Rooms in Erebus:
    • Arachne's Lair – pauses timer; gives reward with armour.
    • Charon's Shop – pauses timer; up to two per region (one guaranteed). 
    • Mini-boss – not technically a skip, but VERY fast and rewards a higher rarity boon.
  • Prioritise:
    • Shop → Arachne → Mini-boss
      • Provided you have enough gold to purchase from the shop
      • Advanced note: generally you can have up to four gods in your ‘pool’. Don’t take/purchase boons from gods you don’t want to see repeatedly (such as Ares).


  • Boss: Hecate
    • Useful boons:
      • Rousing Reception – cast damages enemies as they spawn.
      • Light Smite – damages all enemies in combat when you take damage.
    • Both help clear summoned witches quickly during Hecate phases.
    • Avoid sheep ball in second phase change by repeatedly dodging up and down just before the hex hits you using i-frames.
    • If Hecate splits into three, pause to identify the real one
      • Real Hecate has unlit torches


Oceanus

  • Again, your aim is to:
    • Stack more damage.
    • Get skip rooms and Chaos Gates without losing key shops/boons.
  • Key NPC rooms:
    • Narcissus – NPC encounter; pauses timer & gives free reward.
    • Nemesis – once per whole run; pauses timer.
    • Artemis– once per whole run; only appears in Erebus/Oceanus.
    • Cocoon combats & fountain – fast rooms, avoid lots of combat.
  • You can also get:
    • Chaos Gates – same logic as Erebus.
    • Fig Leaf skips – may skip a large multi-wave combat room.
    • Asphodel - random room on a timer.
      • Interact with the circle that begins the encounter. Leave the circle and let the counter hit 0% so that you progress to the next room. 
        • You won’t receive a reward, but it will save a lot of time.


  • Bosses: Sirens
    • Kill order:
      • Phase 1: kill Jetty quickly (she tries to run).
      • Phase 2: kill Jetty → Scylla → Roxy, then Scylla pops out again without delay.


Mourning Fields

  • Typical pattern in a “normal” Fields:
    • 2 encounters → mini-boss → Echo → 3 encounters.
  • Variants:
    • Rare “slow” fields: more total encounters (3+3).
    • Very rare “fast” fields: 2 encounters → mini-boss → Echo → 2 encounters.
    • Echo scam (rare): Echo never shows up → slow region.
    • If Spark of Ixion comes up prior to Fields, buy it.
      • If 3 encounter → take Chaos Gate
      • If 2 encounter → take encounters
        • Some exceptions. Eg. if the rewards don’t benefit you or you need a Chaos boon to complete your build, take the Chaos Gate. 

Note: there are many fields layouts and they vary considerably in size and structure. They have all been mapped and are available to study/memorise from this website: Mourning Fields Chamber Guide

  • With Gorgon Amulet:
    • Athena finishes encounter early & pauses timer while she is present.
    • Use this pause to:
      • Active Golden Bough → 
      • Grab available rewards
      • Find exit doors
      • Plan pathing
  • With Fig Leaf:
    • Ideally procs on a big, long combat to save the most time.
    • Sometimes you get 'Fig scammed'


  • Boss: Cerberus
    • Pure DPS
    • Careful of miasma, it slows you down 
    • Adds are random enemies → kill as quickly as possible


Tartarus & Chronos

  • Critical rule:
    • Never take side rooms in Tartarus:
      • Each extra combat room increases room depth:
        • Later rooms get more enemies and take longer.
    • Only do:
      • Main sequence: 5 → 4 → 3 → 2 → 1 rooms, then Chronos.
    • Do NOT take Hades room (pauses timer, free boon, tempting) unless:
      • It aligns with the final Chronos door and you’ll fight nothing else afterward.
    • Chaos Gates do not skip a room


  • Chronos fight:
    • Stack as much damage as possible before this fight.
    • Try to:
      • Phase him quickly before he can do big moves/teleport/dash.
      • Use White Antler to melt his HP bar.
    • At the start of second phase, either: 
      • Ideally: Phase him with high damage before the one-shot attack finishes
      • Dodge his one-shot attack with careful timing
      • Block his one-shot attack with armour
      • Use a charge of The Lovers (XV) to take zero damage
      • If you have no armor, charges of The Lovers (XV) or faith in your ability to dodge - move to the designated safe space. 


General Tips & Habits

  • Pause buffering:
    • Pause to:
      • Check door rewards,
      • Evaluate shop/skip/chaos quickly,
      • Check room size and layout as you enter,
      • Check where enemies are spawning mid combat


  • Well management:
    • Check every well for:
      • Sparks of Ixion for Chaos Gates (except in Tartarus)
      • Damage buffs like:
        • Danaid Dagger (conditional +200% attack/special),
        • Others that stack with your build.
      • Splintered Shield, Mist Veil, Witch’s Mark, etc. can all be situationally useful
    • 1 roll per well for Ixion is usually the upper sensible limit.


  • Pool of Purging management:
    • Purge boons under the following conditions:
      • Boons that do not and will not benefit you throughout the run
      • Boons that are actively detrimental to your build
      • Bridal Glow and Proper Upbringing. The effects remains after purging.


  • Shrine of Hermes management (Surface only):
    • Ensure you know where the shrine locations are
    • Usually worth saving some gold for shrines, as they may include boons and useful items


  • Build philosophy:
    • Prefer few, very strong synergies:
      • E.g. Aspect of Medea + Sworn Strike + Heaven Flourish + Origination (XIV) + Strike
      • 1–2 powerful duo boons or legendaries (e.g. Shocking Loss, Cherished Heirloom, etc).
    • Don’t waste time:
      • Over-rolling mediocre gods when you already have a good build.
    • Play to the strengths of your aspect
      • E.g. Aspect of Thanatos gains crit chance as you attack enemies. However, this crit chance resets upon taking damage. 
        • Avoid getting hit
        • Use barrier boons such as Nitro Boost to prevent taking damage
    • Utilise support boons
      • There are a few very powerful boons that are almost always useful and do not have any significant conditions to benefit from them
        • After you've acquired your core boons, aim for some support boons
        • Some examples are: Shameless Attitude, Weed Killer, Blinding Rush, Rousing Reception, Flash Fry, Snuffed Candle and Hydraulic Might


  • Oath of the Unseen 
    • Salute the Oath before an unseeded run, if you’re intending to submit runs to the leaderboards
      • Ensures randomisation of all variables
      • Can be unlocked by completing the epilogue of the story


The Surface

Similarities to The Underworld

  • Keepsake rotation (Jeweled Pom/God → Fig LeafGorgon Amulet/God/Other → White Antler)
  • Arcana (Fate’s Whim for Jeweled Pom / Alterations for god keepsakes / The Huntress (III) for attacks and specials *not omegas*)
  • Aspects (Aspect of Medea, Aspect of Charon, Aspect of Moros, Aspect of Thanatos, Aspect of the Morrigan)  
  • Priorities (skip rooms, shops, NPCs, Chaos Gates, mini-bosses) 


City of Ephyra

(speed focus: routing + fast pylon clears + clean Polyphemus)

  • General concepts:
    • Use the All-Seeing Bats to the left to view layout (pauses timer)
    • Clear rooms in a logical pattern → less running.
    • Destroy Pylons while there are enemies present to benefit from the released shades damage.
    • If you are targeting a specific god’s boons, take that god’s door early, then reroll a major reward door for extremely high odds of rolling target god
  • Take longer encounters first and shorter encounters last
    • The number of spawns increase with room depth. Ideal order:
      • Medea → big rooms → small rooms → mini-boss 
      • Medea does not increase room depth
  • Always take Medea (pauses timer)
    • You can force Medea to spawn by dying in the very first encounter three times in a row (pity mechanic).
    • This works even if you salute the Oath afterwards.
    • Pity resets after you successfully complete a run.
    • This pity mechanic technically works with Arachne and Narcissus in The Underworld.
      • However, this causes them to frequently align with mid-shop and is not recommended.
  • Heracles or Artemis can appear (pauses timer)
    • Look for interactables while Heracles or Artemis are about to give reward
      • Pauses timer during their animation
    • Artemis mostly spawns in rooms with health/magick and poms
      • Take these rooms as late as possible
        • More depth/spawns in later rooms, paused timer is more valuable
      • Artemis is only available in Ephyra
  • Prioritise rooms with boons/hammers 
  • Don't take side rooms, they cost too much time for their rewards
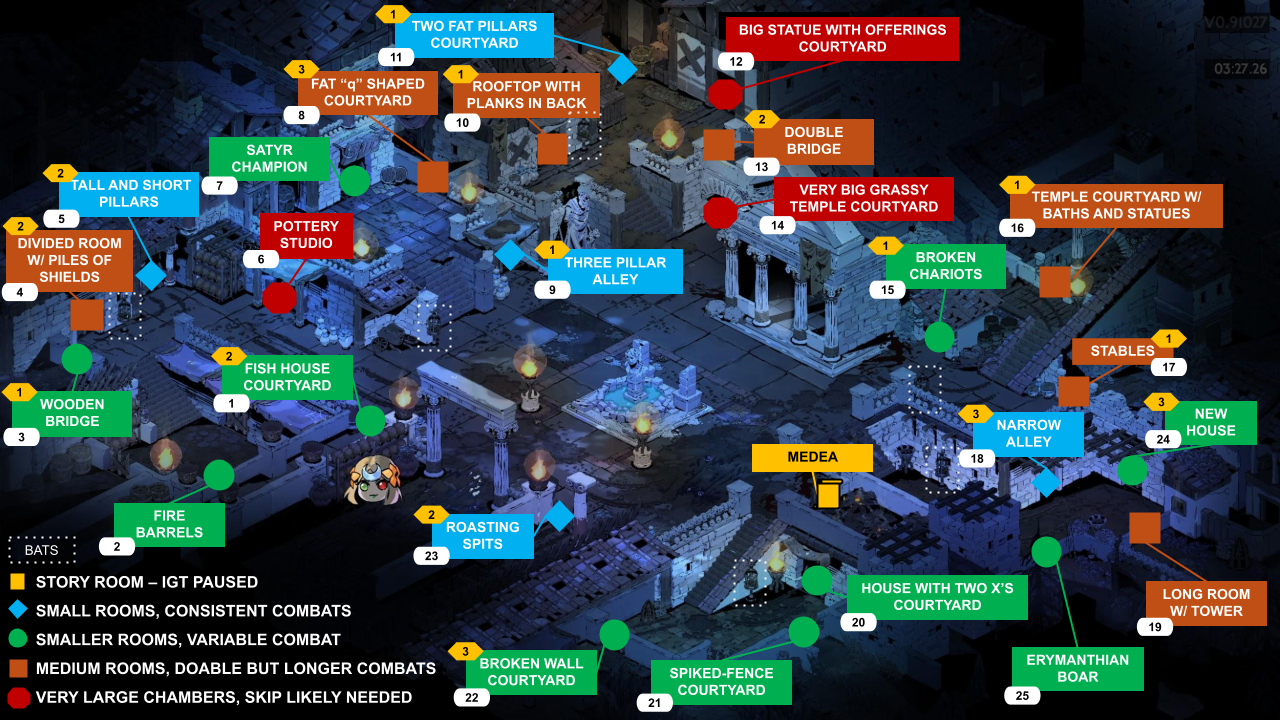
  • Choose rooms based on the layout image below:


Boss: Polyphemus

  • Kill adds passively (don’t chase them):
    • AoE builds kill them automatically.
  • Bait slam → dash through → unload full DPS window.


Rift of Thessaly

  • Clear boats quickly
    • Use the environment such as barrels if possible
    • Fight Zagreus in the mid-shop if:
      • The next location is a boat (big green arrow on the door) 
      • You have high single target damage
    • This skips the entire location (up to three combats).
  • Heracles or Icarus can appear (pauses timer)
    • Take Icarus boons that will increase your DPS 
  • Circe is sometimes available
    • Take boons that increase damage

Mini-Boss: Charybdis

  • Burst tentacles immediately on spawn.
  • Stand so that all tentacles are within range of your attacks.
  • Generally takes longer than other mini-boss → time loss. 

Boss: Eris

  • Eris's attacks create natural DPS windows:
    • Unload while she is using abilities/recovering.
  • During final phase transition, you can manipulate her spawn 
    • Hug column on the bottom right of the room 
      • Always spawns in line of sight
      • Only available spawn is close to the column


Mount Olympus

(speed focus: clean movement, statue usage, minimal downtime, Prometheus phases)

Room Efficiency:

  • Statues that fire beams or blasts can delete waves:
    • Don’t wait on the statue — fire it between waves as you move.
  • Zagreus is situational
    • Rare mid-shop room in Olympus
    • Skips a room
    • Evaluate risk/reward before fighting him


  • Prioritise regular doors over launcher doors
    • Regular doors lead to indoor or outdoor rooms
      • Fountains and Heracles can only appear in indoor rooms
    • Launcher doors ONLY lead to outdoor rooms
      • Aetos can only appear in outdoor rooms
        • Attacks you and adds time to the room
      • Icarus can only appear in outdoor rooms
  • When entering an outdoor room, use falling to your advantage
    • Wait until enemies damage each other (timer is paused)
    • Fall on enemies that are grouped together


  • Athena can appear naturally (pauses timer *at the end of combat*, rewards boon)
    • Natural Athena (appearing without Gorgon Amulet) is a time loss
      • Natural Athena encounters are longer
      • Timer only pauses at the end of the encounter
      • Boon rewards are usually lower rarity than Gorgon Amulet
    • Take Gorgon Amulet (especially non-Fate’s Whim setup) unless there is a much higher priority keepsake


  • Dionysus room is sometimes available (pauses timer, rewards boon)
    • Skip room → prioritise
    • Take boons that increase damage
  • Mini-bosses are VERY fast, prioritise them


Boss: Prometheus

  • Deal as much damage as possible, as fast as possible
  • Use 1-2-3 or bot-mid-top mnemonics when he uses his flame strikes


 The Summit

(speed focus: fast mini-bosses + optimal final DPS + zero wasted time in rooms)

Rooms:

  • Summit has a fixed structure:
    • 2 encounters → mini-boss → 2 encounters → mini-boss → shop → Typhon.
  • No skips: pure execution.

Fast Clears:

  • Rely heavily on:
    • High damage
    • Early wave predictions (room and spawn memorisation).

Mini-bosses:

  • Mini-boss 1 (Twins or Spawn):
    • Avoid chasing twins across the arena; pull them together if possible.
    • Pure DPS Spawn
  • Mini-boss 2 (Tail or Eye):
    • Eye: fast → pure DPS.
    • Tail: Dash through the sweep → punish recovery frames.

Boss: Typhon

  • Pattern is predictable:
    • Learn attack patterns
    • Take Hephaestus boons for safety if required
    • Buy armour to tank hits 
    • Kill eggs as quickly as possible before they hatch


“Death to Chronos!”

~ Melinoë

Resources and Acknowledgements

  • How to Speedrun in Hades 2 
    • Speedrunning guide by Boated 
    • A lot of the information in this document is from this video
  • Hades 2 Speedrunning Community Discord
    • Community discussions, events and PBs  
    • A lot of community input supported the refinement of this document
  • Hades 2 Speedrunning Website
    • Contains speedrunning records and videos
    • Rules on official speedrunning
    • Must record video and reset seed (by saluting the Oath of the Unseen) to have a run considered for ranking
  •  Hades 2 Wiki
    • Contains a lot of useful information, especially about boons