Mortal Shell 2 is deceptively deep. It does not hold your hand and you can very quickly find yourself making mistakes that will really slow down your progression. These tips & tricks will ensure that you make the BEST possible start during your first playthrough - let's get into it!
For more Mortal Shell 2 videos, builds, and guides, check out PhaseShifter on YouTube!
Body Text
Mortal Shell 2 Tips and Tricks: 15 Mistakes You Need to Avoid
Mortal Shell 2 gives you a huge amount of freedom when it comes to building your character, but that freedom can also make it surprisingly easy to waste resources or slow down your progression.
Some of the most important upgrade systems aren't explained particularly well, and several valuable resources are much more useful when invested into a focused build rather than spread across everything you find.
I learned a lot of these lessons the hard way during my first playthrough.
From Tarstones and the Tar Forge to Glimpse, Shell Bonds, Familiarity items, weapons, and build crafting, these are the mistakes I wish I had avoided from the beginning.
If you want to become powerful as quickly as possible, here's how to make your resources work for you.
1. Don't Let Your Tarstones Fall Behind
Tar Stones are one of the most important parts of your character's power progression.
They can completely change how a build plays, and some of their effects are strong enough to define an entire setup.
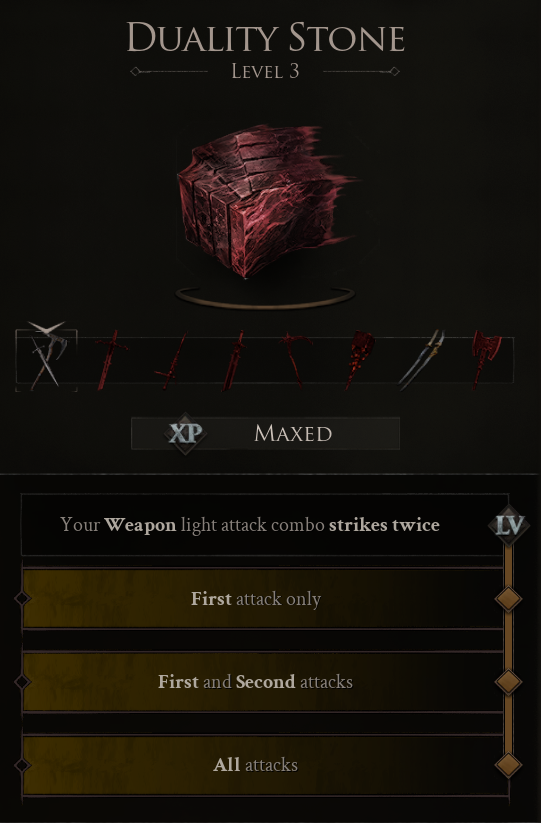
Take Duality Stone, for example.
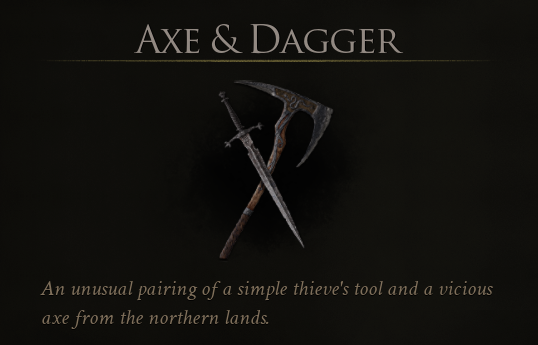
Its upgrades allow your weapon's light attack combo to strike twice, eventually applying the effect across the entire combo. With a fast weapon such as the Axe and Dagger, this can dramatically increase your damage output.
That means Tarstones aren't something you should treat as optional side upgrades.
Prioritize the Tar Stones that actually contribute to your build and keep them levelled.
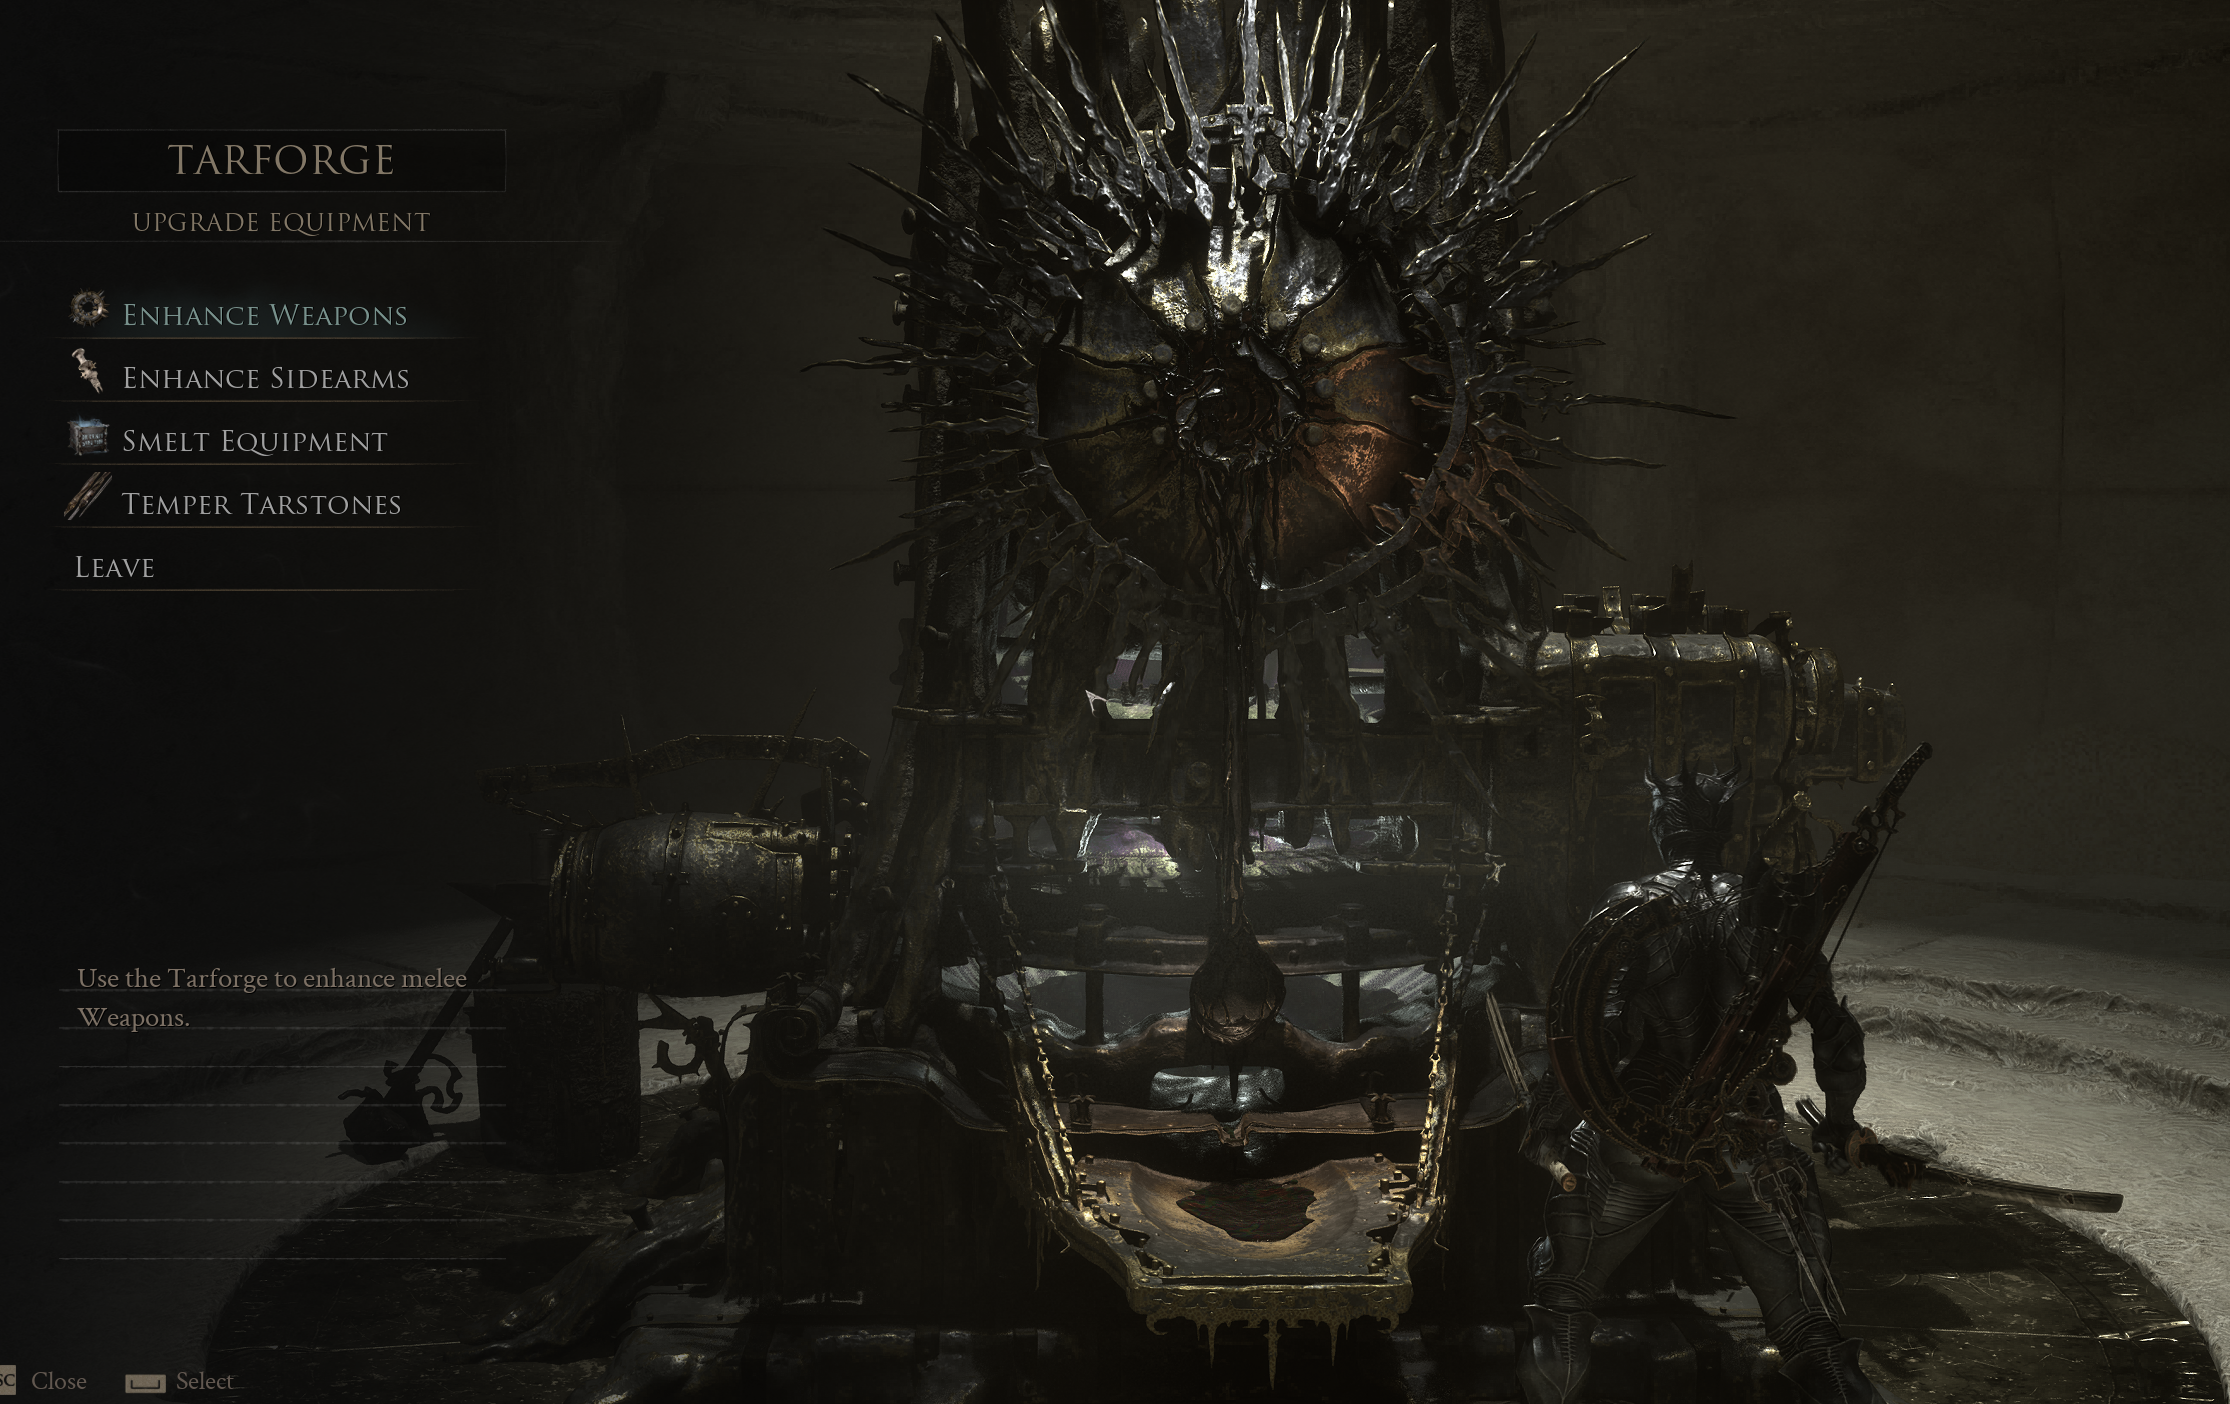
2. Understand the Tar Forge's Hidden Bottleneck
This is one of the easiest progression traps to fall into.
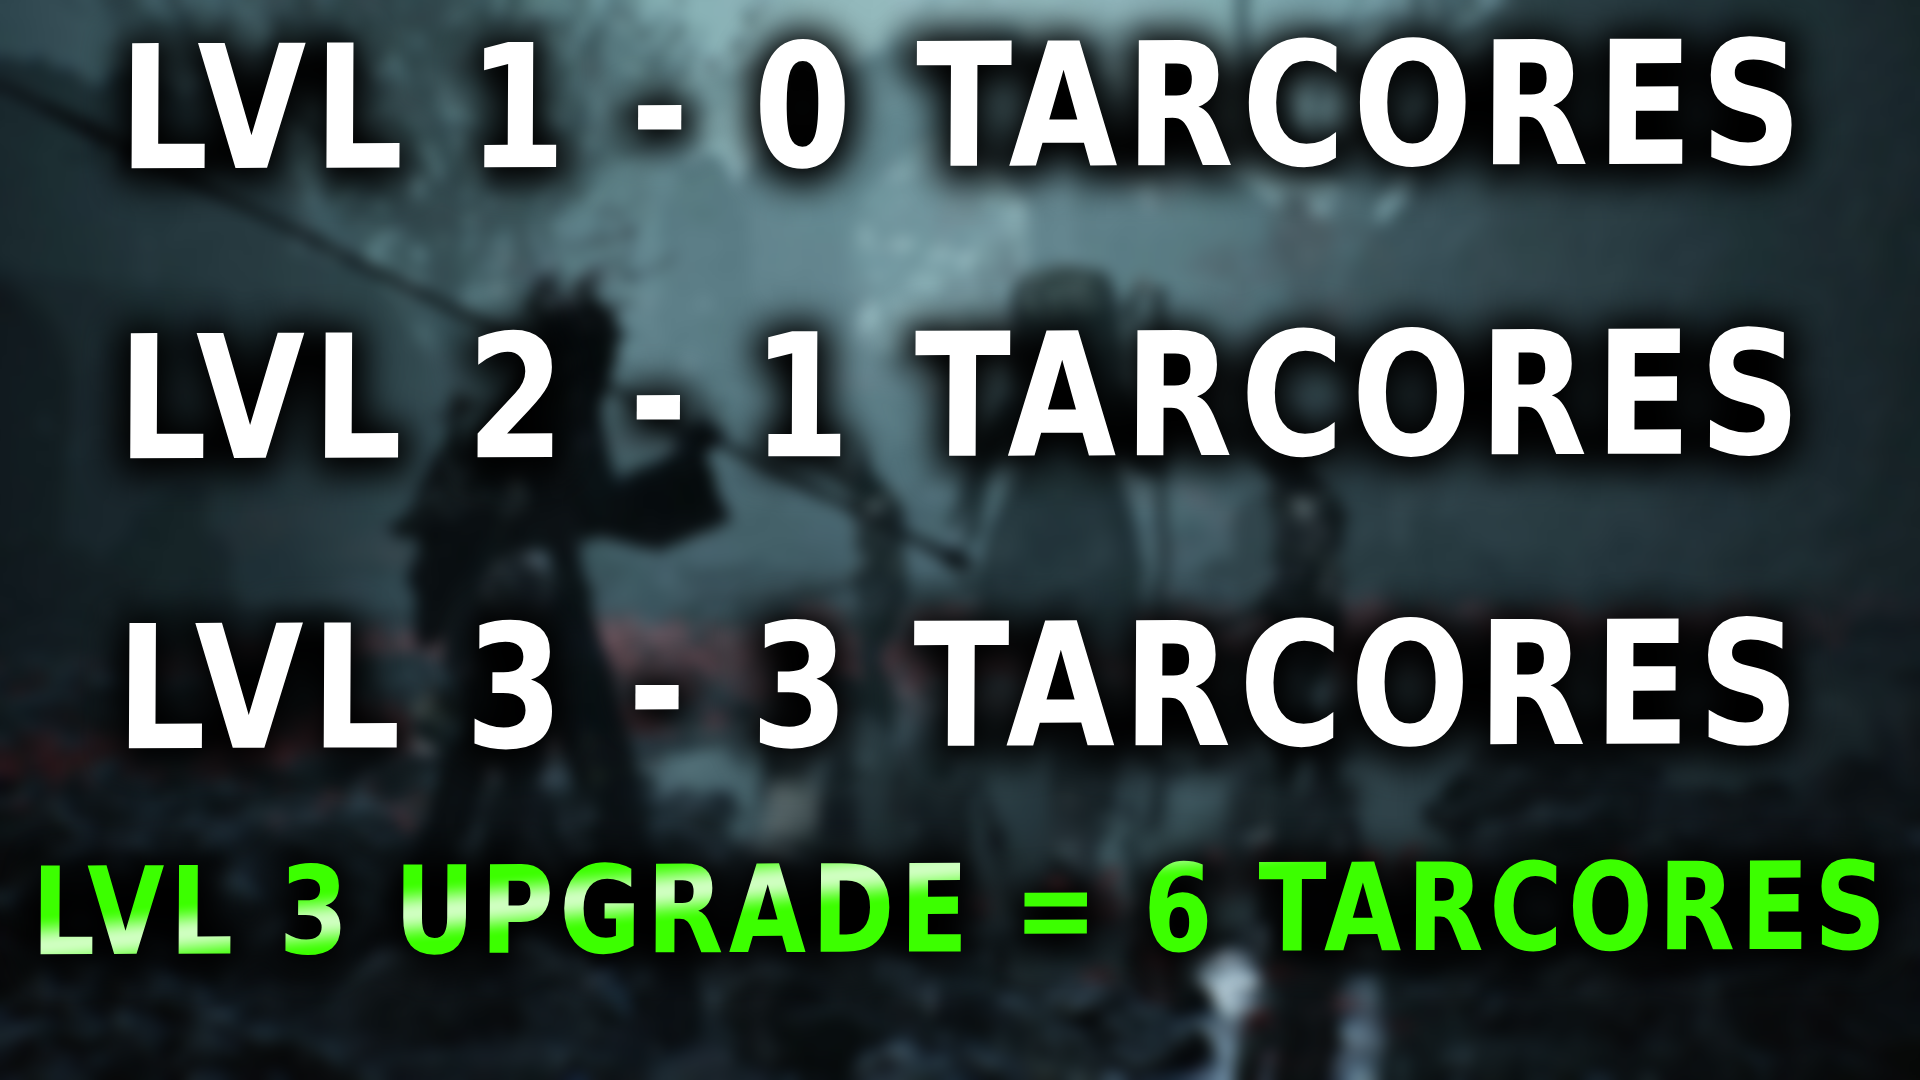
When you temper a Tarstone, you don't just increase its level. You also generate the resource required for higher-level Tar Stone upgrades.
The important part is that you need to upgrade multiple Tarstones before you have enough Tarcores to push an individual stone to its maximum level.
This means you can't simply pick one Tar Stone and funnel everything into it immediately.
You need to keep upgrading your other stones to generate the resources required for the final upgrade.
The Efficient Approach:
Whenever you acquire a new Tar Stone that is ready to be upgraded, level it.
Then swap it out and start leveling another one.
Keep doing this until you've built up a pool of Level 2 Tar Stones.
Once you have enough Tarores, you can push one of your important stones to Level 3.
This is much more efficient than ignoring every other Tar Stone while you focus on a single upgrade.
3. Keep Multiple Tar Stones in Rotation
Tar Stones also require XP to reach their upgrade thresholds.
The exact requirements increase as you progress, meaning it can take a considerable amount of farming to move a stone from one level to the next.
Rather than putting all of your XP into one stone, keep several stones in rotation.
A good early-game routine is:
Equip a Tar Stone that needs XP.
Find a beacon near a dense group of enemies.
Clear the enemies.
Return to the beacon.
Repeat the route.
Swap in another Tar Stone when you've reached the relevant breakpoint.
This keeps your Tarore generation moving while also ensuring you aren't wasting the XP you're earning.
4. Get the Etched Needle Early
You can't properly upgrade your Tar Stones without the Etched Needle.
Fortunately, you don't need to go hunting across the entire map for it.
The Etched Needle can be found in a chest shortly before the first major boss encounter.
You should naturally encounter this area during progression, so once you obtain it, start taking advantage of the Tar Forge rather than leaving your Tar Stones untouched.
Getting this system online early gives you much more control over your build progression.
5. Level Three Tar Stones Can Completely Change a Build
Don't assume a Tarstones Level 2 effect is the final version of what it can do.
Some upgrades fundamentally change how an effect works at Level 3.
A great example is Voltaic Crown.
At Level 2, you need to charge the infusion to gain a limited number of lightning strikes.
At Level 3, it becomes a permanent infusion.
That means your weapon continuously applies the lightning effect instead of requiring you to repeatedly charge it.
This is an important distinction when evaluating Tar Stones.
Always check what the next upgrade actually unlocks before deciding whether a Tar Stone is worth investing in.
Sometimes the final tier isn't just a bigger number. It changes the way the build functions.
6. Don't Spend All Your Glimpse Unlocking Every Shell
It can be incredibly tempting to collect every Shell as quickly as possible.
After all, each one gives you another playstyle to experiment with.
But if your goal is to become powerful quickly, spreading your Glimpse across multiple Shells can leave every character underdeveloped.
Instead, pick a primary Shell and invest heavily into it.
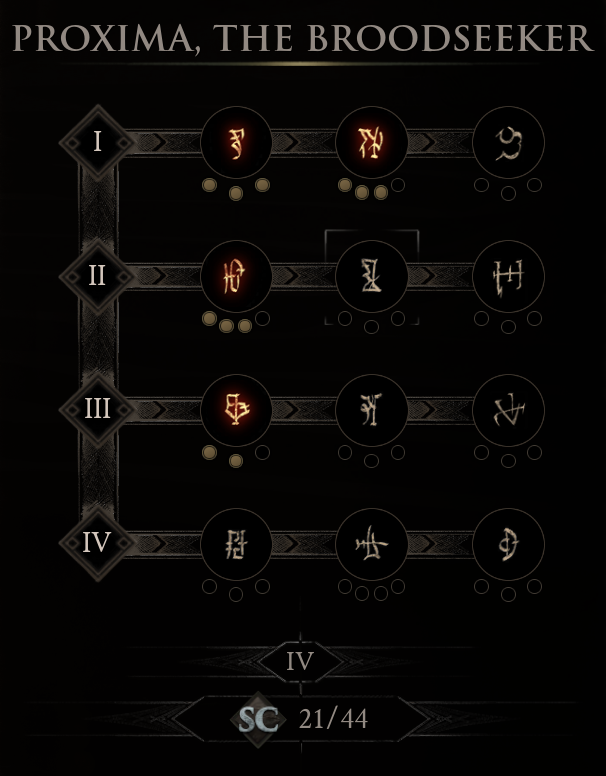
For example, if you're building around Proxima, put your Glimpse into Proxima's Shell Bond rather than immediately trying to unlock every other Shell.
The reason is simple: higher Shell Bond tiers unlock deeper parts of the skill tree.
And those later tiers can contain some of the strongest abilities in the game.
7. Focus on Shell Bond to Unlock the Good Stuff
Proxima is a good example of why focusing your Glimpse can pay off.
At higher Shell Bond tiers, her skill tree opens up powerful effects such as:
Bio Sampler applying Stasis stacks
Bio Sampler knocking enemies back
Bio Sampler triggering a Lightning Storm
Increased Amperon shock damage and radius
The important thing isn't necessarily that you should copy a Proxima build.
The lesson is that Shell Bond progression can unlock the synergies that make a build truly come alive.
If you spread your Glimpse across every Shell, you'll take much longer to reach those powerful interactions.
8. Don't Be Afraid to Respec Your Shell
This is one of the most useful things to understand about the skill system.
Shell Points are account-wide.
That means you aren't permanently locked into the skill choices you make for one Shell.
If you refund your points and switch to another Shell, those points are still available for you to spend.
This gives you a huge amount of flexibility.
Use This Against Difficult Bosses
If you're stuck on a boss, don't automatically assume that you need to farm more levels or find better gear.
Try changing your build.
For example, you might remove some of your offensive abilities and invest those points into mitigation or defensive effects.
A build that is excellent for clearing groups of enemies isn't necessarily the best build for surviving a difficult boss.
Respec around the problem you're trying to solve.
9. Experiment With Different Skill Combinations:
The skill tree isn't designed to force you into a single setup.
Some abilities become much more powerful when combined with effects from other tiers.
That means you should experiment.
If a boss is destroying you, try a defensive setup.
If you're surviving comfortably but taking too long to kill enemies, shift points toward damage.
If you're building around an elemental effect, look for skills and Tar Stones that amplify that same effect.
Instead of asking:
“What's the one correct build?”
Ask:
“What combination solves the problem I'm currently facing?”
That mindset will make the progression system much more rewarding.
10. Stop Chasing Endgame Weapons Too Early
One of the biggest mistakes I made was assuming that I needed one of the game's flashy late-game weapons to make meaningful progress.
You don't.
A weapon being difficult to obtain doesn't automatically make it the best choice for your current character.
In fact, spending hours trying to reach a late-game weapon can actively slow your progression if your character isn't strong enough to access the content required to obtain it.
Sometimes the strongest upgrade is simply the weapon you already have, properly upgraded.
11. The Axe and Dagger Can Carry You
The Axe and Dagger is available extremely early and can be used as the foundation for a surprisingly powerful build.
Rather than chasing an endgame weapon immediately, you can take your starting equipment, level it aggressively, and use it to push through content.
That's exactly what I did during my first playthrough.
I used the Axe and Dagger, starter gear, the early ability obtained after the first proper boss, and Tar Stones that were available early.
The result was much stronger than I expected.
The lesson is important:
Don't confuse “early-game gear” with “bad gear.”
A weapon with strong synergy and several upgrade levels behind it can outperform a theoretically stronger weapon that you haven't invested in.
12. Spend Your Money on Upgrades Before Chasing Everything Else
Once you have a weapon that fits your build, invest in it.
Getting an early weapon to a high upgrade level can produce an enormous improvement in your ability to clear content.
Rather than constantly spending your resources chasing every new weapon, pick something you like and make it strong.
This also makes exploration easier because you're no longer struggling to kill enemies while waiting for your “real” weapon to arrive.
The Foundry Stone is another useful early resource to look out for, and it can be found in the outskirts area near the beacon.
13. Build Backwards From Your Tar Stones
This is one of my favorite build-crafting lessons from the game.
Don't always start with the weapon.
Start with the effect you want.
For example, if you discover Voltaic Crown and see that it provides Lightning infusion, you can work backwards from there.
Ask:
Which weapons benefit from this effect?
Which weapon has the fastest attacks?
Which Tar Stones increase the damage or uptime?
Which Shell abilities synergize with Lightning?
Which sidearm can complete the setup?
This creates a roadmap for your build.
Instead of randomly collecting powerful items, you're deliberately assembling a system where every part supports the others.
Example: Building Around Lightning
You could start with Voltaic Crown.
Then look for weapons that can take advantage of its Lightning infusion.
From there, build around fast attacks and effects such as Duality Stone.
Then look for additional Lightning synergies, such as Voltaic Amber for your sidearm.
You're no longer simply asking which weapon has the biggest damage number.
You're creating a build where the individual pieces multiply each other's value.
14. Use Merrick's Maps When You Need a Specific Weapon
If you've found a weapon you really want but don't want to stumble across it organically, Merrik can help.
Merrik offers maps that point you toward the general area where specific weapons can be found.
This can save you a significant amount of time when you're deliberately assembling a build.
For example, if you know you want the Obsidian Hammer, you can purchase its map rather than blindly searching the world.
You can still save your currency and discover weapons naturally, but when you're committed to a specific build, the maps are a useful shortcut.
15. Don't Ignore Familiarity Items
Familiarity is another progression system that is easy to overlook because it doesn't work like a conventional piece of equipment.
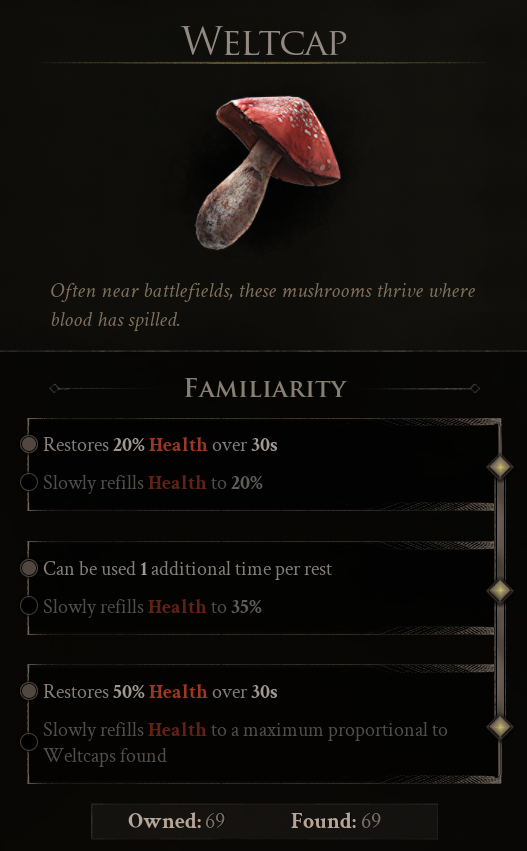
Take Welt Caps as an example.
As you find more of them, you unlock additional Familiarity tiers.
These tiers can provide active and passive effects.
The important thing to understand is that finding the item is what progresses its Familiarity, rather than simply owning a single copy.
That means collecting seemingly common items throughout the world can gradually unlock much stronger effects.
16. Understand Active vs. Passive Familiarity Effects
Familiarity items can have two different effects.
The top effect is active, meaning you manually trigger it.
The bottom effect is passive, meaning it is continuously applied.
You can only select one.
This is an important distinction because you may find an item with an excellent active effect but an even better passive effect.
Don't automatically pick the top option.
Consider what your build actually needs.
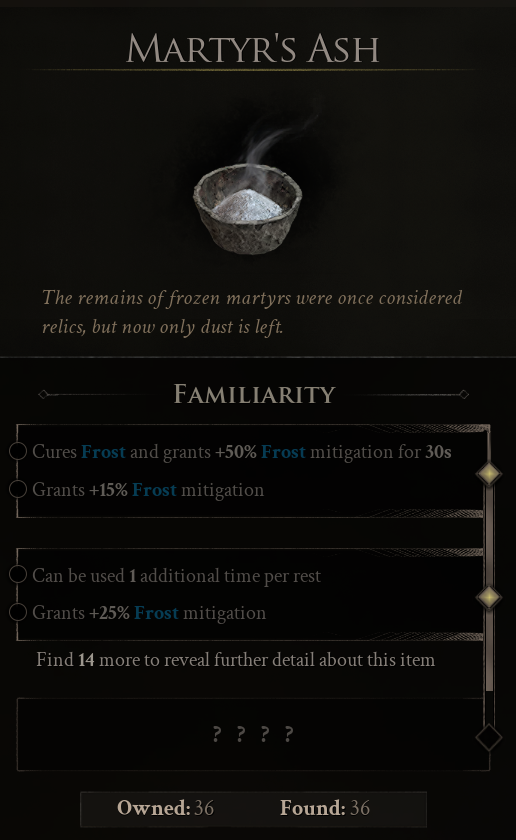
Example: Martr's Ash
Martr's Ash can cure Frost and provide 50% mitigation for 30 seconds.
This makes it particularly useful when you're dealing with enemies that can inflict Frost.
You can use the active effect to remove the status during combat and gain the defensive benefit at the same time.
Alternatively, depending on the Familiarity options available, you may decide that a passive effect better suits your build.
The important thing is to understand that you aren't getting both effects simultaneously.
17. Use Merchants to Reach Familiarity Breakpoints
You don't necessarily have to find every Familiarity item naturally.
Some can be purchased from Merrik.
For example, you can purchase 10 Galvanic Shards for 5,000, immediately helping you reach the next Familiarity breakpoint.
This can be a very efficient use of currency if you're close to unlocking a particularly useful effect.
Don't blindly buy everything, but if a relatively small investment pushes an important Familiarity item to its next tier, it can be worth doing.
18. Passive Familiarity Effects Can Add Up
Some Familiarity effects are subtle.
They aren't going to suddenly double your damage or completely transform your character.
But they can provide useful passive benefits over the course of an entire playthrough.
For example, the passive effect associated with Welt Caps can gradually restore health up to a portion determined by the number you've found.
It's not dramatic, but it's effectively free sustain that you can benefit from while playing normally.
These small effects become much more valuable when you stack several complementary systems together.
19. Look Out for Rare Familiarity Items
Not every Familiarity item requires a huge number of discoveries to reach its maximum effect.
Some of the rarer items reach their maximum potential after finding only a handful.
Gisha Remnant is a particularly interesting example.
Its passive effect gives your melee attacks a chance to summon a Gisha to attack your enemies.
That can provide additional damage without requiring you to actively manage another ability.
Alternatively, you can choose the active version instead.
Again, you have to choose between the active and passive effect, so think about which one fits your build.
20. Collect Gisha Fragments Early
If you want to start working toward the Gisha Remnant, begin at the Mushroom Village waypoint.
From there, head toward the area on the right.
You'll encounter a sequence involving a key and a cage. After returning to the area later, the Gishes will have taken over and you'll be able to begin acquiring the fragments.
Once you've obtained the first fragment, you can continue finding additional Gisha fragments throughout the world.
It's another example of why seemingly minor world activities can eventually become part of a powerful build.
The Biggest Lesson: Build Around Synergy
If there's one thing I wish I'd understood earlier, it's that Mortal Shell 2 isn't simply about finding the biggest weapon and upgrading it.
The strongest builds come from synergy.
A Tar Stone can make a weapon dramatically better.
A Shell ability can amplify that Tar Stone.
A second Tar Stone can improve the same effect.
A Familiarity item can provide another passive bonus.
And suddenly, several individually good mechanics become an extremely powerful build when combined.
That's why I recommend working backwards when you're theorycrafting.
Find something you like.
Maybe it's Lightning.
Maybe it's Bleed.
Maybe it's fast melee attacks.
Maybe it's a particular Shell ability.
Then ask yourself:
What else can I combine with this?
A Simple Build-Crafting Checklist
When you find an effect you want to build around, work through these questions:
What weapons can use it?
Which of those weapons attacks fastest?
Which Tar Stones amplify it?
Which Shell has abilities that benefit from it?
Can a sidearm use the same effect?
Are there Familiarity effects that complement it?
Which abilities provide another layer of synergy?
Which upgrades should I prioritize first?
This approach gives you a plan instead of simply hoping that the next weapon you find happens to be better.
Final Tips for a Stronger First Playthrough:
Mortal Shell 2 gives you plenty of opportunities to make your character stronger, but you don't need to use every system at once.
If you're starting a new playthrough, prioritize these things:
Keep your Tarstones leveling. Don't let the Tar Forge system become a bottleneck.
Focus your Glimpse. Pick a main Shell and push its Bond rather than spreading resources across everything.
Respec when necessary. Your Shell Points give you the flexibility to adapt your build to different encounters.
Upgrade weapons you actually use. Don't spend hours chasing a late-game weapon when your current weapon can already carry you.
Build around synergies. Start with an effect or playstyle and work backwards to find the weapons, Tar Stones, Shell abilities, and Familiarity effects that support it.
Learn your Familiarity items. Active and passive effects work differently, and understanding the distinction can give you useful free power.
Most importantly, don't be afraid to experiment.
The progression systems in Mortal Shell 2 become much more interesting once you stop looking at each upgrade in isolation and start thinking about how everything fits together.
That's when you stop simply upgrading your character and start building a monster!