 League of Legends
 Teamfight Tactics
 Valorant
 Lost Ark
 Destiny 2
 Diablo 4
 Download APP
 Collapse
How to Beat Tocker’s Trials Chaos Mode: A Full Fight by Fight Walkthrough
With patch 14.17 came a new way to play TFT, a PVE mode called Tocker’s Trials. In this game mode, you play against creep rounds as well as unique unit set ups with items. Play against an army of Nomsys, a swarm of Ezreals, or a hoard of Olafs!
TFT Tocker’s Trial Overview
Similar to previous game modes, players get a lot of resources to work with and can create powerful boards that would never be possible in regular games. The game mode is also not timed, so you can take all the time you want to make every decision.
Just press fight when you are ready to go!
This is the perfect game mode for players who are seeking a new challenge in TFT. The game mode isn’t easy – so you might need some help along the way.
After successfully getting a 3-Star of every Legendary in the game with money to spare I wanted to give a walkthrough of how I did it and how you can too!
Final Board of Full Legendary Units in Tocker’s Trials

This game tests your ability to manage your board strength to win by small margins while saving money for interest and economy for the late game.
It is similar to some playstyles in regular TFT, but every round you already know what you are up against and have plenty of time to make any arrangements you see fit.
This game mode is all about min-maxing board strength, gold economy, and item economy!
Tocker’s Trial Stage 1
1-1 | 2 Minions
The game starts with a regular looking PVE round of two minions that any, single unit can solo. It also offers your first shop with all one cost units. Buy front line units as having a front line is very important for winning your future match ups. I pick up Rumble and Galio whenever I see them because they have great synergies to work around for multiple comps on top of being a tank while doing decent damage. Shapeshifters are also not a bad pick up.
1-2 | 5 Minions
I recommend that you buy any Vanguards you see, especially blitzcrank. Their tankiness allows you to win the next creep round and future ones. Blitzcrank 2 is super strong with Vanguard activated and can last as your tank for a while. If you don’t have vanguards, then look for Lillia and Poppy as Bastion tanks. The third option is playing a 2 cost unit if you got one dropped such as Rumble and a damage dealer. Just make sure that you don’t play two units with no synergies that are 1 costs as you risk losing the second round. Be sure to pick up any decent pairs you see as well. Ideally, you don’t have to roll this round, but if you don’t have a synergy or a 2 star, you might just have to.
1-3 | Big Steve Minion and 3 Minions
Your reward is two 1-cost champion duplicators. You also have the option to slam an item which I recommend doing. Let’s take a pause from the creep rounds and go over item slams.
Item Slams for Early that translates well to Late Game
You want to be able to play around Morgana and Diana as much as possible. They are strong units with backline access that act as tanks while dealing damage. They also share a lot of items which keeps them flexible. This is why I recommend going the Ability Power line when possible as it does a good job of killing units early with solid early game units such as Seraphine as well as does well in the mid game with units like Hwei and Zilean and translates well into the late game with 5-cost carries.
Attack Damage items can also be slammed and you can play into Smolder or Briar. I prefer playing Briar as she has backline access and pairs well with Nasus – a strong tank. However, Smolder can do well with Rageblade and Runnan’s to access the backline as well and paired with Varus.
However, Morgana is the strongest unit to play as she can farm you additional resources to star up your units or extra gold to make it easier to hit your legendary board! This is why I like to build items for her. You want one healing item such as Bloodthirster, an AP item, ideally deathcap, and then a flexible final item such as Adaptive helm, Red Buff, Crownguard, Ionic Spark, or other items can fit well as long as you have the base of a healing and AP item.
TFT Tocker’s Trial Item Tier List
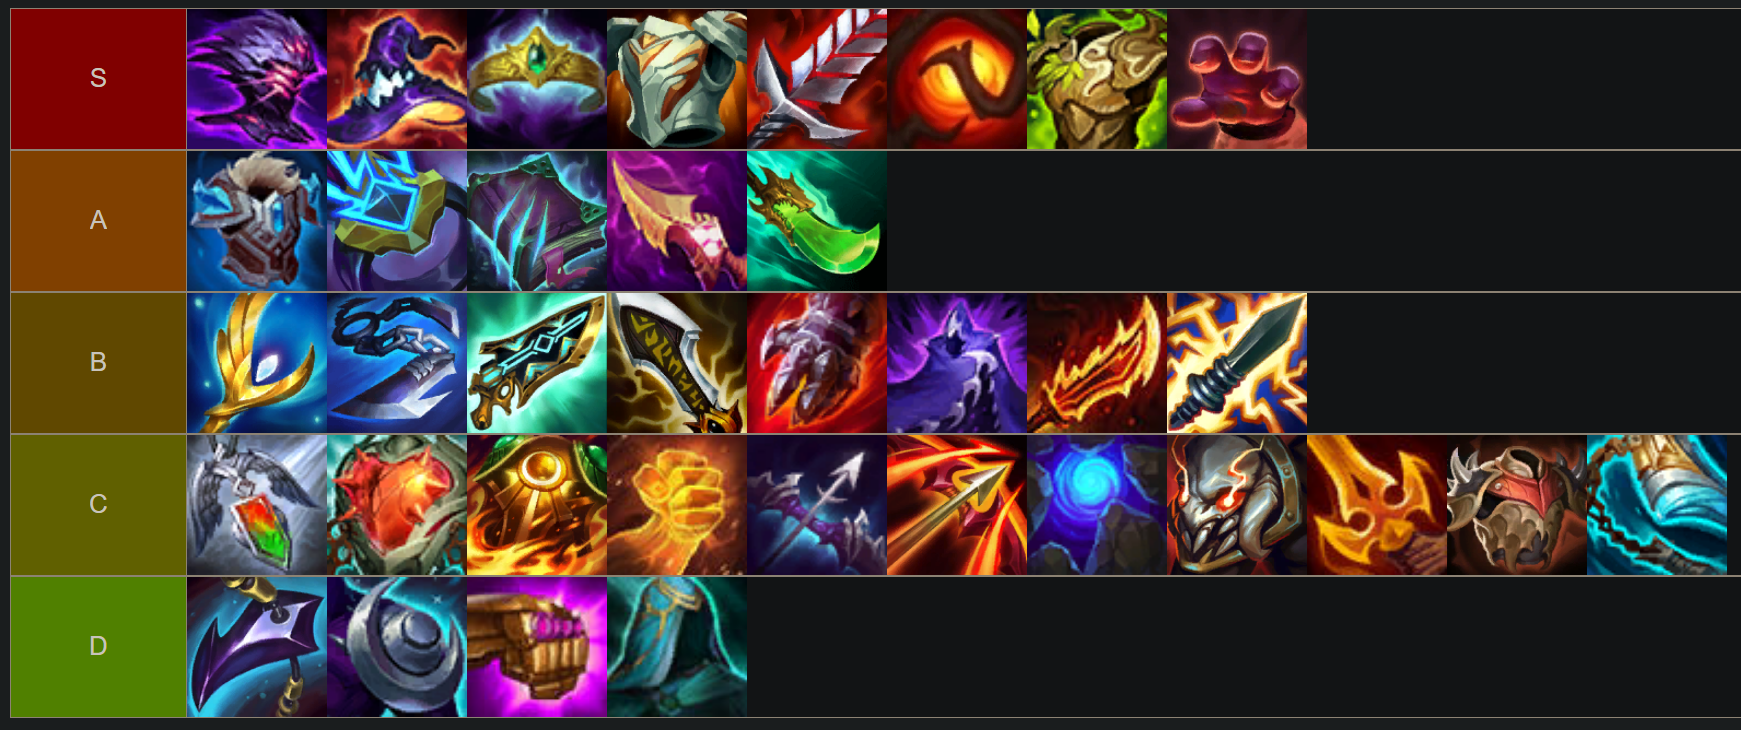
Here is my tierlist of the best items for slamming to kill units as well as their translation into the late game. The items meant for Morgana and Diana being the highest as they do well throughout the entire game.
Thief’s Gloves is a great way to get rid of gloves as they don’t do well in this game mode. On top of this, you have a Golden Remover so you can move the Thief’s Gloves to the appropriate units since the items stay the same when you move the gloves.
I don’t value tank items or sunder as I don’t prefer the AD line in Tocker’s Trials. I don’t mind items that can later go on Briar, but only playing around Briar with AD items feels bad and having the ability to play around Diana, Morgana, or both in the future is much stronger.
That is why AP items tend to be ranked higher as well as tank items that Morgana and Diana can use well. Bloodthirster is a top tier item as well as both Diana and Morgana as well as Briar can use it.
Item Tips
Don’t be afraid to slam your items aggressively. They help you win fights faster which gives you additional points. As well as you have a golden remover that you should be using all the time as you upgrade better units. Don’t sell a unit to get an item off of it if you want to keep that unit still!
Despite its recent nerf, Gargoyle is still very strong in this game mode as there are many fights with a swarm of enemies and solo tanking a unit gets a lot of value with Gargoyle! On top of this, most of the units do not have Sunder or Shred, so Resistances are king in this game mode. That also makes Vanguards and Wukong strong in this mode too with Gargoyle.
You also have a Masterwork Upgrade from the creep round. This lets you turn one of your items into the Radiant version of it. I prefer to make something that will go on Morgana or Diana in the future. Ideally Rabadons to give me plenty of damage or Adaptive helm for mana generation on a Mage until I am ready to play for Morgana, Diana, or even Xerath.
Let’s get back to 1-3 | Big Steve
If you have 2 tanks that have matching synergies and one of them is at least a 2 cost while having a damage dealer in the back with one item slammed you should have the damage to kill Big Steve and the other minions.
There are other ways to solve this as well such as 1-cost duping a Blitzcrank or Soraka to have enough damage while slamming one item. Essentially, this is the time to slam an item, have at least one synergy, and have at least 2-star 1 cost or more expensive units than one costs on the board.
For example, I was able to beat this round with Rumble 1, Soraka 1, and Veigar with a Nashor’s Tooth. A low cost board so I didn’t have to use any of my free rerolls. Make sure you are interest increments so you can get to 50 gold as quickly as you can!
1-4 | Poppy Party
To be safe, I level here to make sure I have 2 front line tanks with matching synergies and two back line damage units. I also slam another item – ideally a front line item to make sure my front line can withstand the force of the Poppies. You can also slam another damage item if you had a previous one.
I don’t recommend splitting damage items on multiple units. Make sure you are stacking units with items and not spreading them unless you have a Thief’s Gloves. If you get stuck with gloves slam Thief’s Gloves as much as you can as the extra items will do a lot for your team now and in the future.
Make sure to use your 1-cost neekos if you have a pair as well. Ideally, you shouldn’t have to roll here either. In one game, I had Blitzcrank 2, Galio 1, Veigar 1, and Soraka 2 with no items win this match as the upgraded Blitzcrank can tank Poppy forever. Abuse Blitzcrank early as much as you can!
Tip: Be looking to secure anti-heal in the form of Red Buff or Morello soon as you will need it in future fights. That is what you should be making with your next anvils if you don’t have anti-heal already. You also will want to make Shred if you are AP or Sunder if you are AD.
Silver Augment Choice

The augments are in ascending order meaning you will start with a Silver Augment, then Gold, with the final one being a Prismatic Augment. I recommend getting an augment that isn’t as good early but scales well into the late game in most cases.
However, there are augments that do a little bit of both such as Item Grab Bag I giving you an item that you can reforge if you miss assuming you saved a Reforger. You can also take augments such as Harmacist that aren’t as strong early game but become much stronger as the game goes on.
1-5 | Jayce and 6 Ashes
At this stage I got to level 5 and make sure I have used my Masterwork Upgrade and have it on a carry. I look to have 2 or 3 trait synergies on my board and a couple upgrades in order to win this one.
1-6 | Abuzz with Kog’maw, Blitz, and Ziggs
This round has felt relatively easy to me and if you won the Jayce match you shouldn’t have much of an issue with this one as long as you have a strong front line as well as a unit that does damage to multiple units such as Seraphine.
Don’t place your units by each other as that gives Zigg’s bombs more value. Spread out your backline so only one gets hit by a bomb at a time! Keep saving your gold! You should be around 40 or 50 gold here. If you only have 30 gold – don’t fret unless your board is weak and losing.
My board at this point was Galio 1 with a Thief’s Glove, Blitzcrank 2 with a Ionic Spark, Soraka 2, Kog’maw 1, and Veigar 1 with a Radiant Adaptive Helm, Nashor’s tooth, and Archangel’s Staff. I also had an additional Thief’s Gloves that I could have put on Soraka, but I was strong enough that I didn’t need it and kept it on bench to give my Veigar additional Ability Power.
Charms
Let’s talk about Charms in this game mode. Charms overall aren’t worth it early unless they are economy related. You shouldn’t need combat charms to win early combats as your natural board should be strong enough especially having the option to duplicate 1-cost units. Take the economy Charms you see but hold off for combat Charms for later!
1-7 | Warwick and the Flight of Nomsys
At this point I level to 6 while still staying at 50 gold – but it is okay if you don’t quite have that much. I throw in an additional tank as the Nomsys will do their best to melt my front line.
Ideally you add a tank that matches synergies with your other tanks, but if you are decently strong you can get away with a non-synergy front line unit.
You will want to also make sure you have enough damage to get through the tanky Warwick; shred or sunder help here as well if you have it. In my case I had a Spark on Blitzcrank that I protected so that Veigar could get through the Warwick and go on to easily kill the Nomsys.
1-8 | 5 Portal
I found this round to be relatively weak, so I didn’t make any additional upgrades to my board. However, if you lost your previous round then you will want to. This one is where you also want to position your units in front of the Kassadin as you don’t want him to stack up the Rageblades to do damage against you, so put your units on the right side of the board for an easier fight!
1-9 | Jayces and the Dummies
This one gets a bit stronger as it can take a bit to eat through the dummies and where you would like to have a second damage dealer on the board.
I also rolled a tiny bit to upgrade my Veigar to a Veigar 2 to make sure I had enough damage. I gave Kog’maw some items to help kill off the dummies because he had Honeymancy synergy with Blitzcrank and Veigar.
However, you could also add another mage in the mix such as Soraka 2 or Seraphine 2. The other option is to have a two item tank Blitzcrank or other Vanguard that can withstand the power of the Jayces! I did keep a Thief’s Glove on the bench while still winning this round, so an upgraded carry with decent front line should be enough.
1-10 | Mordekaiser Mayhem and Early Legendary Unit Notes
This one I went ahead and leveled to 7 to add some additional synergies in. I also took a couple rolls. At level 7, there is only a 1% chance of seeing a legendary unit, but if you do see it, take it and play it.
There are cases where you wouldn’t put Norra or Milio on your board. Everyone else should be on your board.
Morgana
If you have Morgana in particular, congratulations, this is the most broken one and you want to get full items on her as soon as possible. There are two major reasons for this. The first reason is that she farms additional units and gold for you allowing you to level up easier and potentially hit quality units.
As well as she acts as a damage dealer and tank, so if she gets jumped on, she can shake it off when other carries cannot. Once you have a Morgana she should be on your board the rest of the game and never taken off and she should have items on her – as mentioned before.
Xerath
The other big hit is Xerath as you can get him in and start producing Ascendant Charms for your team. Look for The Moon in particular to hit more legendary units.
Tip: Once you pass up or use a Xerath Charm, you then have to go through the entire cycle of Xerath Charms to see that one again!
I did not hit a Morgana or Xerath on 7 in my run, and you certainly don’t need a Legendary to beat the Mordekaisers, but if you do see one, take it!
Otherwise, as long as you have additional synergies, a three item carry, and decent front line you should be able to win this one although it may end up being close if you are greedy with your gold like I was. If you are worried, be sure to take additional rolls at 7 and look for a 2 star Vanguard in addition to Blitzcrank.
Tocker’s Trial Stage 2
2-1 | 3 Star Mages
This is where things get harder. I actually ended up going to level 8 for this round and took a couple free rolls to make a stronger board.
I found a Ryze and a Taric which went well with my board due to Galio being on it. As well as it gives me the option to play around Ryze 2 in the future since my Veigar items of Radiant Adaptive, Nashor’s Tooth, and Archangel’s Staff are fantastic Ryze items and is part of why I slammed them due to their flexibility.
I don’t want to reroll the Mages, so I want to work toward getting out of them to a stronger 4-cost board from my level 8 rolls. Level 8 also gives me more options to potentially hit Legendary 5-cost units that are critical for winning the final battle.
Tip: Take units that hit units in the back row such as Ryze rather than front to back champions such as Kalista.
2-2 | Striking Snakes
Generally, if you are strong enough to beat the Mages, you should be strong enough to beat this especially if you have any sort of backline access. Just make sure your front line is strong enough to give your team enough time to clean up the Cassios after getting through the Wukongs.
My board was Veigar 2 with the 3 items discussed earlier, Soraka with Needlessly Large Gem, Ryze 1, Ahri 1, Blitz 2 with Ionic Spark, Diana with a Thief’s GLove, Galio 2, and Taric 1. I had 2 item components and one Thief’s Glove on my bench while still winning this fight.
2-3 | Shen and Akali Twins
This fight you will want to be sure to have a strong front line and you will want to place your ranged units on the right side of the board to try and avoid Shen’s knock up as well as keep away from Akali if possible.
You can place one bait backline unit on the bottom left in hopes that Akali chooses that as her target while your real carry is able to safely do damage. If you have enough gold, look to potentially make a 2-star 4 cost carry and transfer items from your carry to them instead.
Ryze does a lot more work than Veigar especially as future combats have a lot more units. The other strength of Ryze is that he hits units in the back row and you can snipe carries this way. If you hover the carries, you also might notice that their resistances are reduced – making it even easier to snipe them.
Units such as Veigar is a front to back carry meaning he has to eat through the front line before he can deal damage to the backline. He is prone to getting stuck on large tanks for this reason. There are a lot of strong tanks in Tocker’s Trials, so having units with backline access such as Diana, Fiora, and Ryze is the way to go.
AD Line Tip and Spats Tip
If you aren’t playing an AP line and can’t go Ryze, then look at playing Frost in your mid game. The Frost soldiers help you out by giving your team extra time to carry out the damage they need to do.
The fights are relatively fast so slowing them down with Frost Soldiers and Zilean is a way to let your carries do their job. I won a Tocker’s Trials through this strategy, but not in as flashy of a way as the full Legendary board I did the Ability Power line.
If you get dropped a spat, then slamming Frost might be the way to go as you can play around Swain, Diana, Briar, and the Frost emblem to get the Frost and Shapeshifter web synergy easily.
Support Anvil Choices
I like taking Needlessly Large Gem from the Support Anvil for the additional damage. I also don’t mind Moonstone Renewer as it helps keep your team alive for longer. Locket of the Iron Salari and Chalice of Power are both great for tank or damage as well. I don’t recommend taking an Unstable Treasure Chest as it makes positioning more difficult.
2-4 Chrono Shock
This one is funny as Zileans have 3 Statikk Shivs each while having Vex as the front line. This is where having backline access becomes very important. I rolled to have an upgraded Ryze 2-star.
If you miss Ryze, it is possible a 1-star Morgana, Diana, or Briar on your board will do since they have backline access as well.
Something that is able to tank through the Statikk Shivs as well as deal damage. Your front line of 2 2-star Vanguards should still be strong enough. Just make sure you aren’t a full 1 star backline or else the Zileans might just kill them with the Shivs.
Gold Augment Choices

Your gold augments feel less impactful if you are already in a good spot, but can be game changing if you are behind. If you have plenty of items, taking a Cyber augment might be the way to go. Generic good augments such as Gifts from the Fallen and Tons of Stats are also good. Generally, you want to take augments that benefit your whole team rather than just a couple units.
2-5 | Nasus and the Varus Bros
The most important part of this match is having single target damage. I actually ended up rolling gold to find some Arcana units. I found Xerath, Ahri, and Tahm Kench. I Arcana’d the Xerath so I would be able to do true bonus damage to the tanky Nasus.
My Ryze was able to snipe the Varus in the backline as well as dish out enough damage to kill off the Nasus in this fight pretty easily. Even without the Xerath, don’t worry – a 2-star Ryze with 3 items and decent front line should still do the trick for the damage you need against Nasus!
However, the other way of beating this is just having a giga-tank such as Wukong 2 or quite honestly a Blitz 2 with two Warmogs and with a decent Mage backline – even just Seraphine and Soraka with items you can win against this Nasus board.
2-6 | Swarm of Ezreals
This one has several Ezreals with a Rumble 2 front liner. If you are carrying Ryze you can easily do enough damage here. You also have multiple anvils cashed out so if you don’t already have 3 item Ryze or another 2-star 4 cost carry now is the time!
As well as adding some additional tank items to your front line if needed. I actually ended up keeping 6 components on my bench as I was very strong, but if you are looking to just finish the Trial and not looking for score bonuses it is best to slam all your items!
2-7 | Faerie Menaces
The next set of enemies are Faeries, and they are tanky! I feel like you don’t need to make any upgrades at this point to beat this if you didn’t have trouble with the previous mobs.
If you have been, you might look to make a second carry or a stronger 2-star 4-cost tank such as Taric. Also, be sure not to center your carry as the Katarina will target anything in the middle.
Keep in mind, if you have to roll too deep, then you will be stuck at level 8 for a while and you really want to get to level 9 for Legendary board. You do have 3 lives to work with, so it is okay to be weaker for a round. This is also a point where it is fine to take combat Charms if you need them!
2-8 | Dragon Hoard
This is one tanky group of dragons, but once again, if you beat the Faeries you should be able to beat this. If you need to, put Ryze on the right side of the board in hopes of snipping Smolder.
It is possible to snipe the Nomsy as well. There is only one tank, Shyvana who likes to leave her guard and allow for units to easily access the backline for this reason.
You can even use your front line tanks to pull her away from Nomsy and have units walk up to Nomsy and take him out. There are a lot of ways to position this so you don’t have to spend your gold to get much stronger.
2-9 | AD Sorakas
Don’t let AD Soraka fool you – they have fishbones which means they can do damage to random units on the board- including your carries. This is why we have been making sure we have at least 2 carries on the board.
This is also another fight you might want to consider buying a combat charm to help you out and maybe find a Legendary unit or 2 if your previous fights were close. Be sure to have a decent front line with solid damage in the backline.
2-10 | Radiant Nasus
The stronger version of Nasus and Varus from earlier, this Nasus has Radiant items and requires a lot of single target damage as well as anti-heal to get through him.
I actually went to level 9 here but I know that might not be possible for everyone. Regardless, your board should be upgraded or else you are going to lose. If you are stuck on 8, look for solid 4-cost 2-stars like Nasus, Taric, Ryze, Fiora, Gwen, and Rakan. Then be saving up your gold to go 9 as soon as you can without being broke.
Level 9
If you are able to go 9 or even at 8 make sure you hold onto every decent legendary that you see or have items for. Morgana is always a hold no matter what as she farms additional resources. If you hit a Morgana early and slam items on her you will likely be more rich than I was in this game.
I got my first and upgraded Morgana at this stage 2-10. I removed my Ryze’s Radiant Adaptive Helm, Red Buff, and Archangel’s Staff and gave it to Morgana 2 so she could farm items. I then put a Nashor’s Tooth I had left on my bench on Ryze so he could still cast.
Note that I would not have moved my Ryze 2 items to Morgana 1 in this spot as I wouldn’t have enough damage to kill him. If I only had Morgana 1-star, I would have thrown the Nashor’s and any other item that made sense on her including a tank item like Warmogs.
The most important thing for this round is to make sure you have a single target damage dealer like Ryze or a 2-star Legendary like Morgana or Briar that can beat Nasus.
Tocker’s Trial Stage 3
3-1 | Melee 4s

This one as long as you have anti-heal and single target damage you are fine – similar to Nasus. If you lost to Nasus, you need to roll more or level and roll. If you didn’t, then you are likely fine as long as you have a decent front line.
3-2 | Ahri Fanclub
Another one where backline access is king to deal with the Ahris. Having a strong tank will do a lot as well. Put all your tanks in a line so that multiple of the tanks don’t get hit by a single Ahri cast.
3-3 | Speedy Dragons
This one isn’t very hard, but it is very funny. You will want to make sure you have at least one ranged carry as they don’t have the same trouble as melee ones do. Champs like Ryze and Morgana don’t have much trouble with this one, but comps with Fiora and Gwen it might be more of a struggle. If they have healing, they should be fine overall, but be prepared for a silly fight.
3-4 | The Last Bastion is Ryze

This full Bastion Board is very tanky but doesn’t deal a lot of damage overall. If you have Shred you are fine. You don’t really need to make any upgrades to your board if you were fine in the Nasus fight unless it was close. If you don’t have shred, then this board might be a problem for you. Look for a Charm that can help you out or Arcana units and Xerath so that you can do true damage to them!
3-5 | Ascended Shapeshifters
Another one that is a damage check but this time in the form of health rather than resistances. If you have enough damage you should be fine if you didn’t just rely on having shred for your previous fight.
I was actually at the point where I could level to 10 without breaking 50 gold and rolled until I found a good Xerath Charm while holding onto Legendary units.
I threw in another Arcana unit to make sure I did true damage to the enemy. I also upgraded to a Diana 2 and moved 3 items to her – Crownguard, Ionic Spark, and Hand of Justice.
3-6 | Olaf Assassins
This is one where the positioning matters the most. You will want to move your main tanks to the back middle row. While moving your carries to the 1st and 2nd rows.
You can also put in Zilean to help slow down and stun up the units, but make sure he is in the first row. You should have a couple of 2 star Legendaries and be level 9 and looking to go 10 or be level 10. You can also take a combat Charm if needed.
3-7 | Norra Carry
This one feels even easier than the Olaf one. I wouldn’t bother rolling much here and just saving economy to go 10 or get back to 50 gold. Small tip on positioning is to spread your units if you can so they have less damage done to them against Norra who excels at hitting a group of units.
3-8 | Karma Xerath
This one is actually one of the most tricky ones that I had a tough time with to start. You have to have multiple 2-star Legendaries to beat this one or fantastic backline access.
Two Ryze 2s might do the trick with a good front line, but Diana 2, Briar 2, Morgana 2, and Xerath 2 will take you much further.
A Billion Gold Strategy
This is also the time where you get a Golden Duplicator and you should be going for a 3 star something. Ideally a Legendary unit. There is one that is above all the others which is Xerath. You want to get Xerath 3 here if possible. This is because his Charm, Death kills everything while giving you a ton of gold!
Make sure you don’t take another Charm while rolling down for him as then you can’t buy his Charm. This makes up for all the gold you spent getting him and sets you up for making more 3-star 5-costs!
If you wait until the next stage you can still do this strategy as well as you get dropped more gold as a reward for beating the Karma Xerath board. Just make sure you are strong enough to beat it with plenty of backline access!
3-9 | Multiple Milios
I don’t think these guys are very strong as I also beat them with my 7 frost board, but generally you should have your 3-star 5-cost by this point of fighting them. So they should be easy to deal with.
If you have at least one 3-star 5-cost then don’t dip below 50 gold. At this point you will need to be managing your bench space as well. If you have multiple 2-star 5-costs sell off your other units on board and play those instead so you have plenty of space to pick up every 5-cost unit you see in the shop.
3-10 | The Final Boss Morgana and her Witchy Posse
I have beat this with Diana 3-star with some frost units including a Zilean 3-star, so it is a bit hard to gauge how strong this boss really is as so much was happening on my screen that it was hard to tell how close the battle actually was.
Obviously, with the full 3-star Legendary board it was rather quick. You should be spending all your gold here especially if you don’t already have a 3-star Legendary as this is your last fight and the gold isn’t going to carry over, so get to rolling!
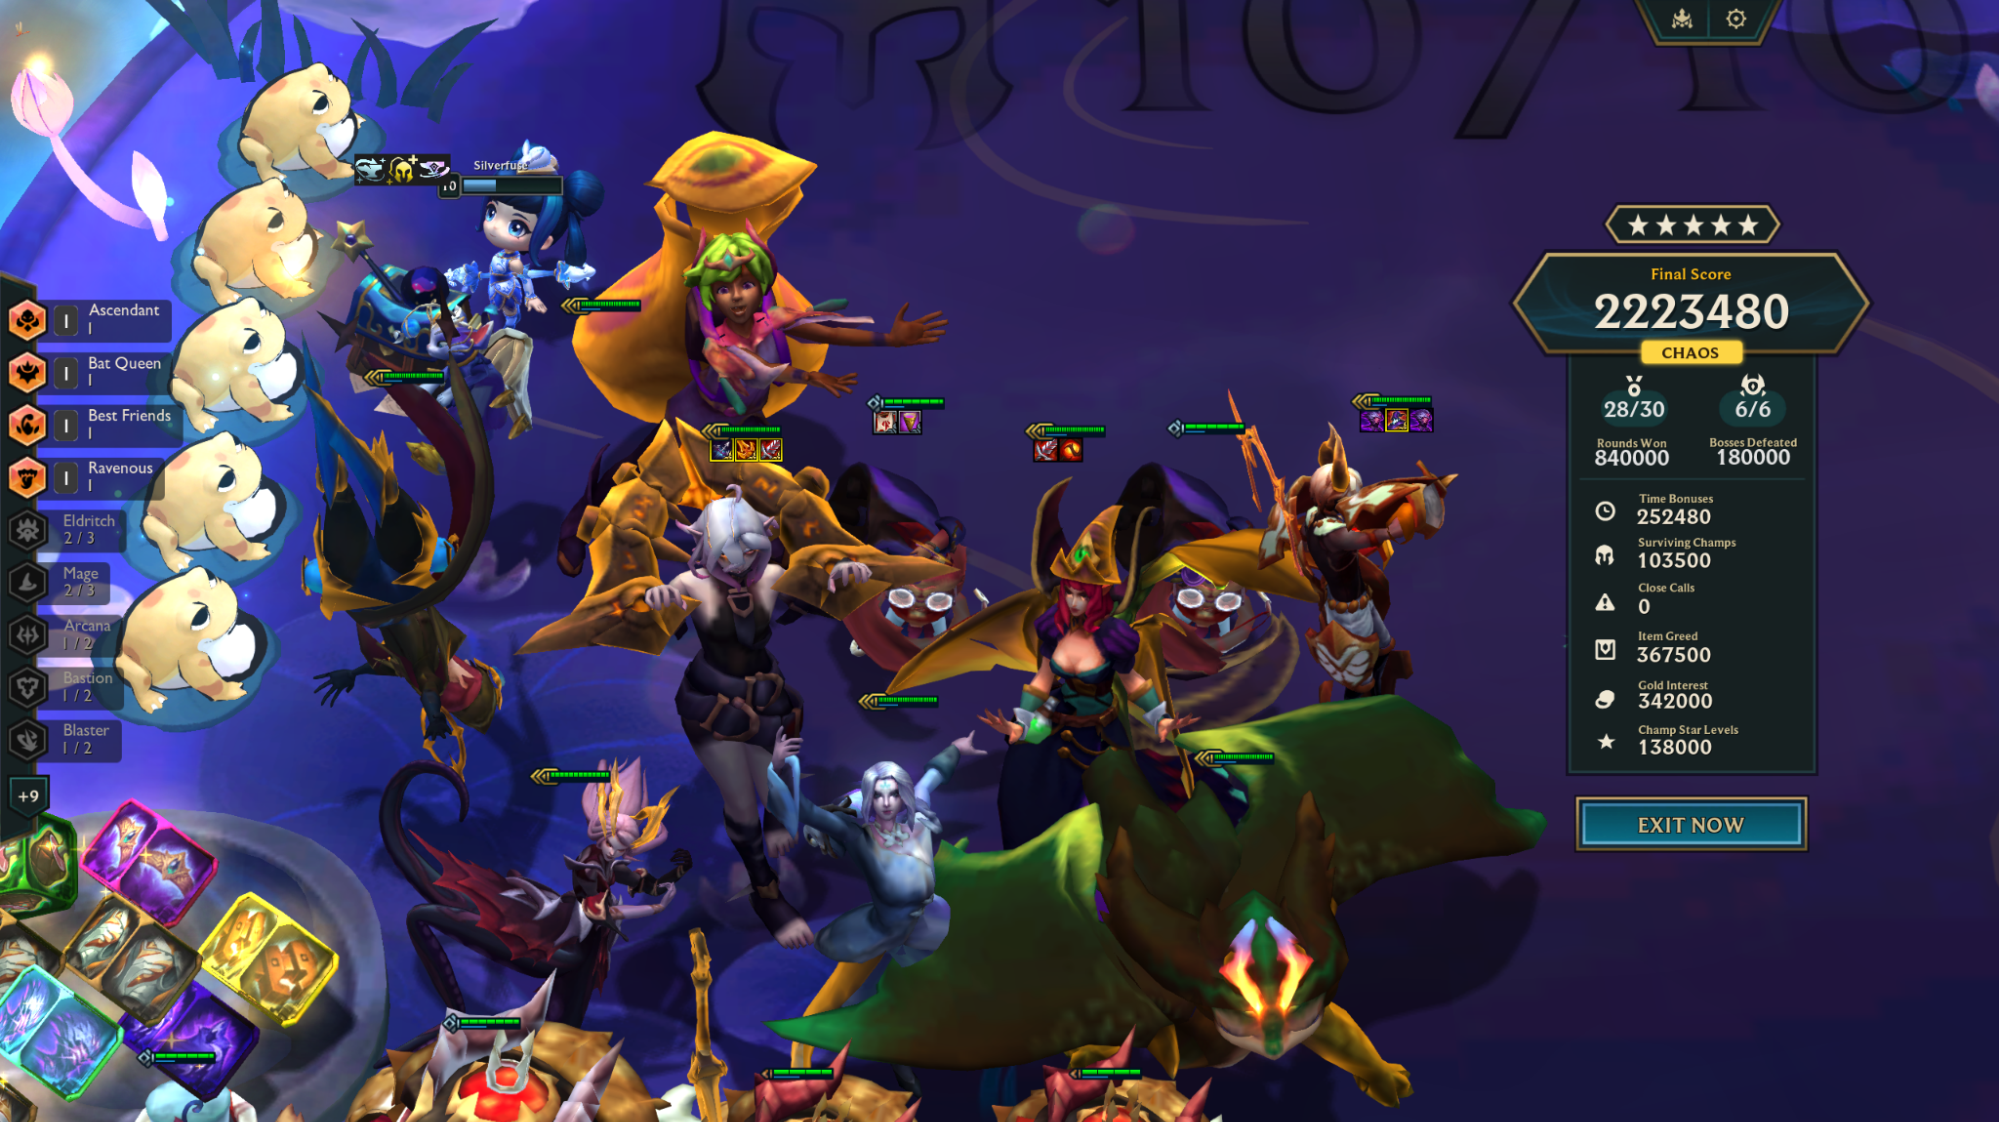
I scored 2,223,480. Are you up for the challenge of beating it? Good luck and have fun!
–Silverfuse
Subscribe to our newsletter:
Don’t miss out on all of the latest TFT content!