 League of Legends
 Teamfight Tactics
 Valorant
 Lost Ark
 Destiny 2
 Diablo 4
 Download APP
The Saltwater Scourge Path of Champions Guide
Hey all, it’s Trevor “Shugo” Yung and I’m back with the next chapter of Path of Champions!
This time we’re exploring some familiar territory…The Saltwater Scourge!
I’m back with Vi and ready to take on the next challenge. We’re continuing our previous adventure against The Fae Sorceress, so there are no additional reputation advantages beyond what we’ve earned so far (Reputation Rank 3).
Before we continue, let’s revisit a couple of disclaimers.
Your experience will vary depending on your champion, but this should serve as a reasonable baseline to compare to.
When it comes to PoC, the choices and possibilities are endless. One run can be completely different from the next, and your experience will differ from mine.
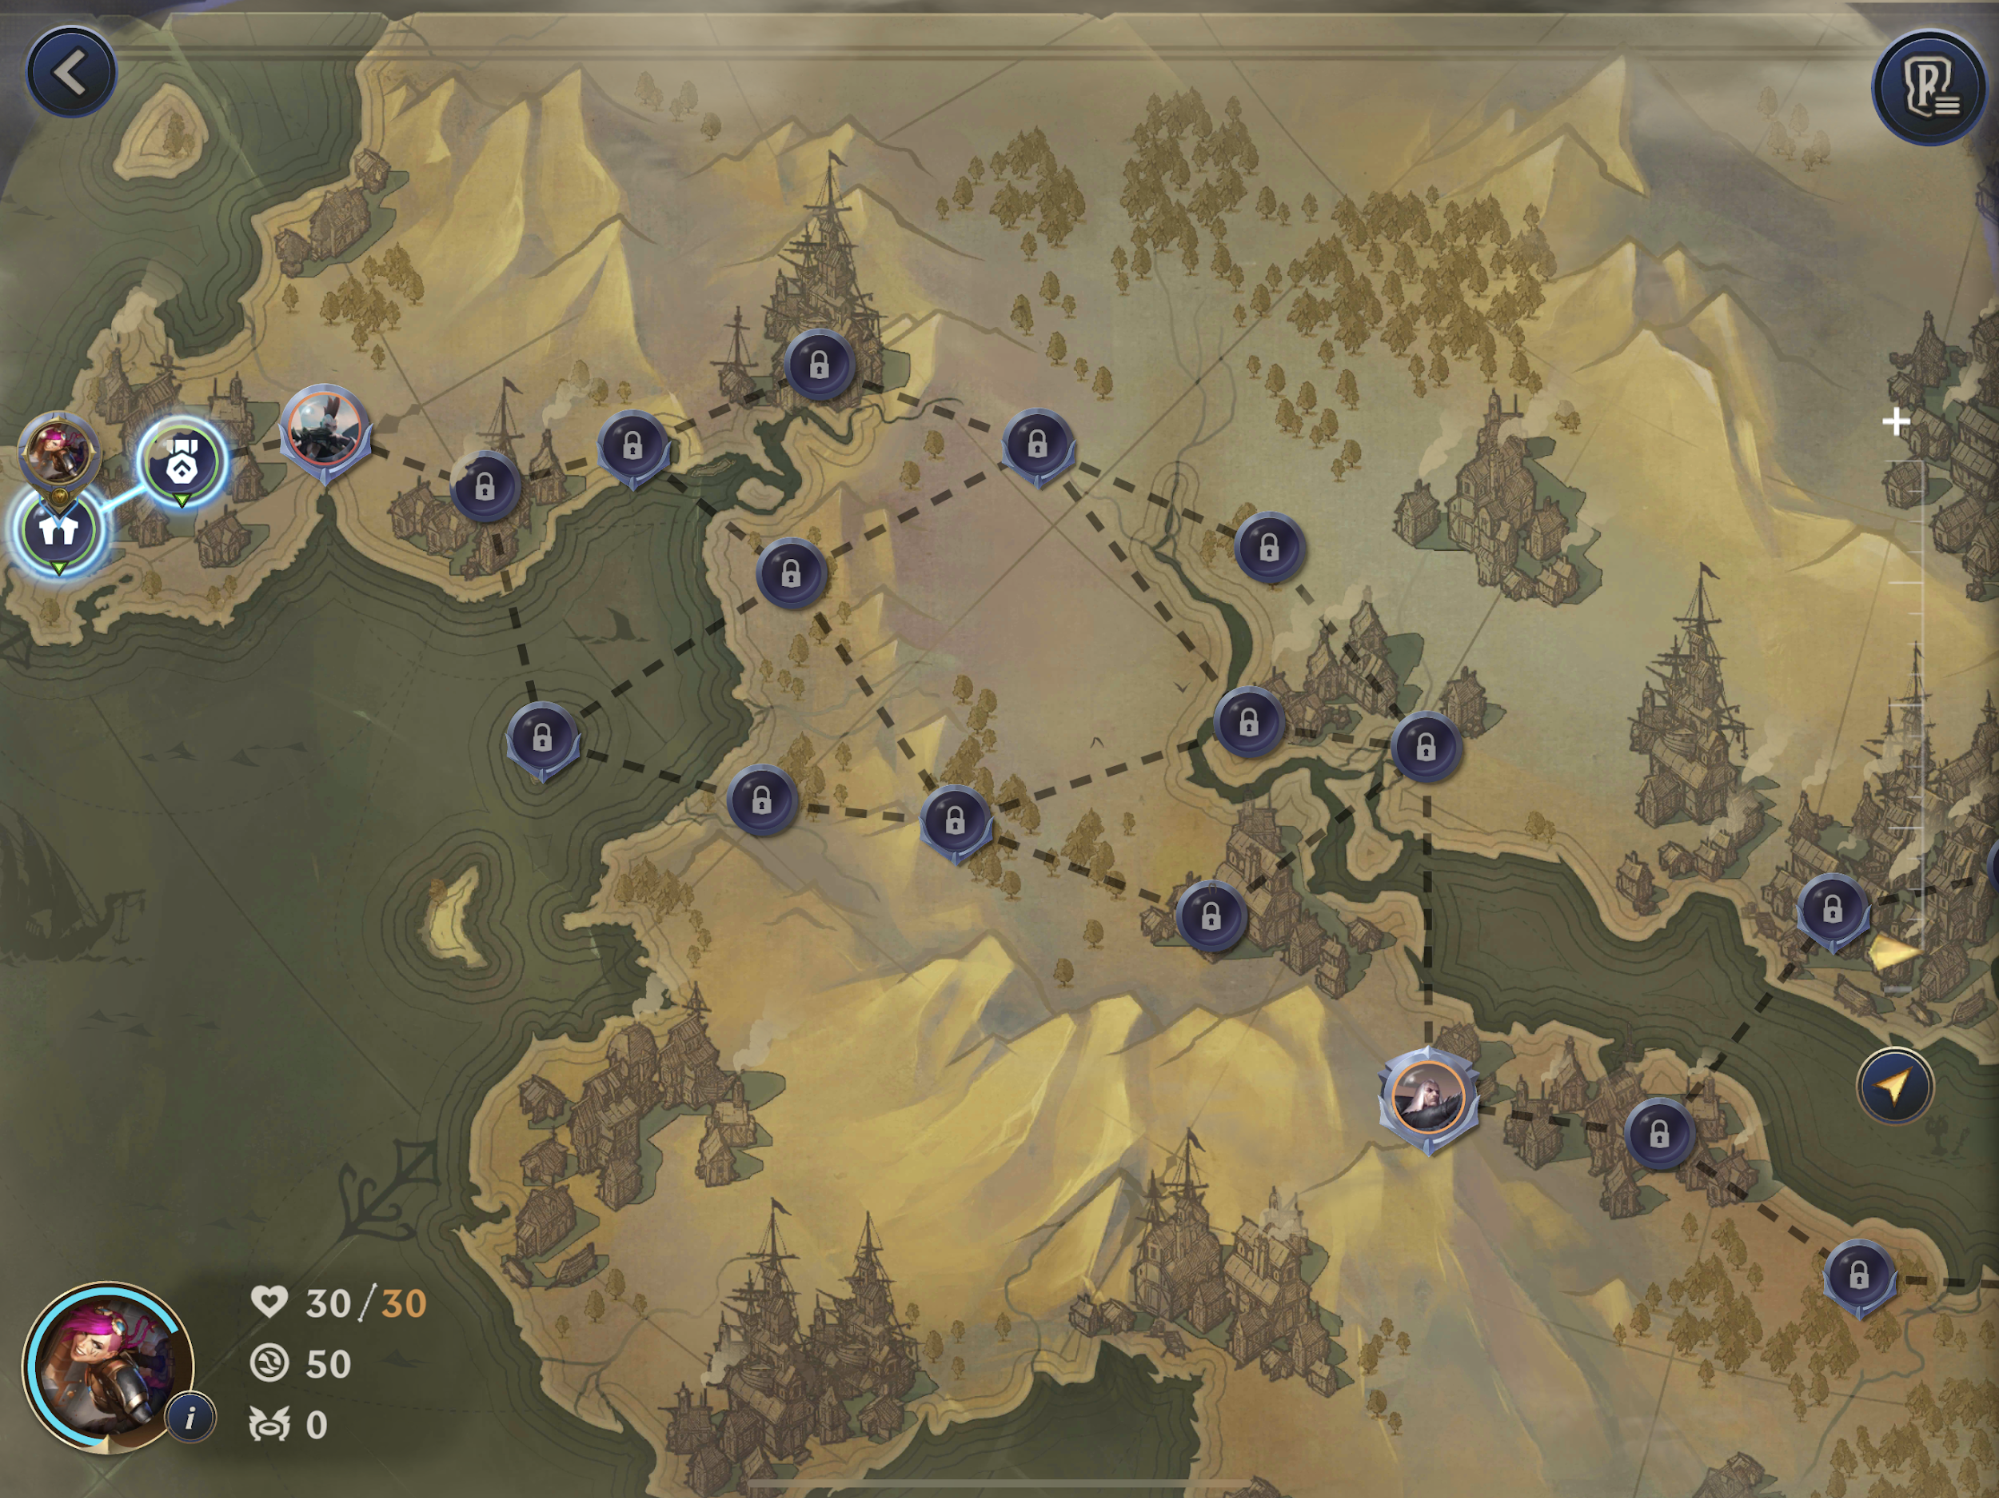
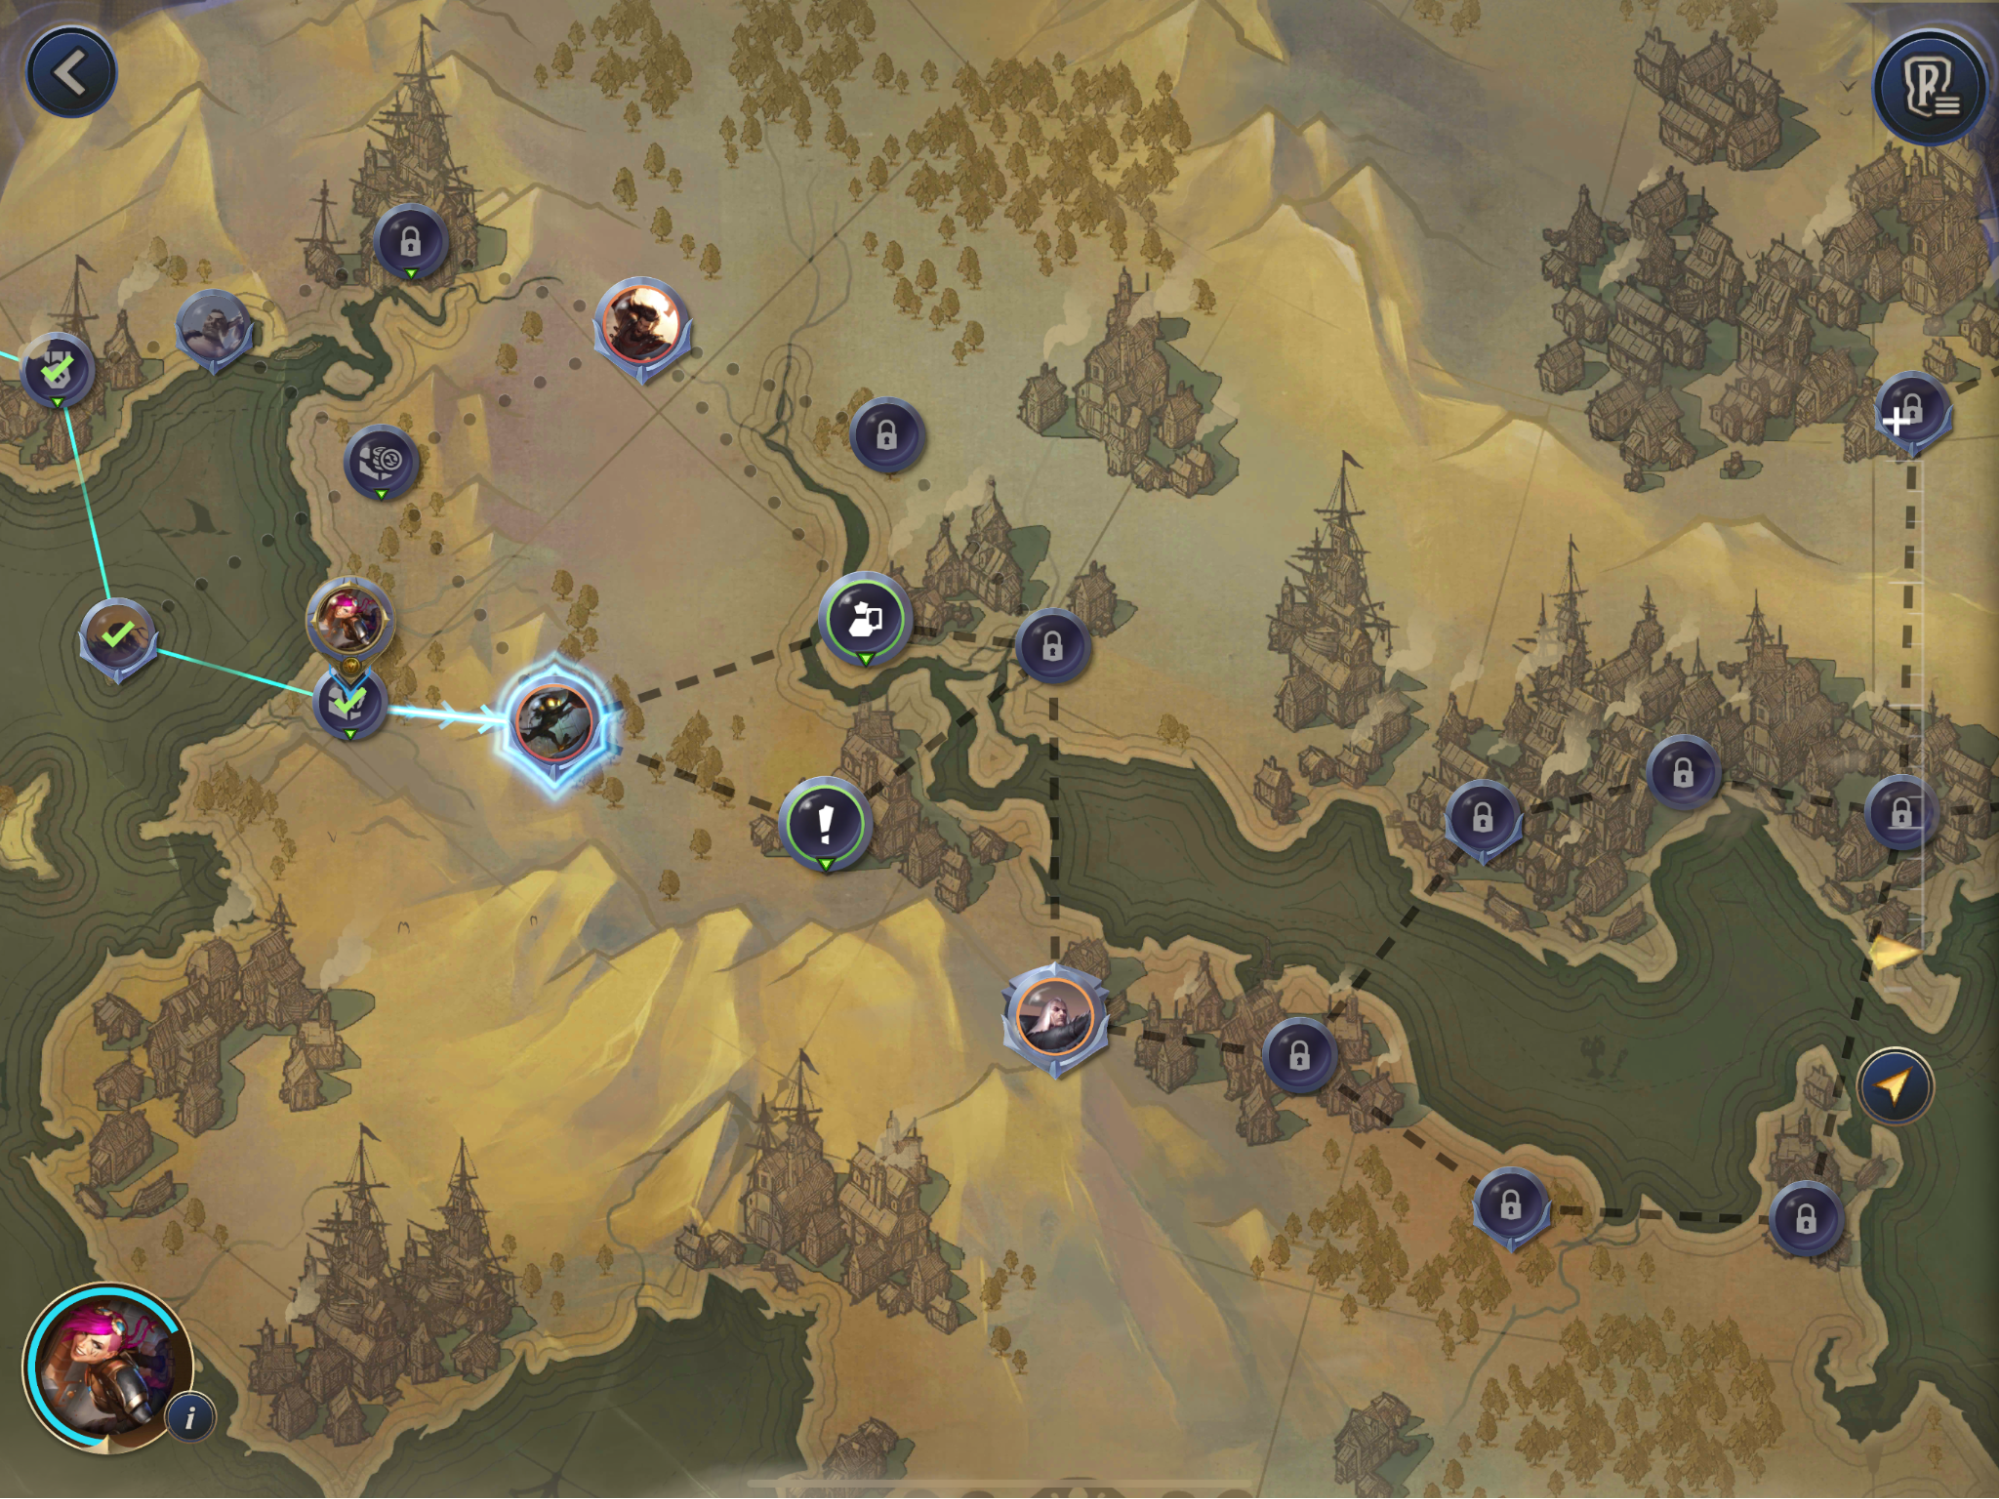
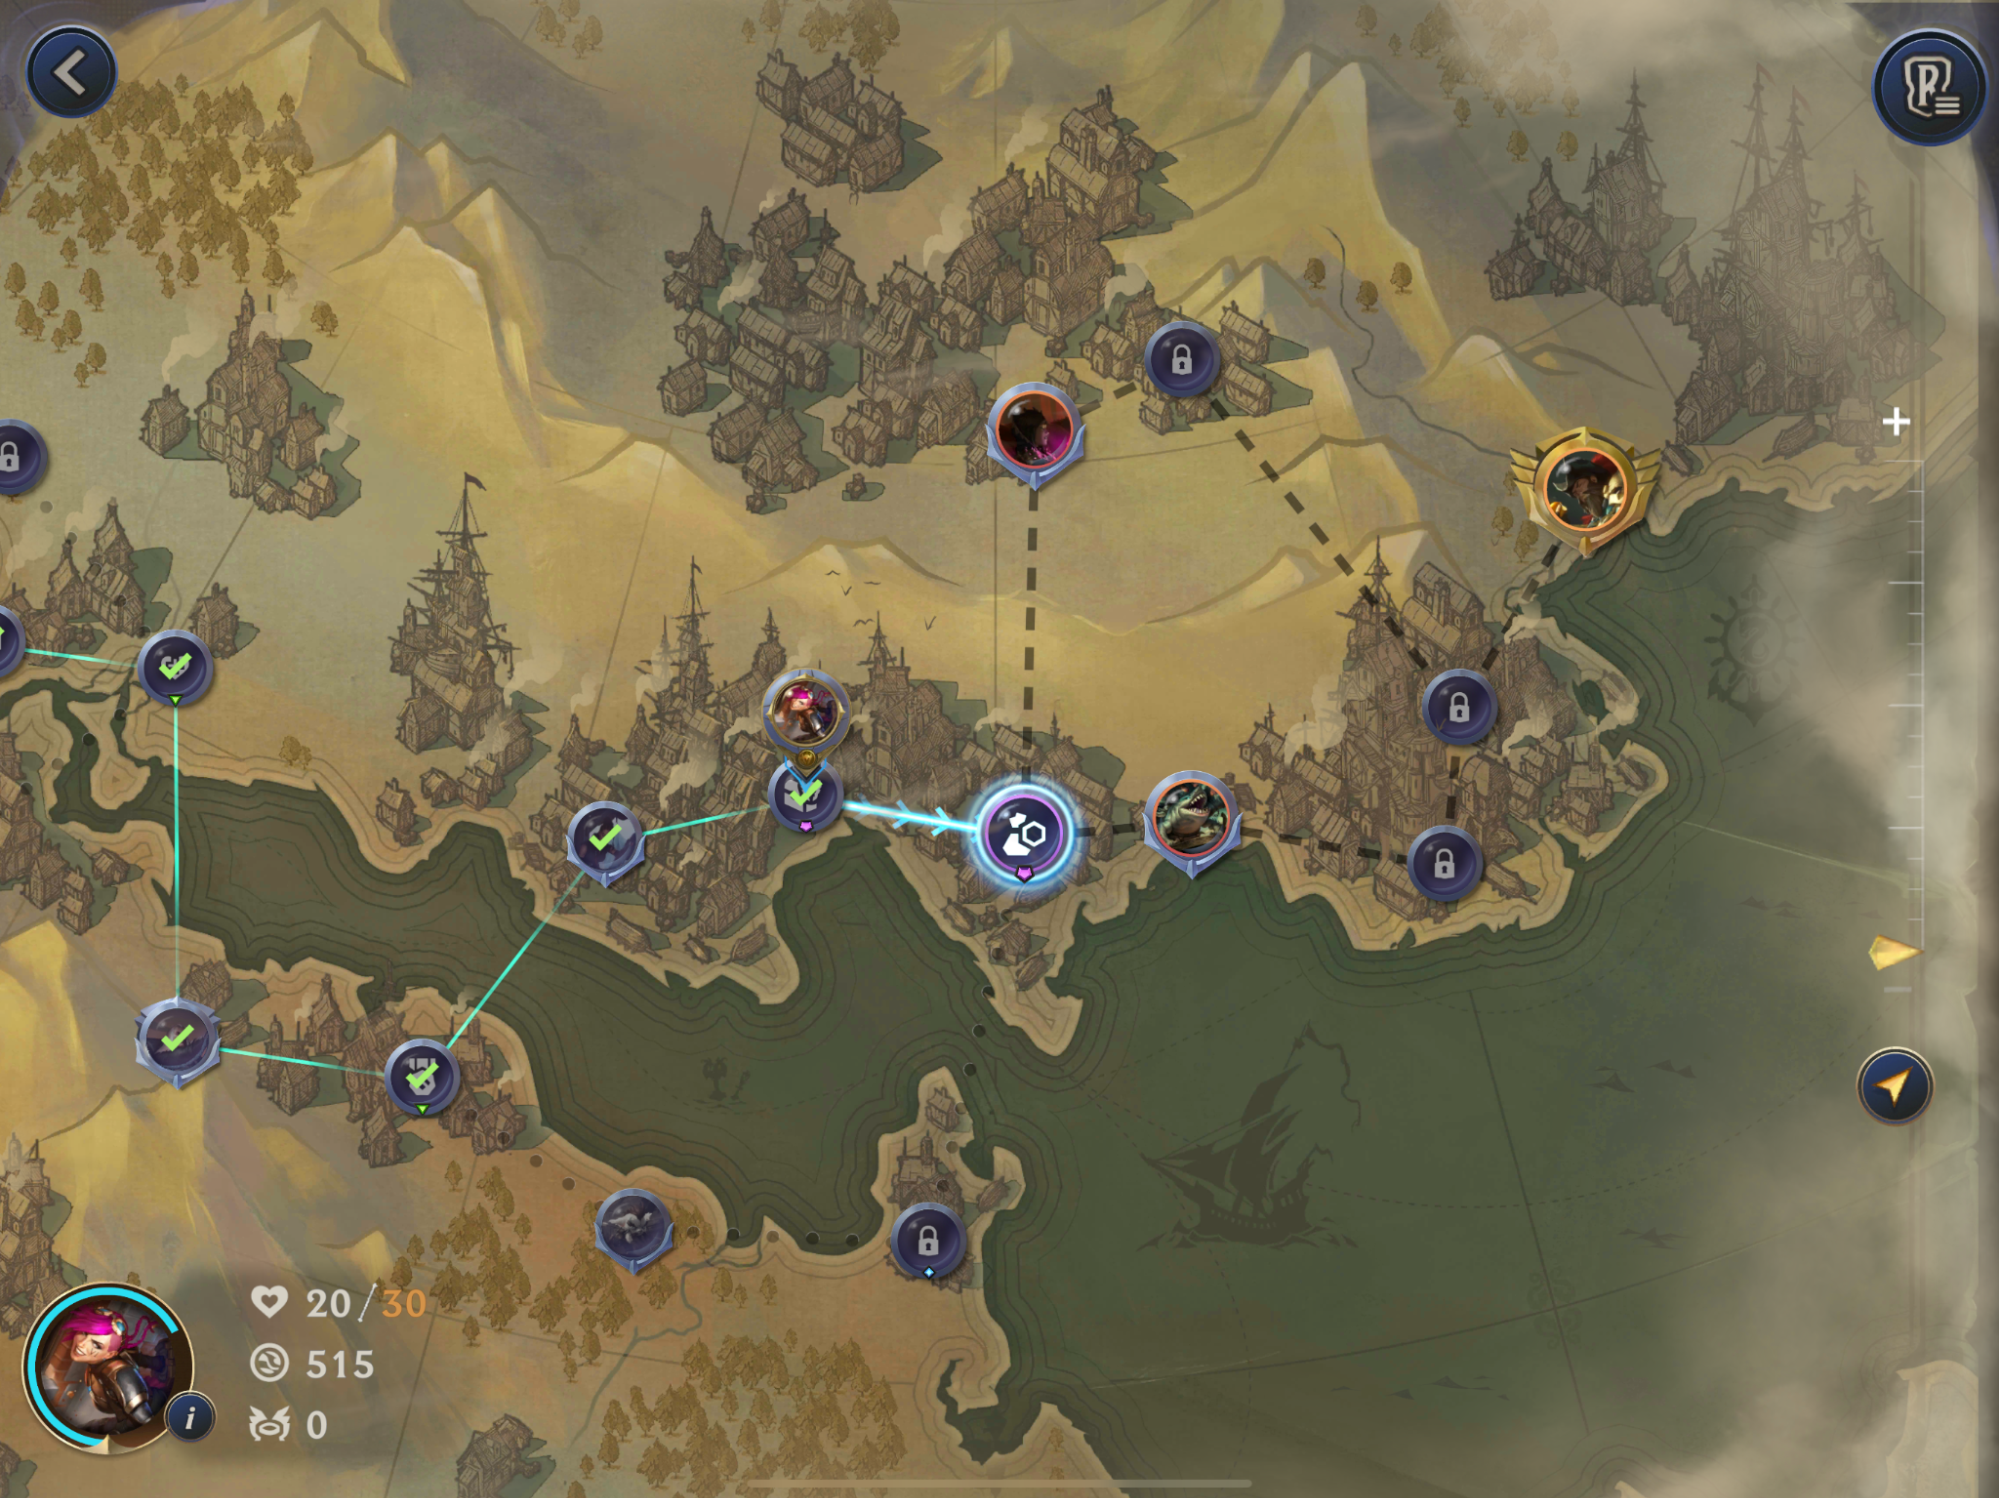
Adventure Preparation
Those familiar with the previous Saltwater Scourge lab will have an edge in this adventure, as they’ve essentially been recrafted for Path of Champions. Nevertheless, these two bosses are powerful!
Let’s also take a look at the Mutators which enhance all of the map’s encounters.
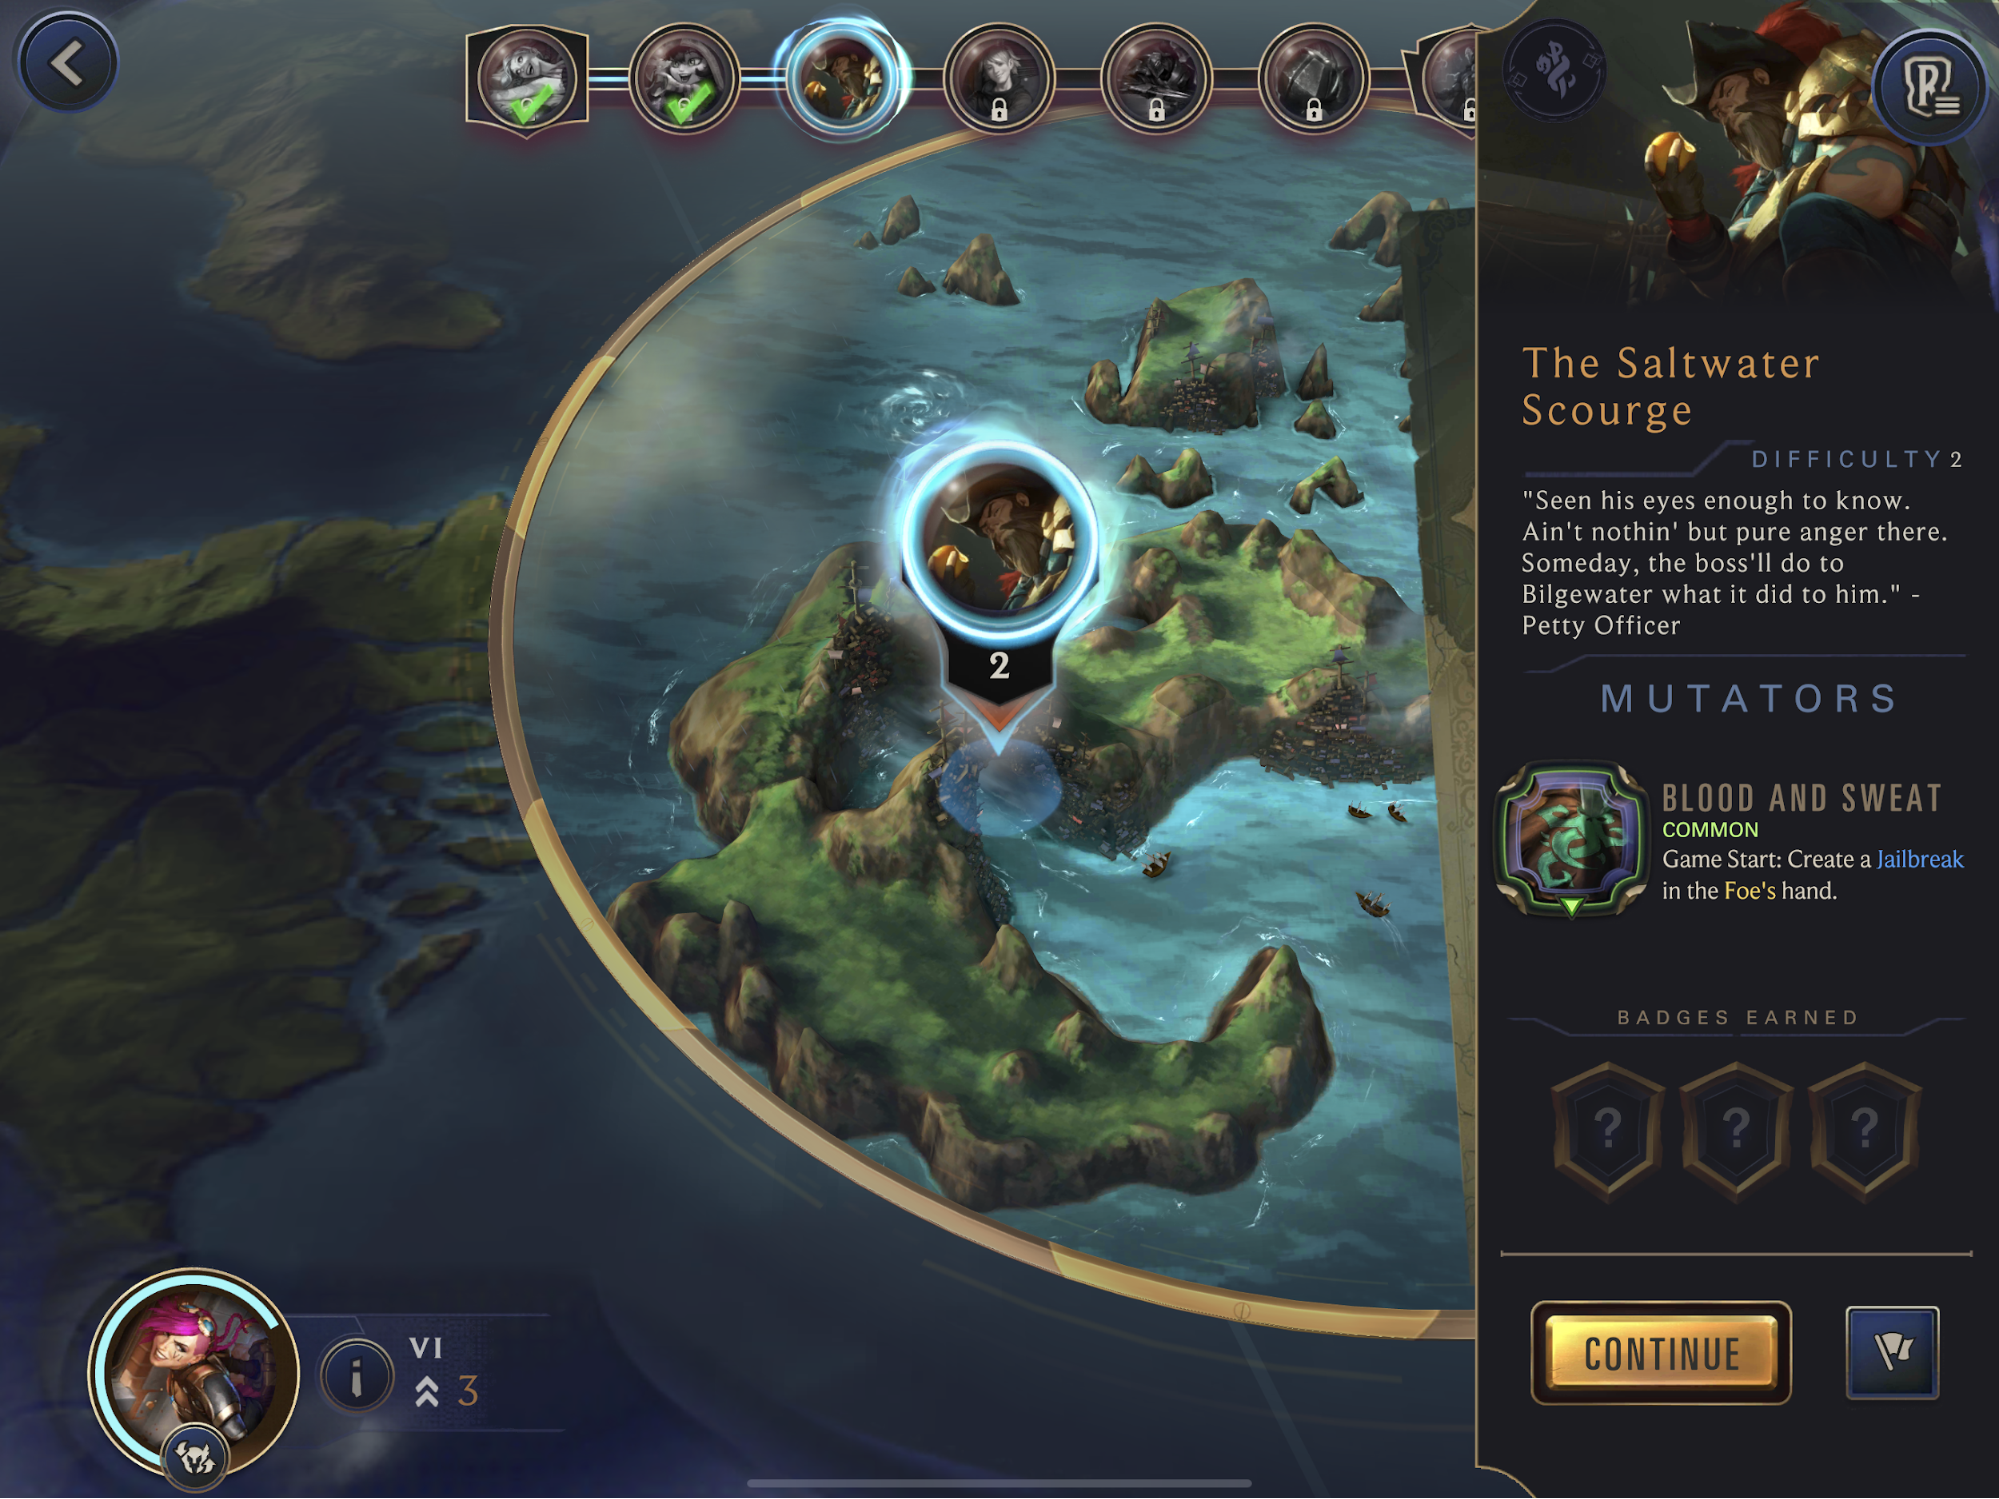
This global power gives each enemy a turn one play, barring the initial encounters that begin round one with no mana gems. A random 1-drop isn’t all that threatening, but it can occasionally throw a wrench into our plans. Just be mindful of its existence so you can plan combat accordingly. Fingers crossed they don’t roll a Crusty Codger!
Swain: Round Start: Deal 1 to the enemy Nexus.
If you’re aiming for that S Rank Skill, you’ll want to go into this fight healthy. If you don’t, Swain’s passive will continue to haunt you each round. The bulk of the deck is packed with heavy hitters, but many of them have poor stats so you’ll be able to dictate trades favorably. Just be cautious of the Overwhelm units.
Preparation: Try to draft some removal to help defend against the Overwhelm threats. Swain lacks protection, so keeping defensive spells gives you a reliable backup plan.
Gangplank: Round Start: The Foe summons a Powder Keg. The first time the Foe starts the round with less than 20 health, summon a The Dreadway.
There are two key points to always watch out for: Kegs, and Gangplank’s Nexus health.
DO NOT attack carelessly or you’ll face the wrath of The Dreadway. Play your units carefully in the early turns so that you aren’t blown out by a keg-buffed Make it Rain.
Preparation: If you’re lucky enough to find the Bouncing Blades power, make it a priority to pick it. It may even be worth using a reroll to try and find it. It’s the perfect counter to those pesky kegs! Additionally, look to have at least some staying power for the late game. This helps let you punch through with 20 damage and avoid triggering The Dreadway.
Note: There’s more detailed info on the bosses as we approach them.
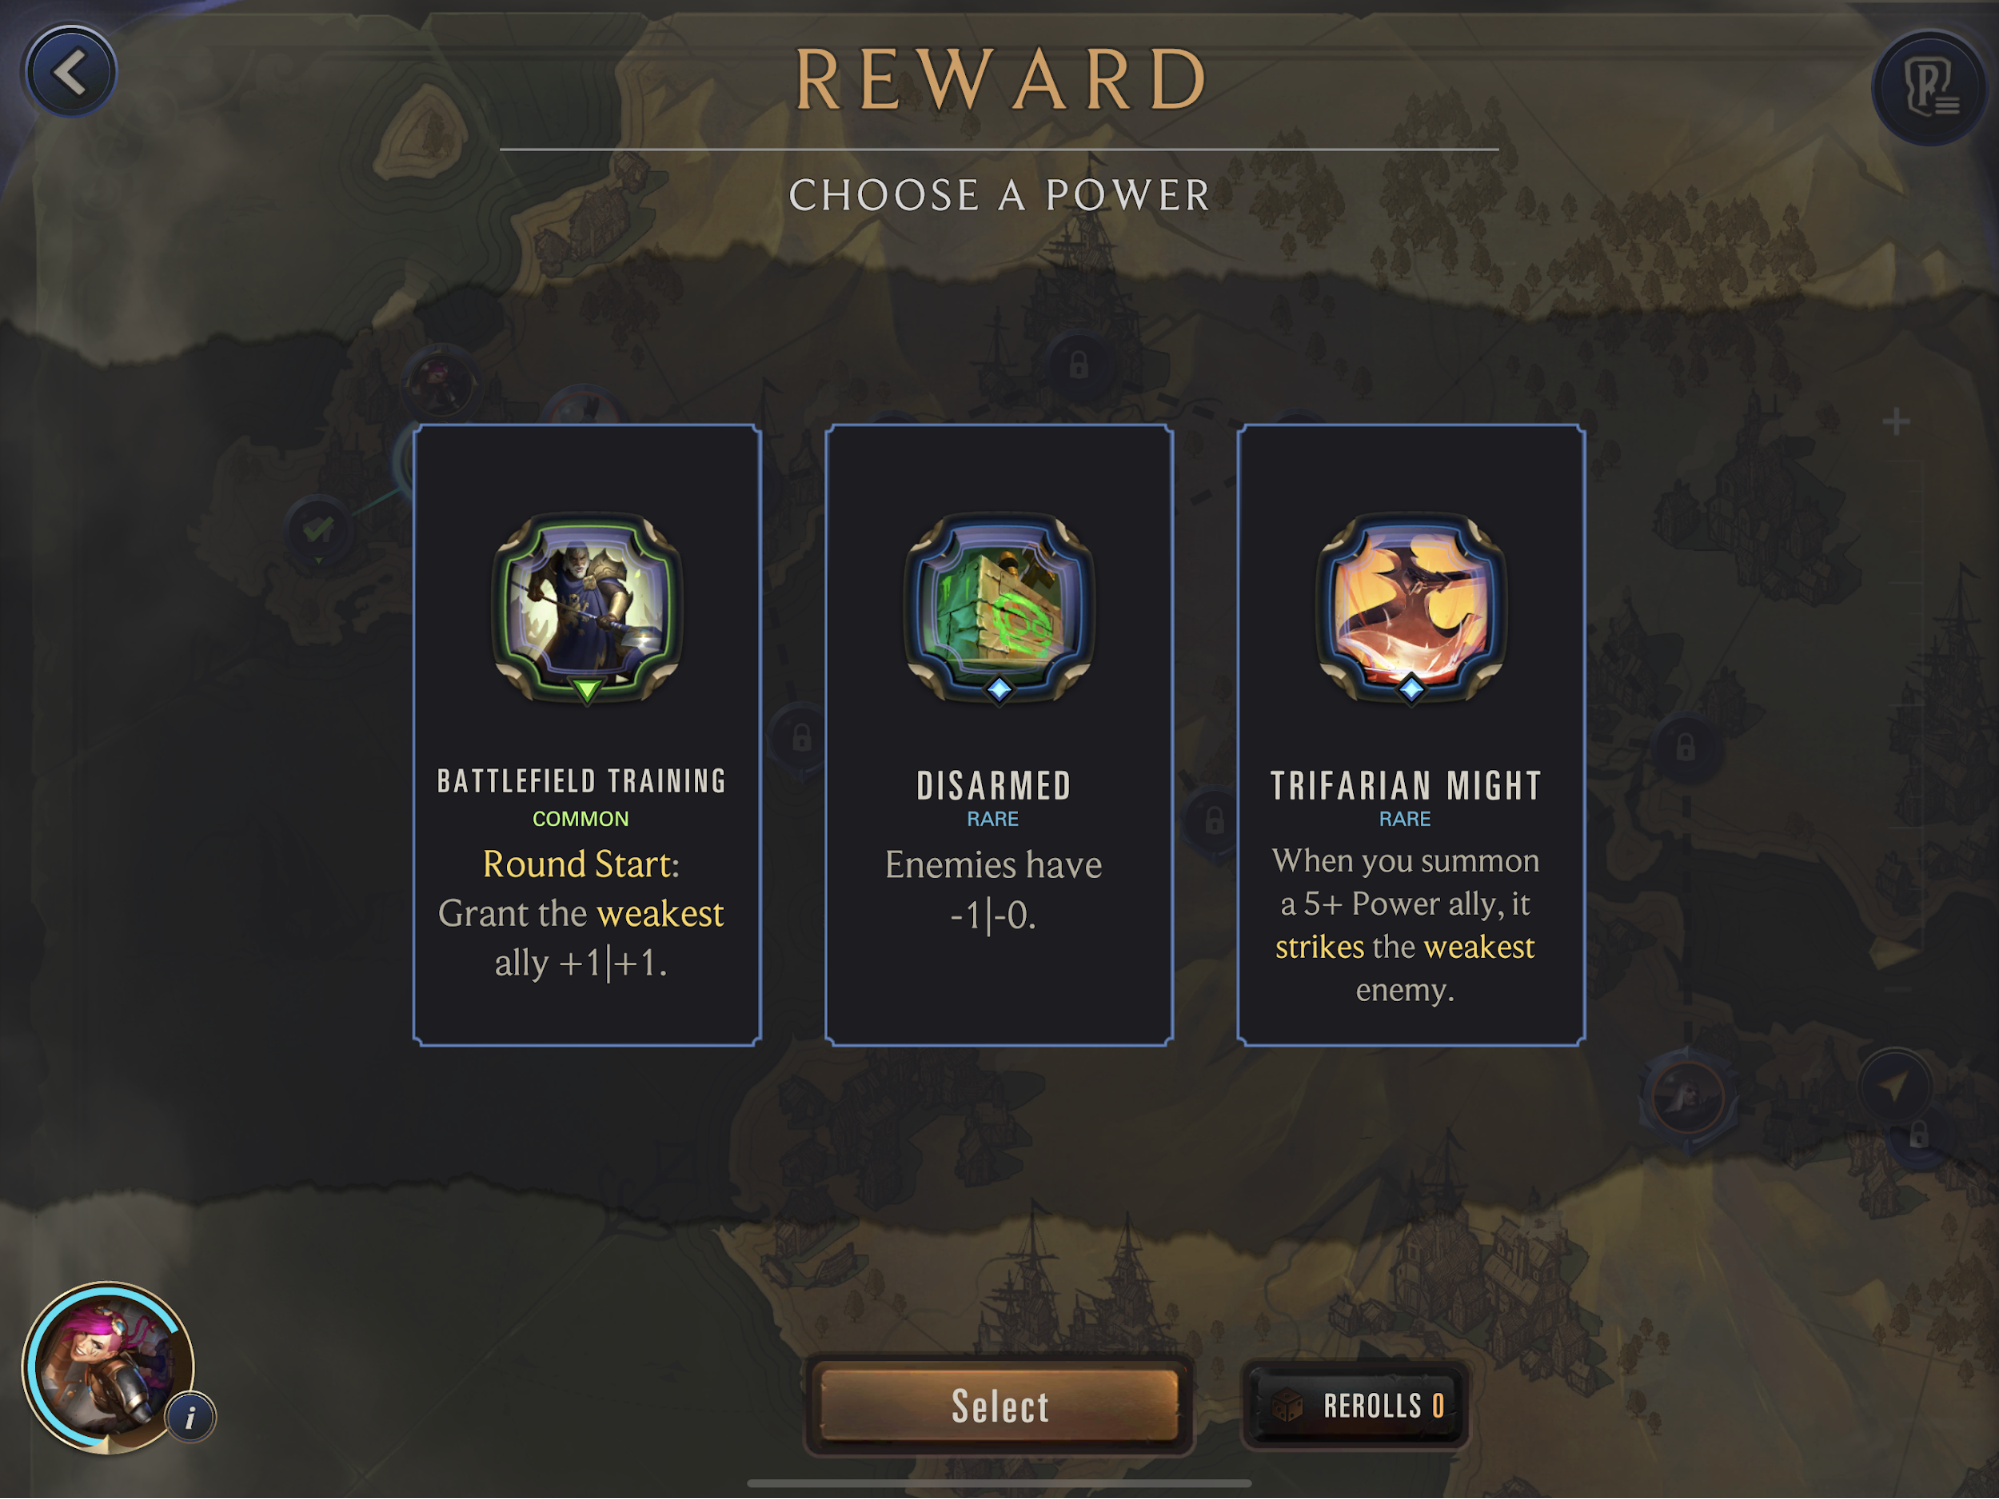
We’re lucky enough to start with two rare powers and one common power. Battlefield Training is pretty mediocre and has a low impact on the overall game. Trifarian Might is powerful in some decks but has no application for us aside from Vi herself. That leaves us with Disarmed. While not amazing, it’s still a solid power that will give us an edge in combat.
Jagged Taskmaster: When the Foe’s allies attack, create a 1 cost follower in its hand.
As usual, the first counter should be a complete breeze thanks to 10 health and -1 starting mana. The only thing worth noting is there’s a fair chance you’ll take at least one point of unavoidable Nexus damage. Can’t avoid that Warning Shot!
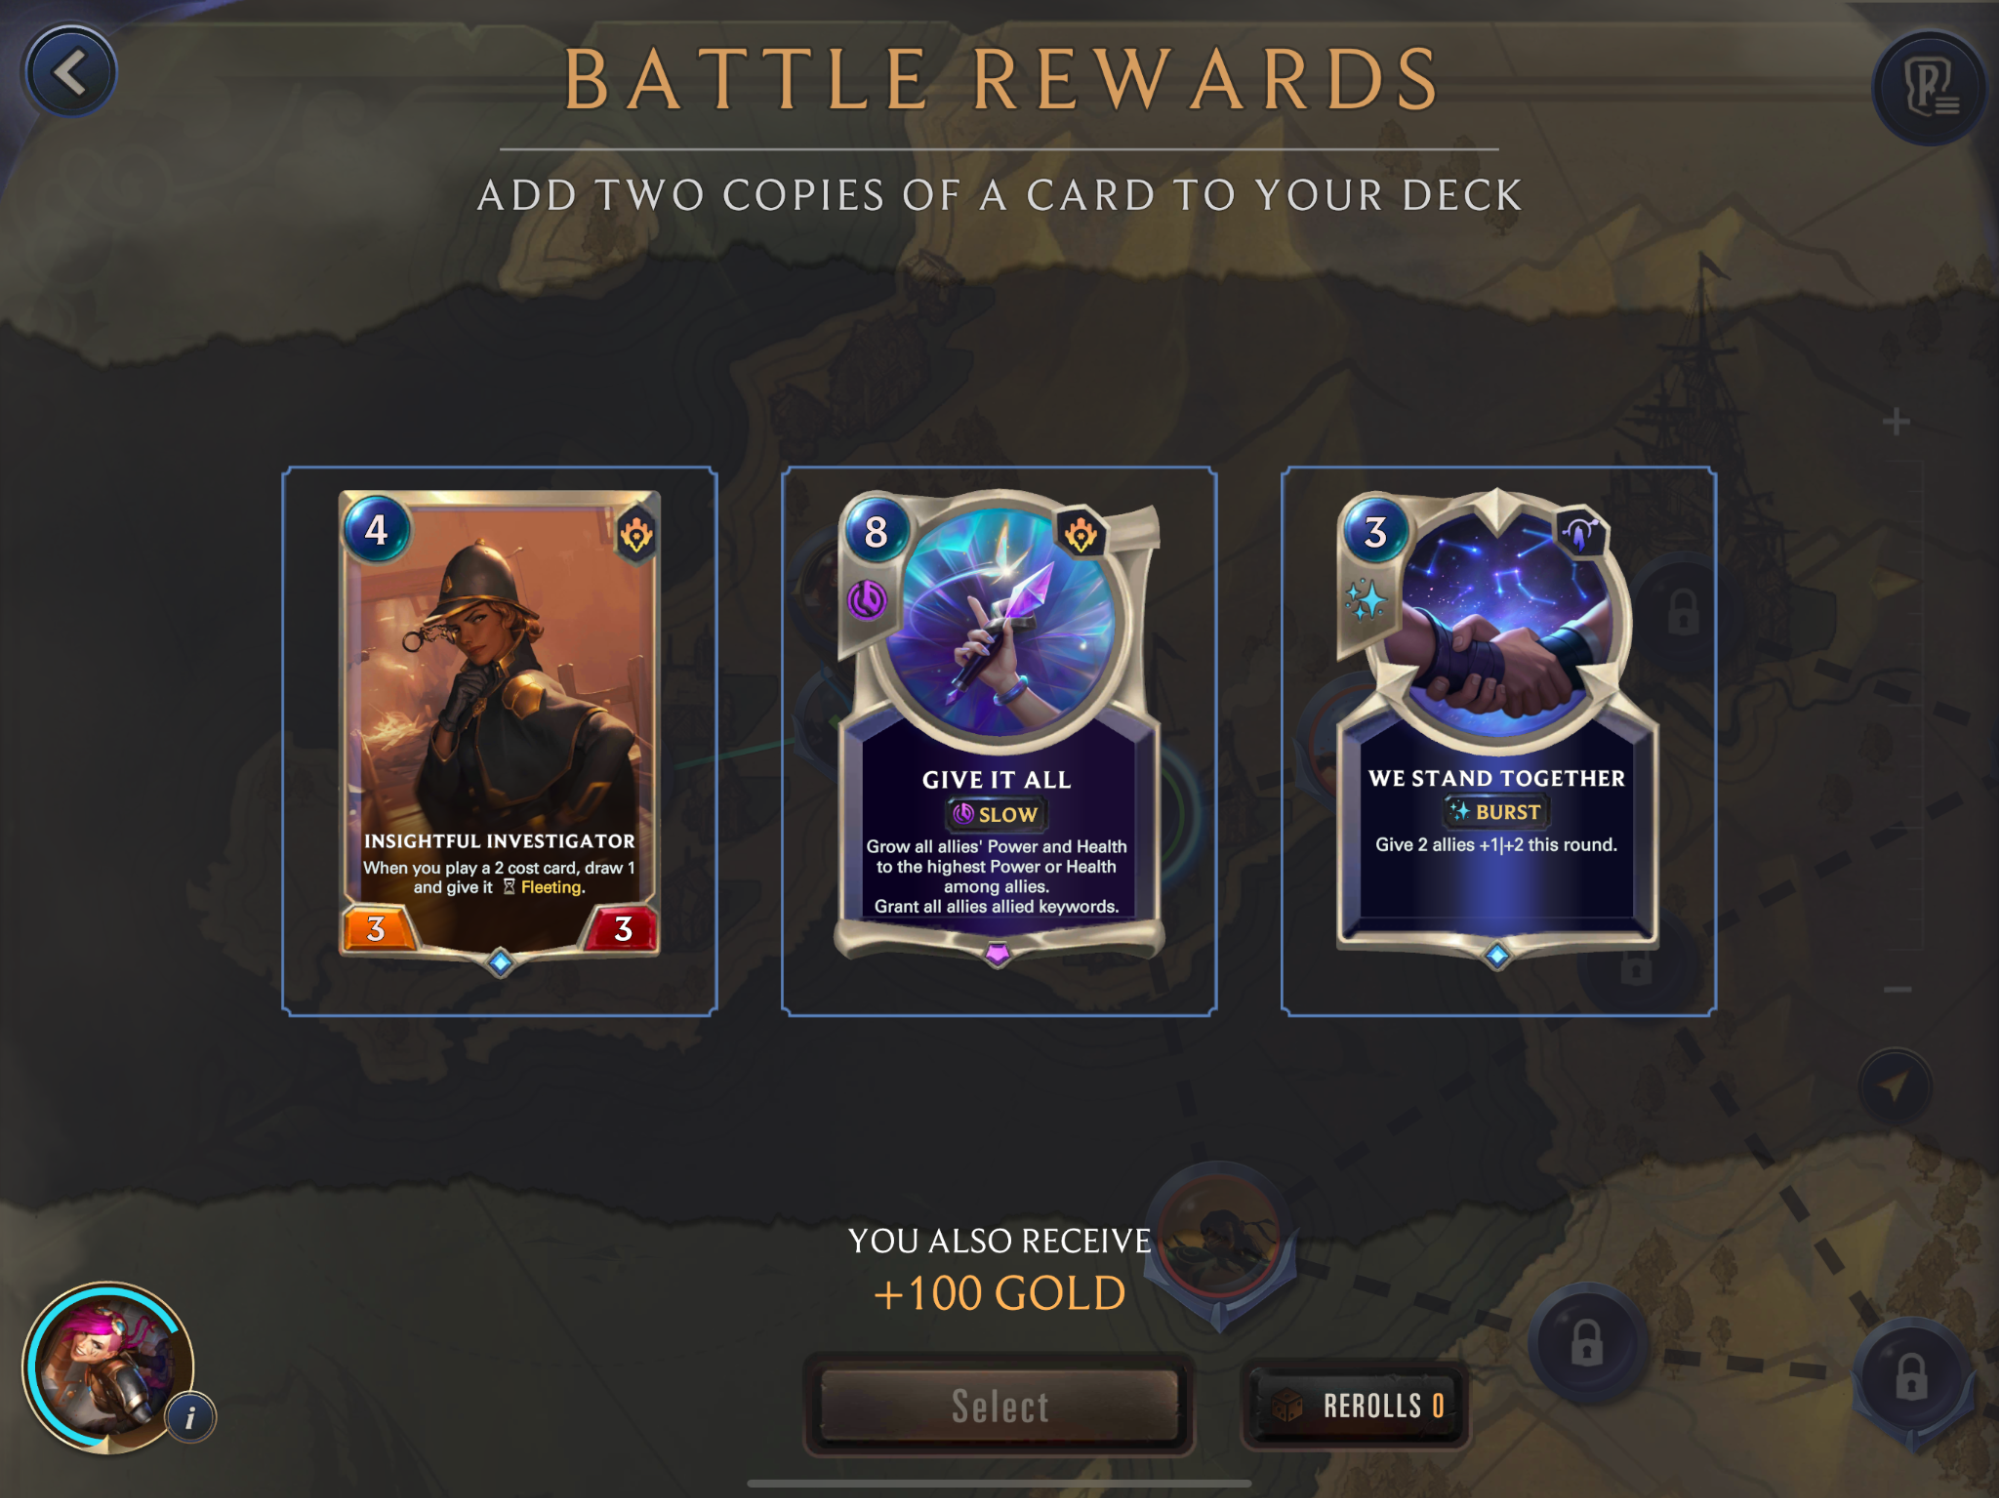
There aren’t enough 2-cost cards in Vi’s deck to warrant playing Insightful Investigator. Although it’s possible to pick up more or even reduce the cost of cards with items, it’s not worth the inclusion. We Stand Together is rather underwhelming as a combat trick, even if it does have some defensive applications against Gangplank.
While Give It All is normally the last card I’d want to see, it does have some incredible synergy with Vi and Poro Cannon. Drafting this also gives us that late-game push to power right through and avoid The Dreadway. A solid start!
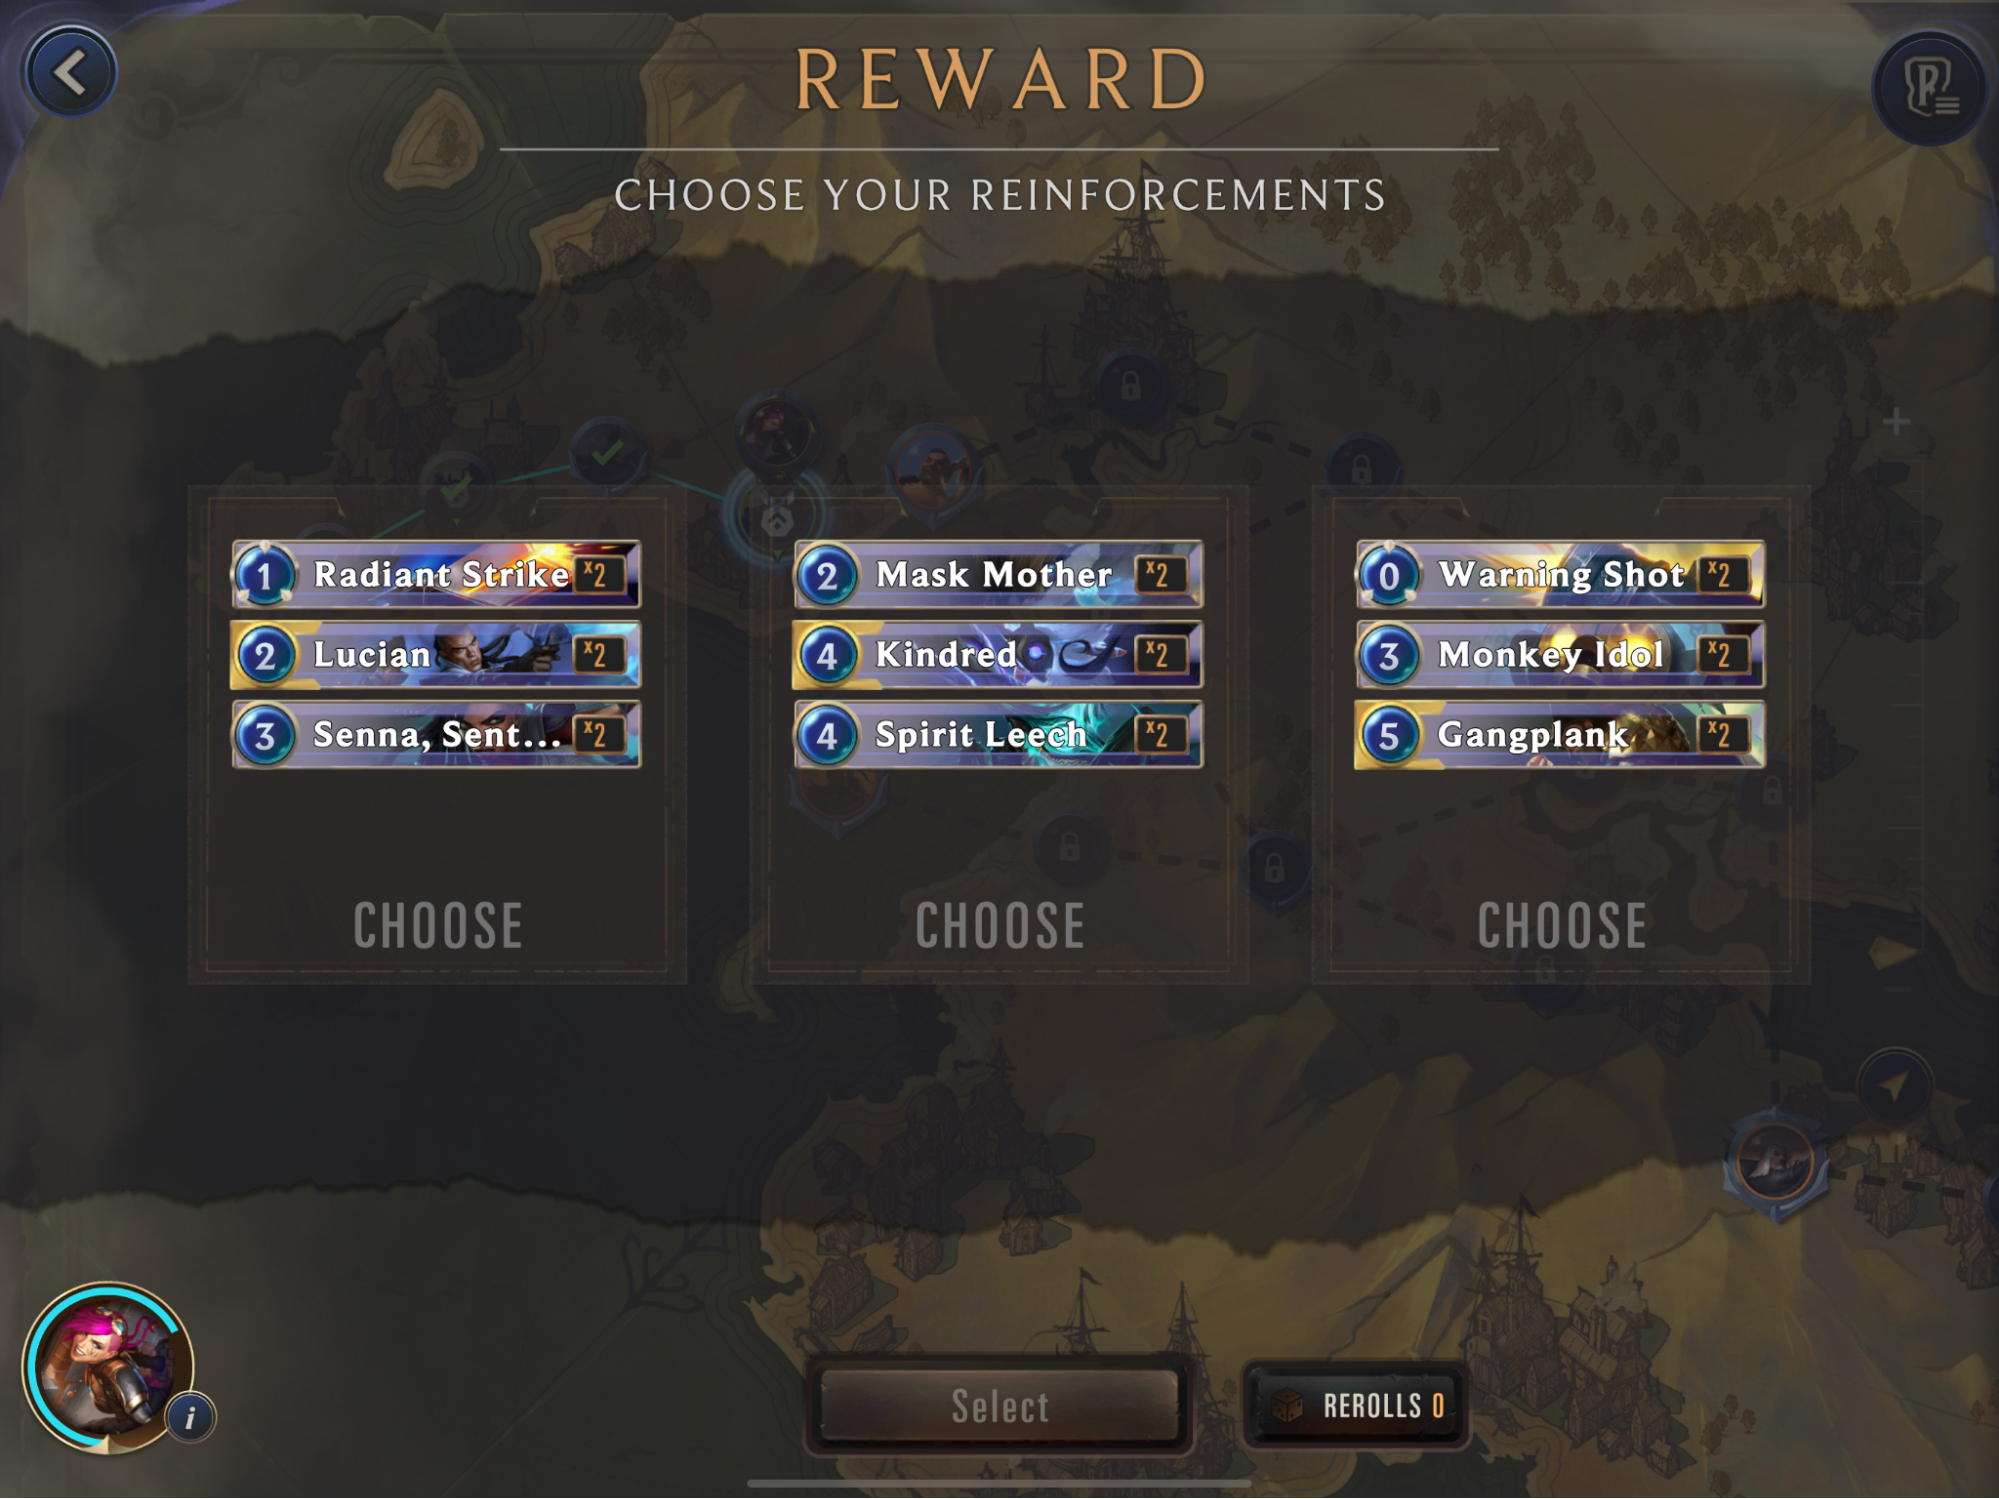
The Lucian package is a bit too aggressive for the plan against Gangplank and doesn’t fit very well with Vi’s deck. Kindred requires far too much synergy to make useful and we lack death fodder for the support cards. I guess that leaves us with Gangplank.
Well isn’t that fitting! Jokes aside, the cards are fair enough of a baseline to include. While Warning Shot is weak, it has incredible potential if we can attach a strong item to it. Never underestimate the power of free Burst spells.
Kato and Shiraza: The Foe’s allies with Overwhelm have +1|+0.
If you don’t have efficient ways to deal with Overwhelm, you’re likely going to take some damage on this one. Don’t fall behind or else Kato will add a ton of extra damage. There aren’t many tricks to look out for as the majority of the deck is followers but do beware of the potential Wild Claws.
Jagged Butcher: ALL units have “Plunder: Grant me +1|+1.”
This encounter is a breeze if you have ways to take advantage of the global Plunder power. If you get ahead on board, you’ll continue to stay ahead due to the stat advantage. This leaves Parrrley as the only surefire way for the enemy to trigger their own Plunder, and without it, their units are pathetic. However, if you’re the slowest, be careful not to let them snowball out of control.
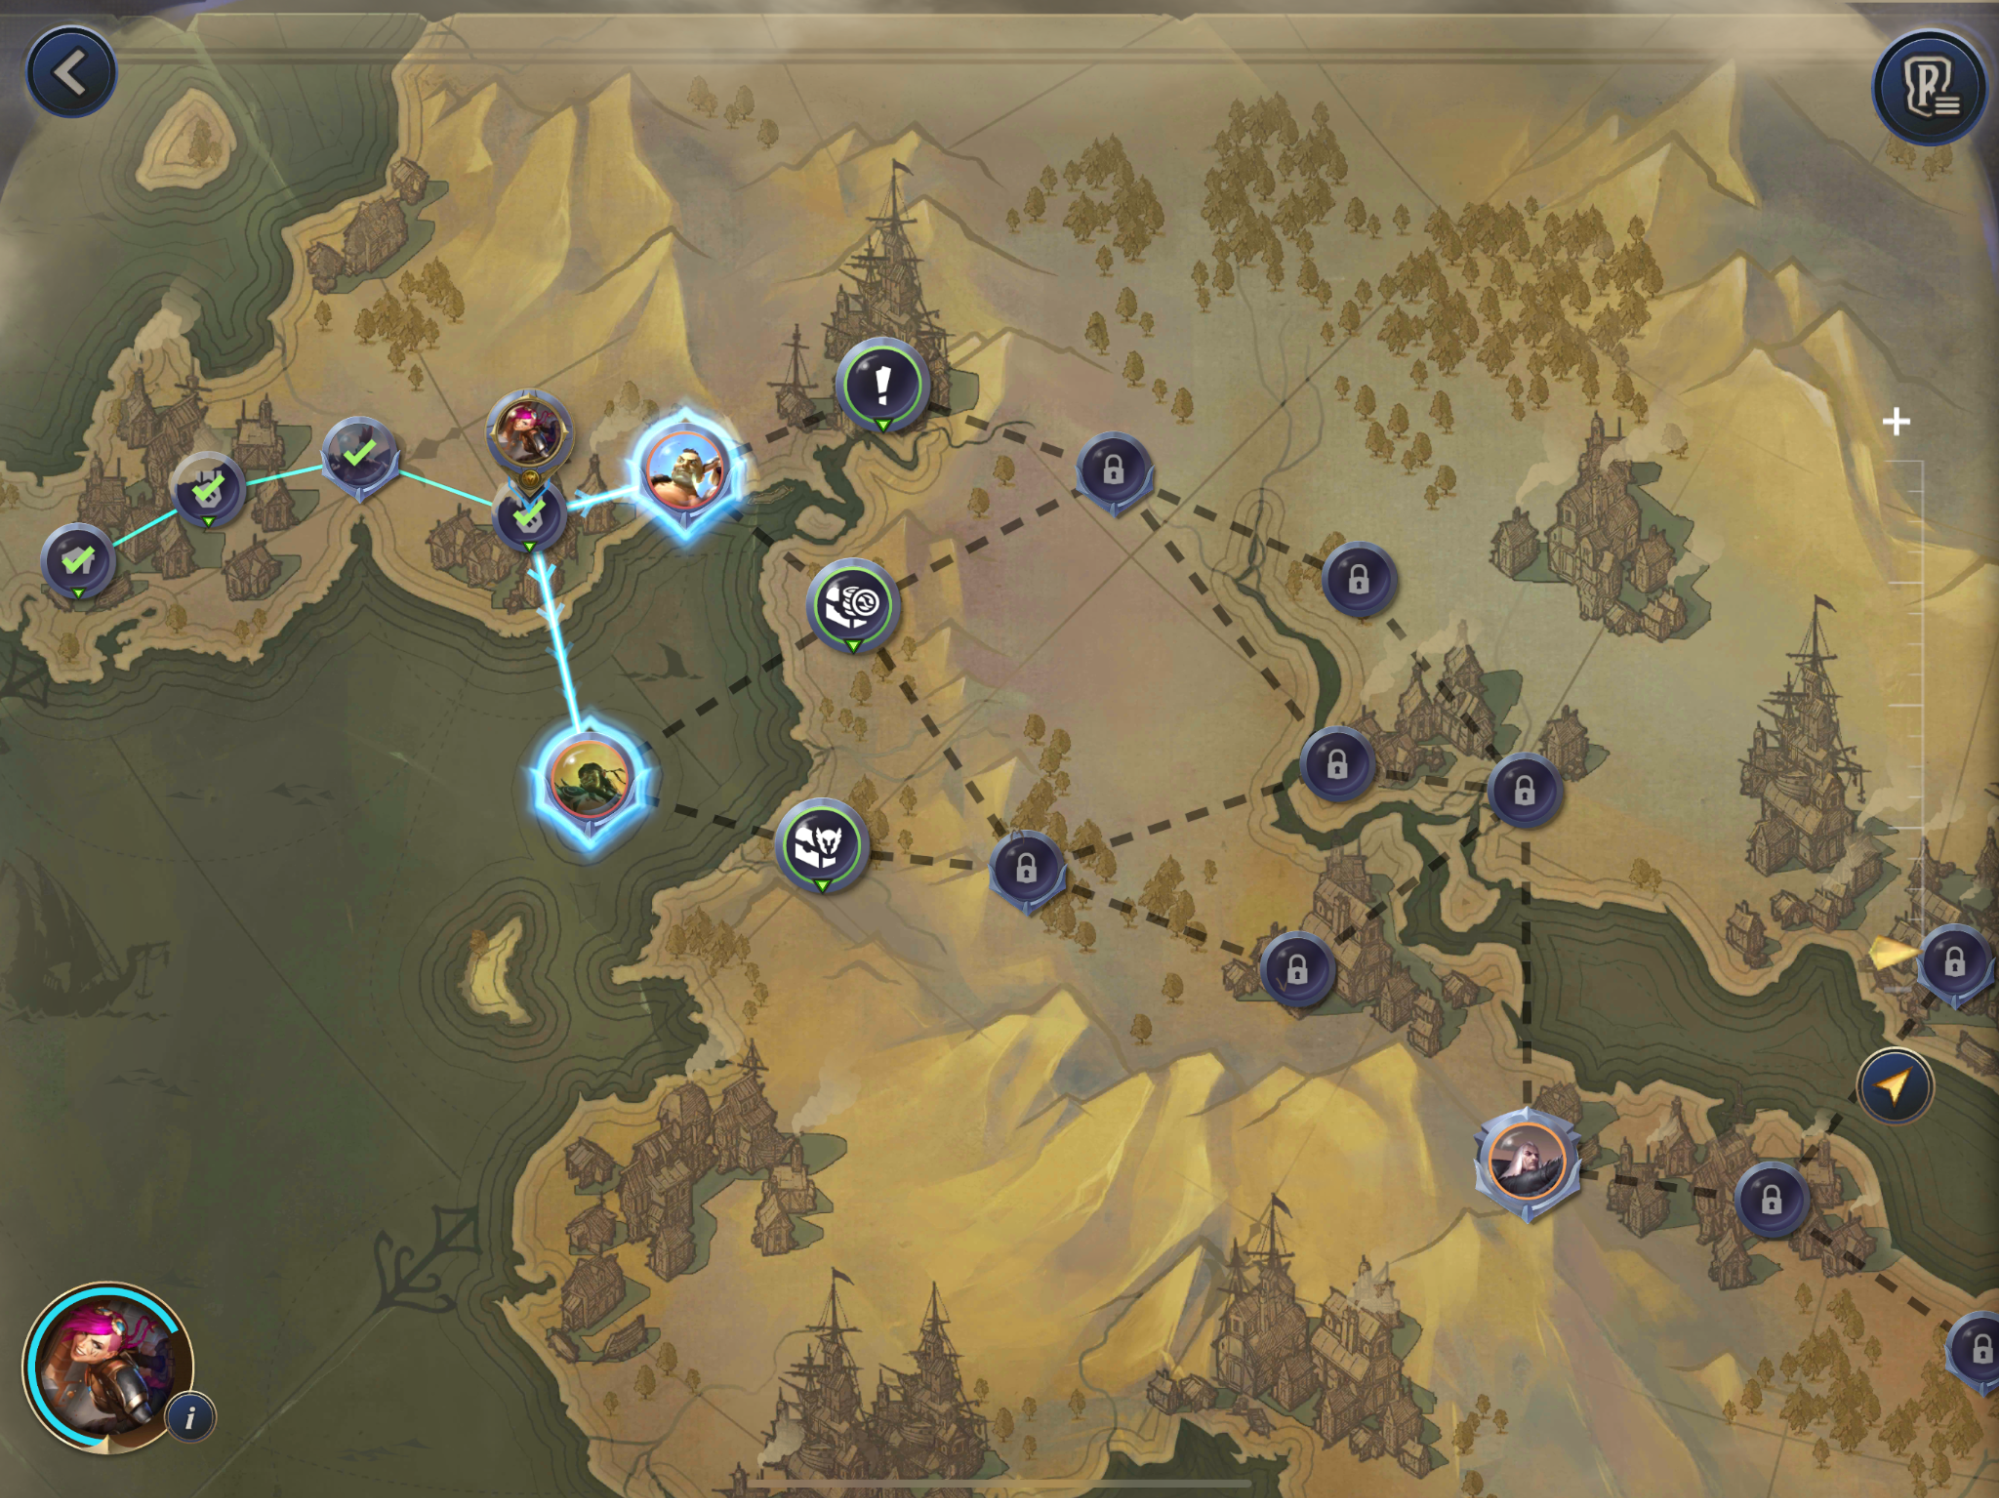
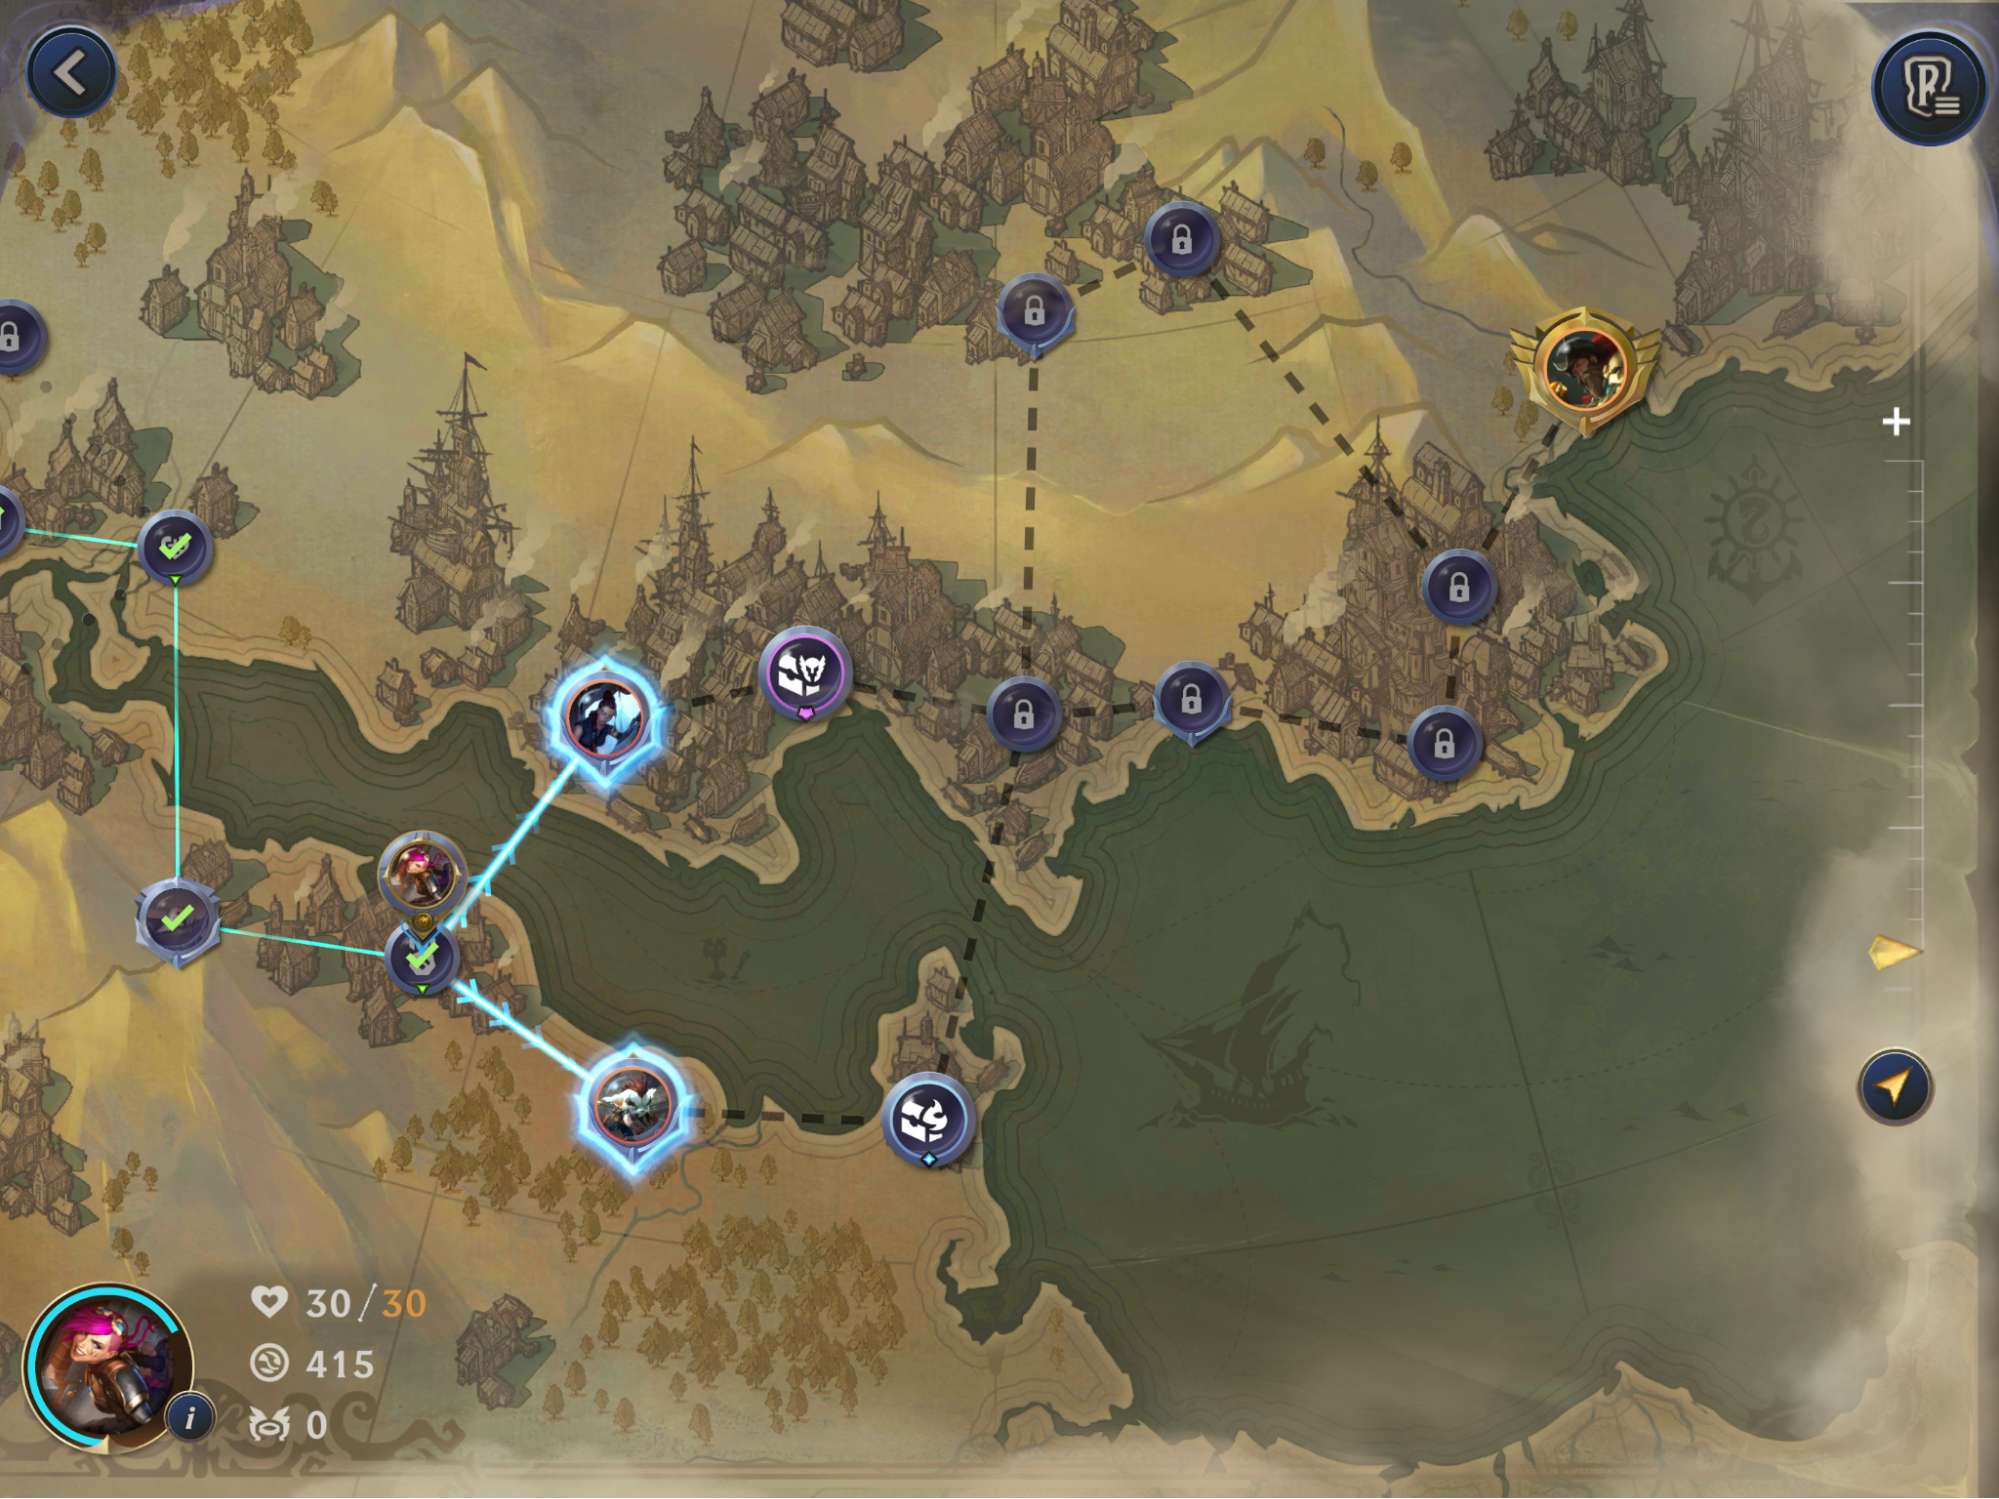
- There’s a Champion Item Chest along the Butcher’s path, so that’s the road I shall follow. Plus we’ve got Poros to take advantage of that Plunder!
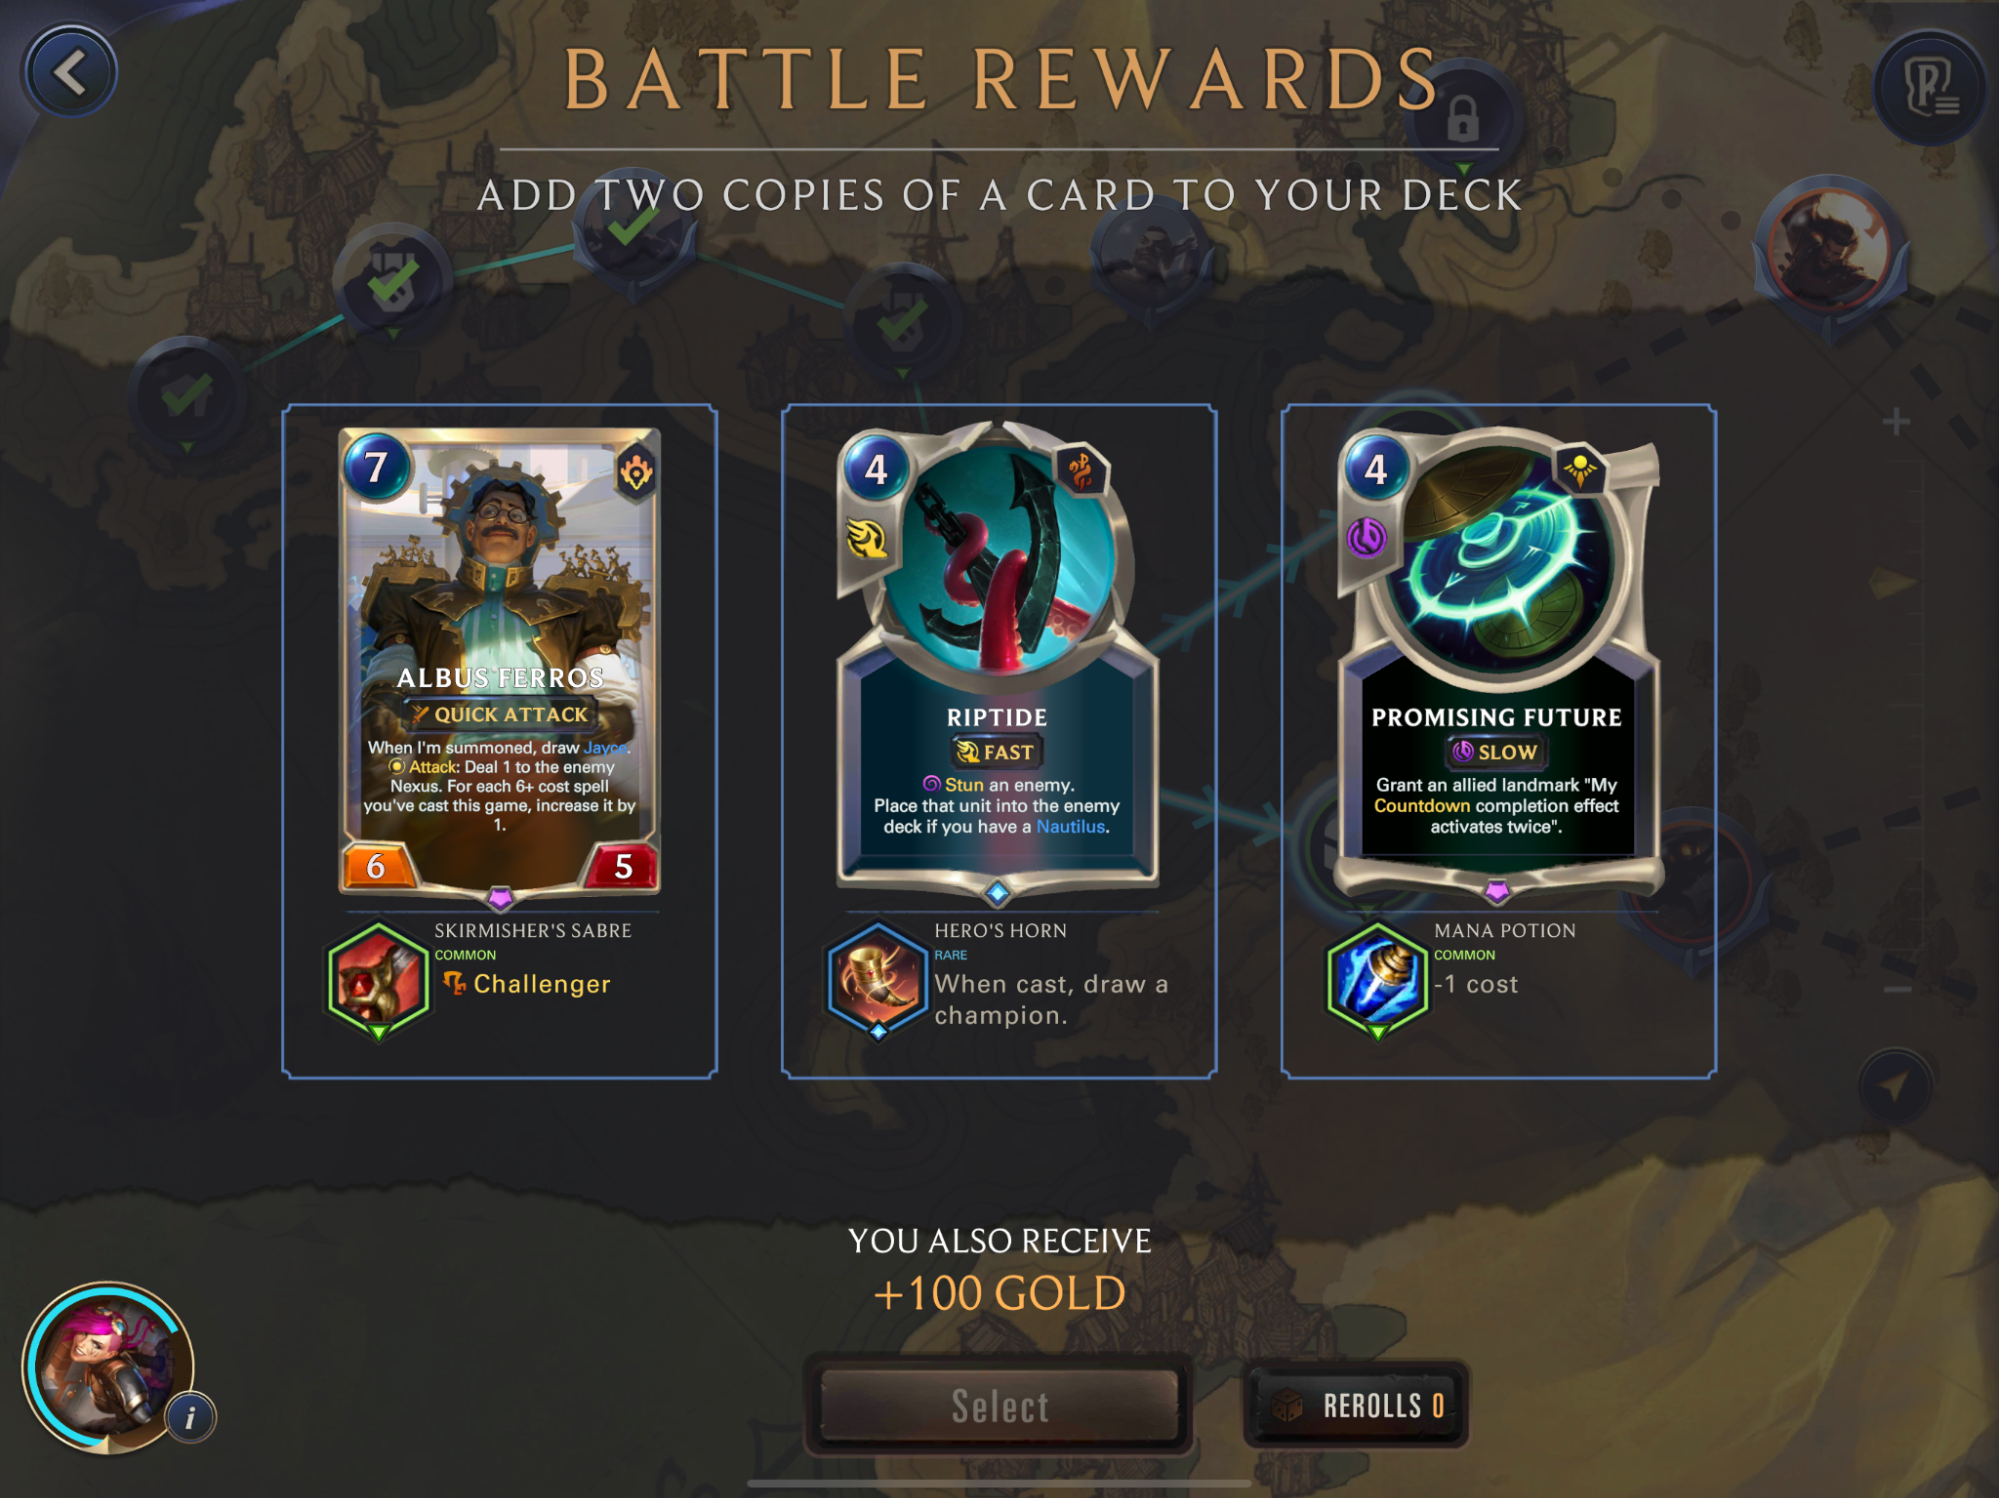
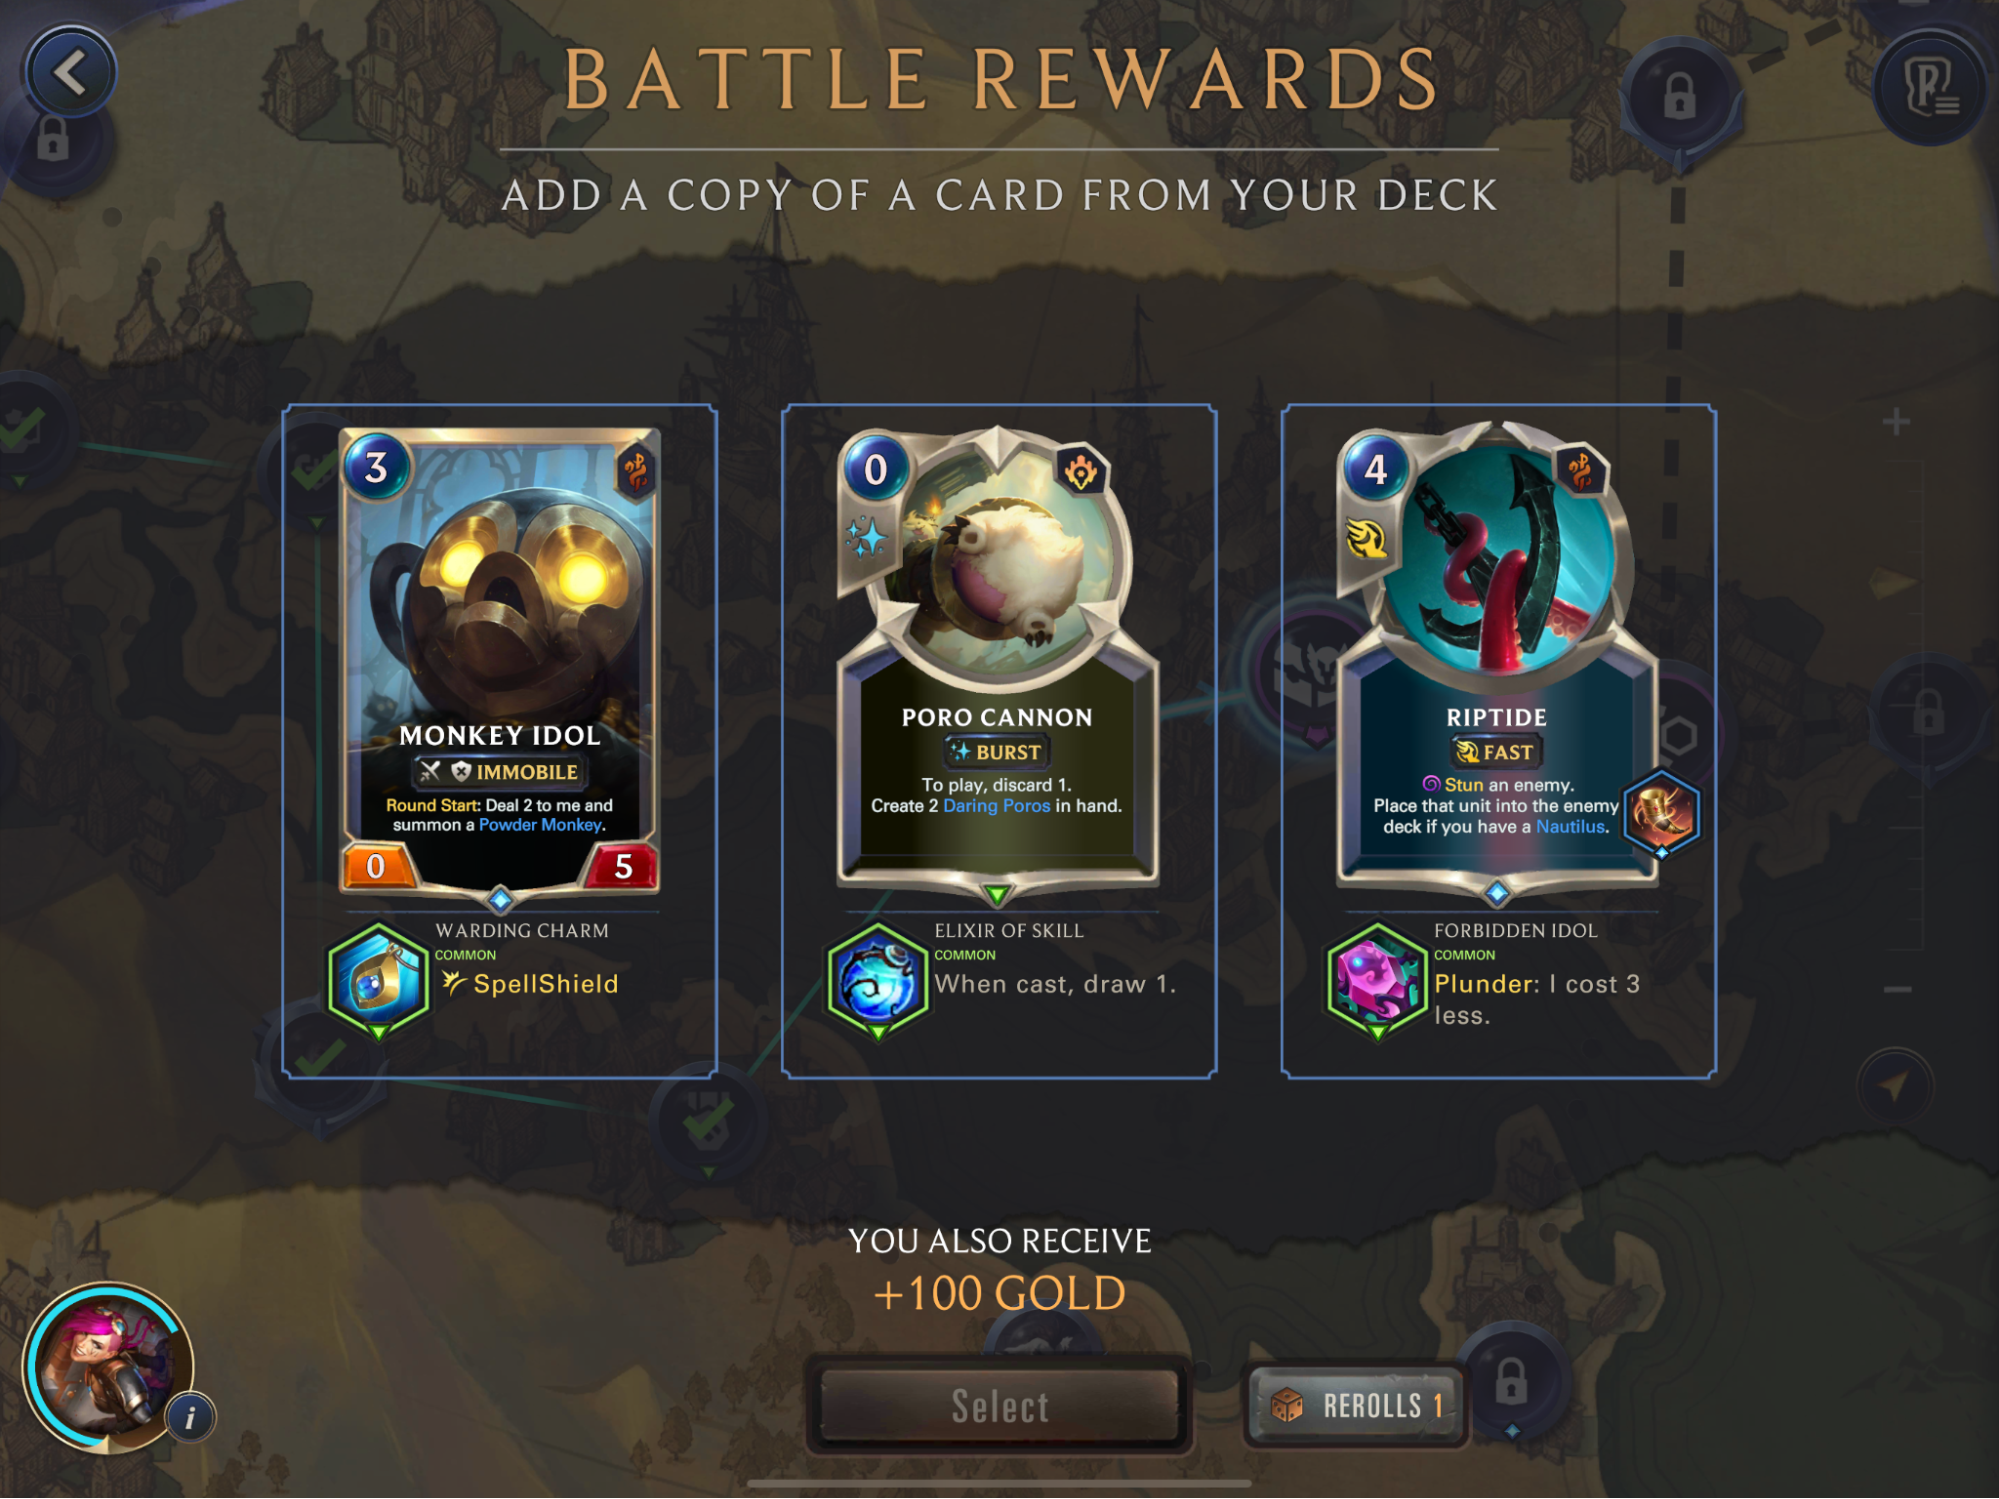
Yikes, it’s times like these where you feel the pain of zero rerolls. Albus Ferros with Challenger is cute but is incredibly slow. Promising Future is uncastable. That leaves Riptide, which if I’m being honest, isn’t the worst card to have. Having access to Stun is a nice safety net to prevent unblocked units or deny Overwhelm damage. It also draws a champion, so all-in-all, not too shabby.
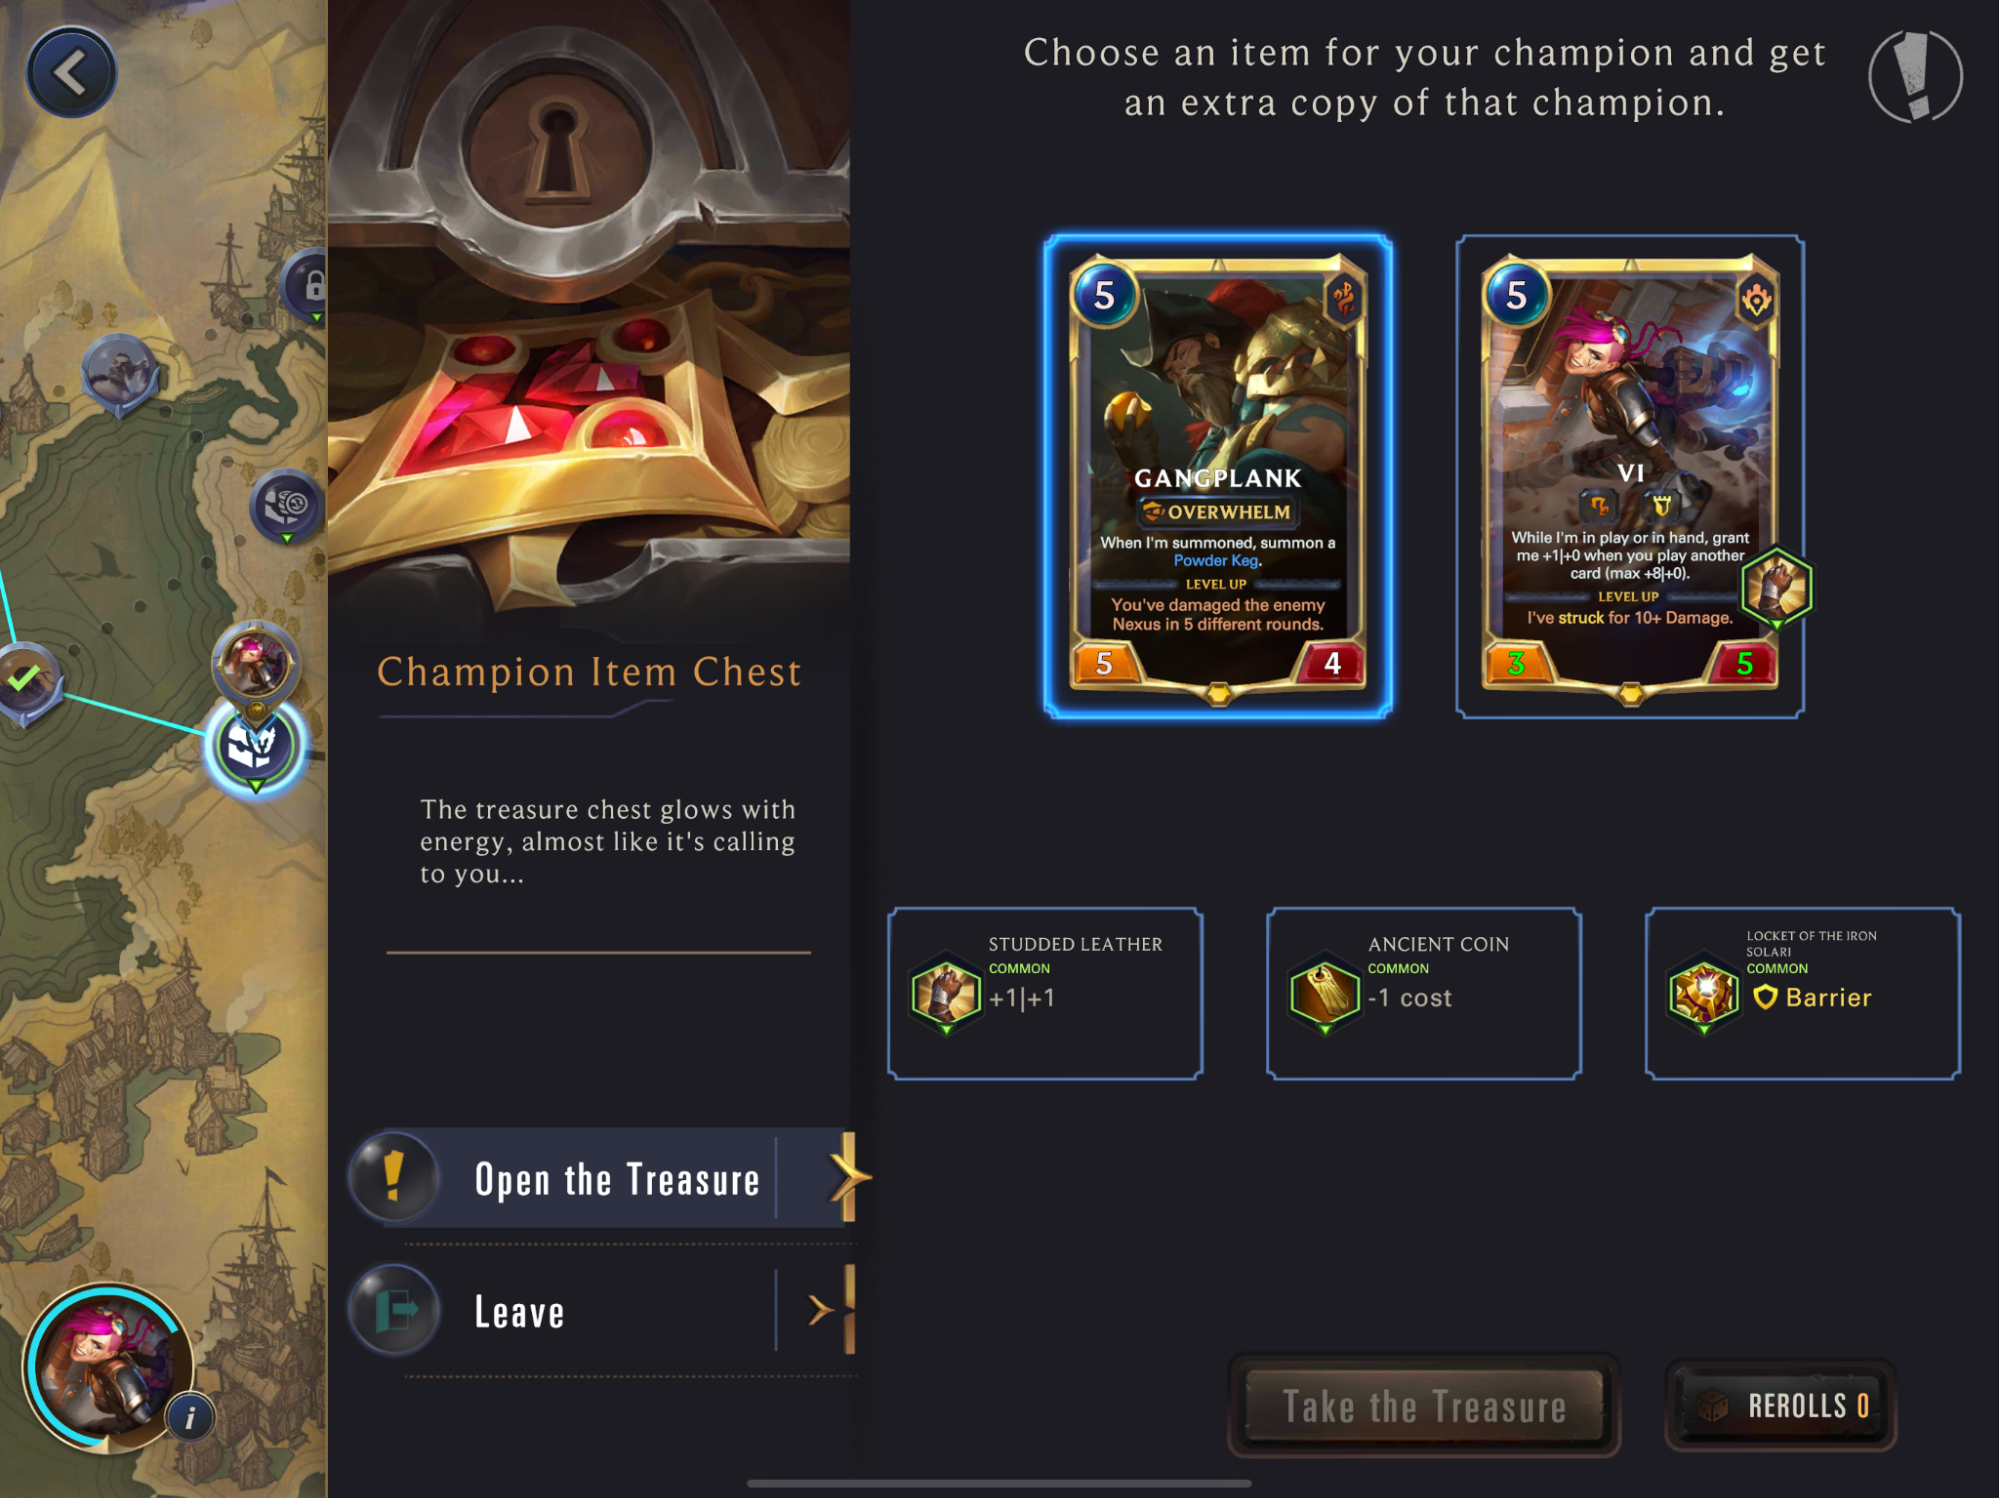
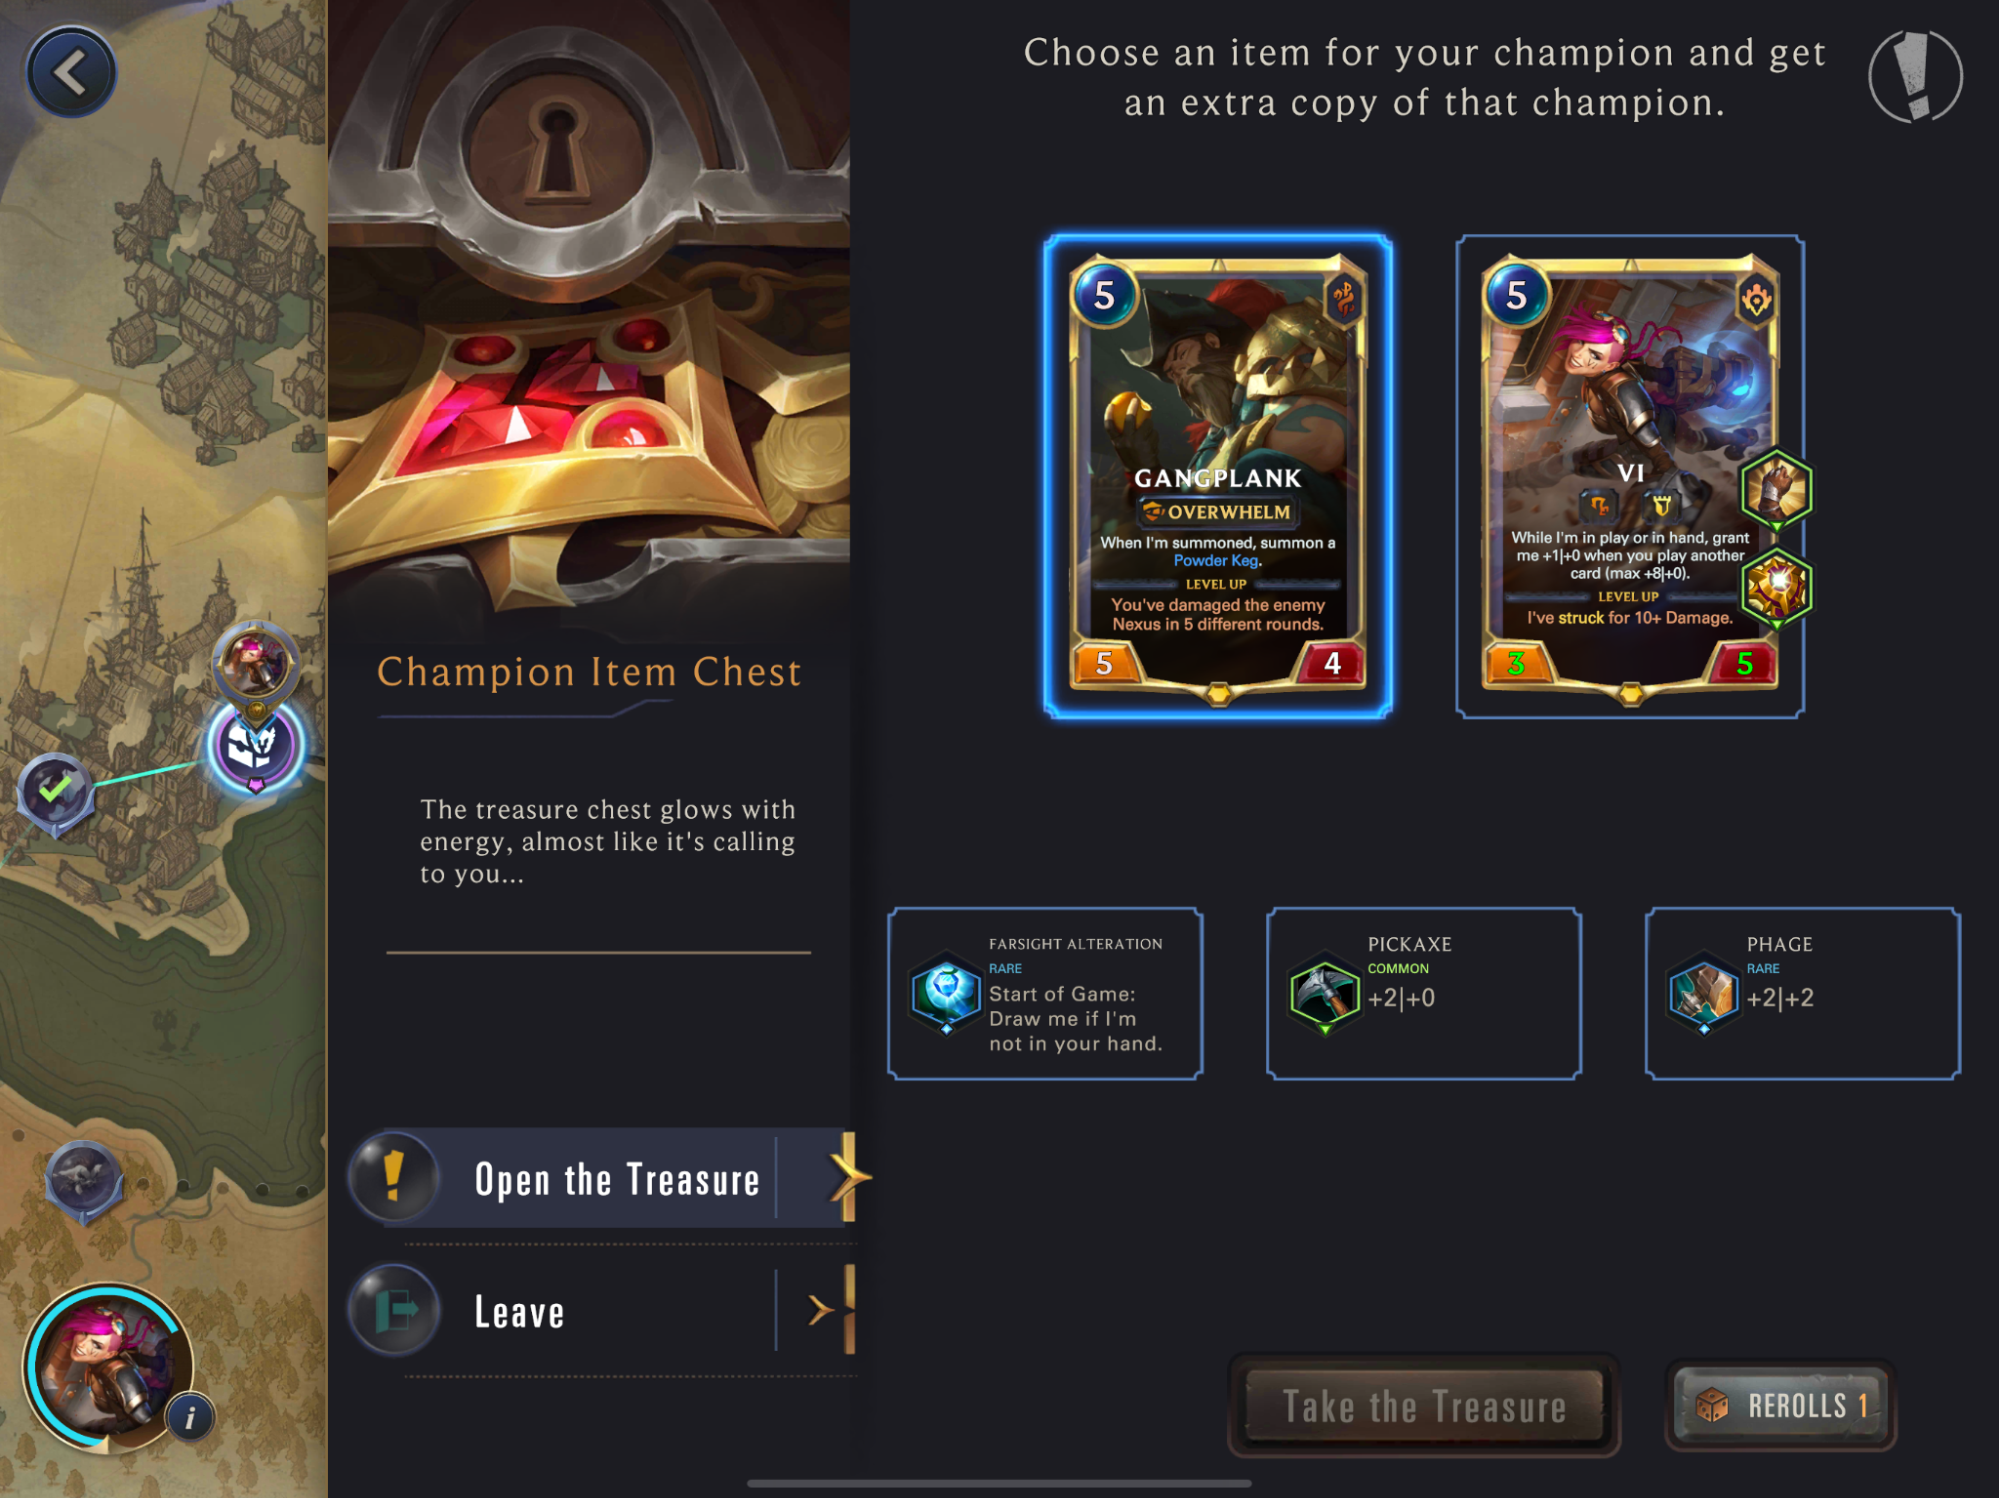
Ancient Coin is always a solid option and would help the deck not have two champions in the 5-drop slot. However, both Vi and Gangplank don’t benefit much from coming down a turn earlier. I think I’ll opt for Barrier on Vi. This allows Vi to come down and safely remove one threat from the board. With the number of high-power units in this adventure, this seems like a more reliable item.
Monkey Idol: Game Start: Summon a Monkey Idol.
Where there are pirates, there are monkeys. And just like the pirates, the monkeys go over the top to ensure you take a beating. There’s realistically no stopping the damage here. Each round you’ll be taking at least one to the Nexus from the Powder Monkeys. The enemy focuses on going wide with tons of Powder Monkeys and Petty Officers.
There’s no big threat to fear, but be cautious of all the kegs that stack up. More Powder and Boomship can set up some nasty plays if left alone but thankfully are easily countered. Don’t worry, there’s no Make it Rain. Just be sure to have enough blockers for this one!
Note: Did you choose a different path? Here’s the other encounter!
Legion Marauder: Game Start: Create a Legion Marauder in hand. When the Foe summons a Legion Marauder, create a Legion Marauder in their deck.
Unlike the Monkey Idol encounter, Legion Marauder starts off slow. There’s a bunch of slow and clunky cards in the deck, but that’s because all it needs is more Marauders. If you can remove the first couple or find ways to halt their attack, that’s often enough to snowball a lead before the deck gets going. Whirling Death is their only real trick, except for Iceborn Legacy (which would likely be precast). Just be sure not to underestimate the deck’s late game. Wait too long and you’ll be overrun.
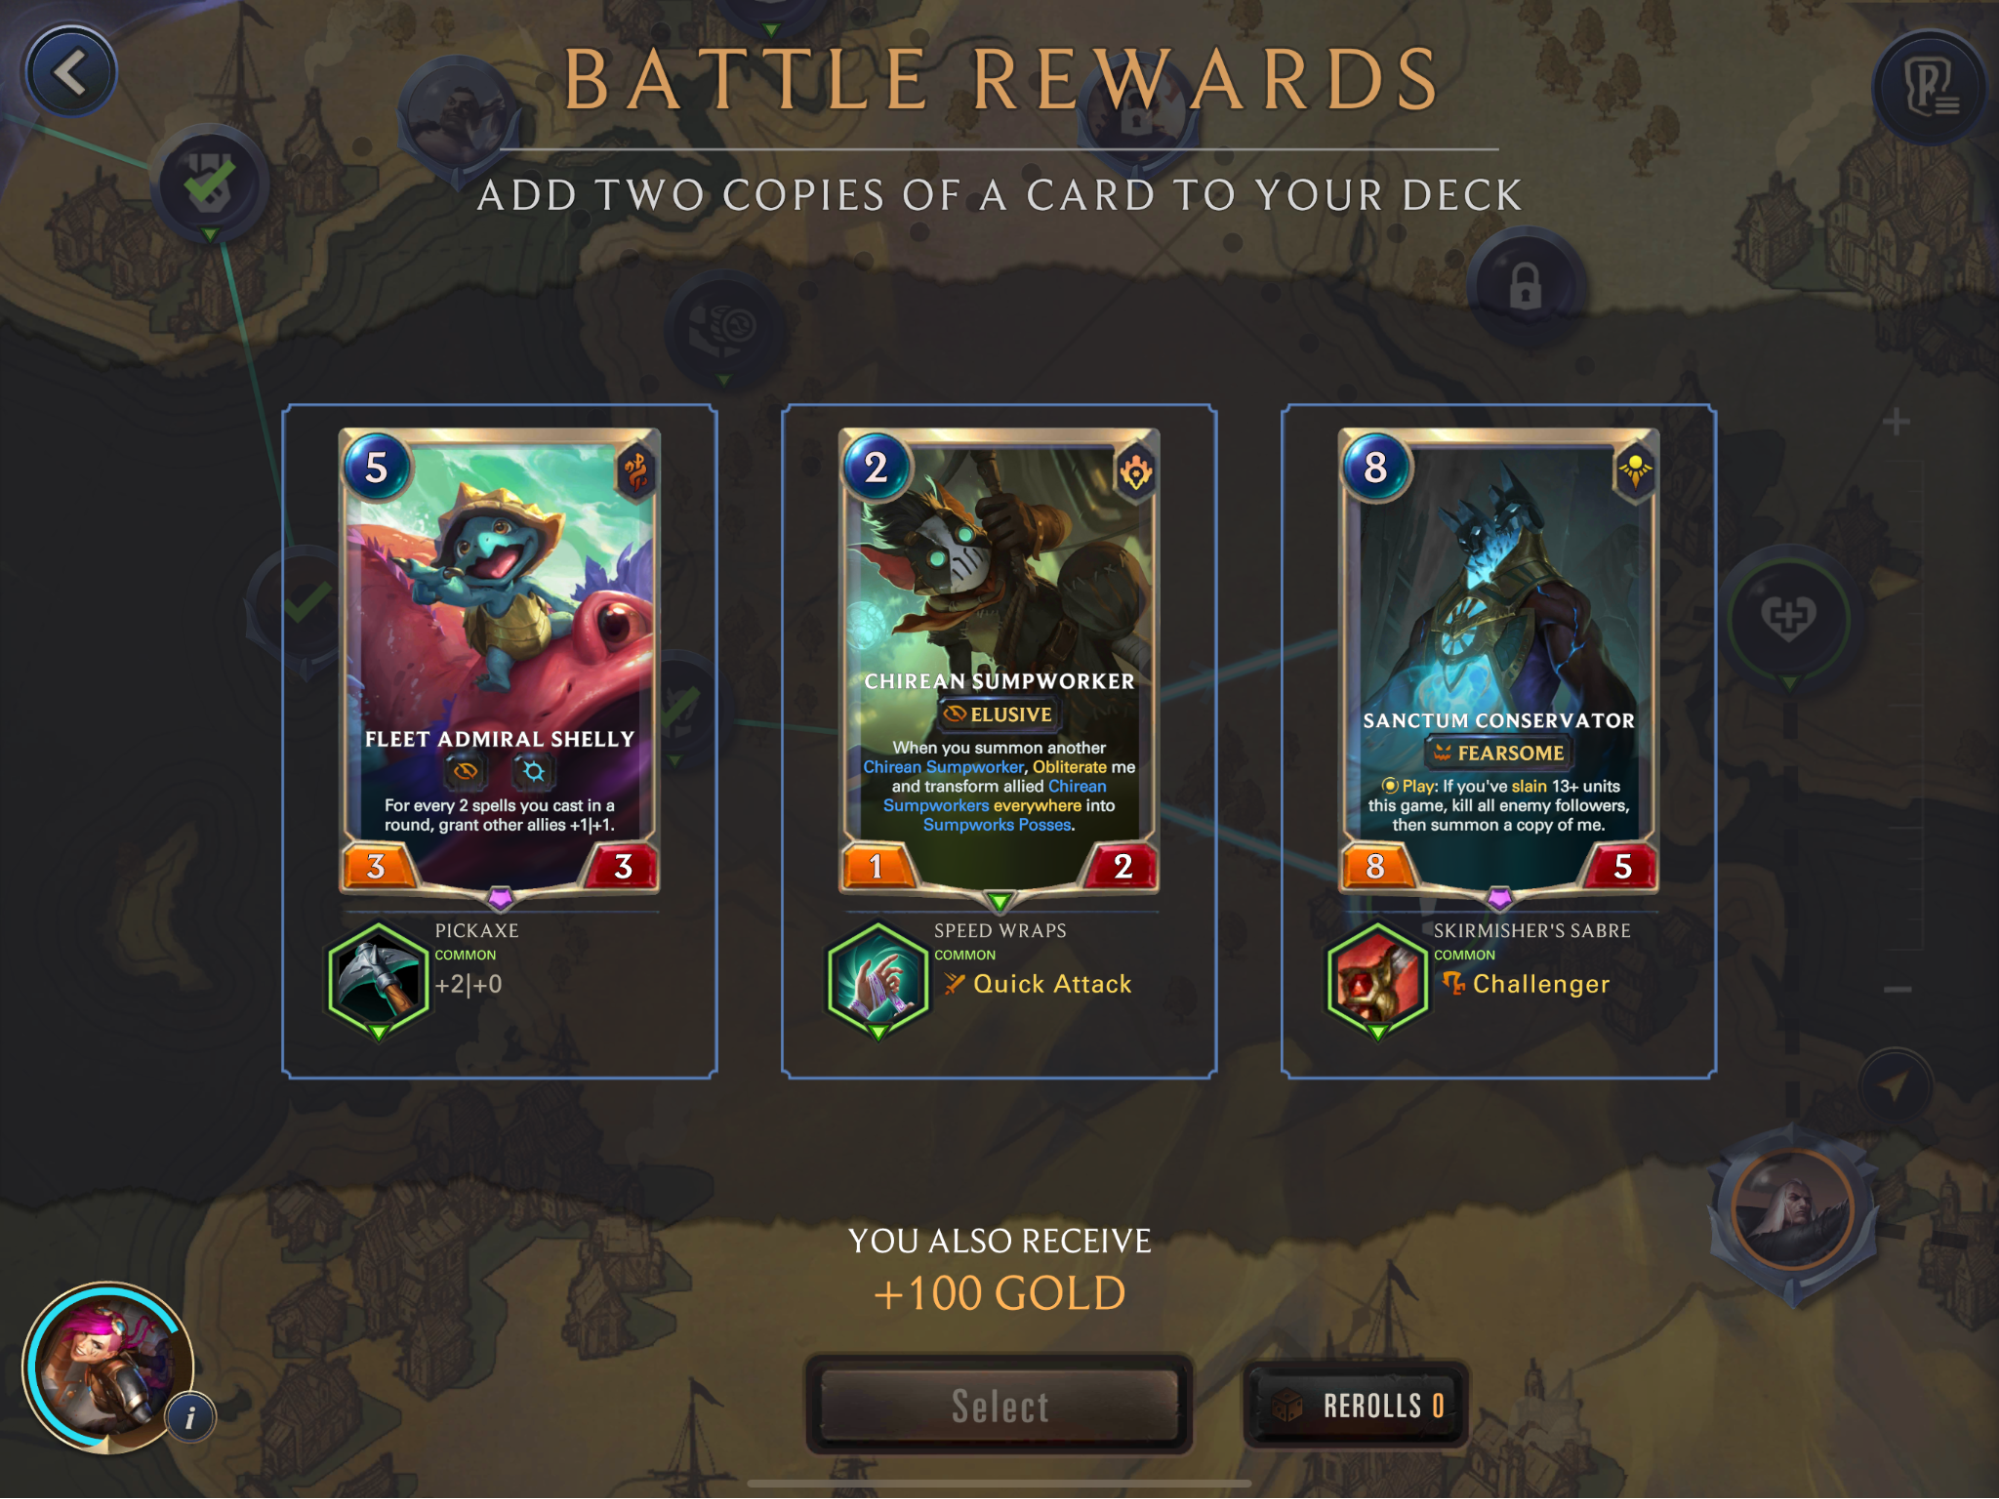
Chirean Sumpworker has no business in a deck that can’t abuse it. Sanctum Conservator is awful, even with slay support, which we don’t have. While I’m not ecstatic about having another 5-drop, Fleet Admiral Shelly is a powerful card, and even better as a five-power Elusive. There’s not much spell synergy yet, but if we do find some items for Poro Cannon or Warning Shot, Shelly becomes incredible.
Note: The three cards below aren’t holding items.
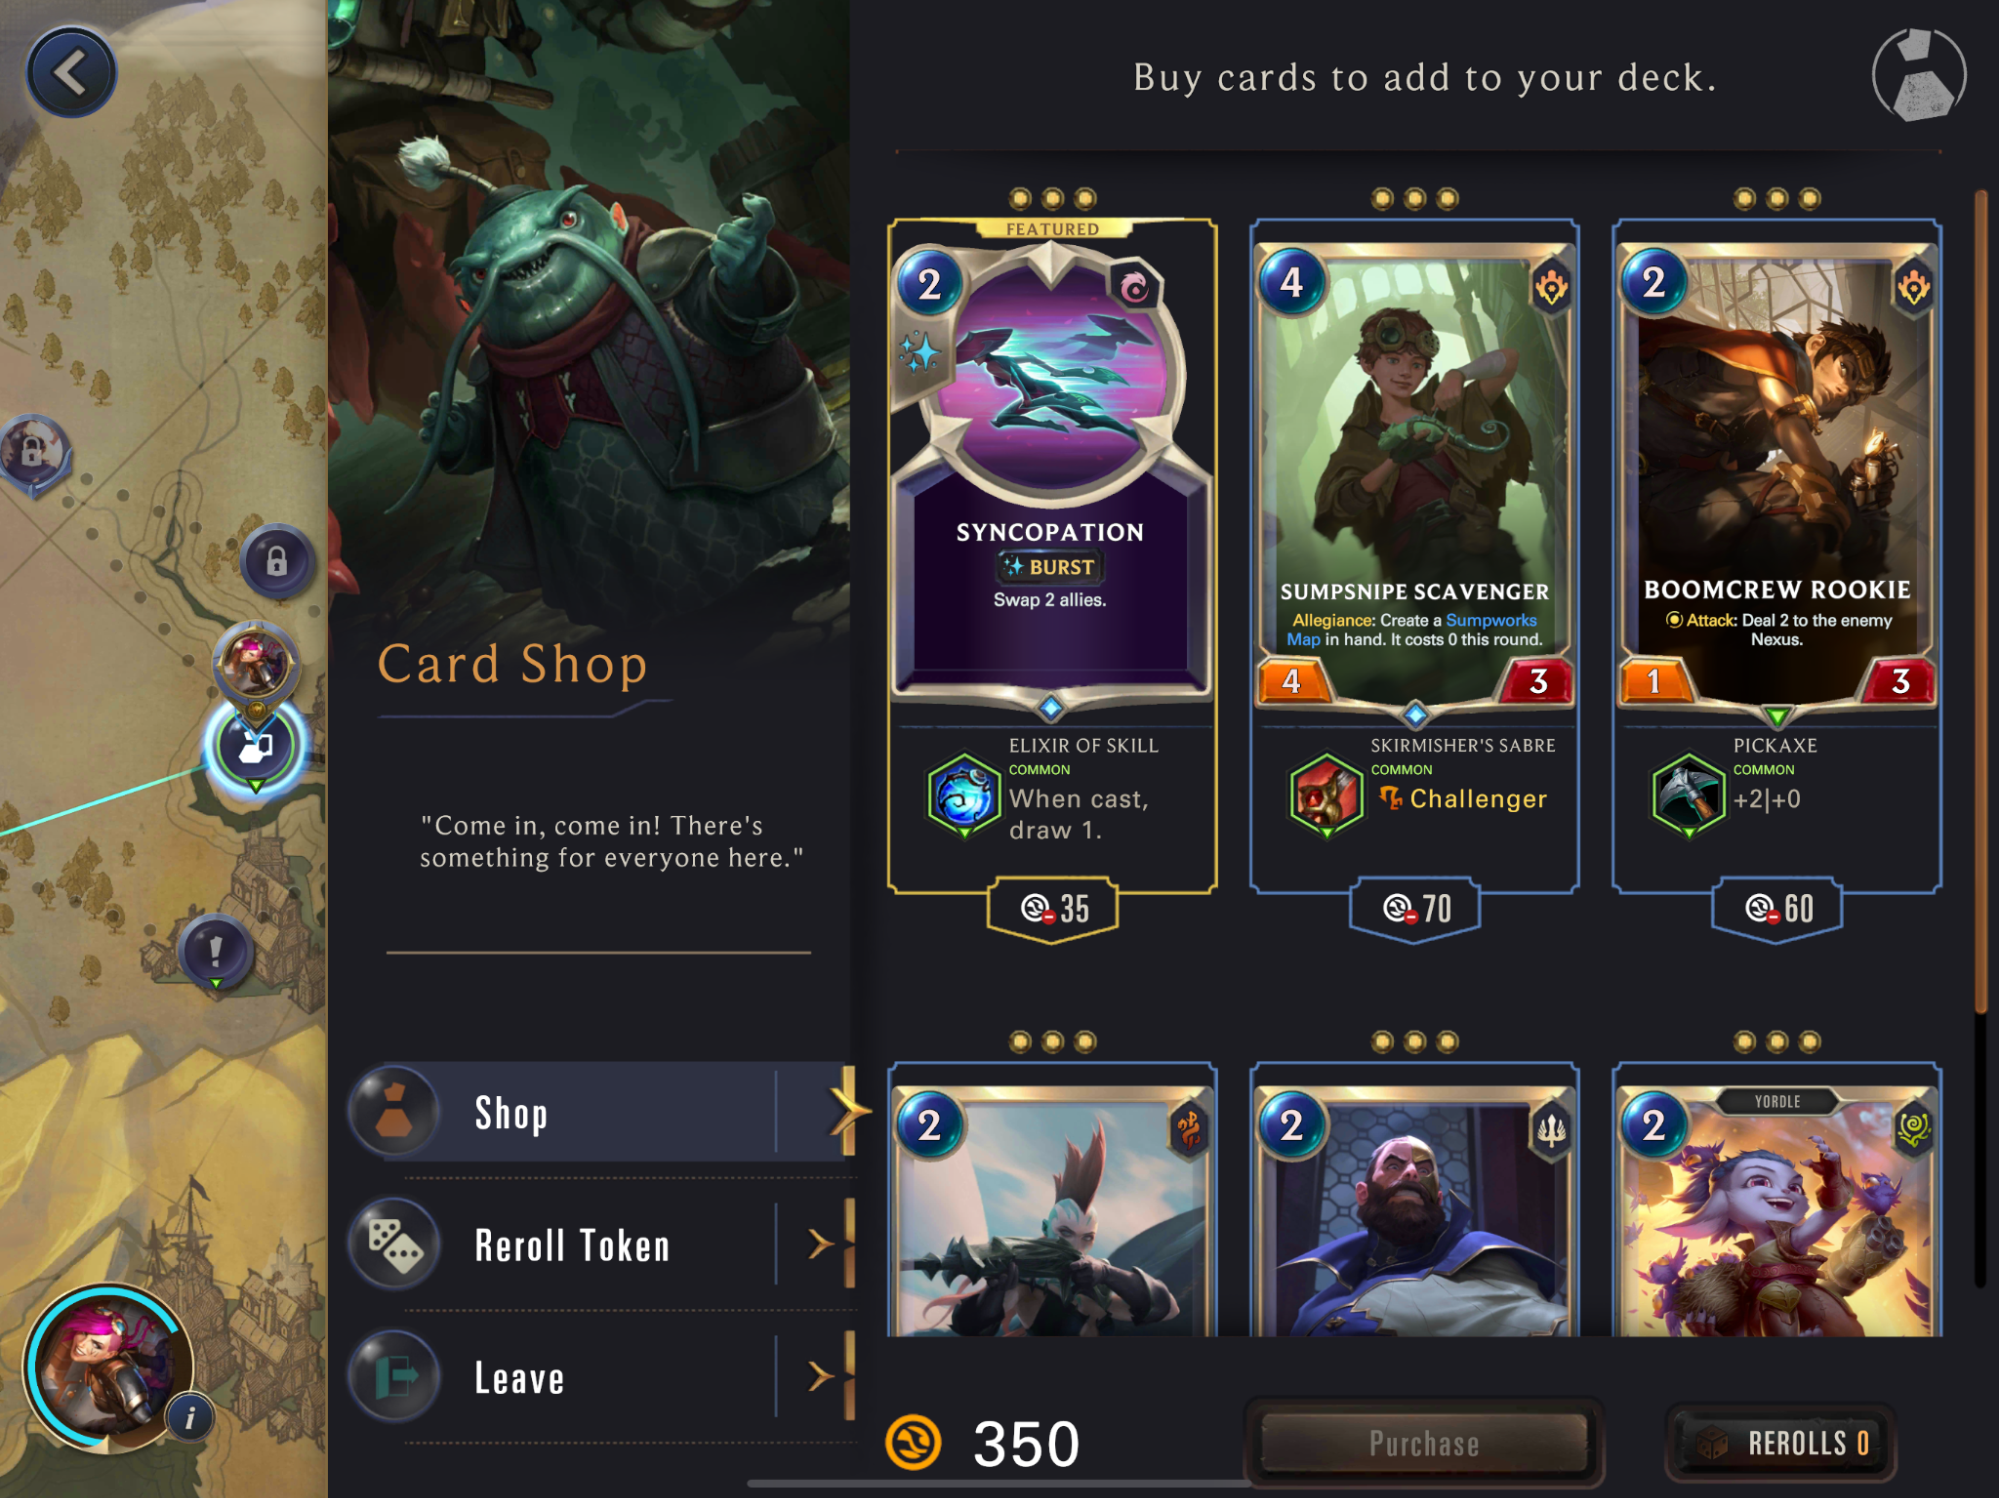
Speaking of spell synergy, check out that Syncopation! Not necessarily my spell of choice, but tack “draw 1” onto it and I’m sold. It’ll help us dodge removal and also let us swap Vi with an unblocked elusive for lethal. I’ll be grabbing all three of these, along with a reroll token for the road.
Miniboss
Swain: Round Start: Deal 1 to the enemy Nexus.
Hopefully, by this point, you haven’t taken too much damage. If your Nexus is at 15 or less, you’re going to need to be extra careful. There’s more burn damage beyond the passive ability with cards like Citybreaker and Death’s Hand. That adds up fast!
Make sure you’ve got early units or cheap removal in your opening hand. An unlucky hand could be fatal due to the enemy’s high-powered units. Thorn of the Rose and Trifarian Hopeful can attack as early as round three (thankfully there are no 1-drops to enable a turn two Trifarian).
Just like the earlier Noxus encounters, Swain’s also packing some heavy Overwhelm hitters. Swain himself also threatens six damage if you aren’t prepared with a Fearsome blocker.
Take advantage of the units with poor statlines. Swain’s interaction is limited to Death’s Hand, Weapons of the Lost, and generated Guiles. Although don’t forget about the potential Ravenous Flock when Swain is on the board.
Keep your Nexus healthy, get ahead on board, and be prepared for multiple Swains. There’s a high likelihood that the second one comes down leveled. Just don’t let him survive!
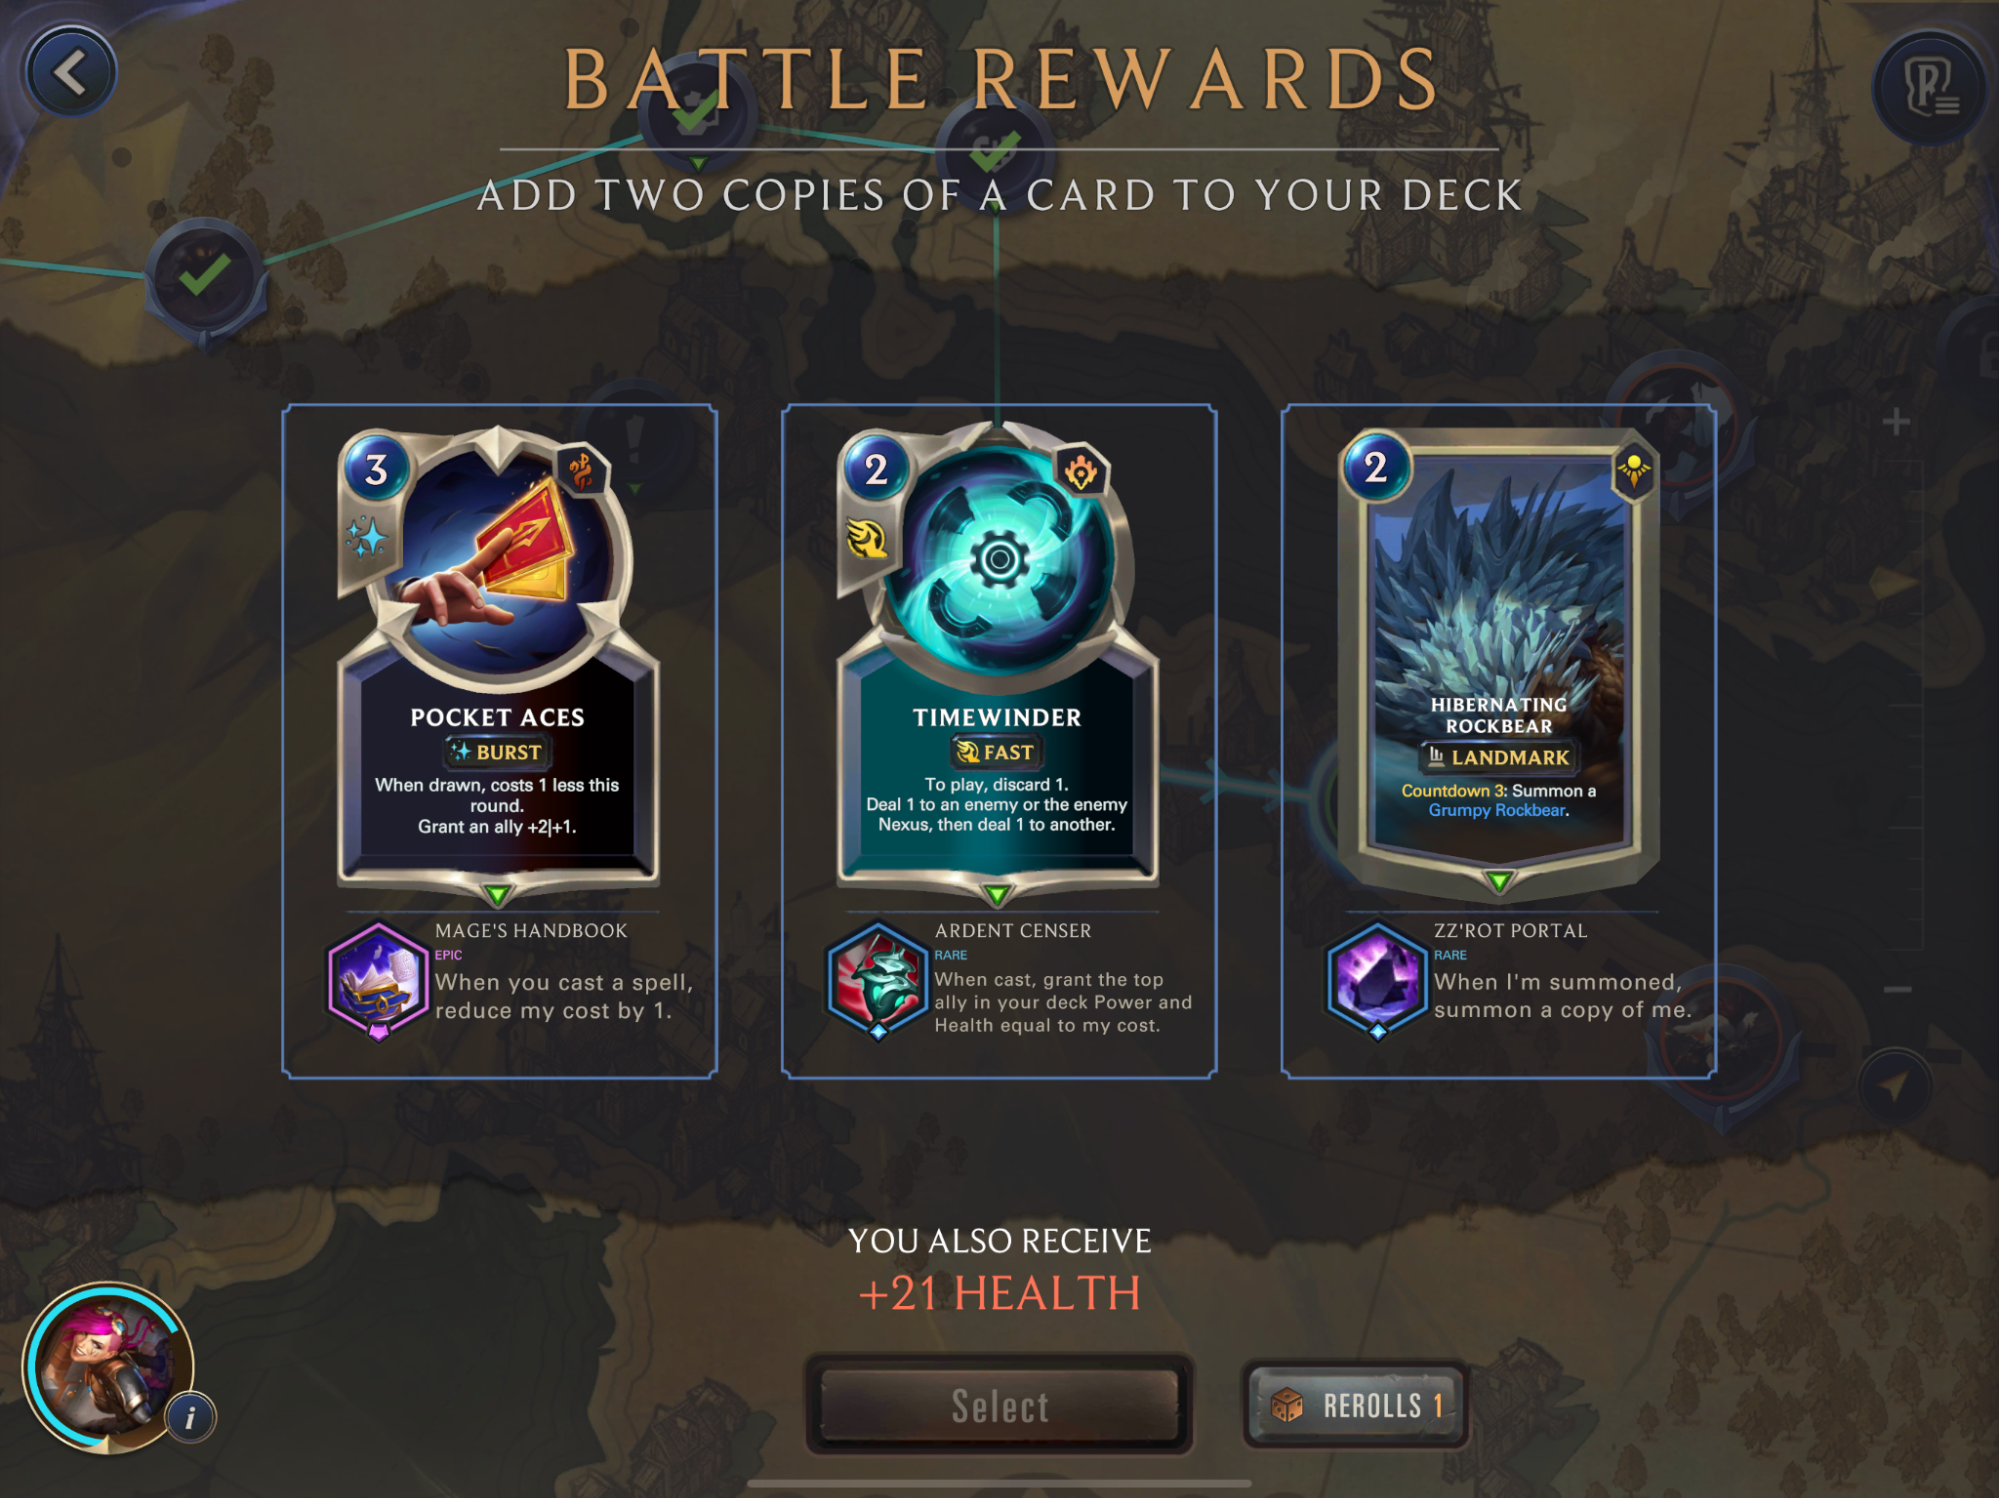
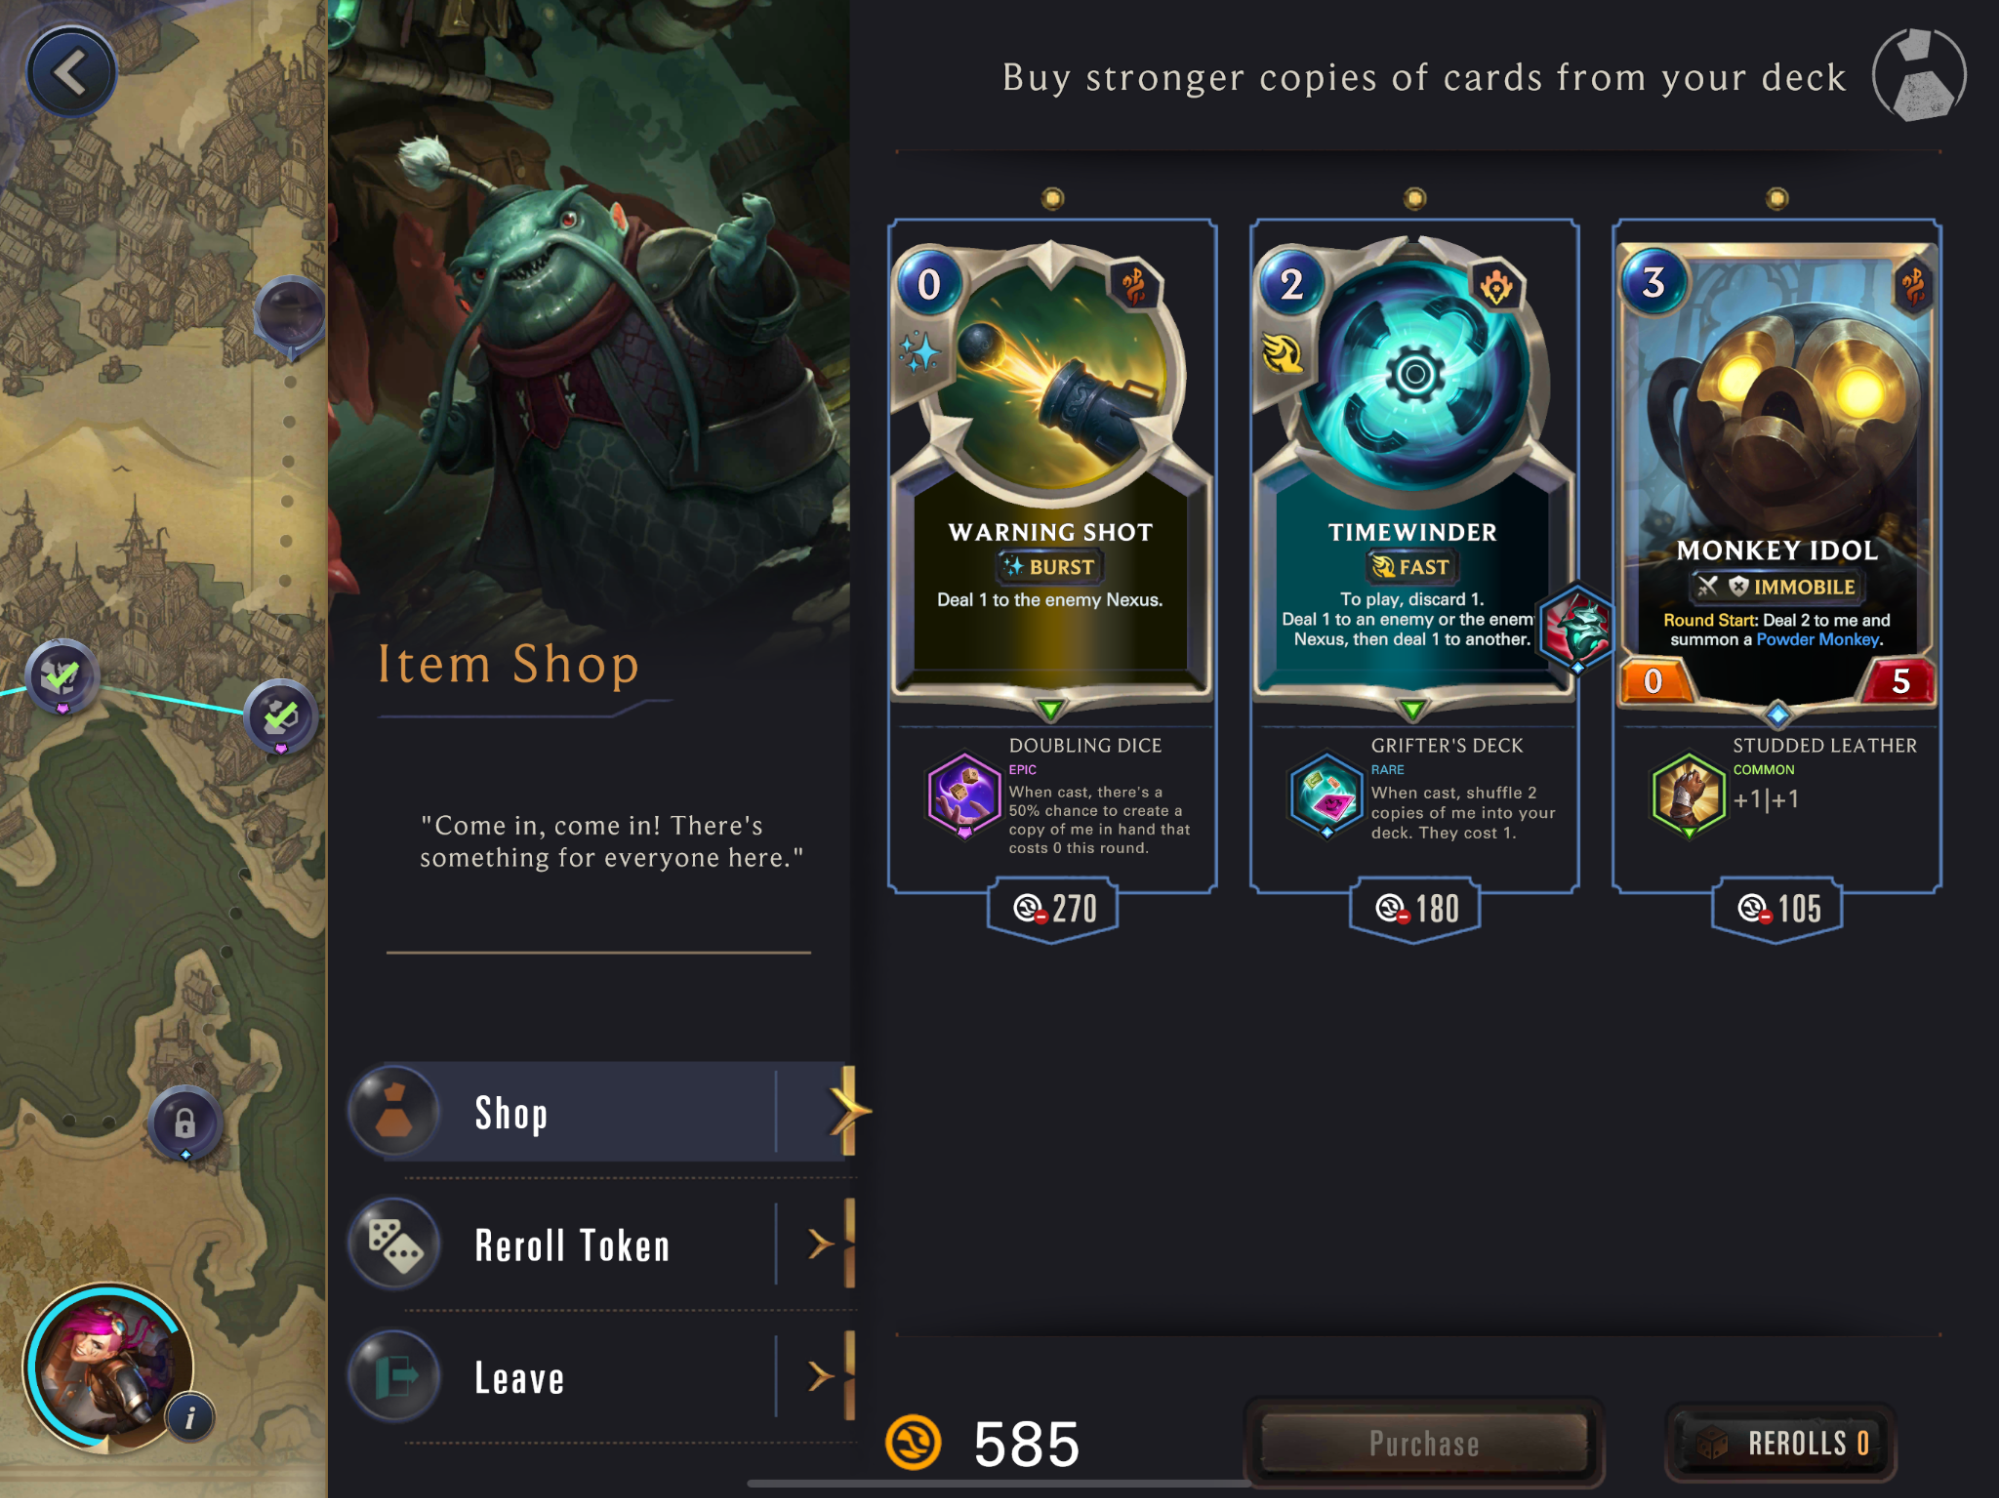
That Hibernating Rockbear has some potential with that item doubling itself. It’s cute on turn two, but it still doesn’t have any place in this deck. Pocket Aces is a reasonable choice for extra spell synergy, albeit not a super impactful spell. Looking at how the draft is shaping up, we’re lacking ways to interact with kegs. Timewinder helps solve this. There’s also an abundance of one health units to target, making it an excellent pickup!
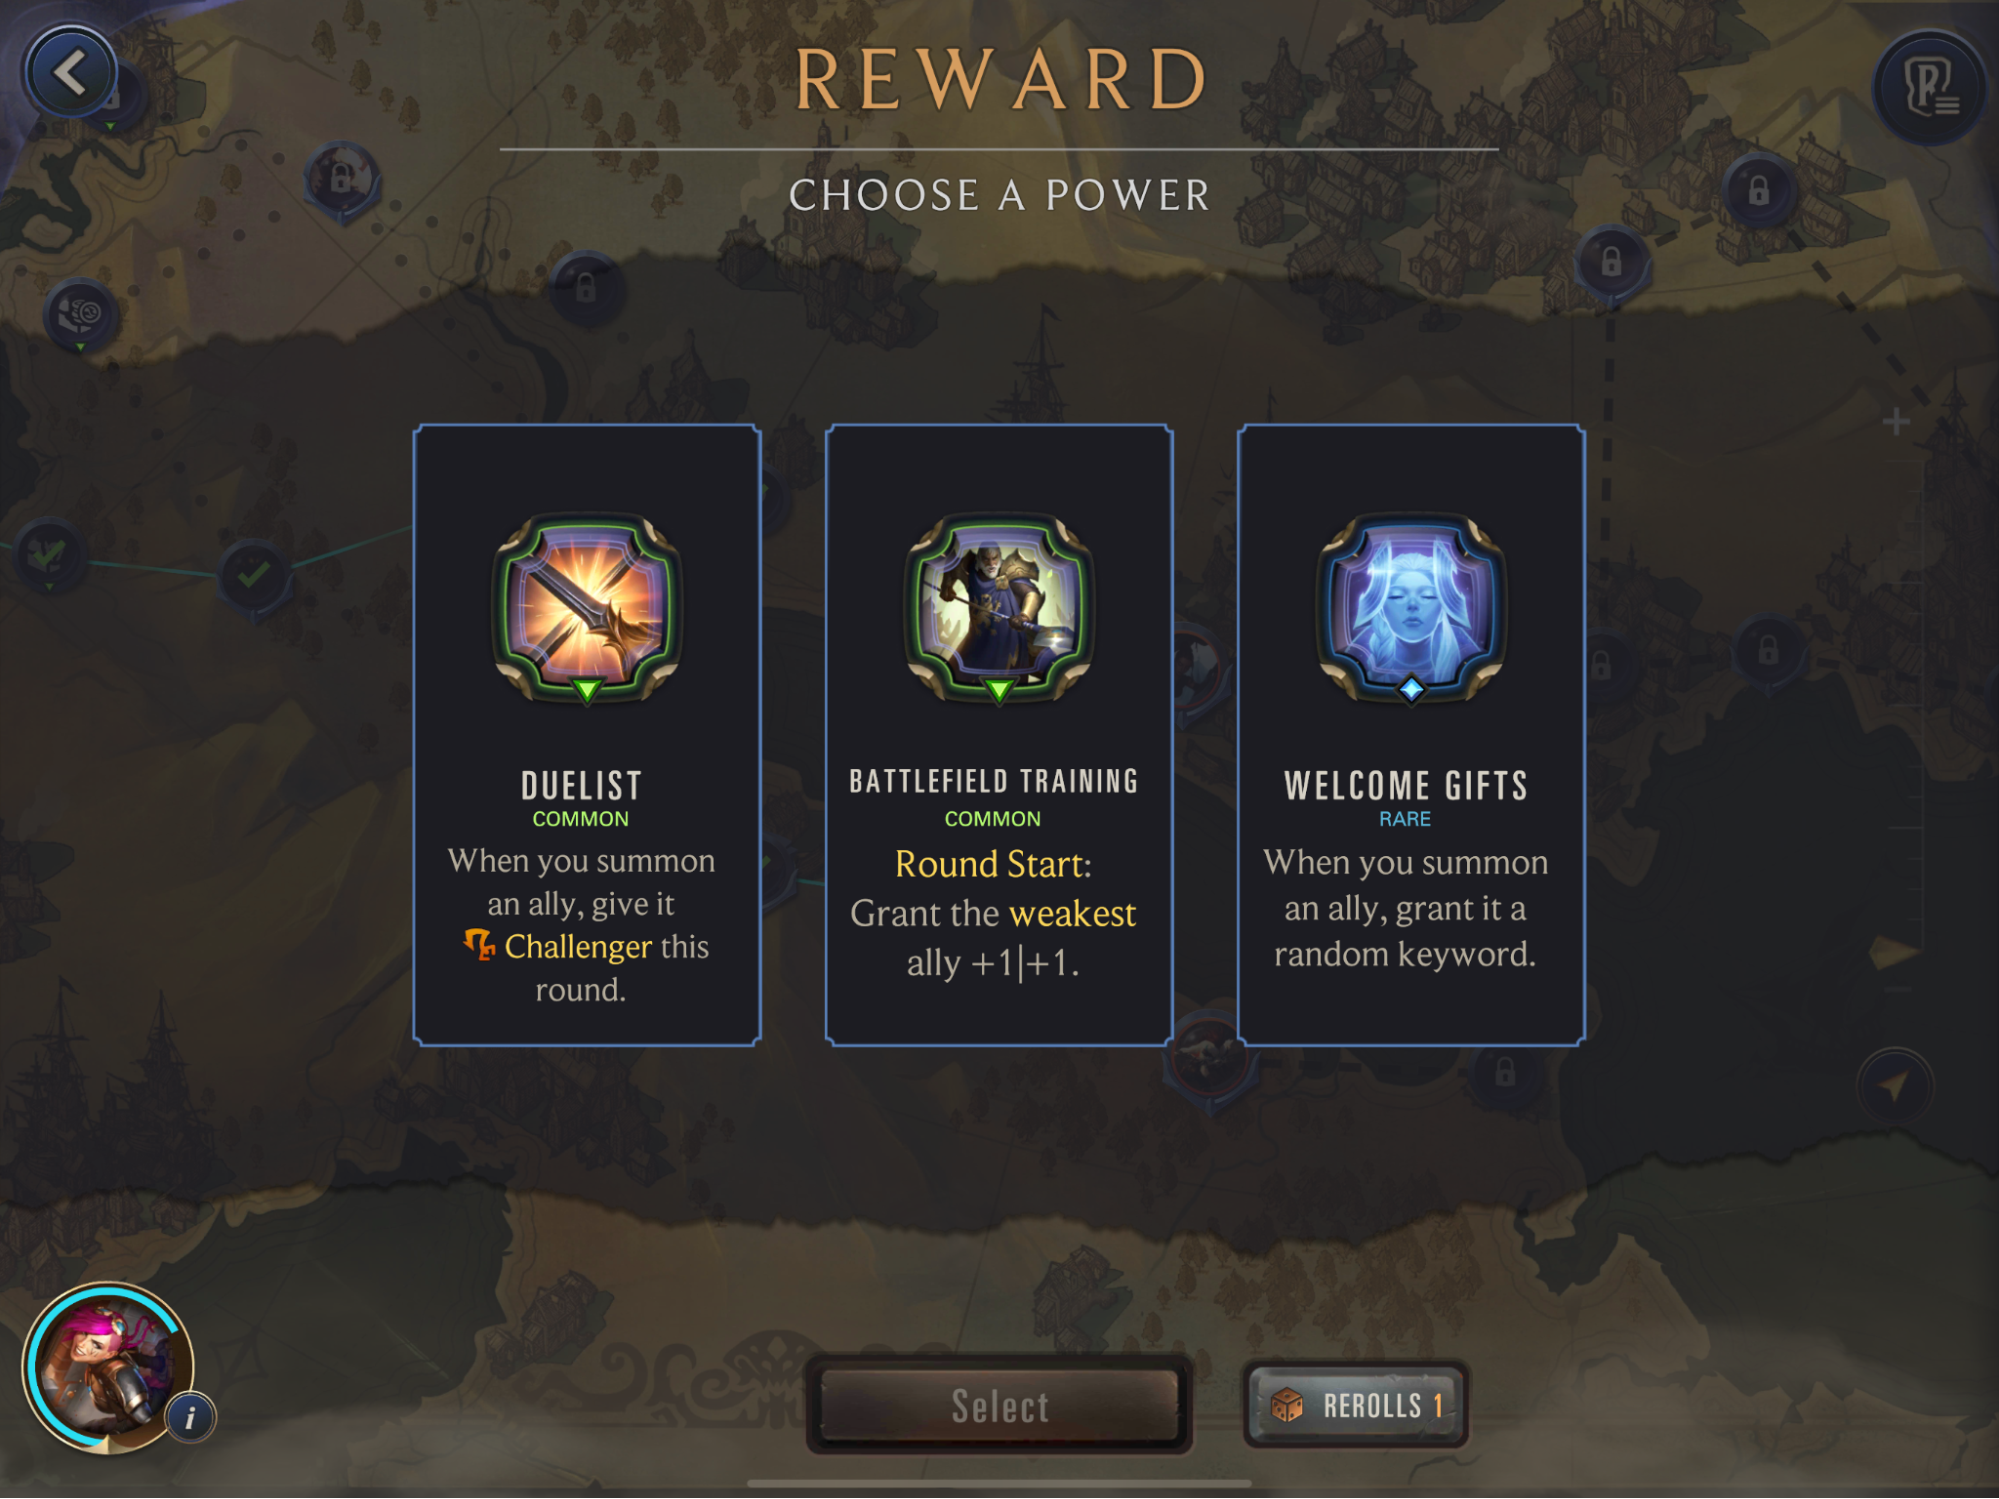
Duelist is alright and has some synergy with Monkey Idol, but not a whole lot else. We passed on Battlefield Training earlier and it’s no different now. Far too low impact. I’ve never been disappointed with Welcome Gifts, so long as I’ve got plenty of units to make use of it, which we do. There’s RNG involved, but getting something like tough or lifesteal can be incredibly impactful. More often than not you’ll get at least something useful.
Trifarian Gloryseeker: When one of the Foe’s allies strikes for 5+ damage, grant it +2|+2.
Roughly half of this deck consists of one health units, making this a very easy encounter to abuse. Prepare your pings and let your chump blockers trade! The enemy’s passive is generally useless since most units will be dying long before they can be buffed. Reckless Trifarian is the one exception. Lastly, look out for Whirling Death as it can trigger the passive during combat.
Petty Officer: Round Start: Create a Knock ‘Em Down in ALL players’ hands.
This is a scary encounter. We’re talkin’ kegs and burn. Dreadway Deckhand and Petty Officer get things started, then More Powder comes down to prepare for a bang. Now that we’ve surpassed the miniboss, if your goal is S Rank skill, avoid this node unless you’ve got a ton of pings and/or healing. If you’ve suited up well to handle kegs then this fight is pretty easy. But even so, the constant Knock ‘Em Downs can be a real pain.
- Our deck is well-prepped to wipe the floor with Trifarian Gloryseeker. There’s also an Epic Champion Item Chest waiting to be claimed. This one’s a no-brainer.
I couldn’t have planned it better myself. We got the “draw 1” on our Poro Cannon. Things are about to get crazy!
Hmm… Start of the game, draw Vi. Sure! Extra stats are pretty unnecessary here, and this guarantees we can start augmenting her power from turn one. She’s also an extra free card provided we don’t draw her during the mulligan. Sounds good to me!
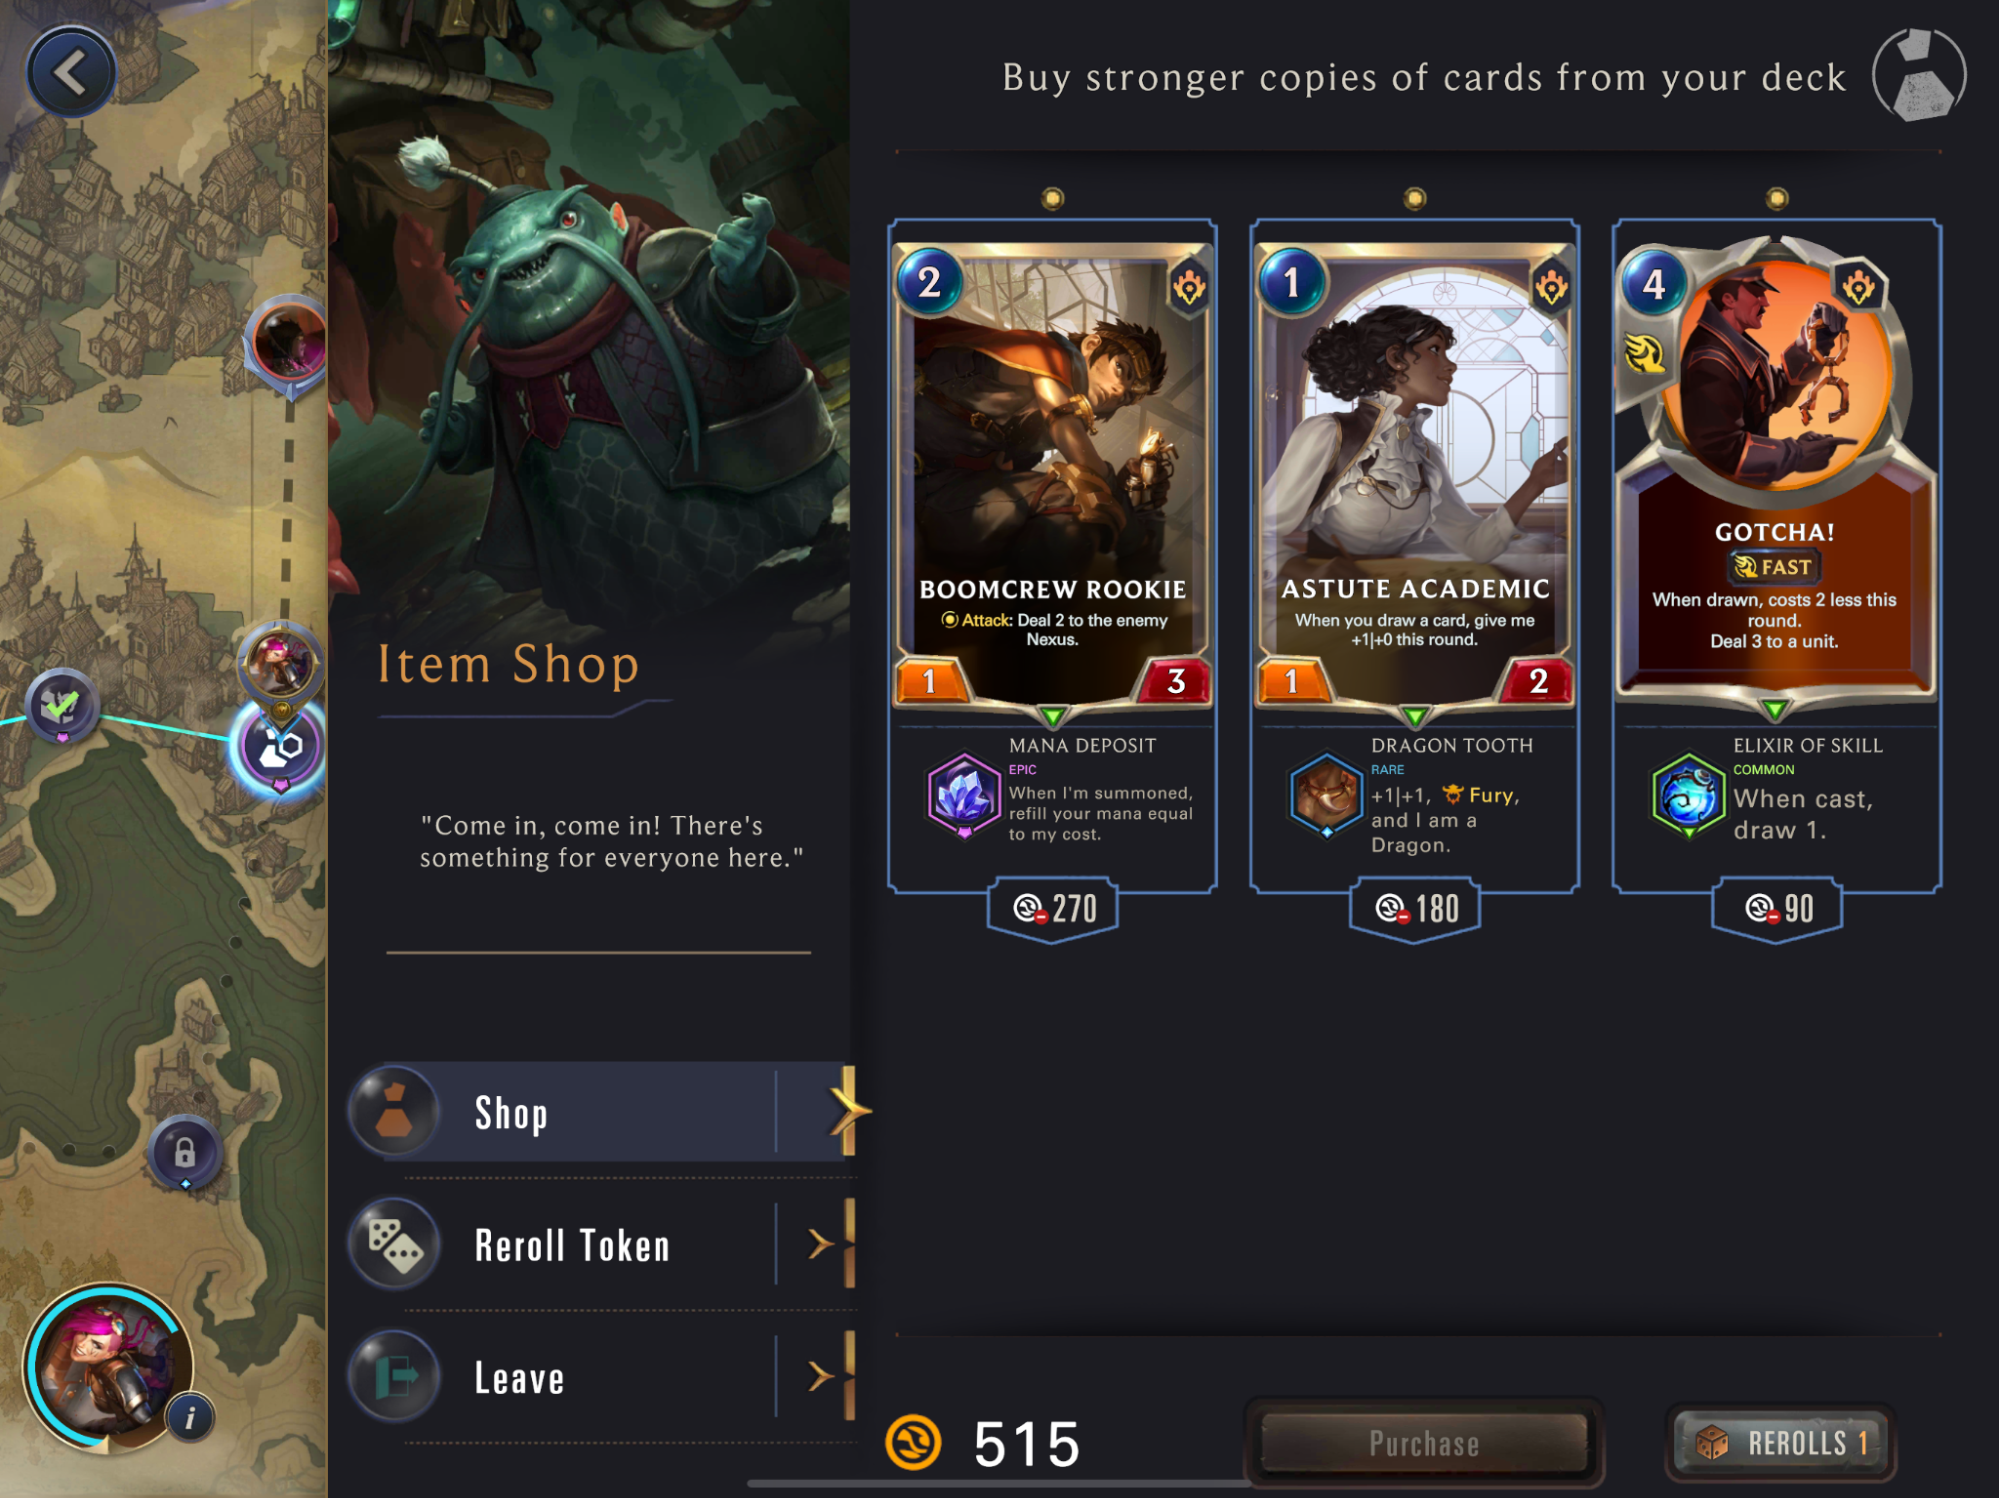
A Boomcrew Rookie that refunds itself is decent, but won’t make a difference to our overall game plan. After all, there’ll be a point where we don’t want to damage Gangplank until we can set up the 20+ damage swing. The other two are also mediocre, so I think now’s a good time to reroll.
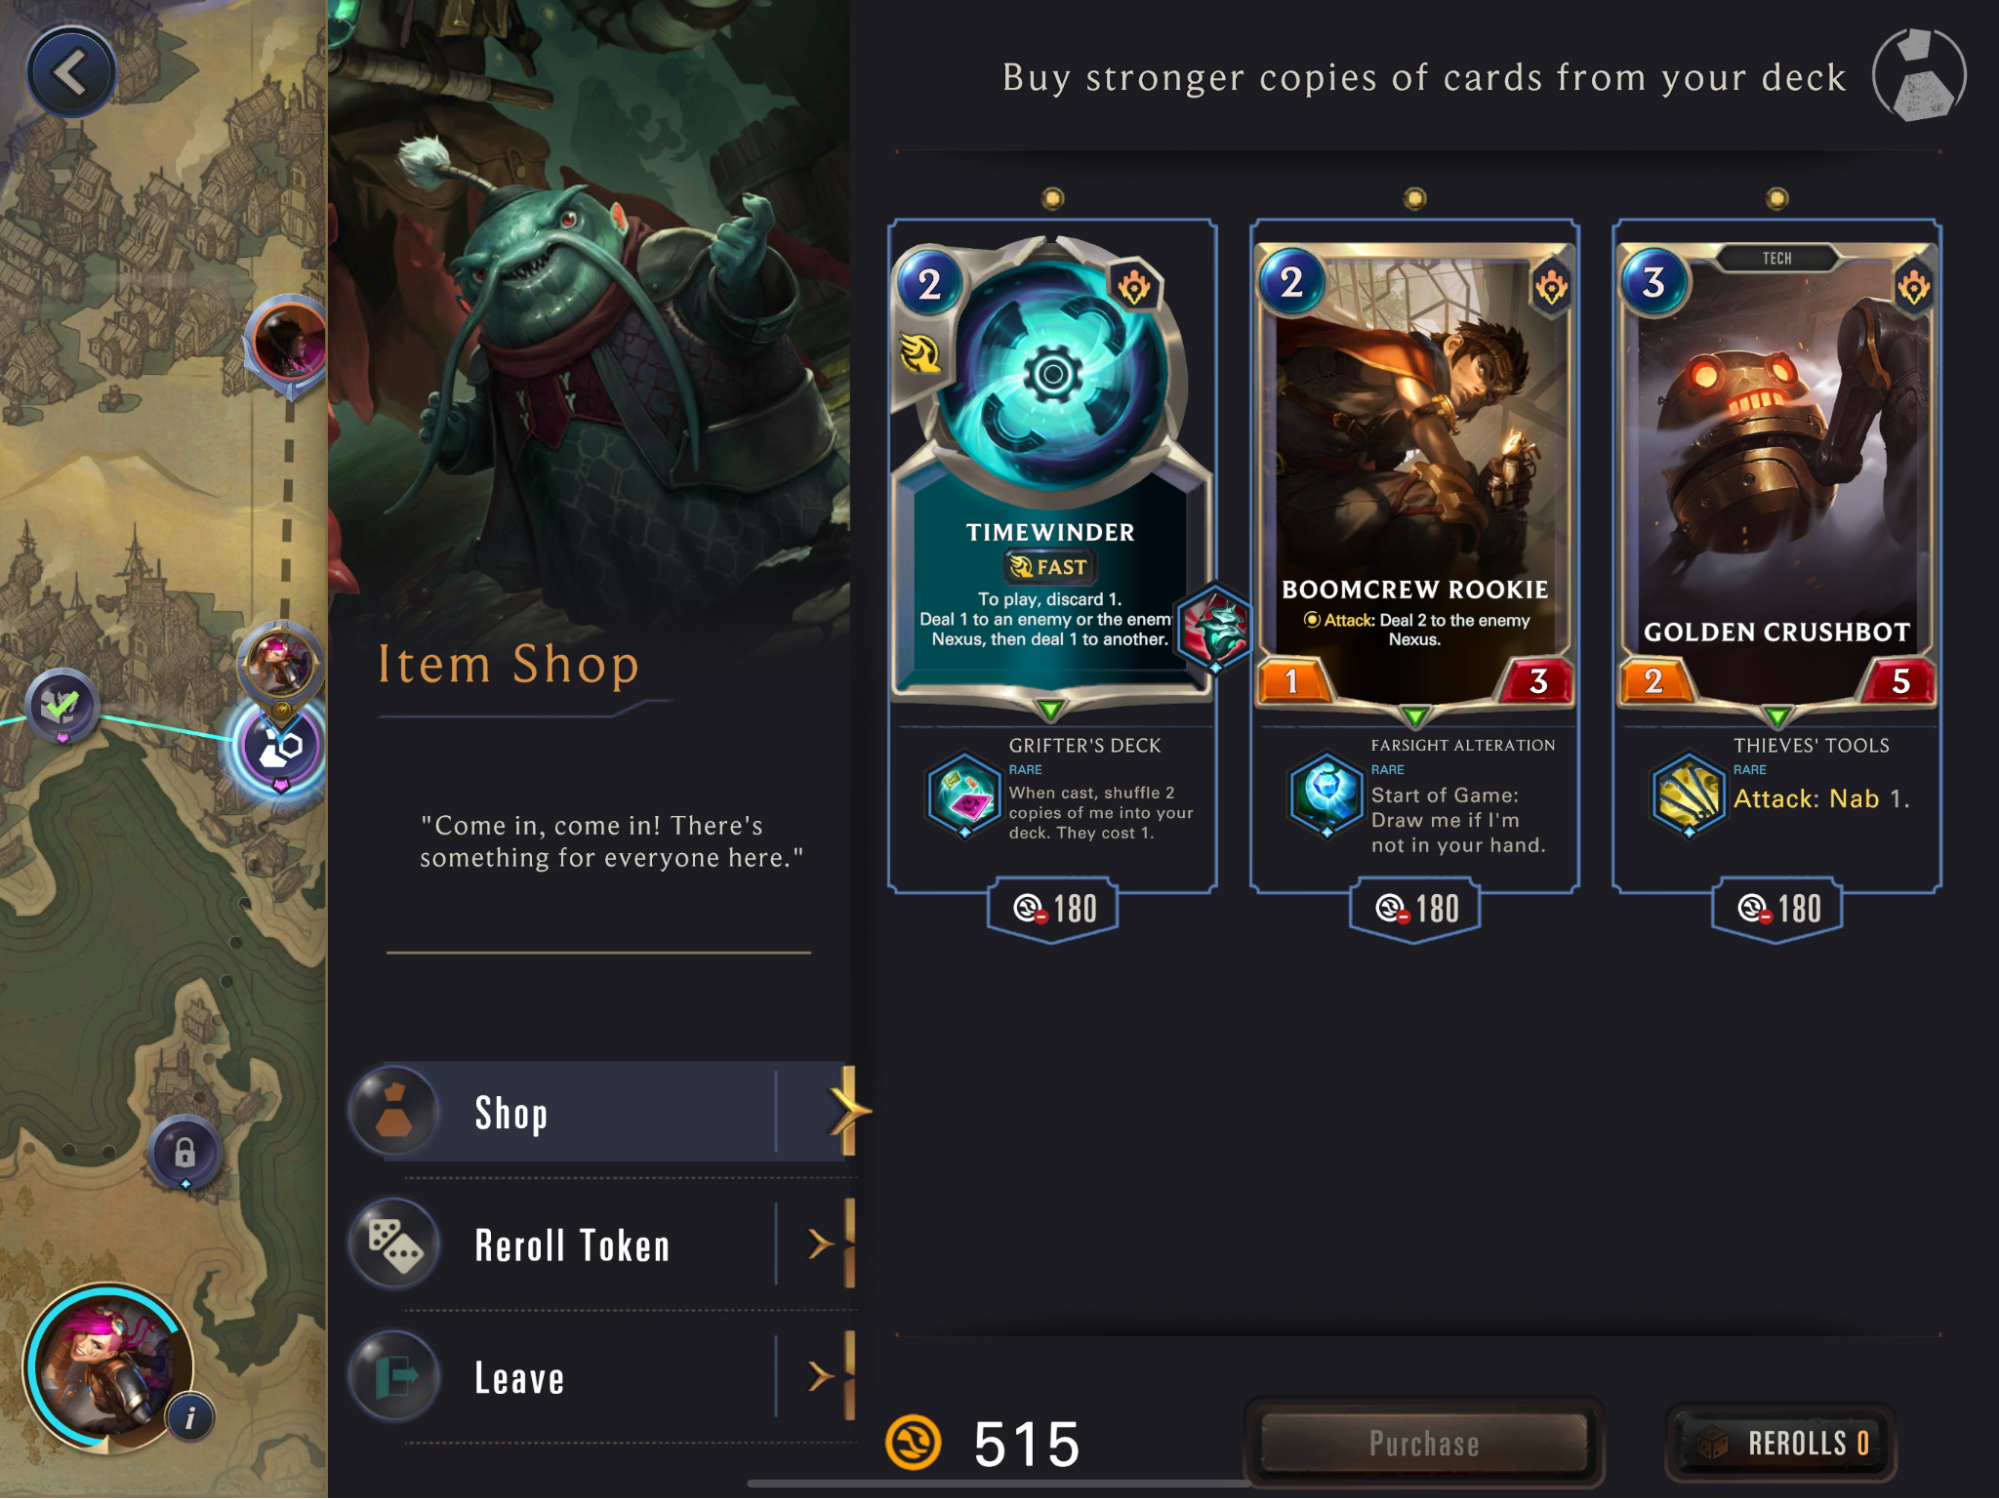
It’s worth considering more Timewinders, but its attached item scares me. While having access to more copies could be helpful in the final fight, I could also lose the game if I brick and draw too many. Let’s buy that reroll token and spin the wheel once more.
Bleh… These also just aren’t good enough. Don’t be deceived by the item on Give it All. Our current regions are PnZ, Bilgewater, and Ionia. Do you know what 8-drops are available in these regions? A 6|4 Plunderless Riptide Rex, a 2|7 Lurkless Jaull-Fish, Zinnia the never-before-played blade dancer, and The Dreadway. Sure, The Dreadway is excellent. But if we’re casting Give it All, we’re winning the game with it already. These random summons are just unnecessary icing that I’m happy to miss out on.
Crimson Disciple: Round Start: Deal 1 to all units, then grant the Foe’s allies +0|+1.
Crimson Disciple is a tricky one. The passive AoE is a game-changer, and a rule not to be ignored. If your deck is vulnerable to this, you’re probably better off taking the alternate path. Not only will it greatly hinder your board state, but it will also buff the enemy’s.
However, if you can keep up on board without dying to the passive, it’s possible to trade units until they run out of steam. There’s next to no card advantage aside from Crimson Curator. Do make sure to watch out for Transfusion and Death Lotus. The latter is especially dangerous when your units take one damage each round.
Riptide Rex: Round Start: Deal 2 to ANY random unit.
Do you feel lucky? The answer is often yes. While it’s certainly possible for the random two damage to hurt you, you can somewhat play around with it. More importantly, Rex LOVES to flood the board with followers.
Marai Warden, Petty Officer, and Island Navigator are all here to take a bullet for you. Or… Swarm you to the ground if the damage fires your way… Both Ruined Rex and Riptide Rex are scary cards if they hit the board. But with a little luck on your side, you can win well before then. Wanna take a chance?
- As much as I’d like to avoid RNG, in this case, it’s the lesser of two evils. Our early units are abysmal against all those three health Crimson followers. We’ve got a decent amount of units that can survive a two-damage hit, so we should be okay long enough for Vi to come help.
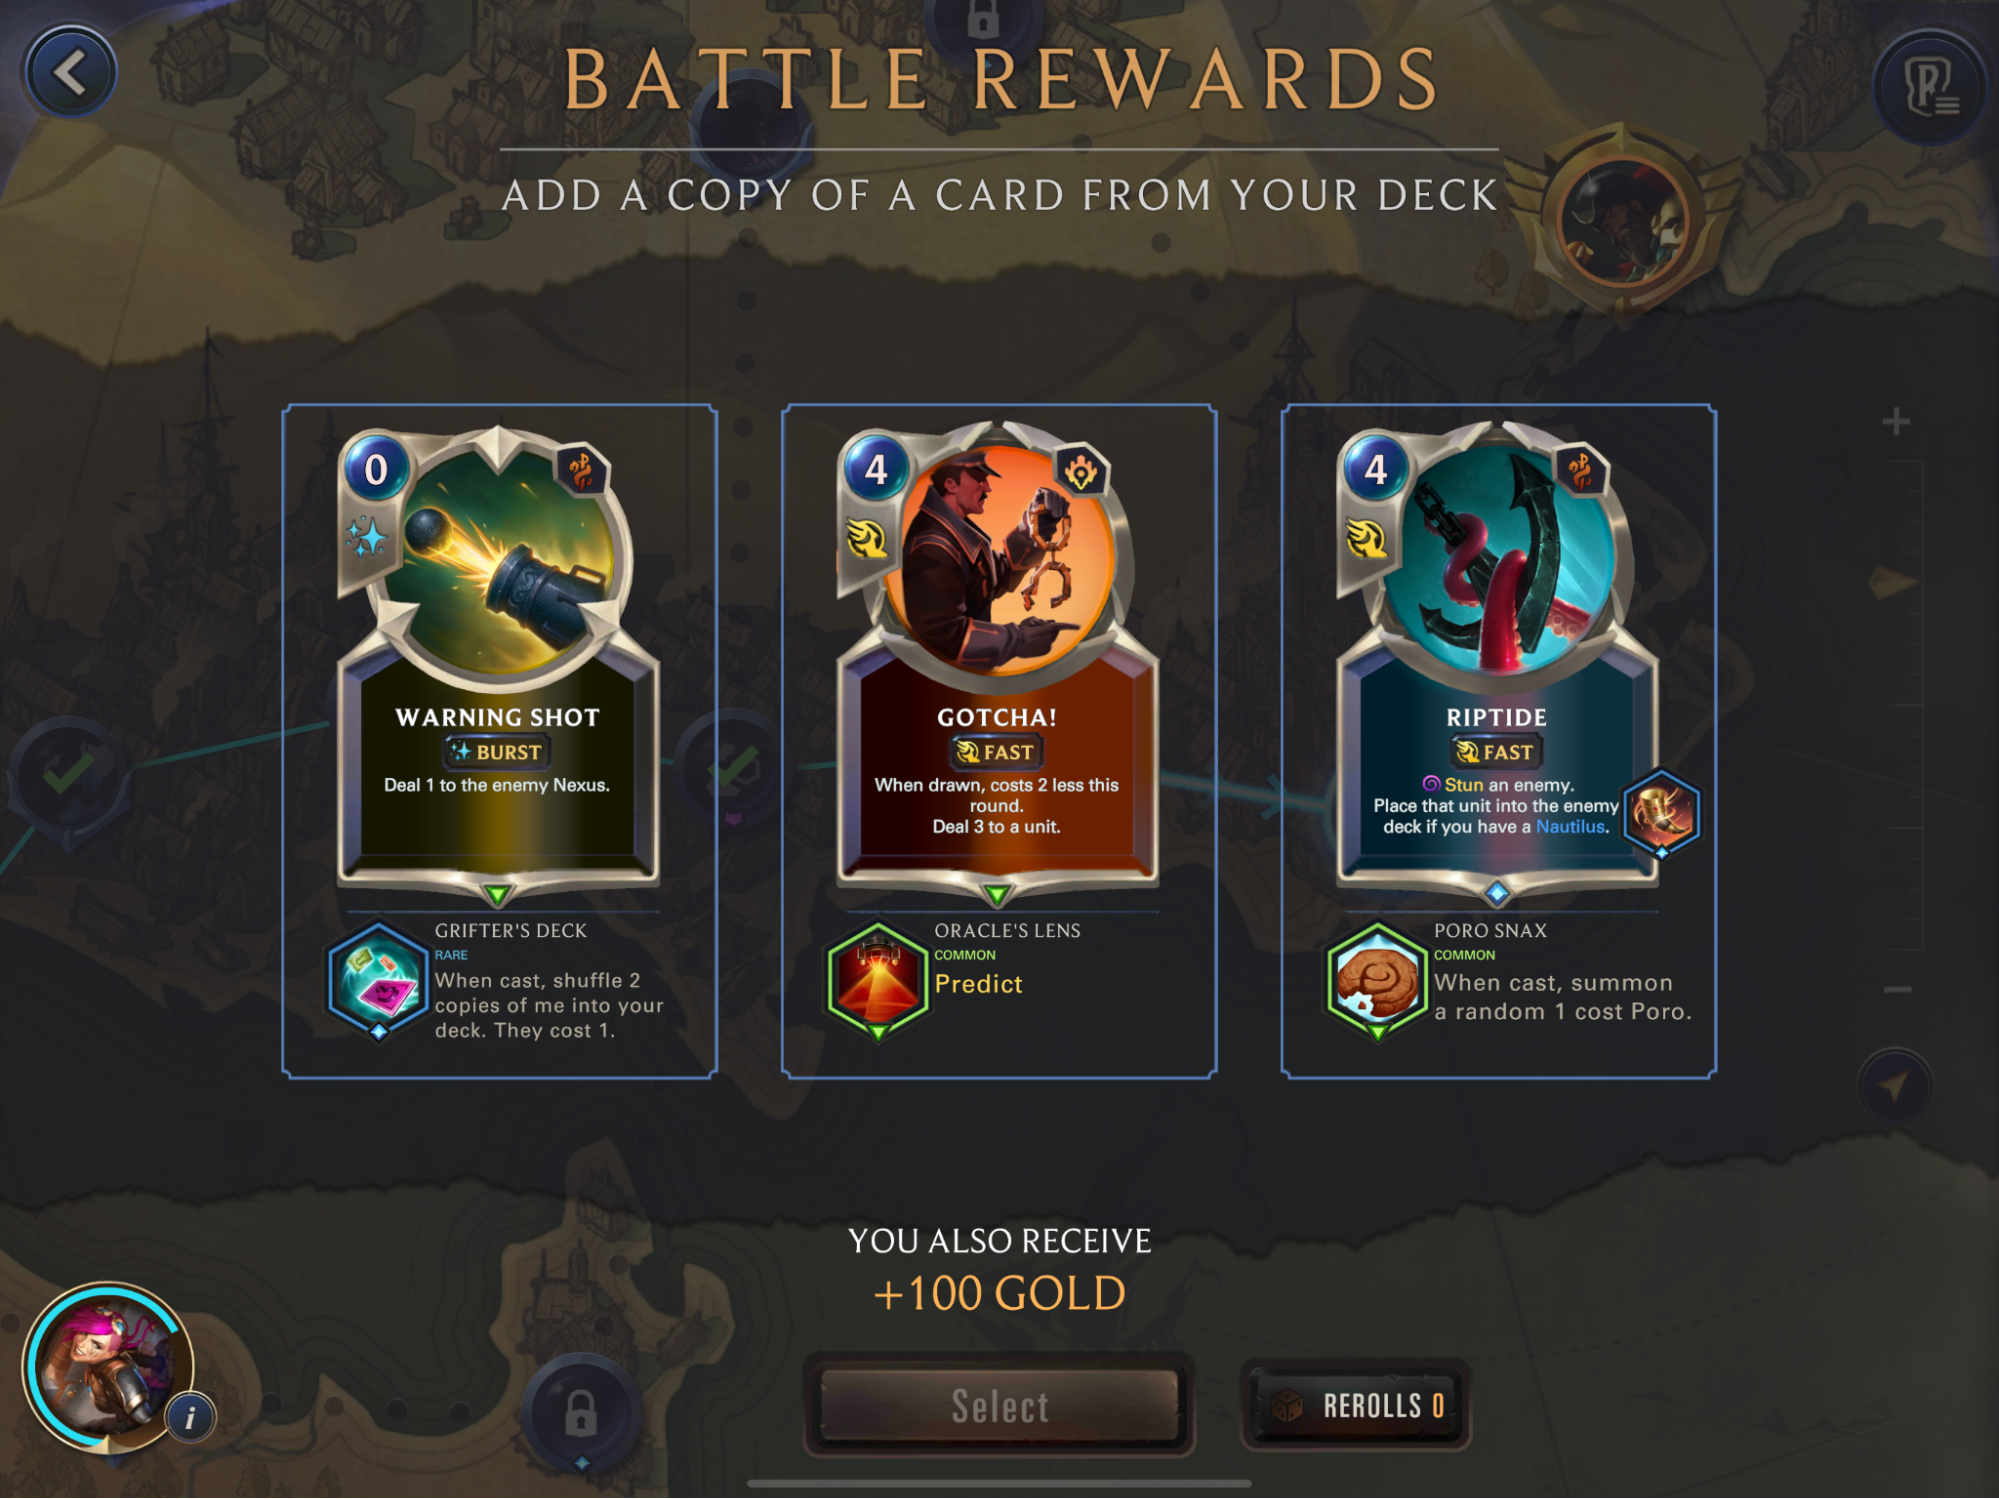
Of all items attached to our Warning Shot… Why did it have to be Grifter’s Deck!? I’d honestly rather avoid all of these, but I suppose adding Predict to Gotcha is alright. Poro Snax just doesn’t fit well on a reactive spell-like Riptide.
More trash item combinations. Time to purchase our last reroll token and try one last time before the boss.
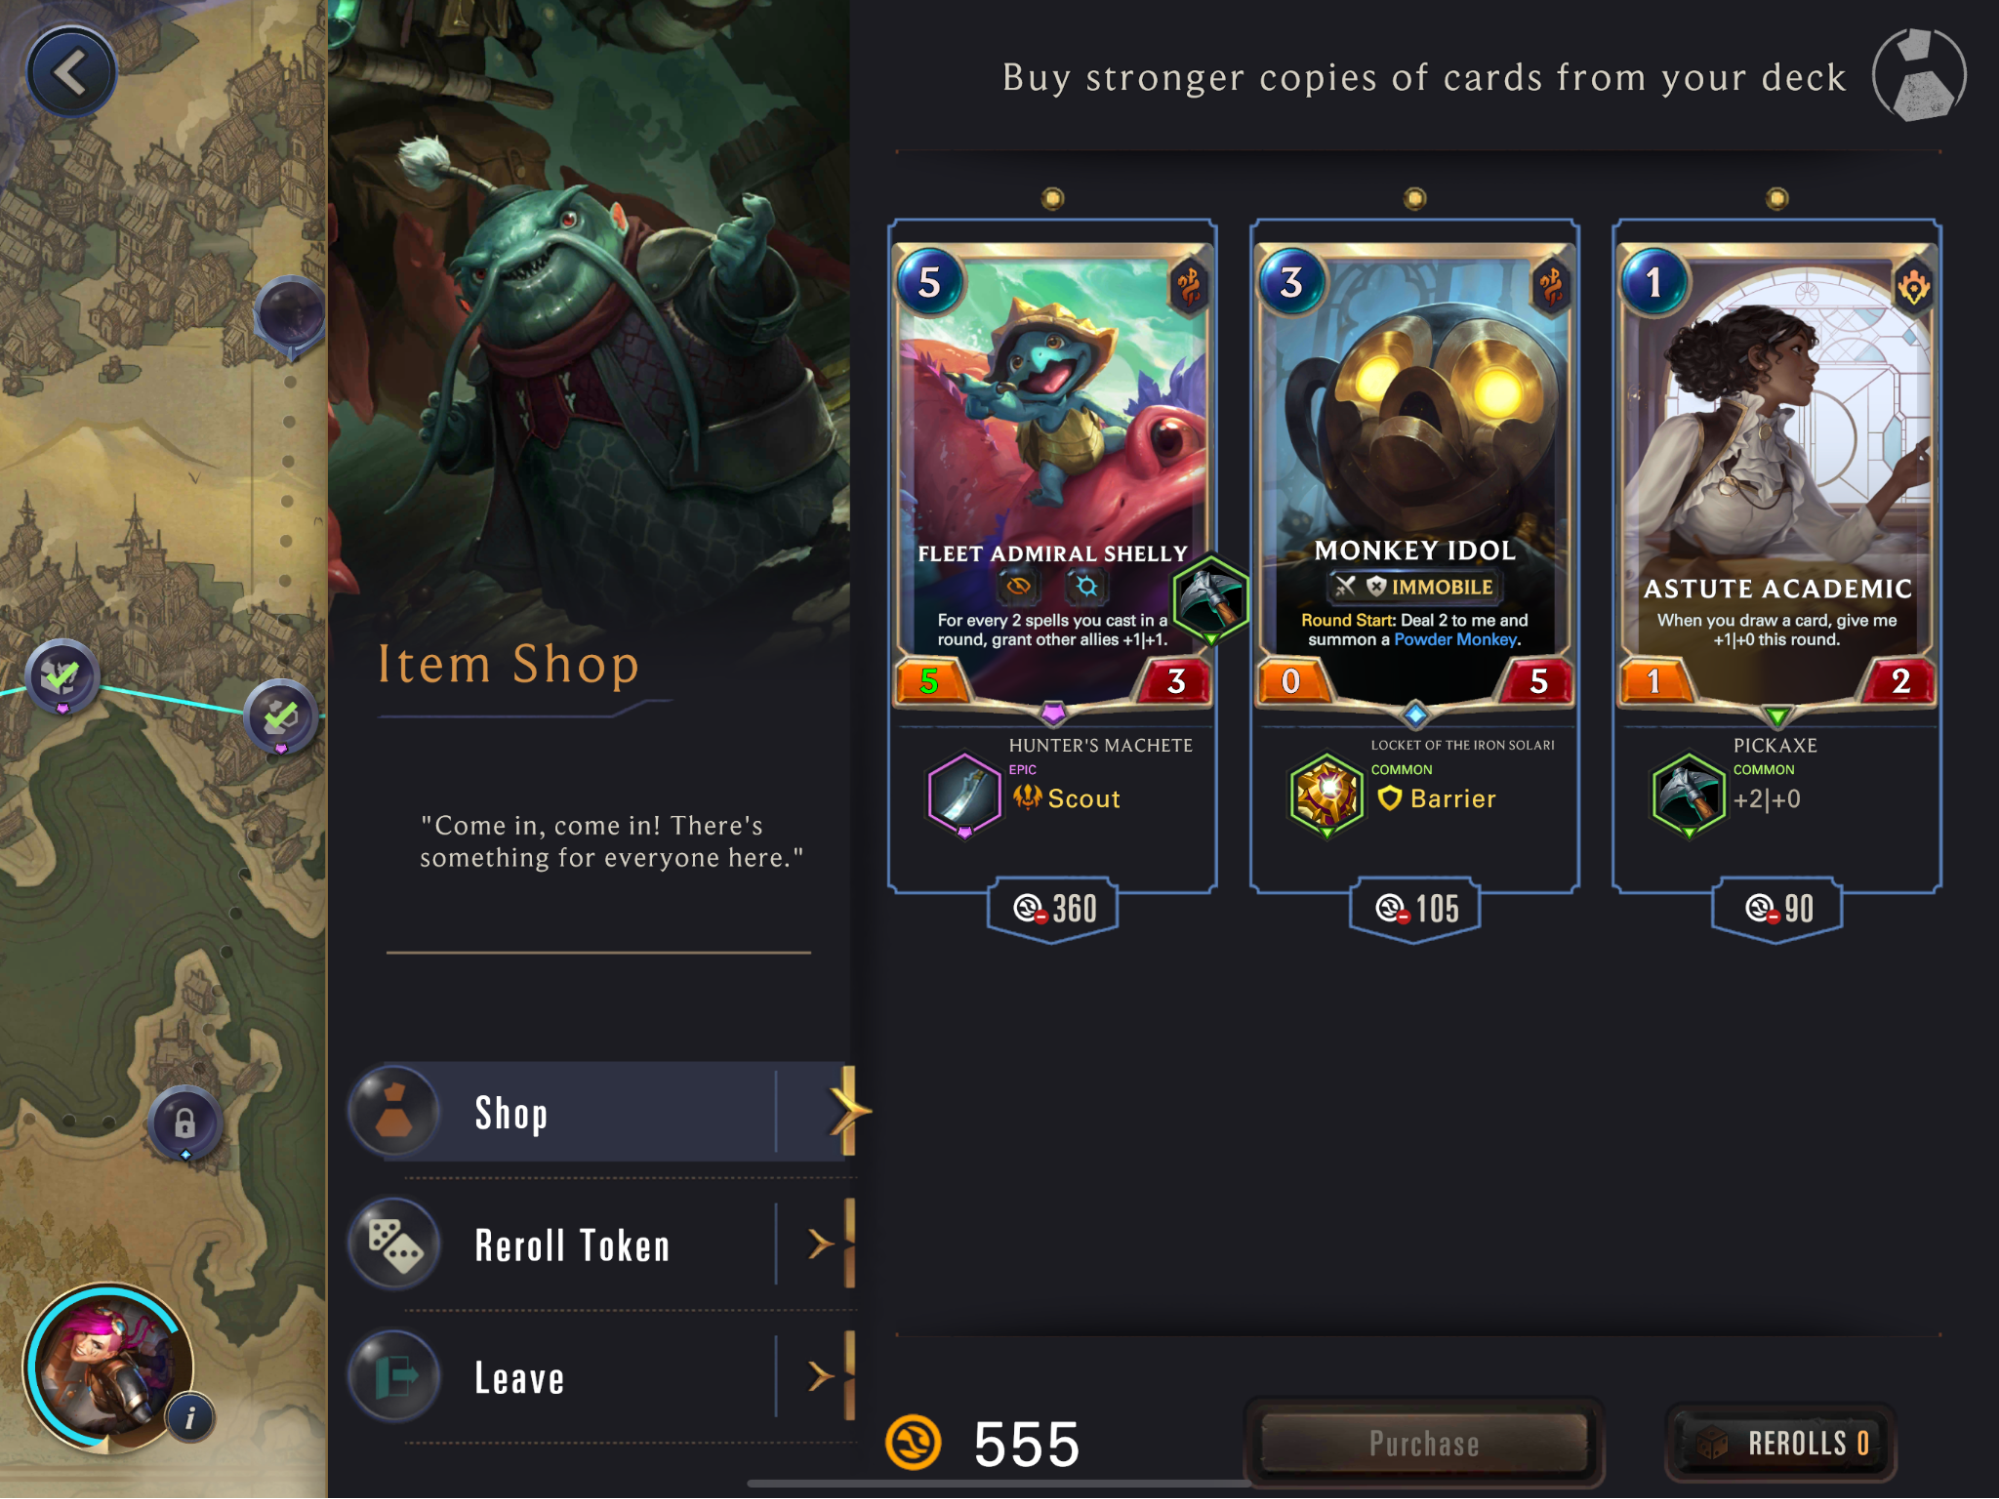
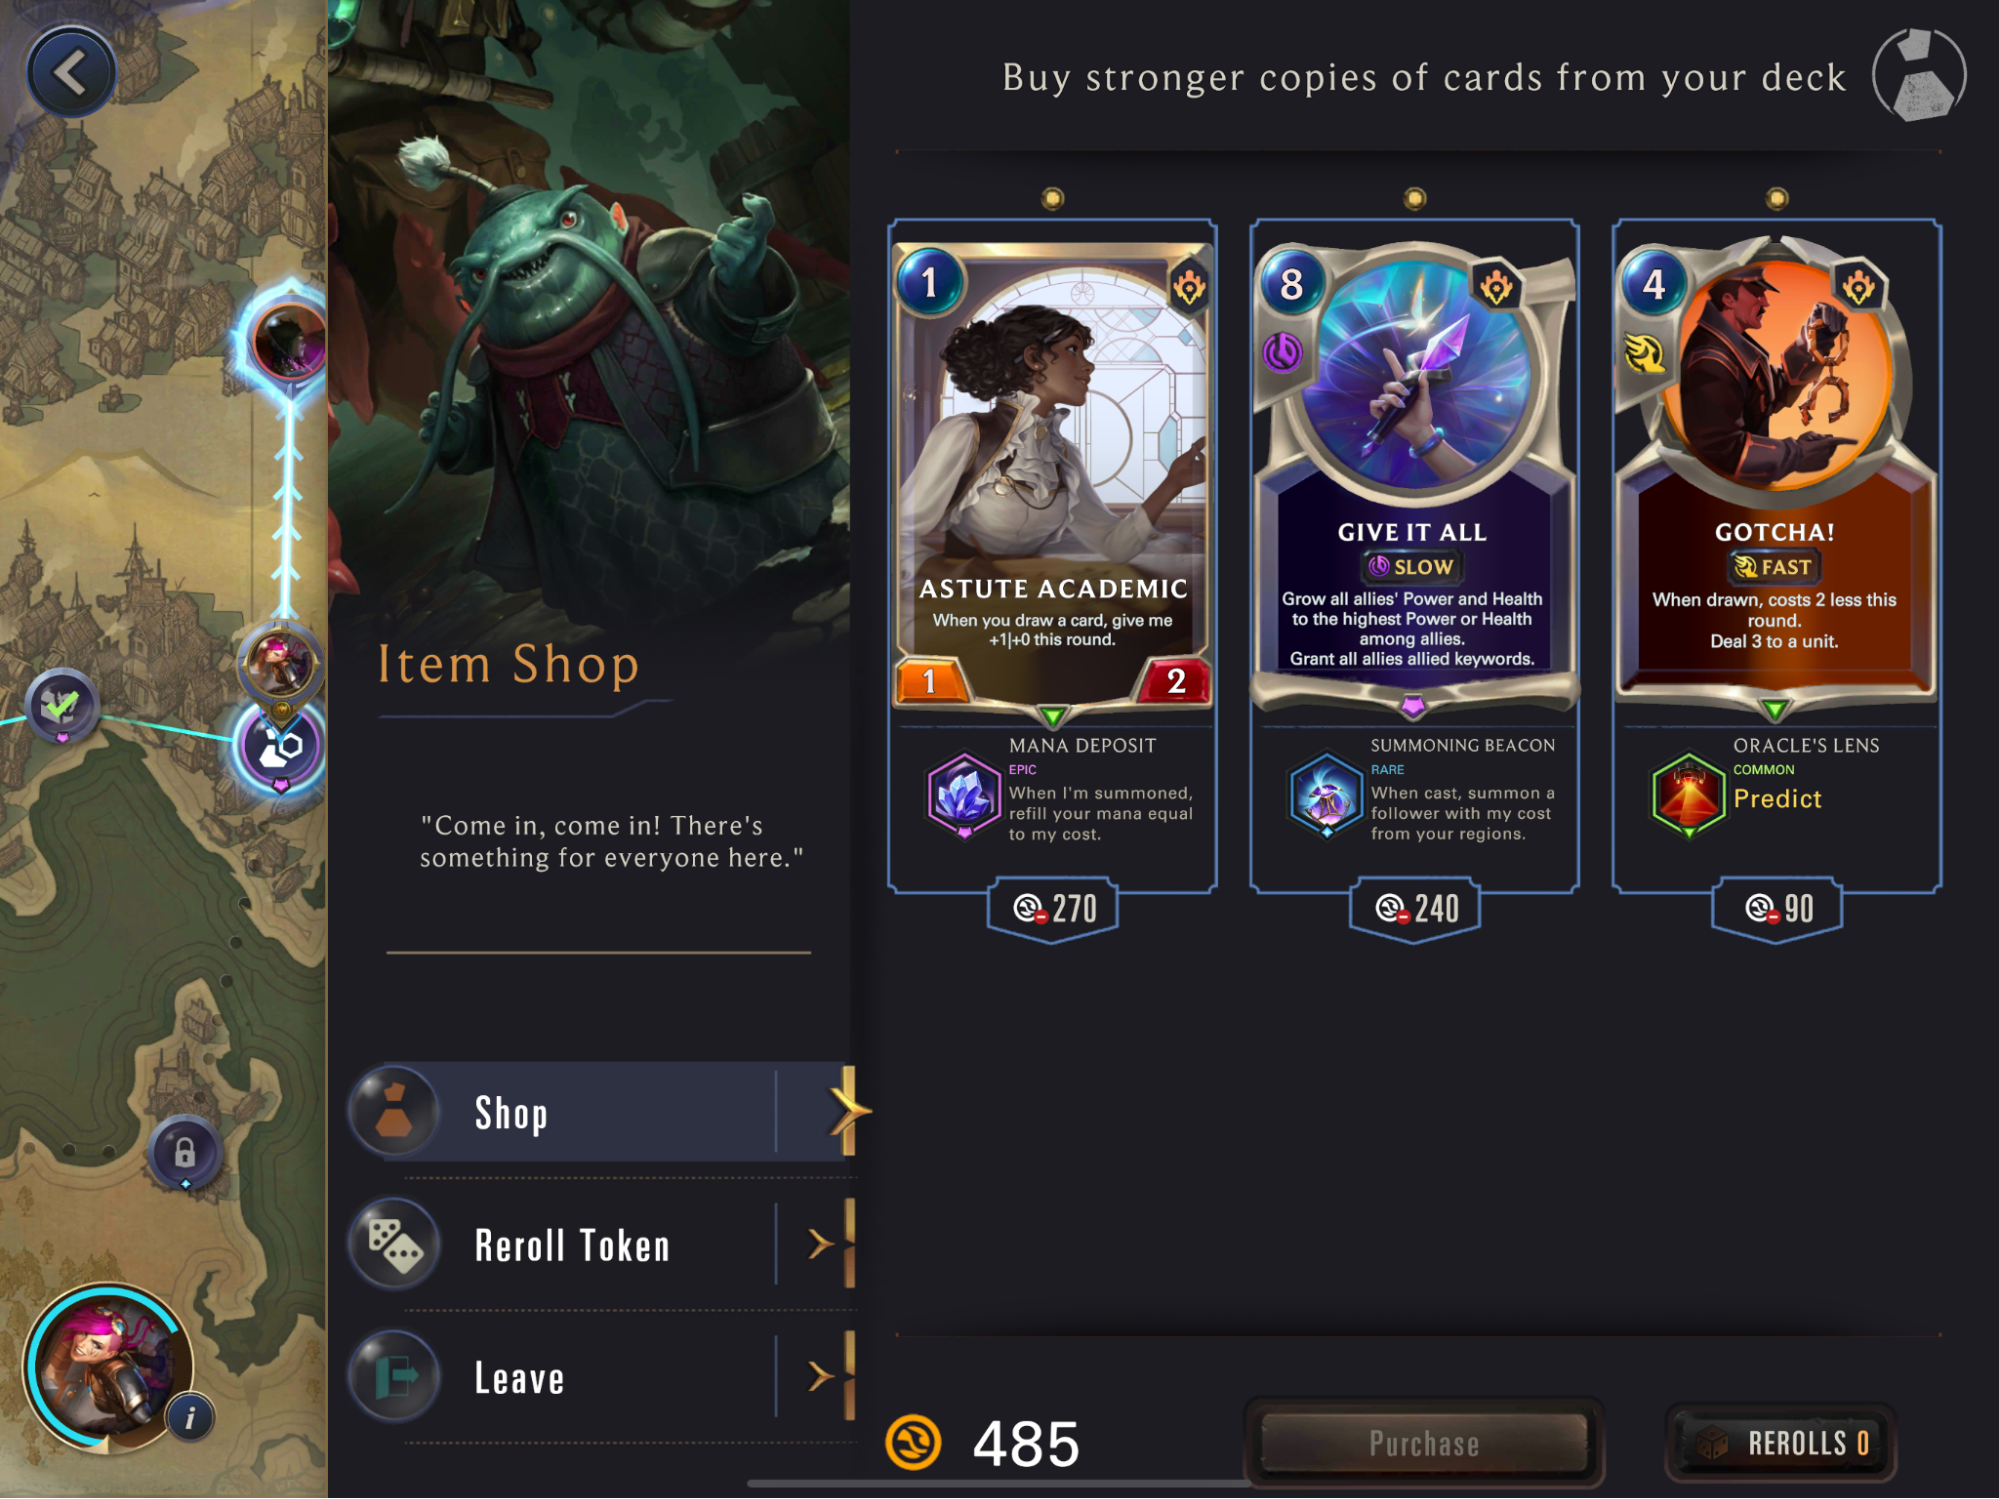
I spy another win condition. As if Shelly wasn’t strong enough already. Scout + Elusive is broken, and it’s gonna help a lot in case we don’t draw Give it All in time. We have exactly enough for the other two so we may as well buy ‘em. I think diluting our deck with two more cards is worth it for the upgrade it provides.
Final Boss
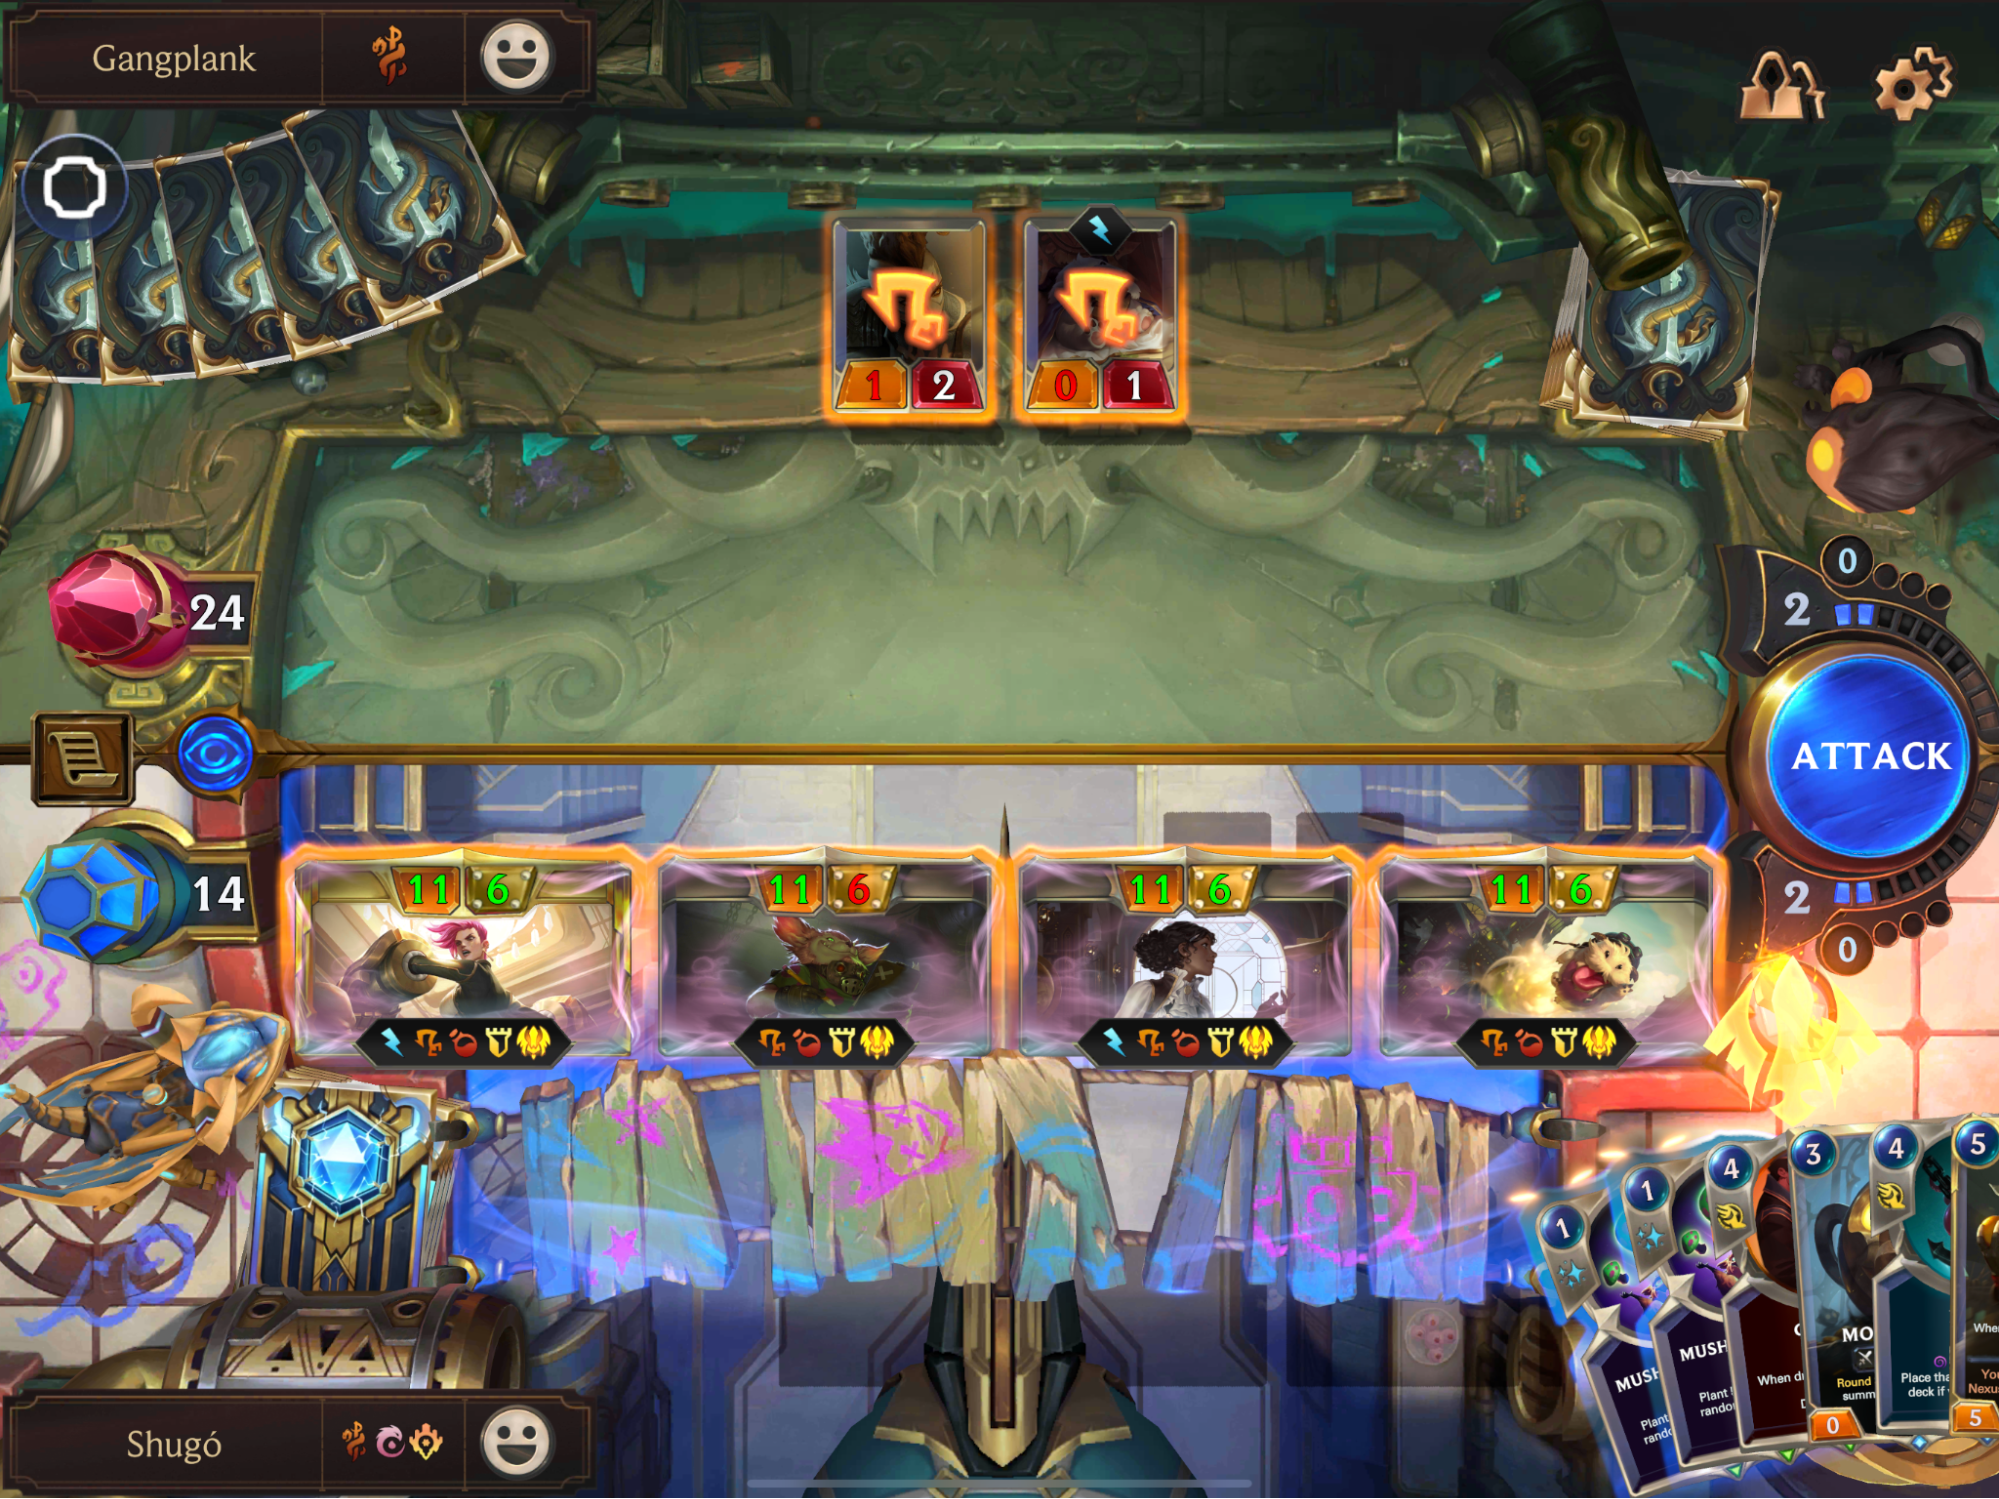
Gangplank: Round Start: The Foe summons a Powder Keg. The first time the Foe starts the round with less than 20 health, summon The Dreadway.
We’ve made it to the end. Remember to mulligan carefully because it’s do or die. While the overall interaction has been fairly limited up until now, Gangplank steps up to a whole new level.
He’s got Parrrley, Line ‘Em Up, Boomship, and most importantly Make it Rain. Thanks to his passive, there will always be a keg on board. This means you always need to be ready or else you risk getting blown out of the water. But that’s not all…
Beyond the typical Keg package, there’s the nab package. Black Market Merchant and Yordle Grifter will pilfer your cards right from your deck… And that includes your powerful item-enhanced cards! Gangplank himself is even geared with a Skirmisher’s Sabre; granting him Challenger to deny your blocking capabilities.
So how do we beat him? We’ve got a couple of options.
Either you need to completely overpower him, or pack more than enough removal to shut down the biggest threats; namely The Dreadway. I suggest the former. Because with The Dreadway, you can easily die on the stack before you can even destroy it. Double Up can be a blowout, and Warning Shot is inevitable.
Set up a position where you can one-shot the Nexus from 20+ health. Don’t knock it down within passive range. Growing a unit with Elusive or Overwhelm would usually do the trick. With Overwhelm, you can drag a keg in front of the unit to prevent any real blockers.
What’s most important is establishing a board while surviving the onslaught of kegs. Timely removal can keep your board safe as you build it up. Make sure you challenge every keg on your attacking turns to minimize risk and save answers. And if a keg-enhanced spell isn’t too devastating, it may be worth taking the hit.
Against Gangplank card advantage is key, so spend your resources wisely! Good luck!
Conclusion:
And there you have it, that wraps up our second adventure. Overall it was a solid draft that helped capitalize on Vi’s deck and work around her. Things won’t always pan out this way, but that’s what makes Path of Champions so enjoyable!
The difficulty starts to ramp up even more in the next adventure. Are you ready?
Shugo’s Productivity Thought of the Day
Sometimes it’s better not to think.
If you originally planned to wake up early, work on an important project, or honor a commitment, then do it. Act immediately.
Don’t give yourself the chance to reconsider. Don’t become your own obstacle.
If you enjoyed this guide, check out our past and future Path of Champions guides.
Subscribe to our newsletter:
Don’t miss out on all of the latest LoR content!