Diablo IVGuides

How Diablo 4 Defense Works (Hit Points, Reduction, and Avoidance)

Table of contents

Deep Dive: Everything You Need to Know About D4 Defenses

Understanding Diablo 4 defenses can be complex due to all its layers, so in this guide, we’ll be breaking down its parts.

The three main parts we’re organizing the topic into are Hit Points, Reduction, and Avoidance.

There’s a decent amount of math involved so feel free to ask any questions in the comments below!

The highly anticipated Spiritborn class will be introduced in Diablo 4’s Vessel of Hatred expansion. Get the scoop with our Spiritborn reveal.

Here’s a handy infographic version below, or feel free to jump to the text.

Coming to Diablo 4, the Vessel of Hatred expansion will showcase the Spiritborn class. Check out our Spiritborn reveal for all the details.

Diablo 4 Defense Deep Dive infographic

TLDR

Defenses can be separate in Hit Points, Reduction, and Avoidance

Hit Points

  • Life
  • Barrier

These are the base of your defense, the more you have, the more benefit you get out of scaling it with reduction and avoidance.

Reduction

  • Damage Reduction
  • Armor
  • Resistances
  • Fortify

These are how you scale your defenses, each percent you add makes your Hit Points more valauble.

Avoidance

  • Dodge

This is another way to scale your defense. When looking at the average case scenario it works exactly like Reduction.

Effective Health Pool (EHP)

How much actual damage your HIt Points can withstand after scaling is called Effective Health Pool.

Effective Health Pool = Hit Points / [(1 – Reduction) * (1 – Avoidance)]

This is the average effective health because avoidance is based on probability.

ehb barbarian

Note:

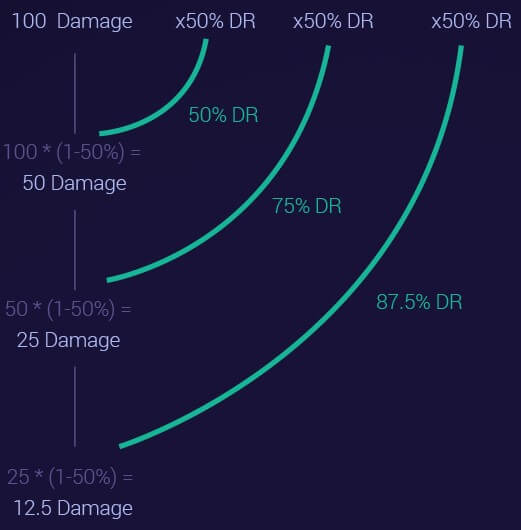
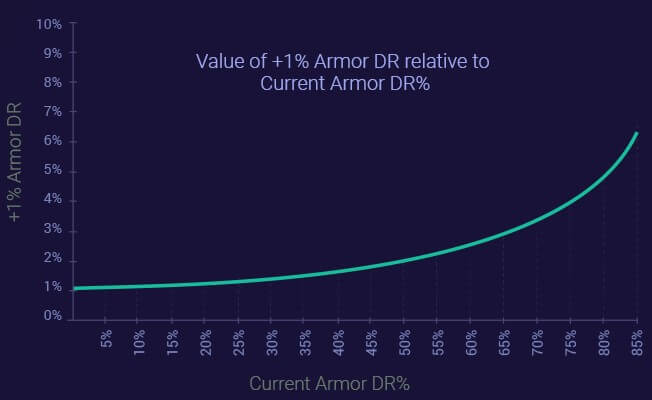
A quick glance at how damage reduction works, in combination with the in-game tooltip, gives the impression that it has diminishing returns. However, if we include our health pool in the equation and consider our actual tankiness, we see the opposite is true, damage reduction scales exponentially.

Hit Points

Life

Life is fairly straightforward. The main thing that needs clarification is how maximum life works.

+X Maximum Life, found on the Paragon Board, functions by multiplying your base life, which is 7959 at level 100. The interesting part is that it is not additive, but multiplicative, which makes it more valuable.

Example: If you have 4 nodes that give you 2% Maximum Life, the total amount that would provide is: (1+2%)^4 – 1 = 8.24% which is more than the 8% you would get if it was additive.

+X Maximum Life, found on your gear, simply adds to your life and is NOT multiplied by +x% Maximum Life.

Example:

7959 Base Life + 8.24% Maximume Life + 1200 Maximum Life
Total Life – 7959 * (1+8.24%) + 1200 = 9814

Barrier

Barrier works exactly like temporary health for the purpose of EHP. It essentially works like a second life pool.

Barrier Generation increases the amount of Barrier you generate up to 100% of your Max Life. It also increases how much Barrier you generate when healing with Temerity.

Example:

Lvl 14 Earthen Bulwark: 104% Base HP = 8277 HP

With 109% Barrier Gen: 8277 * (1 + 109%) = 17,299 Barrier generated per Earthen Bulwark cast.

If you have 17,2999 Max Life or more, you will generate that amount of Barrier, if you have less then you will only generate Barrier up to the amount of Max Life you have.

Reduction

Damage reduction always lowers the amount of damage you take by the stated amount.

reduction graph

Think of every source of DR% as a separate bucket:

Two 10% DR Affixes will give you 1-(1-10%)(1-10%) = 19% DR, which is less than 20%

This is the reason why Dark Shroud and Challenging Shout can be so strong. They work like Armor where you are adding DR% to the same bucket.

challenging shout levels

Every level is more than the previous one.

So in relation to EHP, this means

  • 100 Life, 0% DR -> 100 Damage = 1 hit to die
  • 100 Life, 50% DR -> 50 Damage = 2 hits to die
  • 100 Life, 75% DR -> 25 Damage = 4 hits to die
  • 100 Life, 87.5% DR -> 12.5 Damage = 8 hits to die

Adding 50% DR always doubles the amounts of hits to die no matter how much you have.

EHP = (Life + Barrier) / [(1 – Total DR%)(1 – Dodge%)]

DR% essentially increases the value of each point of health you have. EHP is a metric to understand how valuable our health actually is.

Armor (Physical)

Physical damage is reduced by your total DR% and your armor.

Armor is capped at 85% DR for physical damage.

How much armor is needed to reach 85% depends on the enemy level.

armor cap monster level current armor dr% graph

Armor Formula by Xarrio:

Armor DR% = 100% * (0.00759*(Monster Level)^-0.88165)*(Armor – 614.747) – 0.27596).

Note: The cap for T100 is approximately 13350

The value of armor increases the closer you get to the cap. This makes armor the most important defensive stat as long as you can get close to the gap.

current armor dr% and +1% armor dr graph

Total Physical DR% 1 – (1 – Total DR%)*(1 – Armor DR%)

0 to 13500 armor chart

As you can see, although we’re adding 1500 armor every time, how much damage reduction it’s equivalent to dramatically rises until we reach the Armor Cap.

Disobedience

Disobedience is a key part of your defenses as it greatly scales your biggest source of survivability, Armor. It’s important to understand how it works.

Total Armor after Disobedience = (Flat Armor) * (1 + Armor % + Disobedience %) * (1 +Armor while Werewolf/bear %)

Your total armor in town is already multiplied by your gear’s Armor% which means you can’t simply multiply your Armor in town by your Disobedience% to know what your total Armor in combat will be.

armor in town equipment

Example:

8250 Armor in town. 25% Armor on gear

1.1% Disobedience, 60 Stacks = 66% Disobedience

If you simply did 8250 * (1 + 66%) = 13695 you would think you are above the T100 armor cap.

Your actual armor is:

8250 * (1 + 66% + 25%) / (1 +25%) = 12606 which is under the cap.

Your Total Armor after Disobedience in terms of Armor in Town is:

Armor in Town * (1 + Armor% + Disobedience%) * (1 + Armor while Werewolf/bear%) / (1 +Armor%)

Resistances (Elemental)

Elemental damage is reduced by your total DR% and your resistances.

Resistances have a penalty based only on your World Tier.

world tier resistances

This penalty is additive which means if you had 50% Poison Resistance in WT1, you will now have 50% – 50% = 0% Poison Resistance in WT4.

Because of the SEason 2 rework of resistances, they are now a very strong way to reduce elemental damage as now they work exactly as Armor but for elemental damage.

Resistances can go up to 70% normally and up to 85% through the use of items with +% Maximum Resistance. This incredibly strong as the different between 70% Resistances and 85% is 1 – .15/.30 = 50% Elemental DR.

Fortify

Damage Reduction while Fortified: 50%

fortified silver line

Your character is only considered Fortified when there’s a silver line around your globe.

Your life, however, is automatically Fortified depending on your Fortify meter even if your character is not considered Fortified.

fortified example graph

The Undaunted Glyph is perfect to understand this: the damage bonus is only applied when you have a silver outline around your HP globe and are therefore considered Fortified.

socketed glyph undaunted

The damage reduction applies to whatever % of your life has Fortify.

Avoidance (Dodge)

1% Dodge = 1% DR when looking at the average effect but because it’s a probability to ignore the damage you can’t depend on it, it’s worth less in practice.

Dodge is a defensive stat that gives you a chance to completely ignore an attack. The way it’s calculated is not very straightforward, some sources are additive and others are multiplicative.

avoidance dodge formula

  • Additive
    • Dex
    • Assimilation
  • Multiplicative
    • Affixes
    • Agile Talent
0