League of Legends
 Teamfight Tactics
 Legends of Runeterra
 Valorant
 Lost Ark
 Destiny 2
 Diablo 4
 Download APP
 Collapse
Radiant Chamber Guide (Agent Tips and Tricks)
Chamber currently holds a strong position in the meta and is a very effective solo-queue agent to play when aspiring to climb. He provides benefits for his allies by boosting the team’s economy with his in-built weaponry.
Further, a good Chamber can change the course of eco rounds with his ultimate, Tour de Force and his Headhunter Sheriff. His traps can be used both offensively and defensively and provide vital information for the team.
Not only does this utility provide information for the team by covering flanks, if activated the slow lasts quite a long time and can completely compromise enemy attacks.
Chamber is the agent for you if you feel confident at times ego-peeking angles and making cheesy plays. Crosshair placement needs to be your forte as you will much of the time be pre-aiming opponents.
This article will explain how each ability of his should be used and some strategies to incorporate into your gameplay for all maps on both attack and defense. Let’s start off by exploring his general playstyle on defense and how to best use his Rendezvous teleport ability.
Thoughts on Rendezvous
Chamber’s Rendezvous is his best ability, playing weird off angles whilst easily evading danger makes him such an annoying agent to play against.
It is one of the best forms of disengage in the game since it is almost instantaneous and he does not require a kill like Reyna to Dismiss. The Rendezvous, therefore, goes toe-to-toe against Jett’s dash regarding escape potential.
Having a bunch of go-to set-ups on each map is recommended, especially on defense. Moreover, it is important to mix up the way you are placing the teleport anchors in order to keep the enemy guessing and remain unpredictable.
Similar to how Jett is able to take wild peeks in an attempt to secure opening picks, Chamber can do the same. It takes practice and experience to gain confidence holding certain angles but after repeated interactions across the same lines of sight you will increase your chances of swinging the round in your favor right from the start.
To maximize the effectiveness of his Rendezvous Chamber players must at times be audacious and bold in the way they hold and peek angles upon barrier-drop.
Rendezvous and Trademark setups for Defense (All Maps)
Important considerations
- Be creative
- No strict rules, mixing it up is key. Any little corner and crevice makes a good spot to catch enemies off guard and slow them.
- Placing them near chokepoints and or in very obvious positions repeatedly will increase the risk of these being either smoked and covered, or cleared out by cautious enemies using utility such as Shock Darts etc.
- Chamber only has two Trademarks that he can use in a single round. (There are multiple spots shown, choose two and keep changing things up). Make sure you are playing around your slows and traps and staying alive so that they activate).
- Utilizing your Rendezvous at the very beginning of rounds is worthwhile since you will then have it recharged to use again later in the round/ post-plant . So – Be brave and go for that opening pick, place one anchor for the area you will be peeking in an attempt for first blood and another in a safer area towards the back of sites or spawn so that you are safe after Chamber snaps his fingers.
- KAY/O’s suppression counters Chamber significantly since you will no longer be able to use Rendezvous and teleport out if caught by KAY/O’s ultimate or knife.
- Understanding how to set up for all bomb sites as a Chamber will give the enemy a hard time predicting your setups and strategies.
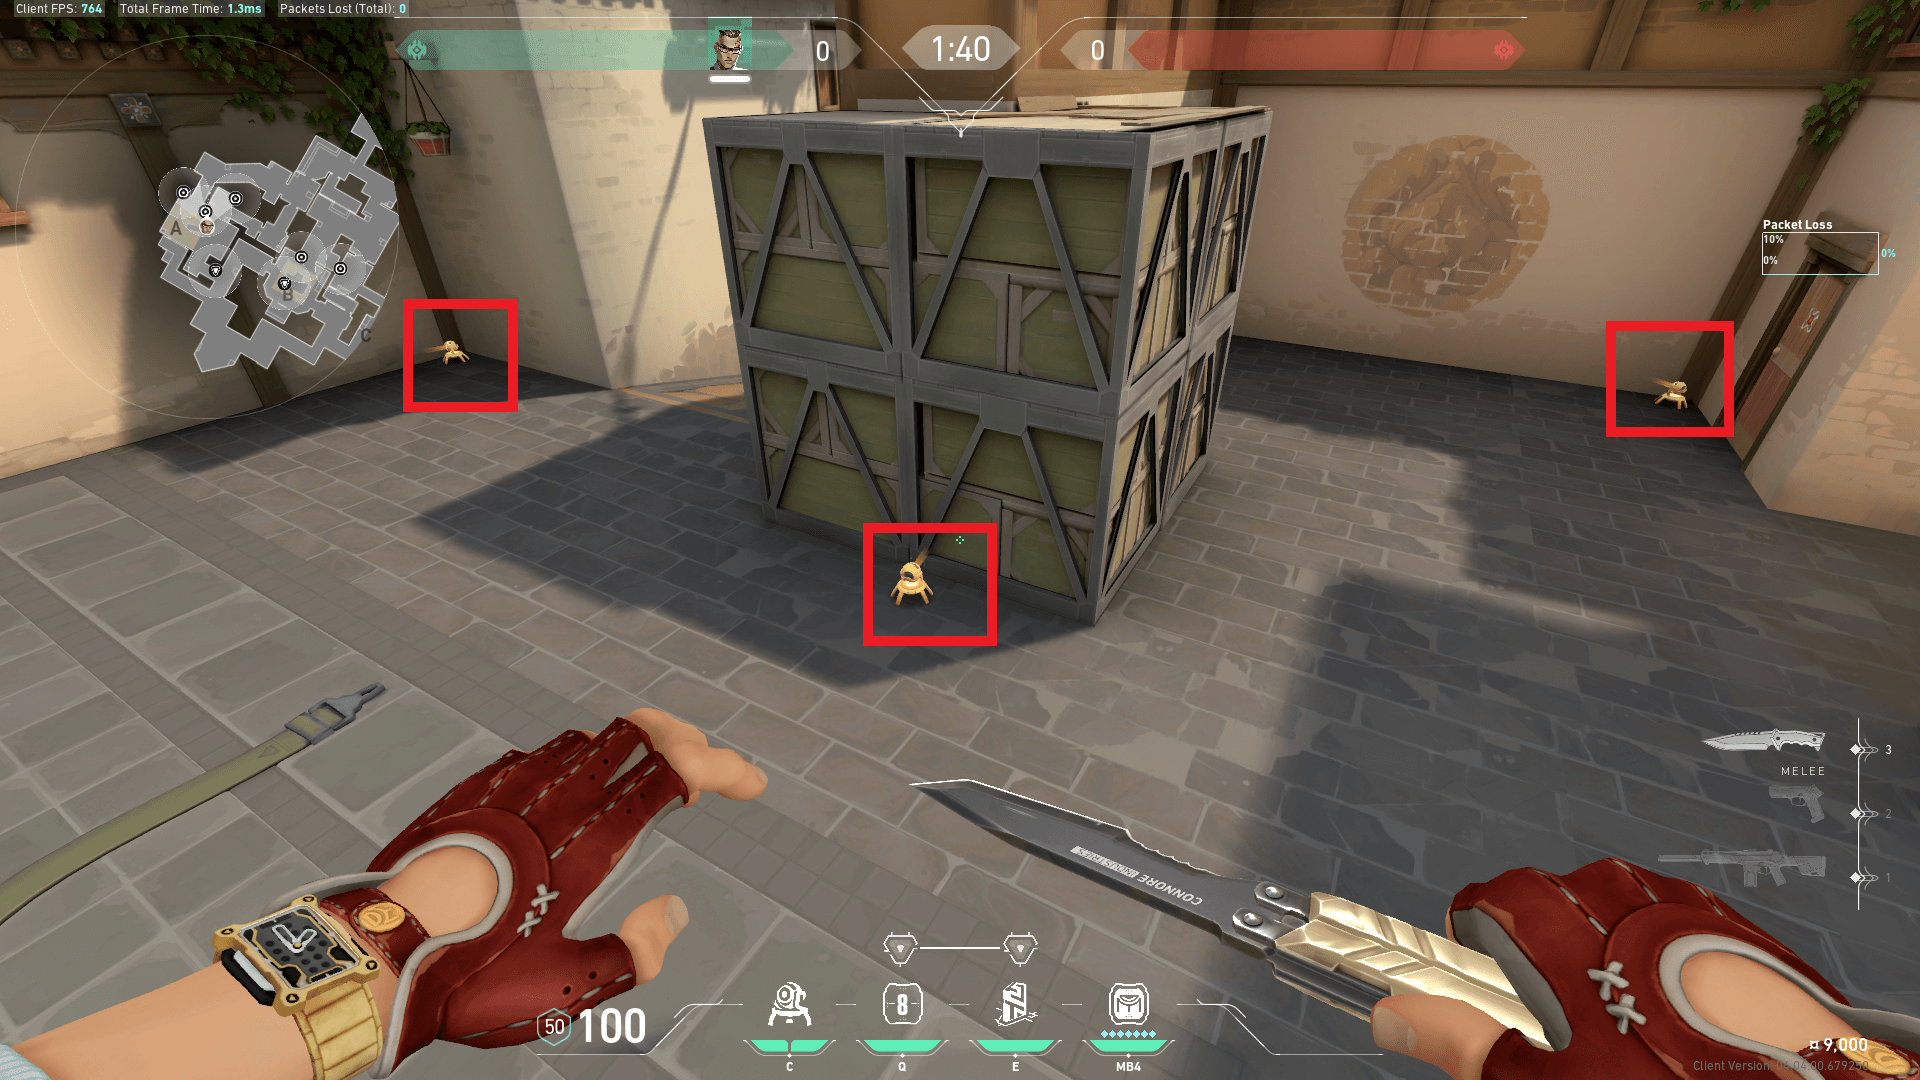
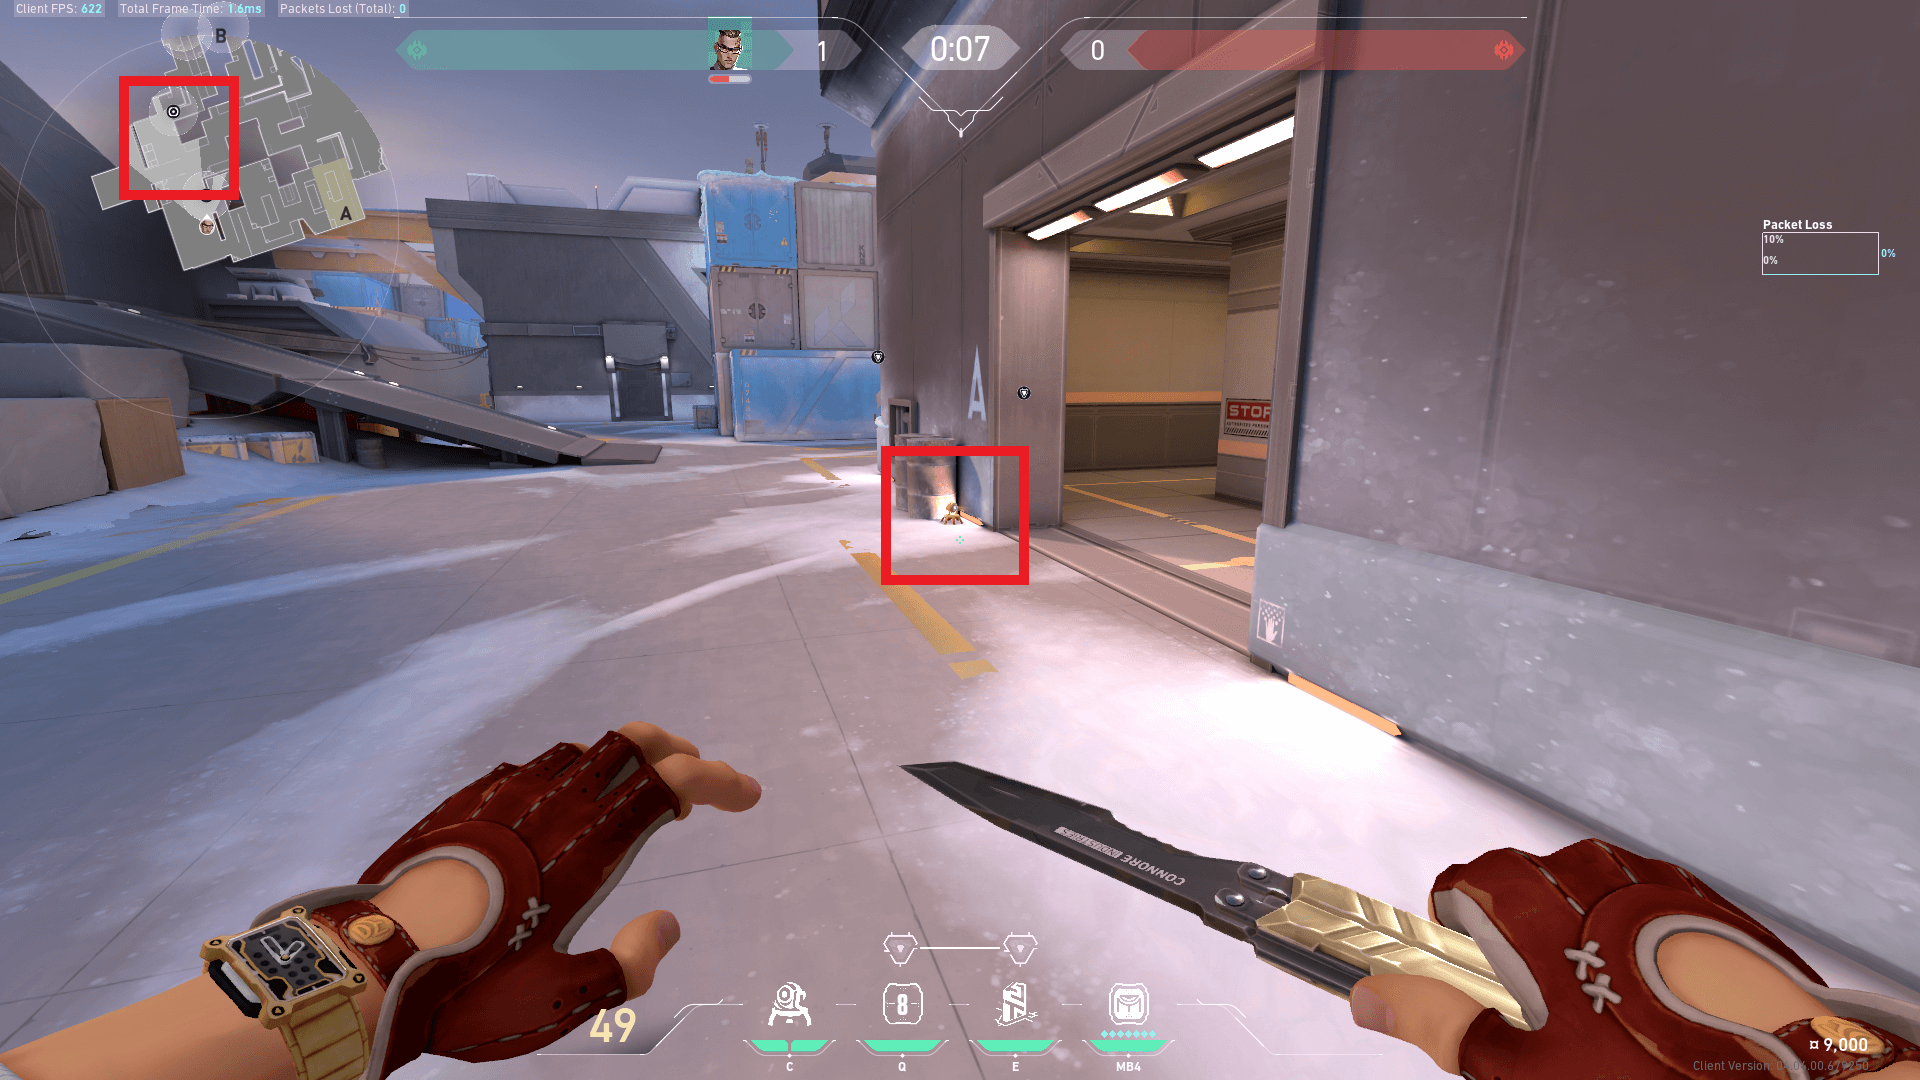
- Red squares are used to highlight his Trademark/trap ability, whilst red circles will be used to showcase where his Rendezvous anchors can be placed.
Haven
A Site
This one must be placed after barrier drop but provides good early information and slows enemies before they have reached the site to allow teammates more time to rotate.
B Site
Mixing it up playing B for one round can be a good option on Chamber, especially when his Ultimate is ready you might be able to catch enemies that peek mid window off guard. Go all the way to the end of the generator when peeking as shown, this will reduce your chances of being blinded by a Leer, etc.
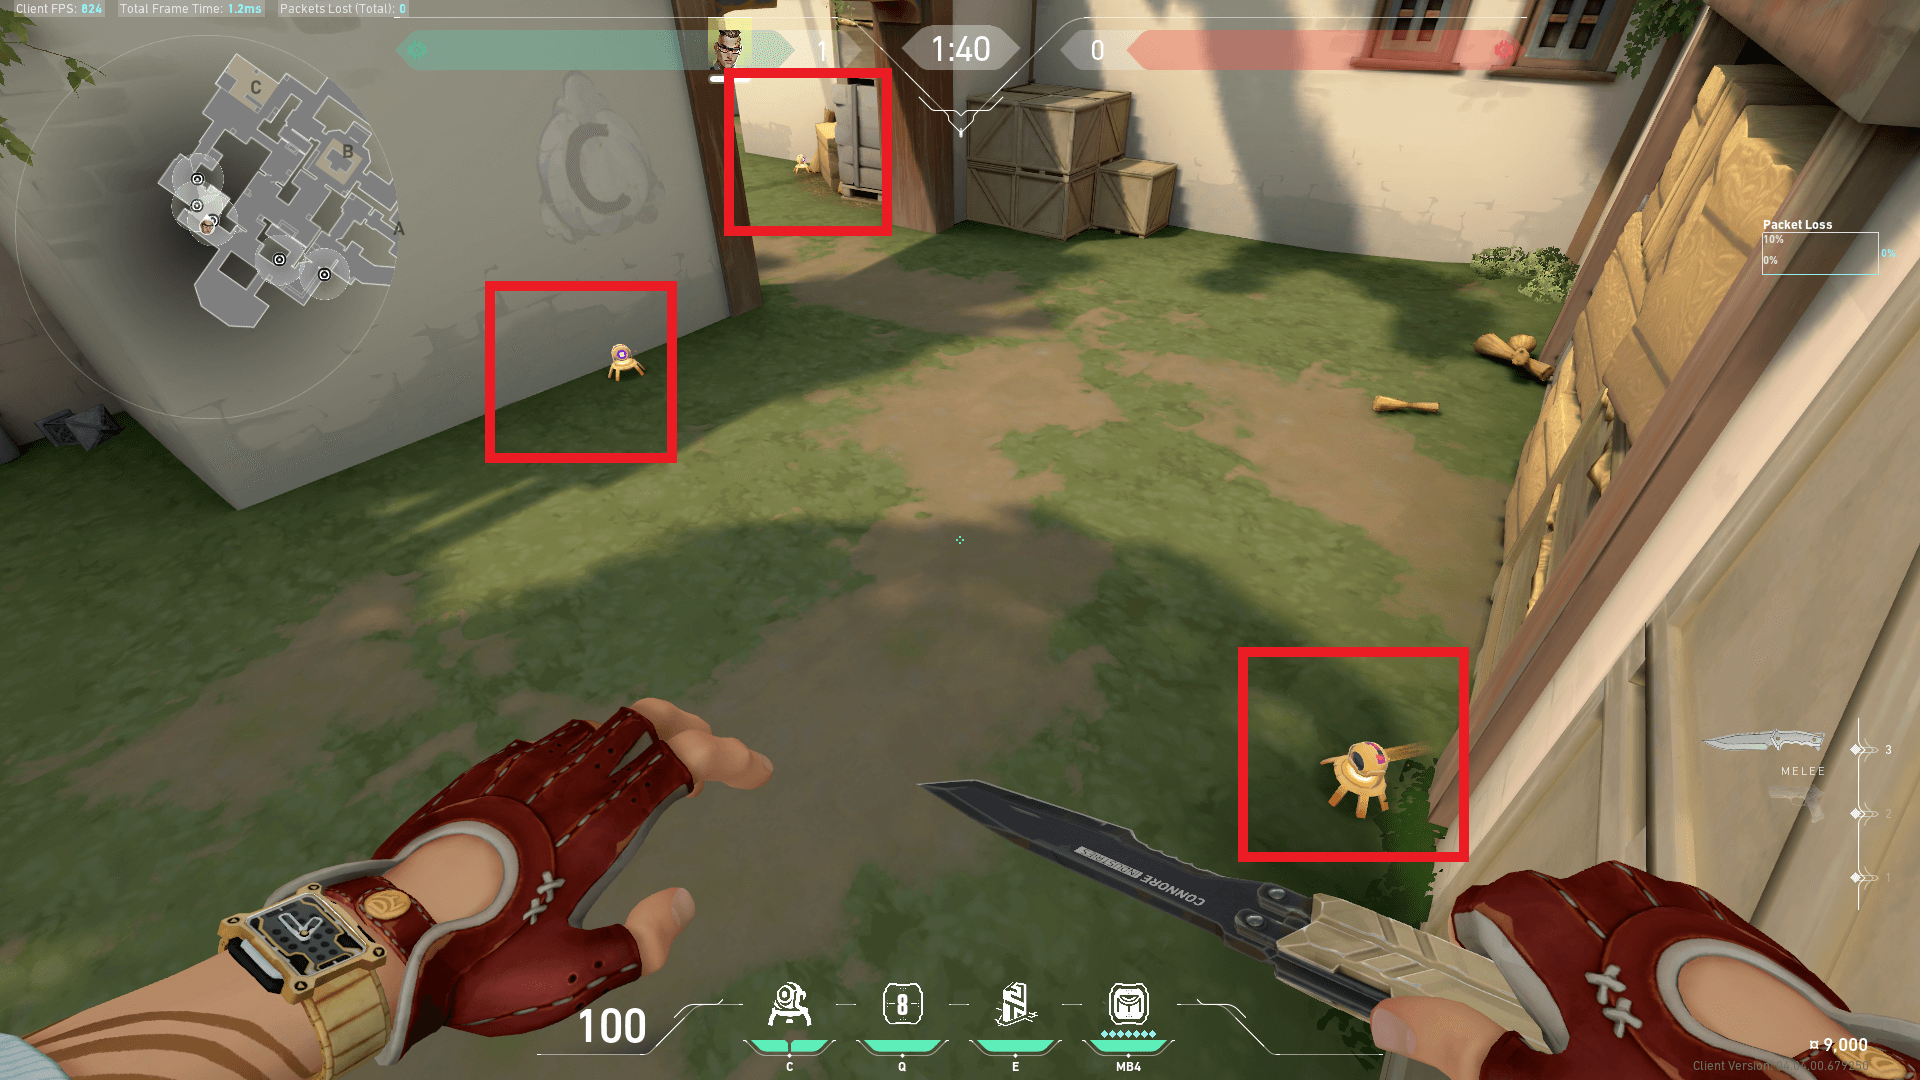
C Site
Placing a Trademark in Garage when playing C allows for greater control of this region of the map. In solo-queue you can’t always whole-heartedly trust your teammates and this prevents any confusion between enemies pushing from grass/versus long, (it allows you to focus solely on C Long).
Bind

Note, teleporters can be placed to rotate between A and B Site on this map. One anchor is to be placed in U-Hall whilst the other should be on B Site in the cubby.
A Site
These are some options for your Trademark, keep mixing it up round-to-round to keep the opponents guessing. You can also opt to place one outside of showers.
Be confident to occasionally get aggressive on A Main. See clip below.
B Site
There are plenty of options to place your Trademarks and Rendezvous anchors on this site. Keep changing it up as rounds progress. (If you are playing back site you might opt to place the anchors deeper into the site like cubby and or the green box. If you are playing around Garden it may be best to place it in/under Hookah and garden/or just outside.) If you are the Sentinel responsible for holding B site it is reliable to place your 2nd anchor Deep into Elbow for safety if you have to fall off site.)
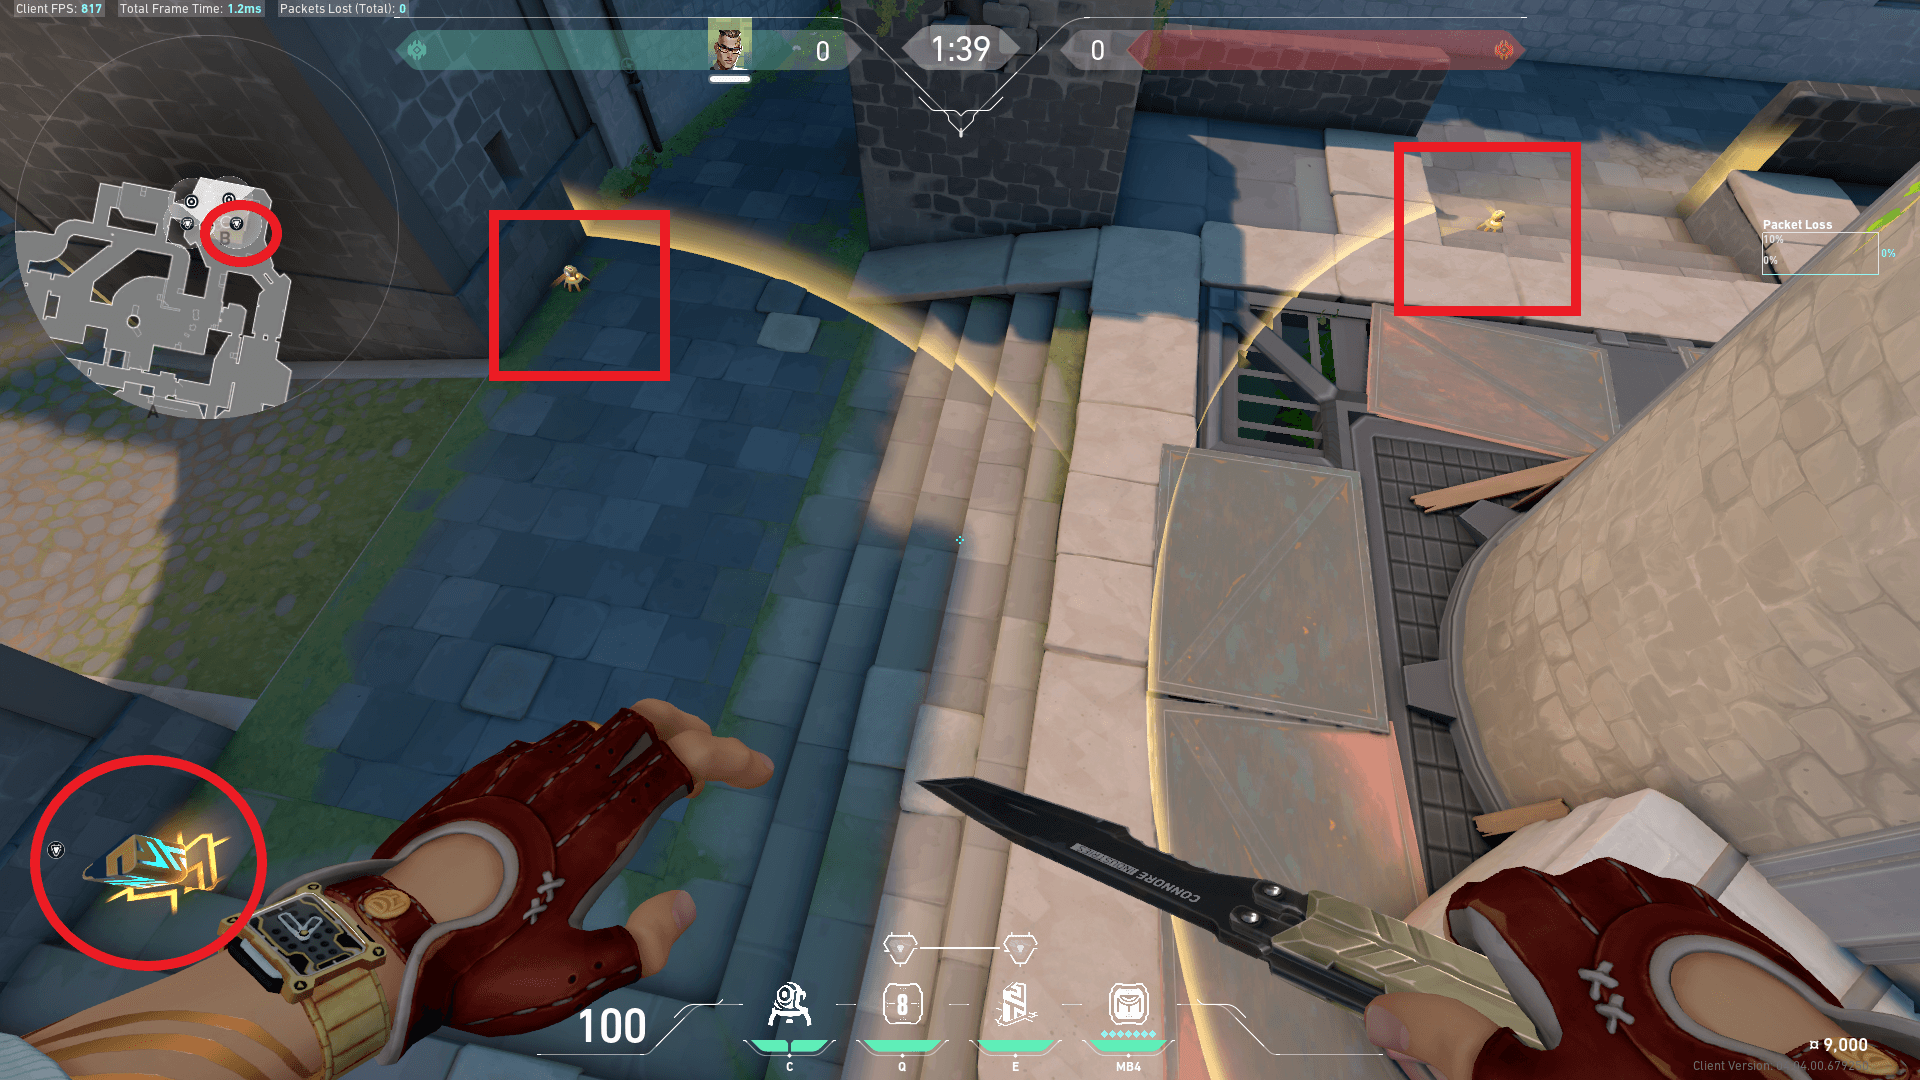
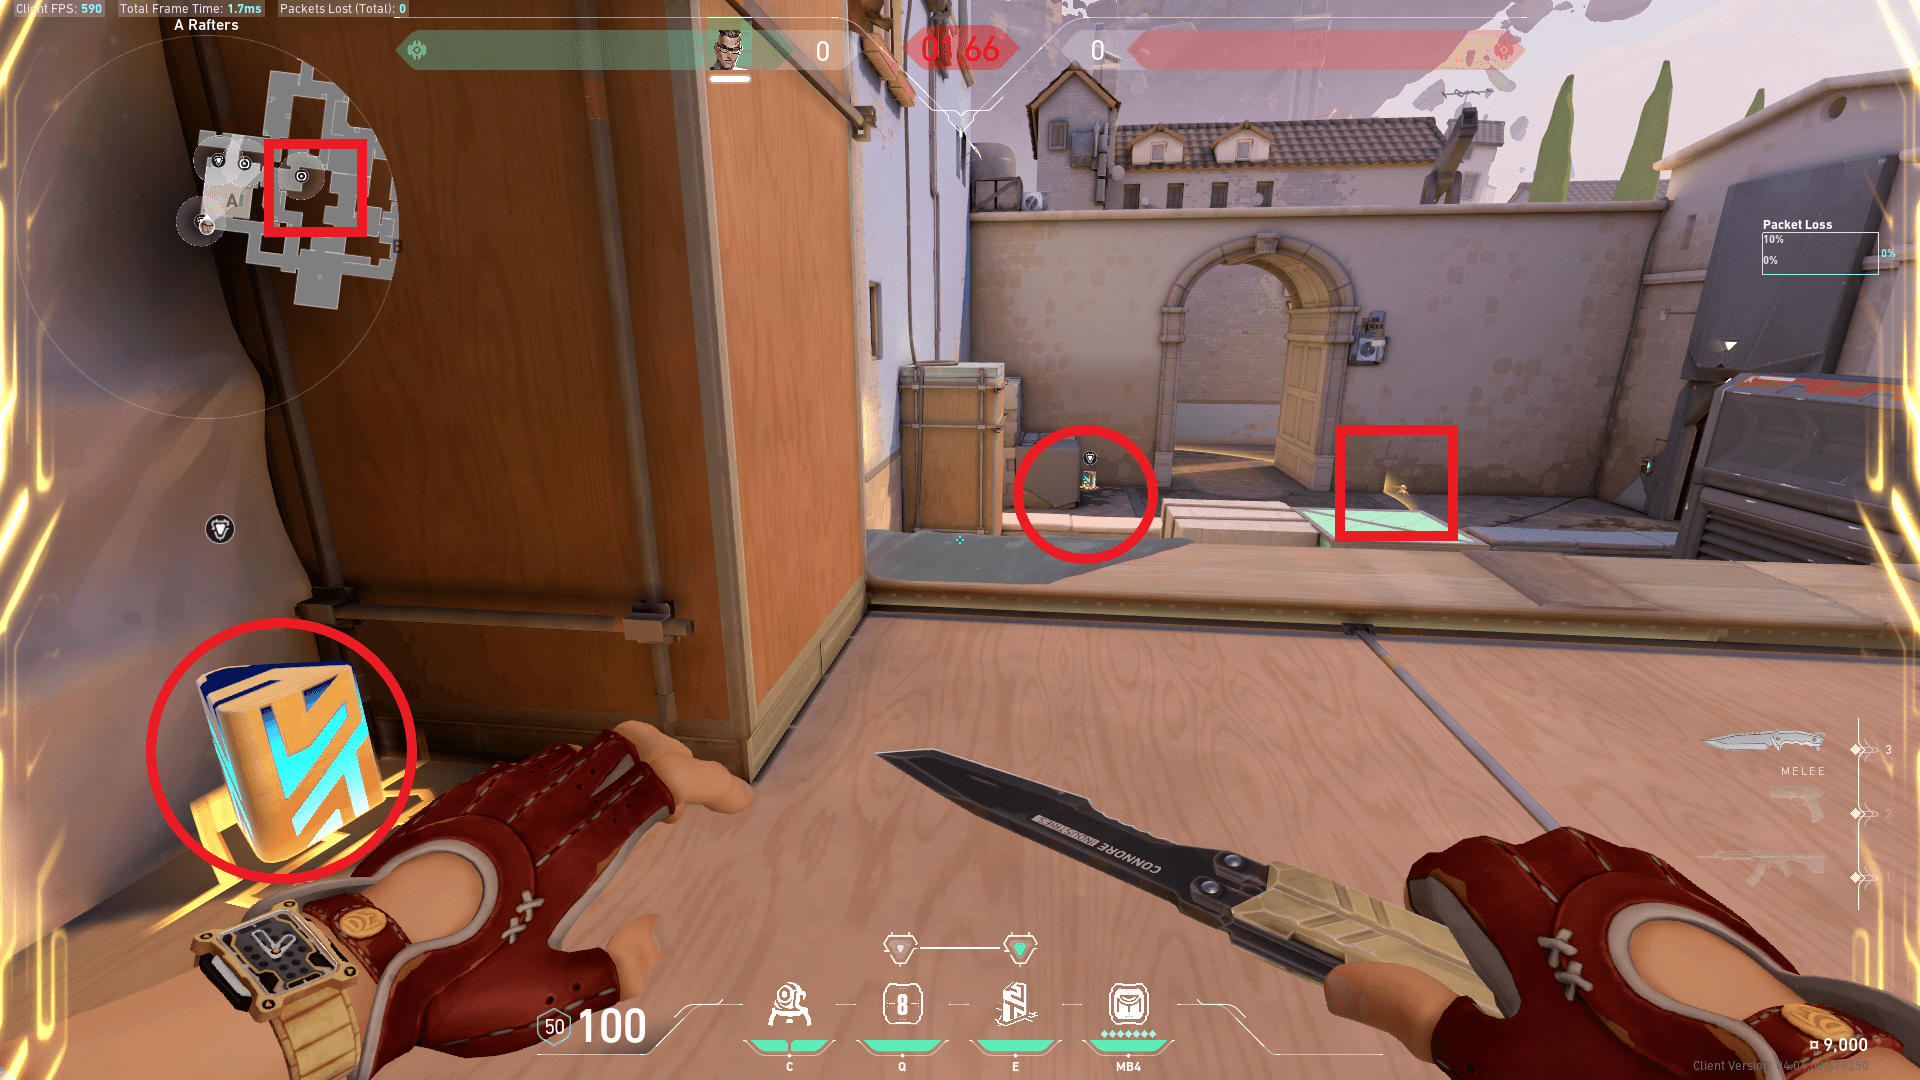
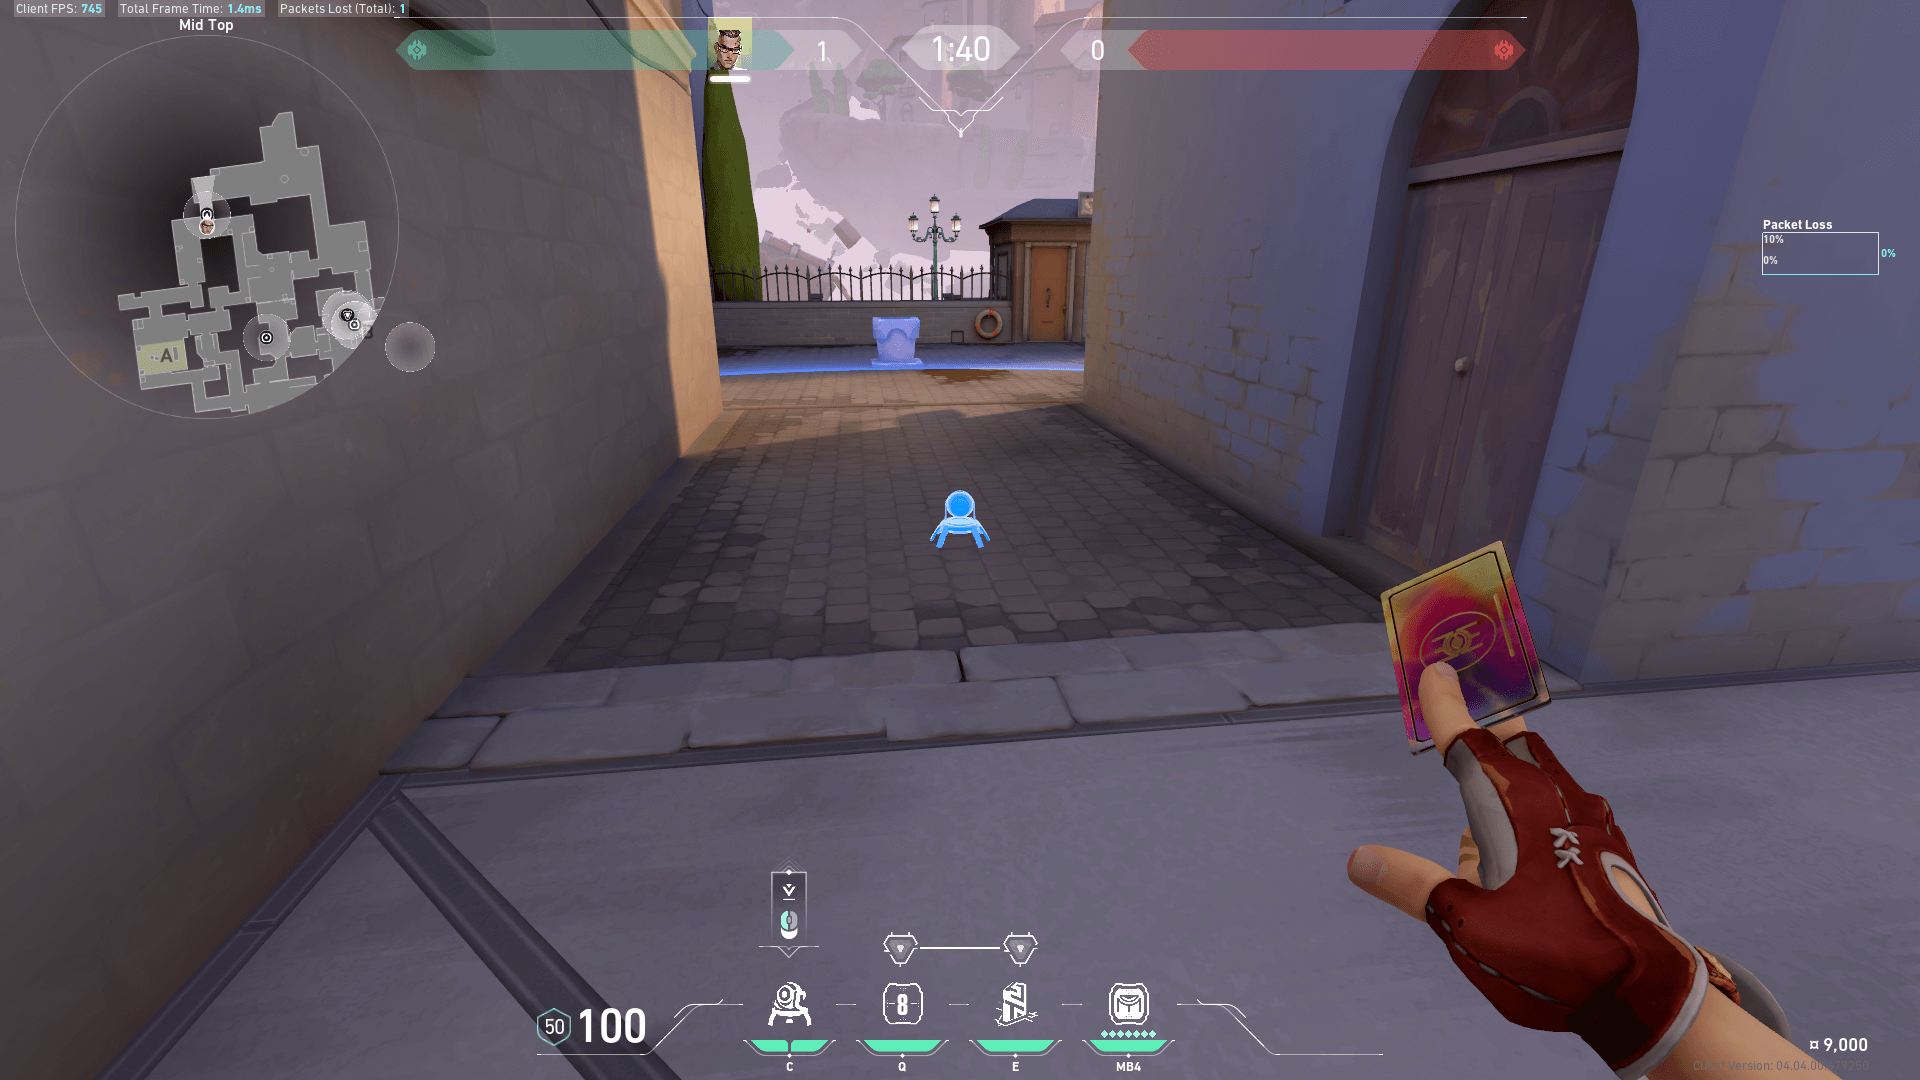
Breeze
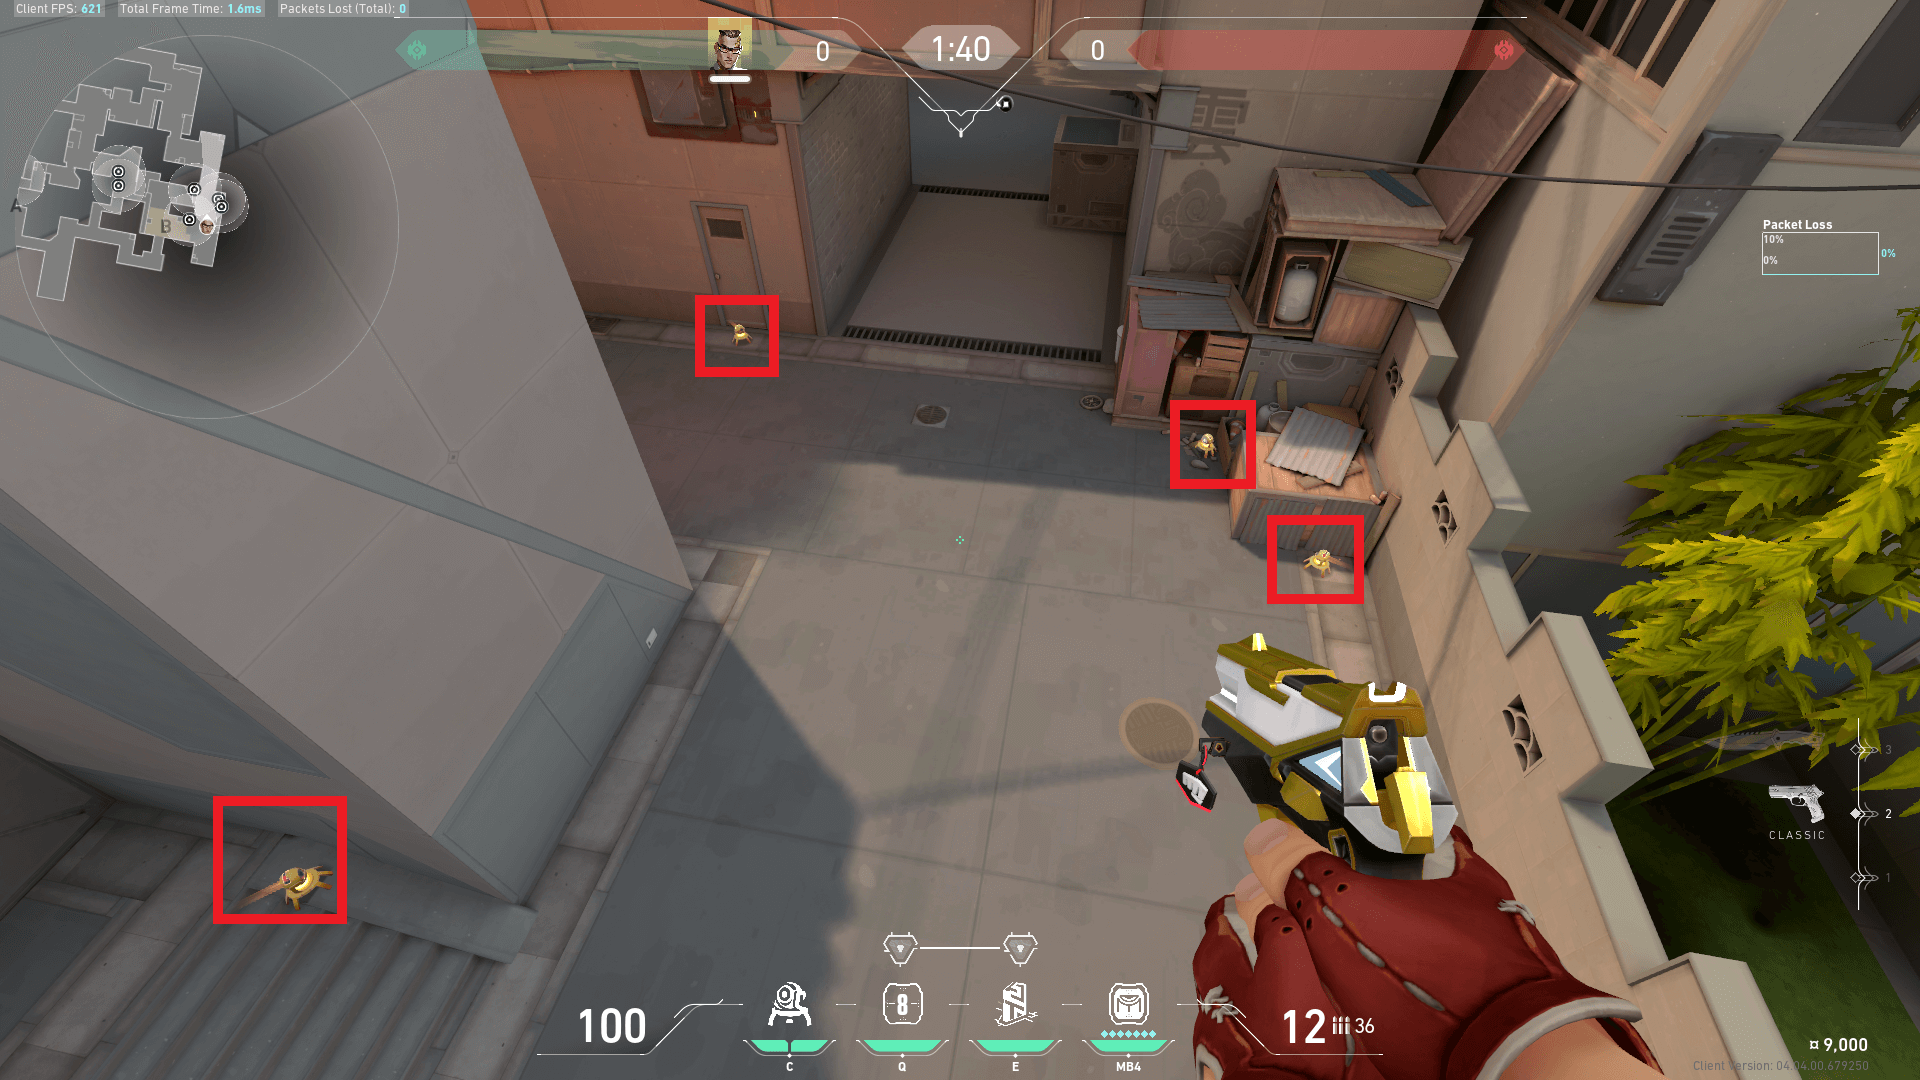
A Site
The trap closest to A Main is unable to be spotted by enemies until they are already too close. See image below…
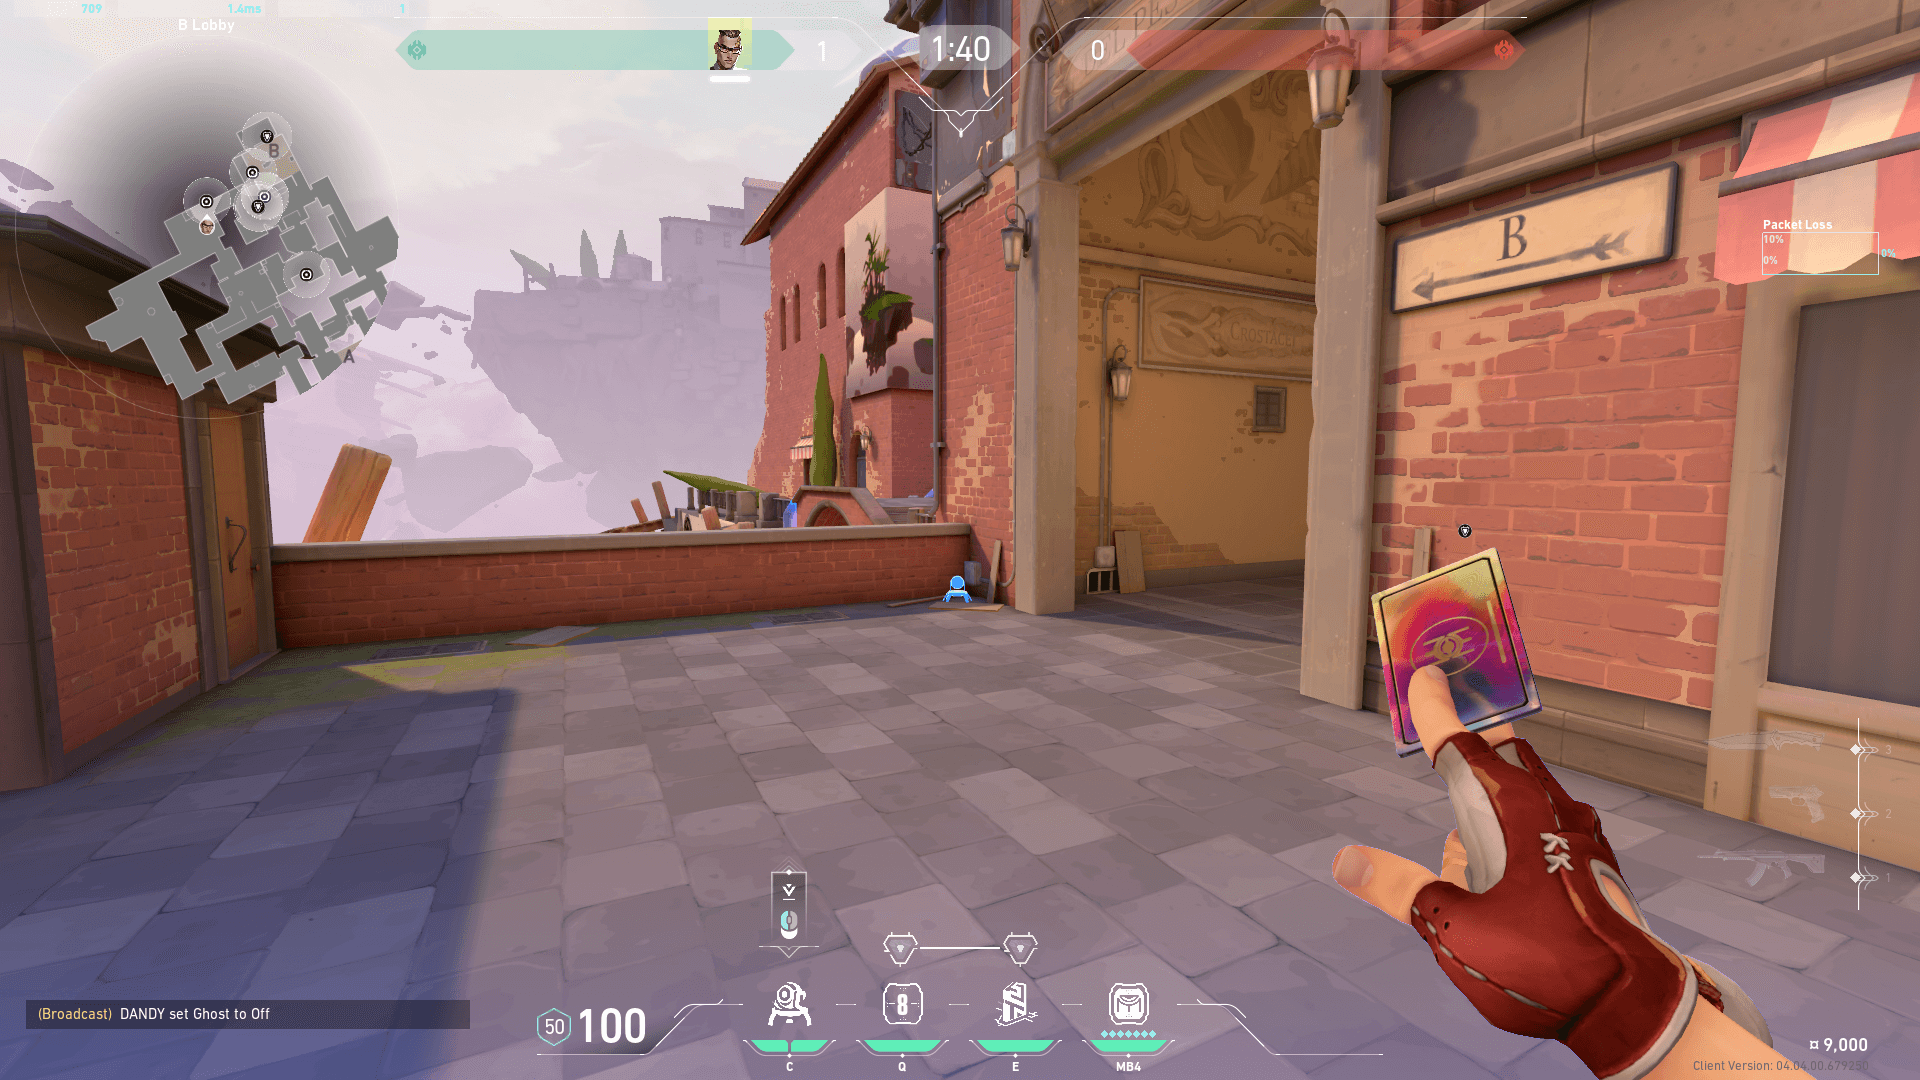
Aggressively holding the push out of A Shop and A Cave is a strong option as a Chamber player. It is not worth overdoing this though as the enemy team will begin cautiously clearing you out with their Initiator and utility.
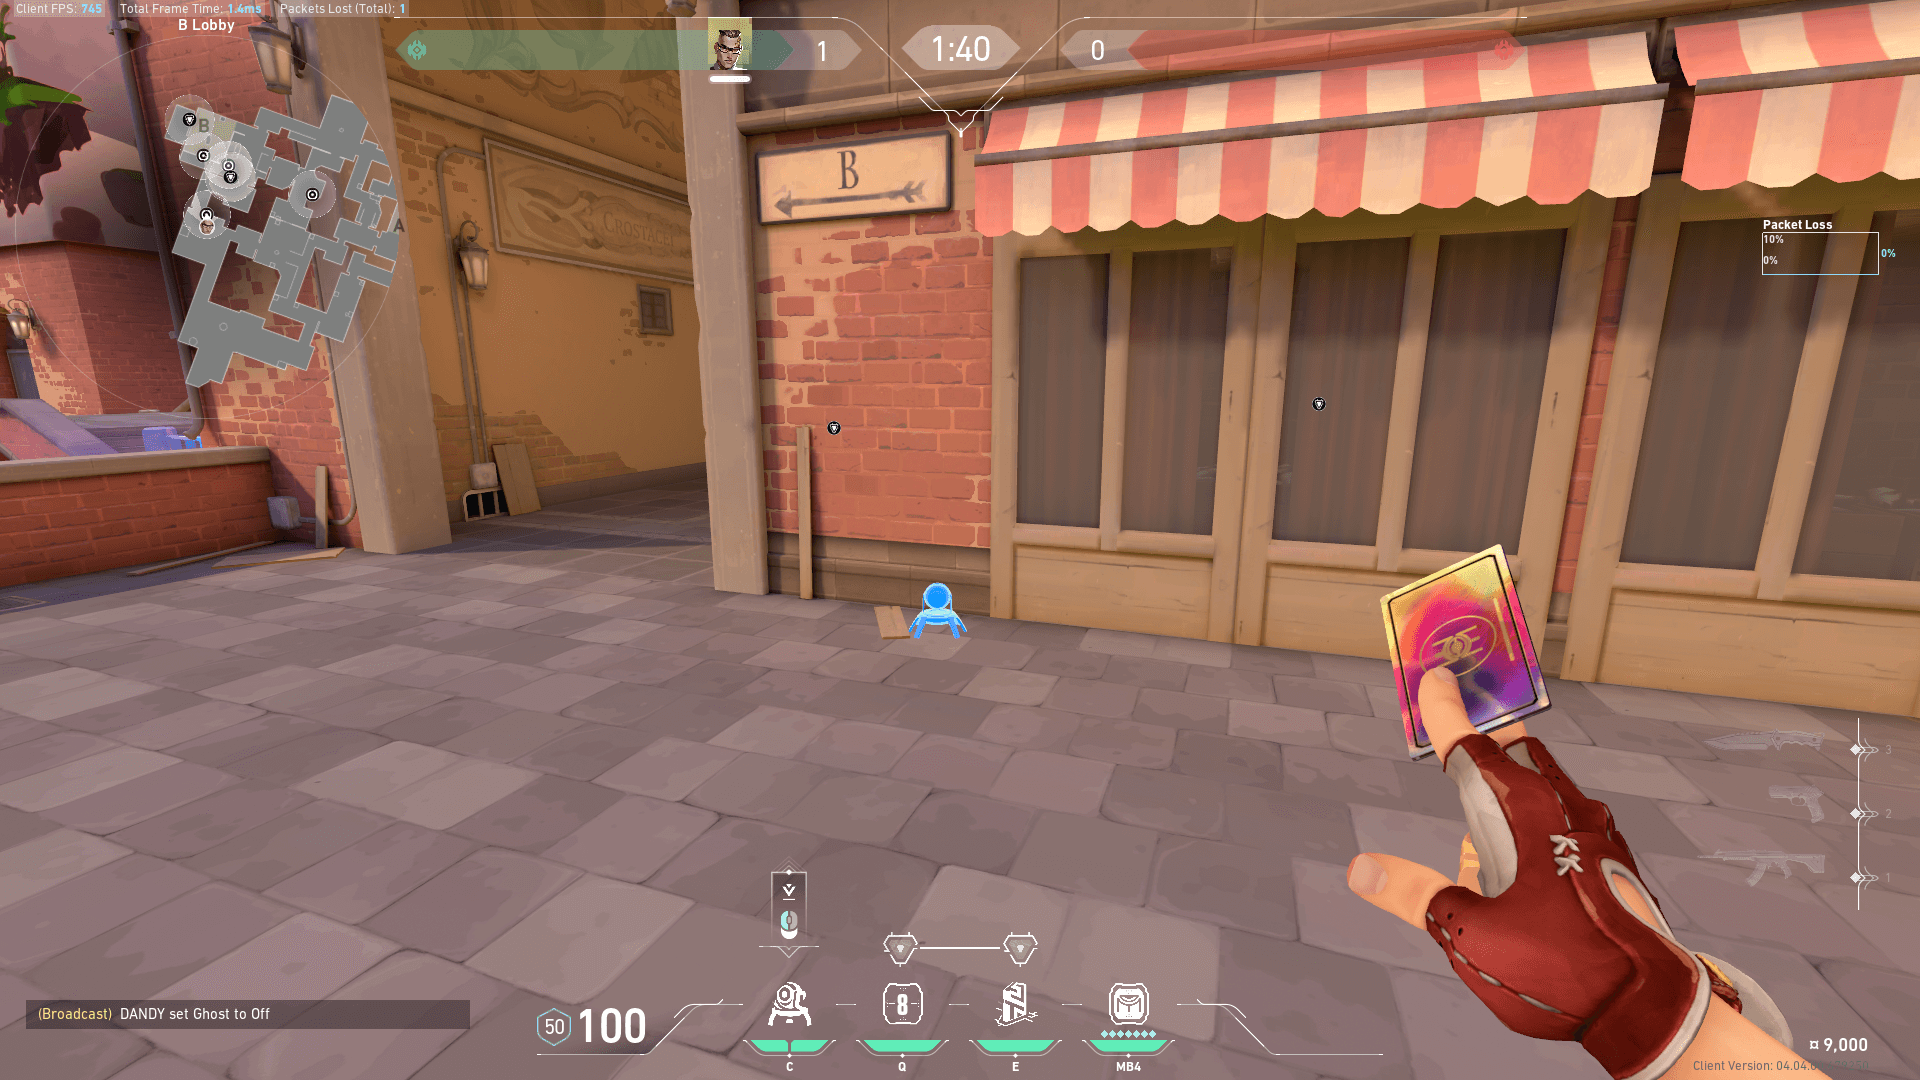
Placing a trap inside Hall in the corner where the door switch is at will provide valuable information and prevent enemies from slowly lurking into your spawn.
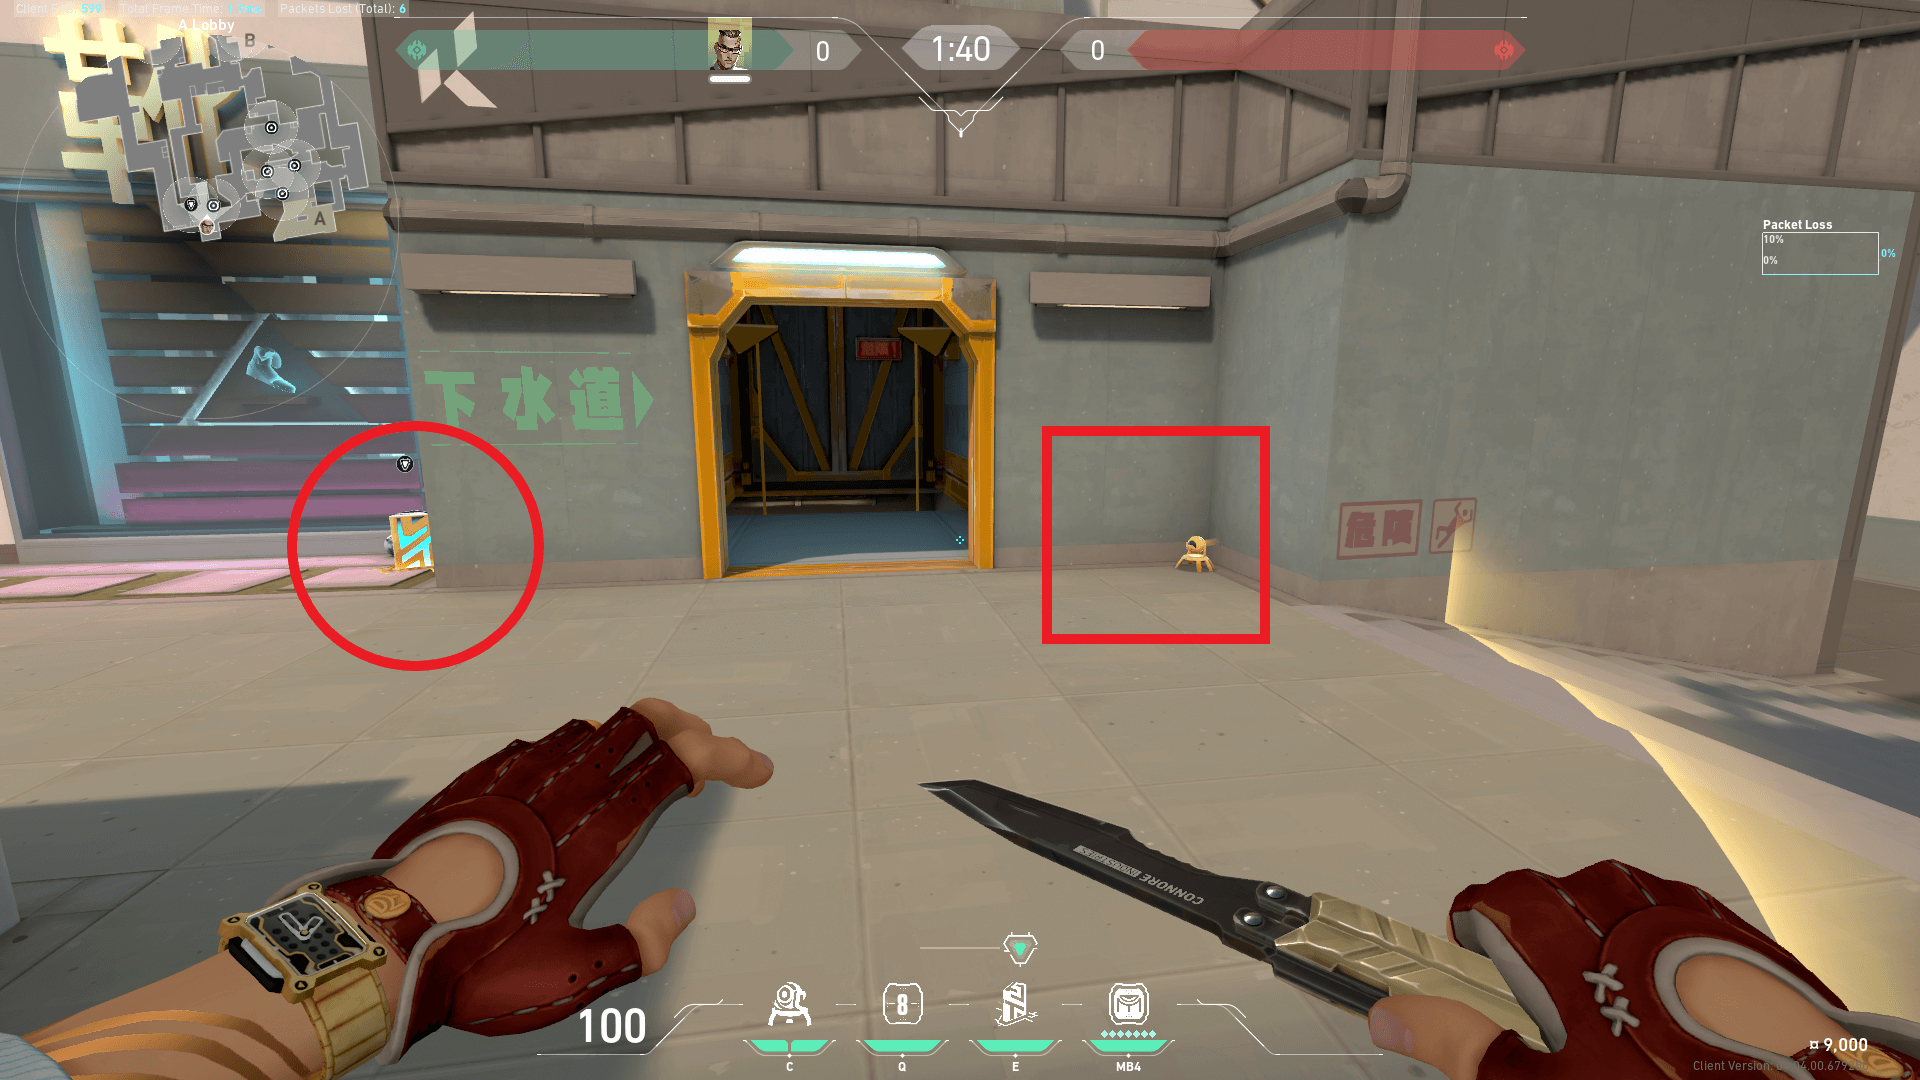
B Site
The teleport anchor right beside B Main is placed there when planning on peeking Elbow immediately upon barrier drop. (There is a very small opportunity to take your shot when making this play as you can be peeked from Window, you must either rely on a teammate holding Window for you; inform them before the round starts to hold Window for you).
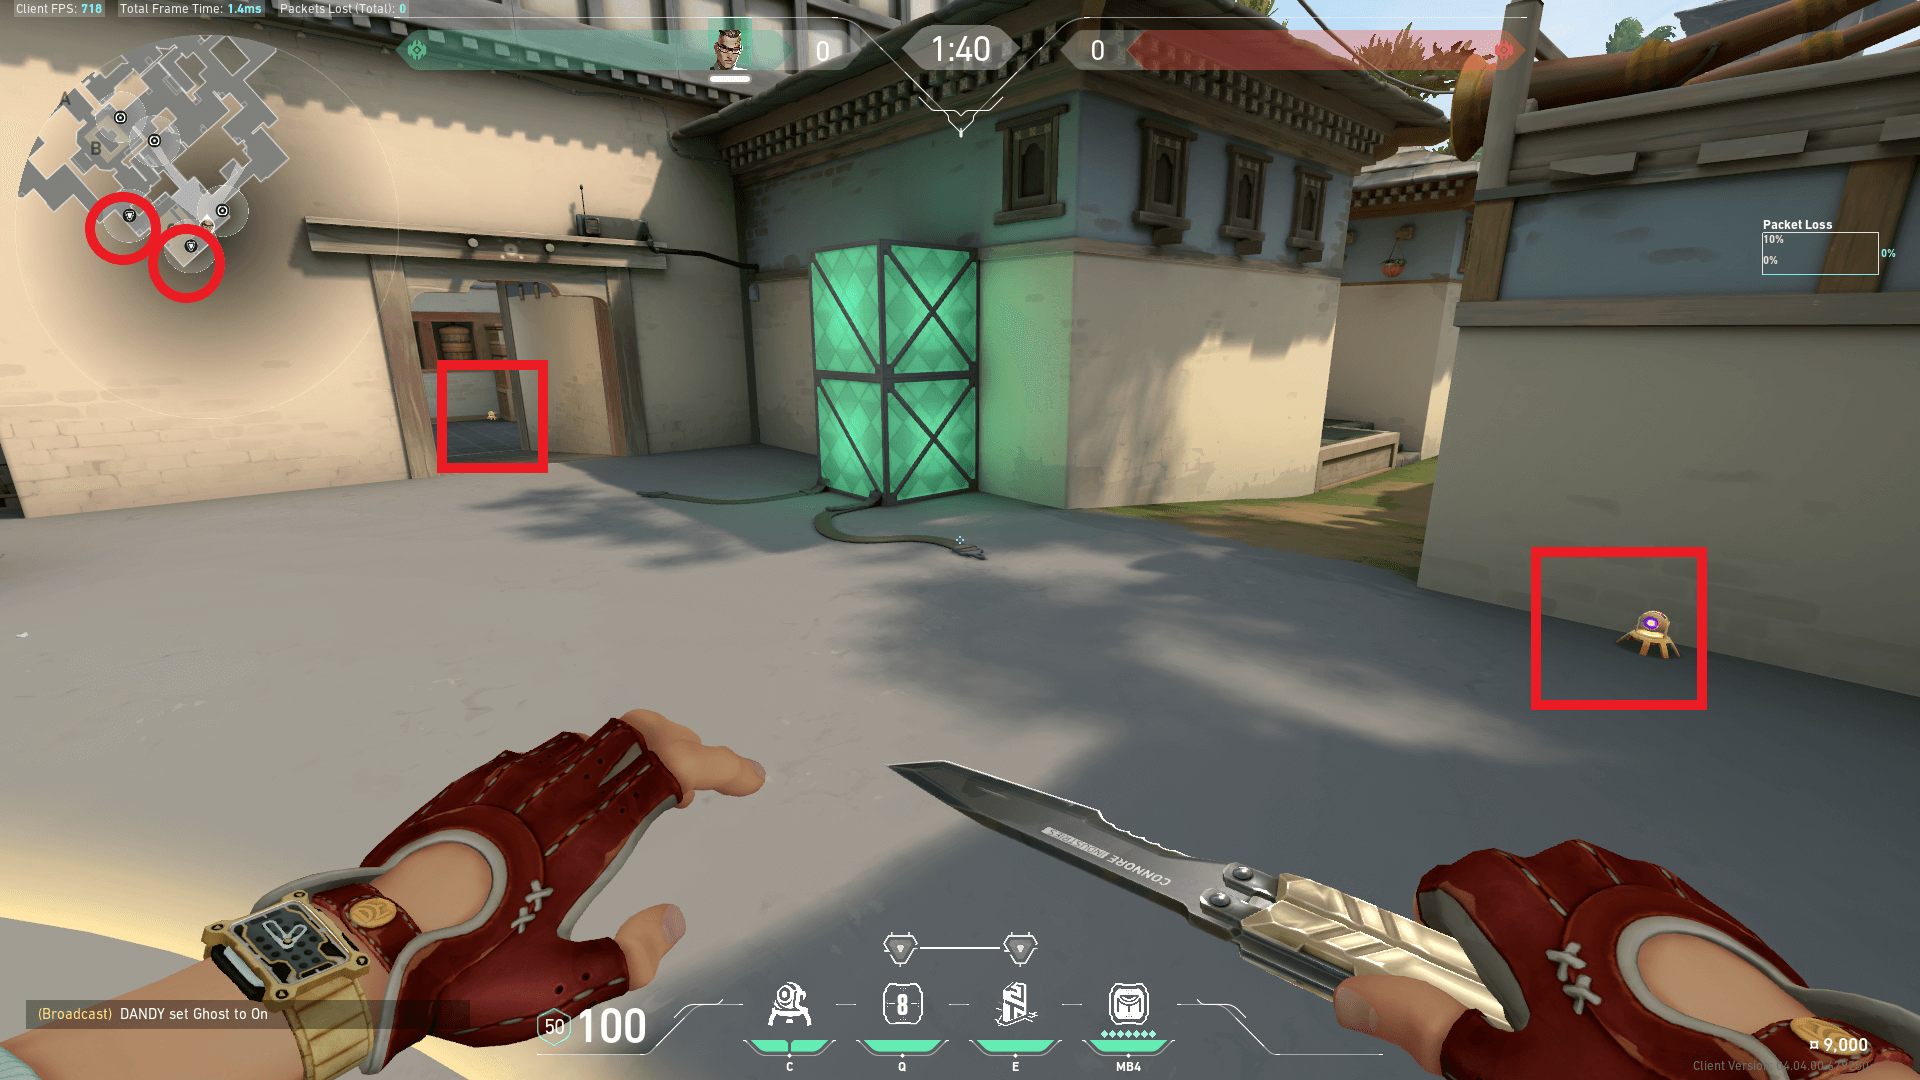
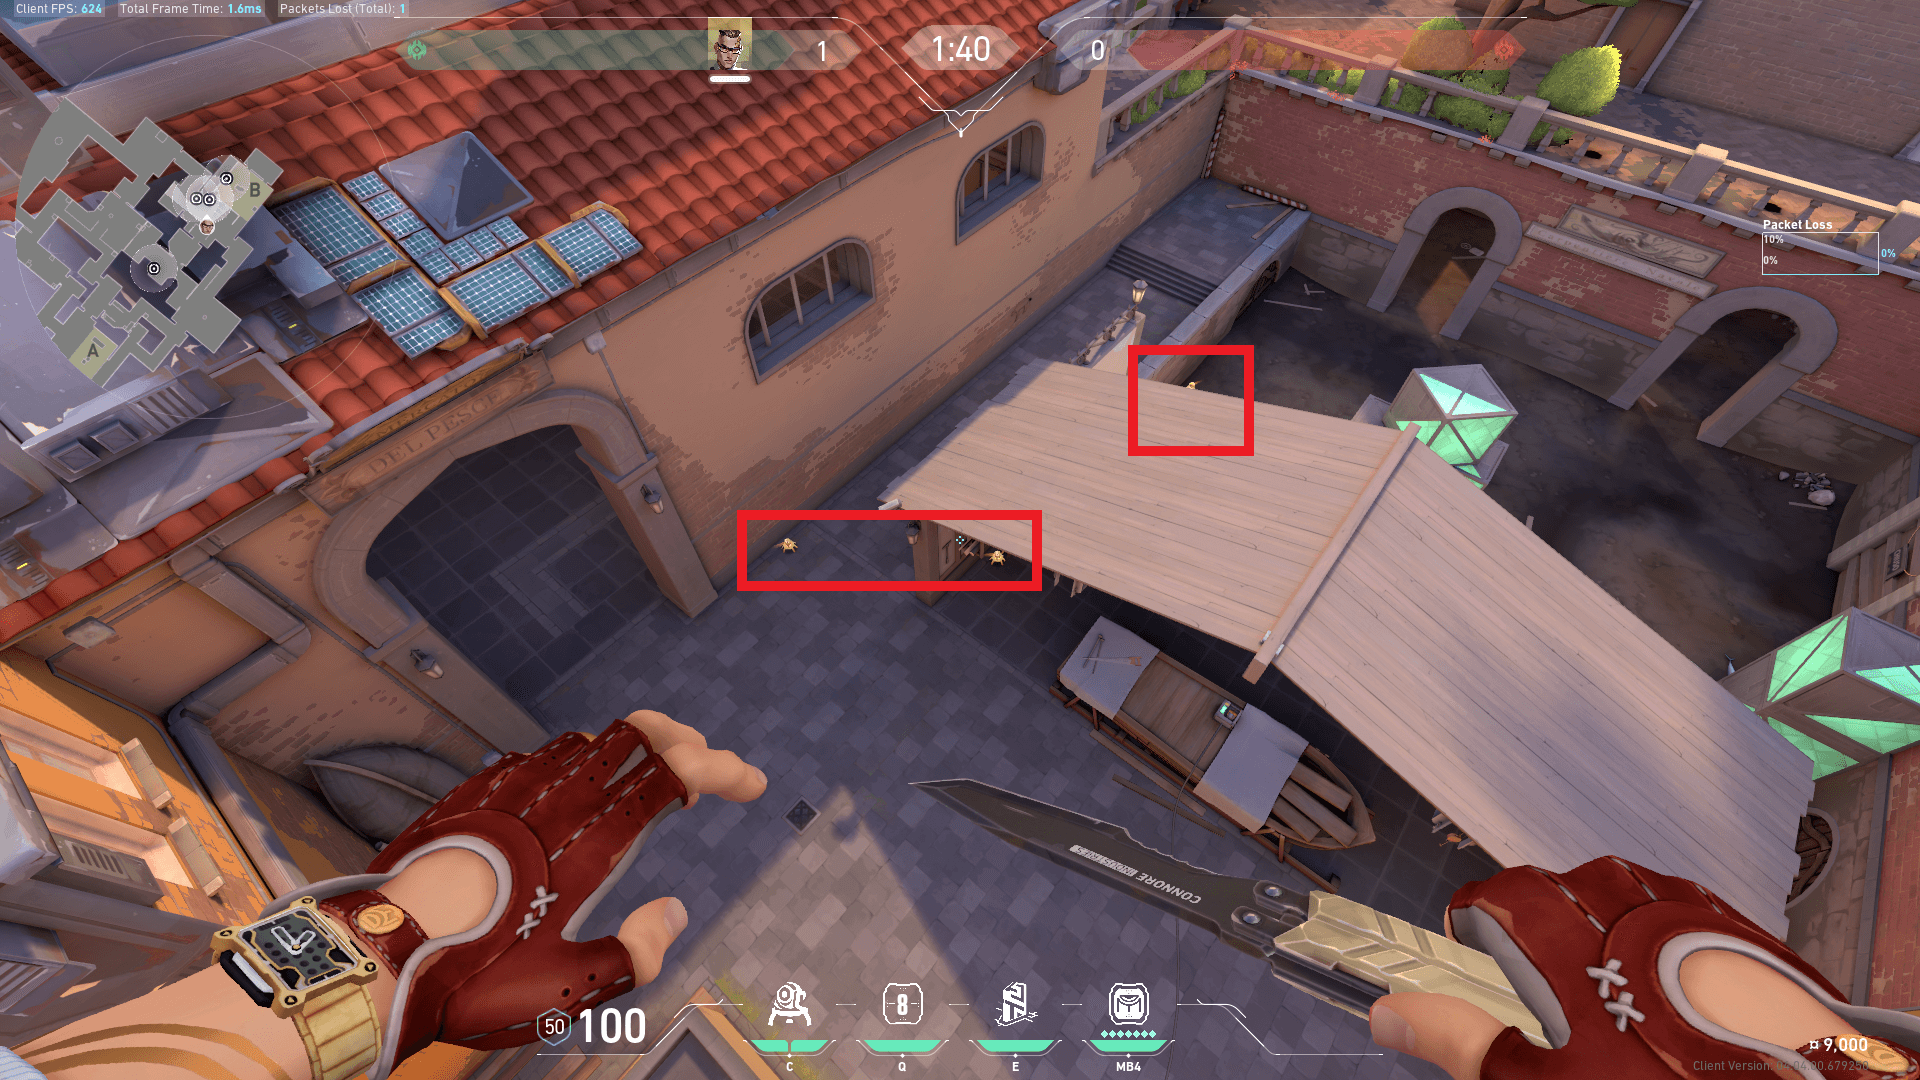
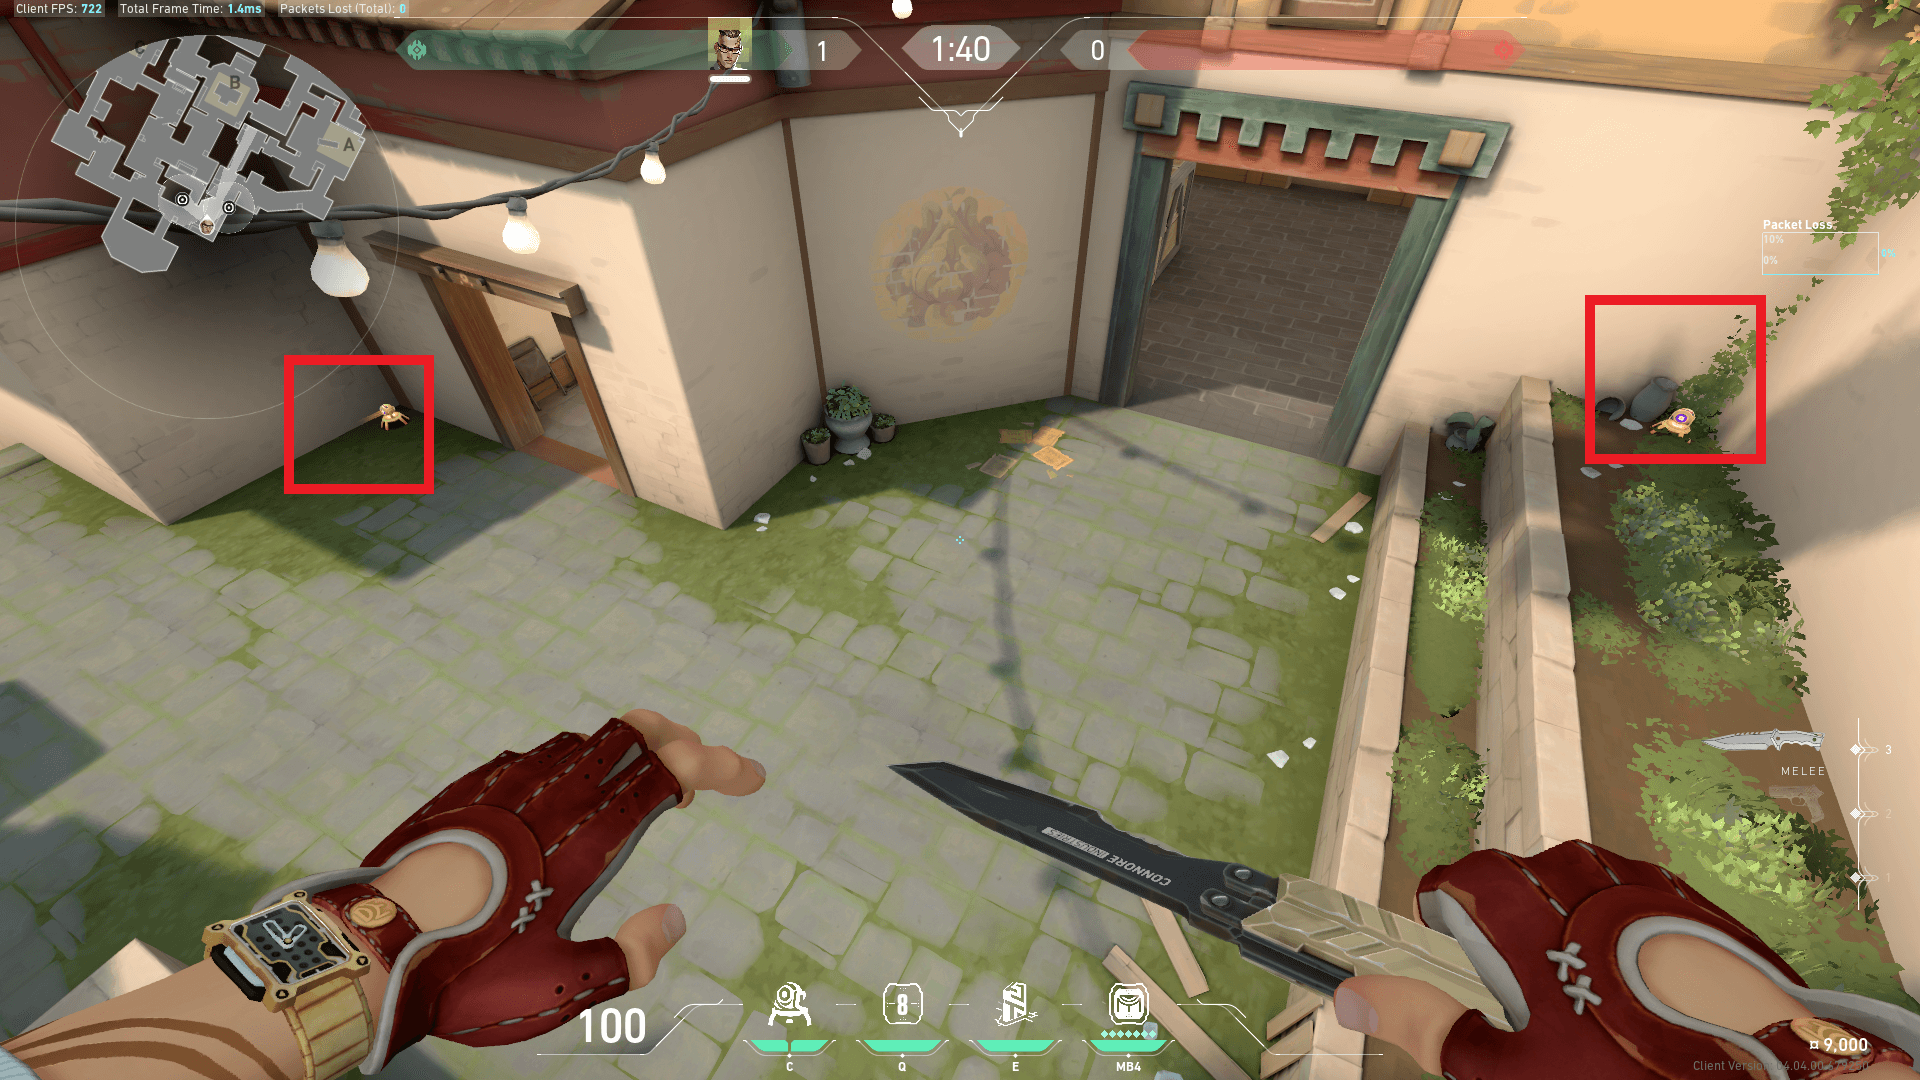
Ascent
A Site
It is safer to retreat to the other side of Heaven, or even Hell, but this play can be utilized on a Pistol round as a tactic to catch the enemy off guard.
It is not recommended to wide-swing/swing at all from this position, hold a line of sight towards the player that will push the door switch for free picks (whilst still being hidden behind the box), it is highly unlikely you will be cleared properly.
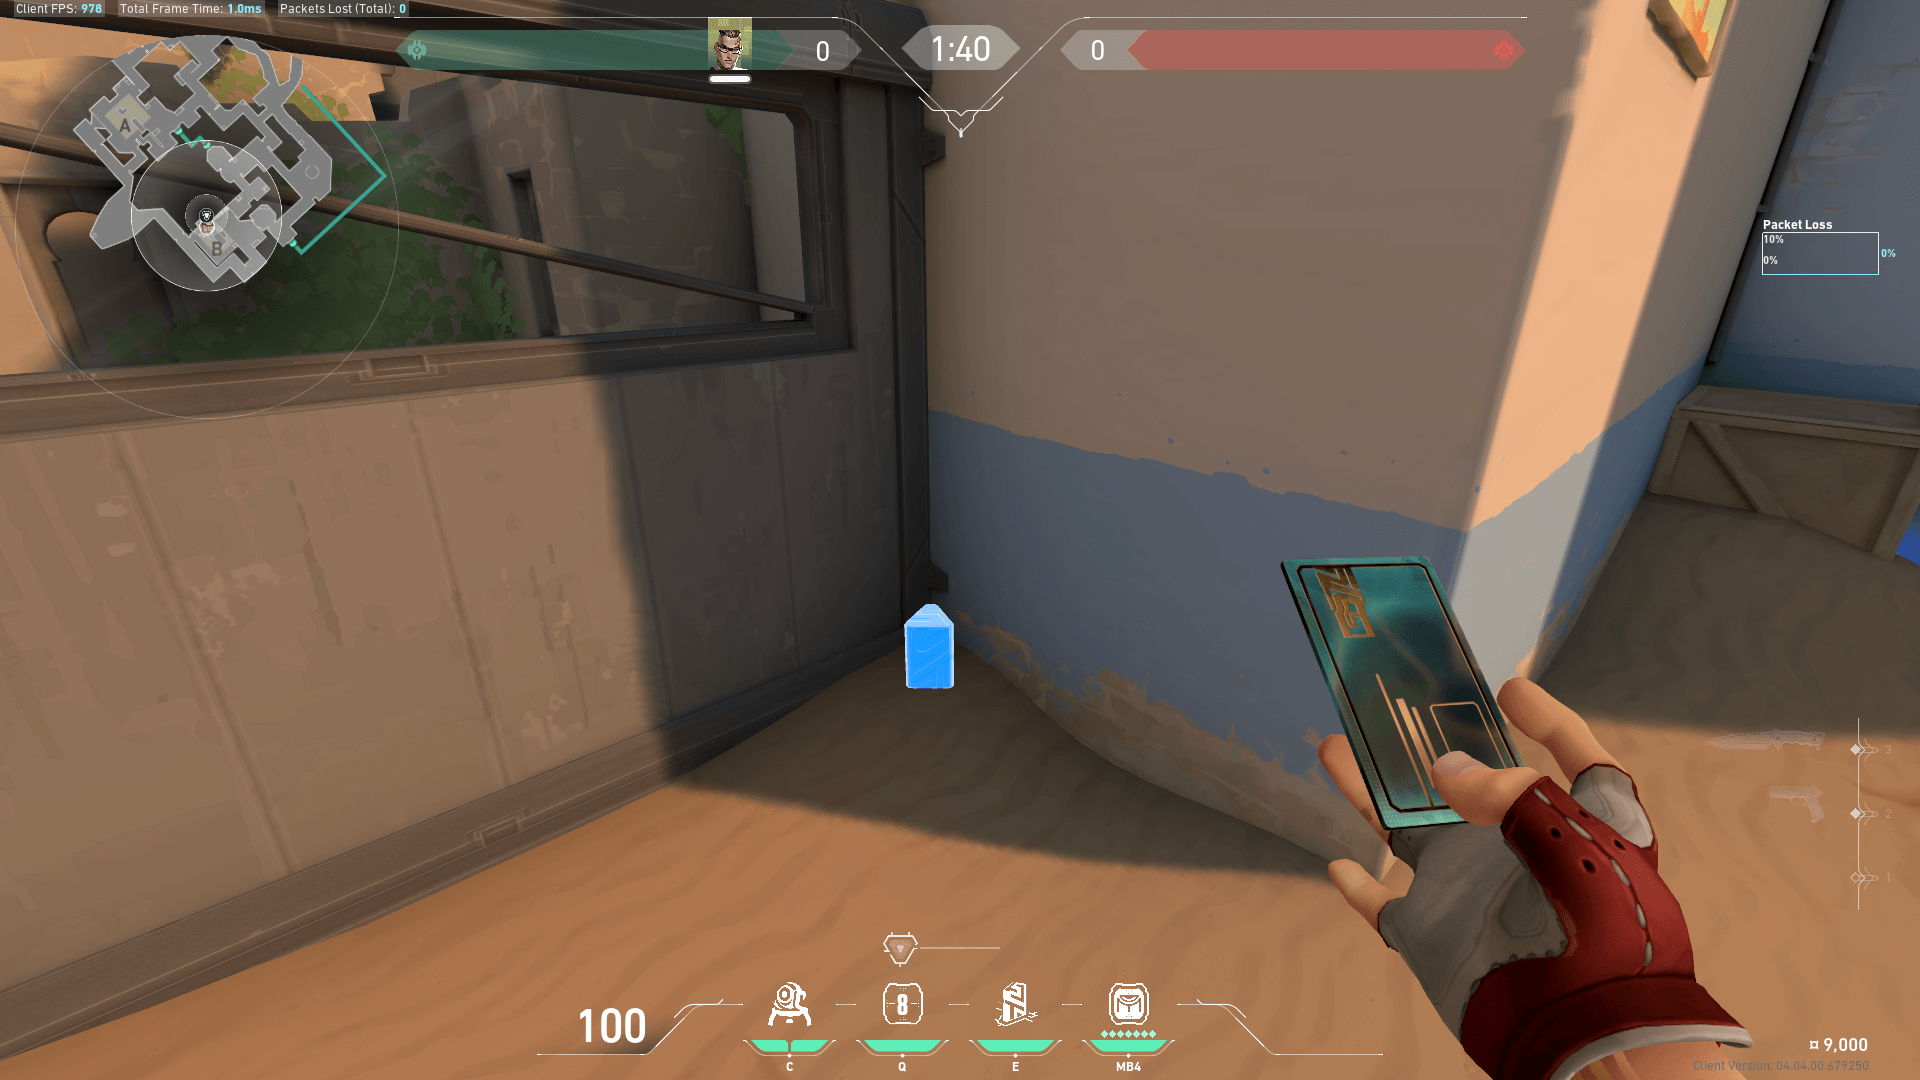
B Site
The teleport anchors can be placed as you wish here, One on Stairs, and then another back site, One near B Main and then another back site or CT, keep mixing things up that is the key as a Chamber player.
Creeping inside B Main and holding an off-angle for an early pick can pay dividends. Teleporting back towards Back Site is also a solid option especially when you have a trip set up for players dropping down from Lane. See clip below.
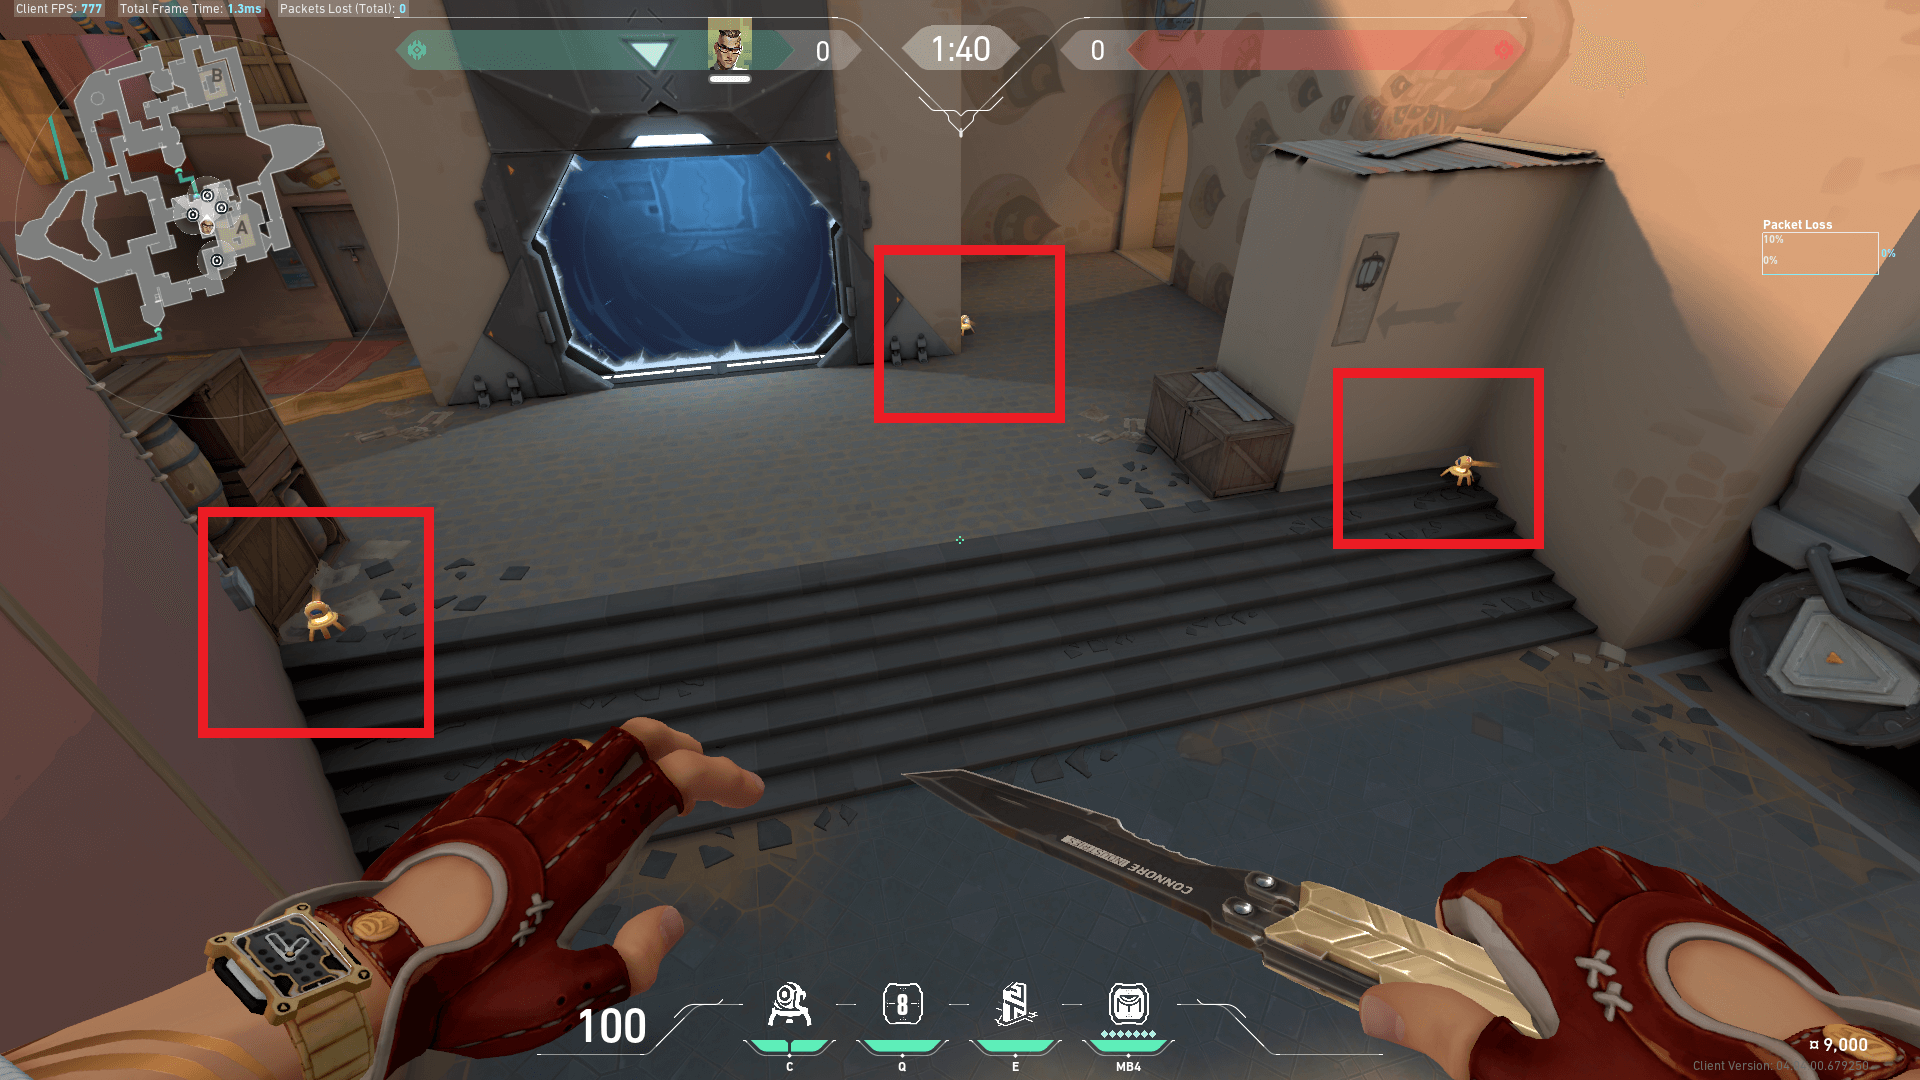
Fracture
A Site
Chamber players should be holding relatively aggressive off angles, and the first anchor is set up for this purpose inside A Main. To retreat safely, it is best to place it at the Link towards Defender Side Spawn. However, you can place it under site/top site to play off your trips if you wish and or have support from another teammate playing A. If no one is playing Dish it is worth placing a Trademark there as well.
B Site
The aggressive anchor is placed to peek B Main, and your second safety/retreat anchor can be placed inside Tower, towards Defender Side Spawn or in the middle of Site to play off the Trademark rightmost in the image above.
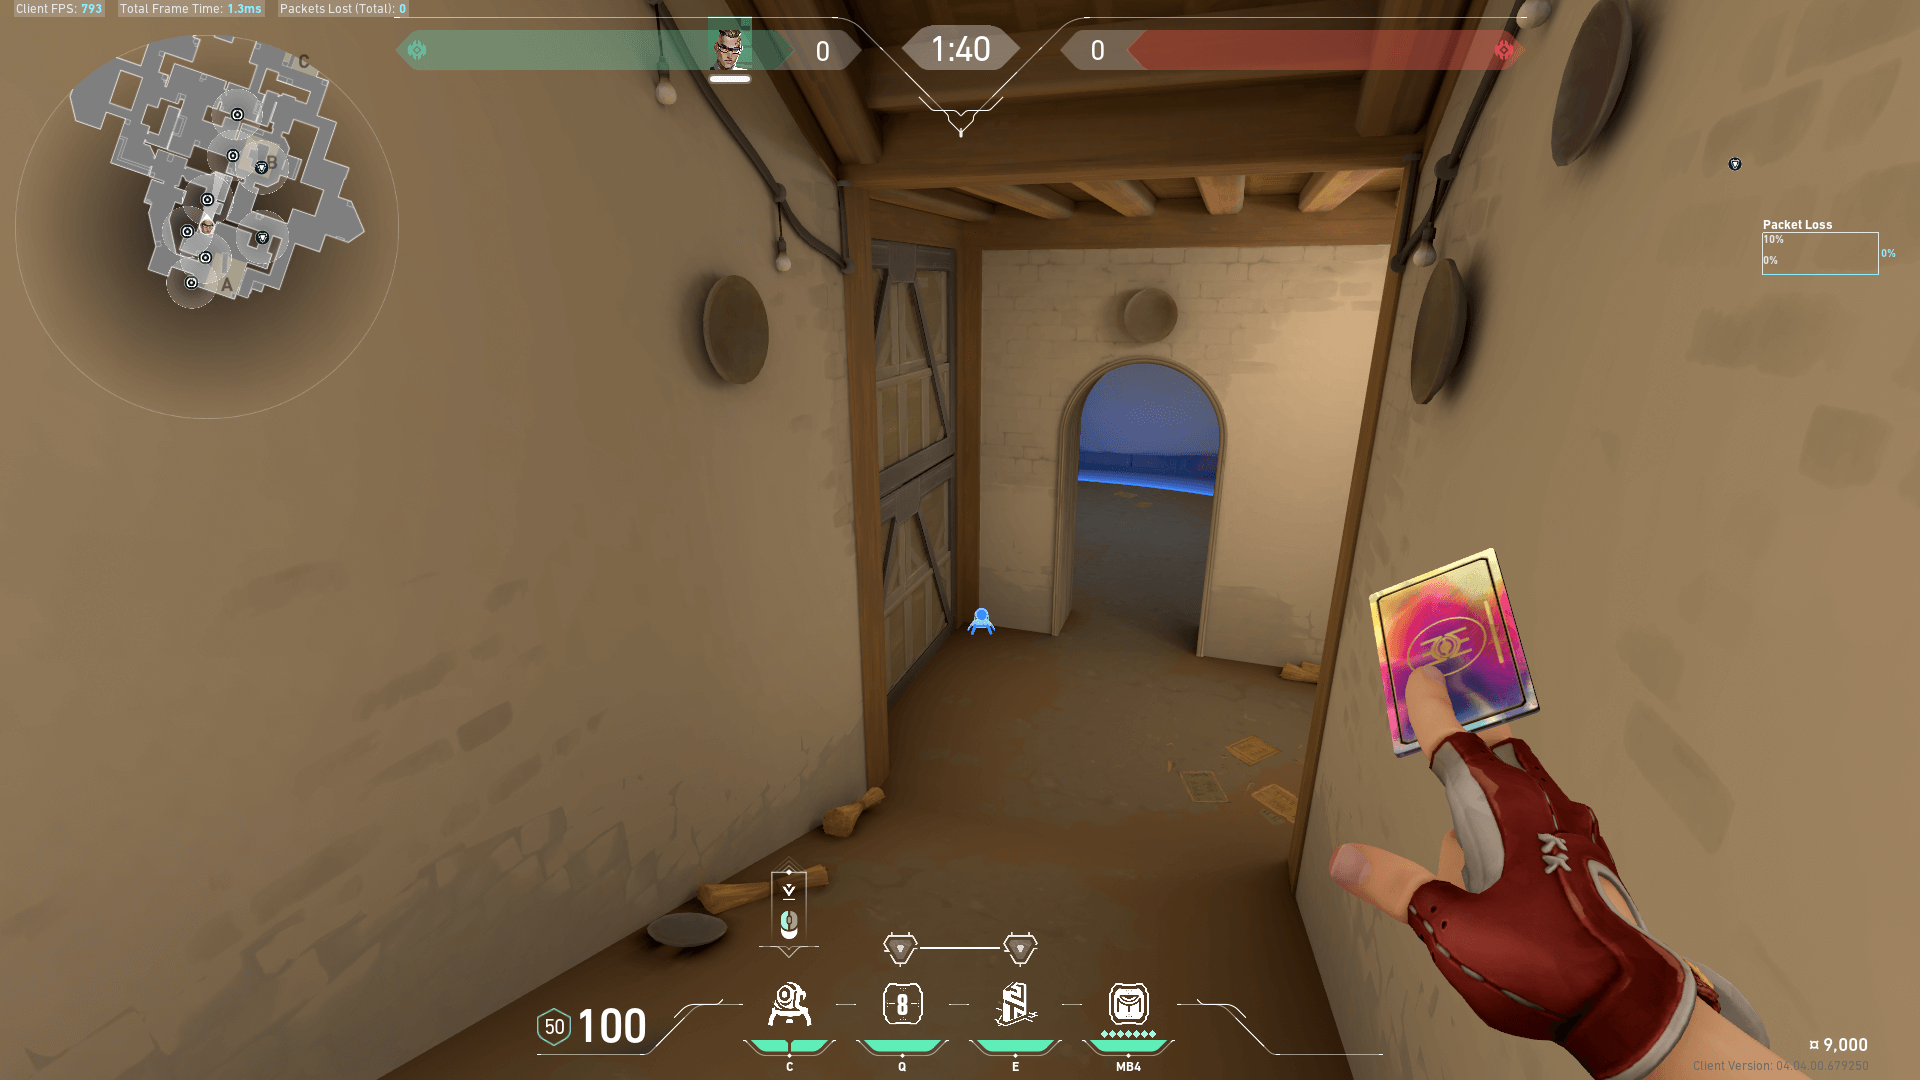
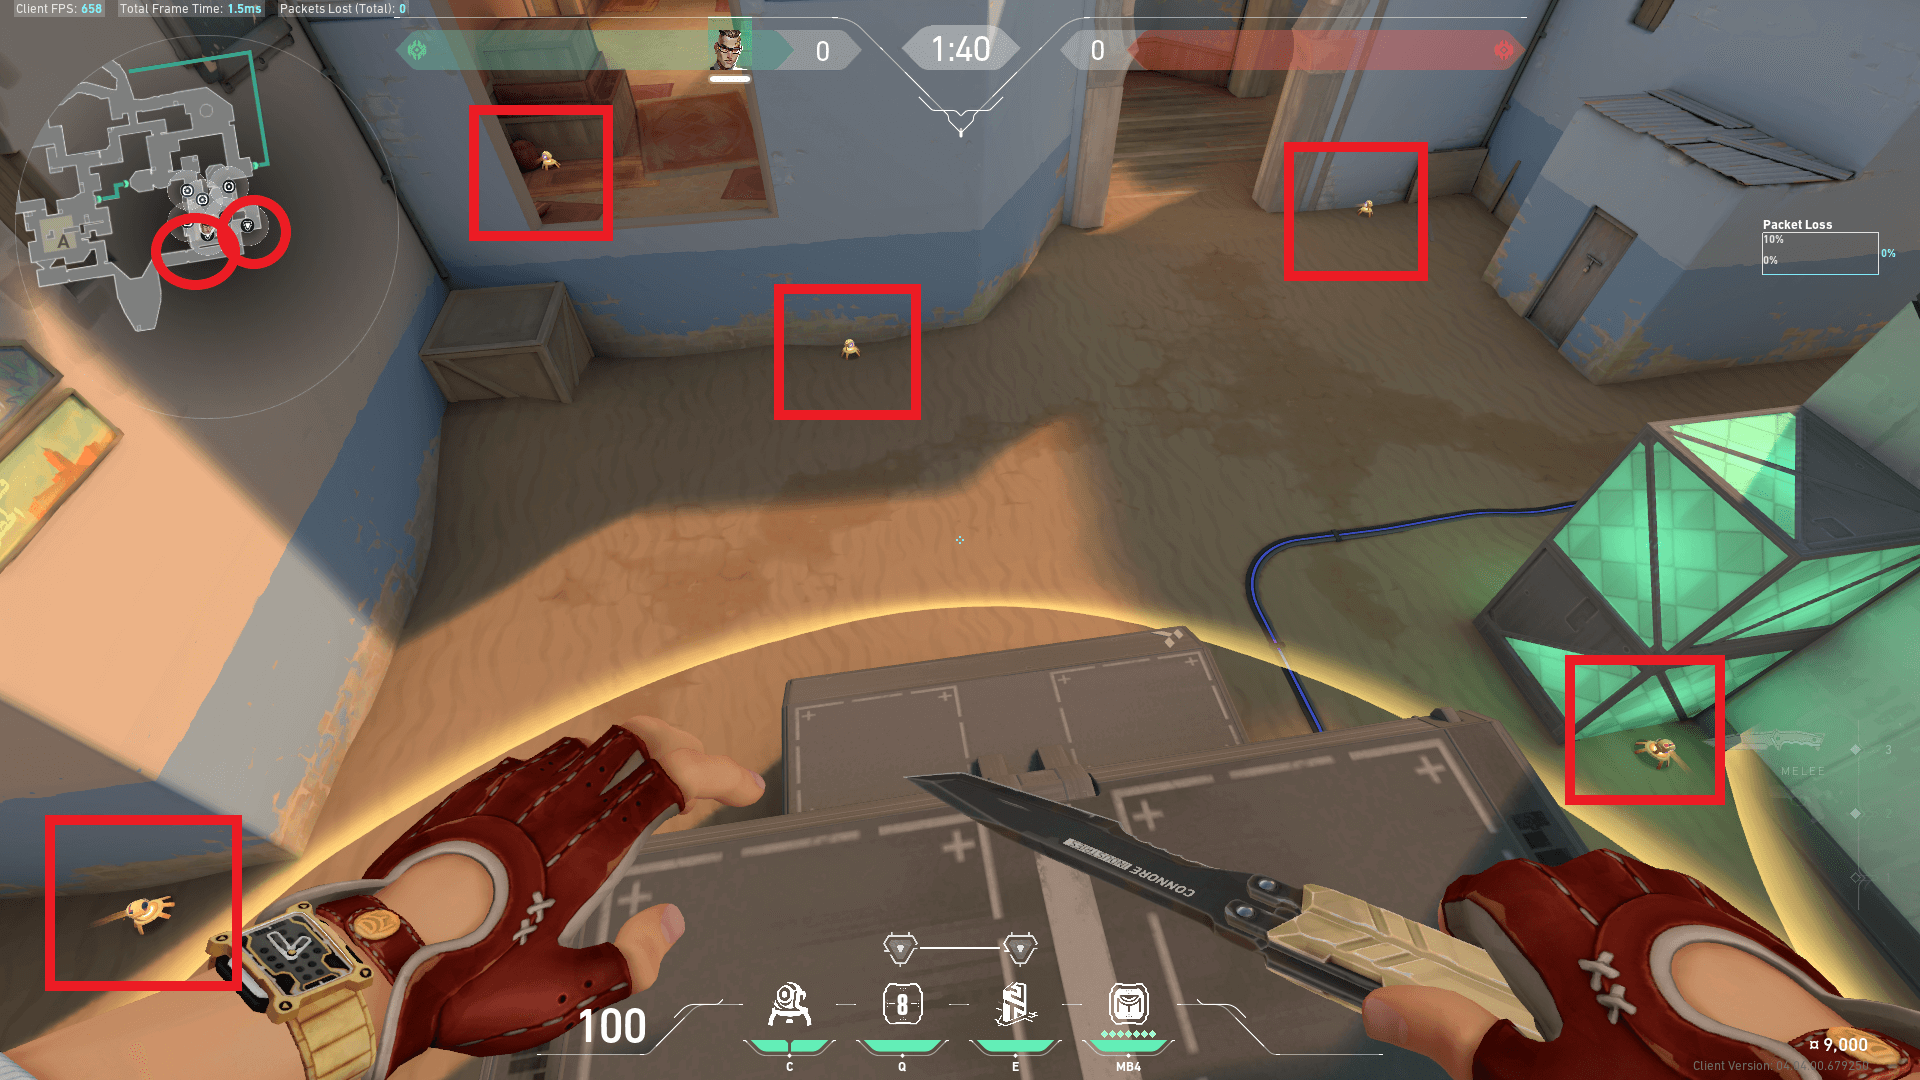
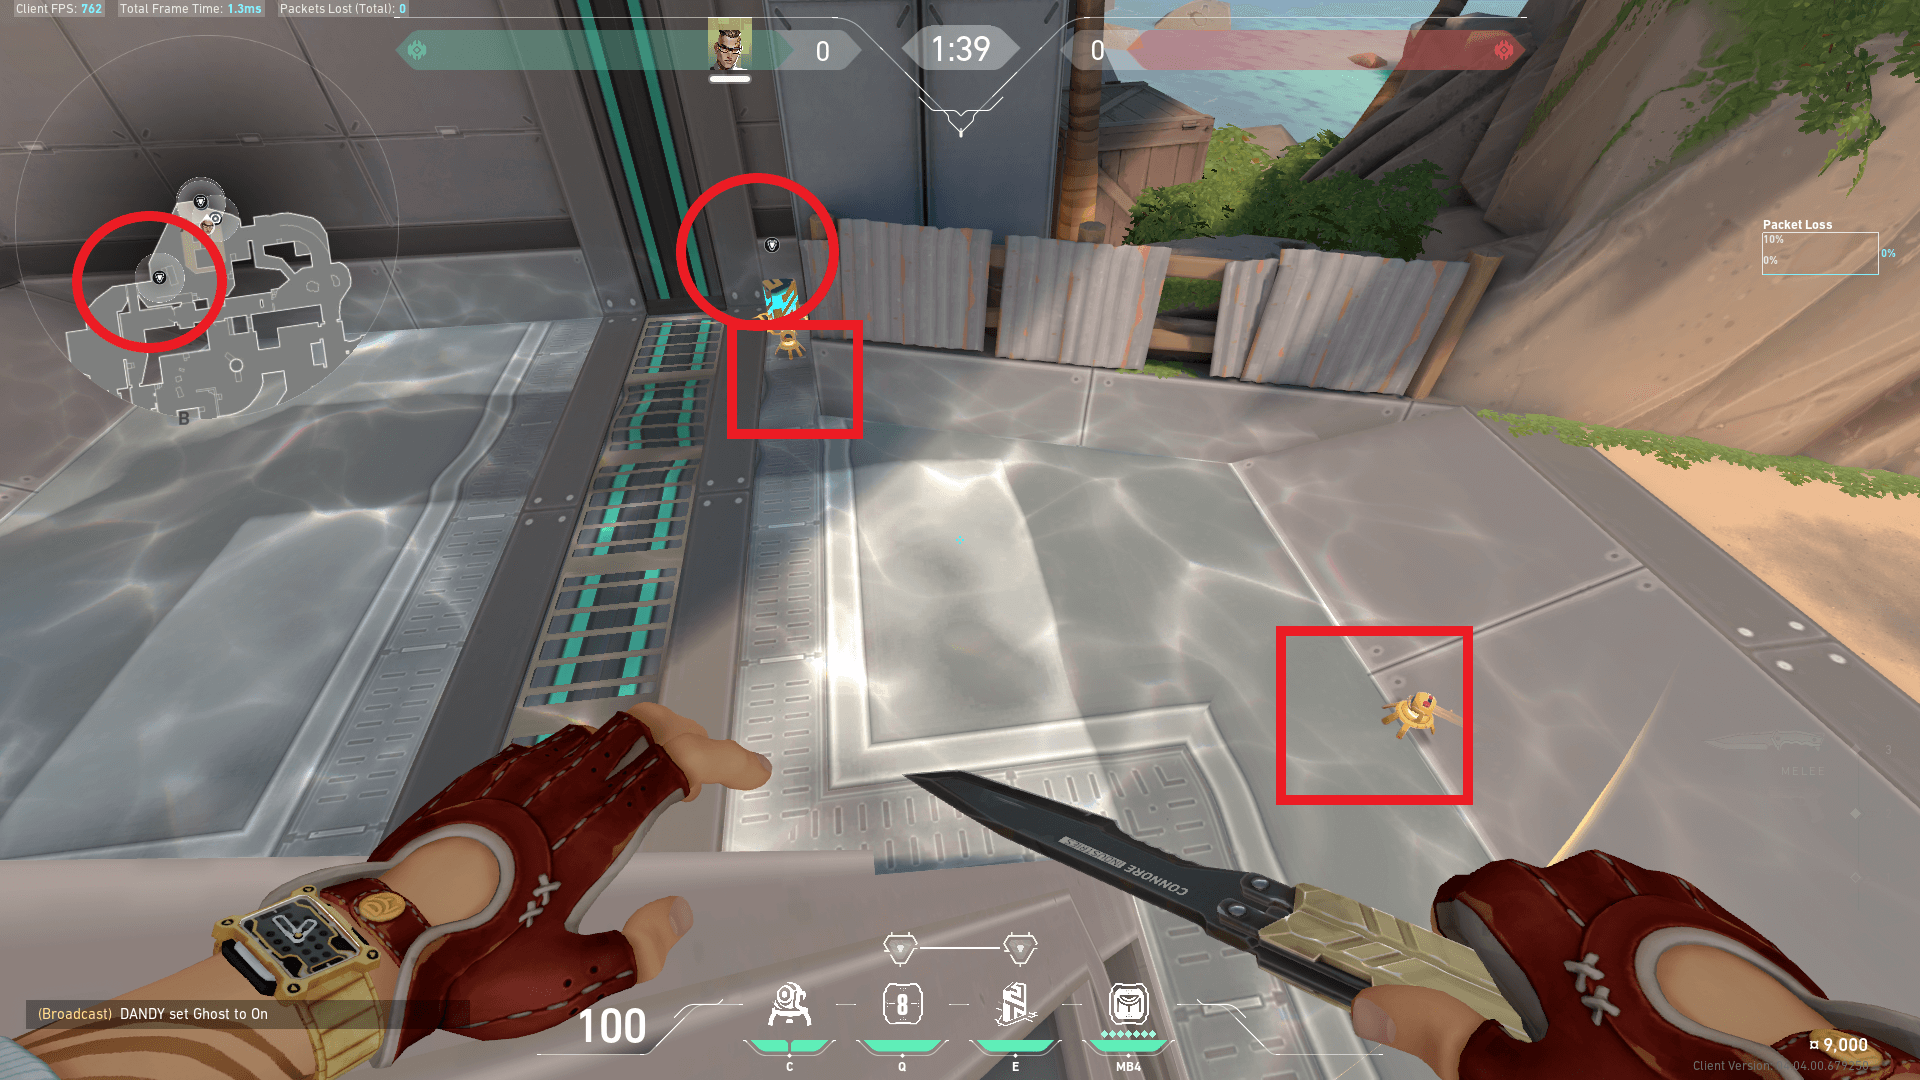
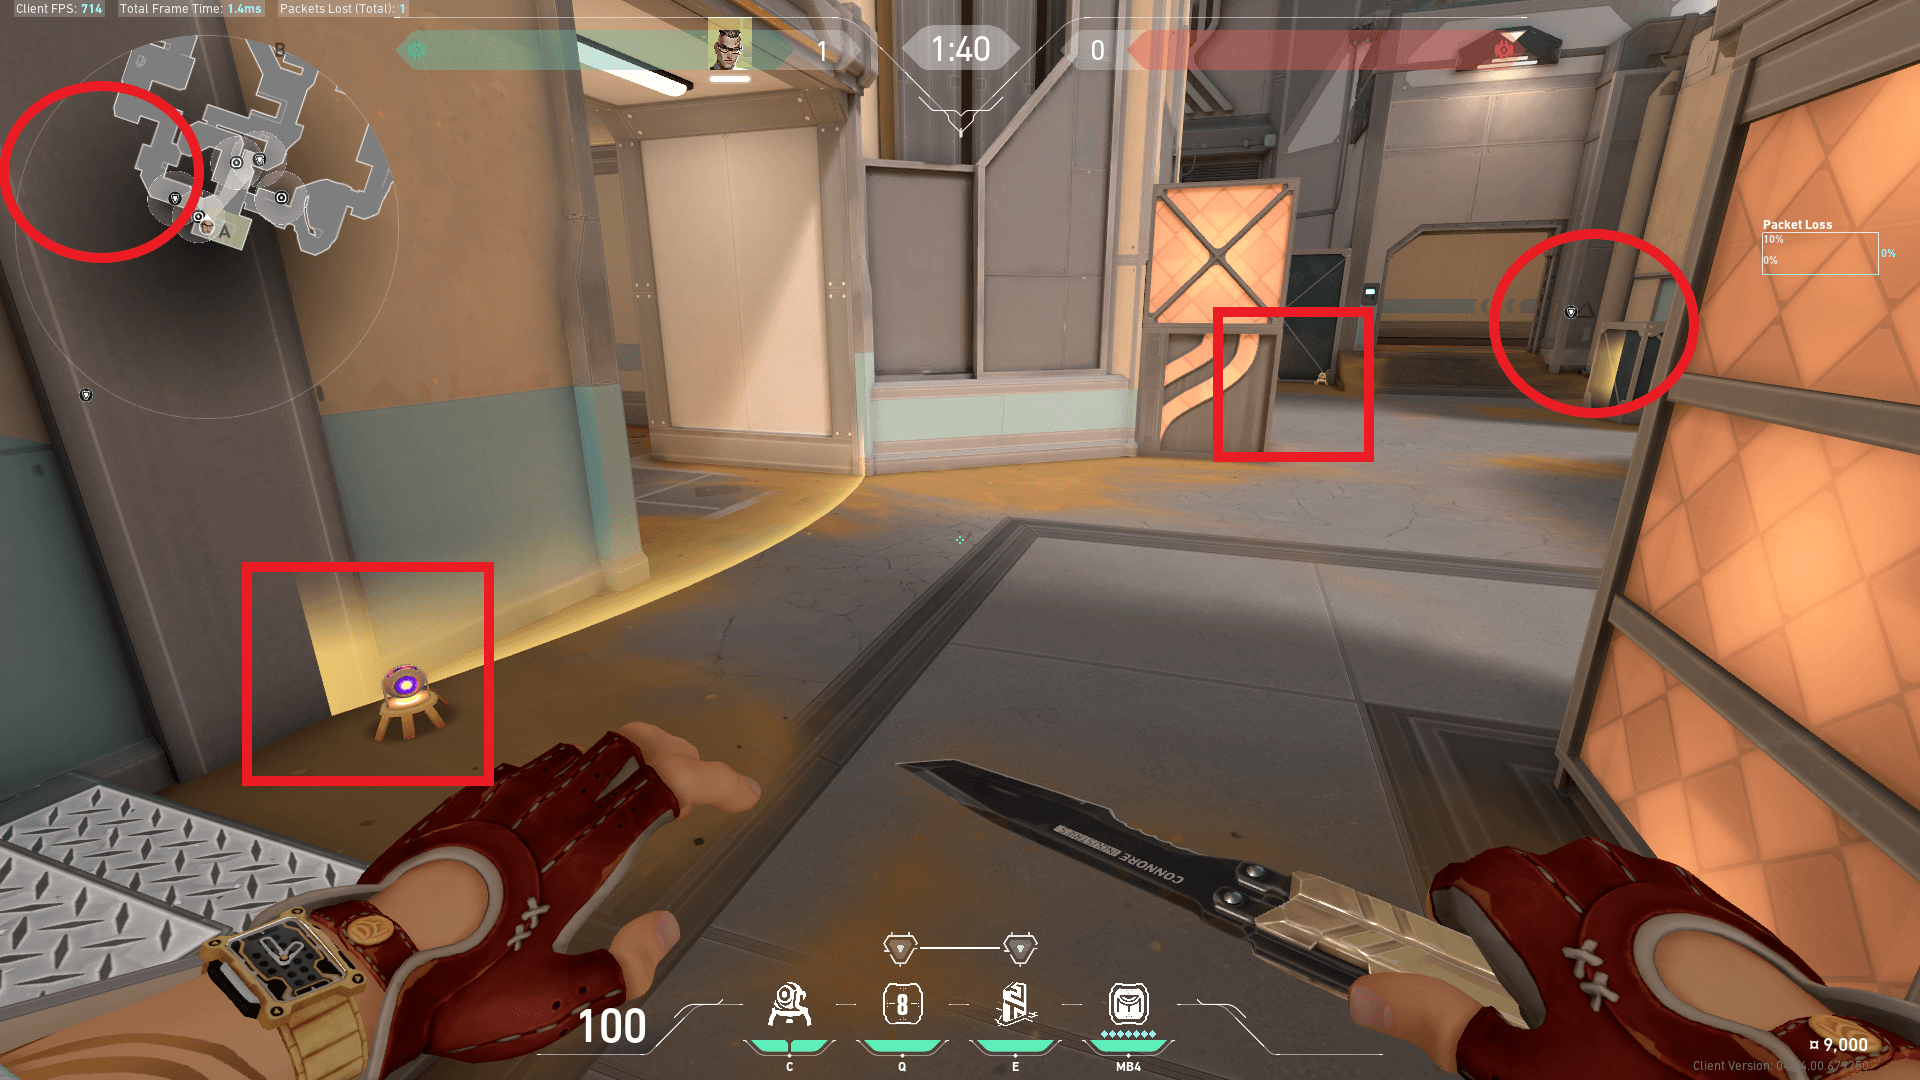
Icebox
A Site
Chamber excels on Icebox as there are so many angles available to hold and he can easily mix up his defensive positioning before enemies have even made it to site.
Take for instance, here…
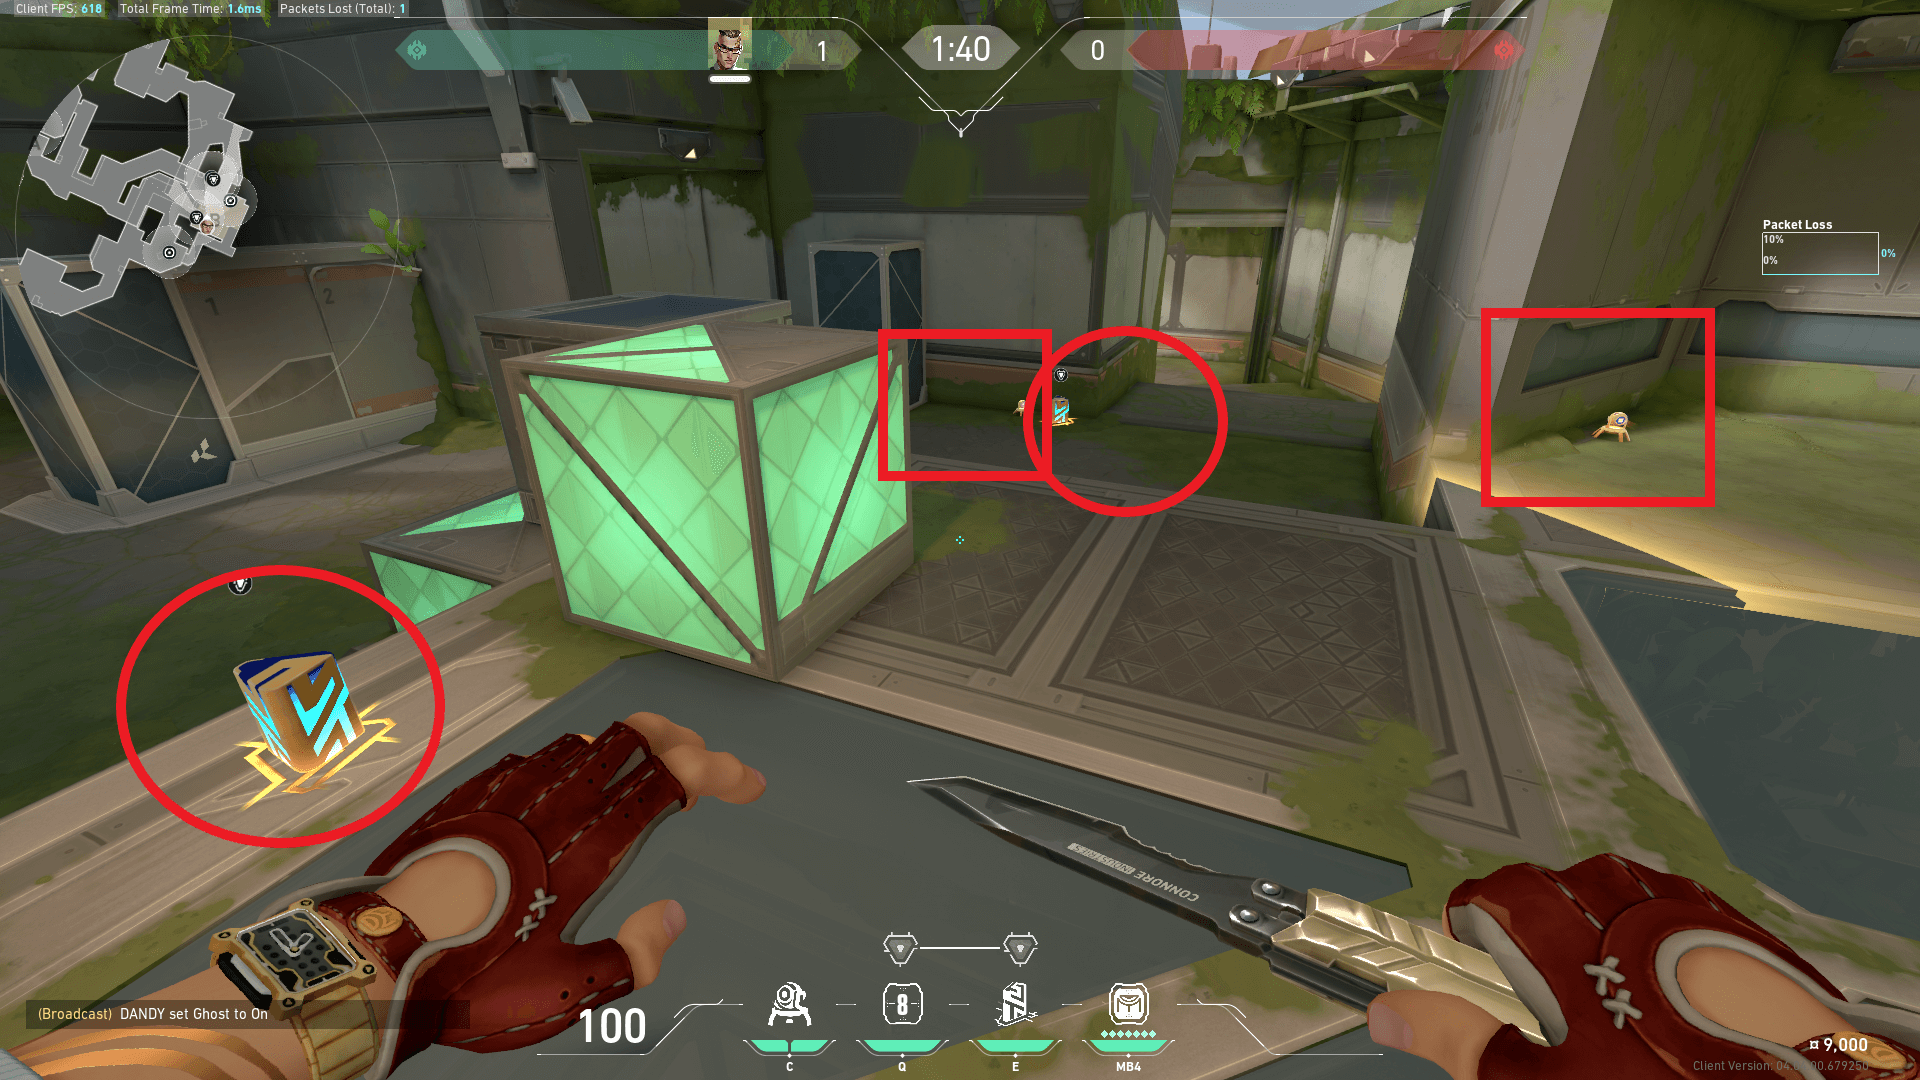
…and here.
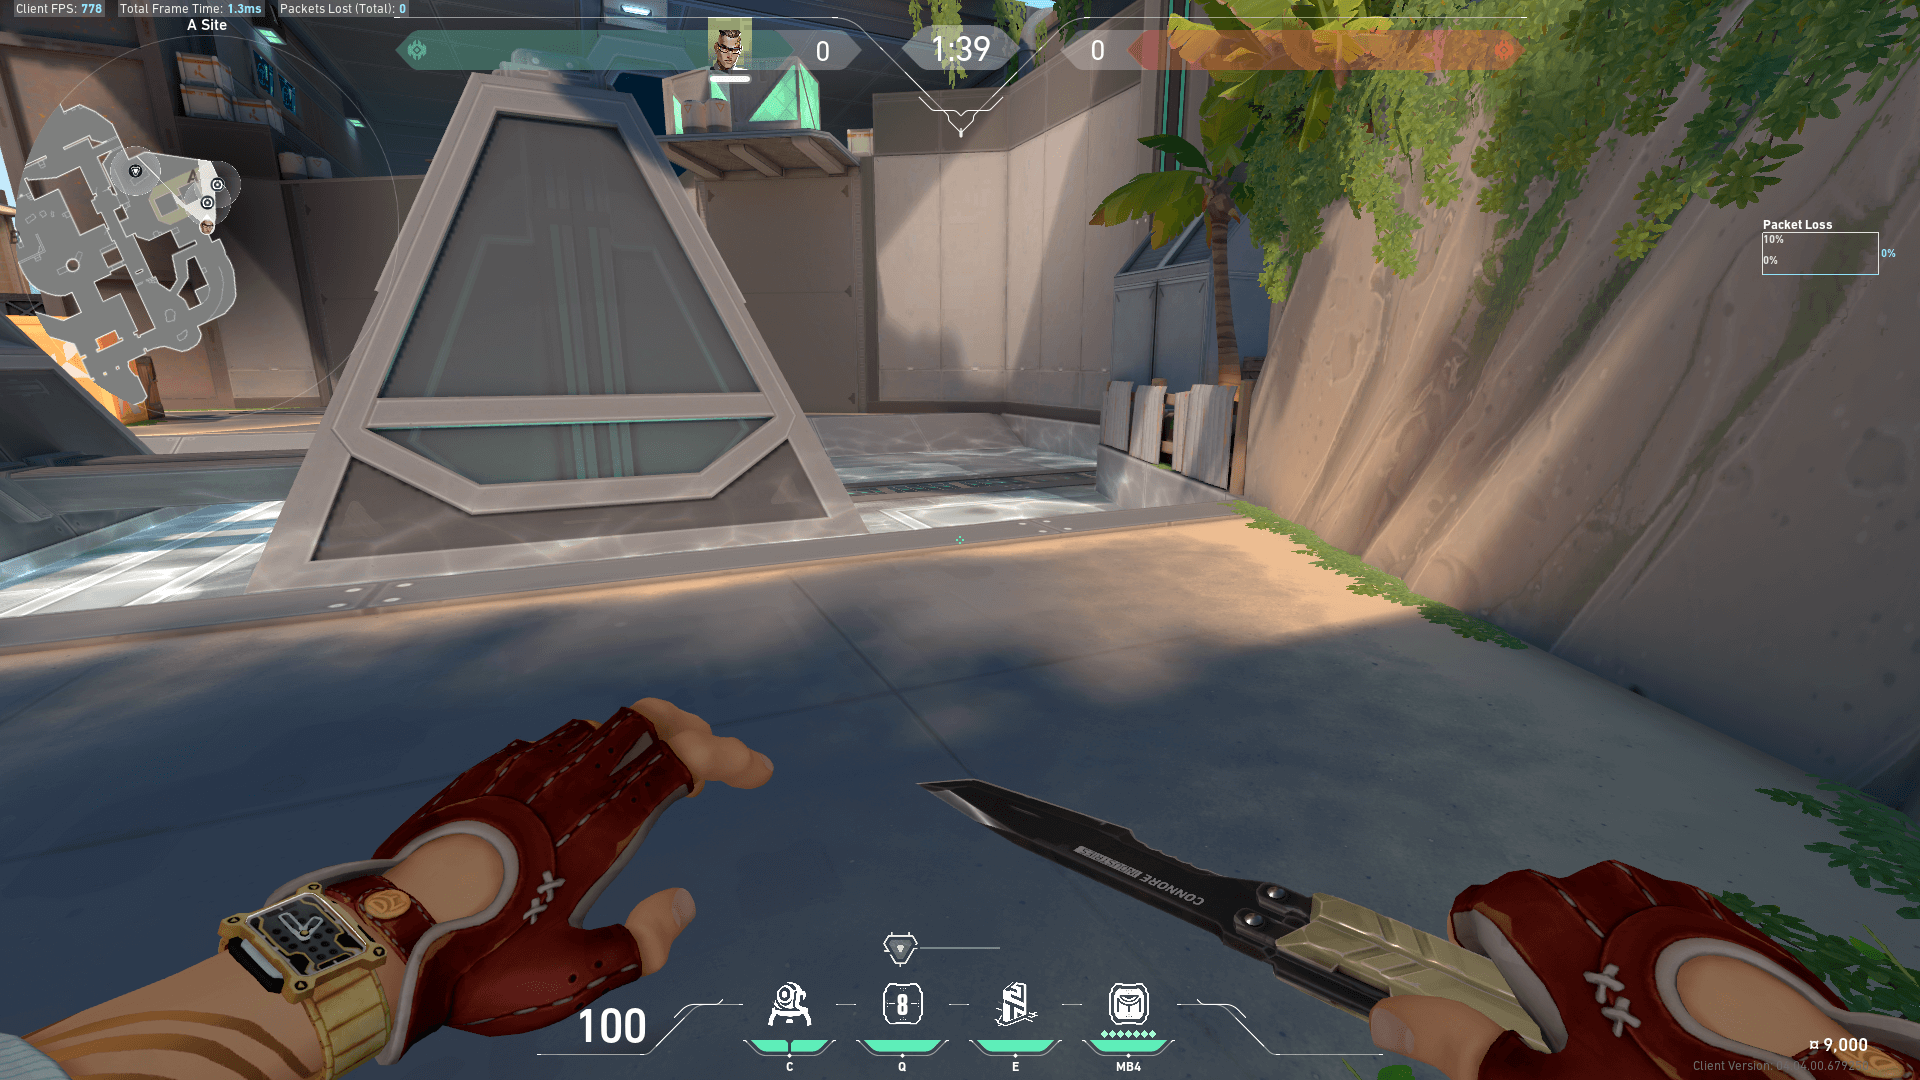
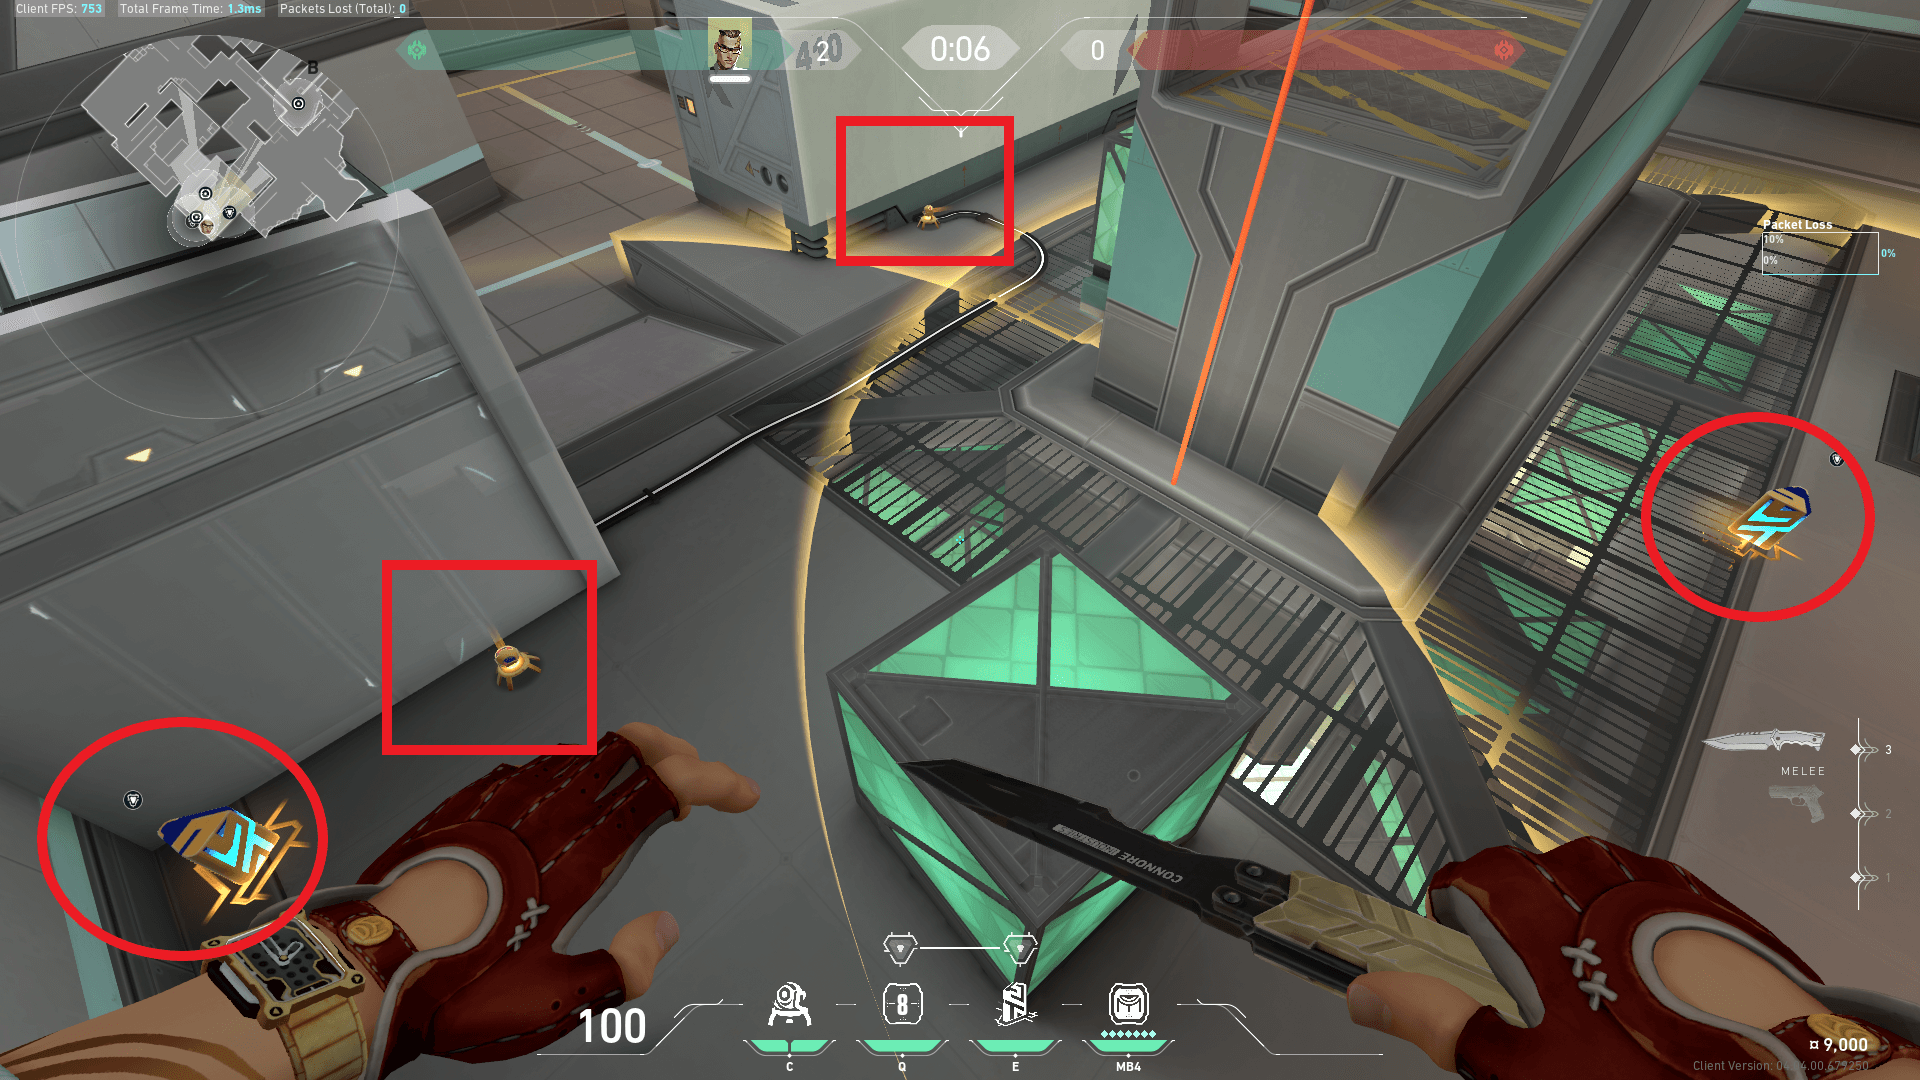
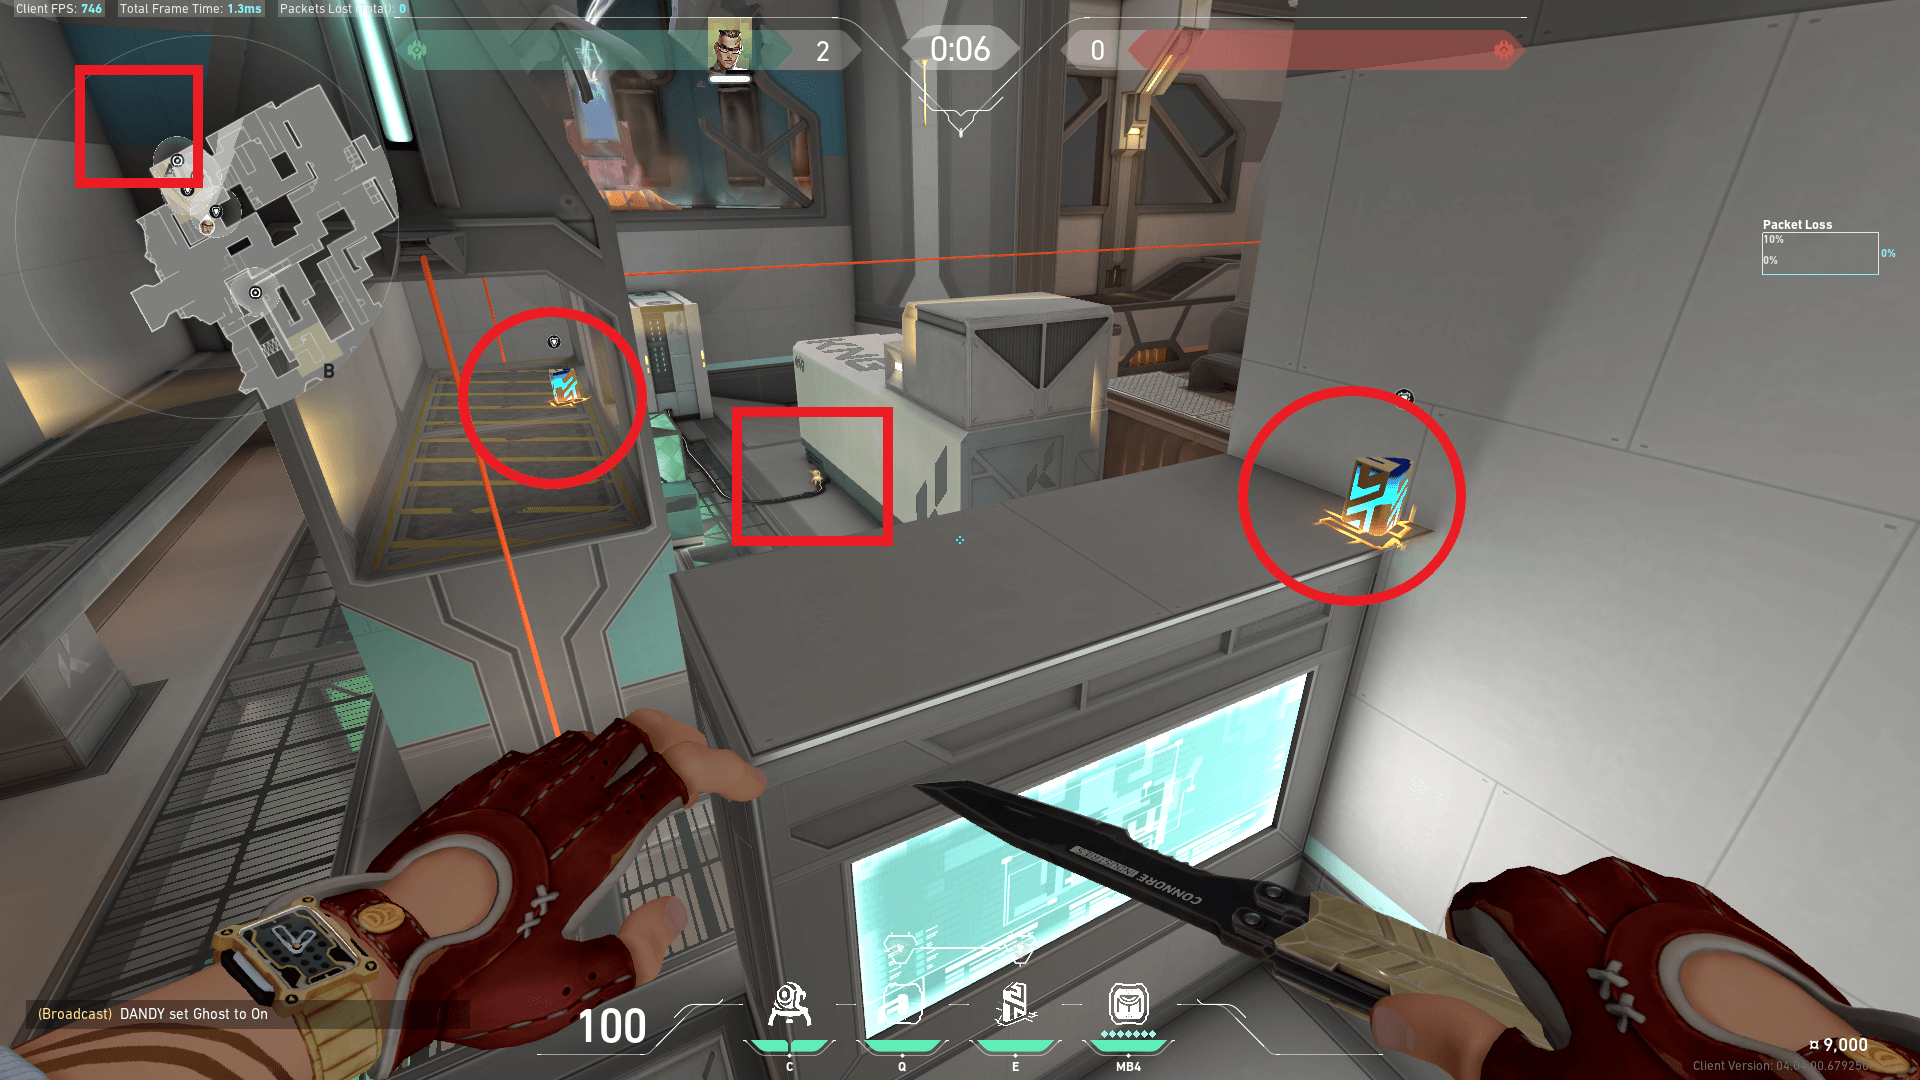
B Site
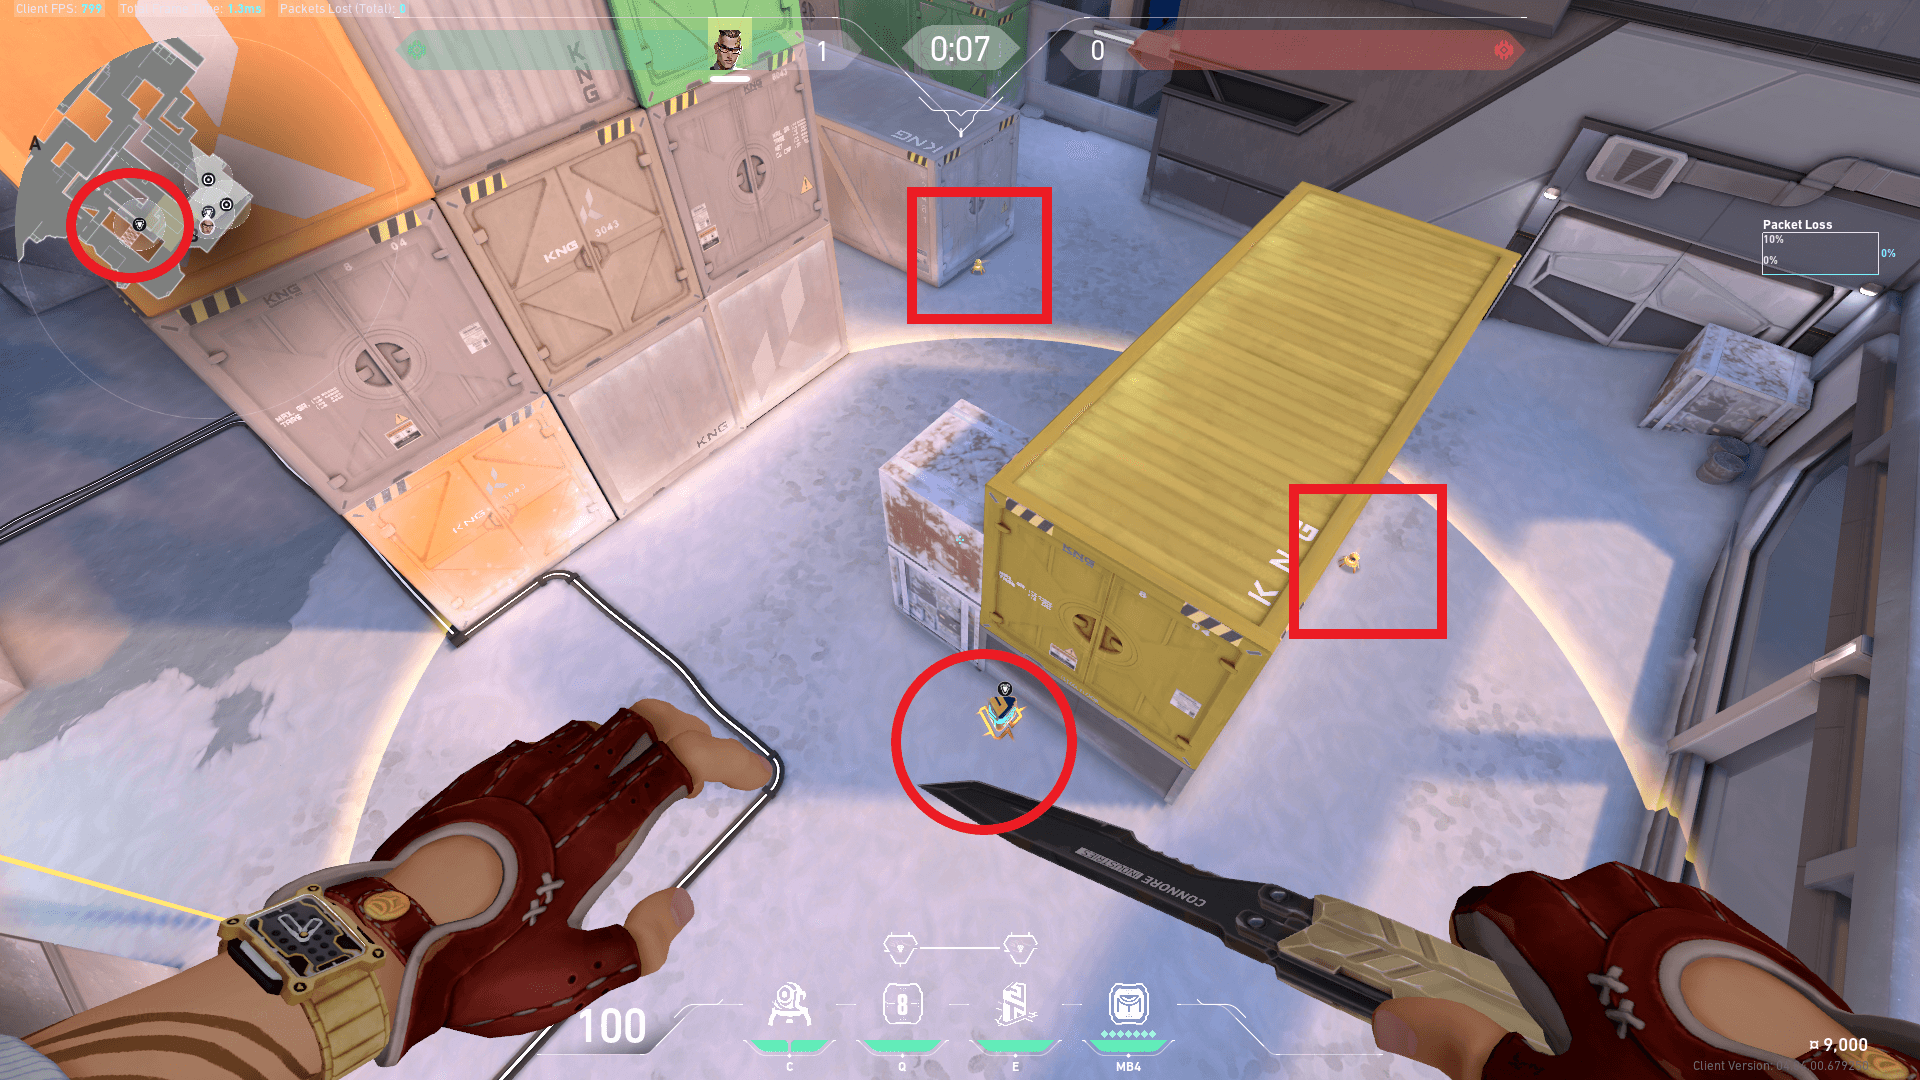
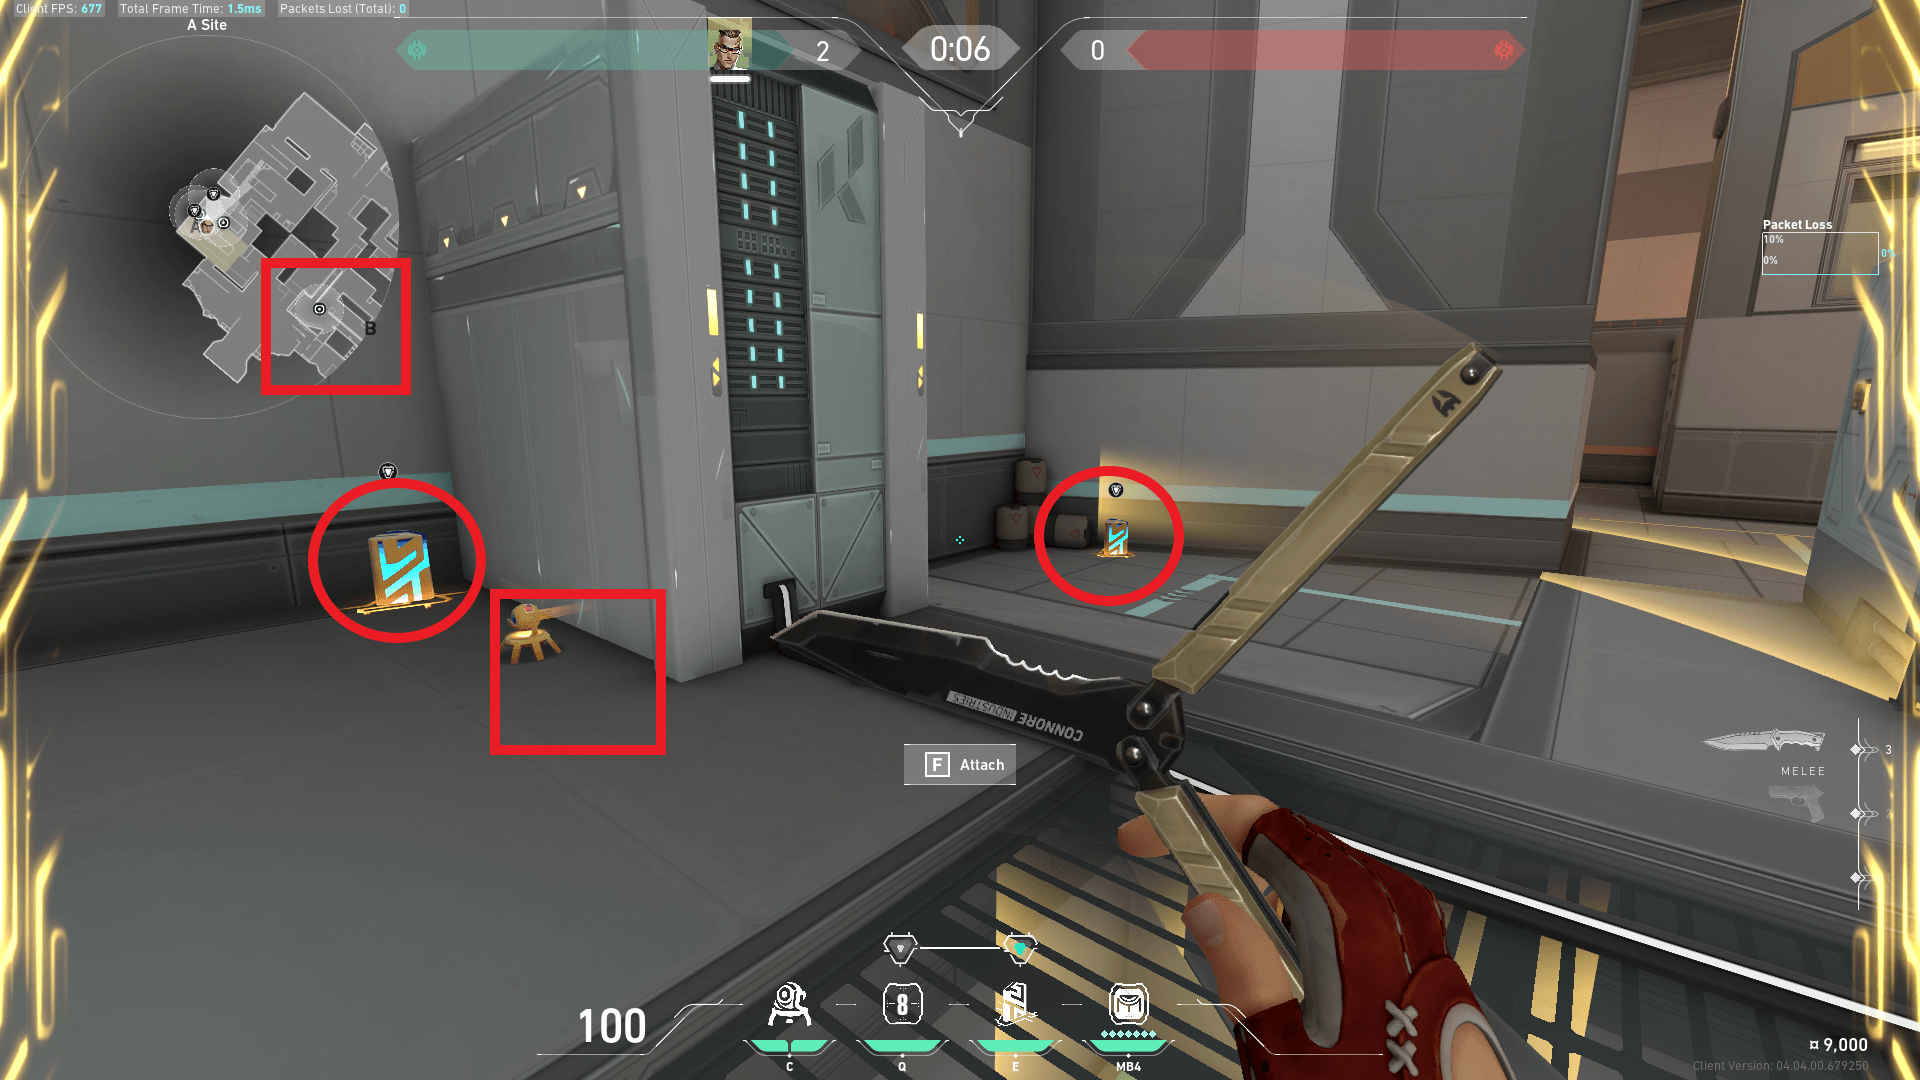
A teleport can also be set up aggressively on top of the box below the crane, to peek at Garage or Attacker Side Spawn when barrier drops.
Split
A Site
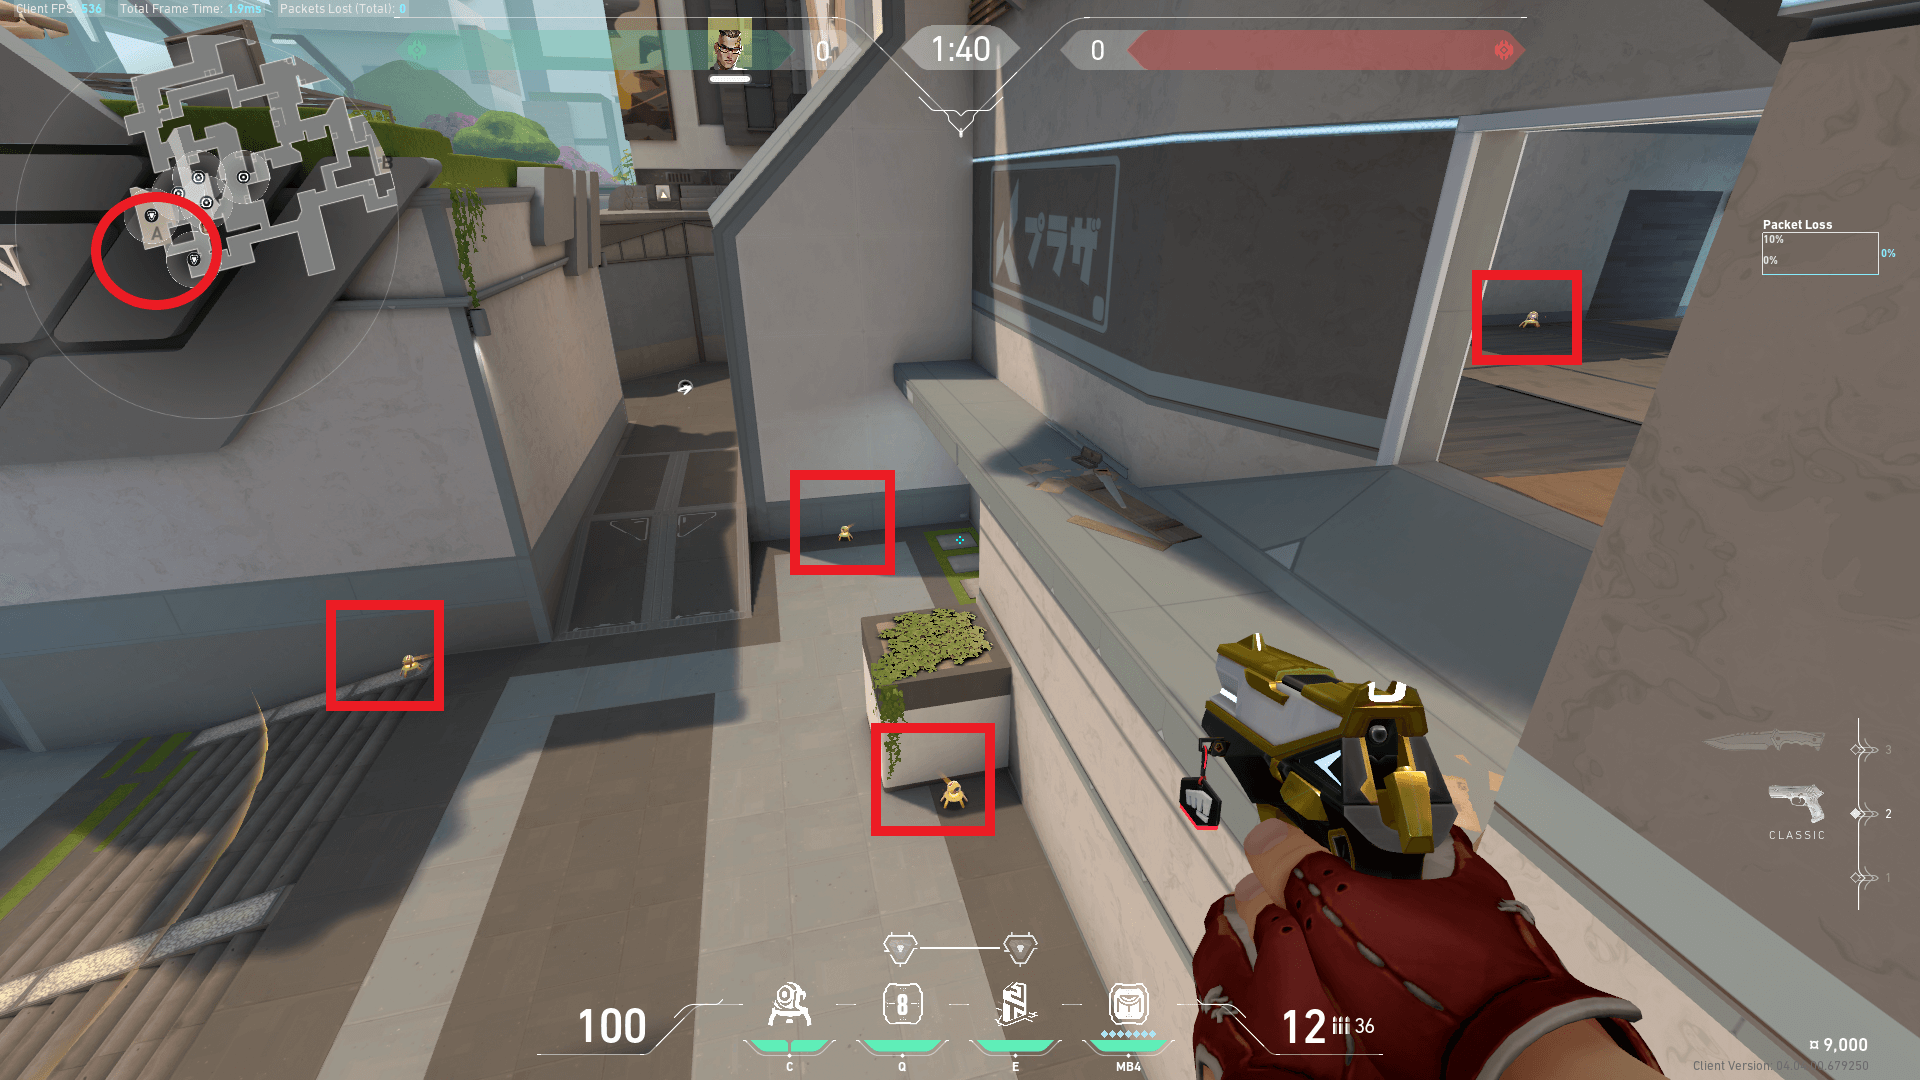
Plenty of options on Split to mix up the location of your Trademarks. It is recommended to have one up at Heaven just to gain information on how far enemies have advanced up Ramp, it prevents the danger of ‘timing’ and sneaky enemy lurks.
B Site
Teleport anchors can be set up around Pillar however you wish and whatever angles you feel comfortable holding most, and then back Alley/CT for a safe retreat to play retake if the enemy is flooding the site.
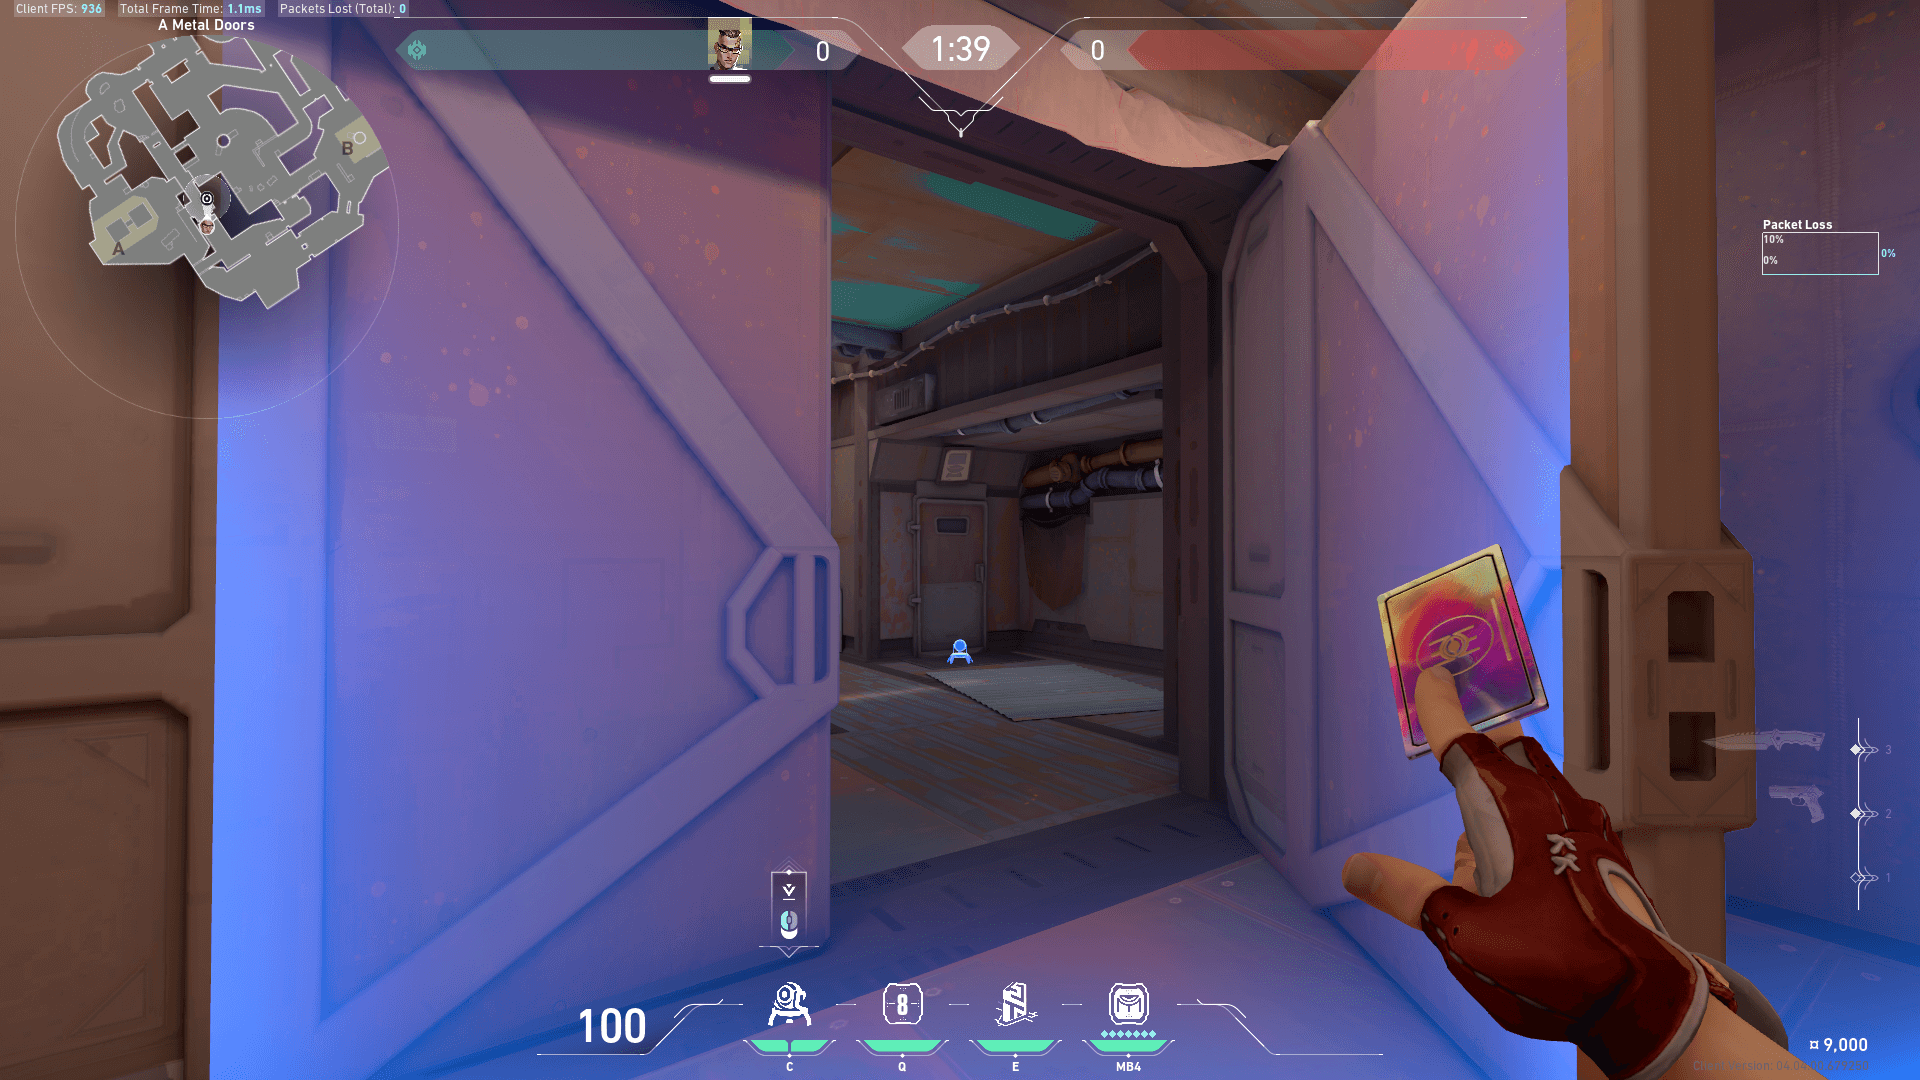
Trademark setups for Attack (All Maps)
This section will just showcase images of where you can position your traps to watch for flanks.
Sometimes if you are hard pushing a particular site with the team it is worth holding onto one Trademark to save for later in the round, either for the purpose of clearing out certain parts of the bombsite and/or to set up a trap for post-plant.
Moreover, if you do not have an initiator on your team, it can be hard to push out smoke since it is difficult to clear 270 degrees left and right of your screen. Placing a trap out of the smoke can clear close angles and detect where the enemy is on the minimap for you if they are close.
See the video below for how Trademarks can be used aggressively to check for the presence of opponents and catch them off-guard.
Haven
Bind
Breeze
Icebox
Fracture

Ascent
Split
Headhunter and its Guardian-esque functionality
For 100 credits a bullet, Chamber is able to one-shot headshot enemies no matter the distance. Considering this, there is value in making yourself accustomed to using his Headhunter’s scope in function.
Being comfortable when scoping in with his Sheriff will allow you to more easily make small adjustments at distances since it is slightly more easy to see and the adjustments will be slightly less miniscule and therefore not as difficult to pull-off.
The Headhunter makes Chamber an eco-round demon since he basically has a Guardian (a weapon valued over 2000 credits) at his disposal for 100 credits a bullet.
Pre-aiming commonly held angles at longer distances that opponents with rifles will need to tap and or burst you in return is your best bet in securing a pick. By doing this you level out the playing field regarding your weapon versus theirs.
Additionally, on pistol rounds it is worth holding longer angles with his scope as this places him at a significant weapon advantage. See clip below.
At the end of the day, Chamber is an aim-based agent. In other words, he is highly skill focused similar to Jett. Expert Chamber players are ones that understand the intricacies of aim and the myriad of ways an angle can and should be held.
To maximize Chamber’s potential you should feel comfortable securing picks on his Headhunter and you should feel like you excel when using the Sheriff and or Operator. If you do not feel comfortable and don’t like using the Sheriff and Operator, Chamber might not be the agent for you.
Tour de Force is broken, make the most of it
An Operator that can one-shot enemies anywhere and has the fire rate and feel of a Marshal?! The movement error of Chamber’s Tour de Force feels a lot less significant than the Operator and it feels very easy to use similar to how the Marshal functions.
Its fire rate makes it difficult for opponents to re-peek you after you miss your shot, this often favors you to re-peek them as their positioning will be much the same.

At times, Chamber’s ultimate is worth saving for eco-rounds as it can completely change the course of the round. The enemy will have a false sense of confidence since your team has very little money and weaponry. But if you manage to find the opening pick or two with your ultimate this not only has given you a 5v4 or 5v3 situation but you have gained one or two rifles for your teammates to use.
This is more than enough to bring the odds back in your favor and help you steal the round. Communicating to your team to hold back and live, and asking them if you can play first contact with your Tour de Force is recommended since they might be able to pick up a rifle. The longer the round goes the more opportunity you give yourself to find a pick, be patient when it comes to your ultimate on eco rounds.
In the example below, my teammates are all saving and just have an assortment of pistols, but after these two opening picks they are able to grab some rifles and we were able to secure the round. It is worth taking risky peeks and ego-peeking since you have very little to lose: your team is saving anyway and the odds of the round are heavily against you.
Final thoughts
- It is worth becoming acclimated to both sides of each map before playing Chamber.
- Chamber is a skill-based agent and you should feel confident using the Sheriff and Operator before adding him to your agent pool.
- Mix things up round-to-round on defense regarding your Trademark and Rendezvous setup as a large part of Chamber’s strategy revolves around off-angles, unpredictability and surprise.
- Chamber economic benefits to the team are considerable. He is a strong solo-queue agent and can change the course of rounds with his weaponry Headhunter/Tour de Force, especially on Eco rounds.
- Similar to Cypher, Chamber is an effective agent to ‘lurk’ on and retain map control with. For example if your team is attacking A Site on Ascent, as a Chamber player, you could place a trap outside B Main and play slowly around the opposite side of the map and try to catch enemies off that are rotating. As the bomb is planted, you can creep towards A Short/Tree Room to reconnect and play around your teammates. Lurking is a viable option on Chamber since he can use his Rendezvous to return quickly to his teammates.
Hope there were some takeaway points for you and you learned something new about Chamber in this article. As always best of luck with your ranked climb and future Chamber games.
Head to our dedicated Chamber agent page to find more setups for each map.