 League of Legends
 Teamfight Tactics
 Legends of Runeterra
 Valorant
 Lost Ark
 Destiny 2
 Diablo 4
 Download APP
How to Play Nami TF Bandle City
Hey all, it’s Trevor “Shugo” Yung here and today I want to showcase a deck that’s been having success even in the crazy Kai’Sa meta.
Nami TF SI has been a prevalent force for a while now, but what about other regions? Bandle City has fish, so it has to make some sense right!?
To top it all off, this deck completely dodged all the nerfs! And the decks that challenged this one the most are ALL getting hit!
If you want a head start into the new meta, look no further than Nami TF Bandle City!
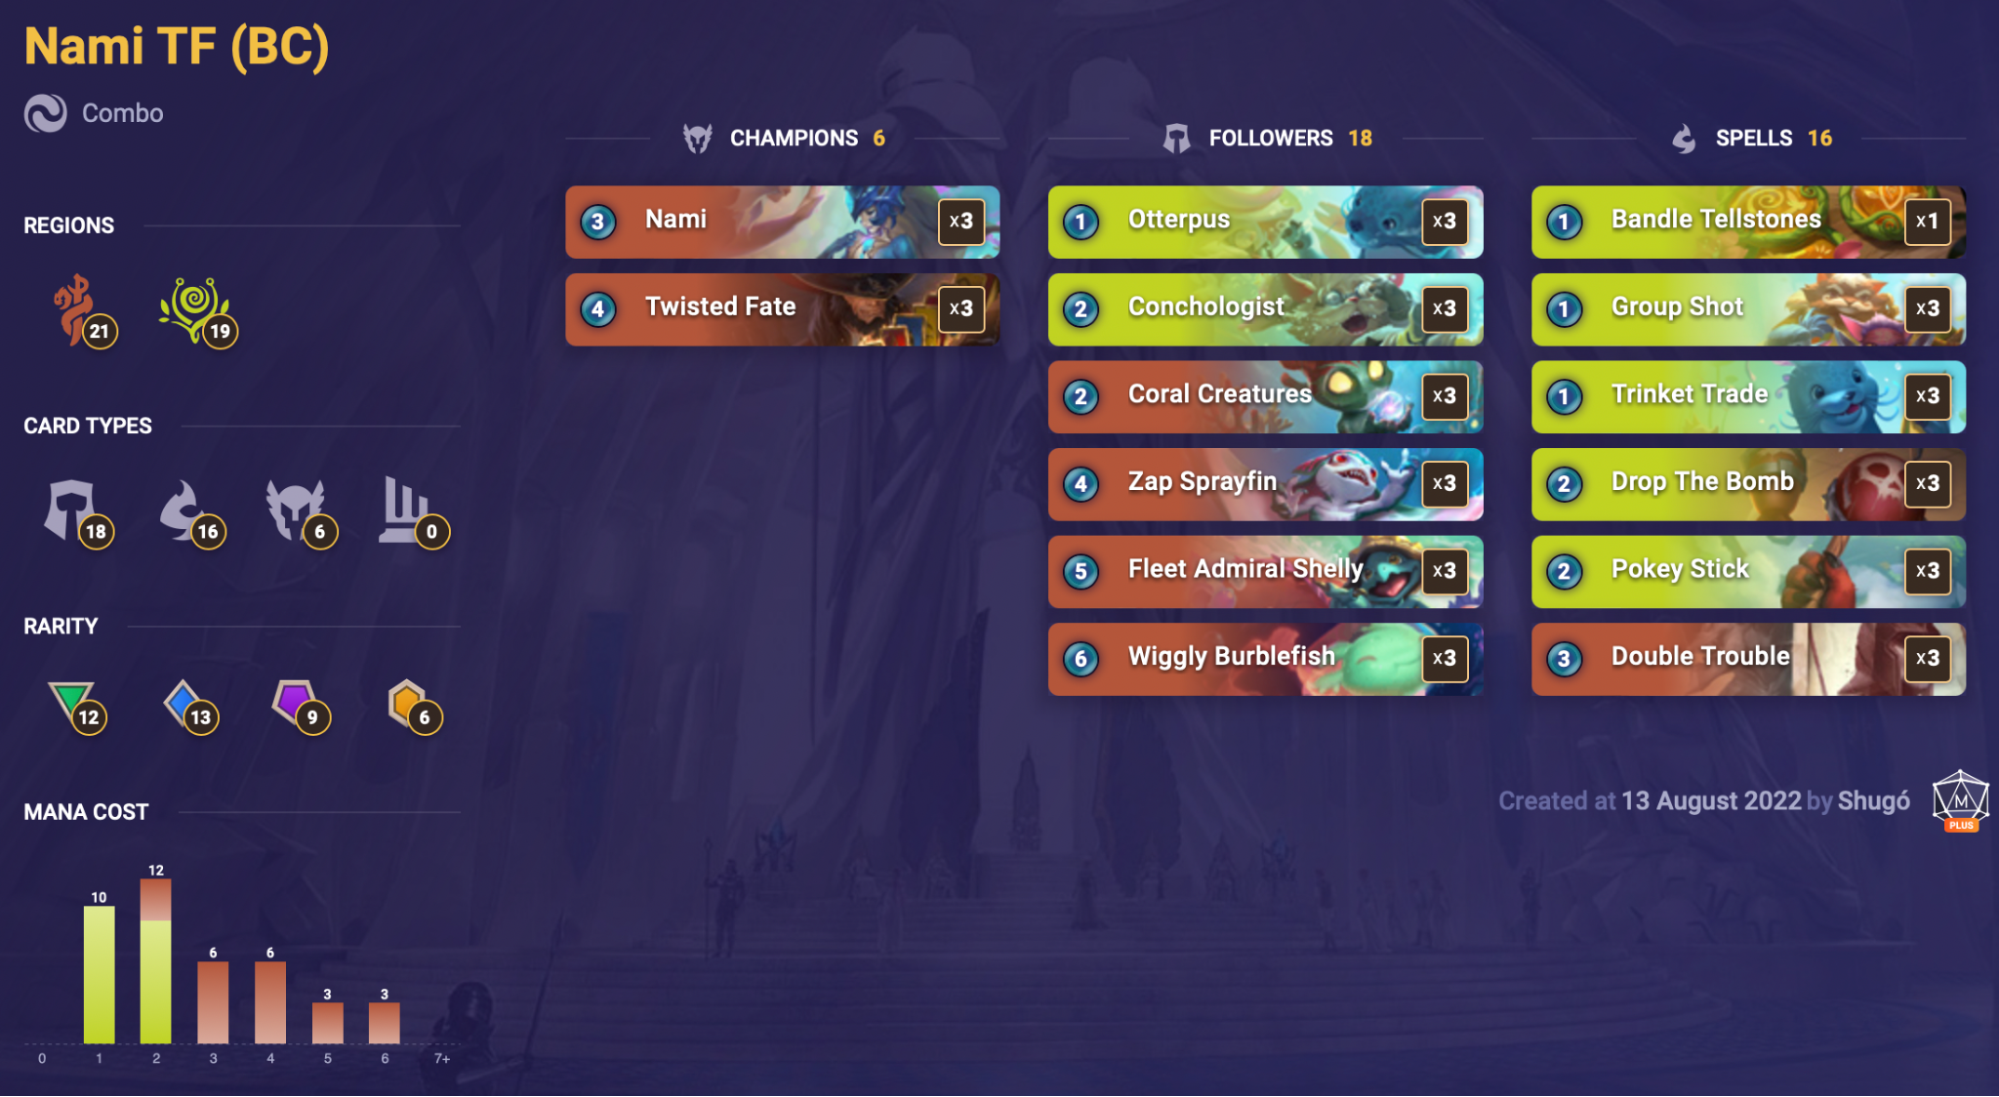
Deck Code: CECQKBIKAQUDDJQBYYAQIAQGBYMBUJQBAYFCOAQFAYCQWAIDAYIQAAIBAYFCQ
Deck Overview
While the Bandle City variant still plays the traditional Nami game plan, it does have some key differences. Thanks to an abundance of Attune effects, we get to play a better tempo game plan. There’s less need to sit and pass in order to bank spell mana for Nami, allowing for a lot more flexibility.
Another notable difference is the lack of top-end. The SI variant plays copies of Vengeance, and often utilizes Harrowing and/or Ruination to give it a late-game Plan B.
Instead, Nami TF BC focuses on disruption via Pranks and uses the tempo advantage to win with Nami or Shelly. And let’s be honest, that’s usually how Nami decks win anyway.
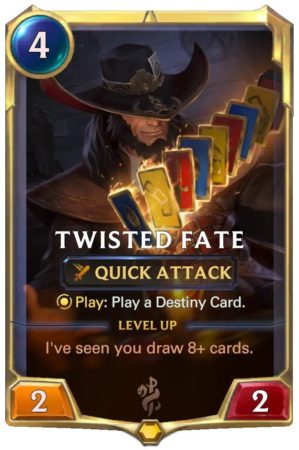
Twisted Fate takes more of a backseat role here as we’re not running additional card-draw outside of Zap, Pokey Stick, second TF, or randomly generated spells. Twisted Fate’s utility is more than good enough while the threat of level-up can still force the opponent into an awkward spot.
Lastly, the Bandle City package adds an absurd amount of lines and play patterns. Literally, one-third of the deck generates random cards, making it almost impossible to account for every possible situation. However, those who do take the time will be extremely rewarded as you’ll find yourself Manifesting the very out you need to win!
Mulligan Strategy
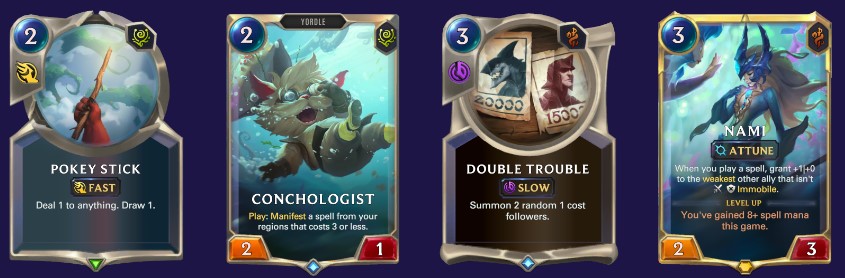
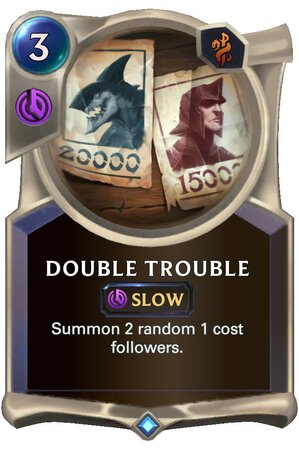
The easiest way to lose with Nami decks is to draw the wrong half of your deck all at once. When we’re unable to spend spell mana efficiently, the deck can really struggle. Focus on early drops and always take into account how you can spend spell mana in order to refill it at the end of the turn. Double Trouble is the absolute best card for achieving this goal.
- Always Keep:
- Double Trouble
- Situational Keep:
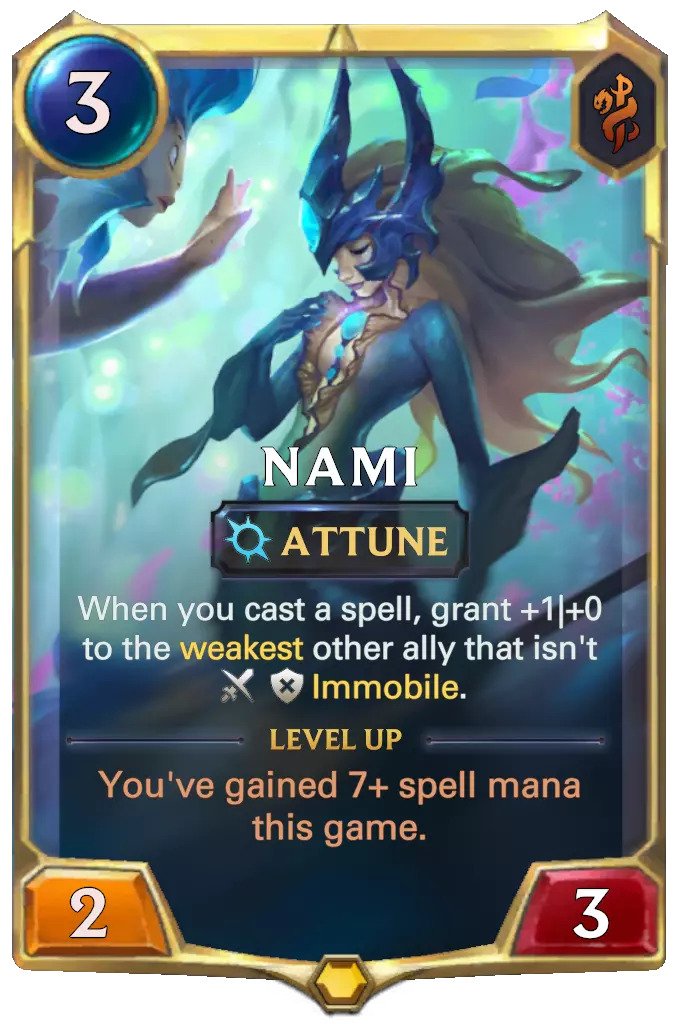
- Nami: Always keep unless against aggro.
- Twisted Fate: Only keep vs. matchups weak to Red Card. Low priority.
- Keep Against Aggressive Decks:
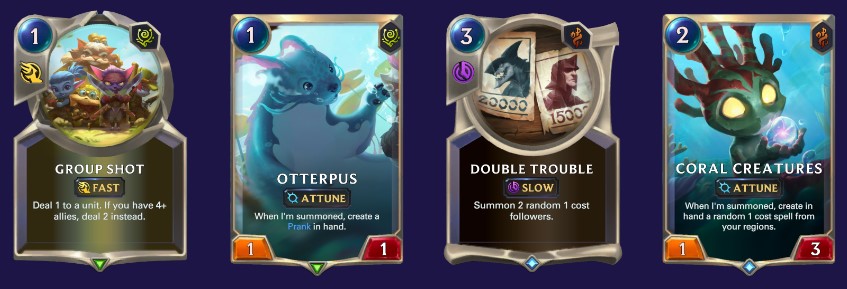
- Otterpus
- Conchologist
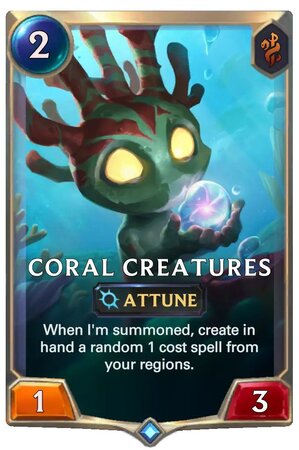
- Coral Creatures
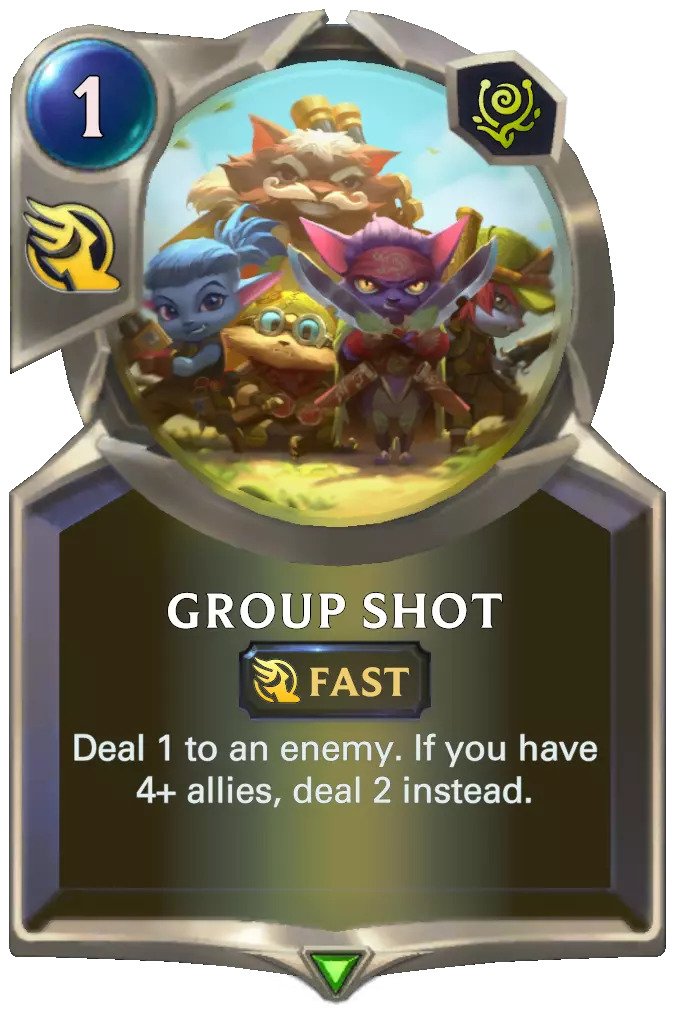
- Group Shot
- Drop The Bomb
- Pokey Stick
Example Hand 1: Double Trouble – Nami – Conchologist – Pokey Stick
Example Hand 2: Double Trouble – Otterpus – Coral Creatures – Group Shot
Game Plans
- Almost every game begins with the same two goals.
- Sequence our cards to progress and level-up Nami.
Cast enough spells to reduce Burblefish to 0.
Unless we’re against hyper-aggressive decks such as Annie Jhin or Spiders, our core game plan remains true. And if we are against aggro? Don’t worry, I’ll be covering that a little later!
The standard ideal start for most Nami decks is passing the first two turns, then casting Double Trouble on turn three. If the situation allows it and we aren’t under pressure, it’s often the ideal line.
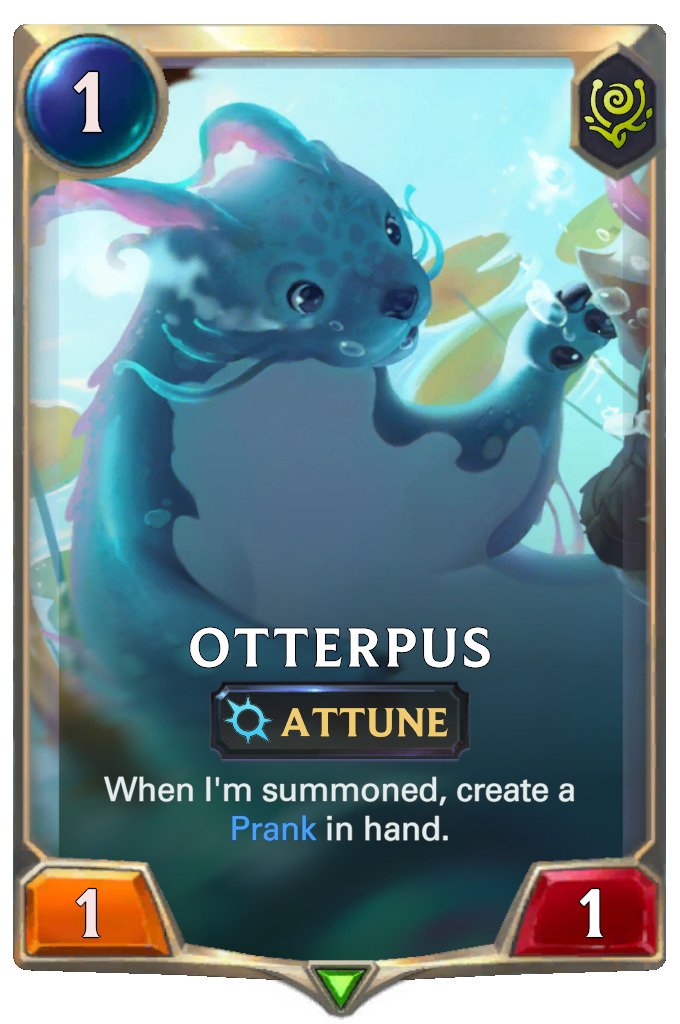
We want to let our opponent develop first. If the opponent plays an X|1 on turn one, we’ll match it with Otterpus. If they play a unit on two, match them with any second unit.
When we aren’t under pressure, this is where we have the freedom to pass and bank spell mana. However, always ALWAYS plan ahead! You don’t want to play an Attune unit with full spell mana!
Otterpus, while simple on the surface, is one of the most interesting and skill-testing cards in the entire deck. This goes beyond knowing when to cast a Prank, as it can be vital knowing when to play it in general.
You need to identify your hand plus the matchup and imagine future turns.
Here are a few questions to ask.
- How important are actions in this matchup? Do I have the time to play this later without getting punished?
- Otterpus effectively functions as a burst-pass in many cases. Will this put my opponent in an awkward spot if I do this later?
- My opponent is Shurima. Do I need a unit to pop Roiling Sands?
- How quickly am I going to need the Prank? Will I need it to set up a big open attack turn? Do I need to cast Prank earlier to disrupt my opponent and/or free up spell mana for my Attune?
- Will I need an additional Attune to flip Nami?
- Otterpus will be my weakest unit on board. Do I need Nami to target a different unit right now?
As you can see, there are a lot of nuances here, and these decisions can really matter. What’s fantastic about Otterpus is it’s essentially free.
We can play it on-curve and it won’t mess up the Double Trouble turn. Either way, Otterpus will definitely have its use. But if you can take it that step further, you’ll unlock a whole new level of agency with the deck.
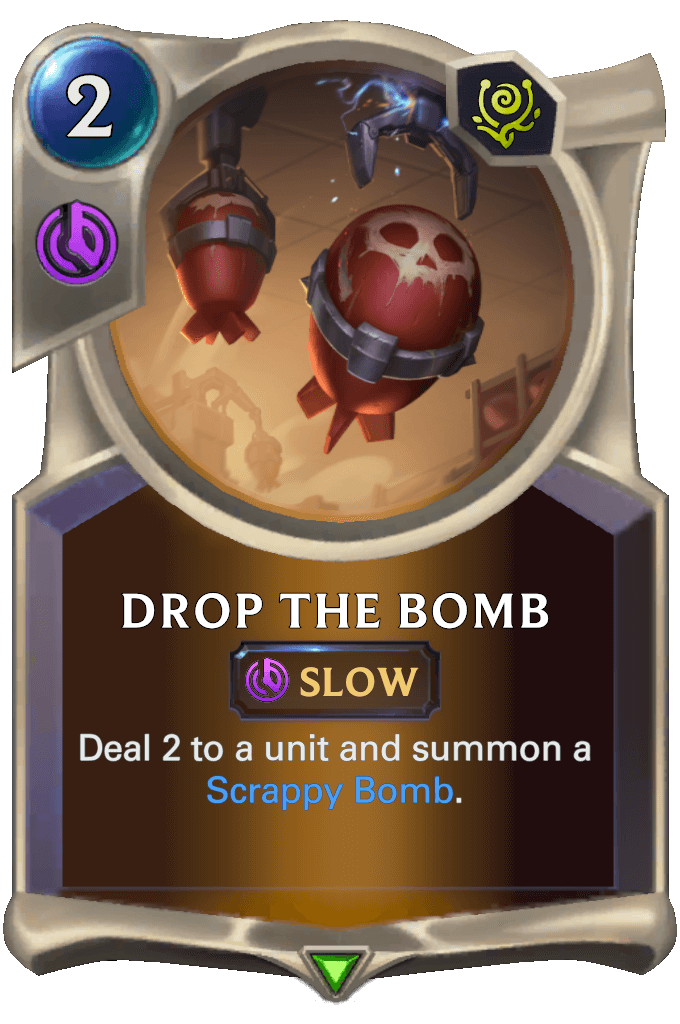
Post Forces From Beyond, Nami TF BC got an excellent tool in Drop The Bomb. A two mana deal two, even at slow speed, is nothing to scoff at.
One of the weaknesses of this region combination is its lackluster removal. Adding Drop The Bomb really helps fix this, and it’s also amplified by being added to the Manifest pool. You can even combine it with Pokey Stick or Group Shot to deal with larger units efficiently.
Once we approach the mid game, we’ll be looking to set up Nami or Shelly. Nami is often the safer pick as the four health makes her tricky to deal with, and three mana is far easier to commit. Shelly does come at a bit of a cost but gives us massive snowball potential if the opponent doesn’t answer it right away.
With an army of Elusives backed by spells, this deck has some insane kill potential. Bandle Tellstones is a powerful source of burst damage with Nami, turning one card and four mana into eight damage!
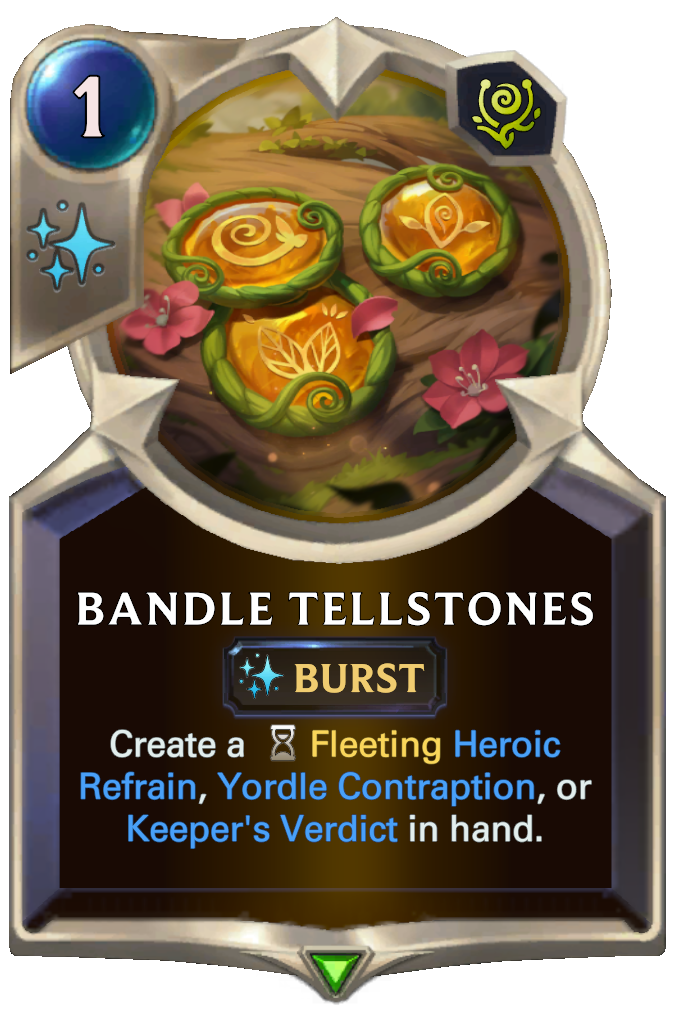
It may not be as efficient as the 2-for-6 rate of SI Tellstones, but it represents a TON of damage from only one card.
If there’s a reason to play Nami Bandle City, it’s Trinket Trade. This card is absolutely bonkers in so many situations. Not only is it the best card to proc Nami and Shelly, but it can bail us out of so many situations.
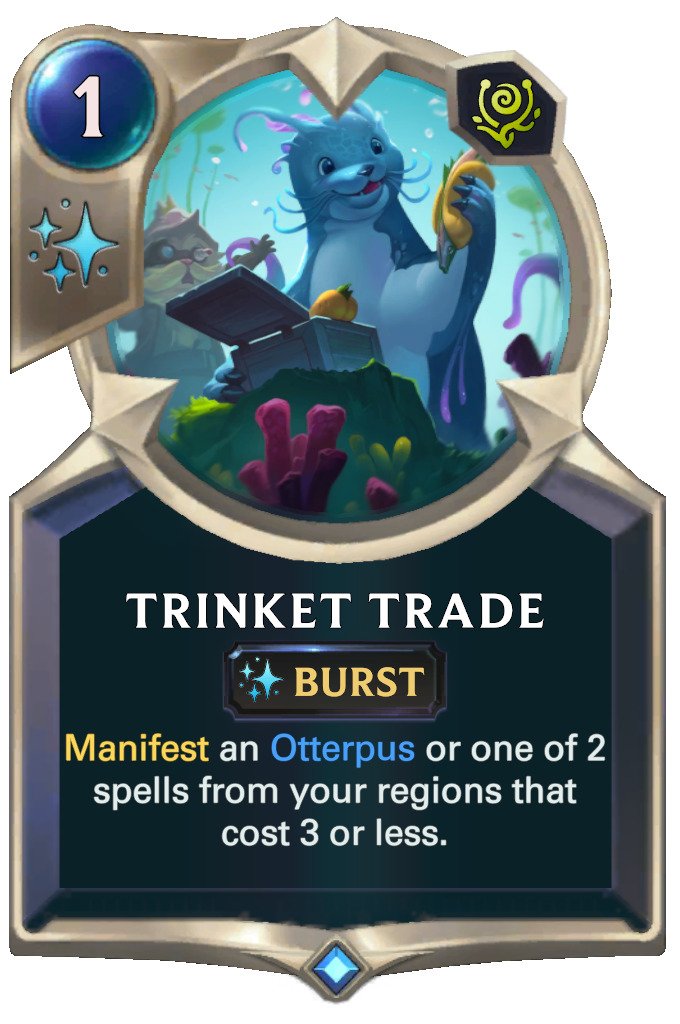
There’s an absurd amount of good choices. At least ten of these I’m very happy to pick! Best of all, we aren’t limited to just three copies.
Conchologist, Coral Creatures, and Wiggly Burblefish will help you find more!
Beyond its combo and utility potential, there’s a common and efficient play pattern that Trinket Trade provides.
- When Nami is 6|8 and we’re sitting with full spell mana, cast Trinket Trade and choose Otterpus.
- Play Otterpus to generate a Prank. Nami goes to 7|8, our spell mana is full again.
- Cast Prank, then play Nami to flip her immediately!
Of course there are similar lines with Otterpus itself or other Attune cards, but part of the challenge is having an efficient way to utilize spell mana and refill it the same turn. This two card combo of Nami + Trinket Trade opens up a sneaky window to drop a leveled Nami one turn earlier than your opponent expects!
Against Aggro
Alright, coming back to the aggro matchup. This is the one time where our fish game plan simply doesn’t matter. It’s all about survival.
We have a lot of units and spells that can help combat the board. The biggest danger is when they are able to go wider, or if they stun our blockers. Otterpus is great into the 2|1’s, but otherwise should chump just about anything (past turn one) to reduce damage.
Double Trouble should always be cast on turn two. It’s an excellent way to match their output. We really don’t care about poor trades. Chump block to reduce damage if necessary. They can always be cleaned up later via Twisted Fate, Pokey Stick, or Group Shot.
Prioritize units with on-attack triggers. Everything else can be dealt with later. We want to avoid as much direct damage as possible so that we can stay out of burn range.
Group Shot can be a good answer to mid game Noxian Fervor as it’s possible to have 4+ units by that state of the game. Although sometimes one damage is already enough.
If you double-draw Nami, make sure you play one so that the other turns into Ebb. This gives us access to an additional removal spell (albeit it could fail). But more importantly, it gives us a form of healing!
Overall, so long as we don’t completely brick and we know what we’re doing, we’re extremely favored here. This deck is an aggro deck’s nightmare. We have an incredible amount of early tempo plays, can flood the board with blockers, and cheaply remove just about everything. We’ve got all the tools so long as we can properly use them!
General Tips
Unlike Shellfolk decks, Pranks aren’t solely used as a combo piece. In fact, on many occasions, we’ll want to cast a Prank in order to free up spell mana for an Attune trigger. Sometimes it’s just straight up useful to disrupt the opponent’s plans. Making their removal or interaction overly expensive opens a safe path for Nami and Shelly!
Group Shot is one of the most efficient removal spells in the deck. Between Double Trouble, Otterpus, and Coral Creatures, it’s very easy to consistently meet the four-unit threshold. Keep this in mind before deciding to trade units.
In some matchups, we heavily rely on Elusives to push through damage. Be cautious of developing other units as they’ll become the target for Nami’s buffs instead.
Take time to learn the Manifest pool. There are a ton of cards that change the equation and can outright save us from losing the game. Desperate for a blocker but don’t have any unit mana or Double Trouble? Manifest a Ransom Riches and have it generate a 0 mana follower. Seriously, the sky’s the limit. There are so many lines of play.
Shugo’s Productivity Thought of the Day
What things in your life deserve more attention than they are currently receiving?
For more decks, head to the Deck Library! To build your own, head to the Deck Builder.
Subscribe to our newsletter:
Don’t miss out on all of the latest LoR content!